The Wicked Noodle

  • All Recipes
  • Freezer Meals
  • Dinner Ideas
menu icon
go to homepage
  • All Recipes
  • Freezer Meals
  • Dinner Ideas
search icon
Homepage link
  • All Recipes
  • Freezer Meals
  • Dinner Ideas
×

the candy cake

July 30, 2010 by Kristy Bernardo 8 Comments

candy cake recipe

candy cake recipe

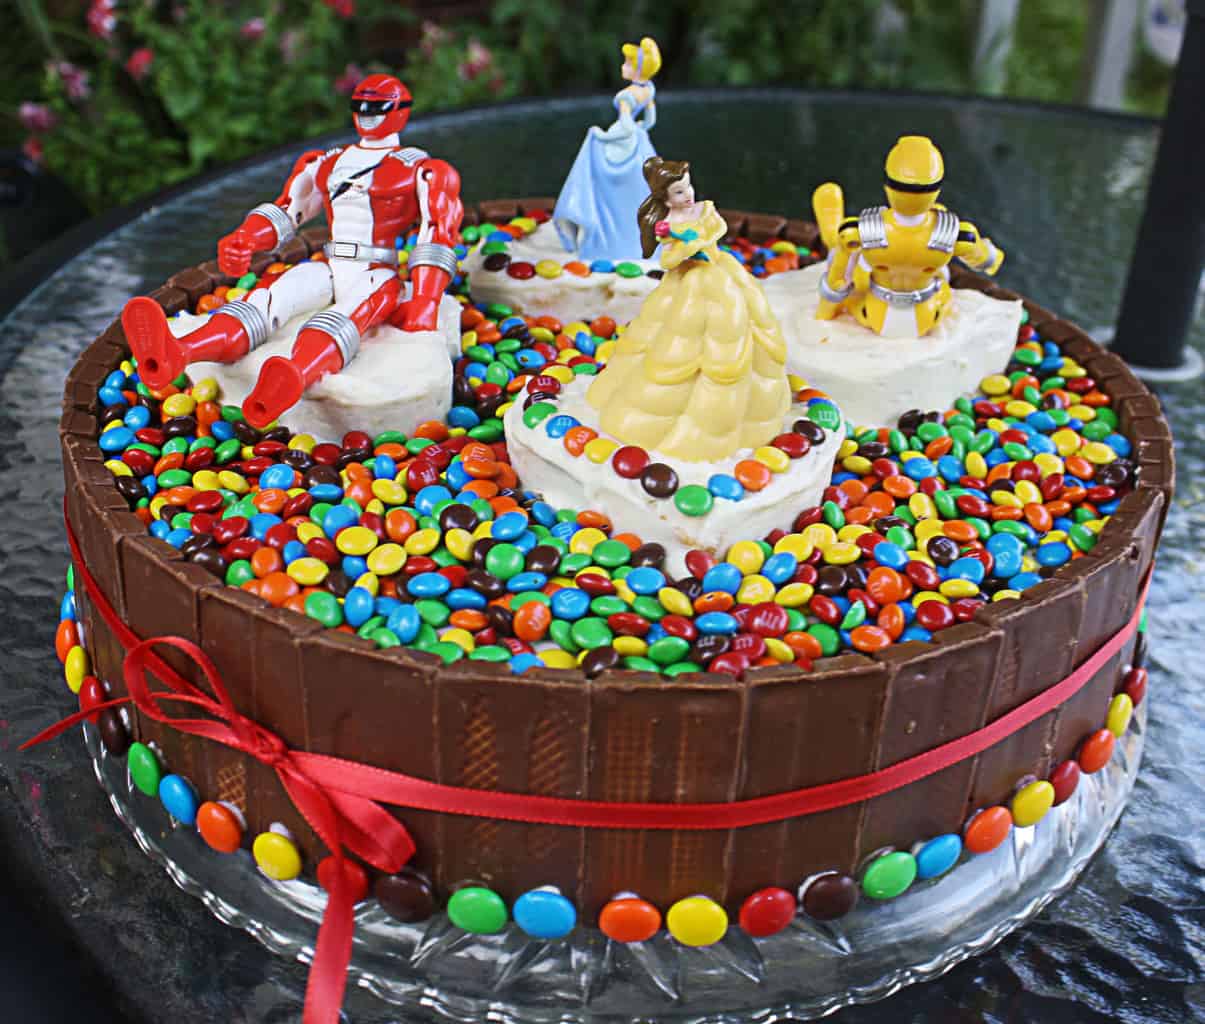
Anyone who knows me knows that I'm not much of a cake baker. I'm really not into making "fancy" cakes of any kind. Too putsy and time consuming, when all I want to do is eat! Not to mention that I always seem to have trouble coming up with great kids birthday cake ideas. [Read more...]

No-Bake Peanut Butter Bars (Just 5 Ingredients!)

April 13, 2010 by Kristy Bernardo 30 Comments

No Bake Peanut Butter Bars stacked on top of each other

If you're a fan of peanut butter and chocolate (and honestly, who isn't?), you're going to love these No-Bake Peanut Butter Bars. They taste just like a homemade version of Reese's but require only five simple ingredients and zero oven time! This is the kind of dessert that gets rave reviews at potlucks, disappears from holiday dessert tables, and becomes a go-to recipe in your back pocket for whenever you need something sweet fast.

a stack of three no-bake peanut butter bars on a black plate

What Are No-Bake Peanut Butter Bars?

No-bake peanut butter bars are an easy, fuss-free dessert made from pantry staples like graham crackers, powdered sugar, peanut butter, butter, and chocolate. Think of them as a simplified, homemade take on a peanut butter cup, but layered in a pan and chilled instead of baked.

The base is rich and slightly crumbly from the graham cracker crumbs and powdered sugar, while the top is a smooth layer of melted chocolate that firms up beautifully in the fridge. They're quick to make and don't require any oven time, which makes them especially ideal for summer or when you just don't feel like baking.

Ingredients You'll Need

You only need five simple ingredients to make these no-bake peanut butter bars, and there's a good chance you already have them in your pantry:

  • Graham Cracker Crumbs: These give a slightly crunchy texture to the peanut butter base. You can crush full graham crackers in a food processor or buy pre-crushed crumbs (here's an example of this product).
  • Powdered Sugar: This sweetens the peanut butter and helps hold everything together.
  • Peanut Butter: Creamy peanut butter works best for smooth bars, but you can use crunchy if you want extra texture.
  • Butter: Melted butter binds everything together. And it's butter, so you know it's gonna be good!
  • Chocolate Chips: Melted and spread over the top to create a smooth, candy-like topping. Use milk chocolate, semi-sweet, or whatever you prefer.
  • Optional: A pinch of salt or splash of vanilla extract can be added to the base for extra flavor, but the recipe is delicious just as it is.

Step-by-Step Instructions

These bars come together in just a few easy steps and require no baking-just a little chill time in the fridge!

  1. Make the peanut butter base: In a large mixing bowl, combine the graham cracker crumbs and powdered sugar. Stir in the peanut butter until the mixture is thick and uniform. Pour in the melted butter and mix thoroughly until it's fully incorporated.
  2. Press it into the pan: Grease a baking dish (anything from 8x8 to 13x9 inches works - smaller pans will yield thicker bars). Press the peanut butter mixture evenly into the bottom, smoothing out the surface with a spatula.
  3. Add the chocolate topping: Melt the chocolate chips in a microwave-safe bowl in 20-30 second bursts, stirring in between until smooth. Pour the melted chocolate over the peanut butter layer and spread it to the edges with an offset spatula or the back of a spoon.
  4. Chill and slice: Refrigerate the bars for about an hour, or until the chocolate topping is just set. Don't let them over-chill or the chocolate can become difficult to slice. When ready, cut into squares or bars and serve!

You can also watch the video below that shows exactly how to make them!

Flavor Variations & Topping Ideas

These bars are endlessly customizable! Here are my favorite ways to give them a twist:

Flavor Variations

  • Dark Chocolate Peanut Butter Bars: Swap milk chocolate chips for dark chocolate for a richer, less sweet bite.
  • Nutella Swirl: Swirl in a few tablespoons of Nutella on top of the melted chocolate before chilling.
  • Salted Caramel: Add a thin layer of store-bought or homemade salted caramel between the peanut butter and chocolate layers.
  • Almond Butter Bars: Substitute almond butter or cashew butter for the peanut butter.
  • Oreo Cookie: Replace the graham crackers with crushed Oreos!

Topping Ideas

  • Flaky sea salt: I do this every time now! Sprinkle a few pinches of sea salt evenly over the melted chocolate just before chilling.
  • Mini chocolate chips: Press mini chips into the chocolate layer before it sets.
  • Crushed pretzels: Another of my favorites. Add a salty crunch by pressing crushed pretzels into the top just before chilling. So good!
  • Toffee bits: Scatter toffee pieces over the chocolate just before chilling..
  • Rainbow sprinkles: Make them fun and kid-friendly with a sprinkle of color. Perfect for birthday parties!
  • Chopped peanuts: Double down on the peanut flavor with a handful of chopped roasted peanuts. Do this before the chocolate sets so they stick well.
  • Shredded coconut: Lightly toast and sprinkle on top just before chilling.
a closeup of a stack of three no-bake peanut butter bars on a black plate

If you love desserts like these no-bake peanut butter bars, you'll definitely want to check out a few of my other favorites! Try my chocolate pudding in the microwave - it's rich, creamy, and ready in minutes with pantry staples! For something fun and festive, decorated chocolate pretzels, dipped marshmallow treats, and chocolate pretzel hugs are always a hit with kids and grown-ups alike. And if you're after a classic sweet with minimal effort, my simple homemade fudge recipe is a must-make. No oven, no stress!

Ingredient Substitutions

Whether you have dietary restrictions, allergies, or just want to try something new, these easy swaps will keep your no-bake peanut butter bars just how you want them.

Peanut Butter Substitutes

  • Almond Butter: A mild, slightly sweet option that works well.
  • Cashew Butter: Super creamy and less nutty, which is great for a more neutral flavor.
  • Sunflower Seed Butter: This is a good choice for nut-free households.
  • Tahini: Tahini is naturally nut-free. The flavor will be very different so keep that in mind.
  • Cookie Butter (like Biscoff): Such a delicious (and very sweet) twist!

Graham Cracker Substitutes

  • Crushed Pretzels: These add a fantastic salty crunch that balances the sweetness of the bars.
  • Oreo or Chocolate Wafer Crumbs: More chocolate is always a good thing.
  • Vanilla Wafers: They'll work in a pinch!
  • Digestive Biscuits: Great for a more British-inspired dessert.
  • Crushed Cereal (like Rice Krispies or Cornflakes): These give the bars a fantastic texture.

Storage & Freezing Tips

These no-bake peanut butter bars are a dream to make ahead and store. I like to wrap them individually and store them in the freezer so I have them whenever I get a craving.

How to Store

In the fridge: Store the bars in an airtight container, separating the layers with parchment or wax paper to prevent them from sticking. They'll stay fresh for up to a week.
At room temperature: You can keep them at room temperature for 1-2 days, especially in cooler months. Just be aware they'll soften significantly and might lose their clean edges.

How to Freeze

Cut the bars into individual servings, then wrap each piece tightly in plastic wrap or parchment. Place the wrapped bars in a freezer-safe bag or container (don't forget to label them). They'll keep in the freezer for up to 3 months. To thaw, let them sit in the fridge for a few hours or on the counter for 15-20 minutes until softened but still firm.

an extreme closeup of stack of three no-bake peanut butter bars on a black plate

Frequently Asked Questions

  • How long do no-bake peanut butter bars last?
    Stored in an airtight container in the fridge, these bars will stay fresh for up to a week. If frozen, they'll keep for 2-3 months.
  • Can I use crunchy peanut butter instead of creamy?
    Crunchy peanut butter adds texture and works really well. Just be sure it's not too dry or stiff; you want it to blend smoothly with the other ingredients.
  • Can I make these dairy-free or vegan?
    Yep, just swap the butter with a plant-based butter and use vegan chocolate chips. Also check that your graham crackers are dairy-free.
  • Can I use natural peanut butter?
    You can, but it's best if the natural peanut butter is well-stirred and not too runny. Otherwise, the bars may not hold together as well. If it's too loose, try adding more crushed graham crackers.
  • Can I use a different type of chocolate?
    Milk, dark, semi-sweet, and white all work. Use what you love!
5 Ingredient Peanut Butter Bars

No-Bake Peanut Butter Bars

Yield: 16 bars
Prep Time: 10 minutes
Additional Time: 1 hour
Total Time: 1 hour 10 minutes

These peanut butter bars are very sweet, so cut back on the powdered sugar if you prefer. I know you'll love them any way you make them!

Ingredients

  • 2 cups graham cracker crumbs, don't worry if there are a few larger "chunks"
  • 3 cups powdered sugar
  • 1 ½ cups peanut butter
  • 1 cup butter, melted
  • 1 12 ounce bag milk chocolate chips (or semi-sweet; use your favorite)

Instructions

  1. In a medium-sized mixing bowl, stir together graham cracker crumbs and powdered sugar. Stir in peanut butter. Add melted butter and mix well.
  2. Pour mixture into a greased baking dish and spread evenly to edges. (Anything from 8x8 to 13x9 will work, just keep in mind that the smaller the pan, the thicker the bars. I typically use a 13x9 size.)
  3. In a microwave-safe bowl or measuring cup, melt chocolate chips in microwave until just melted, stirring well until smooth.
  4. Pour chocolate over peanut butter mixture in pan, spreading evenly out to the edges. Refrigerate for about an hour or until chocolate is just firming up and slice into bars (if you wait too long it will be tough to slice).

Notes

I listed 16 bars as the yield for this recipe, but this greatly depends on the size of the pan you use and how large or small you cut the bars.

Nutrition Information:
Yield: 16 Serving Size: 1
Amount Per Serving: Calories: 483Total Fat: 31gSaturated Fat: 14gTrans Fat: 0gUnsaturated Fat: 14gCholesterol: 35mgSodium: 272mgCarbohydrates: 47gFiber: 2gSugar: 35gProtein: 8g

This data was provided and calculated by Nutritionix.

© Kristy Bernardo
Cuisine: American / Category: Desserts
No-Bake Peanut Butter Bars (Just 5 Ingredients!)

Roasted Tomato Salsa

March 4, 2010 by Kristy Bernardo 10 Comments

Jar of salsa with ingredients

This Roasted Tomato Salsa couldn't be easier but has a wonderfully smoky flavor, both from roasting the tomatoes and from smoky chipotle peppers.

Jar of salsa with ingredients

Roasted Tomato Salsa makes me happy.

Seriously, I want to do a happy dance whenever it's around.  It's bright and colorful with so much flavor, and filled with loads of healthy goodness!  I can eat as much as I want without ever having to worry about eating "too much". Roasted tomato salsa is good on just about everything, from scrambled eggs to steak  (have you tried mixing some into cottage cheese?  It's heaven).

And there are so many different kinds of salsa!  Red or green?  Spicy or mild?  Chunky or blended?  The variations are endless. I prefer Roasted Tomato Salsa simply because I love the depth of flavor that's brought out by roasting the tomatoes until they're good and black then blending them almost to a puree.

I should really call this recipe Spicy Chipotle Roasted Tomato Salsa since I add some chipotle pepper, too; it adds even more smokiness and some spice, which to me is the perfect combination for the perfect salsa.

I swear, every time I make this roasted tomato salsa it feels as if there's a fun fiesta going on!  I've never known anyone who, when deeply depressed, decided to bring out the salsa and margaritas (but I think I'll try it the next time I'm feeling down and see what happens) but I'm certain it could cure anyone's blues. 

It's a sure bet that where there is salsa, there are happy, joyful people to be found.  This Wednesday I'm having a few girlfriends to enjoy this roasted tomato salsa and a pitcher of pomegranate margaritas!

Today might be Cinco de Mayo, a chance for everyone to get happy and celebrate our Mexican-American friends, but I'll be making this roasted tomato salsa all summer long.  I never follow a recipe, I usually just throw it in the food processor and see what comes out.  But here's the general idea and feel free to tweak it to your own tastes.

Jar of salsa with ingredients

Roasted Tomato Salsa

Yield: 12 servings
Prep Time: 10 minutes
Additional Time: 10 minutes
Total Time: 10 minutes

Homemade salsa is always better if you make it at least a few hours before serving to allow the flavors to develop.

Ingredients

  • 2 pounds of roma tomatoes, give or take
  • 1 garlic clove
  • ½ cup cilantro
  • 1 chipotle pepper in adobo sauce, add more to taste or just some of the sauce
  • ¼ of a red onion, more to taste
  • 1 lime, juiced
  • ½ teaspoon salt, or to taste

Instructions

  1. Preheat broiler on high. Cut the tomatoes in half and place cut side down on a baking sheet. Put tomatoes under broiler* – don’t touch them until they’re nice and black (this will give them a nice smoky flavor). Set aside to let juices accumulate and cool a bit.
  2. Meanwhile, put garlic clove in food processor and process until it’s minced (this will prevent any big chunks of garlic). Add the rest of the ingredients except the tomatoes and pulse a few times.
  3. Press each tomato with a spatula to bring out more juices, then drain all juice from the pan. Add tomatoes to processor and pulse until salsa is the consistency that you prefer.
Nutrition Information:
Yield: 12 Serving Size: 1
Amount Per Serving: Calories: 22Total Fat: 0gSaturated Fat: 0gTrans Fat: 0gUnsaturated Fat: 0gCholesterol: 0mgSodium: 150mgCarbohydrates: 4gFiber: 1gSugar: 3gProtein: 1g

This data was provided and calculated by Nutritionix.

© Kristy Bernardo
Cuisine: Mexican / Category: Sauces
Roasted Tomato Salsa

Easy Chocolate Bowls with Balloons – A Fun No-Bake Dessert!

February 21, 2010 by Kristy Bernardo 22 Comments

chocolate bowls

Have you ever wondered how to make chocolate bowls with balloons? It might sound a little crazy at first, but this fun project is surprisingly easy and the results are show-stopping! These edible chocolate cups are made by dipping small balloons into melted chocolate, then letting them set into the perfect shape for filling with mousse, berries, ice cream, or whatever dessert your heart desires.

They're the kind of DIY treat that's fancy enough for a dinner party but simple enough to make on a lazy weekend afternoon. If you're entertaining guests or just looking for a creative dessert idea, chocolate bowls made with balloons are a sweet way to impress with minimal effort.

Chocolate bowl filled with mousse, garnished with orange zest and fresh strawberries on a white plate

What Are Chocolate Bowls?

Chocolate bowls (also called chocolate cups or edible dessert bowls) are small, bowl-shaped shells made entirely of chocolate. They're typically formed by dipping the bottom of a balloon into melted chocolate, then allowing it to harden into shape before removing the balloon. The result is a beautifully glossy, sturdy chocolate vessel that's perfect for filling with mousse, ice cream, berries, whipped cream, or any sweet treat you love.

These fun and functional bowls are often made with semi-sweet or dark chocolate, but you can use milk or white chocolate too. They're an easy way to add a wow factor to dessert without needing any fancy tools, and they're as delicious as they are decorative!

Why Use Balloons to Make Chocolate Bowls?

Balloons are the easiest and most accessible tool for shaping chocolate bowls at home. Their rounded shape naturally mimics a bowl, and when the balloons are dipped into melted chocolate, they form a smooth, even shell as the chocolate cools and hardens.

Here's why making chocolate bowls with balloons works so well:

  • Size & shape control: Small balloons allow you to control the size and depth of your chocolate bowls depending on how far you dip them.
  • Nonstick surface: Once they're deflated properly, balloons release cleanly from the chocolate, leaving behind a smooth interior.
  • Budget-friendly: Balloons are inexpensive, easy to find, and don't require any special equipment or molds.
  • It's fun for all ages: Using balloons makes this process approachable, even for kids or beginner bakers. Just be sure the chocolate is completely cool to avoid popping!
  • It's a fun, creative technique that feels a bit like kitchen magic, and the results are always a crowd-pleaser!
Colorful balloons coated in chocolate bottoms, drying on a stone countertop to make chocolate bowls with balloons

Ingredients and Tools You'll Need

This fun DIY dessert project requires just a few simple ingredients and tools, most of which you probably already have on hand! Have everything ready before you melt the chocolate so you can work quickly while it's at the ideal dipping consistency.

Ingredients

  • High-quality chocolate: Semi-sweet, dark, milk, or even white chocolate will work. Look for baking bars or chocolate chips with cocoa butter for best results. You'll need about 6-8 oz to make 4-6 bowls. Ghirardelli is a good choice that's not too expensive.
  • Flavor additions (optional): A drop of orange oil, peppermint extract, or espresso powder if you want to infuse the chocolate with extra flavor.

Tools & Supplies

  • Small balloons: Choose unprinted, food-safe balloons (water balloons work great!). Avoid using balloons with ink or writing.
  • Parchment paper or silicone baking mat: For setting the chocolate bowls.
  • Baking sheet: To hold the dipped balloons as the chocolate sets (you can also just set them on parchment paper on the counter if you have the room).
  • Microwave-safe bowl or double boiler: For gently melting the chocolate.
  • Spoon or small spatula: To help spread the chocolate, if needed.
  • Toothpick or pin: To slowly deflate the balloons without popping them.
  • Gloves (optional): They help prevent fingerprints on the chocolate bowls.
Multiple chocolate bowls drying on parchment paper, ready to be filled

How to Make Chocolate Bowls with Balloons

Making chocolate bowls with balloons is simple once you know a few key tips. Here's how to do it from start to finish:

  1. Prep the balloons: Wash and dry the outside of the balloons. Blow up each balloon just enough to form a small, round base (about the size of a teacup). Tie them off and make sure they're clean and dry (any moisture can cause the chocolate to seize).
  2. Melt the chocolate: Chop or measure your chocolate and place it in a microwave-safe bowl or double boiler. Microwave method: Heat in 30-second intervals, stirring well between each, until smooth. Double boiler method: Gently melt over simmering water, stirring until smooth. Important: Let the melted chocolate cool slightly before dipping-this is crucial. If the chocolate is too warm, the balloons may pop.
  3. Dip the balloons: Line a baking sheet with parchment paper or a silicone mat. Once the chocolate is cooled but still fluid, hold a balloon by the knot and dip the bottom into the chocolate. Gently swirl or tilt the balloon to coat it as high up as you'd like your bowl to go. Lift and let any excess chocolate drip off. Place the dipped balloon upright on the lined baking sheet. Repeat with the remaining balloons.
  4. Let the chocolate set: Leave the balloons at room temperature for 1-2 hours or until fully hardened. To speed things up, you can chill them in the refrigerator for about 20-30 minutes.
  5. Release the balloons: Once the chocolate is completely set and no longer shiny, use a pin or toothpick to gently poke a small hole near the knot. Let the air slowly escape (you want to avoid popping). As the balloon deflates, it should naturally pull away from the chocolate. Remove it carefully. If needed, trim the edge of the chocolate bowl slightly to even it out.
  6. Fill and serve: Your chocolate bowls are ready to fill! Add mousse, ice cream, berries, whipped cream, or your favorite dessert fillings. Tip: If the bottom of the bowl is uneven, you can very briefly warm it on a plate over hot water to flatten it for more stability.

What to Fill Chocolate Bowls With

Now that you've made your chocolate bowls with balloons, it's time for the fun part - filling them! These edible bowls are so fun and versatile and can be used for both elegant desserts and holiday treats. Here are some of our favorite filling ideas:

Creamy Desserts

  • Chocolate mousse
  • Tiramisu cream with ladyfinger crumbles
  • Vanilla or chocolate pudding
  • Mascarpone and Nutella swirl
  • Cheesecake filling with crushed graham crackers
  • Mini trifles with layers of cake, custard, and fruit

Fruits

  • Strawberries and cream: Add small pieces of pound cake, too!
  • Fresh berries with lemon curd: Pound cake would be delicious here, too.
  • Banana slices and peanut butter mousse
  • Chopped mango with coconut whipped cream

Cold & Frozen Treats

  • Ice cream sundaes: Add sprinkles, caramel drizzle, and a cherry on top!
  • Gelato or sorbet: Perfect for summer!
  • Frozen yogurt with fruit and granola
  • Turtle candy mix - caramel, pecans, and chocolate drizzle

Fun & Festive

  • Holiday candies or chocolate bark chunks
  • Add a few creamy chocolate truffles or coconut and rum dessert bites to each bowl
  • Trail mix or snack mix for kids' parties
  • Mini cookies or brownie bites
  • Turtle candy mix - caramel, pecans, and chocolate drizzle

Tip: When filling your chocolate bowls, avoid overly hot fillings or liquids (this can melt or soften the chocolate). Serve shortly after filling, or refrigerate until ready.

Chocolate bowl filled with chocolate-orange mousse and topped with orange zest

Tips and Tricks

Making chocolate bowls with balloons is surprisingly simple, but a few smart tips will help you get flawless results every time. Here's what to keep in mind:

  • Cool the chocolate enough: Don't skip this! Let melted chocolate cool until it's just warm to the touch (about 85-90°F). If it's too hot, your balloons may pop. Too cool, and it won't coat smoothly.
  • Use small, ink-free balloons: Choose small water balloons or "party balloons" with no printed ink. The smooth surface helps prevent sticking and makes sure they release cleanly.
  • Choose the right chocolate: Use high-quality semi-sweet, dark, or white chocolate for the best taste and structure. Chocolate chips work in a pinch but bars with cocoa butter will temper much better.
  • Let them set properly: Leave the chocolate to harden at room temperature, or chill the bowls in the fridge for 20-30 minutes. Don't rush it! The chocolate should look dull and firm, not glossy, before deflating the balloons.
  • Slowly deflate the balloons: Don't pop the balloons! Gently pierce near the knot and let the air out gradually to avoid cracking the bowls. If any balloon sticks, gently peel it away with clean, dry fingers.
  • Use a nonstick surface: Place the dipped balloons on parchment paper or a silicone mat for easy removal.
  • Even out the base: If the bottom of your bowl is uneven, quickly warm it on a heated plate to flatten the base.
  • Store them properly: Keep empty bowls at cool room temperature or refrigerate them in an airtight container.

When and Where to Serve Chocolate Bowls

Chocolate bowls aren't just a dessert, they're an experience! Here are some ideas for where to serve these gorgeous chocolate bowls with balloons:

  • Holiday Parties: Chocolate bowls are a hit at Christmas, Easter, and Valentine's Day. Fill them with peppermint mousse, strawberry cream, or themed candies for holiday-ready treats.
  • Birthdays: Perfect for both kids and adults! Create a build-your-own dessert station where guests can fill their bowls with toppings like sprinkles, whipped cream, and candy.
  • Dinner Parties & Date Nights: Impress your guests with individually portioned, gourmet-style desserts. Serve the chocolate bowls filled with mousse or berries and cream.
  • Graduations, Showers & Celebrations: Chocolate bowls are a great addition to dessert tables at baby showers, bridal showers, graduations, and other milestone events. They look elegant and are easy to serve in large batches.
  • Kids' Activities & Family Nights: Making chocolate bowls can be a fun family project on a rainy day or during school breaks. Let the kids decorate and fill their own for a creative treat that's as much fun to make as it is to eat.
  • Potlucks & Gatherings: Chocolate bowls travel surprisingly well if packed carefully. Bring a tray to your next potluck filled with mousse or pudding.

If you love easy, no-bake treats that look impressive but take hardly any effort, you've got to try a few more of my favorites! Start with my no-bake chocolate fudge - just three ingredients and it practically makes itself. Or go classic with easy chocolate dipped strawberries and pretzel rods dipped in chocolate, both of which are perfect for gifting or on a holiday dessert try. For something especially simple, pretzel hugs with M&Ms are salty-sweet bites that come together in minutes. And for something extra fun (and adorable), make a batch of chocolate party spoons. They're great for stirring into hot cocoa or wrapping up as edible gifts!

How to Make Chocolate Bowls with Balloons

How to Make Chocolate Bowls with Balloons

Yield: 4-6 chocolate bowls
Prep Time: 10 minutes
Additional Time: 30 minutes
Total Time: 40 minutes

Making chocolate bowls with balloons is so simple but so gorgeous!

Ingredients

  • 8 oz high-quality chocolate
  • 4-6 small balloons, washed and dried thoroughly

Instructions

  1. Prep the balloons: Wash and dry the outside of the balloons. Blow up each balloon just enough to form a small, round base (about the size of a teacup). Tie them off and make sure they’re clean and dry (any moisture can cause the chocolate to seize).
  2. Melt the chocolate: Chop or measure your chocolate and place it in a microwave-safe bowl or double boiler. Microwave method: Heat in 30-second intervals, stirring well between each, until smooth. Double boiler method: Gently melt over simmering water, stirring until smooth. Important: Let the melted chocolate cool slightly before dipping—this is crucial. If the chocolate is too warm, the balloons may pop.
  3. Dip the balloons: Line a baking sheet with parchment paper or a silicone mat. Once the chocolate is cooled but still fluid, hold a balloon by the knot and dip the bottom into the chocolate. Gently swirl or tilt the balloon to coat it as high up as you’d like your bowl to go. Lift and let any excess chocolate drip off. Place the dipped balloon upright on the lined baking sheet. Repeat with the remaining balloons.
  4. Let the chocolate set: Leave the balloons at room temperature for 1–2 hours or until fully hardened. To speed things up, you can chill them in the refrigerator for about 20–30 minutes.
  5. Release the balloons: Once the chocolate is completely set and no longer shiny, use a pin or toothpick to gently poke a small hole near the knot. Let the air slowly escape (you want to avoid popping). As the balloon deflates, it should naturally pull away from the chocolate. Remove it carefully. If needed, trim the edge of the chocolate bowl slightly to even it out.
  6. Fill and serve: Your chocolate bowls are ready to fill! Add mousse, ice cream, berries, whipped cream, or your favorite dessert fillings. Tip: If the bottom of the bowl is uneven, you can very briefly warm it on a plate over hot water to flatten it for more stability.

Notes

Fill the balloons with anything you like! See the post for a list of ideas, but a few quick ones are chocolate mousse, pudding, or little candies or M&Ms.

Nutrition Information:
Yield: 6 Serving Size: 1
Amount Per Serving: Calories: 202Total Fat: 11gSaturated Fat: 7gTrans Fat: 0gUnsaturated Fat: 3gCholesterol: 9mgSodium: 30mgCarbohydrates: 22gFiber: 1gSugar: 19gProtein: 3g

This data was provided and calculated by Nutritionix.

© Kristy Bernardo
Cuisine: American / Category: Desserts
Easy Chocolate Bowls with Balloons – A Fun No-Bake Dessert!

No-Bake Marshmallow Pops – Quick, Fun & Kid-Friendly

February 7, 2010 by Kristy Bernardo 14 Comments

Close-up of colorful marshmallow pops dipped in chocolate and decorated with rainbow sprinkles on a white surface

If you're looking for an easy, no-bake treat that's fun to make and even more fun to eat, you're in the right place! Marshmallow pops are a quick and customizable dessert that are perfect for parties, birthdays, holidays, or just a sweet afternoon project with the kids. With just a few simple ingredients (marshmallows, melted chocolate, and your favorite toppings) you can create a colorful treat that looks impressive but takes just minutes to make!

Close-up of colorful marshmallow pops dipped in chocolate and decorated with rainbow sprinkles on a white surface

What Are Marshmallow Pops?

Marshmallow pops are a fun and easy treat made by placing marshmallows on sticks, dipping them in melted chocolate, and adding toppings like sprinkles, crushed cookies, or graham cracker crumbs. Think of them as a cross between cake pops and s'mores (without the baking)! They're great for parties, holidays, edible gifts, or rainy day kitchen fun with kids. You can decorate them to match any theme, making them just as festive as they are delicious.

a closeup of Mini Marshmallow pops with red and green sprinkles skewered and set on a cup of hot cocoa

Ingredients You'll Need

You only need a few ingredients to make these adorable and delicious marshmallow pops:

  • Marshmallows: Regular-sized marshmallows work best, but feel free to use jumbo or flavored marshmallows for a twist. Mini-marshmallows can also be used and skewered on little food piks and set on or next to mugs of hot chocolate.
  • Chocolate for melting: Milk chocolate chips are classic, but you can also use white chocolate chips or dark chocolate. Colored candy melts in different colors are also a great choice.
  • Toppings: Customize with whatever you like! Some fun options include rainbow sprinkles or nonpareils, crushed graham crackers (for a s'mores version), crushed cookies (like Oreos or Biscoff), mini M&Ms or chocolate chips, or crushed peppermint candies.
  • Lollipop sticks or paper straws: These make the pops easy to hold and serve. You can find them at most craft stores or online.
  • Optional but helpful: Adding a teaspoon of coconut oil or shortening to your chocolate helps it melt smoother and coat the marshmallows more evenly.
Chocolate-dipped marshmallow pops in vibrant colors arranged on a decorative platter

Step-by-Step Instructions

Making marshmallow pops is simple, fun, and totally kid-friendly! Here's how to do it:

  1. Prep your toppings: Pour your chosen toppings (sprinkles, crushed graham crackers, cookie crumbs, etc.) into small bowls for easy dipping.
  2. Melt the chocolate: Add the chocolate or candy melts to a microwave-safe bowl. Microwave in 20-30 second intervals, stirring in between, until melted and smooth. (You can add a teaspoon of coconut oil to help the chocolate thin out and coat better.)
  3. Insert the sticks: Push a lollipop stick or paper straw about halfway into each marshmallow, being careful not to push all the way through.
  4. Dip in the chocolate: Hold each marshmallow by the stick and dip the top and sides into the melted chocolate. Let any excess chocolate drip off.
  5. Add the toppings: Immediately dip or roll the chocolate-coated marshmallow into your toppings, or sprinkle them on by hand.
  6. Let them set: Stand the marshmallow pops upright (use a foam block, mug filled with sugar, or poke holes in a box) and allow the chocolate to set completely at room temperature or in the refrigerator.
Mini Marshmallow pops with red and green sprinkles skewered and set on a cup of hot cocoa

Flavor and Topping Variations

One of the best parts about marshmallow pops is how easy they are to customize. Here are some fun ideas to try:

Chocolate Flavors

  • Milk chocolate: This is classic and loved by all ages.
  • Dark chocolate: Rich and slightly less sweet, dark chocolate is usually better enjoyed by adults.
  • White chocolate: Sweet and perfect for colorful decorating.
  • Candy melts: Use red, green, pink, or blue melts to match any holiday or birthday theme.

Toppings

  • Sprinkles: Use rainbow, holiday, or color-themed sprinkles.
  • Crushed graham crackers: For a s'mores-style marshmallow pop.
  • Mini M&Ms: These make really colorful marshmallow pops!
  • Crushed cookies: Oreos, Biscoff, or chocolate chip cookies.
  • Shredded coconut: Sweetened or unsweetened for a tropical twist.
  • Chopped nuts: Like peanuts, almonds, or pecans (great for adults).
  • Crushed peppermint: Perfect for Christmas marshmallow pops.
  • Cereal pieces: Fruity Pebbles, Cocoa Krispies, or Cheerios.

Extra Fun Twists

  • Add a drizzle: Once the chocolate sets, add a drizzle of chocolate in a contrasting color (white over dark, or vice versa).
  • Flavored marshmallows: Try strawberry, chocolate, or holiday-flavored versions like peppermint.
  • Double dip: Dip once in chocolate, let set, then partially dip a second time in chocolate or a topping in a contrasting color.

Holiday Marshmallow Pops

  • Christmas: Use red and green candy melts or sprinkles, crushed peppermint, or drizzle with white chocolate and top with mini holiday M&Ms.
  • Valentine's Day: Dip in pink or white chocolate and top with heart sprinkles, pink sanding sugar, or edible glitter.
  • Summer parties/4th of July: Use red, white, and blue candy melts or sprinkles. Try layering colored candy melts for a tie-dye effect.
  • Halloween: Dip in orange or dark chocolate and decorate with candy eyes, Halloween sprinkles, or crushed chocolate cookies.
  • Thanksgiving: Roll in crushed graham crackers or pecans and drizzle with caramel or white chocolate.
  • Birthdays: Go wild with rainbow sprinkles, funfetti candy melts, or even edible confetti.
  • Super Bowl: Use your team colors! (Obviously, green and yellow is the only choice here, haha 🙂
halloween marshmallow pops displayed in a cute orange bucket

Storage and Make-Ahead Tips

Make-Ahead Tips

Prep them early: You can make marshmallow pops up to 3-4 days in advance of your event. This gives you plenty of time to decorate and package them without last-minute stress.
Make sure they're set before packaging: Be sure the chocolate is completely set before packaging or stacking to avoid smudging or sticking.

How to Store

Room temperature: Store finished marshmallow pops in an airtight container at room temperature. They'll stay fresh for up to 5 days.
Avoid the fridge: Refrigeration can cause condensation and make the chocolate coating sticky or discolored.
Use parchment or wax paper: If stacking, place a sheet of parchment or wax paper between layers to prevent sticking.
Individually wrap them: For gifting or parties, wrap each pop in a clear treat bag and tie with ribbon or twine. It keeps them fresh and makes for a cute presentation.

Can You Freeze Marshmallow Pops?

Freezing is not recommended, as marshmallows tend to lose their soft, chewy texture and can become grainy when thawed. Stick to making them fresh within a few days of when you plan to serve them.

A row of marshmallow pops coated in chocolate and festive sprinkles resting on parchment paper

Frequently Asked Questions

  • How far in advance can you make marshmallow pops?
    You can make marshmallow pops up to 3-4 days ahead of time. Just be sure to store them in an airtight container at room temperature, away from heat or humidity.
  • Do marshmallow pops need to be refrigerated?
    No, marshmallow pops should not be refrigerated. The cold can cause the chocolate to sweat and become sticky when brought back to room temperature. Store them in a cool, dry place instead.
  • How long do marshmallow pops last?
    When stored properly at room temperature, marshmallow pops will stay fresh for about 5 days. For best results, enjoy them within the first 2-3 days.
  • Can you freeze marshmallow pops?
    Freezing is not recommended. Marshmallows can become chewy or tough after being frozen and thawed, and the chocolate may develop condensation or cracks.
  • What kind of chocolate should I use?
    You can use milk, dark, white chocolate, or colored candy melts. Just be sure to melt it gently so it coats the marshmallows smoothly.
  • What can I use instead of lollipop sticks?
    If you don't have lollipop sticks, try using paper straws, wooden skewers, popsicle sticks, or even decorative toothpicks for mini versions.
  • Can kids help make these?
    Marshmallow pops are a perfect no-bake treat for kids to help make. Just supervise the chocolate dipping and let them go wild with sprinkles and toppings.
  • Do I have to use large marshmallows?
    Large marshmallows are ideal, but you can also use jumbo marshmallows for a bigger treat or mini marshmallows on toothpicks for bite-sized versions.
Overhead view of marshmallow pops with assorted sprinkles in red, green, and white hues

If you love fun, no-bake treats like marshmallow pops, you'll definitely want to try a few more easy favorites! My 3-ingredient fudge dessert is rich, creamy, and done in just minutes. For something a little fancy but still foolproof, DIY chocolate bowls (made using balloons!) and festive dipped pretzel rods are perfect for parties or gifting. For something especially simple, these M&M Pretzel Hugs come together in no time and look adorable on any cookie tray. And don't miss easy chocolate spoons for edible gifts - they're not only delicious but also make the cutest gifts or hot cocoa toppers!

A row of marshmallow pops coated in chocolate and festive sprinkles resting on parchment paper

How to Make Marshmallow Pops

Yield: 24 marshmallow pops
Prep Time: 10 minutes
Additional Time: 30 minutes
Total Time: 40 minutes

These easy marshmallow pops are perfect for any occasion, and a great choice to enlist the help of your littles!

Ingredients

  • 24 regular-sized marshmallows (you can use any size you like, but the yield will change depending on size)
  • 12 oz high-quality chocolate or candy melts

Optional Toppings

  • Rainbow sprinkles or nonpareils
  • Crushed graham crackers (for a s’mores version)
  • Crushed cookies (like Oreos or Biscoff)
  • Mini M&Ms or chocolate chips
  • Crushed peppermint candies

Instructions

  1. Prep your toppings: Pour your chosen toppings (sprinkles, crushed graham crackers, cookie crumbs, etc.) into small bowls for easy dipping.
  2. Melt the chocolate: Add the chocolate or candy melts to a microwave-safe bowl. Microwave in 20–30 second intervals, stirring in between, until melted and smooth. (You can add a teaspoon of coconut oil to help the chocolate thin out and coat better.)
  3. Insert the sticks: Push a lollipop stick or paper straw about halfway into each marshmallow, being careful not to push all the way through.
  4. Dip in the chocolate: Hold each marshmallow by the stick and dip the top and sides into the melted chocolate. Let any excess chocolate drip off.
  5. Add the toppings: Immediately dip or roll the chocolate-coated marshmallow into your toppings, or sprinkle them on by hand.
  6. Let them set: Stand the marshmallow pops upright (use a foam block, mug filled with sugar, or poke holes in a box) and allow the chocolate to set completely at room temperature or in the refrigerator (about 30 minutes).

Notes

See the post for loads of ideas for toppings, holidays, etc!

Nutrition Information:
Yield: 24 Serving Size: 1
Amount Per Serving: Calories: 100Total Fat: 4gSaturated Fat: 3gTrans Fat: 0gUnsaturated Fat: 1gCholesterol: 3mgSodium: 17mgCarbohydrates: 15gFiber: 0gSugar: 12gProtein: 1g

This data was provided and calculated by Nutritionix. This was calculated using ONLY the marshmallows and chocolate - it does not include toppings.

© Kristy Bernardo
Cuisine: American / Category: Desserts
No-Bake Marshmallow Pops – Quick, Fun & Kid-Friendly

M&M Pretzel Hugs (Easiest Christmas Cookies Ever!)

December 3, 2009 by Kristy Bernardo 32 Comments

a white plate filled with m&m pretzel hugs

If you're looking for a festive treat that's as easy as it is adorable, these M&M Pretzel Hugs are your new go-to holiday favorite. They're made with just three ingredients: pretzels, Hershey's Kisses, and holiday M&M's!

These sweet and salty bites are perfect for cookie trays, classroom parties, edible gifts, or a quick baking project with the kids. They come together in minutes, require zero baking skills, and always disappear fast (so go ahead and make a double batch!).

I've been making these easy Christmas cookies for years, and they're one of the few recipes that everyone from toddlers to grandparents can help with. You don't need a mixer, fancy equipment, or even much time. Just a sheet pan, some seasonal candy, and a few spare minutes in the oven. And if you can get your hands on the seasonal pretzels, even better!

a cookie plate filled with christmas m&m pretzel hugs with sprinkles

What Are M&M Pretzel Hugs?

M&M Pretzel Hugs are a simple, no-bake holiday treat made by melting a Hershey's Kiss onto a mini pretzel, then pressing an M&M into the soft chocolate. They're also known as Christmas pretzel hugs, holiday pretzel bites, or pretzel buttons. Whatever you call them, they're festive, fun, and SO delicious to eat!

These bite-sized treats deliver the perfect sweet-and-salty combo:

  • The crunchy pretzel base adds just the right amount of salt.
  • The melted chocolate kiss gives you a rich, creamy center.
  • The M&M on top adds color, a pop of texture, and holiday charm.
  • They're ideal for cookie exchanges, holiday parties, and edible gifts, and since they require almost no prep or cleanup, they're perfect for kids to help make during Christmas break.
a side view of a cookie plate filled with christmas m&m pretzel hugs with sprinkles
a closeup of christmas m&m pretzel hugs with sprinkles

Ingredients You'll Need

These M&M Pretzel Hugs couldn't be easier! They only require three ingredients, all of which are easy to find during the holidays.

  • Waffle Pretzels or Holiday-Shaped Pretzels: These flat pretzels are perfect for holding melted chocolate and pressing in the M&M. You can use square "Snaps," mini twists, or even festive shapes like stars or trees. The UTZ brand sells the festive shapes and I've seen them occasionally in stores, but you can also order bags of 6 or more directly from their site. Trader Joe's has also carried them around the holidays, so check there, too!
  • Hershey's Kisses (12 oz bag): Any flavor works here! Classic milk chocolate is always a hit, but you can get creative with candy cane, cookies and creme, hot cocoa, caramel, or Hershey's Hugs (white chocolate + milk chocolate swirl).
  • Holiday M&M's (plain or peanut butter): Use the red and green variety for a festive Christmas look. Peanut, peanut butter, or even crispy M&Ms all work, just make sure they're not too big to sit on the melted Kiss.
  • Optional Substitutes & Add-Ins: Try Mini Reese's Cups, Rolos, Dove Promises, or Brach's Chocolate Stars in place of Hershey's Kisses. Swap M&M's for nuts, peppermint candies, or sprinkles if you want something different.
a side view of a white cookie plate filled with christmas m&m pretzel hugs with sprinkles

Step-by-Step Instructions

These festive little treats come together in minutes and are so pretty on a holiday cookie tray! Here's how to make them:

  1. Preheat the oven: Preheat your oven to 170°F (or 200°F if your oven doesn't go that low). A low temp is key because you want the chocolate to soften, not melt completely.
  2. Arrange the pretzels: Line a baking sheet with parchment paper. Place the waffle pretzels (or holiday-shaped pretzels) in a single layer on the sheet, spacing them just slightly apart.
  3. Add the Hershey's Kisses: Unwrap your Hershey's Kisses and place one in the center of each pretzel.
  4. Bake: Place the tray in the oven and bake for about 6 minutes, or until the chocolate looks glossy and slightly soft but still holds its shape. Don't overbake! You're just warming the chocolate so it's soft enough to press.
  5. Press in the M&Ms: Immediately after removing the tray from the oven, press one M&M gently into the center of each Kiss. The chocolate should spread just slightly and anchor the M&M in place.
  6. Cool until set: Let the pretzel hugs cool at room temperature or transfer the tray to the refrigerator for about 10-15 minutes until they're fully set.
  7. Serve or gift: Once the chocolate is firm, store them in an airtight container or package them in cellophane bags for easy edible gifts or your cookie trays.
a white cookie plate filled with christmas m&m pretzel hugs with sprinkles

Flavor & Color Variations

One of the best things about M&M Pretzel Hugs is how easy they are to customize. You can switch up the flavors or colors for different holidays or add sprinkles and different flavors!

Chocolate Variations

  • Hershey's Hugs (white + milk chocolate swirl)
  • Candy Cane Kisses for a peppermint twist
  • Caramel Kisses for gooey centers
  • Cookies and Creme, Hot Cocoa, or Almond Kisses
  • Try Mini Reese's Cups, Rolos, or Dove Promises

M&M Variations

Holiday M&Ms (red and green) for Christmas
Pink, red & white for Valentine's Day
Pastels for Easter or spring parties
Red, white & blue for the 4th of July
Orange & brown for Halloween or Thanksgiving
Try Peanut Butter M&Ms, Peanut, Crispy, or Caramel (just be sure they're not too big for the chocolate base)

Topping Ideas

  • Sprinkle with holiday sprinkles, crushed peppermint candies, or colored sanding sugar
  • Add a drizzle of melted white chocolate once they've cooled
  • Top with a toasted pecan and use caramel kisses for a "turtle" version

These little treats are perfect for customizing based on your favorite flavors or the holiday you're celebrating. Once you make one version, you'll want to try them all!

a white plate filled with christmas m&m pretzel hugs

How to Store

Room Temperature

  • Once cooled and fully set, transfer to an airtight container.
  • Store at room temperature for up to 2-3 weeks.
  • Keep them in a cool, dry place, away from heat or sunlight to prevent the chocolate from softening or blooming.
  • Layer with wax or parchment paper if stacking in a container to keep the tops looking perfect.

Freezing

  • Place cooled pretzel hugs in a freezer-safe container or resealable bag.
  • Layer with parchment or wax paper if needed.
  • Freeze for up to 3 months.
  • Let them thaw at room temperature for about 30 minutes before serving.

Make-Ahead

These are a great make-ahead Christmas cookie. You can prep them weeks in advance and either store them at room temp or freeze until needed.

Frequently Asked Questions

Can I use other types of chocolate besides Hershey's Kisses?

Definitely! Rolos, Mini Reese's Cups, Dove Promises, and Brach's Chocolate Stars all work well. Just make sure the chocolate will soften (not melt completely) when heated.

Can I use peanut butter or peanut M&Ms?

Peanut, peanut butter, caramel, and even crispy M&Ms work great. Just make sure the M&M size isn't too large to press into the softened chocolate.

Do I need to use waffle pretzels?

Waffle (square) pretzels are easiest to work with, but mini twists or holiday-shaped pretzels also work. Just try to use flat pretzels so the chocolate sits evenly.

Do I need to refrigerate M&M Pretzel Hugs?

As long as your kitchen is cool and dry, room temperature storage is just fine. If your home is warm or you want the chocolate to set quickly, pop them in the fridge for 10-15 minutes after assembling.

Can I freeze M&M Pretzel Hugs?

Yes, these freeze really well. Store them in an airtight container, layered with wax paper, for up to 3 months. Let them thaw at room temperature before serving.

Can I make M&M Pretzel Hugs ahead of time?

These are perfect for making ahead! They stay fresh for 2-3 weeks at room temperature and can be frozen for up to 3 months. They're great for gifting or prepping cookie trays in advance.

Where can I find holiday-shaped pretzels?

Check your local stores around the holidays. If you're not able to find them, you can order in bulk through the UTZ brand's website. I've also seen them at Trader Joe's.


I don't know about you, but I love no-bake holiday recipes (anything to make the season as stress-free as possible)! Here are a few of my favorite no-bake holiday treats:

These homemade chocolate truffles are rich, creamy, and perfect for gifting, while dipped strawberries in chocolate add a touch of elegance to any dessert tray. For something else that's festive and fun to make with the kids, dipped pretzel sticks are always a hit, and meringue Christmas trees are light, sweet, and so cute on a cookie platter. If you're into peppermint flavor, don't miss my classic holiday bark, and for the grown-ups, these easy rum truffles are a boozy, bite-sized treat that disappears fast!

a white plate filled with m&m pretzel hugs

M&M Pretzel Hugs

Yield: 72 cookies
Prep Time: 10 minutes
Cook Time: 6 minutes
Total Time: 16 minutes

These really are the easiest Christmas cookies you can make! They're always a hit and will fly off of your cookie tray. Give some as homemade gifts, too!

Ingredients

  • 1 bag pretzels (waffle or holiday-shaped if you can find them)
  • 1 bag holiday M&M’s plain or peanut butter chocolate candies
  • 1 12-oz bag Hershey’s Milk Chocolate Kisses
  • Sprinkles (optional)
  • Parchment paper (optional)

Instructions

  1. Preheat the oven to 170°F.
  2. Open the bags of pretzels and remove all the unbroken pretzels. Place them on parchment paper-lined cookie sheets in a single layer.
  3. Unwrap the Hershey’s Kisses and place one on each pretzel.
  4. Place the cookie sheet in the preheated oven for six minutes.
  5. Immediately upon removing from the oven, cover with sprinkles (if using; see notes). Place one M&M on top of the semi-melted Hershey’s Kisses.
  6. Place the entire cookie sheet in refrigerator until cookies are set.
  7. Place in cute holiday bags or on a cookie tray for your guests to enjoy!

Notes

Most of the sprinkles will fall into the pan, and that's okay! Just cover the kisses as much as possible (they adhere easily), then pour any sprinkles that didn't adhere back into the jar after you remove the pretzel hugs from the pan.

Make sure to use M&M's or another candy and not just sprinkles, as pushing down into the chocolate is what makes it "stick" to the pretzel.

Nutrition Information:
Yield: 72 Serving Size: 1
Amount Per Serving: Calories: 33Total Fat: 2gSaturated Fat: 1gTrans Fat: 0gUnsaturated Fat: 1gCholesterol: 2mgSodium: 15mgCarbohydrates: 4gFiber: 0gSugar: 3gProtein: 1g

This data was provided and calculated by Nutritionix.

© Kristy Bernardo
Cuisine: American / Category: Desserts
M&M Pretzel Hugs (Easiest Christmas Cookies Ever!)

Miracle Noodles Review: Are Shirataki Noodles Worth the Hype?

April 15, 2009 by Kristy Bernardo 18 Comments

Just what are Miracle Noodles and are they worth the hype?

If you love pasta but are watching your carbs, calories, or sugar intake, you've probably heard about Miracle Noodles (also known as shirataki noodles). These zero-calorie noodles are made from the konjac root and have been getting a lot of attention for being keto-friendly, gluten-free, and low-carb. But are they actually worth trying? I finally gave them a shot and here's my honest, no-fluff Miracle Noodles review.

a closeup of a package of miracle noodles for a miracle noodles review

What Are Miracle Noodles?

Miracle Noodles are shirataki noodles made from the Japanese konjac plant, a starchy root vegetable. Unlike regular noodles, they're:

  • Grain-free
  • Fat-free
  • Zero-calorie
  • Low in carbs
  • Made almost entirely of soluble fiber (glucomannan)

In other words, they're marketed as a healthy noodle alternative for just about every eating plan out there: Keto, Paleo, gluten-free, vegan, soy-free, kosher, and blood sugar-friendly.

The fiber in these noodles helps slow down digestion, which can help you feel fuller longer and even improve nutrient absorption. That's a big bonus for anyone looking to lose weight, manage blood sugar, or reduce their carb intake without giving up noodles entirely.

First Impressions: Packaging, Smell, and Prep

Okay, let's talk first impressions. The noodles arrive pre-cooked and packaged in water, and yes, they come with a warning: the liquid may smell a little fishy. Don't let that scare you. It's the packaging water, not the noodles themselves, and the smell disappears after rinsing.

The prep couldn't be easier:

  • Rinse under very warm water for 5 minutes
  • Toss with your favorite sauce
  • Serve - no boiling required!

I was immediately impressed by how simple they were to prepare. For busy weeknights or low-effort lunches, that's a major win! I can't tell you how many nights I get home and I just want something easy and fast. But when I'm eating low-carb, fast and easy isn't always possible. Then I'm tempted to order takeout, which will tempt me to order something full of carbs because it just looks so good, and then I'm off the rails. But I think if I keep some miracle noodles around, that could do the trick!

a closeup of a plate of miracle noodles topped with a thick cherry tomato sauce

How Do Miracle Noodles Taste?

Let's be real: Miracle Noodles aren't meant to replace Italian-style pasta exactly, especially not plain with marinara. I tried them with a quick tomato and garlic sauce (like I'd use on spaghetti), and honestly, it didn't quite work. The texture is more like rice noodles or soft vermicelli, and they don't absorb Italian-style sauces in the same way.

But when I tossed them with a bold Asian-inspired sauce - specifically the one from my Crispy Asian Chicken Drumsticks - they were fantastic. The strong flavors coated the noodles well, and they paired perfectly with the chicken. I think that's the key: use Miracle Noodles in recipes where the sauce has a lot of flavor and a little thickness to cling to the noodles.

When Miracle Noodles Work Best

Here's how to get the most out of shirataki noodles:

  • Use them in stir-fries, curries, or ramen-style broths
  • Toss with soy sauce, sesame oil, garlic, and ginger
  • Pair with proteins like grilled chicken, shrimp, or tofu
  • Avoid pairing them with delicate or thin sauces
  • They're great for quick meals when you want something comforting but low in calories or carbs.
a plate of miracle noodles topped with a thick cherry tomato sauce

Final Thoughts: Are Miracle Noodles Worth It?

Yes, with the right expectations.

If you're looking for a one-to-one replacement for pasta night, Miracle Noodles probably aren't it. But if you treat them like a healthy, versatile noodle alternative for Asian dishes, flavorful sauces, or low-carb meals, they're absolutely worth keeping in your pantry.

You can find Miracle Noodles online or at your local Asian market. If you're following a special diet or just want a lighter noodle option that won't spike your blood sugar, I'd definitely recommend giving them a try.

Chocolate Caramel Bars

February 25, 2009 by Kristy Bernardo 15 Comments

Chocolate Bar with Caramel

These easy Chocolate Caramel Bars are DANGEROUSLY delicious. A layer of chocolate and caramel is nestled between sweet and crisp oats. A must try!

Easy Chocolate Caramel Bars Recipe

These Chocolate Caramel Bars are one of the first recipes I ever posted.

I'm often asked why I started a food blog and my answer is always the same: "I was bored". I needed an outlet and something that was mine alone. I never dreamed it could and would become my career! I was simply having a good time creating recipes like these Chocolate Caramel Bars and posting them for friends and family. I hope you enjoy!

Why You'll Love This Chocolate Caramel Bar Recipe

Quick & Easy - Chocolate caramel bars are super delicious and don't take much time at all to make.

Balanced - They're sweet but they have a slightly salty finish that balances the flavor. My favorite part is the outside where it's a little more crisp but the gooey center is a treat all on its own!

Freeze Them - They freeze well, too, so I'll keep a few tucked away for times when I have a craving.

Great Gifts - These square shaped bars are perfect for packing in a tin can and handing out during the holidays or any special occasion.

Chocolate Bar with Caramel

Ingredients For Chocolate Caramel Bars

You can see from this list that these oatmeal caramel bars don't have many ingredients - just 8 including salt! They're all common, shelf-stable ingredients (except for the butter, of course, which should be refrigerated), too.

  • Brown sugar
  • Butter
  • All-purpose flour - Substitute with gluten-free almond flour while adding a slightly nuttier flavor.
  • Baking soda
  • Kosher salt
  • Quick-cooking oats
  • Chocolate chips - I use a combination of milk and dark chips. I prefer Ghirardelli chocolate chips but use what you prefer
  • Caramel sauce - homemade caramel or store-bought

How To Make Caramel Chocolate Bars

  • Beat the butter and brown sugar until it's smooth and creamy. Add 2 cups of the flour, the baking soda, and the salt and mix well. Mix in the oats until just combined.
  • Press half of the mixture in the bottom of a well-greased 11x7 pan (or 9x13) (spraying one hand with cooking spray makes this less sticky).
  • Bake for 10 minutes. Remove from the oven and sprinkle with the chocolate chips. Mix the remaining flour with the caramel sauce until it's thoroughly combined (microwave your sauce to make it easily mixable if you need to).
  • Pour the caramel mixture over the chocolate chips. Sprinkle the remaining crust over the top, trying to cover as much as possible. Bake for another 20-25 minutes or until the top is lightly browned and cooked through.
  • Remove from the oven and allow the bars to cool completely. Cut into bars and serve.

I've also made these with a pinch of salt added to the caramel sauce since I love salted caramel. They don't really need it, but give it a try if salted caramel is your thing.

Best Chocolate Caramel Bars Recipe

Chocolate Caramel Bars Variations

  • Use chocolate chip cookie dough as a base layer with these dessert bars.
  • Add chopped nuts like pecans, walnuts, macadamias, hazelnuts, or cashews.
  • Make them colorful with sprinkles, M&Ms, Reese's Pieces, or yogurt chips.
  • Make it minty with Andes Mints.
  • Swap the chocolate chips for white chocolate, butterscotch, or peanut butter chips.
  • Add dried cranberries, raisins, chopped dried apricots, chia seeds, or shredded coconut.
  • Swirl in a scoop of peanut butter or almond butter.
  • Try adding ¼ to ½ teaspoon of cayenne pepper. This secret ingredient will enhance the flavor of the chocolate and it won't make the the cookie overly spicy.

Storage

These chocolate caramel bars can be kept on the counter or fridge for up to a week in an airtight container. They can be stored in an airtight container in the freezer for up to three months. Wrap them individually in plastic wrap prior to storing them in the freezer. To thaw, just let them rest on the counter overnight.

Have you made these Chocolate Caramel Bars? If you share on social media, be sure to tag me @thewickednoodle on all social channels. I'd love to see your creation!

Easy Chocolate Caramel Bars Recipe

Chocolate Caramel Bars

Yield: 16 bars
Prep Time: 10 minutes
Cook Time: 35 minutes
Total Time: 45 minutes

A layer of chocolate and caramel is nestled between sweet and crispy oats. A must try!

Ingredients

  • 1 ¼ cup light brown sugar
  • 1 ¼ cup butter, softened
  • 2 cups plus 3 tablespoon all-purpose flour, divided
  • 1 teaspoon baking soda
  • 1 teaspoon kosher salt
  • 2 cups quick oats
  • 1 ½ cups chocolate chips, I use a combination of milk and dark chips
  • ¾ cup caramel sauce

Instructions

  1. Preheat the oven to 350F.
  2. Beat the butter and brown sugar until it's smooth and creamy. Add 2 cups of the flour, the baking soda, and the salt and mix well. Mix in the oats until just combined.
  3. Press half of the mixture in the bottom of a well-greased 11x7 pan (or 9x13) (spraying one hand with cooking spray makes this less sticky).
  4. Bake for 10 minutes. Remove from the oven and sprinkle with the chocolate chips. Mix the remaining flour with the caramel sauce until it's thoroughly combined (microwave your sauce to make it easily mixable if you need to).
  5. Pour the caramel mixture over the chocolate chips. Sprinkle the remaining crust over the top, trying to cover as much as possible. Bake for another 20-25 minutes or until the top is lightly browned and cooked through.
  6. Remove from the oven and allow the bars to cool completely. Cut into bars and serve.

Notes

The bars for the number of servings are cut generously. You can get more bars by cutting them smaller.

Nutrition Information:
Yield: 16 Serving Size: 1
Amount Per Serving: Calories: 354Total Fat: 21gSaturated Fat: 12gTrans Fat: 1gUnsaturated Fat: 7gCholesterol: 39mgSodium: 414mgCarbohydrates: 43gFiber: 2gSugar: 32gProtein: 3g

This data was provided and calculated by Nutritionix.

© Kristy Bernardo
Cuisine: American / Category: Desserts
Chocolate Caramel Bars

Try These Next!

  • Almond Butter No Bake Granola Bars
  • 5-Ingredient No Bake Peanut Butter Bars
  • The Best Lemon Bars
  • Easy Cranberry Chocolate Chip Oatmeal Cookies

This recipe was adapted from Recipezaar.

  • « Previous Page
  • 1
  • …
  • 16
  • 17
  • 18

Trending Recipes

  • a metal basket lined with parchment paper that's filled with air fryer flautas mexicanas and topped with pico de gallo, guacamole, and Cacique cheese. there are bowls of guacamole and fresh pico de gallo in the background.
    Air Fryer Flautas Mexicanas – Crispy in Minutes!
  • a closeup of a coconut smoothie bowl topped with fresh blueberries, granola, and goji berries
    Coconut Smoothie Bowl
  • top down view of two birria tacos on a wooden board next to a small bowl of consommé
    Authentic Birria Tacos Recipe (Step-by-Step with Consommé)
  • A stack of keto chocolate chip cookies next to a glass of milk
    Keto Chocolate Chip Cookies

Popular Spring Recipes

  • a white dish with scalloped edges, filled with an easy pea salad that's topped with chopped parsley on a wooden table
    Make-Ahead Easy Pea Salad for Parties
  • Fried Deviled Eggs on a white plate
    Fried Deviled Eggs with Sausage
  • Beet-Pickled Deviled Eggs Recipe
    Beet-Pickled Deviled Eggs
  • A keto salad on a white plate, made up with grilled romaine, sliced cherry tomatoes, thinly sliced avocado and halved lemon slices for a garnish.
    Keto Salad | Lemony Romaine and Avocado Salad

Footer

↑ back to top

  • Privacy Policy
  • About
  • Contact
  • Cookbooks

Copyright © 2026 The Wicked Noodle