The Wicked Noodle

  • All Recipes
  • Freezer Meals
  • Dinner Ideas
menu icon
go to homepage
  • All Recipes
  • Freezer Meals
  • Dinner Ideas
search icon
Homepage link
  • All Recipes
  • Freezer Meals
  • Dinner Ideas
×

Clementine Quick Bread Recipe

April 22, 2026 by Aubrey Cornelius Leave a Comment

a clementine quick bread recipe showing the completed loaf dripping with icing and topped with candied clementines

A good quick bread recipe is just that: quick! But it should also be tender, moist, and flavorful. This makes two loaves so you can either gift or freeze!

a clementine quick bread recipe showing the completed loaf dripping with icing and topped with candied clementines

Today, I present to you a dessert inspired by film. I don't know about you, but I love some food inspiration with my entertainment. After I watched 'The Secret Life of Walter Mitty,' I knew I had to try my hand at a clementine dessert. Instead of a round cake like the one in the film, I went for this quick bread recipe, and wow, it is so delicious. In addition to turning the dessert into sweet bread (who doesn't love eating their dessert in bread form?), this version has a few secret ingredients that make it extra special.

I'm someone who doesn't bake yeast bread; it's just not something I've ever been into (although everyone seems to be making sourdough these days and I'll admit that I'm thisclose to jumping on the current trend).

clementine quick bread just out of the oven

What I am good at is making quick breads, which is bread leavened with either baking soda or baking powder instead of yeast. This quick bread recipe is just another version of the one I've been making for years. I got the recipe from my mom, and she got it from her mom, and I can only assume she got it from her mom, too (although that's just a guess, but I do come from a long line of bakers and talented home cooks)!

Here are just a few reasons why this quick bread recipe will become your new favorite:

  • The flavor is incredible: The citrusy sweetness is perfect on its own or with a hot cup of coffee. It can be breakfast or dessert, I won't tell. 🙂
  • It has a great texture: The light, fluffy texture is tender and cake-like but it still has structure, so you get nice, clean slices.
  • It smells amazing: The process from start to finish will have your kitchen smelling like a dream. Boiling the fruits to make them easier to blend (we'll talk more about this in a bit) releases a sweet scent that you get to enjoy again as the loaves bake.
  • Two-loaf yield: Yes, you read that right! This recipe yields not one but two clementine loaves, which is great because, after your first slice, you will definitely want more. I'll either give one away as a gift or pop the extra in the freezer.
  • It's a great use of clementines: I hate to waste these little fruits, don't you? However, they always come in larger 5-pound bags/crates, and honestly, I can never eat them all. Instead of having them sit around until they go bad, I use them in a quick bread recipe.

Our favorite ways to enjoy quick breads are with a sunny morning and a dalgona coffee. If I'm serving these for a special brunch, I'll offer banana blueberry muffins with a cottage cheese egg bake.

clementine quick bread with the first slice cut

Ingredients

To make this clementine quick bread recipe, you will need:

  • Clementines: Whole clementines are used in this recipe, so obviously, you want to make the best selections possible. To do that, feel to ensure that each fruit is relatively firm with some bounce back and a pleasant scent. Weight also indicates freshness. Clementines shouldn't feel too light. If they do, they probably aren't very juicy.
  • Almond flour: The popular alternative to wheat flour is gluten-free and has a mildly sweet, nutty flavor, which makes it great for baking. Freshly ground almonds join it to give the loaves some bite.
  • Baking powder: The leavening agent helps achieve a light, fluffy texture and tender crumb. Without it, each clementine loaf would be pretty dense.
  • Eggs: Eggs provide lift and structure to the dessert while also contributing to moisture. 
  • Vanilla eggnog: This is my special ingredient, and it gives such a wonderful flavor! Not only does it add richness but it makes the bread SO moist. If it's not the holiday season and you can't locate any, just substitute with either whole milk, evaporated milk, or heavy cream (or a combination of any of those).
Clementine Quick Bread Recipe

Instructions

It might seem like a lot of effort and time to boil the clementines, but it's just a matter of letting them do their thing. Here are the details:

  1. Boil the fruit: Place the clementines in a pot, cover them with water, and bring the water to a boil. Once boiling, turn off the heat and leave the fruits to sit in the boiling water for a couple of hours. Boiling activates their flavorful oils and softens the fruit so they blend up into a silky smooth puree.
  2. Blend them up: After they've had time to sit in hot water, drain and transfer the clementines to a blender or food processor and run it until smooth. Depending on the size of your food processor, you may have to halve or quarter the fruits.
  3. Prepare the batter: Whisk the dry ingredients in the bowl, pour in the puree, then add the remaining wet ingredients, including the vanilla eggnog.
  4. Bake: Divide the batter between two loaf pans lined with parchment paper and bake the clementine loaves.
  5. Make the glaze: As the bread bakes, mix the glaze ingredients until smooth.
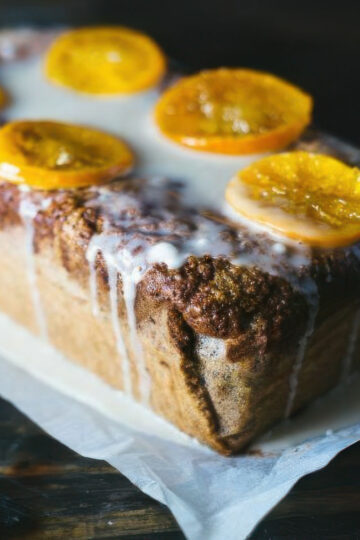
  6. Candy clementine slices: Add thin slices of clementine to boiling sugar and water until soft.
  7. Finishing touches: After each clementine loaf has had time to cool, glaze, and decorate with candied clementine slices.
a closeup image of a clementine quick bread

A few ideas to make it your own!

  • Add spices: Numerous spices pair well with clementines, including cloves, ginger, cinnamon, and nutmeg, to name a few. These additions are a great way to play up the holiday vibe of this dessert.
  • Add lemon: As mentioned, clementines are rather sweet, so a tart, tangy citrus (like lemon) will bring another citrusy layer of flavor to the cake and further brighten the flavor profile.
  • Give mix-ins a try: Fresh berries would be so good here, as would chopped white chocolate. Since this recipe yields two clementine loaves, leave one as is and experiment with the second so you have two variations.
  • Butter before parchment: This helps the parchment stick to the pan, which makes lining so much easier and allows for clean edges. Additionally, it creates a nice nonstick layer for contact points.

More bread recipes for you

  • red lobster biscuits
    Easy Cheddar Bay Biscuits (Red Lobster Copycat)
  • Stuffed Garlic Bread Recipe
    Easiest Stuffed Garlic Bread Recipe
  • Crescent Dough Monkey Bread
    Easy Pull-Apart Monkey Bread Recipe
  • a vintage plate holds three strawberry lemon scones and a few fresh strawberries and lemon slices
    Strawberry Lemon Scones
a clementine quick bread recipe showing the completed loaf dripping with icing and topped with candied clementines

Clementine Quick Bread Recipe

Yield: 2 loaves
Prep Time: 20 minutes
Cook Time: 2 hours 45 minutes
Total Time: 3 hours 5 minutes

Clementines are more than just a refreshing fruity treat, and this clementine loaf is proof! The adorable citrus brings big flavor to this holiday-themed sweet.

Ingredients

Clementine quick bread

  • 8 clementines
  • 12 eggs
  • 2 cups granulated sugar
  • 1 cup ground almonds
  • 3 cups ground almond flour
  • 1 teaspoon baking powder, heaping
  • ½ cup vanilla eggnog

Candied clementines

  • 3 clementines, thinly sliced
  • 2 cups sugar
  • 1 cup water

Clementine Glaze

  • 2 cups powdered sugar
  • 2 tbs clementine juice

Instructions

  1. In a medium-sized pot, add the clementines and cover them completely with water. Bring to a boil and let simmer rapidly for about 2 hours.
  2. Carefully remove the clementines with a slotted spoon and add them to a food processor blender. Blend them just until they're smooth. Set aside while you make the quick bread batter.
  3. In a large bowl, add the remaining loaf ingredients and mix until just combined. Mix in the clementine puree.
  4. Preheat the oven to 375°F.
  5. Butter and line two loaf pans with parchment paper, and divide the batter equally between them.
  6. Bake for about 45-60 minutes (If the top begins to brown too soon, simply cover with aluminum foil and continue baking).
  7. While the loaves are baking, make the candied clementines by adding the thinly sliced clementines to the sugar and water mixture and bring to a simmer and cook until soft (about 25 minutes). Remove with a slotted spoon and set them on a wire rack.
  8. To make the glaze, add the powdered sugar and clementine juice in a small bowl and whisk until it's smooth.
  9. Remove the loaves from the oven and allow to cool completely. When you're ready to serve, top with the glaze and candied clementines.

Notes

    To freeze the loaves, wrap them tightly and place in the freezer once the loaves are completely cooled. Do not top with the glaze and candied clementines before freezing. The loaves will last at least a month in the freezer.

Nutrition Information:
Yield: 16 Serving Size: 1
Amount Per Serving: Calories: 835Total Fat: 35gSaturated Fat: 4gUnsaturated Fat: 31gCholesterol: 140mgSodium: 172mgCarbohydrates: 114gFiber: 9gSugar: 102gProtein: 18g

This data was provided and calculated by Nutritionix. The amounts include the sugar that gets discarded.

© Aubrey Cornelius
Cuisine: American / Category: Desserts
Clementine Quick Bread Recipe

Authentic Italian Marinara Sauce

April 18, 2026 by Aubrey Cornelius Leave a Comment

a jar of authentic italian marinara sauce next to a bowl of cooked pasta and a bowl of tomatoes on the vine

We use just five ingredients for our authentic Italian marinara sauce (and that includes oil and salt)! Minimal ingredients are the key to authenticity, but feel free to add your favorites to make it your own.

a jar of authentic italian marinara sauce next to a bowl of cooked pasta and a bowl of tomatoes on the vine

Today is all about making an authentic Italian marinara sauce with a super fresh tomato flavor, velvety texture, and richness from high-quality olive oil.

Aside from being delicious, having a batch of marinara ready to go opens up a world of possibilities. You can make pasta dishes, eggplant parmesan, chicken parmesan, pizza, and more.

Since authentic Italian marinara sauce uses just 5 ingredients, quality ingredients are crucial. Now is the time to head to the farmers' market to buy tomatoes, nurture one of the living basil plants you can get at grocery stores so you can harvest at home, and increase your olive oil budget.

That said, canned tomatoes can absolutely be used when you can't get your hands on fresh summer tomatoes. A 28-ounce can of San Marzano tomatoes are not only a good substitute, but they'll rival fresh in flavor and allows skipping the step of blanching and peeling the fresh tomatoes.

a basket filled with fresh ingredients for authentic italian marinara sauce (tomatoes, basil, and garlic)

Here are my top reasons for keeping a jar of homemade marinara sauce on hand at all times:

  • It's easy to make: Making authentic Italian marinara sauce may sound like a very involved process that calls for hours in the kitchen, but it's really very simple! All you need are high quality ingredients and about 45 minutes (and most of that time is hands off).
  • Well-developed flavors: The sauce simmers for a while to give the flavors time to develop, specifically the flavors from the tomatoes. The water cooks off, and the umami notes become more concentrated. The garlic and basil bring even more flavor, and you can also had onions and/or herbs if you like.
  • Great make-ahead: It's one of those sauces you want to make in advance because when you do, you're just one step closer to many delicious dishes. The best part is, once you take the time to source the ingredients and make the sauce, all you have to do is store the marinara in jars and refrigerate.
  • Freezes really well: Speaking of making it ahead of time, you can also pop it into the freezer and use it to make an easy dinner on nights when you just don't feel like cooking. We make a double batch and freeze it in our Souper Cubes, which is perfect for anyone living alone or if you have a family who eat on different schedules.
  • Option to can: To preserve your marinara sauce for up to a year, sterilize your jars, add a tablespoon of citric acid to each, fill, then process in boiling water for 30-45 minutes. If you're going to can the marinara, consider tripling the recipe.
Authentic Italian Marinara Sauce

For serving, we like to just toss this sauce with pasta and serve it with stuffed garlic bread and a wedge salad. If we're serving a crowd, we'll also serve it with a soup or two, such as this 6-ingredient Italian Sausage Stew or Italian Minestrone.

a basket of scored and peeled fresh tomatoes

Ingredients

These are the ingredient suggestions from an Italian chef (whose cooking class I was fortunate enough to attend years ago while visiting in Italy), which is where I learned the recipe!

  • Tomato: Tomatoes are the main ingredient here; therefore, it's important to choose wisely. Like every recipe that calls for fresh tomatoes, if you can get your hands on freshly picked local tomatoes in the summertime, they'll always be best. Tomatoes from the store that are still on the vine will also work, although our next-best suggestion to summer tomatoes would be a can of San Marzano.
  • Garlic: It's not marinara if it doesn't have garlic (okay, technically it still can be but I stand by its necessity). I didn't realize this, but apparently, garlic has a much shorter shelf life than I thought, but the fresher the garlic, the less you need. One indicator of garlic a little past its prime is green sprouting at the center of a bulb.
  • Basil: With basil, you may want to consider buying a plant to keep on your windowsill. You can get one for $3-5 at the grocery store. The living basil in containers is fine too. You know, the ones with the soil and roots at the bottom? All you have to do is bring it home, transfer it to a small pot with more soil, and keep it on your windowsill. Don't forget to water it, which I'm notorious for!

Find the complete ingredient list with amounts in the recipe card below.

a jar of authentic italian marinara sauce with bowls of cooked pasta and fresh basil in the background

Instructions

  1. Score the tomatoes: Use a paring knife to cut a shallow "X" in each tomato. Cut through the skin, not the flesh. Many advise making this cut at the bottom of each tomato; however, as you can see in the photo, the stem end works as well.
  2. Blanch: Bring a pot of water to a boil, then, once boiling, add 2-3 tomatoes at a time. Leave for 30 seconds, then carefully remove them and transfer to a large bowl. A mesh skimmer strainer works well for this. Unlike other recipes suggest, do not transfer them to an ice water bath. Remember the Italian chef I mentioned earlier? Well, they advise not to shock the tomatoes in ice water since the tomatoes will absorb more water, which will, in turn, water down the sauce.
  3. Remove the skin and puree: Once the tomatoes are cool enough to handle, use the score marks to peel off the skin (they will come off with ease). After you've peeled the tomatoes, process them with garlic, basil, oil, and salt until smooth. If it has some texture, that is completely fine.
  4. Simmer: Pour the sauce into a saucepan, bring it to a simmer over medium heat, and leave to simmer for 20-30 minutes, stirring occasionally. The flavors will become more concentrated during this time, and the sauce will thicken.
  5. Store: Cool your authentic Italian marinara sauce to room temperature, then store in airtight containers until ready to use.
a basket filled with fresh ingredients for authentic italian marinara sauce

Variations, Substitutions, and Cooking Tips

  • Use canned tomatoes: If you want to make authentic Italian marinara sauce but tomatoes are out of season, canned tomatoes are an option. Use San Marzano tomatoes from the Agro Sarnese Nocerino area of Southern Italy for the best results. They are by far the best canned tomatoes you can buy.
  • Spice it up: Although it's not in traditional recipes, a pinch of chili flakes adds a subtle heat. Add them when it's time to finish the sauce for some spice.
  • For onion lovers: Add about a quarter of an onion to the blender, but be careful not to add too much. You can also slice or chop it and saute it for a few minutes to mellow it out before blending.
  • Add more herbs: Add a little fresh oregano in addition to the basil.
  • Leave it a little chunky: Reserve a couple of the tomatoes and chop them finely, then add them to the sauce once it's been pureed in the blender.
a jar of authentic italian marinara sauce with fresh basil on the table

And there you have it: a super simple, but completely authentic Italian Marinara sauce that's ready for dinner or your freezer!

More Delicious Sauce Recipes

  • a dish of chipotle sauce topped with chopped green onions on a wooden table
    That Creamy Chipotle Sauce Recipe You'll Want on Everything
  • Easy Basil Pesto Recipe
    Basil Pesto Recipe (and 25 unique ways to use it)
  • how to make a balsamic reduction {it's easy!} plus 25 ways to use it
    How to Make the Perfect Balsamic Reduction (plus 26 ways to use it)
  • a black bowl of chimichurri sauce on a wood table
    How to Make Chimichurri Sauce + 20 ways to use it
a jar of authentic italian marinara sauce next to a bowl of cooked pasta and a bowl of tomatoes on the vine

Authentic Italian Marinara Sauce

Yield: 3 cups
Prep Time: 15 minutes
Cook Time: 35 minutes
Total Time: 50 minutes

Authentic marinara sauce is simply minimal, fresh ingredients that transform into a flavorful sauce. These are the ingredients we prefer, but feel free to add onion and/or herbs if you like.

Ingredients

  • 8-10 tomatoes on the vine
  • 2 garlic cloves
  • 1 teaspoon olive oil
  • ¼ cup packed fresh basil
  • 1 teaspoon kosher salt

Instructions

  1. Bring a large pot of water to a boil.
  2. Meanwhile, wash the tomatoes and score twice, forming two very shallow perpendicular lines, lengthwise (see images for an example).
  3. Once the water is boiling, add the tomatoes, about 2-3 at a time, into the water and let sit for about 30 seconds, then remove and place in a large bowl.
  4. Let cool for about a minute, then use your fingers to peel off the skin.
  5. Place the peeled tomatoes into a food processor and add the garlic, olive oil, salt, and basil and pulse together until it's completely smooth (this may take a few minutes).
  6. Once blended, add the mixture back into a large sauce pan and bring to a simmer.
  7. Cook for about 20-30 minutes or until the sauce has thickened.

Notes

  • Keep refrigerated for up to one week.
  • High-quality canned tomatoes can be substituted for fresh (San Marzano are best).

Nutrition Information:
Yield: 6 Serving Size: 1
Amount Per Serving: Calories: 12Total Fat: 1gSaturated Fat: 0gUnsaturated Fat: 1gSodium: 374mgCarbohydrates: 1gFiber: 0gSugar: 0gProtein: 0g

This data was provided and calculated by Nutritionix.

© Aubrey Cornelius
Cuisine: Italian / Category: Sauces
Authentic Italian Marinara Sauce

Garlic Pretzel Knots with Cheese Dipping Sauce

April 16, 2026 by Aubrey Cornelius Leave a Comment

several garlic pretzel knots next to a dish of warm cheese sauce with a person dipping

The only thing better than garlic knots and homemade soft pretzels are these Garlic Pretzel Knots, except when they're dunked in a warm, creamy cheese sauce. Not to mention they're incredibly simple to make!

several garlic pretzel knots next to a dish of warm cheese sauce

Ok, friends. This garlic pretzel knot recipe is a winner. Just imagine a delicious warm pretzel knot stuffed with fresh gouda, topped with garlic salt then dunked in a warm, creamy cheese sauce. I mean, right? And you might not believe me… but these pretzels are super simple to make and are pretty fool-proof! I've made them so many times and they turn out delicious every time.

Besides, this dough is incredibly versatile. I've used it to make pretzel hot dog buns, large soft pretzels, and now these mini pretzel knots! Basically, you need these in your life.

Pretzel knots make a fantastic appetizer and are always a hit when we serve them for parties. We'll also serve them for dinner with a salad (usually this summer pasta salad if it's hot out or a chopped thai salad for something different).

several garlic pretzel knots next to a dish of warm cheese sauce with a person dipping

How to Make Garlic Pretzel Knots

The recipe card has instructions but I wanted to expand a bit in case you have any questions. Of course, you can always leave a comment and I'll get back to you as soon as possible!

  1. To make the dough, just combine sugar, water, butter, and yeast in a bowl. Mix together, then let stand for about 5 minutes (the mixture should start bubbling).
  2. Next, add flour and salt and mix together first with a spatula then, as the mixture starts coming together, knead with your hands until it forms a ball. Add the dough to a well-oiled large-sized bowl and turn to coat the dough with oil. Cover with a clean, damp cloth and let sit in a warm/dry place until the dough doubles in size (should take about an hour).
  3. Preheat the oven to 425 degrees Fahrenheit and bring a large pot of water to a rolling boil. Remove the risen dough from the bowl and divide in half, then in half again. Each resulting portion should be divided again into 4 (I did this by rolling the quartered dough into a long strip, then cutting it into four sections).
  4. To stuff with cheese, simply make a shallow incision along the middle and spread the dough with your fingers. Take some freshly grated gouda (about 1 teaspoon) and place it in the center. Then using your fingers, simply pinch the sides together to seal. Then, take each strip and tie it into a messy knot.
  5. Once dough is split into 16 equal strips you'll want to tie them into knots. Tying pretzel knots is similar to the first step in tying your shoes. To tie the pretzel dough strips into knots make an over and under loose knot, then connect the two ends and then tuck under the pretzel dough. Another way to describe this is to take the ends of a pretzel strip and criss cross them and then thread one end through the center of the hole. Pinch the two ends and then tuck under the pretzel dough.
  6. Add the baking soda to the boiling water (it might look a bit scary at this point, that's OK it's supposed to get super bubbly) and submerge the knots (two at a time) for about 30 seconds on one side, then 30 seconds on the other. Remove from the water and set on a plate covered in paper towels (this will help absorb the excess water). Coat with egg wash, garlic salt, and a sprinkle of sea salt and place on the top rack in the oven for about 15 minutes (or until they reach a deep golden brown).
a person pulling apart a warm garlic pretzel knot

Pretzel Knot Dipping Sauces

Now for my favorite part: the gouda and cheddar cheese dipping sauce!

  1. Just add the heavy cream, salt, flour and whisk vigorously over a medium-high heat until it thickens slightly (about 2 minutes).
  2. Remove from heat and add about 1 cup grated Gouda and 1 cup grated cheddar cheese and mix together until the cheese melts. Serve immediately!

Here are a few more ideas if you'd prefer a different dipping sauce:

  • Garlic butter: Melted butter + fresh garlic + parsley (optional)
  • Herbed olive oil: Olive oil + garlic + Italian herbs + chili flakes
  • Spicy brown mustard: classic! Sometimes we'll tone it down a bit with a little mayo
  • Buffalo sauce: Especially good if you're serving these as game-day food.
  • Chipotle aioli: Chipotle pepper (from a can) + mayo + one mince garlic clove
  • Honey Mustard
  • Ranch Dressing
garlic pretzel knots just out of the oven

Pretzel Knot Tips

  • Knead the dough until it's smooth and make sure to give the dough time to double in size.
  • The egg wash step is important for a classic golden brown crust.
  • Keep the ropes even if possible
  • Tie the ropes loosely so they stay soft while baking
  • Don't skip the baking soda bath!
a closeup of a garlic pretzel knot as it cools

Related Recipes

  • Fresh Almond Flour Biscuits
    Almond Flour Biscuits
  • Stuffed Garlic Bread Recipe
    Easiest Stuffed Garlic Bread Recipe
  • Homemade Blueberry Banana Muffins
    Banana Blueberry Muffins
  • red lobster biscuits
    Easy Cheddar Bay Biscuits (Red Lobster Copycat)
several garlic pretzel knots next to a dish of warm cheese sauce with a person dipping

Garlic Pretzel Knots with Cheese Dipping Sauce

Yield: 16 pretzel knots
Prep Time: 15 minutes
Cook Time: 25 minutes
Total Time: 40 minutes

Garlic Pretzel Knots are a tasty combination of homemade pretzels and garlic knots dunked in a warm, creamy cheese sauce. Not to mention they’re incredibly simple to make!

Ingredients

Pretzel Knots

  • 1 ½ cups warm water
  • 2 ¼ teaspoon active dry yeast (1.25 oz packet)
  • 2 tablespoons light brown sugar
  • ½ cup unsalted butter, completely melted
  • 1 ½ teaspoons salt
  • 4 ½ all-purpose flour (bread flour works too)
  • 1 teaspoon grated gouda
  • ⅔ cups baking soda
  • 1 egg white, beaten with water, for egg wash
  • 1 tablespoon water, for egg wash
  • 1 teaspoon garlic salt
  • Dash of sea salt, for each knot

Cheese Sauce

  • 1 ½ cups heavy cream
  • 4 teaspoons flour
  • 1 teaspoon salt
  • 1 cup freshly grated gouda
  • 1 cup freshly grated cheddar

Instructions

Pretzel Knots

  1. In a bowl, add water, yeast, brown sugar and melted butter. Mix together then let sit for about 5 minutes.
  2. Next, add the salt and flour to the mixture and mix together with a spatula until it begins to come together.
  3. Then, using your hands, knead together until it forms a ball.
  4. Transfer to a lightly greased bowl and cover with a clean, damp towel and place in a warm/dry place for about 1 hour (I like to use the oven for this).
  5. Once the dough has doubled in size, remove and knead on a lightly flour surface.
  6. Divide in half, then in half again (so you should have four balls of dough at this point).
  7. Divide each resulting ball into fourths to get to 16 balls (or, just roll each ball into a long log shape and cut into fourths)
  8. Once divided, roll into a log shape and cut a shallow incision into the middle of each strip of dough,
  9. Add about 1 teaspoon of grated gouda then, using your fingers, seal the incision.
  10. Tie each strips into a messy knot and tuck any ends underneath, then set on a baking sheet.
  11. Bring a large pot of water to a boil. Add the baking soda.
  12. Preheat oven to 425°F.
  13. Place the pretzel knots (two at a time) into the boiling water and let sit for about 30 seconds on each side.
  14. Remove from the water and onto a parchment lined baking sheet.
  15. Brush with the egg wash, and top with garlic salt and a sprinkle of sea salt.
  16. Bake on the top rack of the oven for about 15 minutes or until they reach a deep golden brown.

Cheese Sauce

  1. In a large sauce pan, add the heavy cream, flour, and salt.
  2. Whisk vigorously for about 2 minutes or until slightly thickened.
  3. Remove from heat and add the grated cheeses and stir until fully incorporated.
Nutrition Information:
Yield: 16 Serving Size: 1
Amount Per Serving: Calories: 328Total Fat: 19gSaturated Fat: 12gTrans Fat: 0gUnsaturated Fat: 6gCholesterol: 79mgSodium: 3107mgCarbohydrates: 30gFiber: 1gSugar: 2gProtein: 9g

This data was provided and calculated by Nutritionix.

© Aubrie Cornelius
Cuisine: German / Category: Lunch and Snacks
Garlic Pretzel Knots with Cheese Dipping Sauce

Mussels Carbonara

April 15, 2026 by Aubrey Cornelius Leave a Comment

a plate setting with mussels carbonara

Mussels carbonara is a delectable twist on the classic pasta dish. It's easier to make than you might think!

Instead of the signature porky background flavor, there's a slight brininess and sweetness from the mussels, accompanied by garlic and parmesan. Their natural flavor is really allowed to shine!

Mussels carbonara on a vintage plate

Why You'll Love Mussels Carbonara

I never order anything off a menu that's simple to make at home, so carbonara is made exclusively in my kitchen. It's just so fast and easy with so few ingredients, but it's creamy and flavorful and so comforting. It's on the table in about 20 minutes from start to finish!

Mussels are also a seafood favorite of ours, so combining the two was a no-brainer. They elevate a humble pasta dish into something more elegant and special without much effort.

overhead shot of Mussels carbonara on a vintage plate

Here are just a few more reasons we love this dish so much:

  • Rich and creamy: The luscious creaminess of the carbonara sauce pairs perfectly with the delicate seafood flavors. The sauce, made from eggs, olive oil, garlic, and parmesan cheese, clings to the pasta for a perfect bite every time.
  • A fun twist on a classic: Whenever I get the chance, I love to switch up the classics. Mussels change up the usual flavor profile with a bit more umami.
  • Simple ingredients: Mussels, pasta, eggs, cheese, and garlic. See my suggestion below for using frozen mussels!
  • A great introduction to mussels: If you've never tried mussels, mussels carbonara is a lovely way to get introduced.
  • It's an easy but elegant dish: For the best presentation, plate the pasta first and then nestle the mussels within the pasta. It's gorgeous and perfect for a romantic evening!

All in all, there is a lot to love about this mussels carbonara!

We love to serve this with stuffed garlic bread with an affogato for dessert. It's such a simple meal, you don't need more than 30 minutes for the entire thing!

a big pot of freshly cooked mussels

Ingredients

To make this easy meal, you'll need the following ingredients:

  • Pasta: Spaghetti or linguine is traditionally used, but feel free to use your favorite pasta. Make sure it's cooked just to al dente unless you prefer it a bit softer.
  • Mussels: Opt for fresh mussels with tightly closed shells, without any chips or cracks. A strong indicator of freshness is how they smell. Mussels should smell briny like the sea, not fishy or otherwise unpleasant.
  • Olive oil: Use high-quality olive oil with a flavor you enjoy. The oil is used to sauté the garlic to build an aromatic base.
  • Garlic: Every good pasta dish has at least a little garlic (in my opinion). Sauté it just until it's softened and fragrant.
  • Eggs: Use room-temperature eggs for the creamy carbonara sauce. Whisk the eggs with Parmesan cheese.
  • Parmesan cheese:  Parmesan adds a salty, nutty bite but has a relatively neutral flavor. Traditional carbonara uses aged pecorino, which is tangy. Although pecorino is delicious, parmesan works better with the mussels.

The complete ingredients list with amounts is in the recipe card below.

overhead shot of Mussels carbonara on a vintage plate with a fork

Instructions

To make this delicious mussels carbonara:

  1. Cook the pasta: Bring a pot of water to a boil, season the pasta water, then cook the pasta according to the packaging instructions. Reserve some of the starchy pasta water.
  2. Sauté the garlic: Heat the oil in a large pan and sauté two garlic cloves over medium heat to build an aromatic base for the sauce.
  3. Combine the egg and cheese: Whisk them together until smooth and creamy, then set aside.
  4. Carbonara time: After reducing the heat to medium-low, add the drained pasta to the pan with the oil and garlic, then add the egg mixture and toss to combine.
  5. Cook the mussels: Toss the remaining garlic in a pan, then add the mussels and a cup of water. Cook until the shells open up. Discard any mussels that do not open. Unopen shells mean the mussels died before they went into the pan. Freshness is crucial to this seafood, so you want to throw them away.
  6. Plate and serve: Plate the pasta, garnish with basil, and serve.
overhead shot of Mussels carbonara on a vintage plate with a fork and fresh greens and a white towel

Variations & Tips

  • Customize with vegetables - Feel free to add vegetables like peas, asparagus, or spinach to add more nutritional value and color to the dish.
  • Use different cheese - If you prefer, go the traditional route with pecorino romano or try grana Padano for a slightly different flavor profile. The latter has a nutty taste accompanied by a subtle saltiness. 
  • Avoid overcooking the mussels: Be cautious not to overcook the mussels, as they can become rubbery and develop a very unpleasant taste. Cook until the shells open, then take the pan off the heat. Some carry-over cooking takes place, meaning they will continue to cook while in the hot pasta.
  • If I can get my hands on fresh mussels that's always my first choice. Since that's usually not possible, I like to use the frozen Garlic & Herb Mussels from Trader Joe's. I just prepare them according to the directions on the box then top the carbonara with the mussels. The sauce is served with bread on the side and really completes the meal!

More Pasta Dishes

  • a jar of authentic italian marinara sauce next to a bowl of cooked pasta and a bowl of tomatoes on the vine
    Authentic Italian Marinara Sauce
  • a plate setting with mussels carbonara
    Mussels Carbonara
  • Summer Pasta Salad with Avocado Pesto
    Summer Pasta Salad with Avocado Pesto
  • a large white bowl filled with orzo spinach salad and halved yellow cherry tomatoes on a light tan linen towel
    Orzo Spinach Salad
a plate setting with mussels carbonara

Mussels Carbonara

Yield: 2 servings
Prep Time: 5 minutes
Cook Time: 15 minutes
Total Time: 20 minutes

Mussels carbonara is a delectable twist on the classic pasta dish. It's easier to make than you might think!

Ingredients

  • 8 ounces pasta, such as spaghetti or linguini
  • 1 cup reserved pasta cooking liquid
  • 2 tablespoons olive oil
  • 4 garlic cloves, minced (divided)
  • 2 large eggs
  • ¼ cup freshly grated Parmesan cheese
  • 2 whole, fresh basil leaves
  • 10 mussels, cleaned

Instructions

  1. Boil a pot of water and season with 2 teaspoon salt. Add the uncooked pasta and cook according to box instructions.
  2. Once cooked, reserve 1 cup of the cooking liquid, then drain and set aside.
  3. In a large pan, add the olive oil and half of the garlic and warm over a medium heat.
  4. In a small bowl, whisk together the eggs and parmesan.
  5. Add the cooked pasta to the pan along with the egg mixture and toss together (be sure to keep the temp around medium-low to ensure that you don't end up with scrambled eggs).
  6. Once the pasta is ready, set aside and add 2 more cloves of minced garlic to the pan and warm, then add the mussels along with 1 cup reserved water.
  7. Heat over a medium temp for about 5 minutes until all of the mussels have opened.
  8. Add the fresh basil leaves and serve.
Nutrition Information:
Yield: 2 Serving Size: 1
Amount Per Serving: Calories: 1441Total Fat: 49gSaturated Fat: 12gUnsaturated Fat: 37gCholesterol: 454mgSodium: 2185mgCarbohydrates: 112gFiber: 4gSugar: 2gProtein: 130g

This data was provided and calculated by Nutritionix.

© Aubrey Cornelius
Cuisine: Italian / Category: Pasta Recipes
Mussels Carbonara

Summer Pasta Salad with Avocado Pesto

April 6, 2026 by Aubrey Cornelius Leave a Comment

Avocado pesto is a delicious alternative for mayo-based dressings. Paired with the sweet crunch of fresh summer corn, it makes the perfect summer pasta salad!

a top-down view of summer pasta salad with avocado pesto in a white bowl with swirls of spaghetti noodles

I've been making some form of summer pasta salad since I can remember, with so many variations I can't possibly remember them all. This has been my go-to for the past several years though, and I can't imagine making another one.

The first time I added corn to pasta salad I knew I'd never go back. The texture and sweetness adds so much without much extra effort. We grill our summer corn often so I added some of that since it was on hand, and it was even better! Now I always grill it unless time just doesn't allow for it.

I usually grill as many corn cobs as I can fit on our grill then bag and freeze it. It works for so many recipes, including summer pasta salad! You can also toss it into soups or use it to make summertime homemade creamed corn.

This summer pasta salad is really simple to make and it's almost impossible to mess up. It's also delicious served warm or cold, and even when it reaches room temperature it's still delicious. It's a great choice for a potluck or barbecue.

And if you're an avocado lover, you're going to be making the avocado pesto on its own and putting it on everything! We love to add it to burgers, salads, and even scrambled eggs.

a top-down view of summer pasta salad with avocado pesto in a white bowl with swirls of spaghetti noodles and a fork

Ingredients

In addition to being quick and easy, the ingredients list is simple. To make this summer pasta salad recipe, you'll need the following:

  • Pasta: I used spaghetti, but small pasta like rotini, penne, or macaroni will also work. That said, creating little spaghetti nests is a nice touch and looks so pretty!
  • Basil: This adds a familiar flavor to the pesto and works so well in a summer pasta salad.
  • Avocado: Make sure your avocado is nice and ripe. It will make the pesto really creamy so you don't need any mayo!
  • Garlic: Every good pasta salad needs a little garlic. I'm one of those people who always adds extra garlic, but be careful with that here. The raw garlic adds a punch and too much will overpower the other flavors.
  • Fresh Corn: Fresh summer corn will make all the difference in this recipe! That said, it's possible to use canned or frozen corn, just be aware it won't be nearly as delicious.
  • Cherry Tomatoes: Summer cherry tomatoes are best, and if you're making this during the hot months of the year, chances are you can get your hands on some. If you can't locate any at your local farmers market, the grocery store will be fine.
  • Feta cheese: This adds a nice salty flavor! Add more if you like or you can omit it if you prefer.

The complete ingredients list with amounts is in the recipe card below!

a side view of summer pasta salad with avocado pesto in a white bowl with a small white bowl of yellow cherry tomatoes in the background

Instructions

If you've ever made a pasta salad before, this will be a piece of cake for you. And if you haven't, it'll still be super simple!

  1. Make the pasta: Bring a pot of water to a boil, lightly salt the water, and cook the pasta until al dente.
  2. Grill the corn: Brush the corn with oil, then grill over medium heat until tender and golden. The goal is to get a little color on the corn and bring out the sweetness. Then, use a sharp knife to remove the kernels.
  3. Make the pesto: Use a food processor or blender for this step. Just process/blend the pesto ingredients until smooth.
  4. Toss the pasta: Add drained cooked pasta to a large bowl with some avocado pesto and about ½ cup of the reserved pasta water. Toss to coat.
  5. Finish: Lastly, arrange the corn and tomatoes on top, along with more pesto and feta, then serve!
a top-down view of summer pasta salad with avocado pesto in a white bowl with swirls of spaghetti noodles on a linen cloth

Variations & Substitutions

This summer pasta salad easily adapts to your tastes or dietary guidelines. Whether you're vegan, gluten-free, need more protein per meal, or are not fond of basil, I got you covered. Substitutions and a helpful tip to keep the pesto vibrant are below:

  • Swap the basil for a similar herb - The best options are parsley and cilantro.
  • Add lemon or lime juice - A little lemon or lime juice will prevent the avocado from turning brown. Olive oil does a good job at this, but if you plan to store the summer pasta salad, lemon or lime juice will provide a little extra insurance.
  • Make it vegan - Skip the cheese or finish this summer pasta salad with vegan feta. Cheese alternatives are just as tasty!
  • Go gluten-free - Substitute regular pasta for a gluten-free alternative.
  • Add protein - A grilled chicken breast or two would be a nice, hearty addition to this summer pasta salad. You can also substitute regular pasta for protein pasta.
summer pasta salad with avocado pesto in a white bowl with swirls of spaghetti noodles

Serving Suggestions

All you really need is a loaf of good, crusty bread and dinner is served. Adding some grilled chicken would also be fantastic. Soup would be another obvious choice, so here are a few summer soups you might like:

  • a pot of minestrone soup on a white cloth
    Hearty Italian Minestrone Soup (Easy, Healthy & Delicious!)
  • a closeup overhead shot of a bowl of hatch chile soup garnished with chopped parsley on a rustic wooden table
    Creamy Hatch Chile Soup with Corn & Queso Fresco
  • Seriously Good Chicken Posole
    5-Ingredient Chicken Posole Recipe (Fast & Flavorful!)
  • This avocado soup is simple, healthy and full of flavor. 
    Avocado Soup (Cool, Creamy & Refreshing!)
a top-down view of summer pasta salad with avocado pesto in a white bowl with swirls of spaghetti noodles

Summer Pasta Salad with Avocado Pesto

Yield: 4-6 servings
Prep Time: 15 minutes
Cook Time: 30 minutes
Total Time: 45 minutes

This summer pasta salad features a flavorful avocado pesto so there's no need for mayo. Add some grilled corn, cherry tomatoes, fresh basil, and feta cheese and you'll be the star of the barbecue!

Ingredients

Salad Ingredients

  • 16 ounces pasta (spaghetti, macaroni, or penne are all good choices)
  • 2 ears of corn, shucked and cleaned
  • 1 tablespoon olive oil
  • 1 cup cherry tomatoes, halved
  • 2 tablespoons feta cheese

Avocado Pesto Ingredients

  • ¼ cup olive oil
  • ½ teaspoon salt
  • 1 ripe avocado
  • 3 garlic cloves
  • ½ cup reserved pasta liquid
  • 2 cups packed basil

Instructions

  1. Boil a pot of water and season with 1 teaspoon salt. Add the uncooked pasta and cook according to box instructions.
  2. Reserve ½ cup of the pasta cooking liquid and set aside.
  3. Add the ears of corn to an outdoor grill or grill pan, and brush with the olive oil.
  4. Cook over a medium heat and rotate until all sides are slightly golden and tender (about 20 minutes)
  5. Using a knife, cut the kernels off the corn and set aside.
  6. To make the pesto sauce, add all of the pesto ingredients to a food processor or blender and blend until smooth.
  7. Place the pasta into a large bowl, scoop the pesto onto the pasta and toss to combine.
  8. Top with tomatoes, corn, feta and pesto.
Nutrition Information:
Yield: 6 Serving Size: 1
Amount Per Serving: Calories: 374Total Fat: 19gSaturated Fat: 3gUnsaturated Fat: 16gCholesterol: 4mgSodium: 235mgCarbohydrates: 43gFiber: 6gSugar: 3gProtein: 12g

This data was provided and calculated by Nutritionix.

© Aubrey Cornelius
Cuisine: American / Category: Salads
Summer Pasta Salad with Avocado Pesto

Homemade Peanut Butter Pop Tarts

February 10, 2026 by Aubrey Cornelius 2 Comments

finished peanut butter pop tarts just after spreading with icing and chopped nuts

Homemade peanut butter pop tarts are infinitely better than any you can buy at the store. These might not be as quick as most of our recipes, but it's worth every bit of time you put into them!

finished peanut butter pop tarts just after spreading with icing and chopped nuts

We've been making these homemade pop tarts for years at our house, and they're always the first thing to disappear. I started making them years ago when the kids were little; it was something they could help with and was the perfect activity when hosting playdates.

They're also a great addition to a brunch, especially if there will be kids there. I like to make them with a few different brunch dishes, usually a cottage cheese egg bake and baked oatmeal cups. That way there's something for everyone!

Our favorite filling mixin is marshmallow fluff, and it's how I've written the instructions. The recipe is so versatile though, so try something different if you prefer! I've also let everyone choose their own fillings and just dolloped the fluff, jam, chocolate chips, etc. on top of the peanut butter instead of mixing it together.

On top of all that, peanut butter pop tarts are absolutely delicious! Warm, melty, creamy peanut butter pairs perfectly with the flaky pastry shell. The nuts sprinkled on top add the perfect texture. And did I mention they're convenient since they're basically a portable dessert or snack?

Ingredients

  • Flour: The outer shell of peanut butter pop tarts is a flaky pastry dough, much like a pie crust. To prepare the dough, all-purpose flour works best here.
  • Butter: Unsalted is the way to go here, and please skip the butter spreads (they will not get the job done and the end result won't be the same). As the pastry bakes, the butter melts and creates steam, creating air pockets in the dough that result in irresistibly flaky layers.
  • Marshmallow fluff: The light and fluffy topping has the taste and consistency of melted marshmallows. It's available at most grocery stores here in the US.
  • Peanut butter: We prefer to use creamy peanut butter, although crunchy is fine if you wish to add a little texture. As for the type, I recommend the standard store-bought peanut butter that you spread on white bread for peanut butter and jelly sandwiches instead of the natural or homemade kind, as it doesn't separate and isn't runny.
  • Cocoa powder: Cocoa powder, powdered sugar, and a few other ingredients combine to make the chocolatey icing that tops each pop tart. Use natural cocoa powder or Dutch process for a deep, almost black color.

Check out the recipe card below for a complete ingredients list with measurements.

homemade pop tart dough on parchment paper after being cut into 9 pieces

Instructions

The most challenging part of making peanut butter pop tarts is making the dough, which isn't difficult at all (the most labor-intensive step is cutting the butter into the flour, promise). Waiting for these to bake might be even more challenging!

  1. Prepare the dough: Mix the dry ingredients, then cut the butter into the flour using two forks or do it by hand. Just work quickly if using your hands since your body heat can melt the butter. Afterward, slowly drizzle in ice water, in one-tablespoon increments, as you mix until the dough clumps.
  2. Form and chill: Form the dough into a ball, divide the ball in half, flatten each half so you have flattened disks, then tightly wrap each disk in plastic. Chill the dough in the fridge for at least an hour.
  3. Roll and trim: Working with one at a time, roll each disk out into a 9×12 inch rectangle, trim the edges, cut in half lengthwise, then into thirds diagonally.
  4. Fill and seal: Fold the peanut butter and marshmallow fluff to make the pop tart filling, add a tablespoon of filling to the center of each pop tart, and seal with the tines of a fork.
  5. Freeze and bake: Briefly freeze, then brush the tops with egg wash and bake. Cold butter plus a hot oven will yield flaky pop tarts.
  6. Finish: Peanut butter pop tarts aren't pop tarts without the icing. Sprinkle chopped nuts over the top of each pastry before the icing sets.
step 8 for making homemade peanut butter pop tarts showing how to cut the dough into 9 pieces
Step 8: Cutting the dough into rectangles
step 10 for making homemade pop tarts showing the filling ingredients being mixed together
Step 10: Mixing the filling
a second image of step 13 for making homemade pop tarts showing the edges being crimped with a fork
Step 13: Crimping the edges with a fork
step 15 for making peanut butter pop tarts showing the glaze spread onto the hot pop tarts

Variations

We love these peanut butter pop tarts mixed with marshmallow fluff, but it's nice to switch things up sometimes! Try giving one of these a try instead:

  • chocolate chips or chunks
  • finely chopped peanut butter cups
  • strawberry or raspberry jam (dollop on top instead of mixing it in)
  • toffee bits
  • crushed pretzels
  • crushed oreos
  • crushed graham crackers
finished peanut butter pop tarts just after spreading with icing and chopped nuts

Make Ahead

Peanut butter pop tarts are great make-ahead treats. You can prepare the dough in advance and refrigerate it overnight or freeze it for up to two weeks. The dough is the most labor-intensive part aside from assembly, so this really cuts down on time when you're ready to bake them.

If you make the entire batch, store the pop tarts in an airtight container at room temperature for 3 days or in the refrigerator for up to 6 days.

We like to reheat them in an air fryer or a 375°F oven for 2-3 minutes (keep an eye on the icing and remove them if it starts to get too melted). A microwave will work, too, but be aware that they'll get soft if reheated this way.

Freezing Homemade Pop Tarts

Homemade pop tarts freeze really well, both baked and unbaked. They're actually a great make-ahead pastry!

Here's how to do it depending on when you want to freeze them:


Freezing Unbaked Pop Tarts

  1. Make the pop tarts just up to before baking them, and omit the egg wash for now.
  2. Place them on a parchment-lined baking sheet in a single layer.
  3. Freeze them until they're solid, about 1-2 hours.
  4. Transfer them to a freezer bag or airtight container and freeze for up to 3 months.

To Bake From Frozen:

  • No need to thaw.
  • Brush with the egg wash straight from the freezer.
  • Bake at the same temperature, adding about 3-5 extra minutes.

Freezing Baked Pop Tarts

  1. Bake the pop tarts and allow them to cool completely. Skip icing them for now.
  2. Wrap each pop tart individually in plastic wrap.
  3. Store them in a freezer bag and freeze them for up to 2 months.

To Reheat:

  • In the oven: 350°F for 8-12 minutes.
  • Air fryer: 325°F for 3-5 minutes.
  • Microwave: Not recommended.

Once they're reheated to your liking, spread them with the icing and sprinkle with the nuts.


Tips

  • Freeze them in a single layer first so they don't stick together.
  • Make sure the edges are sealed well to avoid the filling from leaking out.
  • Label with the filling flavor and the date you froze them.
  • You can also add a sheet of parchment between any layers so they don't stick together.

Related Recipes

Looking for more delicious dessert recipes? Try these:

  • a clementine quick bread recipe showing the completed loaf dripping with icing and topped with candied clementines
    Clementine Quick Bread Recipe
  • finished peanut butter pop tarts just after spreading with icing and chopped nuts
    Homemade Peanut Butter Pop Tarts
  • a top-down view of a chocolate ganache tart with a decorative peanut butter swirl on an angle next to a beige towel and two spoons with crushed peanuts
    Chocolate Ganache Tart with Peanut Butter Swirl (No Bake!)
  • a loaf of pull apart apple monkey bread just out of the oven on a white surface
    Apple Pull-Apart Bread
finished peanut butter pop tarts just after spreading with icing and chopped nuts

Peanut Butter Pop Tarts

Yield: 9 pop tarts
Prep Time: 25 minutes
Cook Time: 22 minutes
Additional Time: 1 hour
Total Time: 1 hour 47 minutes

Homemade pop tarts are so much better than store-bought! Don't let the instructions intimidate you - these come together easily once the dough is made.

Ingredients

Pop Tart Dough

  • 2 ½ cups all-purpose flour
  • 1 ¼ teaspoon salt
  • 12 tablespoons chilled unsalted butter, cut into small cubes
  • ½ cup ice water

Egg Wash

  • 1 tablespoon water
  • 1 egg

Filling

  • ½ cup peanut butter
  • ½ cup marshmallow fluff (or another mixin; see notes below)

Icing

  • ½ cup powdered sugar
  • ¼ cup cocoa powder
  • 3 tablespoons water

Toppings

  • 2 tablespoons peanut butter
  • 1 tablespoon heavy cream
  • ¼ cup crushed nuts (peanuts, hazelnuts, etc.)

Instructions

  1. Whisk the flour and salt together in a large bowl. Add the cubed, cold unsalted butter. Using two forks, cut the butter into the flour until the mixture resembles coarse meal.
  2. Measure ½ cup of ice and water in a glass. The ice helps the fats stay chill and keeps the pastry nice and flakey.
  3. Slowly drizzle in the very cold water to the flour mixture, 1 tablespoon at a time, stirring after every tablespoon of water that you add. Stop adding water when the dough begins to clump. Do not add any more water than needed.
  4. Turn the dough onto a floured work surface and knead it with your hands. The dough should come together easily and should not feel overly sticky.
  5. Form the dough into a ball, divide it in half, then flatten each half into 1-inch thick discs using your hands. Wrap each disk tightly in plastic wrap and refrigerate for at least 1 hour or overnight.
  6. Once the dough has chilled, take one disk out of the fridge and let it stand for 3-5 minutes.
  7. Roll it out onto a floured surface into a large rectangle (about 9x12) and transfer the dough to a parchment- lined baking sheet.
  8. Trim the edges then cut in half lengthwise, and into thirds horizontally. This should form 9 rectangular pieces. Repeat these steps with the other half of the dough then place both baking sheets in the refrigerator.
  9. Preheat the oven to 350°F.
  10. Meanwhile, mix the peanut butter and marshmallow fluff together in a medium-sized mixing bowl.
  11. Remove both of the baking sheets from the refrigerator. Using a small ice cream scoop or spoon, add about 1 tablespoon of filling to the center of each pop tart (do this to only 1 of the baking sheets).
  12. Take the second sheet (without filling) and place the pop tart dough on top of the halves with filling. Whisk the egg and water together for the egg wash, and brush the tops of the pop tarts.
  13. Seal the edges together using your fingers, then use a fork to make the edge marks. Place the pop tarts in the freezer for about 5 minutes.
  14. Bake the pop tarts for about 22-28 minutes, or until they're golden brown.
  15. Meanwhile, mix together the icing ingredients in a small bowl. Remove the pop tarts from the oven and allow them to cool slightly. Spread the icing on top and immediately sprinkle with chopped nuts before the icing sets.

Notes

If you'd prefer to use something other than marshmallow fluff, you can also try one of these:

  • chocolate chips or chunks
  • finely chopped peanut butter cups
  • strawberry or raspberry jam (dollop on top instead of mixing it in)
  • toffee bits
  • crushed pretzels
  • crushed oreos
  • crushed graham crackers

Nutrition Information:
Yield: 9 Serving Size: 1
Amount Per Serving: Calories: 671Total Fat: 30gSaturated Fat: 12gUnsaturated Fat: 18gCholesterol: 63mgSodium: 427mgCarbohydrates: 88gFiber: 5gSugar: 23gProtein: 15g

This data was provided and calculated by Nutritionix.

© Aubrey Cornelius
Cuisine: American / Category: Desserts
Homemade Peanut Butter Pop Tarts

Irish Soda Bread Scones with Cinnamon Honey Butter

January 31, 2026 by Aubrey Cornelius 2 Comments

three irish soda bread scones on parchment paper next to a glass of milk

These Irish Soda Bread Scones are soft and tender, sweet and salty, with a wonderful flavor. The cinnamon honey butter is the perfect addition and rivals anything you can get in a bakery.

three irish soda bread scones on parchment paper next to a glass of milk

It's been so cold here and there's no sign of it letting up anytime soon. Baking something warm on a cold, lazy Sunday is one of my favorite things to do, and with St. Patrick's Day coming up, these Irish soda bread scones were first on my list.

Despite having something along the lines of an ⅛th of Irish in me, I like to celebrate anyway (any excuse to enjoy corned beef and cabbage gets my vote). But I also like to serve Irish food with a twist for something unexpected. This year, I decided that these Irish soda bread scones would be the perfect way to celebrate.

several irish soda bread scones on parchment paper next to a knife and a glass of milk

Unlike some scones, these are pretty soft and, thanks to the sea salt and cinnamon honey butter, have a wonderful balance between sweet and salty. They're tender and flavorful, and so incredibly good just out of the oven!

Something about making these from scratch and then eating them fresh out of the oven just makes me feel like spring is right around the corner. And what makes these scones extra special is the use of both dried cranberries and golden raisins. I'll also use dried cherries if I've got some on hand in place of either.

We like to serve these on their own or as a full brunch with a hash brown breakfast casserole or a cottage cheese egg bake. The great thing about making these recipes together is that they all keep well, so we can enjoy the leftovers throughout the week.

a hand holding an irish soda bread scone

Ingredients

Cinnamon Honey Butter

The cinnamon honey butter is entirely optional, but once you make it, you won't want to go without it. The amounts called for is just enough for the Irish soda bread scones, so feel free to double it to use on pancakes or toast.

  • Softened butter
  • Powdered sugar
  • Honey
  • Vanilla extract
  • Ground cinnamon
  • Coarse salt

Scones

  • Unsalted butter
  • All-purpose flour
  • Old-fashioned oats
  • Granulated sugar
  • Baking soda
  • Salt
  • Cranberries: I also make these with dried cherries when I can find them.
  • Golden raisins: Regular raisins will also work, but we really enjoy the golden raisins in this recipe.
  • Coconut cream
  • Buttermilk
  • Vanilla extract
  • An egg
  • Sea salt: for sprinkling on top of the scones
step 6: irish soda bread scones on a marble countertop freshly scored and ready for the oven

Instructions

Don't be intimidated if you've never made Irish soda bread scones before. The key is not to over-mix the dough, so just be gentle with it and they'll turn out perfectly!

  1. Make the cinnamon honey butter first. You can make it days ahead of time or just before you make the scones. Just add all the ingredients to a mixing bowl and beat until it's light and fluffy. Then scrape it into a small dish and set it aside while you make the scones. If you're making it in advance, cover and refrigerate it, then just let it come to room temperature while you're making the scones.
  2. First things first: preheat your oven to 375°F so it's ready once the scones are mixed and sliced.
  3. Next, melt the butter until it's golden brown, which will add a wonderful depth of flavor.
  4. Now you'll whisk together the flour, oats, sugar, baking powder, baking soda, salt, and dried cranberries + the golden raisins.
  5. Next comes the buttermilk, coconut cream, vanilla, and melted browned butter, which you'll fold into the dry ingredients with a spatula. This is the important part: fold it in gently just until the flour mixture is moistened. You don't want to over-mix it!
  6. Then you'll turn the dough out onto a lightly floured surface and, using your hands, knead it gently until the dough comes together. Sometimes the dough is a bit too wet; if this happens, just add additional flour one tablespoon at a time until it's perfect.
  7. Divide the dough in half. Shape each half into a ball, then flatten each ball into an 8-inch round. Cut each round into pieces.
  8. On a parchment-lined baking sheet, add the scones you just cut into pieces. They should be separated by a few inches to prevent them from sticking. Brush the tops with beaten egg, and sprinkle with a good pinch of sea salt (this adds so much flavor)!
  9. Now just bake them until they're golden brown, about 20-25 minutes, then remove them from the oven and let them cool for about 20 minutes.
  10. Slather them with the cinnamon honey butter and serve them with a hot cup of coffee or tea. You can also store them in an airtight container for up to a week. They also make a wonderful homemade gift!
step 7 when making irish bread scones: unbaked scones on parchment paper next to a small dish of beaten egg and a pastry brush for brushing the egg onto the scones

Tips

  • Use real buttermilk if you can: The reaction between buttermilk and baking soda is what gives soda bread its rise and classic texture. If you can't find buttermilk, add 1 tablespoon of lemon juice or vinegar to 1 cup milk and let it sit 5 minutes.
  • Don't overmix the dough: Mix just until the dough is moistened and comes together. Overworking it can make the scones tough instead of tender.
  • Handle the dough gently: Pat the dough into shape instead of rolling it aggressively. The less you handle the dough the softer your scones will be.
  • Flour lightly: Use just enough flour to prevent the scones from sticking. Too much flour can make them dry and dense.
  • Cut them cleanly: Use a sharp knife or bench scraper to cut them into wedges, pressing straight down instead of "sawing". Clean cuts will help them rise evenly.
freshly baked irish soda bread scones with a hand holding a knife, about to spread cinnamon butter on the hot scones

Related Recipes

Looking for more delicious bread recipes? Try these:

  • Homemade Blueberry Banana Muffins
    Banana Blueberry Muffins
  • Stuffed Garlic Bread Recipe
    Easiest Stuffed Garlic Bread Recipe
  • Crescent Dough Monkey Bread
    Easy Pull-Apart Monkey Bread Recipe
  • Fresh Almond Flour Biscuits
    Almond Flour Biscuits
three irish soda bread scones on parchment paper next to a glass of milk

Irish Soda Bread Scones

Yield: 8 scones
Prep Time: 15 minutes
Cook Time: 25 minutes
Total Time: 40 minutes

These Irish Soda Bread Scones are soft and tender, with a burst of flavor from dried cranberries and golden raisins. The cinnamon honey butter isn't a necessity but the scones are even more delicious with it!

Ingredients

Cinnamon Honey Butter

  • ¼ cup unsalted butter, softened
  • 2 tablespoons powdered sugar
  • 1-2 teaspoons honey
  • ¼ teaspoon vanilla extract
  • ¾ teaspoon ground cinnamon
  • large pinch of coarse salt

Scones

  • ¼ cup (½ stick) unsalted butter
  • 3 ¾ cups all-purpose flour
  • ½ cup old-fashioned oats
  • 2 tablespoons granulated sugar
  • 2 ½ teaspoons baking powder
  • 1 teaspoon baking soda
  • ¾ teaspoon salt
  • ¼ cup dried cranberries
  • ¼ cup golden raisins
  • 1 cup coconut cream
  • ¾ cup buttermilk
  • 1 teaspoon vanilla extract
  • 1 large egg, beaten
  • 1 teaspoon sea salt, for sprinkling on top

Instructions

    1. Make the cinnamon honey butter: Add all the ingredients to a mixing bowl and beat until light and fluffy. Place in a small dish and set aside while you make the scones.
    2. Preheat your oven to 375°F.
    3. In a small saucepan, melt the butter over medium heat until it's golden brown, about 3 minutes. Remove it from the heat and let it cool.
    4. In a large mixing bowl, add the flour, oats, sugar, baking powder, baking soda, salt, and dried cranberries/golden raisins. Whisk them to combine.
    5. Pour in the buttermilk, coconut cream, vanilla, and melted browned butter over flour mixture; fold together with a spatula just until the flour mixture is moistened.
    6. Turn the dough out onto a lightly floured surface and, using your hands, knead it gently until the dough comes together (if the dough is a bit too wet, add additional flour one tablespoon at a time).
    7. Divide the dough in half. Shape each half into a ball, then flatten each ball into an 8-inch round. Cut each round into pieces.
    8. On a parchment-lined baking sheet, add the scones (make sure to separate them by a few inches to prevent them from sticking). Brush the tops with beaten egg, and sprinkle with a pinch of sea salt.
    9. Bake the scones until they're golden brown, about 20-25 minutes.
    10. Remove them from the oven and let them cool for about 20 minutes.
    11. Serve immediately or keep them in an airtight container for up to a week.
Nutrition Information:
Yield: 8 Serving Size: 1
Amount Per Serving: Calories: 481Total Fat: 14gSaturated Fat: 9gUnsaturated Fat: 5gCholesterol: 41mgSodium: 868mgCarbohydrates: 81gFiber: 4gSugar: 32gProtein: 9g

This data was provided and calculated by Nutritionix.

© Aubrey Cornelius
Cuisine: English / Category: Breakfast and Brunch
Irish Soda Bread Scones with Cinnamon Honey Butter

Chocolate Ganache Tart with Peanut Butter Swirl (No Bake!)

January 29, 2026 by Aubrey Cornelius Leave a Comment

a top-down view of a chocolate ganache tart with a decorative peanut butter swirl on an angle next to a beige towel and two spoons with crushed peanuts

This easy chocolate ganache tart has an Oreo cookie crust and crisp peanut brittle below a decadent ganache filling. And there's no baking required!

a top-down view of a chocolate ganache tart with a decorative peanut butter swirl on an angle next to a beige towel and two spoons with crushed peanuts

Even after all my years of cooking, publishing cookbooks, and writing about food, I still don't consider myself a baker. I'd say I'm a pro when it comes to cooking and solidly average when baking.

Cooking is an art; baking is a science. However, when it comes to no-bake treats that don't require yeast + proofing and rising, etc., suddenly my skills skyrocket firmly into pro territory.

This easy, gorgeous chocolate ganache tart is the perfect example of this. It's so simple to make, and we absolutely love the crunch of the peanut brittle hidden under silky ganache. And the peanut butter swirl is so gorgeous and only takes a minute!

This is easily one of our favorite no-bake recipes. We make it often at home but will also take it to friends and coworkers or for a dinner party. If we're the ones throwing a party, I'll make a chocolate ganache tart and either some type of icebox cake or a lemon cream cheese pound cake. That way everyone can choose what they like best!

a chocolate ganache tart at an angle next to a cream-colored towel

Ingredients

There are three components to this chocolate ganache tart: the crust, filling, and a crunchy peanut brittle that adds a wonderful texture! None of the components are difficult or time consuming, and you can make the crust and filling while the brittle cools and hardens.

Crust

  • Oreo cookies (you can also use chocolate wafers if you prefer)
  • Unsalted butter, melted

Brittle

  • Granulated sugar
  • Unsalted butter
  • Light corn syrup
  • Water
  • Baking soda
  • Salt
  • Cocktail peanuts, finely ground

Filling

  • Peanut butter (for piping and swirling on the top)
  • Heavy whipping cream
  • High-quality semi-sweet chocolate
a chocolate ganache tart with chopped peanut brittle and a drizzle of warmed peanut butter before being filled with ganache

Instructions

Oreo Crust

  1. Pulse the Oreos in a blender until they're finely ground. Alternatively, you can add them to a heavy plastic storage bag and crush them with a meat mallet or something similar until they're all finely crushed.
  2. Now just mix the crushed Oreos with the melted butter and mix them until they're well combined.
  3. Pour the Oreo mixture into a tart pan and press it firmly into the base and fluted edges.
  4. Place the tart pan in the freezer for 30 minutes so the crust can harden.

Peanut Brittle

  1. Set aside a non-stick mat for pouring the prepared brittle mixture.
  2. Bring sugar, butter, corn syrup, and water to a boil in a small saucepan over high heat. Cook, stirring occasionally, just until mixture begins to brown. Reduce heat to medium, and cook, stirring very frequently, until it's a golden brown color (the mixture should be the color of peanut butter).
  3. Stir in the baking soda, salt, and peanuts until it's well combined, then remove it from the heat.
  4. Immediately pour the mixture onto a nonstick baking mat, spreading it out as thinly as possible with a heatproof spatula or a wooden spoon. Let it cool completely, about 30 minutes (it will harden as it cools).
  5. Once it's cooled, finely chop half the brittle with a heavy knife to yield ½ cup. Reserve any remainder for another use (you can add more or less of the brittle according to your preference).

Chocolate Ganache Filling

  1. For the ganache, bring the heavy cream to a boil then add to a heat-proof bowl along with the semi-sweet chocolate chips and let sit for about 3-5 minutes.
  2. Once whisked and creamy, pour on top of the peanut & brittle base.

Peanut Butter Swirl

  1. Warm the peanut butter in the microwave for about 30 seconds and add it to a Ziploc or pastry bag (these microwave-safe piping bags are terrific for this and you can melt right in the bag).
  2. Pipe diagonal lines with peanut butter onto the base of the Oreo tart crust, then top with the crushed peanut brittle (press the brittle into the peanut butter).
  3. Top with peanut butter (I like to draw zigzag lines in a diagonal pattern then use a toothpick to make swirls).

Chill and Serve

  1. Place the chocolate ganache tart in the fridge to firm up for at least an hour, then slice and serve!
a top-down view of a chocolate ganache tart with a decorative peanut butter swirl next to a beige towel

Variations

A chocolate ganache tart can be made any number of ways. Our favorite is the recipe as written, but here are a few ways you can change it to suit your tastes:

Crust

  • Chocolate graham cracker crust: Swap the Oreos for chocolate graham crackers. It will be slightly less sweet but still delicious!
  • Pretzel crust: Use crushed pretzels + butter for a salty-sweet contrast. This works really well with the peanut butter.
  • Biscoff cookies: This will significantly change the flavor but Biscoff is delicious with chocolate ganache.
  • Gluten-free chocolate cookies: Easy 1:1 swap for a gluten-free option.
  • Add espresso powder: Mix about ½ teaspoon into the crust mixture.

Brittle

  • Mixed nuts: Use a blend of peanuts, almonds, and pecans.
  • Honey brittle: Replace the corn syrup with honey.
  • Sesame seeds: Add 1-2 tablespoons sesame seeds.
  • Spicy: Add a pinch of cayenne or smoked paprika.

Peanut Butter Layer

  • Crunchy peanut butter: Adds a little extra texture.
  • Almond butter or cashew butter: This works well if you want less nut flavor.
  • Peanut butter mousse layer: Whip a little cream into slightly warmed peanut butter.

Ganache

  • Dark chocolate ganache: If you prefer dark chocolate to semi-sweet, you can use this for a less sweet tart.
  • Milk chocolate ganache: This is great for kids or peanut-butter-cup lovers.
  • Espresso ganache: Add a teaspoon espresso powder to the cream.
  • Coconut cream: Replace part (or all) of the heavy cream with coconut cream for a subtle coconut flavor.

Garnish Ideas

  • Flaky sea salt: Add a light sprinkle right before serving. This is my favorite garnish!
  • Chocolate curls or shards
  • Finely chopped Reese's peanut butter cups
  • Mint leaves add some color.

Related Recipes

Looking for more delicious no-bake desserts? Try these:

  • a vintage loaf pan filled with cranberry ice cream on a marble countertop with an ice cream scoop, two waffle cones, and a few fresh cranberries scattered around it
    Cranberry Ice Cream (The Perfect Thanksgiving Dessert)
  • rocky road bars made with marshmallows and cashews just out of the freezer and cut into bars
    No-Bake Rocky Road Bars with Cashews
  • a metal loaf pan filled to the brim with chunky monkey ice cream, with an ice cream scoop sitting on the top and a waffle cone next to it
    Chunky Monkey Ice Cream Recipe (No-Churn!)
  • Easy Microwave Chocolate Pudding in a white, scalloped dish on a pink napkin
    Easy Microwave Chocolate Pudding
a top-down view of a chocolate ganache tart with a decorative peanut butter swirl on an angle next to a beige towel and two spoons with crushed peanuts

Chocolate Ganache Tart

Yield: 8-12 servings
Prep Time: 20 minutes
Additional Time: 1 hour 30 minutes
Total Time: 1 hour 50 minutes

This easy chocolate ganache tart has an Oreo cookie crust and crisp peanut brittle below a decadent ganache filling. And there's no baking required!

Ingredients

Oreo Crust

  • 30 Oreos
  • 5 tablespoons unsalted butter, melted

Peanut Brittle

  • ½ cup granulated sugar
  • 2 tablespoons unsalted butter
  • 1 tablespoon light corn syrup
  • 2 tablespoons water
  • ¼ teaspoon baking soda
  • ¾ teaspoon salt
  • 1 ½ cups cocktail peanuts, finely ground

Filling

  • 2 cups heavy whipping cream
  • 12 ounces high-quality semi-sweet chocolate
  • 1 cup peanut butter, for piping and decoration

Instructions

    Oreo Crust

    1. Pulse the Oreos in a blender until they're finely ground. Alternatively, you can add them to a heavy plastic storage bag and crush them with a meat mallet or something similar until they're all finely crushed.
    2. Mix the crushed Oreos with the melted butter until they're well combined.
    3. Pour the Oreo mixture into a tart pan and press it firmly into the base and fluted edges.
    4. Place the tart pan in the freezer for 30 minutes so the crust can harden.

    Peanut Brittle

    1. Set aside a non-stick mat for pouring the prepared brittle mixture.
    2. Bring sugar, butter, corn syrup, and water to a boil in a small saucepan over high heat. Cook, stirring occasionally, just until mixture begins to brown. Reduce heat to medium, and cook, stirring very frequently, until it's a golden brown color (the mixture should be the color of peanut butter).
    3. Stir in the baking soda, salt, and peanuts until it's well combined, then remove it from the heat.
    4. Immediately pour the mixture onto a nonstick baking mat, spreading it out as thinly as possible with a heatproof spatula or a wooden spoon. Let it cool completely, about 30 minutes (it will harden as it cools).
    5. Once it's cooled, finely chop half the brittle with a heavy knife to yield ½ cup. Reserve any remainder for another use (you can add more or less of the brittle according to your preference).

    Chocolate Ganache Filling

    1. For the ganache, bring the heavy cream to a boil then add to a heat-proof bowl along with the semi-sweet chocolate chips and let sit for about 3-5 minutes.
    2. Once whisked and creamy, pour on top of the peanut & brittle base.

    Peanut Butter Swirl

    1. Warm the peanut butter in the microwave for about 30 seconds and add it to a Ziploc or pastry bag.
    2. Pipe diagonal lines with peanut butter onto the base of the Oreo tart crust, then top with the crushed peanut brittle (press the brittle into the peanut butter).
    3. Top with peanut butter (I like to draw zigzag lines in a diagonal pattern then use a toothpick to make swirls).

    Chill and Serve

    1. Place the chocolate ganache tart in the fridge to firm up for at least an hour, then slice and serve!

Notes

I use a 14-inch rectangle tart pan with fluted edges. A round 9-inch tart pan or similar will work too.

Nutrition Information:
Yield: 12 Serving Size: 1
Amount Per Serving: Calories: 957Total Fat: 58gSaturated Fat: 26gUnsaturated Fat: 32gCholesterol: 72mgSodium: 646mgCarbohydrates: 100gFiber: 5gSugar: 66gProtein: 11g

This data was provided and calculated by Nutritionix.

© Aubrey Cornelius
Cuisine: American / Category: No-Bake Desserts
Chocolate Ganache Tart with Peanut Butter Swirl (No Bake!)

Chickpea Feta Salad

January 19, 2026 by Aubrey Cornelius Leave a Comment

an overhead shot of chickpea feta salad in a vintage metal bowl

This bright and zesty Mediterranean chickpea feta salad comes together in just fifteen minutes, making it a perfect weekday lunch or dinner. Serve it alone or in a warm pita!

I love a light, bright salad, and this chickpea feta salad is so simple to make and delicious to eat. The meaty chickpeas gives the salad some bulk, while the juicy bites of tomato and fruity tang from the citrus are undeniably refreshing. And let's not forget about the feta. The rich and salty cheese is an excellent addition that complements the other ingredients really well.

an overhead shot of chickpea feta salad in a vintage metal bowl

We love serving this salad in warm pita bread as a sandwich. If we're serving it on its own, I like to make a stuffed garlic bread for the side. It's also terrific with a hot soup (our favorites is a hearty loaded potato soup, especially since it's so easy you don't even have to peel or drain anything)!

Ingredients

Chickpea Feta Salad

Although there are just five ingredients in the salad itself, they're all very flavorful and complement each other perfectly.

  • Canned chickpeas, drained: Canned chickpeas make this easy recipe so quick to make!
  • Tomato, thinly sliced or chopped: A good summer tomato will really make the salad shine. Substitute for cherry tomatoes if they're not in season.
  • Fresh mint, coarsely chopped: Don't skip this ingredient! It adds a lot of freshness and flavor to the salad overall.
  • Shredded Brussels sprouts: These add a nice crunch to the salad and won't wilt if you have leftovers.
  • Crumbled feta cheese: We call for half a cup of feta cheese, but use more or less as you like.

Vinaigrette Dressing

  • 2 lemons, juiced
  • ¼ cup extra-virgin olive oil
  • 1 teaspoon coarse salt
a hand holding pita filled with chickpea feta salad

Instructions

It's so simple to make this salad that you probably don't even need instructions for how to make it. Just in case, here are the steps for you:

  1. Grab a large bowl (you can even use the one you'll be serving it in if it's large enough) and add all of the salad ingredients.
  2. In another small bowl, add the dressing ingredients and whisk it vigorously to combine it.
  3. Pour the vinaigrette dressing into salad ingredients bowl and gently toss it all together to combine it thoroughly. You can stop here and serve it immediately, or you can let it sit for 15-30 minutes to allow the flavors to meld. It's delicious either way!
  4. Serve it cold or at room temperature, or use it as a sandwich filling for warm pita bread!
two pita filled with chickpea feta salad on parchment paper

Make Ahead Instructions

This chickpea feta salad works very well as a make-ahead dish and actually improves with a little time.

  • Up to 24 hours ahead: You can assemble the entire salad, including the vinaigrette, cover it tightly, and refrigerate it. The chickpeas will absorb the lemony dressing and become even more flavorful.
  • 48 hours ahead: Prep the components separately. Combine the chickpeas, Brussels sprouts, mint, and dressing and refrigerate. Add the tomato and feta just before serving to keep everything as fresh as possible.
  • Meal-prep option: Portion the dressed salad without the tomato and feta into individual containers. Add the tomato and feta when you're ready to eat (especially if you plan to use it as a pita filling).
two pita filled with chickpea feta salad on parchment paper next to a lemon wedge

Storage Instructions

  • Refrigerator: Store any leftovers in an airtight container in the refrigerator for up to 3 days.
  • After storing: The salad may release a little liquid as it sits. Just give it a quick stir and it'll be good as new.
  • Freezing: This salad is not freezer-friendly sadly. The fresh tomato, feta, and mint don't hold up well once thawed so we advise skipping the freezer altogether.

Related Recipes

Looking for more delicious and healthy salad recipes? Try these:

  • Great texture and flavor plus takes just minutes to make! | www.thewickednoodle.com | #healthy #vegetables #salad
    Chopped Veggie Salad with Lemon-Garlic Dressing
  • a very colorful chopped thai salad in a red bowl on a red table. the salad is covered in a coconut curry dressing with yellow and red bell peppers, kale, and chopped peanuts showing through the dressing
    Healthy Chopped Thai Salad with Mango and Kale
  • a black serving bowl filled with cucumber and pineapple salad with hot honey, it's sitting on a green fabric napkin on a wooden table
    Cucumber and Pineapple Salad with Hot Honey
  • Fall Fruit Salad
    Fall Fruit Salad with Crunchy Pecans and Creamy Dressing
an overhead shot of chickpea feta salad in a vintage metal bowl

Chickpea Feta Salad

Yield: 4-6 servings
Prep Time: 15 minutes
Total Time: 15 minutes

This bright and zesty Mediterranean chickpea salad comes together in 15 minutes, making it a perfect weekday lunch or dinner. Serve alone or in a warm pita!

Ingredients

Salad Ingredients

  • 32 ounces canned chickpeas, drained
  • 1 medium tomato, thinly sliced or chopped
  • 2 tablespoons fresh mint, coarsely chopped
  • ½ cup shredded Brussels sprouts
  • ½ cup crumbled feta cheese

Vinaigrette Dressing

  • 2 lemons, juiced
  • ¼ cup extra-virgin olive oil
  • 1 teaspoon coarse salt

Instructions

  1. Add all of the salad ingredients to a large bowl.
  2. In another small bowl, add the dressing ingredients and whisk it vigorously to combine.
  3. Pour the vinaigrette dressing into salad ingredients bowl and gently toss to combine. (See notes)
  4. Serve it cold or at room temperature, or use it as a sandwich filling for warm pita bread.

Notes

Allow it to sit for 15-30 minutes if possible to allow the flavors to meld (but it's delicious enjoyed immediately, too)!

Nutrition Information:
Yield: 6 Serving Size: 1
Amount Per Serving: Calories: 418Total Fat: 19gSaturated Fat: 5gUnsaturated Fat: 14gCholesterol: 18mgSodium: 926mgCarbohydrates: 48gFiber: 13gSugar: 10gProtein: 18g

This data was provided and calculated by Nutritionix.

© Aubrey Cornelius
Cuisine: Mediterranean / Category: Salads
Chickpea Feta Salad

Orzo Spinach Salad

January 13, 2026 by Aubrey Cornelius Leave a Comment

a large white bowl filled with orzo spinach salad and halved yellow cherry tomatoes on a light tan linen towel

This orzo spinach salad is one of those easy recipes that works for lunch, dinner, or as a side dish. It comes together quickly and easily and has a lot of flavor!

a large white bowl filled with orzo spinach salad on a light tan linen towel

We make orzo spinach salad at least once a week because it's such a quick, simple, and healthy meal. It also makes a great side dish with fish (we like it with either blackened salmon or a quick broiled salmon. I'll toss in more veggies if I have them, especially brussels sprouts. Avocado is really good, too!

Ingredients

You really only need a handful of ingredients to make an orzo spinach salad, and we make our own dressing that's to die for. You could also use a store-bought dressing if you prefer, but this one is so quick to make and it will be done before the pasta is even cooked.

Orzo Spinach Salad

  • Orzo pasta, uncooked
  • Baby spinach, chopped
  • Cherry tomatoes, halved
  • Olives, cut in half (we use Kalamata but you can use your favorite)
  • Salt

Lemon Garlic Dressing

  • Fresh lemon juice
  • Garlic
  • Extra-virgin olive oil
  • Salt
a closeup of a large white bowl filled with orzo spinach salad

Instructions

  1. Add all of the dressing ingredients to a small container and whisk vigorously to combine. Set it aside to let the flavors meld while you make the salad.
  2. Bring a medium-sized pot of water to a boil and season with a teaspoon or so of salt. Add the orzo pasta and cook according to the package instructions. Once it's done to your liking, strain the pasta really well in a colander (you don't want any water diluting the dressing). Turn off the heat on the stove.
  3. Add the pasta back into the pot, then add the spinach, tomatoes, and olives. Toss gently to combine.
  4. Drizzle with the lemon garlic dressing and gently toss again to coat. Serve immediately or keep it in the fridge for up to 3 days.
a large white bowl filled with orzo spinach salad on a light tan linen towel with a spoon

Notes

  • If you want your spinach to wilt more, combine all of the ingredients immediately after draining the pasta while it's still hot. Or you can let the pasta cool slightly so the spinach doesn't wilt as much.
  • This orzo spinach salad is delicious as a cold pasta salad, too. Just store it in the fridge and let it warm slightly on the counter before serving.

Variations

The recipe is delicious as written, but sometimes we want to either add or swap something. Here are the ingredients we most commonly add or substitute:

Proteins

  • Grilled chicken breast (sliced or chopped) or shredded rotisserie chicken
  • Grilled shrimp or sautéed shrimp (this is my personal favorite!)
  • Canned chickpeas or white beans, rinsed and drained
  • Salmon (grilled is especially delicious, but we'll often just add leftover salmon if we have it; canned salmon is also really good)
  • Tofu

Cheeses

  • Crumbled feta (this is what we add most often)
  • Shaved or grated Parmesan
  • Fresh mozzarella pearls
  • Crumbled goat cheese
  • A big dollop of ricotta cheese

Veggies

  • Baby arugula or mixed greens instead of spinach (make sure to add the pasta after it's completely cooled if you go this route)
  • Roasted or shaved brussels sprouts
  • Sliced or diced avocado
  • Roasted red peppers, chopped
  • Thinly sliced or diced cucumber
  • Zucchini ribbons or grilled zucchini
  • Roasted asparagus, chopped
  • Artichoke hearts, chopped
  • Sun-dried tomatoes, chopped
  • Red onion or shallots, thinly sliced

Olives

  • Castelvetrano olives
  • Green olives
  • Nicoise olives
  • Capers (use sparingly but they're so good!)
  • Pepperoncini

Herbs

  • Fresh basil, chiffonade
  • Parsley (flat-leaf works best)
  • Chopped fresh dill
  • Chopped fresh mint
  • Chopped chives

Dressing

  • Add a little Dijon mustard
  • Stir in a little honey or maple syrup if you prefer a sweeter dressing
  • Swap lemon juice for red wine vinegar
  • Add lemon zest for extra lemon flavor
  • Finish with a large pinch or two of red pepper flakes for a little spice! You can also serve them at the table for everyone to add them as they like.

Pasta

  • Whole wheat orzo
  • Gluten-free orzo
  • Pearl couscous
  • Farro
  • Quinoa

Add a little crunch

We'll sometimes add nuts for a little crunch. These are our favorites:

  • Toasted pine nuts
  • Slivered almonds
  • Chopped walnuts
  • Pistachios (whole or chopped)
  • Homemade garlic croutons
a large white bowl filled with orzo spinach salad and halved yellow cherry tomatoes on a light tan linen towel

Related Recipes

Looking for more delicious salad recipes? Try these:

  • Simple Spinach Salad with Creamy Parmesan Dressing
    Simple Spinach Salad with Parmesan Dressing
  • Jar of Avocado Lime Ranch Dressing with a Spoon
    Avocado Lime Ranch Dressing
  • Fall Fruit Salad
    Fall Fruit Salad with Crunchy Pecans and Creamy Dressing
  • Asian Ramen Noodle Salad
    Asian Ramen Noodle Salad
a large white bowl filled with orzo spinach salad and halved yellow cherry tomatoes on a light tan linen towel

Orzo Spinach Salad

Yield: 4 servings
Prep Time: 10 minutes
Cook Time: 10 minutes
Total Time: 20 minutes

This easy, delicious salad comes together quickly and makes a great lunch, dinner, or side dish. It's even great for breakfast when topped with a poached egg!

Ingredients

Lemon Garlic Dressing

  • 2 tablespoons fresh lemon juice
  • 1 garlic clove, minced
  • 3 tablespoons extra-virgin olive oil
  • ½ teaspoon kosher salt

Pasta Salad

  • 1 teaspoon salt
  • 1 ½ cups orzo pasta, uncooked
  • 1 cup baby spinach, chopped
  • ½ cup cherry tomatoes, halved
  • 1 tablespoon kalamata olives, halved

Instructions

  1. Add all of the dressing ingredients to a small container and whisk vigorously to combine. Set it aside to let the flavors meld while you make the salad.
  2. Bring a medium-sized pot of water to a boil and season with a teaspoon or so of salt. Add the orzo pasta and cook according to the package instructions. Once it's done to your liking, strain the pasta really well in a colander (you don't want any water diluting the dressing). Turn off the heat on the stove.
  3. Add the pasta back into the pot, then add the spinach, tomatoes, and olives. Toss gently to combine.
  4. Drizzle with the lemon garlic dressing and gently toss again to coat. Serve immediately or keep it in the fridge for up to 3 days.
Nutrition Information:
Yield: 4 Serving Size: 1
Amount Per Serving: Calories: 339Total Fat: 13gSaturated Fat: 2gUnsaturated Fat: 11gSodium: 906mgCarbohydrates: 47gFiber: 4gSugar: 3gProtein: 10g

This data was provided and calculated by Nutritionix.

© Aubrey Cornelius
Cuisine: Italian / Category: Salads
Orzo Spinach Salad

Whole Oven Roasted Onions (+ 33 Ways to Use Them!)

January 6, 2026 by Kristy Bernardo Leave a Comment

step 6 when making whole oven roasted onions: a sheet pan filled with whole oven roasted onions after they've cooled and the skins have been removed, the tops cut off, and they're ready to be enjoyed

No peeling, no chopping! These whole oven roasted onions are sweet and flavorful, and are perfect on their own as a side dish or used in a recipe. Save time and energy with this simple recipe.

step 6 when making whole oven roasted onions: a sheet pan filled with whole oven roasted onions after they've cooled and the skins have been removed, the tops cut off, and they're ready to be enjoyed

My friend Jill of 30 years and I had a 3-hour catch-up session the other night (we live on opposite coasts). We were talking about how much we both love Souper Cubes and she said she's surprised I love them so much because she pictures me cooking elaborate meals every night.

I laughed at this! It's true, I do cook a lot, but it's (mostly) a means to an end for me. I just love to eat, and I want to eat delicious food every time I eat, which means I cook so that can happen. And I constantly look for shortcuts so I can get to the eating part as quickly as possible!

These whole oven roasted onions are one of those shortcuts. It's not an overstatement to say that I LOVE onions of any kind. My favorite are caramelized onions, with creamed onions being a very close second. But this recipe is so simple that it's the one I find myself using again and again. I mean, you don't even have to remove the skins! That's my kind of easy recipe.

step 5 when making whole oven roasted onions: a sheet pan filled with whole oven roasted onions after they've cooled and the skins have been removed

Ingredients

Yes, it's true: all you need are onions and a little oil for this easy recipe!

  • 3 pounds sweet or yellow onions: We prefer using sweet onions but yellow onions will work just fine. You can also adjust the amounts up or down; the three pounds called for is the amount we like to roast since we enjoy having extras to use in recipes all week long.
  • olive or avocado oil

Instructions

Making whole oven roasted onions truly couldn't be simpler! Here are the steps to make them:

  1. As with all oven recipes, preheat your oven first.
  2. Slice the core end off of the onions so the onions will sit flat on the pan. You can stop here (as seen in the step-by-step images below) or you can also slice off the other end. Neither way is better, although it's easier to slice the tops off before roasting than after (we just like the look of leaving it on if we're serving them whole). Yes, you leave the skins on!
  3. Place all the onions on a sheet pan and drizzle with the olive oil. You don't need a lot, just a quick drizzle over each onion.
  4. Roast the onions for 45 minutes. At this stage, the skins will be loose enough to peel off very easily. Smaller onions (as in our images) will likely be sweet and ready to enjoy, and will be soft with a small bit of crunch left. You can sample an outer layer of one of the onions; if they're not soft enough for your liking, put them back in for another 15 minutes. Larger onions can be roasted for one hour before checking for doneness.
  5. Once the onions are done to your liking, remove them from the oven and allow them to cool until you can handle them easily (I usually go about 20 minutes). Slip the skins off and discard them. If you didn't slice the tops off before roasting the onions, you can either serve them as-is or slice the tops off now.
  6. Now simply serve your whole oven roasted onions as a side dish, use one of our recommendations below, or save them for your favorite recipes!
an image showing step 2 for how to make whole oven roasted onions (an onion with the root end being cut off)
Step 2: Slice the ends off of the onions.
step 3 when making whole oven roasted onions: a sheet pan filled with whole onions after having been drizzled with olive oil
Step 3: Place the onions on a sheet pan and drizzle with oil.
step 4 when making whole oven roasted onions: a sheet pan filled with whole onions after having been roasted in the oven for 45 minutes
Step 4: Roast the onions until they're tender and the skins are loose.
step 5 when making whole oven roasted onions: a sheet pan filled with whole oven roasted onions after they've cooled and the skins have been removed
Step 5: Allow the roasted onions to cool, then remove the skins.
step 6 when making whole oven roasted onions: a sheet pan filled with whole oven roasted onions after they've cooled and the skins have been removed, the tops cut off, and they're ready to be enjoyed
Step 6: Serve immediately as a side dish or use in your favorite recipes.

33 Delicious Ways to Use Whole Oven Roasted Onions

You can use these oven roasted onions in any dish that calls for roasted or sautéd onions. Here is a list of our favorite ways to use them:

  1. Serve as a simple side with grilled steak, chicken, pork chops, or fish
  2. Add fresh herbs like thyme or parsley
  3. Add to a grain bowl with farro, rice, or quinoa
  4. Serve with scrambled eggs or omelets
  5. Fold into mashed potatoes or mashed cauliflower
  6. Top baked potatoes or sweet potatoes
  7. Add to a charcuterie or cheese board (they're especially good with aged cheddar or goat cheese)
  8. Blend them into a creamy roasted onion soup
  9. Use as the base for French onion-style soup
  10. Purée into gravy or pan sauce
  11. Stir into vegetable, chicken, or beef stock for extra depth
  12. Blend with cream or yogurt for a roasted onion sauce
  13. Add to tomato sauce or marinara for natural sweetness
  14. Toss with pasta, olive oil, and Parmesan
  15. Add to risotto, orzo, or pilaf
  16. Mix into mac and cheese
  17. Stir into fried rice or grain-based salads
  18. Add to baked pasta dishes or lasagna
  19. Pile onto burgers, steaks, or pork chops
  20. Add to sausages and brats
  21. Layer into chicken thighs or roasted chicken dishes
  22. Fold into meatloaf or meatballs
  23. Add to quiche, frittata, or egg bakes
  24. Use as a topping for flatbread or pizza
  25. Use in grilled cheese or melts
  26. Add to tacos, quesadillas, or burritos
  27. Layer into wraps or paninis
  28. Spread onto flatbreads with cheese and herbs
  29. Mix with mayo or aioli for a roasted onion spread
  30. Freeze chopped onions in small portions
  31. Freeze blended onion purée in cubes
  32. Slice them and caramelize them (saves time if you need caramelized onions!)
  33. Portion them for soup bases or sauces later

Related Recipes

Looking for more easy veggie side dish recipes? Try these:

  • Easy Smashed Brussels Sprouts Recipe
    Smashed Brussels Sprouts Recipe
  • cooked snap peas on a white plate set on a wood table
    Garlic Snap Peas Recipe
  • Green Beans Almondine on a white oval plate which sits on a wooden board with a rustic napkin next to it.
    Green Beans Almondine
  • Golden brown parmesan roasted cauliflower on a baking sheet, showing crispy, caramelized edges.
    Parmesan Roasted Cauliflower (Crispy, Caramelized & Easy!)
step 6 when making whole oven roasted onions: a sheet pan filled with whole oven roasted onions after they've cooled and the skins have been removed, the tops cut off, and they're ready to be enjoyed

Whole Oven Roasted Onions

Yield: 12 servings
Prep Time: 5 minutes
Cook Time: 45 minutes
Additional Time: 20 minutes
Total Time: 1 hour 10 minutes

You can scale the amounts for this recipe up or down as needed. It's so simple you can make them anytime!

Ingredients

  • 3 pounds sweet onions (yellow will also work)
  • 2 tablespoons olive or avocado oil

Instructions

  1. Preheat your oven to 400°F.
  2. Slice the core end off of the onions so the onions will sit flat on the pan. You can stop here or you can also slice off the other end (see notes).an image showing step 2 for how to make whole oven roasted onions (an onion with the root end being cut off)
  3. Place all the onions on a sheet pan and drizzle with the olive oil. step 3 when making whole oven roasted onions: a sheet pan filled with whole onions after having been drizzled with olive oil
  4. Roast the onions for 45 minutes. At this stage, the skins will be loose enough to peel off very easily. Smaller onions (as in our images) will likely be sweet and ready to enjoy, and will be soft with a small bit of crunch left. You can sample an outer layer of one of the onions; if they're not soft enough for your liking, put them back in for another 15 minutes. Larger onions can be roasted for one hour before checking for doneness. step 4 when making whole oven roasted onions: a sheet pan filled with whole onions after having been roasted in the oven for 45 minutes
  5. Once the onions are done to your liking, remove them from the oven and allow them to cool until you can handle them easily (I usually go about 20 minutes). Slip the skins off and discard them. If you didn't slice the tops off before roasting the onions, you can either serve them as-is or slice the tops off now. step 5 when making whole oven roasted onions: a sheet pan filled with whole oven roasted onions after they've cooled and the skins have been removed
  6. Serve them as a side dish or save them for your favorite recipes! step 6 when making whole oven roasted onions: a sheet pan filled with whole oven roasted onions after they've cooled and the skins have been removed, the tops cut off, and they're ready to be enjoyed

Notes

It's easier to slice the tops off before roasting than after (we just like the look of leaving it on if we're serving them whole). Yes, you leave the skins on!

Nutrition Information:
Yield: 12 Serving Size: 1
Amount Per Serving: Calories: 58Total Fat: 2gSaturated Fat: 0gUnsaturated Fat: 2gSodium: 9mgCarbohydrates: 9gFiber: 1gSugar: 6gProtein: 1g

This data was provided and calculated by Nutritionix.

© Kristy Bernardo
Cuisine: American / Category: Sides
Whole Oven Roasted Onions (+ 33 Ways to Use Them!)

Sourdough French Toast with Mascarpone

January 2, 2026 by Aubrey Cornelius Leave a Comment

a stack of sourdough french toast on a black plate topped with fresh berries and mascarpone cream

Sourdough french toast is a little tangy and a little sweet with a creamy mascarpone topping and fresh sweet berries. It's perfect for a lazy weekend or a holiday morning brunch!

a stack of sourdough french toast on a black plate topped with fresh berries and mascarpone cream

Sourdough has always been my first choice for French toast, and once you try it this way, it's hard to go back. It has a slightly tangy flavor that balances the richness of the custard. I love the sturdy structure of sourdough because it soaks up the eggy goodness without turning soggy. You get a crisp, golden outside and a creamy center every single time.

This version takes things a step further with a mascarpone cream topping, which might be my favorite way to finish French toast. Mascarpone is rich and silky but not overly sweet, so it complements the sourdough instead of overpowering it. It tastes indulgent without feeling heavy, and it pairs really well with everything from fresh berries to a drizzle of maple syrup.

a stack of sourdough french toast on a black plate topped with fresh berries and mascarpone cream with one bite taken out

We love to make this mascarpone french toast for Christmas morning, but we also make it for lazy Sunday mornings. If we have guests over, it's goes really well with a sausage hash brown breakfast casserole or a cottage cheese egg bake. And you can make some baked oatmeal cups with different toppings so there's something for everyone!

Ingredients

There aren't many ingredients in this easy recipe, and it's really simple to make. Here's a list of everything you'll need:

  • large eggs
  • unsweetened almond or dairy milk
  • cinnamon
  • sourdough baguette
  • mascarpone cheese
  • heavy whipping cream
  • powdered sugar
  • vanilla extract
  • salt

Toppings

  • maple syrup
  • powdered sugar
  • fresh berries
a sourdough baguette, an open carton of fresh eggs, and powdered sugar showing the ingredients needed to make sourdough french toast

Instructions

There are just a few steps to make this easy mascarpone french toast. You can make the mascarpone up to two days ahead of time, but it's best made fresh and it only takes a few minutes. It's worth it!

  1. The first thing you'll want to do is to make the custard for the french toast. Whisk together the eggs, milk, and a little cinnamon and set it aside.
  2. Next make the whipped mascarpone. It works best if you have a whisk attached to a stand mixer, but a regular hand mixer will also work. Whisk the mascarpone, heavy whipping cream, a little powdered sugar, and some vanilla extract until soft peaks form. Now set that aside to make the french toast.
  3. Preheat a griddle or large skillet over medium heat. Dip each bread slice into the egg mixture, letting the excess drip off. Place into the hot skillet and cook until both sides are golden brown.
  4. Now just top a few slices of the french toast with a dollop of whipped mascarpone and your toppings of choice!
a closeup of a stack of sourdough french toast on a black plate topped with fresh berries and mascarpone cream

Storage and Make-Ahead

  • French Toast: French toast is always best served fresh, but leftovers store well if you have extras. Let the cooked slices cool completely, then store them in an airtight container in the refrigerator for up to 3 days. Reheat them in a skillet over medium heat or warm them in a toaster oven or air fryer. To freeze, place cooled slices in a single layer on a baking sheet and freeze until solid. Transfer to a freezer-safe bag or container and freeze for up to 2 months. Reheat straight from frozen in a toaster, air fryer, or oven until heated through.
  • Whipped Mascarpone: The whipped mascarpone can be made up to 2 days in advance. Store it in an airtight container in the refrigerator. Before serving, give it a gentle stir or quick whisk. Freezing is not recommended.
  • Make-Ahead: Whisk the egg mixture the night before and refrigerate it in a covered container. Slice the bread ahead of time as well. When you're ready to cook, just re-whisk the custard, heat the skillet, and you're minutes away from fresh French toast!

Related Recipes

Looking for more delicious breakfast recipes? Try these:

  • Easy Overnight French Toast Bake Recipe
    Overnight French Toast Bake
  • Homemade Blueberry Banana Muffins
    Banana Blueberry Muffins
  • a vintage plate holds three strawberry lemon scones and a few fresh strawberries and lemon slices
    Strawberry Lemon Scones
  • Crescent Dough Monkey Bread
    Easy Pull-Apart Monkey Bread Recipe
a stack of sourdough french toast on a black plate topped with fresh berries and mascarpone cream

Sourdough French Toast with Mascarpone

Yield: 4 servings
Prep Time: 10 minutes
Cook Time: 15 minutes
Total Time: 25 minutes

Sourdough french toast is a little tangy and a little sweet with a creamy mascarpone topping and fresh sweet berries. It's perfect for a lazy weekend or a holiday morning brunch!

Ingredients

French Toast

  • 3 eggs, whisked
  • 1 cup unsweetened almond or dairy milk
  • 1 ½ teaspoons cinnamon
  • 1 loaf sourdough baguette, sliced

Whipped Mascarpone

  • ½ cup mascarpone cheese
  • ½ cup heavy whipping cream
  • 1-2 tablespoons powdered sugar
  • 1 teaspoon vanilla extract

Additional Toppings

  • maple syrup
  • powdered sugar
  • fresh berries

Instructions

  1. Whisk together the eggs, almond milk, and cinnamon in a large mixing bowl. Set it aside.
  2. Add the mascarpone, heavy whipping cream, a tablespoon of powdered sugar, and the vanilla extract to the bowl of a stand mixer fitted with the whisk attachment. Beat until soft peaks form (about 1 minute or so). Taste and add more powdered sugar, if needed. Set aside.
  3. Preheat a skillet or pan over medium heat.
  4. Generously dip each bread slice into the egg mixture until both sides are wet. Allow the excess to drip into the bowl.
  5. Place in the skillet and cook until both sides are golden brown (about 3-4 minutes each side).
  6. Once the french toast is finished, top with a dollop of the whipped mascarpone and any additional toppings of your choice.
Nutrition Information:
Yield: 4 Serving Size: 1
Amount Per Serving: Calories: 385Total Fat: 31gSaturated Fat: 18gUnsaturated Fat: 13gCholesterol: 223mgSodium: 325mgCarbohydrates: 15gFiber: 2gSugar: 6gProtein: 11g

This data was provided and calculated by Nutritionix.

© Aubrey Cornelius
Cuisine: American / Category: Breakfast and Brunch
Sourdough French Toast with Mascarpone

Mexican Spaghetti Squash

December 29, 2025 by Aubrey Cornelius Leave a Comment

two mexican spaghetti squash on a white plate

The Mexican Spaghetti Squash "bowls" are so incredibly good! They're a fantastic way to eat healthy while still enjoying a flavorful meal.

two mexican spaghetti squash on a white plate

Whenever I'm creating a new recipe, I invariably lean into Mexican flavors. The flavors are so easy to pair, and you can go all-out with spice or tone it down. Different proteins work, too: birria tacos with a chuck roast, chicken for a chicken dorito casserole, or even fish for beer-battered fish tacos.

The new year is almost here, however, and while I'm not one for resolutions, I do tend to eat healthier once the holidays are over. I also crave spicier foods after all that spiral ham and prime rib! So when I was at the store the other day and saw these gorgeous spaghetti squash, I knew immediately which flavors I wanted to use.

I added some cumin & chili powder first, then dressed it up with black beans, corn, cotija cheese, and fresh cilantro. Some cubed avocado brought all the flavors together and I didn't even feel like this was "healthy"!

a closeup of two mexican spaghetti squash on a white plate

Ingredients

  • Spaghetti squash: Look for firm squash without any blemishes.
  • Olive oil: This will help the squash brown in the oven.
  • Cumin: This adds a lot of flavor!
  • Chili powder: I usually use regular chili powder, but chipotle powder is also delicious and will add more smokiness.
  • Salt: Be sure to season it well!
  • Canned black beans: These add some protein and flavor.
  • Fresh corn: I can't stress enough how much better this is with fresh corn, but you can use canned or frozen in a pinch.
  • Cotija cheese: I've also used queso fresco with success.
  • Fresh cilantro: Sub for parsley if you're not a fan of cilantro.
  • Avocado: Slice the avocado or cut it into cubes.
a side view of two mexican spaghetti squash on a white plate with a small bowl of tortilla chips in the background

Instructions

Mexican spaghetti squash is really simple to make! Here are the basic steps, but check the recipe card for more details.

  1. Prep the squash first by cutting it in half lengthwise, and scoop out all of the seeds and membranes. Discard those and place the squash cut-side up on a sheet pan lined with parchment paper.
  2. Next you'll mix together the cumin and chili powder with the oil in a small dish. Brush this mixture all over the cut sides of the spaghetti squash, and take care that it gets everywhere.
  3. Now pop the squash in the oven for about a half hour or until they're nice and soft and have started to brown.
  4. Meanwhile, grill your fresh corn on either a gas grill or on a grill pan on the stove. If you don't have either of those, you can simmer the corn in water or cook it in the microwave. I actually enjoy uncooked corn so I'll often skip cooking it altogether! Then just remove the kernels in put them in a large mixing bowl.
  5. When your squash is done, remove the flesh and scrape it into the bowl with the corn kernels. Add the black beans and give it all a gentle stir (the heat from the squash will warm the beans and corn, too).
  6. Place the mixture back into the squash "shells", then top it with the cheese. Broil it for a few minutes to heat the cheese, then remove it from the oven.
  7. Top it with the fresh cilantro and avocado, and enjoy it immediately!
two mexican spaghetti squash on a white plate next to a halved avocado and a bowl of tortilla chips

Variations

Here are some different ways I've made this Mexican spaghetti squash, so feel free to switch it up and make it your own!

  • Add shredded rotisserie chicken or grilled chicken
  • Stir in cooked ground beef, cooked ground turkey, or cooked Mexican chorizo
  • Swap cotija for queso fresco, Pepper Jack, Monterey Jack, or cheddar
  • Use chipotle powder or smoked paprika for a more smoky flavor
  • Add sautéed bell peppers, poblano peppers, or zucchini
  • Mix in red onion or scallions (or use them as a garnish)
  • Skip the corn and add extra beans for a lower-carb option
  • Top with sour cream or Mexican crema
  • Finish with pico de gallo or salsa
  • Add a squeeze of fresh lime juice just before serving
  • Make it vegan by skipping the cheese and adding more avocado and extra beans
  • Add shrimp tossed with more the same spice mix!

Related Recipes

Looking for more delicious Mexican dishes? Try these:

  • Walking Taco Casserole In A Serving Dish
    Walking Taco Casserole (Easy, Cheesy Weeknight Dinner)
  • Porcupine Meatballs with Chipotle Sauce - comes together quickly and the easy sauce is to die for!
    Porcupine Meatballs in Chipotle Sauce
  • An easy recipe for killer Chicken Enchiladas. Makes a great use out of leftover Thanksgiving turkey, too!
    Chicken Enchiladas with Roasted Jalapenos
  • This Dorito Taco Casserole is so simple to throw together that my kids make it all the time!
    Dorito Taco Casserole with Black Beans and Corn
two mexican spaghetti squash on a white plate

Mexican Spaghetti Squash

Yield: 4 servings
Prep Time: 10 minutes
Cook Time: 35 minutes
Total Time: 45 minutes

This Mexican Spaghetti Squash has all of your favorite flavors! It comes together quickly and is an easy, healthy, and delicious weeknight meal.

Ingredients

  • 2 spaghetti squash, halved lengthwise and deseeded
  • 2 tablespoons olive oil
  • 1 teaspoon ground cumin
  • 1 teaspoon chili powder
  • 1 teaspoon coarse salt (plus more to taste)
  • 1 15-ounce canned black beans, rinsed and drained
  • 3 ears of fresh corn (see notes)
  • ½ cup Cotija cheese
  • ½ cup cilantro, chopped
  • 1 avocado, sliced (or cut into cubes

Instructions

  1. Line a baking sheet with parchment paper and place the spaghetti squash on the paper cut-side-up.
  2. Preheat the oven to 375°F.
  3. In a small bowl, combine the olive oil, cumin, and chili powder.
  4. Using a basting brush, brush the cut-side of the squash, making sure to coat it evenly.
  5. Place the squash in the oven to bake for about 30 minutes, or until it's fork- tender.
  6. In the meantime, heat a grill pan over a medium-high heat. Brush the ears of corn with olive oil and sprinkle with salt. Grill for about 4-5 minutes on each side (don't move while cooking to get nice grill marks on the corn). Once done, remove from the heat and cut the kernels off and set aside.
  7. Once the squash is done, remove from the oven to let cool.
  8. Using a fork, scrape the meat from the squash and place in a large pan.
  9. Add the beans and corn and allow to heat (at this time you may want to add additional salt, according to taste)
  10. Once the corn and beans are heated through, place the mixture back into the squash shells.
  11. Preheat the oven to Broil.
  12. Top the bowls with the Cotija cheese and place under the broiler for about 3 minutes (or until the cheese has melted).
  13. Top with cilantro and avocado. Serve immediately.

Notes

Fresh corn is best, but canned or frozen corn can also be used.

Nutrition Information:
Yield: 4 Serving Size: 1
Amount Per Serving: Calories: 514Total Fat: 25gSaturated Fat: 8gUnsaturated Fat: 17gCholesterol: 31mgSodium: 1127mgCarbohydrates: 64gFiber: 16gSugar: 16gProtein: 18g

This data was provided and calculated by Nutritionix.

© Aubrey Cornelius
Cuisine: Mexican / Category: Dinner
Mexican Spaghetti Squash

Spicy Cheese Fritters - Deep or Air Fry

December 23, 2025 by Aubrey Cornelius Leave a Comment

a pan of spicy cheese fritters on a white towel on a wood table

These spicy cheese fritters have all the flavors of jalapeño poppers but with a crispy outside and gooey, cheesy inside. They're always the first thing to disappear!

a pan of spicy cheese fritters on a white towel on a wood table

We're major jalapeño lovers, and when melty cheese is included, we're always on board! We love to serve these spicy cheese fritters as an appetizer for everything from a football party to a dinner party.

This recipe is tied for our favorite with these stuffed jalapeño poppers with chorizo & smoked gouda (and we've even made fritters with that recipe, too)! We like to serve these with healthier nachos that help balance the richness of the cheese.

Ingredients

You only need a handful of ingredients to make spicy cheese fritters. And with hardly any chopping, it comes together really quickly.

Filling

  • Jalapeños - Use more or less of these depending on how spicy you like them. You can also divide the filling and add more to just half so everyone is happy.
  • Cream cheese - Make sure this is softened to make mixing in the cheese and jalapeños much easier.
  • Shredded cheese - We like a Mexican blend or we'll go all cheddar. As long as it's a cheese that melts nicely, it should work just fine.

Coating

  • Panko breadcrumbs - You can use regular breadcrumbs if that's all you have, but Panko will definitely give you the best crunchy exterior.
  • Eggs - Mix whisked eggs with the water for dipping the cheese fritters, which is how the breadcrumbs will stick.
  • Water
  • Canola oil - Any oil with a high smoke point will work, like peanut oil or avocado oil.
a hand holding a spicy cheese fritter being pulled apart with a pan of them sitting on a table in the background

Instructions - Deep Frying or Air Frying

This recipe is so simple it almost doesn't even need instructions! Here are the basics for how to make these easy, spicy cheese fritters:

  1. First you'll just need to mix the filling ingredients together. Add the cream cheese, jalapeños, shredded cheese, and salt to a medium-sized mixing bowl (make sure the cream cheese is room temperature to make this step a breeze). Then just mix it all until it's thoroughly combined.
  2. Then, using a small ice cream scoop or just with your hands and a spoon, scoop out the cheese balls and roll them into balls. Place them onto a parchment lined baking sheet (you should get about 20 balls).
  3. Now set up your dredging station: Place the breadcrumbs in a large bowl, and in another bowl, whisk together the eggs and the water.
  4. Dunk each ball into the egg wash first, then roll them in the panko breadcrumbs until they're completely coated. Remember to use one hand for wet ingredients and the other for the dry ingredients.
  5. Place them into the freezer for at least 30 minutes and up to 60 minutes. This will help the balls stay intact and get golden brown on the outside without the filling seeping out while they're frying.

Deep Frying Instructions

  1. Add the oil to a large, deep-sided skillet and heat it to 360°F.
  2. Add 4-5 fritters to the skillet and fry until they're golden brown on one side, then flip them over to brown the other side. Once they're golden brown and crispy all over, remove them with a slotted spoon and place them on a plate lined with paper towels to drain.
  3. Serve immediately on their own or with a dipping sauce of your choice.

Air Frying Instructions

These spicy cheese fritters work great in the air fryer and come out crispy on the outside with a melty center (just a little lighter than deep frying).

  1. Prepare the fritters as directed, including breading and freezing them for at least 30 minutes.
  2. Preheat the air fryer to 375°F.
  3. Lightly spray the fritters with cooking spray or brush them lightly with oil.
  4. Arrange the fritters in a single layer, leaving space between them (you may need to cook them in batches).
  5. Air fry for 8-10 minutes, flipping halfway through, until they're golden brown and crispy.
  6. Serve them immediately on their own or with a dipping sauce of your choice.
a metal mixing bowl with whisked eggs next to a small dish of flour and some eggs to show the ingredients for spicy cheese fritters

Dipping Sauces

These are the dipping sauces we recommend for cheese fritters:

  • Chipotle mayo (mix a little adobo sauce from canned chipotle peppers with some mayo)
  • Sriracha mayo (mix Sriracha to taste with mayo)
  • Ranch dressing (a classic!)
  • Hot honey (drizzle this on just before serving or serve it at the table)
  • Buffalo sauce
  • Salsa verde or roasted tomato salsa
  • Pico de gallo
  • BBQ sauce (especially smoky or chipotle-flavored)
  • Sweet chili sauce
  • Pepper jelly (warm it slightly so it's dippable)
a pan of spicy cheese fritters on a white towel next to fresh eggs and a fresh jalapeño

Variations

  • Add cooked, crumbled bacon
  • Swap jalapeños for serranos (hotter) or poblanos (milder)
  • Use pickled jalapeños or a mix of pickled and fresh
  • Use hatch chiles when they're in season!
  • Add finely diced red onion or scallions
  • Stir in a spoonful of salsa or salsa verde to the filling
  • Add fresh corn off the cob for a little crunch and sweetness (this is one of our favorite additions)

Related Recipes

Looking for more Mexican appetizer recipes? Try these:

  • a cast iron skillet filled with choriqueso made with chorizo and cheese then topped with diced tomato, white onion, and cilantro
    Choriqueso - Easy Mexican Chorizo and Cheese Dip
  • Smoked Queso Dip
    Smoked Queso Dip
  • Close-up of colorful nachos showing melted cheese, diced tomatoes, red onions, avocado chunks, black beans, and fresh herbs.
    How to Bake Nachos in the Oven (Crispy Every Time!)
  • Large skillet of 3-cheese loaded fries with cheddar, mozzarella, and feta, topped with crispy bacon, ranch dressing, and fresh herbs.
    How to Make Loaded Fries at Home (+ Epic Topping Ideas)
a pan of spicy cheese fritters on a white towel on a wood table

Spicy Cheese Fritters

Yield: 20 fritters
Prep Time: 10 minutes
Cook Time: 20 minutes
Additional Time: 1 hour
Total Time: 1 hour 30 minutes

These cheese fritters are crispy on the outside with a gooey, cheesy, spicy filling that's irresistible!

Ingredients

Filling

  • 1 cup diced jalapeños (about 4-6 jalapeños)
  • 8 ounces cream cheese
  • 2 cups Mexican-blend shredded cheese
  • 1 teaspoon salt

Coating

  • 2 cups Panko breadcrumbs
  • 4 large eggs
  • 1 cup water
  • 2 cups canola oil (for frying)

Instructions

  1. Add the cream cheese, jalapeños, shredded cheese, and salt to a medium-sized mixing bowl. Mix it until it's thoroughly combined.
  2. Using a small ice cream scoop or just with your hands and a spoon, scoop out the cheese balls and roll them into balls. Place them onto a parchment lined baking sheet (you should get about 20 balls).
  3. Place the breadcrumbs in a shallow bowl, and in another bowl, whisk together the eggs and the water.
  4. Dunk each ball into the egg wash first, then roll them in the panko breadcrumbs until they're completely coated.
  5. Place them into the freezer for at least 30 minutes and up to 60 minutes.
  6. Add the oil to a large, deep-sided skillet and heat it to 360°F.
  7. Add 4-5 fritters to the skillet and fry until they're golden brown on one side, then flip them over to brown the other side. Once they're golden brown and crispy all over, remove them with a slotted spoon and place them on a plate lined with paper towels to drain.
  8. Serve immediately on their own or with a dipping sauce of your choice.

AIR FRYER INSTRUCTIONS

  1. Prepare the fritters as directed, including breading and freezing them for at least 30 minutes.
  2. Preheat the air fryer to 375°F.
  3. Lightly spray the fritters with cooking spray or brush them lightly with oil.
  4. Arrange the fritters in a single layer, leaving space between them (you may need to cook them in batches).
  5. Air fry for 8-10 minutes, flipping halfway through, until they're golden brown and crispy.

Notes

See the post for a list of dipping sauce suggestions.

Nutrition Information:
Yield: 20 Serving Size: 1
Amount Per Serving: Calories: 481Total Fat: 39gSaturated Fat: 10gUnsaturated Fat: 30gCholesterol: 74mgSodium: 506mgCarbohydrates: 21gFiber: 1gSugar: 3gProtein: 11g

This data was provided and calculated by Nutritionix.

© Aubrey Cornelius
Cuisine: Mexican / Category: Appetizers
Spicy Cheese Fritters - Deep or Air Fry

Easy Tater Tot Casserole

December 19, 2025 by Kristy Bernardo

a white plate with a serving of easy tater tot casserole

If you're craving a comforting, easy meal that tastes amazing, this easy tater tot casserole fits the bill. It takes just minutes to throw together and everyone loves it!

a closeup of a white plate with a serving of easy tater tot casserole

We love this easy tater tot casserole around here for so many reasons. It's not always easy to make something that everyone loves that's also so simple to make. It's nostalgic for me, having grown up on it, and it's so satisfying that it still hits after all these years!

It's also nice to make a dish that really doesn't need any sides, since tater tot casserole has it all: meat, potatoes, and a veggie. When I do serve something with it, it's usually an easy appetizer like bacon-wrapped pickles or a no-bake dessert.

an easy tater tot casserole in an oval casserole dish just out of the oven

Ingredients

  • Ground beef: I use lean ground beef, but really any will work.
  • Onion: We're serious onion lovers, so I usually double this! Try making it as written first, then increase it if you're an onion lover, too (it already calls for one whole onion).
  • Garlic cloves: I have a friend who always doubles the amount of garlic a recipe calls for, no matter what. For this one, I recommend sticking with the actual amount called for, since more garlic could easily overpower the other flavors.
  • Worcestershire sauce: Don't skip this - it adds a wonderful umami flavor and the dish just won't be the same without it.
  • Cream of mushroom soup: Longtime followers of this website know that I very rarely use canned soups in my recipes (I'm not sure there are any!). But it absolutely works in tater tot casserole, plus it drastically cuts down on the prep time.
  • Canned green beans: You could use frozen beans, too, although canned is definitely preferred. Frozen will release more water and can make the overall casserole a bit watery. You also want to be sure to drain the canned beans really well!
  • Salt & pepper: This does need some seasoning, although the soup is somewhat salty on its own, so we add just enough.
  • Shredded cheddar cheese: As always, shredding your own cheese will melt much better, but bagged cheese will also do the trick just fine.
  • Tater tots: I often opt to use the "crowns" instead (as in the images), so just use what you prefer.
an easy tater tot casserole fully assembled in an oval casserole dish ready for the oven

Instructions

Making this easy tater tot casserole is truly very simple. It's mostly about layering ingredients then just giving it time to get hot and bubbly in the oven.

  • First you'll cook the ground beef, onions, and garlic in a large skillet, season it with salt and pepper, and stir in the Worcestershire sauce.
  • Next is just layering everything! You'll put the ground beef mixture into the bottom of a greased casserole dish, then add the creamed soup, then the green beans, and top it with the cheese. The tater tots go on the top so they can get nice and crispy!
  • Next you'll bake it for about 40 minutes or so, until it's bubbling hot and the tater tots are golden brown.
  • And finally, tater tot casserole really benefits from a short rest out of the oven (about 5-10 minutes) so it can cool slightly and firm up a bit.
  • And then it's just time to serve it!
a hand holding a white plate with a serving of easy tater tot casserole

Variations

This recipe is really versatile, so it's easy to make it your own. I usually just make it as written, but I do enjoy switching it up now and then. Here are some ideas for you:

  • Use ground turkey, chicken, or pork in place of the ground beef. Or swap out some of the beef and add Italian sausage. You could also mix some crumbled bacon into the ground beef layer.
  • If you're not a fan of green beans, try different vegetables like corn, peas, sautéed mushrooms, diced bell pepper, broccoli, or zucchini. You could even add some spinach (go with frozen that's been thawed and squeezed VERY dry).
  • Another flavor of creamed soup would also work. Try cream of chicken, celery, or onion, or swap one of the cans for cheddar cheese soup. If you're really averse to using canned soups, just make a homemade white sauce instead.
  • Instead of the shredded cheddar cheese, try Monterey Jack, pepper jack, colby, mozzarella, or even a smoked cheddar. A blend of several cheese would also be delicious.
  • If you want to add even more flavor, try adding a little smoked paprika, Italian seasoning, or dry ranch seasoning. If you'd like a little spice, you can add some Cajun seasoning, red pepper flakes, or a few dashes of hot sauce (or mix in some green chiles with the ground beef)!
  • I like to use "crowns" instead of tater tots, mostly because that's what I buy for our breakfast so that's what I've got on hand. You could also use shredded hash browns or sweet potato tots. Use your favorite brand or choose from this list.
  • Sometimes I'll add a spoonful of Dijon to the beef layer, especially if I replace the sautéed onions with caramelized onions (the flavors just go so well together)!
a hand holding a white plate with a serving of easy tater tot casserole

Storage & Make-Ahead

This easy tater tot casserole is one of those dishes that reheats really well, so it's an easy one to prep ahead for busy nights.

  • Make-Ahead
    • You can assemble the casserole up to a day in advance. Follow the recipe just until topping it with the tater tots, then cover it tightly and refrigerate. When you're ready to bake it, just add the tots and pop it into the preheated oven.
    • You can also make just the ground beef mixture and refrigerate it for up to two days, then proceed with layering and baking from there.
  • Storing in the refrigerator
    • Once it's fully baked, leftovers will keep well for 3 or 4 days. Let the casserole cool completely, then cover it tightly and refrigerate. Reheat individual servings in the microwave or put it back in the oven at 350°F until it's heated through.
  • Freezing the Whole Casserole
    • To freeze unbaked: Assemble the casserole in a disposable aluminum pan or a freezer-safe baking dish. Wrap it in plastic wrap, then foil, and freeze it for up to 3 months. Thaw it overnight in the refrigerator and bake it as directed, or bake it directly from frozen and add about 30 minutes to the baking time.
    • To freeze after baking: Let it cool completely. Wrap it tightly or transfer it to a freezer-safe container, then freeze it for up to 3 months. Thaw overnight before baking, or bake straight from frozen but add about 30 minutes to the baking time.
  • Freezing in Souper Cubes
    • Cool the casserole completely, then spoon portions into the Souper Cubes. Add the lid and freeze until solid.
    • Pop out the frozen blocks and store them in a labeled freezer bag.
    • Frozen portions reheat straight from the freezer! You can microwave them for a quick meal or bake at 375°F until it's hot and bubbling (1 hour to 1 hour and 15 minutes for 2-cup cubes, or 45 minutes for 1-cup cubes). The images below show the steps to assembling this easy tater tot casserole in a 1-cup Souper Cubes tray:
a 1-cup souper cube tray filled with cooked ground beef, onions, and garlic, the first layer in easy tater tot casserole
a 1-cup souper cube tray filled with cooked ground beef, onions, and garlic with cream of mushroom soup on top, the second layer in easy tater tot casserole
a 1-cup souper cube tray filled with cooked ground beef, onions, and garlic, cream of mushroom soup, and green beans on top, the third layer in easy tater tot casserole
a 1-cup souper cube tray filled with cooked ground beef, onions, and garlic, cream of mushroom soup, green beans, and shredded cheddar cheese on top, the fourth layer in easy tater tot casserole

Related Recipes

Looking for more easy weeknight meals like this easy tater tot casserole? Try these:

  • a platter of hot ham and cheese party sandwiches
    Hot Ham and Cheese Party Sandwiches
  • A Plate of Szechuan Gourmet Beef Pasta on a Black Table with Greens and Chopped Peanuts
    Szechuan Beef Pasta
  • baked chicken drumsticks just out of the oven, topped with a delicious asian sauce, chopped green onions, and sesame seeds
    Easy Baked Chicken Drumsticks with Garlic-Honey Asian Glaze
  • Homemade Mississippi Pot Roast Sandwich with Cheese
    Instant Pot Mississippi Pot Roast
a white plate with a serving of easy tater tot casserole

Tater Tot Casserole

Yield: 12 servings
Prep Time: 10 minutes
Cook Time: 40 minutes
Additional Time: 10 minutes
Total Time: 1 hour

Tater tot casserole is a hearty, comforting, and easy-to-make meal that everyone loves!

Ingredients

  • 2 pounds ground beef
  • 1 medium onion, chopped
  • 4-5 garlic cloves, minced
  • 1-2 teaspoons Worcestershire sauce
  • 2 10.5-ounce cans cream of mushroom soup
  • 2 15-ounce cans green beans, drained well
  • ½ teaspoon salt, divided
  • ½ teaspoon freshly ground black pepper
  • 16 ounces shredded cheddar cheese
  • 32-ounce bag tater tots or crowns

Instructions

  1. Preheat the oven to 375°F.
  2. Heat a large skillet over medium heat. Add the ground beef and cook, stirring often, until the beef is almost cooked through (drain off excess grease now). Add the onions and garlic, and cook a few more minutes until the beef is cooked through and the onions have softened. Stir in the Worcestershire sauce, ¼ teaspoon salt, and the black pepper.
  3. Grease a 13x9 baking dish. Add the beef mixture to the pan, spreading it out to cover the bottom.
  4. Spread the cream of mushroom soup evenly over the ground beef. Spread the green beans evenly on top of the soup layer, then season with the remaining ¼ teaspoon salt. Add the shredded cheese evenly on top of the green bean layer. Add the tater tots on top, as evenly as possible.
  5. Bake in the preheated oven for approximately 40 minutes, or until the casserole is hot and bubbly and the tater tots are golden brown and crispy.
  6. Remove from the oven and let the casserole sit for 5-10 minutes before serving.

Notes

You can cut the ingredients in half and bake in an 8x8 casserole if you prefer. This casserole also freezes really well, so you can also split the full amounts between two 8x8 pans and freeze one (or divide it into Souper Cubes).

Nutrition Information:
Yield: 12 Serving Size: 1
Amount Per Serving: Calories: 395Total Fat: 27gSaturated Fat: 12gUnsaturated Fat: 15gCholesterol: 106mgSodium: 557mgCarbohydrates: 5gFiber: 1gSugar: 1gProtein: 30g

This data was provided and calculated by Nutritionix.

© Kristy Bernardo
Cuisine: American / Category: Dinner
Easy Tater Tot Casserole

Sausage Bean Soup (Stovetop or Instant Pot)

December 16, 2025 by Kristy Bernardo Leave a Comment

a side view of sausage bean soup with a spoon and garnished with chopped fresh parsley

There's nothing quite like a steaming hot and hearty bowl of sausage bean soup when the weather turns colder. This version is simple to make and has loads of flavor to help warm you from the inside out!

an overhead shot of sausage bean soup with a spoon and garnished with chopped fresh parsley

I've long been a fan of bean soups and for good reasons: they're flavorful, filling, and more economical than most other soups. This is one of my easy go-to's and with grocery prices rising, I thought it was time to share the easy recipe.

I like to serve sausage bean soup with a crusty stuffed garlic bread or some cheddar bay biscuits. That makes a complete meal in my opinion, but if I do feel I need a side dish, I'll go with a quick roasted vegetable just to keep things simple.

Ingredients

  • Olive oil: The sausage needs a little extra help since it doesn't have much fat, so just a tablespoon of olive oil will do the trick.
  • Chicken sausage: I like to use chicken sausage since it's lower in fat, but any sausage you love will work great!
  • Onion: I'll often double the amount of onion because we're serious onion lovers in my house. Start with the amount listed the first time - you can always tweak it to your liking later.
  • Garlic: The same goes for garlic! Add a little extra if you like, but the three cloves the recipe calls for adds a nice amount.
  • Low-sodium chicken stock or broth: Using a low-sodium broth or stock let's you control the amount of salt much easier.
  • Water: You'll need to soak the beans if you use dried, which are much cheaper than canned. The extra step of soaking them is worth it!
  • Dried cannellini beans: I like to use dried beans whenever possible, but I'll admit that canned are easier since there's no soaking involved. Both work really well in sausage bean soup, so just use what you like. And if you've got an Instant Pot, you can skip soaking the dried beans altogether (we've included both stovetop and Instant Pot instructions)!
  • Fire-roasted diced tomatoes: I always opt for fire-roasted canned tomatoes whenever possible, as it just adds a little extra flavor without any more effort. That said, regular canned tomatoes are good, too!
  • Crushed red pepper flakes: These are optional, but we like just a hint of spice. You can also opt to just serve this at the table (or do both)!
  • Coarse salt & freshly ground black pepper: Season, season, season!
  • Grated parmesan cheese: A sprinkling of parmesan over each bowl adds a ton of flavor and helps to season it, too. If you really want to get crazy, put the bowls under a broiler to brown the parmesan before serving (make sure the bowls are broiler-safe)!
a side view of sausage bean soup with a spoon and garnished with chopped fresh parsley

Instructions

We're big fans of the Instant Pot, so we've included instructions for both the IP and the stovetop. If you go the IP route, there's no need to soak the beans and the recipe comes together much quicker.

Stovetop

  1. If you're using dried beans, rinse them well and pick out anything that doesn't belong. Put them in a large pot, bowl, dish...whatever you have that will be large enough will work. Cover them with water at approximately a 3-to-1 ratio (ie. 3 cups of water for every 1 cup of beans). Then just let them soak for at least 8 hours or overnight. If you're using canned beans you can skip this step (just be sure to drain and rinse them before adding them to the soup).
  2. Heat a large pot over medium heat, then add the oil. When it's shimmering, add the chopped sausage. Brown it on all sides, then remove it with a slotted spoon and set it aside.
  3. Add the onions to the pot and cook them until they're soft and translucent, about five minutes, stirring frequently. Add the garlic and cook for about another minute.
  4. While the onions are cooking, drain the beans and discard the water you soaked them in. Note: You'll add more water to the soup (or you can use all chicken broth or stock if you prefer), but I like to use "fresh" water for this.
  5. Add the sausage back into the pot along with the stock, more water, and the tomatoes. Bring it to a low boil, then reduce the heat until it's just simmering.
  6. If you used dried beans, you'll want to simmer the soup for about 2 hours or so, until the beans are fully cooked and tender. If you opted for canned beans, you'll only need simmer it for about 30 minutes (just enough time for all the flavors to come together and for the soup to be piping hot).
  7. Now just season the sausage bean soup with salt and pepper, then serve! You can add crushed red pepper either before or after serving (or skip it entirely if you prefer). I like to serve the grated parmesan at the table, but it can be added directly to the soup pot, too. This recipe is very versatile so do what your heart (and taste buds) tell you!

Instant Pot

  1. Press "Saute" to preheat your Instant Pot. When the word "hot" appears on the display, add the olive oil, then the sausage and cook until it's nicely browned. Add the onions and cook, stirring occasionally, until the onions are soft, about five minutes. Add the garlic and cook one more minute.
  2. Add a small amount of the chicken stock to the pot and scrape the browned bits from the bottom of the pot. Be sure to get it all from the bottom, adding more stock if necessary.
  3. Add the remaining stock to the pot along with the water, beans, tomatoes and red pepper flakes.
  4. Close and lock the lid of the Instant Pot. Press "Manual" and immediately adjust the timer to 45 minutes. Check that the cooking pressure is on "high" and that the release valve is set to "Sealing".
  5. When the time is up, allow the pressure to release naturally. Season well to taste with salt and pepper.

Note: This sausage bean soup is a great candidate for a freezer meal. I like to double the recipe and freeze it in portions in my Souper Cubes for easy meals.

a closeup shot of sausage bean soup that's garnished with chopped fresh parsley

Variations

The beauty of this sausage bean soup is how flavorful it with so few ingredients. That said, here are some ideas for things you could add to switch things up!

  • Different sausages: Italian sausage (sweet or spicy) or Andouille sausage
  • Add a little bacon or pancetta! You could skip the oil and cook this first, remove it with a slotted spoon, and cook the onions in the grease left in the pot. Add it back in before simmering.
  • Carrots & celery would be delicious and would add more nutrients.
  • Bell peppers (any color)
  • Stir in a little spinach just before serving. You could also add some chopped kale!
  • A few dried herbs added at the same time as the onions, such as rosemary, thyme, oregano, or a bay leaf.
  • Add a little smoked paprika or Cajun seasoning alongside the onions.
  • A little tomato paste after the onions and garlic but before the rest of the ingredients.
  • Crushed tomatoes or extra fire-roasted tomatoes can be added if you're a tomato lover. You might need to increase the stock or water amounts if it gets too thick.
  • I love adding small pasta like ditalini or elbows, but you'll want to add extra liquid so it doesn't get too thick.
  • Chopped potatoes or sweet potatoes are delicious! Again, add a little extra broth or water to compensate or the soup might be too thick for your liking.
  • In place of the cannellini beans, try chickpeas or pinto beans.
  • A squeeze of fresh lemon juice at the end
  • If you prefer a creamier sausage bean soup, add a little heavy cream, half-and-half, or small pieces of cream cheese about 10 minutes before the soup is done simmering.
  • Fresh parsley or basil as a garnish

Related Recipes

Looking for more bean soup recipes? Try these:

  • two white bowls of cannellini bean and kale soup on a rustic wood table
    Cannellini Bean & Kale Soup
  • Navy Bean Soup with Bacon. This is the only bean soup I've ever made where I got TWO double-takes at the table after the first bite and LOADS of compliments! Smooth, creamy, flavorful and guaranteed to make the whole family dinner happy :)
    Navy Bean Soup with Bacon
  • a pot of easy an brunswick stew recipe on striped towel
    Brunswick Stew (Stovetop or Crockpot)
  • a pot of minestrone soup on a white cloth
    Hearty Italian Minestrone Soup (Easy, Healthy & Delicious!)
a side view of sausage bean soup with a spoon and garnished with chopped fresh parsley

Sausage Bean Soup

Yield: 8 servings
Prep Time: 10 minutes
Cook Time: 2 hours 30 minutes
Additional Time: 8 hours
Total Time: 10 hours 40 minutes

This sausage bean soup is very versatile and simple to make. It's hearty, filling, and filled with flavor!

Ingredients

  • 1 tablespoon extra-virgin olive oil
  • 1 pound chicken sausage, diced (or your favorite sausage)
  • 1 medium onion, chopped
  • 3 cloves garlic, minced
  • 4 cups low-sodium chicken stock or broth
  • 2 cups water (plus more for soaking the beans)
  • 1 pound dried cannellini beans
  • 1 14.5-ounce can fire-roasted diced tomatoes
  • pinch of crushed red pepper flakes (optional)
  • coarse salt & freshly ground black pepper, to taste
  • grated parmesan cheese, for topping

Instructions

Stovetop

  1. Rinse the dried beans well and pick out anything that doesn't belong. Put them in a large pot or bowl and cover them with water at approximately a 3-to-1 ratio (ie. 3 cups of water for every 1 cup of beans). Let them soak for at least 8 hours or overnight. If you're using canned beans you can skip this step (just be sure to drain and rinse them before adding them to the soup).
  2. Heat a large pot over medium heat, then add the oil. When it's shimmering, add the chopped sausage. Brown it on all sides, then remove it with a slotted spoon and set it aside.
  3. Add the onions to the pot and cook them until they're soft and translucent, about five minutes, stirring frequently. Add the garlic and cook for about another minute.
  4. While the onions are cooking, drain the beans and discard the water you soaked them in.
  5. Add the sausage back into the pot along with the stock, more water, and the tomatoes. Bring it to a low boil, then reduce the heat until it's just simmering.
  6. If you used dried beans, you'll want to simmer the soup for about 2 hours or so, until the beans are fully cooked and tender. If you opted for canned beans, you'll only need simmer it for about 30 minutes (just enough time for all the flavors to come together and for the soup to be piping hot).
  7. Now just season the soup with salt and pepper, then serve! You can add crushed red pepper either before or after serving (or skip it entirely if you prefer). I like to serve the grated parmesan at the table, but it can be added directly to the soup pot, too.

Instant Pot

  1. Press “Saute” to preheat your Instant Pot. When the word “hot” appears on the display, add the olive oil, then the sausage and cook until it's nicely browned. Add the onions and cook, stirring occasionally, until the onions are soft, about five minutes. Add the garlic and cook one more minute.
  2. Add a small amount of the chicken stock to the pot and scrape the browned bits from the bottom of the pot. Be sure to get it all from the bottom, adding more stock if necessary.
  3. Add the remaining stock to the pot along with the water, beans, tomatoes and red pepper flakes.
  4. Close and lock the lid of the Instant Pot. Press “Manual” and immediately adjust the timer to 45 minutes. Check that the cooking pressure is on “high” and that the release valve is set to “Sealing”.
  5. When the time is up, allow the pressure to release naturally. Season well to taste with salt and pepper.
Nutrition Information:
Yield: 8 Serving Size: 1
Amount Per Serving: Calories: 261Total Fat: 10gSaturated Fat: 2gUnsaturated Fat: 8gCholesterol: 55mgSodium: 587mgCarbohydrates: 21gFiber: 4gSugar: 3gProtein: 23g

This data was provided and calculated by Nutritionix.

© Kristy Bernardo
Cuisine: American / Category: Soups and Stews
Sausage Bean Soup (Stovetop or Instant Pot)

Apple Pull-Apart Bread

December 13, 2025 by Aubrey Cornelius Leave a Comment

a loaf of pull apart apple monkey bread just out of the oven on a white surface

Made with sweet and sticky spiced apple bread, this Apple Pull-Apart Bread is the ultimate breakfast or dessert treat. You're going to want seconds!

a loaf of apple pull-apart bread just out of the oven on a white surface

I've always been a bit intimidated by pull-apart bread recipes, but even though this one looks (and tastes!) impressive, it actually comes together really easily, and you can have it on the table in just over two hours.

I love serving this apple pull-apart bread as a fun and interactive dessert at dinner parties, or you can make a batch at the beginning of the week and then reheat a slice whenever you want it in a warm pan so the edges get all caramelized. It's perfect with a scoop of vanilla ice cream.

The flavor of cinnamon and butter with apples is a tried and true favorite, but this is such a fun twist on a Christmas morning classic. I like to make a big spread for Christmas morning, so this pull apart monkey bread get served alongside my overnight french toast bake and a sausage hashbrown breakfast casserole. Everything can be made ahead of time which makes the morning relaxing!

Ingredients

There are three components to this apple pull-apart bread: the bread itself, apples that are tossed with butter, brown sugar, and cinnamon, and a topping of butter and cinnamon. Together they turn out an incredibly delicious apple monkey bread!

  • BREAD
    • All-purpose flour
    • Active dry yeast
    • Granulated sugar
    • Milk (whole or 2%)
    • Unsalted butter
    • Water
    • Vanilla extract
    • Salt
    • Ground cinnamon
    • Eggs
  • APPLE MIXTURE
    • Granny smith apples - these are a great baking apple, but you can substitute for one of these if you prefer
    • Unsalted butter
    • Brown sugar
    • Ground cinnamon
  • CINNAMON BUTTER MIXTURE
    • Unsalted butter
    • Ground cinnamon

Instructions

It may seem like there are a lot of steps to this recipe, but once the dough is made, it comes together really quickly. And I assure you that it's worth it!

  1. Reserve ¾ cup flour, then combine the remaining flour, yeast, and sugar in the bottom of a stand mixer (or large bowl).
  2. In a small saucepan, gently warm the milk and butter until the butter has just melted. Remove it from the heat and let it sit for about 2-3 minutes. Add in the water and vanilla and stir to combine.
  3. Pour the milk mixture into the flour mixture and, using the dough hook or knead with your hands, mix it together until it's well combined.
  4. Add the salt, cinnamon and eggs one at a time, making sure to beat well after each one.
  5. Add the remaining ¾ cup of flour and mix until the dough comes together.
  6. Place the dough in a large, well-oiled bowl. Cover it with a damp cloth and leave it in a dry, warm place to rise for about an hour.
  7. Once the dough has doubled in size, punch it down and roll it out to the size of a large rectangle on a well floured surface.
  8. Preheat the oven to 350°F.
  9. In a medium-sized skillet, add the butter, brown sugar and diced apples over medium heat and cook until the apples are soft and tender, stirring occasionally.
  10. Mix together the butter and cinnamon to make the cinnamon-butter mixture. Spread it over the surface of the dough, then top it evenly with the apple mixture.
  11. Cut the dough into 5 strips from top to bottom. Then, cut again into thirds going from left-to right.
  12. Stack the slices together and place in a well buttered 9x5 loaf pan.
  13. Bake for about 30-40 minutes or until it's golden brown.

Related Recipes

Looking for more delicious breakfast recipes? Try these:

  • three irish soda bread scones on parchment paper next to a glass of milk
    Irish Soda Bread Scones with Cinnamon Honey Butter
  • a stack of sourdough french toast on a black plate topped with fresh berries and mascarpone cream
    Sourdough French Toast with Mascarpone
  • a closeup of a coconut smoothie bowl topped with fresh blueberries, granola, and goji berries
    Coconut Smoothie Bowl
  • a top down view of a loaf of pumpkin brioche on a white cloth napkin with two slices cut out
    Pumpkin Brioche with Chocolate Swirl
a loaf of pull apart apple monkey bread just out of the oven on a white surface

Pull-Apart Apple Monkey Bread

Yield: 1 loaf (4-6 servings)
Prep Time: 25 minutes
Cook Time: 35 minutes
Total Time: 1 hour

Made with sweet and sticky spiced apple bread, this Apple Fritter Monkey Bread is the ultimate breakfast or dessert treat.

Ingredients

Bread

  • 2 ¾ cups all-purpose flour, divided
  • 2 ¼ teaspoons active dry yeast
  • 2 tablespoons sugar
  • ⅓ cup milk (whole or 2%)
  • ¼ cup unsalted butter
  • ¼ cup water
  • 2 teaspoons vanilla extract
  • ¼ teaspoon salt
  • 1 teaspoon cinnamon
  • 2 large eggs

Apple Mixture

  • 2 small granny smith apples, peeled and diced
  • 1 tablespoon unsalted butter
  • ¼ cup brown sugar
  • 1 teaspoon ground cinnamon

Cinnamon Butter Mixture

  • 4 tablespoons unsalted butter
  • 2 teaspoons ground cinnamon

Instructions

  1. Reserve ¾ cup flour, then combine the remaining flour, yeast, and sugar in the bottom of a stand mixer (or large bowl).
  2. In a small saucepan, gently warm the milk and butter until the butter has just melted. Remove it from the heat and let it sit for about 2-3 minutes. Add in the water and vanilla and stir to combine.
  3. Pour the milk mixture into the flour mixture and, using the dough hook or knead with your hands, mix it together until it's well combined.
  4. Add the salt, cinnamon and eggs one at a time, making sure to beat well after each one.
  5. Add the remaining ¾ cup of flour and mix until the dough comes together.
  6. Place the dough in a large, well-oiled bowl. Cover it with a damp cloth and leave it in a dry, warm place to rise for about an hour.
  7. Once the dough has doubled in size, punch it down and roll it out to the size of a large rectangle on a well floured surface.
  8. Preheat the oven to 350°F.
  9. In a medium-sized skillet, add the butter, brown sugar and diced apples over medium heat and cook until the apples are soft and tender, stirring occasionally.
  10. Mix together the butter and cinnamon to make the cinnamon-butter mixture. Spread it over the surface of the dough, then top it evenly with the apple mixture.
  11. Cut the dough into 5 strips from top to bottom. Then, cut again into thirds going from left-to right.
  12. Stack the slices together and place in a well buttered 9x5 loaf pan.
  13. Bake for about 30-40 minutes or until it's golden brown.
Nutrition Information:
Yield: 6 Serving Size: 1
Amount Per Serving: Calories: 709Total Fat: 21gSaturated Fat: 12gUnsaturated Fat: 9gCholesterol: 111mgSodium: 131mgCarbohydrates: 113gFiber: 7gSugar: 19gProtein: 16g

This data was provided and calculated by Nutritionix.

© Aubrey Cornelius
Cuisine: American / Category: Bread
Apple Pull-Apart Bread

Coconut Smoothie Bowl

December 9, 2025 by Aubrey Cornelius Leave a Comment

a closeup of a coconut smoothie bowl topped with fresh blueberries, granola, and goji berries

This coconut smoothie bowl is a healthy treat that tastes like dessert yet is packed with super nutritious ingredients. It's not only healthy, vegan, dairy-free, and gluten free, but it taste absolutely delicious and is ready in 5 minutes!

It's one of my favorite breakfasts (it's even something I'll make for a dessert when I'm craving coconut). It just comes together so quickly and has such a great flavor that I forget I'm eating something good for me!

a coconut smoothie bowl topped with fresh blueberries, granola, and goji berries

This coconut smoothie bowl recipe came to me (as most recipes do, come to think of it) while wandering around my local market checking out the gorgeous produce. They happened to have these beautiful little satsuma oranges and I just knew that I had to use them in something.

This coconut smoothie bowl has fresh orange juice, banana, mango, almond milk, and a spoonful of coconut cream (in case you want it a bit creamier) which can be switched out for any of your favorite fruits and then top with whatever goodies you have on hand! I would recommend not skimping on the blueberries, however, as they really add a nice sweetness.

a closeup of a coconut smoothie bowl topped with fresh blueberries, granola, and goji berries

I like to make a double (or even triple) batch and store it in my souper cubes. Then when I'm getting ready for the day, I just take one out of the freezer, put it in a bowl, and let it sit for 20-30 minutes. By the time I'm ready, so is my smoothie bowl! It just needs a good stir and some toppings.

I do the same thing with my pineapple spinach banana smoothie and my chia seed smoothie. I rotate between all three and always have a few in my freezer ready to go.

a coconut smoothie bowl topped with fresh blueberries and granola next to wooden scoops filled with the toppings and a bowl of fresh oranges

Ingredients

Smoothie

  • Fresh orange juice: Freshly squeezed oranges make a huge difference in the flavor of this coconut smoothie bowl, but store-bought will do the trick, too!
  • Bananas: The more ripe your bananas are, the sweeter the smoothie bowl will be. I like to use bananas that have started to get a few brown spots on them.
  • Fresh or frozen mango: Mango is one of those fruits that I almost exclusively use the frozen version (unless it's for a dessert like mango with sticky rice; then fresh is worth it). It's just so much easier to toss in a bag of frozen mango without having to peel and slice it!
  • Ice: Make sure your blender has enough power to cut through the ice and blend it until it's smooth. There's nothing worse than a smoothie bowl with big chunks of ice throughout.
  • Coconut cream (optional): If I've got this on hand, I definitely use it. It's what gives this smoothie bowl a rich, coconut flavor.

Toppings

  • Chia seeds
  • Granola: This adds such a nice crunch and I highly recommend it. Homemade or store-bought are both fine!
  • Goji berries: I pick mine up at Costco in bulk whenever they've got them, otherwise I order them online. They're my favorite and so good for you!
  • Blueberries, blackberries, or raspberries
  • Unsweetened shredded coconut
three wooden scoops filled with toppings for a coconut smoothie bowl (granola and goji berries, fresh blueberries, and shredded coconut)

Instructions

I'm fairly certain I could skip the instructions since you likely already know how to make a smoothie bowl! But here they are, just in case it's helpful for you:

  1. Place all the smoothie ingredients into the blender in the order listed (it's much easier for the blender to mix everything if you have liquid on the bottom).
  2. Blend it until it's smooth!
  3. Add your toppings. The ones we have listed are our favorites but we've included a list of ideas below if you want to try something a little different.
a coconut smoothie bowl topped with fresh blueberries and granola next to wooden scoops filled with the toppings and a bowl of fresh oranges

Smoothie Variations

  • Add some greens: Blend in a handful of spinach or kale. It won't change the flavor much but adds a nice boost of nutrients. I sometimes toss in half an avocado for extra creaminess.
  • Increase the protein: Add a scoop of vanilla protein powder, Greek yogurt, or a few tablespoons of cottage cheese. You may need a splash more orange juice to keep it really smooth.
  • Try a different citrus: Swap part of the orange juice for pineapple juice or add the zest of one of the oranges.
  • Make it a berry bowl: Replace half (or all) of the mango with frozen strawberries, blueberries, or raspberries.
  • Make it everything coconut: Use coconut milk instead of orange juice, and increase the coconut cream to ½ cup. It becomes really thick and even more like a dessert!
  • Add a little chocolate: Blend in 1-2 teaspoons cocoa powder and top it with cacao nibs.
  • Add some nuts: Add a tablespoon of almond butter or cashew butter to the smoothie ingredients, then top with chopped almonds, pistachios, or cashews.
  • Low-sugar option: Use one banana instead of two, add a little more ice, and swap the granola for extra berries or chopped nuts.
  • Add a little exotic flavor: Blend in a pinch of turmeric, ginger, or cardamom. These pair really well with the citrus and coconut!
  • Make it a smoothie instead of a bowl: Add an extra ½-1 cup of orange juice or coconut milk to thin it out.

Related Recipes

Looking for more delicious breakfast recipes? Try these:

  • Hash Brown Casserole with Eggs, Sausage and Mushrooms - super easy, delicious and feeds a crowd!
    Cheesy Sausage Hash Brown Breakfast Casserole
  • Easy Overnight French Toast Bake Recipe
    Overnight French Toast Bake
  • a top-down view of a cottage cheese egg bake on a rustic wooden table
    Cottage Cheese Egg Bake - Easy High-Protein Breakfast Casserole
  • Baked Oatmeal Cups in muffin tin just out of the oven on a black plate.
    Baked Oatmeal Cups (Easy, Healthy, and Make-Ahead!)
a closeup of a coconut smoothie bowl topped with fresh blueberries, granola, and goji berries

Coconut Smoothie Bowl

Yield: 2 smoothie bowls
Prep Time: 10 minutes
Total Time: 10 minutes

This Tropical Super Food Smoothie Bowl is a healthy treat that tastes like dessert yet is packed with super nutritious ingredients.

Ingredients

  • ¾ cup fresh navel orange juice
  • 2 bananas
  • 1 ½ - 2 cups frozen mango (or one fresh mango)
  • 1 cup of ice
  • ¼ cup coconut cream (optional)
  • 1 tablespoon chia seeds
  • 3-4 tablespoons granola
  • 1 tablespoon goji berries
  • ¼ cup blueberries (or blackberries or raspberries)
  • 2 tablespoons unsweetened shredded coconut

Instructions

  1. In a blender, add the orange juice, banana, mango, ice and coconut cream (if using) and blend until smooth.
  2. Serve immediately with the toppings listed or any toppings of your choosing.
Nutrition Information:
Yield: 2 Serving Size: 1
Amount Per Serving: Calories: 480Total Fat: 17gSaturated Fat: 13gUnsaturated Fat: 4gSodium: 42mgCarbohydrates: 82gFiber: 11gSugar: 57gProtein: 6g

This data was provided and calculated by Nutritionix.

© Aubrey Cornelius
Cuisine: American / Category: Breakfast and Brunch
Coconut Smoothie Bowl

Frozen Berry Pie

December 8, 2025 by Aubrey Cornelius Leave a Comment

a frozen berry pie baked in a cast iron skillet just out of the oven on a white kitchen towel

There's nothing like having the ingredients on hand to make an easy, impressive, and delicious dessert at a moment's notice. This frozen berry pie is so simple to throw together, so be sure to keep frozen berries on hand!

a frozen berry pie baked in a cast iron skillet just out of the oven, garnished with mint, on a white kitchen towel on a wood table

Frozen Berry Pie could also be called Triple Berry Pie since it uses three different types of berries. It's the perfect addition to any meal and, for how incredible it looks, is very simple!  Even the lattice top was done freehand and I think it adds a nice "rustic" touch.  So don't worry if your crust isn't cut to perfection, it will all taste delicious in the end!

The mix of the three berries combined with the buttery and flakey pie crust makes this a perfect dessert during the holidays, too.

a frozen berry pie with a lattice crust in a cast iron skillet, sitting on a rustic wood table, ready for the oven

I love using my freezer as a way to store ready-made meals, but I also love freezing desserts. I have a tiramisu recipe coming that I assembled in Souper Cubes for a ready-made dessert, and I always have a few lemon bars or sopapilla cheesecake squares on hand.

This frozen berry pie is almost as easy as having it already made, since I just keep a few frozen fruits and berries on hand. Store-bought pie crusts are so good that I typically will just buy those, too, and keep them stocked.

Ingredients

This recipe has just a handful of ingredients, making it a truly simple last-minute dessert.

  • Granulated sugar: This will get mixed with the cornstarch, then tossed with the berries. It sweetens the pie just enough!
  • Cornstarch: The berries will get coated in cornstarch, which will thicken the juices while it bakes.

A mix of berries is best, but you can mix and match as you like. Just try to keep the overall amount of berries and fruit the same.

  • Frozen raspberries
  • Frozen blackberries
  • Frozen blueberries
  • Frozen peaches

Make a homemade pie crust or use store-bought, either will be delicious. I usually opt for store-bought since it's so nice to have them on hand.

  • Pie crust (here's a list of store-bought crusts ranked worst to best)
assembling a lattice crust top on a frozen berry pie

Instructions

  1. The first thing to do is preheat your oven! It doesn't take long to make this freezer berry pie so you'll want the oven ready when you are.
  2. Next you'll mix the sugar and cornstarch together in a medium-sized mixing bowl until it's well combined. Then just gently fold the berries into the mixture so they're all coated. This mixture is what will thicken the berry juices as the pie bakes, so it's important to coat all the berries.
  3. We usually use a cast iron skillet for baking this pie, but a pie pan will also work. You can use either one or two pie crusts, and if you're using two, now is when you'll gently press the bottom crust into whichever type of baking dish you're using.
  4. Now pour the berry mixture into the bottom crust (or just directly into the baking dish if you're only using a top crust). Spread it out so it's even on the top.
  5. Now roll out the top layer of pie dough and cut it into thin strips. Lay each strip onto the berries, weaving the strips together using an "over and under" lattice pattern.
  6. Bake for for 35 minutes or until the crust begins to turn golden brown and the filling is bubbly.
a frozen berry pie baked in a cast iron skillet just out of the oven on a white kitchen towel on a wood table

Variations

  • Mixed Berry Pie with No Peaches: Substitute the peaches for the three berries in equal parts.
  • Cherry Berry Pie: Omit the peaches, raspberries and blackberries. Increase the blackberries to 3 ¼ cups and add 3 cups pitted fresh or frozen tart cherries.
  • Bumbleberry Pie: A bumbleberry pie is just a made up word for a random mix of berries used in a pie. This flexible pie uses at least three kinds of berries like blackberry, raspberry, strawberry, and blueberry. Other fruits such as apples and/or rhubarb can be added as well. If you stick to 6 ¼ cups berries and fruits, any combination can be used for a bumbleberry pie.
  • Razzleberry Pie: This is another made up berry and refers to a mixture of raspberries and blackberries. Simply use equal parts berries for this pie.
a frozen berry pie baked in a cast iron skillet just out of the oven on a white kitchen towel

Frozen Berry Pie

Yield: 8 servings
Prep Time: 20 minutes
Cook Time: 35 minutes
Total Time: 55 minutes

Keep frozen berries and pie crusts on hand so you can make this easy, delicious pie anytime!

Ingredients

  • ½ cup granulated sugar
  • 3 tbs cornstarch
  • 2 cups frozen raspberries
  • 1 cup frozen blackberries
  • 2 cups frozen blueberries
  • 1 ¼ cups frozen peaches
  • 9-inch pie crust (ready-to-bake or homemade)

Instructions

  1. Preheat oven to 400°F.
  2. In a medium-sized mixing bowl, mix the sugar and cornstarch until it's well combined. Gently fold the berries into the mixture. Set aside.
  3. Gently press one of the pie crusts into a pie dish or a cast iron skillet (you can use a store-bought or a homemade pie crust).
  4. Pour the berry mixture into the crust.
  5. Roll out the top layer of pie dough and cut into thin strips. Weave the strips together over the berries using an "over and under" lattice pattern. Some will hang over the sides, so cut those once everything is weaved together.
  6. Bake for for 35 minutes or until the crust is golden brown and the filling is bubbly.

Notes

A mix of frozen and fresh berries will also work.

Any berry combination will work, just be sure to have approximately the same amount of fruit overall.

Nutrition Information:
Yield: 8 Serving Size: 1
Amount Per Serving: Calories: 215Total Fat: 1gSaturated Fat: 0gUnsaturated Fat: 1gSodium: 3mgCarbohydrates: 52gFiber: 8gSugar: 29gProtein: 2g

This data was provided and calculated by Nutritionix.

© Aubrey Cornelius
Cuisine: American / Category: Cake and Pie Recipes
Frozen Berry Pie

Mediterranean Cottage Cheese Bowls

December 4, 2025 by Kristy Bernardo

a mediterranean cottage cheese bowl in a round, red bowl on a wood table next to fresh tomatoes on the vine and two spoons

These cottage cheese bowls take just five minutes to make and have loads of flavor! They're high in protein and are perfect for lunch or a light dinner.

mediterranean cottage cheese bowls in a round, red bowl on a white table next to fresh tomatoes on the vine and fresh, sliced cucumbers

Cottage cheese recipes are all the rage - who knew cottage cheese is so versatile? I've always loved savory ingredients + a scoop of cottage cheese (I shared my love for cottage cheese and salsa years ago) but these cottage cheese bowls take it to another level.

These Greek cottage cheese bowls make a wonderful lunch and that's usually when I make them, but I've also had them for a quick dinner. If I'm especially hungry, I'll add some rotisserie chicken and serve them with stuffed garlic bread and/or with baked oatmeal cups as a "dessert".

a mediterranean cottage cheese bowl in a round, red bowl on a wood table next to fresh tomatoes on the vine, sliced cucumbers, and two spoons

Ingredients

  • Cottage cheese: The Good Culture brand is my personal favorite, but any brand will work. Here's a list of cottage cheese brands ranked from best to worst to help you decide.
  • Cucumbers: I use the mini cucumbers but English cucumbers are also a good choice.
  • Cherry tomatoes: During the summer, I pick these straight from my garden (is there anything better?). Store-bought are good, too!
  • Olive tapenade: I stock up on this at Trader Joe's but I've also used Muffaletta from Costco. Chopped kalamata olives are a good substitute.
  • Feta cheese (optional): I add this if I have it, but it's just as delicious without it. It has a lot of sodium so keep that in mind.
  • Salt & pepper: The cottage cheese and feta are already a little salty, but the cucumbers and tomatoes really benefit from a bit of seasoning.
a mediterranean cottage cheese bowl in a round, red bowl on a white table next to fresh tomatoes on the vine

Instructions

You likely don't really need me to tell you how to make this, but just in case:

  1. Dice your cucumber and halve or quarter your cherry tomatoes.
  2. Put about a cup of cottage cheese in a bowl, then top it with the cucumbers, cherry tomatoes, olive tapenade, and feta cheese (if using). Taste and add salt and pepper if you think it needs it.
  3. That's it! Super fast, easy, and delicious!

Variations

  • Add some diced red onion, bell peppers, celery, radishes, and/ or shredded carrots
  • Turn it into more of a salad by serving it over chopped romaine lettuce
  • Add fresh herbs like basil, mint, parsley, or dill
  • Use goat cheese instead of feta
  • Avocado or mozzarella pearls are great to add a little more creaminess.
  • Sub half of the cottage cheese for ricotta
  • White beans or chickpeas are delicious!
  • Try adding leftover chopped, grilled chicken or rotisserie chicken
  • Chop up a hard-boiled egg
  • Add tuna or smoked salmon
  • Add some capers! If you're like me, you use some for a recipe then wonder what to do with the rest of the jar.
  • Marinated artichokes or chopped, roasted red peppers
  • You could also serve it over cooked quinoa, farro, rice, or pasta
  • A little lemon zest, garlic powder, or crushed red pepper flakes
  • A drizzle of balsamic glaze is fantastic!
  • Add a scoop of hummus or pesto
a mediterranean cottage cheese bowl in a round, red bowl on a wood table next to fresh tomatoes on the vine and two spoons

Frequently Asked Questions

Can I make these cottage cheese bowls ahead of time?

You can prep the ingredients in advance, but it's best to keep everything separate until you're ready to eat. Cucumbers and tomatoes release liquid, so mixing everything together too early will can make it watery. I'll often chop the cucumbers and tomatoes and put them in separate containers so I'm ready for the week.

What type of cottage cheese works best?

Any cottage cheese will work! I like for Good Culture since it has great texture. Low-fat versions work well if that's your preference, but they won't be quite as creamy.

Is this recipe gluten-free?

Yes, all of the ingredients are naturally gluten-free. If you decide to serve it with bread, crackers, or pita chips, just choose gluten-free versions.

How can I lower the sodium?

Use a low-sodium cottage cheese, scale back the tapenade or feta, and skip seasoning the cucumbers and tomatoes. You could also swap the tapenade for chopped fresh tomatoes, roasted red peppers, or fresh herbs to keep the flavor without adding extra salt.

Can I use Greek yogurt instead of cottage cheese?

The texture and flavor will be slightly different, but Greek yogurt still makes a great base for the toppings.

What can I use instead of tapenade?

Chopped olives, roasted red pepper spread, marinated artichokes, or a spoonful of pesto all work well. Each one brings a different flavor, so it's an easy way to switch things up!

How can I turn this into a heartier meal?

Add a protein like rotisserie chicken, tuna, white beans, or chickpeas, or pair it with a small soup or bread.

Can I pack this for lunch?

Yes, just keep the components separate. Pack the cottage cheese in one container and the veggies, tapenade, and feta in another. Then just assemble it when you're ready to eat.

Do I have to use feta?

Not at all, and I often don't. It adds a lot of flavor, but the bowls are still excellent without it. Goat cheese or mozzarella pearls are also great alternatives if you want something different.

a closeup of a greek cottage cheese bowl

Related Recipes

Looking for more easy lunch recipes? Try these:

  • a closeup of tuna salad lettuce wraps with a small dish of mayo and lemon wedges
    Tuna Lettuce Wraps
  • Buffalo Chicken Egg Salad
    Buffalo Chicken Egg Salad
  • A healthy turkey sandwich recipe! Piled high with turkey, lettuce, tomato, roasted anaheim peppers and a creamy black bean spread!
    Healthy Turkey Sandwich Recipe with a Black Bean Spread
  • a platter of hot ham and cheese party sandwiches
    Hot Ham and Cheese Party Sandwiches
a mediterranean cottage cheese bowl in a round, red bowl on a white table next to fresh tomatoes on the vine

Mediterranean Cottage Cheese Bowls

Yield: 2 bowls
Prep Time: 5 minutes
Total Time: 5 minutes

These cottage cheese bowls are super flavorful and perfect for an easy lunch or light dinner. They have just a few ingredients and take just 5 minutes to make!

Ingredients

  • 2 cups cottage cheese
  • 2-3 mini cucumbers, chopped
  • 15 cherry tomatoes, halved
  • ½ cup olive tapenade
  • ½ cup crumbled feta cheese
  • salt & pepper

Instructions

  1. Place a cup of cottage cheese into two bowls. Top with the other ingredients and serve.

Notes

The amounts are merely suggestions, so add more or less of any ingredients.

Chopped kalamata olives or muffaletta can be used in place of the olive tapenade.

Nutrition Information:
Yield: 2 Serving Size: 1
Amount Per Serving: Calories: 1470Total Fat: 112gSaturated Fat: 60gUnsaturated Fat: 51gCholesterol: 313mgSodium: 2565mgCarbohydrates: 50gFiber: 13gSugar: 25gProtein: 80g

This data was provided and calculated by Nutritionix.

© Kristy Bernardo
Cuisine: Mediterranean / Category: Lunch and Snacks
Mediterranean Cottage Cheese Bowls

Double Chocolate Cookies

December 1, 2025 by Aubrey Cornelius Leave a Comment

a vintage plate filled with double chocolate cookies topped with sea salt

The only thing better than a chocolate chip cookie are these double chocolate cookies! A chocolate cookie batter that's filled with chunks of more chocolate then topped with fleur de sel for a chocolate lover's dream.

We bake these double chocolate cookies whenever we need a chocolate fix. I usually freeze half of the unbaked cookies so we can just pop a few into the oven whenever the mood strikes (it also helps with portion control)!

a vintage plate filled with double chocolate cookies topped with sea salt

I most often bake these around Christmas since they're perfect for a cookie tray. They're a good choice to pair with quicker no-bake desserts like M&M Pretzel Hugs and Coconut Rum Balls. But they're wonderful any time of the year, so don't hold back!

Ingredients

  • Light brown sugar
  • Granulated sugar
  • Butter!! - Use a high-quality butter, it makes all the difference
  • Vanilla extract - A vanilla bean paste will also work just fine if that's what you've got
  • Eggs
  • All-purpose flour
  • Cocoa powder
  • Baking soda
  • Salt - even though you'll be adding fleur de sel to the top of the cookies, don't skip what's in the batter as it makes for a much richer, more flavorful cookie.
  • Dark chocolate chunks - I love the ones from Trader Joe's)
  • Sea salt or fleur de sel - this is technically optional but it really takes these double chocolate cookies over the top!)

Instructions

  1. Preheat your oven first - it's one of the golden rules of baking.
  2. The first step is to cream together the brown sugar, white sugar, and butter until it's light and fluffy. This takes a little time but don't be tempted to speed it up! You want the mixture to be super light and fluffy, which takes a few minutes of beating.
  3. Next you'll beat in the vanilla extract and the eggs, one at a time, until everything is well-incorporated and smooth.
  4. Meanwhile, you can sift together the flour, cocoa powder, baking soda and salt, then combine that mixture with the sugar and butter mixture. You'll want to mix this just until it's incorporated, which should take about 30 seconds or so.
  5. Now stir in the chocolate chunks - it's the best part of these cookies.
  6. Use a cookie scoop or just your hands to form balls, then fill up a cookie sheet 3 across and 3 down with enough space for the cookies to spread out while baking.
  7. And now, for my personal favorite part of these delectable double chocolate cookies: sprinkle them evenly with the fleur de sel. This is what sets these cookies apart!
  8. Finally, bake the cookies until they're just set. Let them cool, then transfer them to a wire rack to cool completely.
  9. You can enjoy them right away (is there anything better than a warm cookie fresh out of the oven??), box them up and save them for later, or gift them to a friend, family member, or to bring to the office to share. They'll be a big hit in any scenario!
a side view of a vintage plate filled with double chocolate cookies topped with sea salt next to a pink flower in a vase

Variations

  • Try different chocolate: Swap some of the dark chocolate chunks for milk chocolate, semisweet chips, or chopped white chocolate. Or try a mix of all three!
  • Add espresso powder: Stir a teaspoon of instant espresso powder into the dry ingredients. It doesn't make the cookies taste like coffee, it just makes them even more chocolatey.
  • Make them extra fudgy: Reduce the flour by ¼ cup and add an extra tablespoon of cocoa powder. This gives the cookies a softer, more brownie-like center.
  • Add nuts: Toasted pecans, walnuts, or macadamia nuts are all great choices. Fold in ½ cup or more depending on how chunky you like them.
  • Add dried fruit: I do this most often during the holidays. Chopped dried cherries, cranberries, or even raisins work especially well with the dark chocolate.
  • Make them spicy: Hear me out on this one: a pinch of cayenne adds just a subtle heat that's surprisingly delicious! Or add a little cinnamon that really wakes up the chocolate. Start with ⅛ teaspoon of cayenne for the first batch - you really don't want to go overboard with this twist.
  • Orange zest twist: This is one of my favorite ways to switch things up (citrus and dark chocolate are always a win together). Just add the zest of one orange to the butter and sugar mixture.
  • Peppermint version: Add ½-1 teaspoon of peppermint extract to the dough, then fold in crushed peppermint candies or candy cane pieces. Especially terrific during the holidays!
  • Salted caramel: Skip the fleur de sel and press a soft caramel candy into the center of each dough ball before baking. You can then sprinkle with a tiny bit of flaky salt when they come out of the oven.
  • Brown butter upgrade: Brown one stick of the butter, let it cool slightly, then mix it in with the remaining softened butter. Don't brown all of the butter, you just want a little extra toasted flavor.
  • Chunkier cookies: Chill the dough for an hour before baking. This keeps the cookies thicker and gives them softer centers.
  • Double cocoa: Swap ¼ cup of the flour for ¼ cup more cocoa powder for an even more intense chocolate flavor!
a vintage plate filled with double chocolate cookies topped with sea salt

Storage Tips

  • Room temperature: Store the double chocolate cookies in an airtight container for 4-5 days. They stay soft, and the chocolate chunks keep their richness at room temperature. If you like a slightly chewier cookie, tuck a slice of sandwich bread into the container-the cookies draw in a little moisture and stay fresh longer.
  • Refrigerator: Refrigeration isn't required, but if your kitchen runs a little warm, you can refrigerate the cookies for up to a week. Bring them to room temperature before serving so the chocolate softens again.

Freezing Instructions

  • Freezing baked double chocolate cookies:
    • Let the cookies cool completely on a wire rack.
    • Arrange them in a single layer on a baking sheet and freeze until solid.
    • Transfer the frozen cookies to a freezer bag or container, press out the extra air, and label with the date.
    • They keep well for up to 3 months.
    • To serve the cookies, thaw them at room temperature or warm them up in a 300°F oven for a few minutes.
  • Freeze cookie dough balls
    • Freezing the dough gives you fresh-baked cookies anytime!
    • Scoop the dough into balls, just like you would for baking.
    • Place them on a parchment-lined baking sheet and freeze them until they're firm (this is so they won't stick together).
    • Transfer the solid dough balls to a freezer bag or airtight container.
    • Freeze for up to 3 months.
  • To bake from frozen:
    • Add an extra minute or two to the bake time. No need to thaw!
  • Using Souper Cubes Cookie Tray
    • The Souper Cubes cookie tray is perfect for getting consistently shaped frozen dough portions.
    • Scoop some dough into each well of the Souper Cubes cookie tray.
    • Level the tops so they freeze evenly.
    • Freeze until solid (usually a few hours or overnight).
    • Pop out the frozen dough portions and store them in a freezer bag or container.
    • Label with "double chocolate cookies" plus the date and baking instructions (trust me, you won't remember what's in a frozen bag of food so don't skip this...ask me how I know)!
    • Bake directly from frozen following your normal baking temperature, adding a minute or two of baking time.
several vintage plates stacked with the top plate filled with double chocolate cookies topped with sea salt

Frequently Asked Questions

Can I use different types of chocolate?

Milk chocolate, semisweet chips, or chopped white chocolate all work if you prefer them to dark chocolate. Try a mix of several types!

Do I need to chill the dough?

Chilling isn't required, but it does make thicker, chunkier cookies. If you want that bakery-style look, chill the dough for at least an hour before baking.

Why did my cookies spread too much?

Your butter may have been too soft or slightly melted. If your kitchen is really warm (especially during the hot summer months), chilling the dough or adding an extra tablespoon of flour can help the cookies hold their shape.

Can I make the dough ahead of time?

The dough can be made up to 48 hours in advance. Keep it covered in the refrigerator and scoop the cookies when you're ready to bake.

Can I freeze the dough?

Yes, this dough freezes great! Scoop the dough into balls and freeze on a baking sheet, or use a freezer cookie tray for perfectly portioned pieces. Bake straight from frozen with just a minute or two of extra time.

Can I freeze the baked cookies?

Yes, but be sure to freeze them in a single layer, then transfer them to a freezer bag once they're solid. They thaw quickly and taste just as good!

How do I keep the cookies soft?

Store them in an airtight container and place a slice of bread inside. The cookies absorb just enough moisture to stay soft for days.

Can I make these cookies smaller?

Just use a smaller scoop or roll smaller dough balls. Reduce the baking time slightly and keep an eye on them so they don't overbake.

Can I add nuts or other mix-ins?

Toasted nuts, dried cherries, crushed peppermint, or even caramel bits work really well. Don't use more than a cup of extras so you don't change the structure of the dough.

What kind of salt should I sprinkle on top?

Fleur de sel or flaky sea salt works best. Table salt won't give the same texture or that fantastic pop of flavor.

an overhead shot of a vintage plate filled with double chocolate cookies topped with sea salt

Related Recipes

Looking for more chocolate dessert recipes? Try these:

  • a white bowl filled with chocolate meringue cookies with more cookies on a linen towel on the table around the bowl
    Chocolate Meringue Cookies with Dark Chocolate Swirls
  • a plate of white chocolate biscotti, some coated with chopped pistachios and some with chopped cacao nibs, next to a glass of milk
    White Chocolate Biscotti Recipe (Gift-Worthy Cookies!)
  • a round, vintage silver plate filled with chocolate shortbread cookies
    Chocolate Shortbread Cookies with Crunchy Pistachios
  • Homemade chocolate truffles in white paper candy cups for gift-giving
    Easy Chocolate Truffles Recipe
a vintage plate filled with double chocolate cookies topped with sea salt

Double Chocolate Cookies

Yield: 36 cookies
Prep Time: 15 minutes
Cook Time: 15 minutes
Total Time: 30 minutes

A chocolate cookie batter is baked with chunks of chocolate and topped with fleur de sel. They're rich and chocolatey and perfect for sharing (or not)!

Ingredients

  • 2 cups brown sugar
  • 1 ½ cups sugar
  • 3 sticks butter (softened)
  • 2 tablespoons vanilla extract
  • 3 eggs
  • 5 cups all-purpose flour
  • ½ cup cocoa powder
  • 1 ½ teaspoons baking soda
  • 1 ½ teaspoons salt
  • 24 ounces dark chocolate, chopped into chunks
  • 4 tablespoons fleur de sel or sea salt (optional but highly recommended)

Instructions

  1. Preheat oven to 350°F.
  2. In a large mixing bowl, cream together the brown sugar, white sugar, and butter until it's light and fluffy (about 2-3 minutes).
  3. Add the vanilla. Then add the eggs, one at a time, mixing well between each addition.
  4. In another large bowl, sift together the flour, cocoa powder, baking soda and salt.
  5. Combine with the sugar and egg mixture, being careful not to over mix.
  6. Stir in the chocolate chunks.
  7. Using a cookie scoop (or hands to form balls), fill up a cookie sheet 3 across and 3 down with enough space for the cookies to spread out while baking.
  8. Sprinkle evenly with the fleur de sel.
  9. Bake for about 13-15 minutes or until the cookies are just set. Let them cool for about 5 minutes, then transfer them to a wire rack to cool completely.
Nutrition Information:
Yield: 36 Serving Size: 1
Amount Per Serving: Calories: 353Total Fat: 8gSaturated Fat: 4gUnsaturated Fat: 3gCholesterol: 22mgSodium: 790mgCarbohydrates: 64gFiber: 2gSugar: 34gProtein: 6g

This data was provided and calculated by Nutritionix. Serving size is 1 cookie.

© Aubrey Cornelius
Cuisine: American / Category: Desserts
Double Chocolate Cookies

Baked Lemon Ricotta Pasta with Italian Sausage

November 29, 2025 by Aubrey Cornelius Leave a Comment

a casserole dish filled with baked lemon ricotta pasta just out of the oven

This easy baked lemon ricotta pasta takes just 20 minutes to put together and has a wonderfully bright flavor from the lemon juice and zest. It's easy enough for a weeknight but delicious enough for company!

You can use any type of noodle you've got on hand. Our favorites are lasagna noodles, as seen in our images, and ziti noodles. But any type will work, so use up that pasta that's been hanging out in your cupboard!

a casserole dish filled with baked lemon ricotta pasta just out of the oven

We love to serve this easy lemon ricotta pasta with a good crusty bread and a simple side salad. This stuffed garlic bread is a real treat and a wedge salad is always a popular choice. Or simply serve it on its own with a nice glass of wine!

This dish is also a favorite of ours to use in our freezer cubes. You can layer it before or after baking, then simply bake it in individual servings as needed. It's great for busy nights when everyone's on different schedules, or for anyone who lives alone and doesn't want to be eating the same leftovers for days on end. (For more ideas, join our Freezer Cubes subreddit!)

Ingredients

This baked lemon ricotta pasta has a lot of flavor despite the short ingredient list. It comes together quickly!

  • Ricotta cheese (whole milk is best but low-fat will do the trick)
  • 1 lemon (zested and juiced)
  • Italian sausage
  • Onion & garlic (omit these for an even easier recipe - it will still be delicious!)
  • Pasta sauce (store-bought or homemade)
  • Dried pasta, such as lasagna, ziti, etc.
  • Shredded mozzarella cheese
  • Grated Parmesan cheese
hands removing the first serving from a casserole dish filled with baked lemon ricotta pasta

Instructions

  1. The first thing you'll need to do is make the lemon ricotta, which is simply mixing together the ricotta cheese with lemon juice and zest, then adding some salt and pepper.
  2. Next you'll cook the pasta just until it's al dente (it will cook more in the oven) and set it aside.
  3. Now cook the Italian sausage, onions, and garlic, then stir in the pasta sauce.
  4. Putting it all together is the next step. Layer a third of the pasta sauce, then half of the pasta, half of the ricotta, then repeat. End with the remaining pasta sauce, then top it all with the mozzarella and parmesan.
  5. Now just bake it until it's hot and bubbling!

Variations

  • Try ground turkey or chicken sausage for a lighter version.
  • Try adding some fresh spinach if you'd like to get your greens in.
  • For a vegetarian version, you can swap the sausage for mushrooms or a mix of bell peppers and zucchini. Spinach is also a great choice.
  • Add shredded provolone or fontina with the mozzarella, or mix a little pecorino into the ricotta.
  • If you prefer creamy sauces, you can add a little cream to the pasta sauce before assembling.
  • Fresh basil, parsley, oregano, or thyme can be mixed into the ricotta or sprinkled over the top before baking.
  • Add some crushed red pepper to the pasta sauce if you like it spicy. You can also use spicy Italian sausage.
a serving of baked lemon ricotta pasta on a vintage plate with a forkful being scooped out

Storage & Make-Ahead

Storage

  • Refrigerator: Store any leftover lemon ricotta pasta in an airtight container for 3-4 days.
  • Reheating: Warm individual portions in the microwave, or cover the baking dish with foil and heat in a 325°F oven for approximately 30 minutes or until it's hot and bubbling.

Make-Ahead

  • Make-ahead (unbaked): Assemble the casserole completely, cover it tightly with foil or a fitted lid, and refrigerate it for up to 24 hours. Bake it as directed, adding about 10-15 minutes if it goes into the oven straight from the fridge.
  • Make-ahead (baked): Bake the casserole fully, let it cool, then cover and refrigerate. Reheat at 325°F until it's hot and bubbling.

Freezing

  • Freeze the whole casserole (unbaked): Assemble the entire dish in a freezer-safe, tightly wrapped baking dish. Cover it first with plastic wrap, then with a layer of foil. Freeze it for up to 3 months. Thaw overnight in the refrigerator and bake as directed above.
  • Freeze the whole casserole (baked): Let the cooked casserole cool completely, then wrap it well in plastic wrap and foil. Freeze it for up to 3 months. Thaw it in the refrigerator, then reheat it at 325°F as directed above.
  • Freezer Cubes: Assemble the ingredients directly into the freezer cubes and freeze them unbaked, or portion the fully cooked casserole into the cubes once it has cooled. Press down gently so the pasta and sauce settle evenly, then freeze the cubes until they're solid (8 hours or overnight). Pop out the frozen blocks, transfer them to a freezer bag, and label it with the name and date. They keep well for 2-3 months. Bake from frozen in a small covered baking dish (45 minutes for 1-cup servings or 1 hour 15 minutes for 2-cup servings).
a casserole dish filled with baked lemon ricotta pasta just out of the oven and garnished with fresh thyme

Related Recipes

Looking for more easy freezer recipes? Try these:

  • two white bowls of cannellini bean and kale soup on a rustic wood table
    Cannellini Bean & Kale Soup
  • frozen shepherd's pie in a small casserole dish just out of the oven, sitting on a rustic wood table
    Freezer Shepherd's Pie
  • a hearty bowl of sausage tortellini soup with kale and cream
    Sausage Tortellini Soup (Freezer Friendly)
  • Best Beanless Chili Recipe
    Thick and Beefy Beanless Chili Recipe
a casserole dish filled with baked lemon ricotta pasta just out of the oven

Baked Lemon Ricotta Pasta

Yield: 8 servings
Prep Time: 20 minutes
Cook Time: 40 minutes
Additional Time: 10 minutes
Total Time: 1 hour 10 minutes

This easy pasta recipe has a creamy lemon ricotta paired with Italian sausage and a blend of two cheeses. It's a perfect weeknight meal!

Ingredients

  • 2 cups ricotta cheese
  • Zest from one lemon
  • 2 tablespoons fresh lemon juice
  • 1 teaspoon kosher salt
  • ¼ teaspoon freshly ground black pepper
  • 16 ounces ground Italian sausage
  • 1 medium yellow onion, diced
  • 2 garlic cloves, minced
  • 36 ounces pasta sauce, divided
  • 12 ounces dried pasta, such as lasagna, ziti, etc.
  • 2 cups mozzarella cheese
  • ½ cup grated parmesan cheese (see notes)

Instructions

  1. Preheat the oven to 350°F.
  2. In a medium mixing bowl, add the ricotta cheese, lemon juice and zest, salt, and pepper. Mix it until it's thoroughly combined and set it aside.
  3. Boil a pot of water and season with 2 teaspoons of salt. Add the uncooked pasta and cook it just until it's al dente, according to box instructions. Set it aside.
  4. In a large skillet over medium heat, add the Italian sausage and cook it until almost no pink remains. Add the onions and garlic and cook for another few minutes, stirring frequently, until the onions have softened. Stir in the pasta sauce and remove it from the heat.
  5. In a lightly greased casserole dish, add a layer of pasta sauce (just enough to coat the bottom) then a layer of the cooked pasta.
  6. Spoon about half of the ricotta mixture over the top of the pasta. Then, spread the sausage over the ricotta.
  7. Add another layer of pasta sauce, then cooked pasta, then layer the last of the ricotta.
  8. Layer the rest of the pasta sauce and top with mozzarella and parmesan.
  9. Bake for 30-35 minutes, or until it's bubbling hot and has a nice golden crust.

Notes

You can also use shredded Parmesan cheese, it will just have a crunchier top

Nutrition Information:
Yield: 8 Serving Size: 1
Amount Per Serving: Calories: 821Total Fat: 58gSaturated Fat: 29gUnsaturated Fat: 29gCholesterol: 163mgSodium: 2166mgCarbohydrates: 31gFiber: 3gSugar: 9gProtein: 47g

This data was provided and calculated by Nutritionix.

© Aubrey Cornelius
Cuisine: Italian / Category: Pasta Recipes
Baked Lemon Ricotta Pasta with Italian Sausage

Cannellini Bean & Kale Soup

November 28, 2025 by Aubrey Cornelius Leave a Comment

two white bowls of cannellini bean and kale soup on a rustic wood table

This easy cannellini bean and kale soup has a coconut milk-based broth with Italian sausage, cannellini beans, thinly sliced red potatoes, and a few handfuls of kale. It has a nice kick from the sausage and red pepper flakes, and a heartiness from the potatoes and beans.

two white bowls of cannellini bean and kale soup on a rustic wood table

There's nothing quite like a good, hearty soup when the weather turns colder. Soup is the original one-pot meal and they're a great way to get some veggies in while still enjoying something warm and comforting. We love adding sausage to our soups, like our lentil soup and Italian sausage stew. All you need is a crusty bread and dinner is done!

Ingredients

  • Italian sausage: You can use either pork or chicken sausage which is cut into small, bite-sized pieces.
  • Coconut milk: Either full-fat or light will work
  • Chicken broth: We like to use low-sodium in our recipes, which makes it easier to control the amount of salt.
  • Almond milk: Almond milk keeps it lighter but whole milk will make the soup a bit more rich.
  • Yellow onion: You can also use a sweet onion if you prefer.
  • Cannellini beans: We use canned beans to make quick work of this easy soup.
  • Red potatoes: No need to peel these, just give them a quick slice.
  • Red pepper flakes: These add a little kick which is a great contrast to the soup's creaminess.
  • Kosher salt: We add about a teaspoon but this can be adjusted to suit your taste.
  • Corn starch: We prefer a thicker soup, but this can be omitted if you prefer.
  • Kale: A few handfuls of kale adds a lot of body and texture, plus it's good for you!

Instructions

This cannellini bean and kale soup couldn't be simpler to make! Once your sausage and onions are chopped and the potatoes are sliced, it's really just a bit of sautéing and simmering.

  1. First you'll just heat a little olive oil in a large pot or dutch oven over medium heat. Then add the sausage and onions and cook until the sausage is browned on all sides, which takes just a few minutes.
  2. Next, add the coconut milk, chicken broth, most of the almond milk, beans, potatoes, red pepper flakes and salt. Bring it just to a low boil, reduce it to a simmer, then cook it for around 15-20 minutes just until the potatoes are soft.
  3. Make a small slurry: In a small container with a lid, add the cornstarch and the remaining almond milk. Close the lid and shake it vigorously until it's well combined. Add it to the soup and cook for a few more minutes, stirring it frequently, until the soup thickens.
  4. All that's left is to stir the kale in and serve!
two white bowls of cannellini bean and kale soup on a rustic wood table next to roasted chicken for dinner

Variations

  • Change the sausage: Mild or hot Italian sausage both work well in this cannellini bean and kale soup, and chicken or turkey sausage keeps things lighter. Smoked sausage is another option if you want deeper flavor.
  • Use different greens: Kale holds up best, but baby spinach, Swiss chard, or even chopped collards are great substitutes. Spinach will wilt fast, while chard brings a little more texture.
  • Try another bean: Great Northern beans are the closest match to cannellini. Chickpeas and butter beans are also good choices.
  • Adjust the creaminess: Using all whole milk will make the soup much richer, and using all almond milk keeps it very light.
  • Add more vegetables: Carrots, celery, or zucchini would all work well. You couls also try adding some sun-dried tomatoes or roasted red peppers.
  • Add a little cheese: A Parmesan rind simmered in the broth would be delicious!
  • Add more spice: Add extra red pepper flakes or swirl in a spoonful of Calabrian chili paste. Hot Italian sausage is another easy way to add more kick.
  • Make it vegetarian: Swap in plant-based Italian sausage or substitute it entirely with sautéed mushrooms, and use vegetable broth.
  • Make it heartier: Stir in cooked barley, farro, or a handful of small pasta (like ditalini or orzo). Extra potatoes will also thicken the soup naturally as they soften.

Storage & Make-Ahead

  • Refrigerator: Store leftover cannellini bean and kale soup in an airtight container for 3-4 days. The flavors deepen as it sits, and the kale softens a bit more.
  • Freezer: Creamy soups can be frozen, but it's better to freeze them without the dairy for the best results. We like to freeze this soup in freezer cubes for an easy soup starter anytime. Make the recipe as directed, omitting the coconut milk and almond milk. When you're ready to make the soup, heat the soup starter until it's simmering, then add the slurry plus the milks.
  • Reheating: Warm on the stovetop over medium heat, stirring it occasionally. If it thickens too much in the fridge, add a small amount of chicken broth or milk.
  • Make-ahead: You can prep most of the soup in advance. Cook it up to the point where you add the kale, then cool it completely and refrigerate. Then just reheat it until it's piping hot and add the kale just before serving.
two white bowls of cannellini bean and kale soup on a rustic wood table
an overhead shot of two white bowls of cannellini bean and kale soup on a rustic wood table

Frequently Asked Questions

Can I use a different type of bean?

Great Northern beans or butter beans are the closest substitutes, but chickpeas will also work just fine.

Is this soup dairy-free?

This cannellini bean and kale soup is dairy-free because we use almond and coconut milk instead of dairy milk.

Can I make this without sausage?

You can, although it won't be nearly as flavorful.

Will spinach work instead of kale?

Spinach is a great substitute for the kale in this recipe!

How do I thicken the soup without cornstarch?

You can add ¼ cup of flour to the sausage and onion mixture (wait until the sausage has browned to add it), then just stir it for a minute or so to remove any raw flour taste. You can also add an extra can of beans that have been pureed.

Can I make it spicy?

A little extra red pepper flakes or hot Italian sausage does the trick. Calabrian chili paste also blends in easily and adds great flavor.

Related Recipes

Looking for more hearty soup recipes? Try these:

  • a bowl of loaded potato soup with a beige towel and a sprig of parsley
    Loaded Potato Soup Recipe - No Peeling, Baking, or Draining!
  • Best Beanless Chili Recipe
    Thick and Beefy Beanless Chili Recipe
  • This Wild Mushroom Brie Soup has incredible flavor yet is very easy to make. Perfect for a special dinner or holiday meal!
    Wild Mushroom Brie Soup with Parmesan Pepper Croutons
  • a hearty bowl of seafood chowder with a slice of grilled bread
    Seafood Chowder Recipe - Ready in 30 Minutes
two white bowls of cannellini bean and kale soup on a rustic wood table

Cannellini Bean and Kale Soup

Yield: 8 servings
Prep Time: 10 minutes
Cook Time: 30 minutes
Total Time: 40 minutes

This hearty soup has a coconut milk-based broth with Italian chicken sausage, cannellini beans, red potatoes, and red kale.

Ingredients

  • 1 tablespoon olive oil
  • 2 cups Italian sausage, sliced and then halved (pork or chicken)
  • 1 medium yellow onion, diced
  • 13.5 oz can coconut milk (regular or light)
  • 4 cups low-sodium chicken broth
  • 4 ¼ cups almond milk, divided (or whole milk)
  • 15.5-ounce can Cannellini beans
  • 4 red potatoes, thinly sliced
  • 1 teaspoon red pepper flakes
  • 1 teaspoon kosher salt
  • ¼ cup corn starch
  • 2 cups kale, chopped

Instructions

  1. Heat the olive oil in a large pot or dutch oven over medium heat. Add the sausage and onions, and cook until the sausage is browned on all sides (about 4 minutes).
  2. Add the coconut milk, chicken broth, 4 cups of the almond milk, beans, potatoes, red pepper flakes and salt. Bring it just to a low boil, then reduce it to a simmer. Continue to cook about 15 – 20 minutes longer or until the potatoes are soft.
  3. In a small container with a lid, add the cornstarch and the remaining ¼ cup of almond milk. Close the lid and shake it vigorously until it's well combined. Add it to the soup and cook for a few more minutes, stirring frequently, until the soup thickens.
  4. Stir the chopped kale into the soup. Remove from the heat and serve.
Nutrition Information:
Yield: 8 Serving Size: 1
Amount Per Serving: Calories: 966Total Fat: 61gSaturated Fat: 14gUnsaturated Fat: 46gCholesterol: 161mgSodium: 1172mgCarbohydrates: 44gFiber: 9gSugar: 6gProtein: 60g

This data was provided and calculated by Nutritionix.

© Aubrey Cornelius
Cuisine: Italian / Category: Soups and Stews
Cannellini Bean & Kale Soup

Loaded Twice-Baked Sweet Potatoes

November 24, 2025 by Aubrey Cornelius Leave a Comment

a vintage platter of twice baked sweet potatoes

The creamy texture of these twice-baked sweet potatoes goes really well with the slight crunch of brussels sprouts. They're delicious, healthy, and really simple to make!

a vintage platter of twice-baked sweet potatoes

Some foods is just better cooked twice. Refried beans, twice-baked potatoes, and twice-baked sweet potatoes. They're an awesome fall and winter comfort food dish that takes a little time to bake, but is totally worth the effort.

Plus the vitamins, minerals, and protein in the sweet potatoes, sprouts, and even the egg all add delicious nutrition. They're great for an easy dinner or a light lunch, or even for a holiday meal!

a vintage platter of twice baked sweet potatoes with a fork and knife

We like to serve these with a spiral ham for the holidays, or with a smoked pork butt in the fall. They're just so simple and everyone can add their own toppings if you have a family with different tastes.

Ingredients

  • Sweet potatoes
  • Heavy cream
  • Grated cheese (I used colby jack)
  • Salt
  • Bacon
  • Brussels sprouts
  • Eggs
  • Chives
  • Sour cream
  • Sriracha

(Scroll down to the bottom for the printable recipe card with exact measurements and instructions.)

a vintage platter of twice baked sweet potatoes with a bottle of sriracha drizzling over the top

Instructions

To make this recipe, poke holes in your sweet potatoes and put them in tin-foil. Bake in the oven for about 40 minutes, remove, and scrape out the flesh and be sure to keep the skins since you will be reloading them in a bit.

Put the sweet potato flesh in a food processor. Pulse with some cream, salt and cheese. then spoon back into their shells and bake again for another 10-15 minutes.

Once your potatoes are finished cooking, top with a fried egg, sriracha, chives, sour cream and extra cheese! They are definitely even more delicious than they look, and are perfect for an easy weeknight dinner.

a vintage platter of twice baked sweet potatoes with a fork

Variations

Here are some more ideas for what to put on top of a loaded baked sweet potato:

  • Bell peppers, tomatoes, jalapeño, and mozzarella
  • Maple syrup, butter and pecans
  • Blue cheese, walnuts and honey (this one is a personal favorite)!
  • Brown sugar, cinnamon and marshmallows
  • Brown sugar, cinnamon and honey butter
  • Cheddar cheese, black beans, avocado and chives
a vintage platter of twice baked sweet potatoes

Loaded Twice-Baked Sweet Potatoes

Yield: 4 servings
Prep Time: 20 minutes
Cook Time: 1 hour
Additional Time: 5 minutes
Total Time: 1 hour 25 minutes

These loaded twice-baked sweet potatoes are simple to make yet loaded with flavor. They're great for breakfast, lunch, or an easy dinner!

Ingredients

  • 4 sweet potatoes, washed
  • 6 bacon slices
  • 6 Brussels sprouts
  • ⅓ cup heavy cream
  • ⅓ cup grated cheese (I used colby jack)
  • 1 ½ teaspoon salt, divided
  • 1 tablespoon olive oil
  • 4 eggs, sunny-side up or how you prefer
  • 4 tablespoons sour cream
  • 1 tablespoon chopped chives
  • 1 tablespoon Sriracha

Instructions

  1. Preheat the oven to 400°F.
  2. Using a fork, poke a few holes on each side. Wrap them in tinfoil then place them in the oven to cook for about 40-45 minutes or until soft inside when pierced with a fork.
  3. While the potatoes are cooking, add the bacon to a baking sheet and lined mine with tinfoil or parchment paper, and place in the oven to cook for about 15-20 minutes with the sweet potatoes.
  4. Meanwhile, halve about 6 Brussels sprouts and toss with olive oil and ½ teaspoon salt. Arrange in an even layer and roast in the oven along with the sweet potatoes for 18 to 24 minutes or until the edges are golden brown.
  5. Once the potatoes are done, let cool for a few minutes then slice in half and scoop out the inside while leaving the skin in tact. Save skin.
  6. Place the inside flesh in a food processor or blender and add heavy cream, cheese, and salt.
  7. Pulse together until creamy.
  8. Spoon the filling back into the potato skins and bake for an additional 20 minutes.
  9. Once finished, top 3 sweet potato halves with fried egg and the other 3 sweet potato halves with sour cream. Top all halves with Brussels sprouts, bacon, chives, and Sriracha.
Nutrition Information:
Yield: 4 Serving Size: 1
Amount Per Serving: Calories: 677Total Fat: 41gSaturated Fat: 18gUnsaturated Fat: 23gCholesterol: 289mgSodium: 2023mgCarbohydrates: 42gFiber: 5gSugar: 4gProtein: 36g

This data was provided and calculated by Nutritionix.

© Aubrey Cornelius
Cuisine: American / Category: Sides
Loaded Twice-Baked Sweet Potatoes

Freezer Shepherd's Pie

November 21, 2025 by Kristy Bernardo Leave a Comment

frozen shepherd's pie in a small casserole dish just out of the oven, sitting on a rustic wood table

There's no easier dinner than popping a freezer Shepherd's Pie into a baking dish, then relaxing until it's hot and bubbling. This version has a butter parmesan top added to the mashed potatoes halfway through baking. You'll want to keep this on hand at all times!

freezer shepherd's pie in a small casserole dish just out of the oven, sitting on a rustic wood table, with the first serving in a small bowl

This is the first dish I ever made with our Souper Cubes, and it's the one I make again and again. Sausage tortellini soup is another favorite, with the filling for birria tacos being a close second. Almost every meal I serve now comes straight from the freezer, and has reduced the time I actually spend cooking to just a couple days a month!

Ingredients

The ingredients for this freezer Shepherd's Pie are for two 13x9 baking dishes (so you can make one and freeze one). If you're using Souper cubes, it will fill two 2-cup trays plus two 1-cup trays (fill them to the top, not according to the marks on the side of the wells).

  • Ground beef or lamb: Lamb is traditional and is what makes it a Shepherd's pie. I usually go with ground beef since it's not easy to find lamb where I live. Both are delicious!
  • Sweet onion: We're onion lovers and will often add a little extra.
  • Dried thyme: Make sure the dried herbs are fresh so they have a lot of flavor. The recipe adds them during the sautéing stage which will also help to bring out their flavors.
  • Dried rosemary: see above!
  • Garlic cloves: Yes, my garlic lovers, you may add more if you like.
  • All-purpose flour: This is an important ingredient as it thickens the sauce and makes it more gravy-like.
  • Tomato paste: If you have extra, freeze it into 1-2 tablespoons cubes for use later (for the next time you make freezer Shepherd's Pie)!
  • Worcestershire sauce: I usually just eyeball this. Measure with your heart!
  • Beef broth: The last time I made this, I didn't realize I was out of beef broth and had to use chicken broth. It still turned out delicious and no one even noticed!
  • Frozen peas and carrots: No need to thaw, just add them straight from the freezer.
  • Frozen corn: See above.
  • Yellow potatoes: No need for peeling unless you substitute these for russets.
  • Butter: Make sure this is softened enough to melt easily when added to the potatoes. You'll add butter directly to the potatoes and some to the top during baking.
  • Heavy cream or half & half: Add more cream if you prefer the mashed potatoes to be on the looser side. The recipe is very forgiving!
  • Grated parmesan: Possibly my favorite ingredient in the entire recipe! It forms a nice crust and adds a lot of flavor to the overall dish.
frozen shepherd's pie in a small casserole dish just out of the oven, sitting on a rustic wood table

These are frozen 1 and 2-cup cubes that I've placed into a small baking dish. I wanted to show that you can "tetris" the cubes if necessary to fit more servings if necessary. They don't fit this dish exactly, but they spread out a bit while baking so it still works.

The first image is the freezer Shepherd's pie just before going into the oven, and the second shows the same dish after adding the butter and parmesan before going back into the oven for round two.

(For what it's worth, I gave my parents a few 2-cup cubes and my dad called after they baked their first cube and said "this is the best 'pot pie' I've ever had"!)

two souper cubes of frozen shepherd's pie in a small baking dish, ready for the oven
freezer shepherd's pie halfway through baking, covered with grated parmesan and dots of butter, ready to go back into the oven

Instructions

  1. The first "phase" is cooking the ground beef or lamb, then adding the onions and herbs. Adding the herbs at this stage helps bring out their flavors, which is especially helpful if your herbs are on the older side. Then you'll add the garlic and cook about another minute.
  2. Next you'll stir in the tomato paste, then the flour, and cook for a few minutes so there's no remaining raw flour taste.
  3. Add the Worcestershire sauce and the beef broth, bring it to a strong simmer, and cook for a few minutes until the sauce thickens. Then you'll add the frozen vegetables, give it a good stir, and remove it from the heat. Congrats, your filling is ready!
  4. While all that's going on, you'll cook the potatoes until they're soft and just starting to fall apart. Then you'll drain them, return them to the same pot, letting them sit a few minutes so any excess moisture evaporates. Add the butter and cream, stirring well until they're nice and smooth, season to taste, and the potatoes are also done!
  5. The next "phase" is assembling the freezer Shepherd's pie: you'll simply divide the filling among the baking dishes or freezer cubes, then top each with equal amounts of the mashed potatoes. Cover them with either both saran wrap and foil or the freezer cubes covers. Place them in the refrigerator so they're completely cooled before going into the freezer (this helps prevent any ice crystals from forming).
  6. Now comes the freezer: place them in the freezer overnight or until they're frozen solid. Transfer the cubes to freezer bags and freeze for up to 3 months (or vacuum seal and freeze for up to 6 months).
  7. And finally, it's baking time! Preheat the oven to 400°F.
    • 13x9 PANS: Place in the oven for 30 minutes. Remove from the oven, dot with the butter and sprinkle with the parmesan. Return to the oven and bake another 60 minutes or until it's bubbling hot and the top is golden brown.
    • FREEZER CUBES: Place a cube in a small baking dish the same size as the cube. Place in the preheated oven for 15 minutes. Remove from the oven, dot with the butter and sprinkle with the parmesan. Return to the oven and bake another 30 minutes for a 1-cup serving or 1 hour for a 2-cup serving (or until it's bubbling hot and the top is golden brown).
    • ALL SIZES: Remove from the oven and let it rest for 10 minutes before serving.
frozen shepherd's pie in a small casserole dish just out of the oven, sitting on a rustic wood table, with the first serving in a small bowl

Variations

  • Use either ground beef or lamb, or make a chicken version with ground chicken and chicken stock.
  • Swap mashed cauliflower for the mashed potatoes
  • Use different frozen veggies like green beans in place of the peas and carrots and/or the corn
  • Add a few tablespoons of pureed chipotles in adobo sauce to the filling for a little smoky spice
  • Swap the butter and parmesan topping for shredded cheddar cheese
  • Add a little cream to the filling for a creamy version

Related Recipes

Looking for more freezer meals? Try these:

  • Best Beanless Chili Recipe
    Thick and Beefy Beanless Chili Recipe
  • a metal basket lined with parchment paper that's filled with air fryer flautas mexicanas and topped with pico de gallo, guacamole, and Cacique cheese. there are bowls of guacamole and fresh pico de gallo in the background.
    Air Fryer Flautas Mexicanas - Crispy in Minutes!
  • Beef Bourguinon Recipe
    Beef Bourguignon Recipe
  • a white bowl of beef short ribs braised with garlic and red wine with a sprig of fresh thyme on a wooden table
    The BEST Braised Beef Short Ribs Recipe for the Holidays
frozen shepherd's pie in a small casserole dish just out of the oven, sitting on a rustic wood table

Freezer Shepherd's Pie

Yield: 16-20 servings
Prep Time: 10 minutes
Cook Time: 1 hour 30 minutes
Additional Time: 10 minutes
Total Time: 1 hour 50 minutes

This is the perfect recipe for freezer meal prep. It freezes beautifully and can go straight from the freezer into the oven!

Ingredients

Filling

  • 4 pounds ground beef or lamb
  • 2 medium onions, chopped
  • 2 teaspoons dried thyme
  • 2 teaspoons dried rosemary
  • 6 garlic cloves, minced
  • 6 ounces tomato paste (one small can)
  • ¼ cup all-purpose flour
  • 3 tablespoons Worcestershire sauce
  • 4 cups beef broth
  • 24-ounce bag frozen peas and carrots
  • 12-ounce bag frozen corn

Mashed Potatoes

  • 4 pounds yellow potatoes, cut into quarters
  • 1 ½ sticks butter, cut into 12 pieces, softened to room temperature
  • 1 cup heavy cream or half & half, gently warmed
  • Salt & pepper

Topping

  • 1 stick butter, cut into tablespoons then quartered
  • 1 cup grated parmesan (or more, depending on your preference)

Instructions

  1. Preheat a very large skillet over medium heat. Add the ground beef and cook until almost no pink remains. Drain off all the fat except about a tablespoon.
  2. Add the onions, dried thyme, and dried rosemary to the skillet. Cook about 5 minutes, or until the onions are soft. Add the garlic cloves and cook another minute.
  3. Add the tomato paste and stir well until the it's thoroughly combined. Sprinkle the flour into the skillet, stir it well until it's combined, and cook for 2-3 minutes to remove any raw flour taste.
  4. Add the Worcestershire and beef broth and bring it to a strong simmer, them cook for about 5 minutes or until the sauce thickens. Add the bags of peas, carrots and corn, stirring to mix well. Remove the pan from the heat.
  5. Meanwhile, place the potatoes into a large pot and cover with cold water by about 1 inch. Bring to a boil, then reduce to a simmer and cook for 25–30 minutes, or until the potatoes are very tender and just starting to fall apart.
  6. Drain the potatoes well, then return them to the warm pot. Let them sit uncovered for 2–3 minutes to allow excess moisture to evaporate, shaking the pot occasionally.
  7. Add the butter, a tablespoon at a time, directly to the hot potatoes. Stir with a wooden spoon or spatula until the butter melts and coats the potatoes.
  8. Slowly pour in the warm cream, stirring gently between additions until the potatoes reach your desired consistency. Add salt and pepper to taste.
  9. Assemble in freezer cubes or two freezer-safe 13x9 baking dishes: Divide the filling between the freezer cubes or pans. Top evenly with the mashed potatoes. Place them in the refrigerator to cool completely before freezing.
  10. Cover the baking dishes with saran wrap, then very tightly with foil and freeze for up to 3 months. OR place the lids on the freezer cubes, place in the freezer overnight or until they're frozen solid. Transfer the cubes to ziploc freezer bags and freeze for up to 3 months (or vacuum seal and freeze for up to 6 months).

BAKING FROM FROZEN

  1. Preheat the oven to 400°F.
  2. 13x9 PANS: Place in the oven for 30 minutes. Remove from the oven, dot with the butter and sprinkle with the parmesan. Return to the oven and bake another 60 minutes or until it's bubbling hot and the top is golden brown.
  3. FREEZER CUBES: Place a cube in a small baking dish the same size as the cube. Place in the preheated oven for 15 minutes. Remove from the oven, dot with the butter and sprinkle with the parmesan. Return to the oven and bake another 30 minutes for a 1-cup serving or 1 hour for a 2-cup serving (or until it's bubbling hot and the top is golden brown).
  4. All sizes: Remove from the oven and let it rest for 10 minutes before serving.
Nutrition Information:
Yield: 20 Serving Size: 1
Amount Per Serving: Calories: 631Total Fat: 38gSaturated Fat: 17gUnsaturated Fat: 20gCholesterol: 161mgSodium: 355mgCarbohydrates: 26gFiber: 3gSugar: 2gProtein: 42g

This data was provided and calculated by Nutritionix.

© Kristy Bernardo
Cuisine: Irish / Category: Dinner
Freezer Shepherd's Pie

Sausage Tortellini Soup (Freezer Friendly)

November 18, 2025 by Kristy Bernardo Leave a Comment

a hearty bowl of sausage tortellini soup with kale and cream

This sausage tortellini soup is one of our all-time favorites. It's incredibly simple to make, plus it's hearty, comforting, and so flavorful! It's also versatile: make it creamy (or not), add more kale or omit it completely, or add more tortellini to make it more of a pasta dish and less of a soup. It's absolutely delicious (and easy) any way you make it!

a bowl of sausage tortellini soup with kale on a vintage towel on a wood table

This sausage tortellini soup is one of the first things we made with our new freezer cubes, and it freezes like a dream. It's hearty enough that it doesn't require a side dish, but it does go perfectly with a loaf of stuffed garlic bread or parmesan garlic butter biscuits.

Ingredients

  • Ground Italian sausage: Buy it already ground or buy links and remove the sausage from its casings)
  • Onion: A medium-sized sweet onion is what we prefer, but use whatever you've got
  • Garlic: Is there any recipe that doesn't improve with a little (or a lot of) garlic?
  • Dried basil & oregano: Make sure your herbs aren't stale, but if they are, don't worry too much. We add the herbs when the onions are sauteéd to help bring out their natural flavors and oils.
  • 1 teaspoon aglio olio seasoning from Trader Joe's (optional): We use this seasoning on just about everything, and it's terrific in sausage tortellini soup! Don't worry if you don't have any, it's a suggestion more than anything and the soup will still be fantastic.
  • 2 cups kale, chopped: This will cook down significantly, so add more if you'd prefer a lot of greens.
  • Heavy cream (optional): Looking to cut down on fat and calories? You can skip the cream or just reduce it.
  • Tortellini: We prefer using fresh tortellini from the refrigerated section, but frozen will work just fine.
  • Chicken stock: Homemade is always best, but if you do go store-bought, opt for the low-sodium version so you can better control the amount of salt in the final dish. You can also sub this for vegetable stock if you prefer.
a side view of a bowl of sausage tortellini soup with kale on a vintage towel on a wood table

Instructions

There are two ways we prepare sausage tortellini soup: one is to just make the recipe and enjoy it immediately (or with some leftovers). The other is to make "soup starters" and freeze them for quick and easy dinners later. I'll show you how to make it both ways below:

Traditional Recipe Instructions:

  1. The first thing you'll need to do is to cook the sausage until almost no pink remains, then drain off most of the fat.
  2. Next you'll add the onions and seasonings, and sauté those together for about 5 minutes. Toss in the minced garlic and cook it for another minute or so.
  3. Now add the chopped kale and the chicken stock and give it a good stir. Heat it until it's at a low boil, then reduce the heat and simmer it for a little while so the flavors can meld.
  4. Next you'll add the tortellini and cook it until it's cooked to your liking (we prefer ours on the softer side).
  5. Now just taste and season the soup with salt and pepper, and you're done!
a frozen souper cube of sausage tortellini soup starter

Freezer Cubes:

This is how I prefer to make this soup since it freezes really well. It's such a great feeling to know that I have an easy meal ready to go anytime I want!

  1. Follow the recipe through step 3.
  2. Make sure the soup has completely cooled (this is really important when you're freezing anything to help prevent ice crystals from forming). Then just ladle it into 6 1-cup freezer cubes (or 3 2-cup servings, or however it works best for you). Add just enough chicken stock to make sure it freezes into one solid cube.
  3. Cover and freeze the cubes overnight or until they're completely frozen solid, then either vacuum seal or transfer to freezer bags. Freeze them for up to 3 months (longer if they're vacuum-sealed).
  4. To serve, place a frozen cube along with 1 cup of chicken stock into a medium-sized pot on the stove over medium heat, stirring occasionally to break it up as it thaws. Once it's very hot and simmering, add the tortellini and simmer until they're soft and cooked to your liking. Add a small amount of cream, if desired, then taste and season. Serve immediately.
an extreme closeup of a bowl of sausage tortellini soup

Variations

This sausage tortellini soup is so versatile! Here are a few ideas for ways to make it your own:

  • Add more or less chicken stock: I'll often use less stock so that it's more of a tortellini pasta dish with a little broth (as shown in the images). If I want to stretch it to serve more people or I'm just in the mood for more of a soup, I'll add more stock. The recipe is very forgiving so play around with the amounts until it's exactly how you like it.
  • Add more or less tortellini: This is the same idea as above, but instead of adjusting the amount of stock, you'll add more or less pasta. The end result is the same!
  • Use your favorite kind of tortellini: We prefer cheese tortellini, but sausage lovers may want to double up. Any flavor would be delicious so choose your favorite!
  • Add more or less kale: If you're looking to get more greens into your diet, you can easily double the amount of kale if you prefer.
  • Omit the cream: Avoiding dairy or just want to cut down on fat and calories? Skip the cream entirely. Or if you're looking to up the creamy factor, add a little more! I tend to go heavy on the cream and don't usually even measure it, and it's turned out delicious no matter how much (or how little) I happen to add.
a bowl of sausage tortellini soup with kale on a vintage towel on a gray wood table

Storage and Make-Ahead

  • Refrigerator: Store the soup in an airtight container in the refrigerator for up to 5 days.
  • Freezer: This soup freezes really well! It's best if you freeze it without the pasta and cream, so if you'd like to freeze it, follow the recipe through step 3 and set aside the amount you plan to freeze. Once it's cool, freeze it in an airtight container for up to 3 months.
  • Reheating: To reheat from the refrigerator, you can either microwave it for 1-2 minutes or until it's hot, or heat it over medium-low heat on the stove.

Related Recipes

Looking for more easy soup recipes? Try these:

  • a hearty bowl of seafood chowder with a slice of grilled bread
    Seafood Chowder Recipe - Ready in 30 Minutes
  • Best Beanless Chili Recipe
    Thick and Beefy Beanless Chili Recipe
  • a bowl of loaded potato soup with a beige towel and a sprig of parsley
    Loaded Potato Soup Recipe - No Peeling, Baking, or Draining!
  • Avgolemono Soup is a creamy, comforting soup with tender chicken, orzo pasta and a bright lemon flavor. Delicious and incredibly easy!
    Avgolemono Soup (Chicken Soup with Egg and Lemon)
a hearty bowl of sausage tortellini soup with kale and cream

Sausage Tortellini Soup

Yield: 6-8 servings
Prep Time: 10 minutes
Cook Time: 30 minutes
Total Time: 40 minutes

This hearty, comforting sausage tortellini soup is incredibly simple to make and has loads of flavor! It also freezes well, so be sure to double the batch!

Ingredients

  • 1 lb ground Italian sausage
  • 1 medium sweet onion, chopped
  • 1 teaspoon dried basil
  • ½ teaspoon dried oregano
  • 1 teaspoon aglio olio seasoning from TJ's (optional)
  • 3 garlic cloves, minced
  • 2 cups kale, chopped
  • 6 cups chicken stock
  • 2-3 cups tortellini
  • 1 cup heavy cream
  • salt and pepper, to taste

Instructions

  1. Cook the Italian sausage in a large soup pot over medium heat until almost no pink remains, then drain off all but 1 tablespoon of fat.
  2. Add the onion, basil, oregano, and aglio olio seasoning (if using) and cook for about 5 minutes, or until the onions are soft and translucent, stirring occasionally. Add the minced garlic and cook for about another minute.
  3. Add the kale and chicken stock; stir to combine. Bring to a gentle boil, then reduce the heat and simmer for 15-20 minutes.
  4. Add the tortellini and the heavy cream and stir the soup gently to make sure the tortellini are all submerged. Cook for just a few minutes if using fresh tortellini, or for the amount of time instructed on your package if using frozen.
  5. Taste and season the soup to your tastes, then ladle into bowls and serve immediately.

TO MAKE AS SOUP STARTERS:

  1. Follow the recipe through step 3.
  2. Allow the soup to cool completely, then ladle into 6 1-cup freezer cubes. Add just enough chicken stock to make sure it freezes into one solid cube (see post images for an example).
  3. Cover and freeze the cubes overnight or until they're completely frozen solid, then either vacuum seal or transfer to freezer bags. Freeze them for up to 3 months (longer if they're vacuum-sealed).
  4. To serve, place a frozen cube along with 1 cup of chicken stock into a medium-sized pot on the stove over medium heat, stirring occasionally to break it up as it thaws. Once it's very hot and simmering, add the tortellini and simmer until they're soft and cooked to your liking. Add a small amount of cream, if desired, then taste and season. Serve immediately.
Nutrition Information:
Yield: 8 Serving Size: 1
Amount Per Serving: Calories: 744Total Fat: 51gSaturated Fat: 20gUnsaturated Fat: 31gCholesterol: 240mgSodium: 805mgCarbohydrates: 9gFiber: 2gSugar: 3gProtein: 58g

This data was provided and calculated by Nutritionix.

© Kristy Bernardo
Cuisine: Italian / Category: Soups and Stews
Sausage Tortellini Soup (Freezer Friendly)

Are Souper Cubes Worth It? (YES!)

November 15, 2025 by Kristy Bernardo Leave a Comment

assorted sizes of freezer cubes, both the souper cubes brand and a knockoff

If you've arrived on this page, then you must be thinking about getting into the freezer meal prep game, wondering if it's worth the time and energy, and more specifically, whether Souper Cubes (or their knockoff alternatives) are worth the expense. I'm going to answer these questions to help you make an informed decision!

I've put as much information into this article as possible, so there's a lot to take in. You can use the links below to jump straight to whichever section most interests you, but first I'd like to quickly answer the question you came here for: Are Souper Cubes worth it?

The short answer is YES, purchasing the branded Souper Cubes are definitely worth the extra expense. Having used both a knockoff and the branded versions, I strongly prefer the original Souper Cubes. They're a much better quality and they also fit the baking dishes where the knockoffs I own do not.

assorted sizes of freezer cubes, both the souper cubes brand and a knockoff

I strongly recommend going branded if you're going to be using the baking dishes (they may not fit otherwise)! I still recommend Souper Cubes even if you're purchasing just the freezer cubes because the quality is so much better, but the knockoffs aren't a bad alternative and do the job they're supposed to do, so you really can't go wrong with either.

[feast_advanced_jump_to]

How I Got Started with Souper Cubes

Here's the condensed version if you just want the bullet points:

  • Bought knockoff freezer cubes from Amazon a year or two ago, then never used them
  • Happened to catch a TikTok a few months ago showing someone using Souper Cubes to freeze their leftovers, then pop them directly into baking dishes of the same size.
  • Decided I needed to finally try my knockoff freezer cubes BUT with the baking dishes, so I ordered the baking dishes from the Souper Cubes website.
  • Prepared and froze a bunch of dishes in the knockoff freezer cubes, then got really excited when my Souper Cubes baking dishes arrived!
  • Discovered that my frozen cubes of delicious meals didn't fit the 2-cup baking dishes. Ugh! I never thought to check...my bad. Found a cheese baker in my cupboard that fit the 2-cup size so I could make do. The 1-cup size worked well enough as-is.
  • Decided to order more freezer cubes, this time directly from Souper Cubes so they'd fit the dishes perfectly. I was also able to get two more sizes (one ½ cup tray and one 2-tablespoon tray), both of which I've used and love (see the section below for suggestions for what to freeze in which size tray).

And now for the more detailed version:

I don't recall how I first discovered "freezer cubes", but at that time I didn't know there was a brand called "Souper Cubes" to compare them to. It was at least a year ago that I ordered two sets of the 2-cup portions by a knockoff brand on Amazon. I kept one and gifted one to my mom.

And then promptly never used them. They sat in the back of my cupboard, never used even once and all but forgotten.

Then a few months ago, I was scrolling through TikTok, and I watched a video showing how this person uses their Souper Cubes. It showed them taking a serving from a casserole that had been frozen into a cube shape, and dropped into a baking dish that fit this cube perfectly! Every part of my brain associated with creating recipes started firing...I wanted to try this.

Here's the thing...I've never been a freezer gal, nor a meal prep person. Unless it's a holiday, I cook what we're in the mood to eat, and then I move on to the next. Planning and freezing just weren't a part of my meal process.

But the realization that I could freeze so much more than just soup in these freezer cubes had me really excited. So I ordered the baking dishes from Souper Cubes, then pulled out those sad knockoff freezer cubes from the back of my pantry and got to work!

Today, as I type this, my freezer is filled with the following dishes, all frozen into different sizes and ready to be dropped into their respective baking dishes (all recipes coming soon, but if you just can't wait, we've got 240+ freezer meals you can browse through):

  • Tater Tot Casserole
  • Freezer Shepherd's Pie
  • Lasagna Soup
  • Chicken Pot Pie with Mashed Potatoes
  • Sausage Tortellini Soup
  • Mexican Sloppy Joes
  • Rotisserie chickens from Costco, the meat shredded and tossed with three different sauces (a candied jalapeño bbq sauce and two curry sauces I picked up at Aldi).

Those meals took me a few days to make them all (plus another two to remake them with a few tweaks so I felt confident posting the recipes), and it was a fair amount of work filling the cubes, freezing them, putting them into freezer bags, then playing Tetris in my freezer to get everything stacked neatly. Whew! I was finished, and my freezer was now stocked with ready-to-heat-and-eat meals that would last us for at least a month, possibly two!

And then, it was finally time to start heating and eating. I pulled out a 2-cup portion of the Tater Tot Casserole, and realized that it didn't fit the baking dish. I'd never thought to check the sizes (square is square and rectangle is rectangle, right??) and now I was stuck with having to find something suitable to bake these in.

Luckily, the 1-cup baking dishes fit the 1-cup cubes well enough that they'd work just fine (the cubes are a bit smaller). Despite not fitting perfectly, they were close enough. I also discovered that a round cheese baker I have worked well enough for the 2-cup size, so at least I could bake that size immediately, if not perfectly.

But I did want them to fit perfectly, so I decided that since I already knew I'd be cooking this way permanently, it was worth the investment to purchase another set of freezer cubes directly from Souper Cubes. I'm so glad I did!

The difference in quality between my Amazon knockoffs and the Souper Cube brand is significant. I've detailed these differences below, but the gist is that my knockoffs are a bit more difficult to remove, and the metal insert has already bent on two of them as a result.

Souper Cubes vs. Knockoff Brands: Which Are Better and Why?

There are many different knockoffs and you can buy them almost anywhere (I've seen them at Target, Walmart, and Costco, and I purchased mine on Amazon). The prices I've seen have been significantly cheaper than branded Souper Cubes, and that may be the route you want to go.

Here is the knockoff brand purchased from Amazon on the left and the Souper Cubes brand on the right. You can see the difference in quality just from looking at them:

a 1 cup size freezer cube purchased from Amazon
a gray 1-cup sized souper cube

I researched the pros and cons of purchasing the Souper Cubes brand and the knockoff brand I purchased from Amazon. Here is what I found for comparison:

CATEGORYSOUPER CUBESAMAZON KNOCKOFF
Durability & Materials

My thoughts: I haven't owned them long enough to comment on long-term durability, however, the Souper Cubes are vastly superior in sturdiness and popping out the cubes when full.
● Made from 100% platinum food-grade silicone with a steel-reinforced rim.
● Very sturdy and retains shape even when it's full.
● Doesn't stain or absorb odors even after long-term use.
● Built to last for years of heavy use.
● Advertised as food-grade platinum silicone with steel rim, but some buyers question their consistency.
● A few reports of silicone flaking or degrading after dishwasher cycles.
● Thinner silicone walls make it slightly flimsier when full.
Lid Seal & Quality

My thoughts: The lid on the Souper Cubes brand is very sturdy and fits much better than the knockoff silicone lid. Note: The lids are not oven-safe.
● Sturdy BPA-free plastic lid fits securely for stacking and odor protection.
● Protects against freezer burn when stored flat.
● Not completely leak-proof if tipped; lid can crack if forced off while frozen.
● Flexible silicone lid creates a good seal and won't crack.
● Helps prevent freezer odors and air exposure.
● Can feel slightly loose or pop off if tray is overfilled; seal may loosen over time.
Ease of Use / Portion Removal

My thoughts: I found the Souper Cubes to be much easier to remove. Also, the metal bar in the knockoff brand bent in two trays when I had difficulty removing a block. It bent back easily, but it doesn't lend confidence that it will last after continuous bending.
● Clear markings for precise measuring.
● Frozen blocks pop out easily and maintain perfect shape.
● Works well for soups, sauces, casseroles, and broth.
● Many also feature measurement lines.
● Slightly softer silicone makes unmolding easy, but still more difficult than Souper Cubes.
● Some users find portions pop out even faster than Souper Cubes (this is not my personal experience).
Cleaning & Safety

My thoughts: I've run both through the dishwasher and both did well. I haven't noticed any staining or odors from either brand. I did find the Souper Cubes slightly easier to hand wash.
● Dishwasher, oven (up to ~415°F), microwave, and freezer safe.
● Resists staining and odor absorption.
● Dishwasher, oven (up to 428°F), microwave, and freezer safe.
● Some reports of odor retention after washing.
● Occasional concern about silicone quality after multiple washes.
Price & Value

My thoughts: You can't beat the price of the Amazon brand, but as they say, you get what you pay for. I find Souper Cubes to be far superior and therefore worth the price. Time will tell how they both hold up (and I'll update here as time goes on).
● About $22 per tray (four 1-cup wells + lid).
● Higher cost, but excellent build and longevity.
● Usually $20-$30 for a two-pack (eight 1-cup wells total).
● Much lower cost per tray, excellent value if quality holds up.
Brand Ethics & Transparency

My thoughts: I love that Souper Cubes is a family-run business based in the US. I also contacted their customer support to express how much I love the cubes, and they were very quick to respond.
● Family-run U.S. company; trays made with certified food-grade materials.
● Consistent quality control and customer support.
● Generic import brand with limited background or support.
● Inconsistent quality reports; warranty limited to Amazon returns.
Real-World Feedback● Users praise durability and odor resistance.
● Many report years of flawless use; "totally worth it" despite higher cost.
● Frozen blocks fit neatly into their baking dishes for reheating.
● Thousands of positive reviews (~4.7/5 stars) for convenience and price.
● Some isolated reports of flaking silicone or odor retention.
● Overall considered "gets the job done" and great for budget users.
Conclusion

My thoughts: If I knew then what I know now, I'd skip the knockoff brands and stick with Souper Cubes despite the higher price. One reason I say that is because I use their baking dishes; if you're not planning on using them and if cost is a concern, the knockoffs may be the better choice for you. Keep in mind that the frozen cubes have been a bit harder to remove from the knockoffs, and the steel rim has bent as a result. I was able to bend it back, but there's no telling how long it is before they break.
● Premium quality and longevity for serious home cooks and meal preppers.
● Higher upfront cost but proven durability and safety
● Affordable alternative offering nearly identical functionality.
● Risk of lower quality or shorter lifespan.

Join our NEW Freezer Cubes Subreddit!

Where to Buy

Freezer cubes have surged in popularity, and for good reason. I'm a huge Trader Joe's fan, and I like to stock up on my favorite frozen items when I can (the closest store is 45 minutes from me, and not in a direction I usually travel). But that gets expensive, plus (not to toot my own horn) I like my cooking better. So the convenience of having frozen, ready-to-eat foods in my freezer that I know I love is worth taking the time to portion out my recipes.

Here are the major retailers that have sold freezer cubes (keep in mind that some stores, such as Aldi, don't carry them year-round):

  • Costco - Brands sold: Souper Cubes, MIU
  • Target - Brands: Room Essentials™
  • Aldi - Brands: Crofton
  • Amazon - Many different sellers, check website for details
  • Walmart - Brands: Several, however they're not sold at my local store but are available to be shipped.
  • Souper Cubes - visit their website

Have you seen them in stores? If so, please leave a comment telling us where you've seen them so we can update this section!

Freezer Cube Sizes and Serving Ideas for Each

The freezer cubes I use come in the following sizes:

  • 2-cup
  • 1-cup
  • ½-cup
  • 2-tablespoon

The 1 and 2-cup sizes are the most common and are also the ones I personally use the most. It's so satisfying to cook for a day or two in exchange for having easy meals to pull out and pop into a baking dish!

Freezer cubes are all roughly the same size in overall length and width; the number of wells in each one is the biggest difference.

2-cup freezer cubes

This is the 2-cup size Souper Cube. You can see the measuring lines on the side which are really helpful when freezing. They can be filled above the 2-cup line but it does make them slightly more difficult to remove.

This particular freezer cube has been used several times and washed in the dishwasher. There have been no stains or odors, although my dishwasher did leave the small spots you can see in the image (these are easily wiped away).

This is a great size for freezing lasagna, shepherd's pie, or other casserole-type dishes. Soups are also great frozen in this size. In our house, this size serves 1-2 people.

a gray 2-cup sized souper cube

1-cup Freezer Cubes

This is the 1-cup size Souper Cube. You can see the measuring lines on the side which are really helpful when freezing. They can be filled above the 1-cup line but it does make them slightly more difficult to remove.

This particular freezer cube has been used several times and washed in the dishwasher. There have been no stains or odors, although my dishwasher did leave the small spots you can see in the image (these are easily wiped away).

This is a also a great size for freezing lasagna, shepherd's pie, or other casserole-type dishes. Soups are also great frozen in this size. In our house, this size serves 1 person.

We also like to freeze things like mashed potatoes, rice, or beans in this size to pair with something else, such as birria taco meat or braised beef short ribs.

a gray 1-cup sized souper cube

½-cup Freezer Cubes

This is the ½-cup size Souper Cube. You can see the measuring lines on the side which are really helpful when freezing. They can be filled above the ½-cup line but it does make them slightly more difficult to remove.

We use this size for things like rice, chicken or beef stock, mashed potatoes, beans, or chicken that's been tossed in a sauce. This size is perfect for mixing and matching different frozen ingredients!

a gray ½-cup sized souper cube

2-tablespoon Freezer Cubes

This is the 2-tablespoon size Souper Cube. You can see the measuring lines on the side which are really helpful when freezing. They can be filled above the 2T line but it does make them slightly more difficult to remove.

We mostly use this size for things like leftover tomato paste and better than bouillon cubes or homemade bouillon cubes. I also use it for canned chipotle peppers in adobo sauce (just puree the entire can, then pour into the cubes and freeze).

a gray 2T sized souper cube

How I Plan and Cook My Freezer Meals

The first thing to know is that you don't necessarily need to have a plan, you can just freeze whatever leftovers you have and call it a day. But I have two goals for using freezer cubes: saving money and saving time. Having a plan greatly helps with both of these!

The first thing I do is make a list of my favorite recipes that will freeze well. I like to have this on hand so it's easier to decide what meals I'll be prepping. Then I put together a shopping list and hit the store.

Once I have all the ingredients I need, I set aside a few hours to cook as much as possible during that time. I try to keep similar recipes together: for example, I like to make Frozen Shepherd's Pie and Chicken Pot Pie with Mashed Potatoes in one cooking session since they have similar ingredients.

I'll start with the filling for the shepherd's pie in a very large skillet (and I typically triple the recipes so I need a large pan!), while simmering the potatoes in a stockpot at the same time (enough for both recipes). When the filling is done, I'll portion it into my freezer cubes, give the skillet a quick clean, and make the chicken pot pie filling.

Once the fillings are both portioned into the freezer cubes, I'll top them with the mashed potatoes, gently pressing down to make sure there aren't any air pockets. Once it's all cooled completely, I cover them and freeze them overnight.

NOTE: I'm able to do two recipes at once (technically six since both are tripled) because I happen to have enough freezer cubes to fill at one time. If you have just one set, you can still make both fillings, just refrigerate one until the first batch is frozen solid, then freeze the next batch.

Once the cubes are frozen solid, I take them out of the cubes and place them in Ziploc freezer bags. When I'm ready to eat, I just pop one into one of the baking dishes, bake it, and enjoy! Also, if what I've frozen is soup or something similar, then all I have to do is pop it into the microwave or a pan on the stove to heat it.

An even better option is to vacuum seal the frozen cubes, so definitely opt for that if you have a vacuum sealer. I don't happen to have one at the moment, and because we eat everything within two months, I haven't purchased one (yet)!

Recipe Ideas

We have an entire category dedicated to freezer meals, so be sure to browse through them! Here's a list of of general ideas of things that we love to freeze:

  • Casseroles: Almost all casseroles are great candidates for meal prep. We tend to triple all recipes and stock up as much as possible (an especially good idea for families). These work especially well with the baking dishes from Souper Cubes.
  • Soups: Soups without cream work best, but most still freeze well. I like to make "starter soup cubes" that have all of the ingredients but with a much smaller amount of broth/liquid. I'll add just enough to freeze it solid, then add additional broth, cream, etc. when reheating. This saves freezer space with just an extra step when reheating. (Note: this idea came from SimplySarahHart).
  • Rotisserie Chicken + Sauce: This idea came to me when I was shopping at Aldi. I picked up a few jars of their curry sauces and realized they'd be great for an easy freezer meal! I took the meat off of three Costco rotisserie chickens, tossed each in a different sauce, and froze them in the Souper Cubes. Then I made rice and froze it into ½ cup portions. It worked like a charm and was so simple!
  • Chicken or beef stock: I used the bones from the rotisserie chickens and made chicken broth, then kept reducing it down until it was more concentrated. Froze it in the 2T cubes so now I just have to add a bit of water and I've got broth! I also did this with a half-empty jar of Better than Bouillon (a product that I've always preferred over a box of broth, but struggled with using all of it).
  • Tomato Paste: This was a game-changer for me! I never use the entire can of tomato paste, so freezing it into 2T cubes is just perfect.
  • Chipotle Peppers in Adobo Sauce: Again...I love this product and use it often, but struggled to use the entire can. Now I just puree the entire can and pour it into the 2T cubes.
  • Restaurant leftovers: I use this mostly with leftovers from this fabulous Indian restaurant near my parent's house, but it will work with all kinds of foods!
  • Holiday leftovers: By the time a holiday is over, I'm often craving different foods but don't want the leftovers to go to waste. Now all I have to do is freeze it into portions and enjoy them anytime.
  • Smoothies: Blend your favorite smoothies and freeze them in whichever size you like. You can also make smoothie bowls; just let a freezer cube thaw for about 30 minutes, stir, then add toppings.
  • Individual components: Freeze individual portions of rice, beans, and some type of protein (this cilantro lime chicken would work well), then make burrito bowls!

Frequently Asked Questions

Are Souper Cubes dishwasher safe?

Yes! I've run my own Souper Cubes through my dishwasher and they've held up really well.

Are Souper Cubes microwave safe?

Technically yes, but Souper Cubes themselves do not recommend putting them in the microwave, and doing so will also void your warranty. Personally, I see no need to use them in the microwave as the cubes pop out easily into a microwave-safe dish.

Are Souper Cubes oven safe?

Souper Cubes are oven safe up to 415°F, so you can bake directly in the cubes! The lids, however, are NOT safe to put in the oven, so if you must cover the dish you're baking, opt for tinfoil instead.

Do Souper Cubes stain or retain odors?

I have not experienced any staining or odors after using my Souper Cubes.

Are Souper Cubes worth the cost?

In my opinion, absolutely. Having used both the Souper Cubes as well as a knockoff brand I purchased from Amazon, I strongly prefer the branded cubes. The quality is far superior, they pop out much easier, and they're easier to stack in my freezer.

I'd like to point out that this article was NOT sponsored in any way, by any company. This is a completely unbiased review of a product that I use and love, and I welcome your opinions and experiences (just leave a comment below)! This article will continue to be updated with new ideas, and any changes in opinions as time goes on.

Pumpkin Brioche with Chocolate Swirl

November 11, 2025 by Aubrey Cornelius Leave a Comment

a top down view of a loaf of pumpkin brioche on a white cloth napkin with two slices cut out

This Pumpkin Brioche Bread is soft, buttery, and just sweet enough! It has a wonderful pumpkin flavor that's swirled with dark chocolate for subtly sweet bread that's perfect for breakfast or dessert. It will make your kitchen smell like fall!

Homemade brioche might seem intimidating, but it's really quite simple to make. The dough comes together easily, and it's perfect for the holidays (especially as a homemade gift)! I love serving it warm when the chocolate is still a little melty, but it's equally delicious toasted the next day with a pat of butter or a drizzle of honey.

If you're looking for a fall baking project that's impressive but not complicated, this pumpkin brioche checks all the boxes!

a top down view of a loaf of pumpkin brioche on a white cloth napkin with two slices cut out

We love gifting loaves of pumpkin brioche during the holidays! We'll often pair it with an easy no-bake dessert like M&M Pretzel Hugs or Chocolate Covered Pretzel Rods. Just tuck a few of whichever little extra treat you make into a box with the bread for a fantastic and delicious gift. You can also tie a little bag of the treats to the top of the box for an extra festive look.

[feast_advanced_jump_to]

Ingredients

  • Bread flour: Be sure to use bread flour and not all-purpose flour. Bread flour has a higher protein content which makes a big difference in the end result.
  • Active yeast: Make sure the yeast you're using is fresh as old yeast won't rise properly.
  • Sugar: We add just enough to make it slightly sweet.
  • Kosher salt: Yep, even bread benefits from a little salt!
  • Unsalted butter: This is melted into the dough for a soft, buttery crumb.
  • Whole eggs + and egg yolk: The whole eggs are added to the dough and an extra yolk is brushed on to make a gorgeous golden brown crust.
  • Canned pumpkin: You only need a small amount, so this is a perfect recipe to use up any you have left over.
  • Nutmeg: Freshly grated is best but use what you've got.
  • Cinnamon: We add a little to the dough and a little more with the chocolate for a wonderfully flavorful bread!
  • Dark chocolate: Use a high-quality chocolate bar for the best results.
a loaf of pumpkin brioche bread in a loaf pan just out of the oven

Instructions

  1. Mix the dry ingredients: In a large bowl, combine 2 cups of the bread flour, yeast, sugar, and salt. Stir it well to make sure it's evenly mixed.
  2. Warm the wet ingredients: In a small saucepan over low heat, warm the water and butter together until the butter is melted. The mixture should be warm, not hot (you don't want to kill the yeast).
  3. Combine the mixtures: Pour the warm butter mixture into the dry ingredients. Mix by hand until just combined (you don't want to overmix).
  4. Add the remaining ingredients: Add the eggs, pumpkin, nutmeg, and 1½ teaspoons of cinnamon. Mix until everything is incorporated, then add the remaining flour a little at a time until a soft dough forms and pulls together into a ball.
  5. First rise: Lightly oil a clean bowl, place the dough inside, and cover with plastic wrap. Let it rise in a warm, dry spot for about 2½ hours, or until it's doubled in size.
  6. Roll and fill: Once the dough has risen, turn it out onto a lightly floured surface. Roll it into a rectangle. Sprinkle evenly with the chopped dark chocolate and the remaining 2 teaspoons of cinnamon.
  7. Shape the loaf: Starting on the long side closest to you, roll the dough tightly into a log. Place it seam-side down into a lightly buttered loaf pan.
  8. Second rise: Cover and let the dough rise for another 30 minutes (it will puff up).
  9. Preheat the oven: While the dough rises, preheat your oven to 350°F.
  10. Brush and bake: Once the dough has risen a second time, brush the top with the egg yolk. Bake for about 25 minutes, or until the loaf is deeply golden and it sounds hollow when you tap it.
  11. Cool and serve: Let the brioche cool slightly before slicing. Serve warm (the chocolate will be soft and gooey inside)!
a loaf of pumpkin brioche bread on a white cloth napkin

Equipment Needed

  • Large mixing bowl
  • Small saucepan
  • Wooden spoon or dough whisk
  • Clean kitchen towel or plastic wrap
  • Rolling pin
  • Loaf pan
  • Pastry brush
  • Bench scraper (optional)
  • Wire rack
a top down view of a loaf of pumpkin brioche on a white cloth napkin with two slices cut out

Storage and Make-Ahead

  • Make-ahead: The pumpkin brioche dough can be prepared a day ahead. After the first rise, cover the bowl tightly with plastic wrap and refrigerate it overnight. The next day, let the dough come to room temperature before rolling, filling, and baking.
  • Room temperature storage: Once the pumpkin brioche is baked, allow it to cool completely then store it in an airtight container or wrap it tightly in plastic wrap. It will keep for up to 3 days at room temperature.
  • Refrigeration: You can also refrigerate the bread for up to 5 days. Make sure to wrap it in plastic wrap or store it in an airtight container.
  • Freezing: Pumpkin brioche freezes really well! Once it's baked and completely cool, wrap the whole loaf or individual slices tightly in plastic wrap, then place it in a freezer bag or airtight container. Freeze for up to 2 months. Thaw it overnight at room temperature, then warm it in a 300°F oven for 10 minutes before serving.
  • Serving ideas: Pumpkin brioche is wonderful on its own, but it also makes next-level French toast, bread pudding, or a delicious holiday breakfast served warm with butter or honey.
a slice of pumpkin brioche drizzled with maple syrup on a white plate with a fork

Frequently Asked Questions

Can I make this pumpkin brioche without the chocolate?

The dough itself is lightly sweet and full of pumpkin flavor, so it's delicious even without the chocolate. You can skip the chocolate entirely or swap it with chopped nuts, cinnamon sugar, or even dried cranberries.

Why didn't my brioche rise properly?

Brioche dough needs time and a warm space to rise. If your kitchen is on the cool side, place the covered bowl in a very slightly warm oven (around 80°F) or near a sunny window (but not directly in the sun). Also make sure your yeast is fresh and not expired.

Can I use instant yeast instead of active yeast?

You can substitute instant yeast one-for-one. The only difference is you can skip the activation step since instant yeast mixes directly with the dry ingredients.

Can I knead this dough with a mixer instead of by hand?

A stand mixer with a dough hook definitely makes the process easier! Knead it on medium speed for 8-10 minutes.

What's the best way to serve pumpkin brioche?

We love it served warm with butter or honey. You can also toast it lightly, turn leftovers into French toast, or use it to make bread pudding.

How can I tell when it's baked through?

The loaf should be a deep golden brown and sound hollow when it's tapped on top. If you prefer to check it by temperature, it should register about 190°F in the center when it's fully baked.

Can I make mini loaves or rolls instead of one large loaf?

You can, and we often do this when we're giving it as gifts! Divide the dough into smaller portions and adjust the bake time (mini loaves will take about 15-18 minutes, and rolls about 12-15 minutes).

Related Recipes

Looking for more fall pumpkin recipes? Try these:

  • a slice of pumpkin tres leches cake on a small white plate on a wood table with fall decorations in the background
    Pumpkin Tres Leches Cake (A Make-Ahead Holiday Favorite)
  • Mini Pumpkin Cheesecake Recipe
    Creamy Pumpkin Cheesecake (with Caramel Pecan Topping!)
  • a closeup of a slice of pumpkin pie cake on a black plate topped with fresh whipped cream
    Easy Pumpkin Pie Cake Recipe (Better Than Pie!)
  • This Creamy Baked Pumpkin Gnocchi with Italian Sausage is so good you will be dancing in your kitchen!! Sophisticated yet easy to make and something the whole family will love!
    Creamy Baked Pumpkin Gnocchi with Italian Sausage
a top down view of a loaf of pumpkin brioche on a white cloth napkin with two slices cut out

Pumpkin Brioche with a Chocolate Swirl

Yield: 1 loaf
Prep Time: 30 minutes
Cook Time: 25 minutes
Additional Time: 2 hours 30 minutes
Total Time: 3 hours 25 minutes

This pumpkin brioche is subtly sweet with the perfect amount of chocolate swirl. It makes a great gift during the holidays!

Ingredients

  • 3 ½ cups bread flour, divided
  • .25 ounces active yeast (1 packet)
  • ⅓ cup sugar
  • 1 teaspoon kosher salt
  • ½ cup water
  • ½ cup unsalted butter
  • 4 eggs + 1 egg yolk, divided
  • ½ cup canned pumpkin
  • ½ teaspoon nutmeg (freshly grated if possible)
  • 3 ½ teaspoons cinnamon, divided
  • 4 ounces high-quality dark chocolate, roughly chopped

Instructions

  1. In a bowl, mix two cups of the flour, yeast, sugar and salt together.
  2. Gently heat water and butter together in a small saucepan. Make sure it doesn't come to a simmer/boil. Just heat over a low temperature until melted.
  3. Add the water/butter mixture to the flour mixture.
  4. Mix together using hands until just combined.
  5. Add in the four eggs, canned pumpkin, nutmeg, 1 ½ teaspoons cinnamon and combine. Add the rest of the flour and mix until it forms a ball shape.
  6. In a lightly oiled bowl, place the brioche dough and cover with saran wrap. Leave to rise for about 2.5 hours in a warm/dry place.
  7. After it has doubled in size, roll the dough out into a rectangle on a clean surface sprinkled with flour (to prevent sticking). Sprinkle the chocolate pieces and 2 teaspoons cinnamon. Roll the dough towards you then place in a lightly buttered bread pan.
  8. Allow to rise for an additional 30 min.
  9. Preheat the oven to 350°F.
  10. Once the dough has risen for the second time, brush with the egg yolk.
  11. Bake for about 25 minutes (or until a deep golden crust forms). Serve warm!
Nutrition Information:
Yield: 8 Serving Size: 1
Amount Per Serving: Calories: 674Total Fat: 20gSaturated Fat: 12gUnsaturated Fat: 9gCholesterol: 130mgSodium: 423mgCarbohydrates: 106gFiber: 5gSugar: 19gProtein: 16g

This data was provided and calculated by Nutritionix.

© Aubrey Cornelius
Cuisine: American / Category: Bread
Pumpkin Brioche with Chocolate Swirl

Butternut Squash and Sweet Potato Soup

November 8, 2025 by Aubrey Cornelius Leave a Comment

a white bowl filled with butternut squash and sweet potato soup topped with croutons on a rustic wood table

This Butternut Squash and Sweet Potato Soup is everything you want in a cozy fall dish! It's silky smooth and a little sweet, and full of warm, fall flavors. It's hearty enough to serve as a main course but elegant enough for the start to a holiday meal.

I especially love making butternut squash and sweet potato soup around Thanksgiving. It's the kind of dish that looks impressive but is simple and can be made ahead of time. The roasted vegetables caramelize in the oven, and when they're blended with coconut cream and a little cinnamon, every bite tastes like fall comfort in a bowl!

an overhead view of a white bowl filled with butternut squash and sweet potato soup, next to a white napkin and a spoon an a rustic wood table

Butternut squash and sweet potato soup is perfect with a loaf of crusty bread! Sometimes I'll make a stuffed garlic bread or, if I want to keep things a bit healthier, I'll saute some green beans and mushrooms for the side. It's a thick, filling soup, and we'll often have it as our main course on chilly nights.

[feast_advanced_jump_to]

Ingredients

  • Butternut squash: All we'll do here is cut the squash in half and roast it (no need to peel). You can substitute acorn squash if you'd like.
  • Sweet potatoes: These will be cut into medallions and roasted alongside the squash.
  • Olive oil: Used for roasting the vegetables.
  • Salt: Salt = Flavor. 🙂
  • Black pepper: Just a touch to balance the soup's sweetness.
  • Green apples: Green apples are slightly tart which also helps to balance the sweet flavors of this soup.
  • Vegetable broth: You can use homemade or store-bought.
  • Unsweetened almond milk: Feel free to substitute dairy milk for this if you prefer.
  • Cinnamon: You might think this doesn't belong in a soup, but it adds such a wonderful fall flavor and your belly will be happy!
  • Nutmeg: See above. 🙂
  • Coconut cream: This makes the soup silky and adds just a hint of coconut flavor.
  • Toasted pumpkin seeds: These add some texture to an otherwise smooth and silky soup.
  • Croutons (optional): These also add a nice texture to the soup, although I usually omit them if I'm serving it with bread and just stick with the pumpkin seeds. Trader Joe's has seasonal pumpkin croutons that I love to use when I can find them.
a white bowl filled with butternut squash and sweet potato soup, next to a white napkin, a spoon, and a small white pumpkin on a rustic wood table

Instructions

  1. Preheat the oven: Set your oven to 375°F and line two baking sheets with parchment paper.
  2. Prepare the vegetables: Arrange the sweet potato medallions on one baking sheet and the butternut squash halves on the other. Drizzle both with olive oil, then season them with salt and pepper. Toss them gently with your hands to make sure they're coated evenly.
  3. Roast until tender: Roast the sweet potatoes for about 20 minutes, or until they're soft and starting to brown. Roast the butternut squash for about 35 minutes, or until it's tender when pierced with a fork. Note: I'll often roast the vegetables the day before and refrigerate them to save some time.
  4. Blend the soup: Scoop out the insides of the squash and place it in a food processor or blender, discarding the seeds and skin. Add the sweet potatoes, apples, vegetable broth, almond milk, coconut cream, cinnamon, and nutmeg. Blend until it's completely smooth and creamy.
  5. Simmer: Pour the blended mixture into a large soup pot and simmer over medium-low heat for 20 minutes or so, stirring occasionally, giving the flavors time to meld.
  6. Serve and garnish: Ladle the soup into bowls and drizzle with any remaining coconut cream. Top each bowl with pumpkin seeds and croutons for a little crunch.
a person's hand holding roasted pumpkin seeds above a white bowl filled with butternut squash and sweet potato soup

Equipment Needed

  • 2 Baking sheets: You'll need two large baking sheets (one for the sweet potatoes and one for the butternut squash). One will also work as long as everything can fit in one layer.
  • Parchment paper: This prevents the veggies from sticking to the sheet pan and makes cleanup super easy. If you don't have any, give the pan a quick spray with cooking spray (the veggies are coated with olive oil so that will help, too).
  • A sharp knife and a cutting board: The only cutting you need to do is to slice the sweet potatoes and halve the squash, but you'll still want a sturdy board to protect your countertops.
  • Blender or food processor: An immersion blender will also work! You can add everything directly to the pot instead of a blender or food processor, then blend it directly in the pot.
  • Large soup pot: The soup needs time to simmer to bring out its flavors, and a large soup pot is perfect for this.
  • Spatula or wooden spoon: For stirring the soup and scraping down the sides if necessary.
  • Measuring cups and spoons: The spices in butternut squash and sweet potato soup need to be accurately measured. I usually just eyeball the amounts in the palm of my hand, but for this one I make sure the amounts are spot-on. Too much cinnamon or nutmeg can be overpowering, so measure accurately.
  • Serving bowls and ladle: I like to use wide, shallow soup bowls for this recipe, but any soup bowls will do.
a person sitting at a table about to take a spoonful from a white bowl filled with butternut squash and sweet potato soup

Storage and Make-Ahead Tips

  • Make-ahead: This butternut squash and sweet potato soup is perfect for prepping ahead of time. One option is to roast the vegetables the day before, then refrigerate and continue with the recipe the next day. Or you can make the soup entirely up to two days in advance, then refrigerate in an airtight container. Warm it over low heat on the stove, stirring occasionally.
  • Refrigeration: Let any leftovers cool completely before transferring to an airtight container. Store in the refrigerator for up to 4-5 days.
  • Freezing: You can freeze the soup in freezer-safe containers or bags for up to 3 months (leave a little room at the top for expansion). Thaw it overnight in the fridge, then reheat it on the stove over low heat until it's warmed through. (I freeze mine in freezer cubes for individual servings).
  • Reheating tips: It's important to reheat butternut squash and sweet potato soup slowly so it doesn't lose its creamy texture. If the soup thickens too much after chilling, just add a small amount of milk or broth until it loosens up a bit (add just a little at a time, and remember that it will thin out a little as it heats up).
a white bowl filled with butternut squash and sweet potato soup topped with croutons on a rustic wood table

Frequently Asked Questions

Can I use other types of squash?

If you can't find butternut squash, acorn squash is a great substitute. The flavor will change slightly (acorn squash is milder and nuttier).

Do I have to roast the vegetables?

Roasting is key to the flavor in this soup. It caramelizes the natural sugars in the squash and sweet potatoes, which adds a lot of flavor! You can steam or boil them if you have to but it won't be quite as flavorful.

Can I make this soup nut-free?

Just substitute the almond milk with dairy milk, soy milk, oat milk, or coconut milk.

Can I use an immersion blender instead of a food processor?

An immersion blender works well and makes cleanup even easier. Just blend the soup directly in the pot until it's smooth.

How can I make it spicy?

Add a little cayenne pepper, a pinch at a time, until it reaches your perfect spice level. You can also just serve the cayenne at the table so people can add it as they like.

What can I serve with this soup?

It's wonderful with a simple green salad or a side of roasted vegetables. A good, crusty bread is practically a must, or even a grilled cheese sandwich.

Related Recipes

Looking for more fall soup recipes? Try these:

  • a bowl of loaded potato soup with a beige towel and a sprig of parsley
    Loaded Potato Soup Recipe - No Peeling, Baking, or Draining!
  • Best Beanless Chili Recipe
    Thick and Beefy Beanless Chili Recipe
  • a hearty bowl of seafood chowder with a slice of grilled bread
    Seafood Chowder Recipe - Ready in 30 Minutes
  • This Wild Mushroom Brie Soup has incredible flavor yet is very easy to make. Perfect for a special dinner or holiday meal!
    Wild Mushroom Brie Soup with Parmesan Pepper Croutons
a white bowl filled with butternut squash and sweet potato soup topped with croutons on a rustic wood table

Butternut Squash and Sweet Potato Soup

Yield: 6-8 servings
Prep Time: 15 minutes
Cook Time: 55 minutes
Total Time: 1 hour 10 minutes

This creamy fall soup is perfect for chilly nights with a loaf of crusty bread. It's also a wonderful starter for a holiday meal!

Ingredients

  • 1 butternut squash, halved and the seeds removed
  • 3 sweet potatoes, peeled and sliced into medallions
  • 3 tablespoons olive oil
  • 2 teaspoons salt
  • ½ teaspoon freshly-ground black pepper
  • 2 green apples, peeled, cored, and chopped
  • 16 ounces vegetable broth
  • 4 cups almond or dairy milk
  • 2 teaspoons cinnamon
  • 1 teaspoon nutmeg (freshly grated if possible)
  • ½ cup coconut cream (plus extra for drizzling if desired)

Toppings (optional)

  • ¼ cup roasted pumpkin seeds
  • ¼ cup croutons

Instructions

  1. Preheat the oven to 375°F.
  2. Line two baking sheets with parchment paper. Place the sweet potatoes on one and the squash on the other. (Note: You can use just one sheet pan if it's large enough to fit everything in one layer).
  3. Drizzle the vegetables with olive oil, salt and pepper.
  4. Bake the sweet potatoes for about 20 minutes (or until soft and tender) and the squash for about 35 minutes (or until it's tender when pierced with a fork).
  5. Scoop out the insides of the squash and add it to a food processor or blender, discarding the skin. Add the sweet potatoes and the rest of the ingredients (minus toppings). Blend until it's nice and smooth. (Note: you can also use an immersion blender; just add the ingredients to the soup pot in the next step).
  6. Pour the blended soup into a large soup pot. Bring to a simmer over medium-low heat and simmer for 20 minutes or so to heat and bring the flavors together.
  7. When you're ready to serve, drizzle with a little coconut cream, and top with the pumpkin seeds croutons.
Nutrition Information:
Yield: 8 Serving Size: 1
Amount Per Serving: Calories: 340Total Fat: 15gSaturated Fat: 3gUnsaturated Fat: 12gCholesterol: 22mgSodium: 910mgCarbohydrates: 38gFiber: 6gSugar: 8gProtein: 14g

This data was provided and calculated by Nutritionix.

© Aubrey Cornelius
Cuisine: American / Category: Soups and Stews
Butternut Squash and Sweet Potato Soup

Cranberry Ice Cream (The Perfect Thanksgiving Dessert)

November 6, 2025 by Aubrey Cornelius Leave a Comment

a vintage loaf pan filled with cranberry ice cream on a marble countertop with an ice cream scoop, two waffle cones, and a few fresh cranberries scattered around it

This Cranberry Ice Cream is everything a Thanksgiving dessert should be. Most importantly, it has to be delicious. It also has to be easy to make ahead of time, and something everyone will love. Check, check, and check!

If you've ever wished Thanksgiving desserts weren't quite so heavy, this one's for you. The cranberry syrup brings a pop of tangy sweetness that cuts through the richness of the custard, while a hint of citrus adds a wonderful depth of flavor. It can be served on its own, but it's also incredible alongside a slice of pie or spooned over warm apple crisp.

Homemade ice cream might sound ambitious for the holidays, but most of the time is hands-off (just chilling and churning). It's an elegant, make-ahead dessert that adds a fresh twist to the Thanksgiving lineup and always surprises guests in the best way!

a vintage loaf pan filled with cranberry ice cream on a marble countertop with an ice cream scoop, two waffle cones, and a few fresh cranberries scattered around it

When it comes to baking for the holidays, I try to make as many ahead of time as possible. There's always one that's warm and freshly baked (usually a pumpkin pie cake for Thanksgiving and jam sandwich cookies for Christmas) and the rest are no-bake desserts that don't need much time or effort. Anything that pairs well with this cranberry ice cream is a contender, since it gets made every year!

[feast_advanced_jump_to]

Ingredients

There are two sets of ingredients to make cranberry ice cream: one for the custardy vanilla base, and another for a cranberry syrup that will be mixed in. There are only 10 ingredients (minus water and salt), and it comes together quickly!

Custard Base

  • Heavy cream: The cream is what gives it a creamy, velvety texture that you expect from good ice cream.
  • Whole milk: Using a combination of whole milk and cream helps it to freeze smoothly and scoop easier.
  • Granulated sugar: This will be dissolved completely when you make the custard.
  • Vanilla bean: I usually use vanilla extract in most recipes, but a vanilla bean adds those little flecks of seeds that I just love!
  • Vanilla extract: I like to boost the vanilla flavor with a combination of a vanilla bean and some extract. It balances the tartness of the cranberries, so be sure to use both.
  • Egg yolks: These are a necessity for a smooth, creamy custard.
  • Lemon juice: A little citrus flavor never hurt anyone.
  • Salt: Yep, a little salt helps bring out all the flavors.

Cranberry Syrup

  • Fresh cranberries: I always have extra cranberries after making cranberry sauce, and this is a great way to use them up.
  • Sugar: Cranberries are pretty tart, so the sugar helps balance them and makes the sauce nice and sweet.
  • Water: This is what makes it a sauce and will soften the cranberries enough to make them blend easily.
  • Orange zest and juice: Adds a wonderful citrus flavor to the syrup!
an ice cream cone filled with cranberry ice cream, dripping down onto the hand that's holding it

Instructions

Make the Cranberry Syrup

  1. In a medium saucepan, combine the fresh cranberries, sugar, and water. Bring to a simmer over medium heat and cook for about 15 minutes, until the cranberries are soft and have released their juices.
  2. Remove from the heat and let the mixture cool for about 10 minutes.
  3. Transfer the mixture to a blender or food processor and pulse 4-5 times. You're looking for a slightly chunky texture, not completely smooth.
  4. Pour the mixture into a bowl and refrigerate to chill it completely.

Prepare the Custard Base

  1. In a medium saucepan over medium heat, warm 1 cup of heavy cream, the milk, and granulated sugar until the sugar has dissolved.
  2. Split the vanilla bean lengthwise, scrape out the seeds with the back of a knife, and add both the seeds and the pod to the pan. Cover and remove from heat. Let it steep for about 30 minutes to infuse the vanilla flavor.
  3. In a medium bowl, whisk together the egg yolks. Very slowly pour the warmed cream mixture over the yolks, whisking constantly so the eggs don't scramble.
  4. Return the mixture to the saucepan and cook over medium heat, stirring constantly, until it thickens enough to coat the back of a spoon.
  5. Stir in the vanilla extract, lemon juice, and a pinch of salt.
  6. Place a fine-mesh strainer over a clean bowl containing the remaining 1 cup of heavy cream. Strain the custard through the sieve to remove any bits of cooked egg or vanilla pod.

Combine and Chill

  1. Remove the chilled cranberry mixture from the refrigerator and stir in the orange zest and orange juice.
  2. Gently whisk the cranberry mixture into the custard until fully combined.
  3. Set the bowl in an ice bath and let it cool to room temperature.
  4. Once it's cooled, transfer it to the freezer for about 40 minutes, just until cold but not frozen.

Churn and Freeze

  1. Pour the chilled mixture into your ice cream maker and churn according to the manufacturer's instructions.
  2. Once it's churned, transfer the ice cream to a container and freeze it for at least 4-6 hours, or until it's firm.
an ice cream scoop filled with cranberry ice cream with some fresh cranberries scattered around it on a marble countertop

Equipment Needed

  • 2 medium saucepans: You'll need one for making the cranberry syrup and another for the custard base.
  • Fine-mesh strainer: This will catch any bits of cooked egg so the cranberry ice cream is smooth.
  • Mixing bowls: Have a few ready for whisking eggs, chilling the syrup, and cooling the custard in an ice bath.
  • Whisk: Use a sturdy whisk for tempering the egg yolks.
  • Blender or food processor: Used to puree the cranberry syrup.
  • Ice cream maker: Yes, you'll need an ice cream maker for this recipe. Just follow the manufacturers instructions.
  • Spatula: For stirring, scraping, and folding.
  • Ice cream container or freezer-safe dish: An airtight, lidded container helps to keep ice crystals from forming on your ice cream as it freezes.
a vintage loaf pan filled with cranberry ice cream with one scoop missing

Storage and Make-Ahead Tips

  • Make ahead for Thanksgiving: This is one of those desserts that's even better when made ahead. You can prepare the ice cream up to a week in advance, which makes it perfect for the busy days leading up to Thanksgiving. Just keep it sealed in a freezer-safe container until it's time to serve it.
  • Storage: Store your cranberry ice cream in an airtight container in the coldest part of the freezer (not in the door)! Press a piece of plastic wrap directly onto the surface before sealing to help prevent ice crystals from forming.
  • Soften before serving: For the best texture, let the ice cream sit at room temperature for about 10 minutes before scooping.
  • Leftovers: If you somehow end up with leftovers (it happens less often than you'd think!), it'll keep well in the freezer for up to two weeks.
  • Serving ideas: This ice cream pairs beautifully with Thanksgiving favorites! Try it with pumpkin pie, apple crisp, or a pecan tart. It also makes a refreshing stand-alone dessert! If you do want to serve it on its own, try adding a small handful of sugared cranberries to each dish - they're so good!
a vintage loaf pan filled with cranberry ice cream on a marble countertop with a few fresh cranberries scattered around it

Frequently Asked Questions

Can I use frozen cranberries instead of fresh?

Frozen cranberries work just fine when fresh ones aren't available. Just thaw them first and pat them dry before cooking so the syrup doesn't become too watery.

Do I need an ice cream maker?

I don't recommend it as an ice cream maker gives you the creamiest texture, but if you don't have one, you can make this as a no-churn ice cream. Pour the cooled custard into a freezer-safe container, cover it tightly, and stir it every 30 minutes for the first few hours.

Can I make this ahead for Thanksgiving?

It's one of the best desserts to prepare early! Make it up to a week ahead and keep it frozen until you're ready to serve (just allow about 10 minutes for it to soften on the counter).

How do I keep homemade ice cream from getting icy?

Make sure the custard is fully chilled before churning it, and store the finished ice cream tightly sealed. The sugar and fat in this recipe help prevent iciness, but exposure to air is what usually causes crystals to form.

Can I skip the lemon juice?

The lemon juice helps balance the richness and brings out the cranberry flavor. You can skip it, but the ice cream will taste slightly sweeter.

What can I serve with cranberry ice cream?

This cranberry ice cream is wonderful on its own, but it really shines alongside traditional Thanksgiving desserts like pumpkin pie or apple crumble. You could also serve a small cookie tray at the table and let everyone choose their favorites.

How long does cranberry ice cream take to set?

After churning, the ice cream needs about 4-6 hours in the freezer to firm up completely. If you prefer a softer texture, you can serve it right away as a "soft serve" style dessert.

Pairings

Looking for more ideas for what to pair with this cranberry ice cream? Try these:

  • a plate of white chocolate biscotti, some coated with chopped pistachios and some with chopped cacao nibs, next to a glass of milk
    White Chocolate Biscotti Recipe (Gift-Worthy Cookies!)
  • Lemon Shortbread Cookies Recipe
    Lemon Shortbread Cookies
  • a top-down shot of a cranberry christmas cake topped with fresh cranberries and a sprig of rosemary with three slices cut and one slice on a vintage spatula
    The Best Cranberry Christmas Cake (Make-Ahead Friendly)
  • Another Almond Crescent Cookies Recipe - but this one comes from Dorie Greenspan! Light, crumbly, not too sweet and perfect for coffee or Christmas.
    Almond Crescent Cookies Recipe
a vintage loaf pan filled with cranberry ice cream on a marble countertop with an ice cream scoop, two waffle cones, and a few fresh cranberries scattered around it

Cranberry Ice Cream

Yield: 4 quarts
Prep Time: 30 minutes
Additional Time: 5 hours 20 minutes
Total Time: 5 hours 50 minutes

This is a wonderful dessert for fall or Thanksgiving when fresh cranberries are everywhere.

Ingredients

Cranberry Syrup

  • 2 cups fresh cranberries
  • 1 cup sugar
  • 1 cup water
  • Zest of 1 orange
  • Juice of 1 orange

Custard base

  • 2 cups heavy cream, divided
  • 1 cup whole milk
  • ¾ cup granulated sugar, divided
  • 1 whole vanilla bean
  • 6 egg yolks
  • ¾ teaspoon vanilla extract
  • 1 tablespoon lemon juice
  • Pinch of salt

Instructions

  1. In a medium sauce pan, add the the fresh cranberries, sugar and water. Bring it to a simmer and cook for about 15 minutes, stirring often, until the cranberries are soft and tender. Remove from heat and allow it to cool for about 10 minutes.
  2. Place the cooled mixture into a food processor or blender. Pulse the mixture about 4-5 times (the texture shouldn't be creamy smooth). Transfer it to a bowl and place it in the fridge to chill.
  3. Add 1 cup of heavy cream and all of the milk and sugar to another medium-sized sauce pan over medium heat. Stir it constantly until it's warm and the sugar has completely dissolved.
  4. Split the vanilla bean all the way down and scrape the seeds into the cream mixture (add the pod as well), stirring to combine. Cover it with a lid and remove it from the heat. Allow to sit for about 30 minutes, then remove the pod.
  5. In another medium-sized bowl, add the remaining heavy cream and place a mesh strainer atop the bowl. Set it aside.
  6. In a separate bowl whisk together the egg yolks. Very slowly pour the warmed heavy cream mixture over the egg yolks while whisking constantly to make sure the eggs don't scramble. Transfer back into the sauce pan, and stir it constantly over a medium heat until it thickens and coats the back of a spoon.
  7. Stir in the vanilla extract, lemon juice and salt, then pour the mixture through the mesh strainer into the remaining heavy cream.
  8. Remove the cranberry mixture from the fridge and stir in the orange zest and juice.
  9. Combine the cranberry mixture with the custard, stirring it well to incorporate it completely. Set in an ice bath (water and ice) to cool down. Let it sit until it reaches room temperature then transfer it to the freezer for 40 minutes to rapidly cool. Remove it when it's chilled but not frozen.
  10. Churn the chilled mixture in an ice cream maker according to the instructions. Once complete, transfer the ice cream to an ice cream container and freeze for 4-6 hours.
Nutrition Information:
Yield: 16 Serving Size: 1
Amount Per Serving: Calories: 265Total Fat: 13gSaturated Fat: 8gUnsaturated Fat: 5gCholesterol: 106mgSodium: 44mgCarbohydrates: 33gFiber: 1gSugar: 30gProtein: 4g

This data was provided and calculated by Nutritionix for 16 servings (½ cup).

© Aubrey Cornelius
Cuisine: American / Category: Desserts
Cranberry Ice Cream (The Perfect Thanksgiving Dessert)

No-Bake Rocky Road Bars with Cashews

November 4, 2025 by Aubrey Cornelius Leave a Comment

rocky road bars made with marshmallows and cashews just out of the freezer and cut into bars

These easy Rocky Road Bars have layers of smooth chocolate, soft marshmallows, and buttery cashews, creating that classic rocky road texture that's impossible to resist!

I've always loved how easy these are to make. There's no oven and only a handful of ingredients! This version uses coconut butter instead of butter, which makes the chocolate melt into an ultra-smooth, glossy mixture that sets perfectly.

a closeup of a baking pan filled with slices of rocky road bars

I grew up making all kinds of no-bake desserts. Back then, I wasn't much of a cook or baker, but I had a serious sweet tooth, so easy treats like these were right up my alley. My top pick was always microwave chocolate pudding (still one of my favorites - you have to try it!), along with anything that came together fast with just a handful of ingredients.

[feast_advanced_jump_to]

Ingredients

  • Coconut butter: Using coconut butter instead of regular butter gives these rocky road bars a silkier texture (and makes the recipe dairy-free)!
  • Corn syrup: Just a few tablespoons helps the chocolate stay soft and fudgy, otherwise it can get too hard once it's chilled.
  • Cacao bar: Use a high-quality bar like Ghirardelli if you can. There are so few ingredients that you want to use the best you have.
  • Semi-sweet chocolate: Combining the cacao and semi-sweet chocolate gives a better depth of flavor than just using one kind, and makes them just the right amount of sweet.
  • Mini marshmallows: These add a necessary sweetness and are mandatory for rocky road bars!
  • Cashews: We like the buttery crunch of cashews, but you can use any nut you like (pecans are our second choice).
step 3 for making rocky road bars: chopped chocolate bars being added to the bowl

Instructions

  1. Prepare the pan. Lightly butter an 8x8-inch pan with coconut butter to prevent the bars from sticking.
  2. Melt the coconut butter and corn syrup. In a large, microwave-safe bowl, combine the coconut butter and corn syrup. Microwave for about 30 seconds, or until the coconut butter has completely melted. Stir to combine.
  3. Add the chocolate. Stir in all of the chopped chocolate. Return the bowl to the microwave and heat in 20-second intervals, stirring after each one, until the chocolate is almost completely smooth, then whisk until it's all melted and incorporated.
  4. Build the first layer. Spread half of the chocolate mixture evenly across the bottom of the pan. Top with 1 cup of mini marshmallows and ⅓ cup of crushed cashews.
  5. Add the second layer. Pour the remaining chocolate mixture over the first layer, then top again with 1 cup of mini marshmallows and ⅓ cup of cashews.
  6. Swirl it together. Use a small spatula to gently swirl the chocolate, marshmallows, and cashews together so everything is evenly distributed.
  7. Finish with the final topping. Sprinkle the remaining marshmallows and cashews evenly over the top.
  8. Freeze to set. Place the pan in the freezer for 20 minutes until firm.
  9. Cut and serve. Once the bars have set, remove them from the freezer and cut them into bars. Let them soften at room temperature for a few minutes before serving.
step 5 for making rocky road bars: melted chocolate being poured over the first two layers

Equipment Needed

Not only are there just a handful of ingredients in this recipe, you also don't need much in the way of equipment either:

  • Microwave-safe mixing bowl
  • Rubber spatula
  • 8x8-inch baking pan: You can use a slightly different size if needed, but keep in mind that thinner bars will set faster.
  • Measuring cups and spoons
  • Small spatula or offset spatula

Storage and Make-Ahead

  • Make-ahead: Rocky road bars are perfect for preparing in advance. Once the bars have set in the freezer and sliced, they can be stored in the fridge until you're ready to serve them. Just bring them to room temperature for a few minutes before enjoying (the texture softens slightly and becomes even fudgier).
  • Refrigeration: Store the bars in an airtight container in the refrigerator for up to a week. If you stack them, add parchment paper between the layers to prevent them from sticking together.
  • Freezing: These bars need about 20 minutes in the freezer to set, but they aren't meant for long-term freezing. Extended freezing can cause the chocolate to bloom or the marshmallows to become chewy when they're thawed.
  • Serving tip: Serve these rocky road bars slightly chilled or at room temperature. The coconut butter keeps the chocolate smooth and glossy, even after refrigeration!
a baking pan filled with slices of rocky road bars

Frequently Asked Questions

Can I use butter instead of coconut butter?

You can use regular unsalted butter if you don't need the recipe to be dairy-free. The flavor will be a little richer, and the bars will be slightly firmer once they're chilled.

What kind of chocolate works best?

A mix of 60% cacao and semi-sweet chocolate makes these bars rich and smooth without being overly sweet. Choose high-quality bars over chocolate chips, which contain stabilizers that can affect the final texture.

Do I have to use cashews?

Any nut works here. Almonds, pecans, or salted peanuts are all delicious substitutes. If you need a nut-free option, you can use seeds, more marshmallows, or even chopped dried fruit.

How do I cut the bars cleanly?

Use a serrated knife and let the bars sit at room temperature for a few minutes before cutting. This softens the chocolate just enough to get neat, smooth slices.

Can I make these without a microwave?

Just melt the coconut butter and chocolate using a double boiler (or place a heat-safe bowl over a pot of simmering water).

How long do rocky road bars last?

Stored in an airtight container in the refrigerator, they'll stay fresh for up to a week. Let them sit out for about five minutes before serving.

Do these bars travel well?

They do travel well, and they're great for potlucks and parties. Keep them chilled until just before serving if possible.

Related Recipes

Looking for more easy, no-bake desserts? Try these:

  • Homemade Affogato Recipe with Ice Cream and Coffee
    Affogato Recipe - Italian Dessert
  • A side view of five chocolate covered pretzel rods decorated with different colors and sprinkles for Christmas
    Chocolate Covered Pretzel Rods
  • chocolate bowls
    Easy Chocolate Bowls with Balloons - A Fun No-Bake Dessert!
  • Homemade chocolate truffles in white paper candy cups for gift-giving
    Easy Chocolate Truffles Recipe
rocky road bars made with marshmallows and cashews just out of the freezer and cut into bars

Rocky Road Bars

Yield: 9 bars
Prep Time: 10 minutes
Cook Time: 20 minutes
Additional Time: 25 minutes
Total Time: 55 minutes

Sink your teeth into these delicious no-bake rocky road bars made with chocolate, fluffy marshmallows, and crunchy cashews!

Ingredients

  • 1 cup + 1 tablespoon coconut butter
  • 3 tablespoons white corn syrup
  • 16-ounce 60% cocoa bar, roughly chopped
  • 16-ounce semi-sweet chocolate bar, roughly chopped
  • 3 cups mini marshmallows
  • 1 cup cashews, coarsely chopped

Instructions

    1. Butter an 8x8 pan with 1 tablespoon of the coconut butter.
    2. In a large microwave-safe bowl, add the remaining coconut butter and corn syrup and heat in the microwave for about 30 seconds (or until the coconut butter has completely melted).
    3. Add all of the chopped chocolate and stir together. Place it back into the microwave in 20 second intervals, stirring each time until the chocolate is almost completely smooth, then continue stirring until all of the chocolate is smooth and creamy.
    4. Add half the chocolate mixture to the pan, spreading it out so the bottom is completely covered.
    5. Top with 1 cup of the mini-marshmallows and ⅓ cup chopped cashews.
    6. Add another layer of chocolate, taking care to cover to the edges. Add another 1 cup mini marshmallows and ⅓ cup crushed cashews.
    7. Use a small spatula to swirl together all of the layers and evenly distribute the ingredients. Top with a final layer of the remaining marshmallows and cashews.
    8. Place the pan in the freezer for about 20 minutes. Once firmly set, remove from the freezer and cut into bars.
    9. Let the bars sit at room temperature for about 5 minutes, then enjoy!
Nutrition Information:
Yield: 9 Serving Size: 1
Amount Per Serving: Calories: 318Total Fat: 4gSaturated Fat: 2gUnsaturated Fat: 2gCholesterol: 2mgSodium: 63mgCarbohydrates: 67gFiber: 2gSugar: 46gProtein: 4g

This data was provided and calculated by Nutritionix.

© Aubrey Cornelius
Cuisine: American / Category: No-Bake Desserts
No-Bake Rocky Road Bars with Cashews

Chocolate Meringue Cookies with Dark Chocolate Swirls

October 30, 2025 by Aubrey Cornelius Leave a Comment

a white bowl filled with chocolate meringue cookies with more cookies on a linen towel on the table around the bowl

These Chocolate Meringue Cookies are light as air and melt the second they hit your tongue. They have a delicate chocolate flavor that's just sweet enough but not too sweet as some meringue cookies can be.

I've been making chocolate meringue cookies for years during the holidays because they look so pretty on a cookie tray, yet they come together with just a few simple ingredients. No butter, no flour, no fuss! Just egg whites and sugar whipped into glossy peaks, drizzled with chocolate, and baked low and slow until they're perfect!

a white bowl filled with swirled chocolate meringue cookies with more cookies on a linen towel on the table around the bowl

These chocolate meringue cookies are wonderful on their own, but I also love to serve them alongside a dalgona coffee or crumble a few over homemade chocolate pudding. And if you're looking for more easy ideas for your cookie tray, don't miss our Christmas no-bake desserts!

[feast_advanced_jump_to]

Ingredients

There are only 5 ingredients in these chocolate meringue cookies. They're so simple but look so impressive!

  • Egg whites: Make sure to use room-temperature egg whites as they whip up higher and are more stable. Cold egg whites will still work, but you'll get better results if you let them sit out for about 30 minutes before starting.
  • Superfine sugar: The sugar dissolves into the whipped egg whites, giving the cookies their structure and glossy finish. You can make your own superfine sugar by pulsing regular granulated sugar in a blender or food processor for around 30 seconds (just be careful you don't turn it into powder).
  • White Vinegar: This helps stabilize the meringue and keeps it from collapsing. Don't worry, you can't taste it in the finished product!
  • Vanilla extract: This adds a nice flavor to the cookies, so use real if you have it.
  • Dark chocolate: Use a high-quality dark chocolate bar around 70% cacao. Most will be swirled into the meringue, and the rest will be drizzled over the tops before baking.

What to Do with the Extra Egg Yolks

Whenever I make chocolate meringue cookies, I always end up with yolks that I don't want to just throw away. You can keep them covered in the fridge for up to two days (make sure to press a piece of plastic wrap directly onto the surface so they don't dry out). Here are a few ways to put them to good use:

  • Make custard or pudding
  • Whisk them into scrambled eggs
  • Make homemade mayonnaise
  • Add to pasta or make an authentic carbonara
  • Make homemade lemon curd or pastry cream
  • Add them to easy mashed potatoes or baked mashed cauliflower
  • Make salt-cured egg yolks
  • If you don't have plans for them right away, you can freeze yolks too! Just whisk them with a pinch of salt or sugar first so they don't thicken too much when you thaw them.
a white bowl filled with swirled chocolate meringue cookies with more cookies on the table around the bowl

Instructions

  1. Preheat the oven: Set your oven to 215°F and line a baking sheet with parchment paper. Make sure the sheets are completely dry! Even a small amount of moisture will affect how the meringue sets.
  2. Beat the egg whites. In a very clean and dry glass or metal mixing bowl, beat the egg whites and cream of tartar on medium speed until soft peaks form.
  3. Add the sugar, vanilla extract, and vinegar. With the mixer running, gradually add the sugar one tablespoon at a time, then the vanilla and vinegar with the last bit of sugar. Continue beating until stiff, glossy peaks form and you can rub a bit between your fingers without feeling any sugar granules.
  4. Melt the chocolate. Chop the dark chocolate and melt it using a double boiler or the microwave. If using the microwave, heat in 30-second increments, stirring between each until smooth.
  5. Create the swirl. Drizzle about ¾ of the melted chocolate directly into the meringue. Gently fold it in just until it's streaked through (you want visible swirls, not a fully mixed batter).
  6. Scoop and drizzle. Use a cookie scoop to portion the meringue onto the prepared baking sheet. Drizzle the remaining melted chocolate over the tops of the cookies.
  7. Bake low and slow. Place the baking sheet on the lowest rack and bake for until the meringues are crisp.
  8. Cool completely. Turn off the oven and leave the meringues inside with the door closed for another 20-30 minutes to cool them gradually. This helps prevent cracking and gives them a perfect texture!

Equipment Needed

  • Electric mixer: A stand mixer with a whisk attachment works best for whipping egg whites, but a handheld mixer works, too.
  • Large mixing bowl: Use glass or metal (plastic bowls can hold traces of grease that will prevent the egg whites whipping properly).
  • Rubber spatula: This works best for folding the chocolate into the whipped egg whites.
  • Double boiler or microwave-safe bowl: For melting the chocolate.
  • Cookie scoop or large spoon: It doesn't matter which you use, you just want to make sure the cookies are all the same size.
  • Parchment paper or silicone baking mat: This makes it so there's no cleanup and prevents the cookies from sticking.
  • Baking sheet: Use a light-colored baking sheet if possible (darker pans can cause the bottoms to brown too quickly).
a white bowl filled with swirled chocolate meringue cookies with more cookies on a linen towel on the table around the bowl

Storage and Make-Ahead Tips

  • Room temperature: Once your meringue cookies have completely cooled, transfer them to an airtight container. Keep them at room temperature for up to a week. Meringues are sensitive to humidity, so make sure the lid is tight! Even a little moisture in the air can make them sticky. If you need to stack them, place a sheet of parchment paper between the layers to keep the chocolate from smudging and the cookies from sticking together.
  • Make-ahead: You can bake these up to 3 days before serving. They hold up beautifully if kept dry and sealed. Make sure to store them in a cool, dry place away from sunlight.
  • Freezing: Meringue cookies can be frozen, but it's a bit tricky since they can absorb moisture when thawing. If you do freeze them, use an airtight, freezer-safe container and thaw them at room temperature inside the sealed container to prevent potential condensation.
  • Re-crisping: If they do soften, you can place them back in a 200°F oven for about 10 minutes, then let them cool with the door cracked open. They'll crisp right back up!

Frequently Asked Questions

Why did my chocolate meringue cookies deflate or flatten?

Deflating usually happens when the egg whites were over-mixed or not folded gently enough when adding the chocolate. Be gentle when folding, and make sure the bowl and utensils are completely grease-free before you start.

How do I know when the meringues are done baking?

If they lift easily from the parchment without sticking, they're done. They should aslo feel dry to the touch but not browned.

Can I use milk or semi-sweet chocolate instead of dark chocolate?

Use your favorite chocolate, but keep in mind that the flavor will be sweeter and less intense.

My meringues turned sticky. What went wrong?

That's almost always due to humidity. Meringues need to stay dry, so try to make them on a low-humidity day and store them in an airtight container as soon as they're cool.

Can I make them smaller or bite-sized?

Yes, I love making them bite-sized! Just reduce the baking time slightly (check them around the 35-40 minute mark).

Do I need cream of tartar for this recipe?

The vinegar in the recipe serves the same purpose by stabilizing the egg whites. You can use cream of tartar instead if you prefer (about ¼ teaspoon per egg white), but it's not necessary.

Can I make these ahead for a party or the holidays?

These chocolate meringue cookies are a great make-ahead option because they keep well at room temperature (when stored properly). Make sure to keep them in a sealed container until you're ready to plate them.

a white bowl filled with chocolate meringue cookies with more cookies on a linen towel on the table around the bowl

Chocolate Meringue Cookies

Yield: 12 large cookies
Prep Time: 15 minutes
Cook Time: 50 minutes
Additional Time: 20 minutes
Total Time: 1 hour 25 minutes

These chocolate meringue cookies are chewy and soft with a crispy outside. They're a wonderful cookie to make for the holidays!

Ingredients

  • 6 egg whites, room temperature
  • 3 ½ cups superfine sugar (see notes)
  • 1 teaspoon vanilla extract
  • ½ teaspoon white vinegar
  • 4 ounces dark chocolate

Instructions

  1. Preheat oven to 215°F and set a rack to the lowest position.
  2. Whip the egg whites until frothy and light in color. With the mixer running, gradually add the sugar one tablespoon at a time, then the vanilla and vinegar with the last bit of sugar.
  3. Melt the chocolate either in a double boiler or in the microwave in 30-second bursts.
  4. Drizzle about ¾ of the chocolate directly into the meringue, and very gently fold it in just until you have thick streaks.
  5. Using a cookie scoop, scoop out the cookies onto a parchment lined baking sheet.
  6. Drizzle with the remaining chocolate and place in the oven for about 50-60 minutes. When the cookies are ready, turn off the oven and leave them to cool gradually for another 20-30 minutes.

Notes

To make superfine sugar from regular granulated sugar, blend or pulse the sugar in a food processor or blender until it's fine but not powdery (about 30 seconds).

Nutrition Information:
Yield: 12 Serving Size: 1
Amount Per Serving: Calories: 287Total Fat: 3gSaturated Fat: 2gTrans Fat: 0gUnsaturated Fat: 1gCholesterol: 1mgSodium: 30mgCarbohydrates: 64gFiber: 1gSugar: 63gProtein: 2g

This data was provided and calculated by Nutritionix.

© Aubrey Cornelius
Cuisine: French / Category: Desserts
Chocolate Meringue Cookies with Dark Chocolate Swirls

Arancini - Italian Rice Balls (Bake, Fry, or Air-Fry)

October 27, 2025 by Aubrey Cornelius Leave a Comment

a platter of arancini rice balls with a small bowl of marinara sauce

Arancini have always been one of our favorite appetizers (and sometimes a meal): the combination of that crispy outside and creamy, cheesy rice inside is irresistible! It's always the first thing to disappear every time we serve it.

Traditional arancini are deep-fried, but I like to bake mine for a lighter version that's still crisp on the outside and gooey in the middle. The key is using short-grain rice so it sticks together just enough to hold its shape while still staying soft inside. I also cook the rice in part chicken broth to infuse a little extra flavor before mixing it with ricotta, mozzarella, and Parmesan.

Arancini can be baked, deep-fried, air-fried, or pan-fried, and I'll give you instructions for them all so you can them your way. And if you want to make them ahead of time, you can freeze them and bake right before guests arrive!

a platter of arancini rice balls with a small bowl of marinara sauce

I'll often serve arancini as our main course since everyone loves it so much! It pairs well with a vegetable side dish like garlic snap peas or green beans almondine. For dessert, I like to stick with the Italian theme and serve a simple affogato (which, if you've never had one, it's an absolute must-try for coffee lovers)!

[feast_advanced_jump_to]

Ingredients

  • Rice: Traditional arancini are made with Arborio rice, the same short-grain rice used in risotto. We use short-grain brown rice in this recipe, but you can use whichever you prefer.
  • Broth: Cooking the rice in a mix of water and chicken (or vegetable) broth adds even more flavor. Feel free to use water, just be sure to add extra seasoning later.
  • Cheese: We use three cheeses in this arancini rice balls recipe: ricotta, mozzarella, and Parmesan. Ricotta adds creaminess, mozzarella gives you that stretchy cheese pull, and Parmesan adds a ton of salty flavor.
  • Marinara sauce: We add a small amount mixed into the rice mixture to add more flavor, then we add some to a small dish for dipping. Use your favorite homemade or store-bought sauce, just make sure it's thick and not too watery.
  • Eggs: The secret to binding everything together and helping the coating stick.
  • Flour: All-purpose flour works best, but whole wheat flour is fine if that's what you have on hand.
  • Panko breadcrumbs: If you only have regular breadcrumbs, those will work too, but panko will make these extra crispy.
  • Salt and pepper: Season these well!
  • Fresh parsley: A little sprinkled on top adds a lot of color, but this is optional.
  • Oil or cooking spray: Which you use will depend on the baking method you choose. Pan-frying and deep-frying uses oil, while air-frying or baking uses cooking spray.
an arancini Italian rice ball above a small bowl of marinara sauce just before being dipped

Instructions for Baking, Frying, or Air-Frying

Step 1: Cook the rice. In a medium saucepan, bring the chicken or vegetable broth and some water to a boil. Add the rice, reduce it to a simmer, and cook until the liquid is absorbed and the rice is tender but not mushy (it should still have a little bite).

Spread the rice out on a baking sheet to cool completely (this helps it firm up and makes shaping the rice balls much easier). Note: This step can be done the day before and can make the arancini easier to shape.

Step 2: Mix the filling. In a large bowl, combine the cooled rice with the marinara sauce, ricotta cheese, grated Parmesan, and a pinch of salt and pepper. Mix until it's well combined. The mixture should be sticky enough to hold its shape, so if it feels too loose, stir in a tablespoon or two of breadcrumbs. Note: If you're using brown rice or a longer grain, add the mixture to a food processor instead of just mixing it together. Pulse it a few times just until the rice is half its original size and all of the ingredients are well combined.

Step 3: Shape the arancini. Scoop about 2 tablespoons of the rice mixture and roll it into a ball using your hands. Press a small amount of the mozzarella into the center, then reshape to fully enclose the cheese. Repeat with the remaining mixture until all the rice is used. Place the balls on a parchment-lined baking sheet and refrigerate for at least 15 minutes to firm them up.

Step 3 of making arancini rice balls: the process of forming the rice balls and placing them on a sheet pan lined with parchment paper

Step 4: Coat the rice balls. Set up three shallow bowls: one with flour, one with whisked eggs, and one with panko breadcrumbs mixed with a little salt and Parmesan. Roll each rice ball first in flour, then dip it into the egg, and finally coat it evenly in breadcrumbs.

Step 4 of making arancini rice balls: dredging them in flour, then egg, then panko breadcrumbs

Step 5: Choose Your Cooking Method

  • Bake: Preheat your oven to 400°F. Place the rice balls on a parchment-lined baking sheet and lightly spray them with olive oil or cooking spray. Bake for 20-25 minutes, turning halfway through, until they're golden brown all over.
  • Pan-Fry: Heat about ½ inch of oil in a large skillet over medium heat. When the oil is hot (about 350°F), add the rice balls in batches, making sure not to crowd the pan. Cook for 2-3 minutes per side until they're golden and crispy. Transfer to a plate lined with paper towels to drain off the oil.
  • Air-Fry: Preheat the air fryer to 375°F. Lightly spray the basket and the rice balls with oil. Air-fry in batches for 10-12 minutes, shaking halfway through, until the rice balls are crispy and golden brown.
  • Deep-Fry: Heat cooking oil with a high smoke point (canola or avocado oil works well) in a deep fryer or heavy pot to 350°F. Fry the rice balls in small batches for 3-4 minutes, until they're golden brown and crispy. Remove with a slotted spoon and drain on paper towels.

Step 6 (last but definitely not least): Serve and enjoy! Sprinkle with fresh, chopped parsley and serve warm with marinara sauce for dipping.

Tips and Variations

  • Use day-old rice for easier shaping. Freshly cooked rice can be too soft and sticky to form into balls. If you can, cook the rice a day ahead and refrigerate it. Cold rice firms up, making it easier to handle and less likely to fall apart.
  • Don't skip the chill step. Once your rice balls are shaped, chill them for at least 15-20 minutes before coating or cooking. This helps them keep their shape when you bake or fry them.
  • Make sure the oil is the right temperature. If it's too hot, the outside will brown before the inside is heated through. If it's too cool, the rice balls will soak up more oil and make them greasy. If you're baking or air-frying, a light mist of olive oil spray makes all the difference.
  • Try different fillings. While mozzarella is a classic choice, small cubes of provolone, fontina, or smoked gouda are all delicious. You can even add a dollop of pesto for something a little different.
  • Turn leftover risotto into arancini. If you've made our Risotto with Mushrooms and Gorgonzola, you're already halfway there. It makes incredible arancini: just scoop, shape, coat, and fry (or bake). The gorgonzola melts adds so much flavor that you won't even need extra cheese. It's one of my favorite ways to turn leftover risotto into a whole new meal or appetizer.
  • Make them ahead of time. Form and coat the arancini, then refrigerate for up to 24 hours or freeze for up to 3 months before cooking. Bake or fry them straight from frozen, just add a few extra minutes of cooking time.
  • Serving ideas: These are fantastic as appetizers with warm marinara, but they also make a fun side or main dish for Italian dinners. I sometimes serve them alongside a bowl of tomato cauliflower soup for a cozy meal.
a platter of arancini rice balls with a small bowl of marinara sauce, with one arancini being dipped into the sauce

Storage and Reheating

  • Refrigerate: Store any leftovers in an airtight container in the refrigerator for up to 3 days. Let them cool completely before sealing the container to prevent condensation, which can make the coating soggy.
  • Freezing: Arancini freeze well, both cooked and uncooked. To freeze before cooking: Place the coated rice balls on a baking sheet and freeze them until they're solid, then transfer them to a freezer bag or airtight container for up to 3 months. To freeze after cooking: Let them cool completely before freezing the same way.
  • Reheating: Oven or Air Fryer (Best Method): Reheat at 375°F for about 10-12 minutes, or until heated through and crispy on the outside. Stovetop: Pan-fry in a little olive oil over medium heat for a few minutes per side until the outside is crispy again. Microwave: Use only if you're in a hurry (about 45 seconds per rice ball). The crust will be soft but the flavor will still be good!
  • Tip: If you froze them uncooked, you can bake or fry them straight from frozen (no need to thaw)! Just add an extra 3-5 minutes of cooking time.

Frequently Asked Questions

What kind of rice is best for arancini?

Traditional arancini are made with Arborio rice, the same type used for risotto. Its short grains and high starch content help the rice stick together while still staying creamy inside. If you don't have Arborio, other short-grain varieties like Carnaroli or Vialone Nano also work well. We use brown rice often because that's what we usually have on hand.

How do you keep arancini from falling apart?

The trick is to make sure the rice mixture is cool and sticky before shaping the balls. If it feels too loose or its not sticking together, mix in a tablespoon or two of breadcrumbs or grated Parmesan. Chilling the formed balls for 15-20 minutes before coating also helps them hold their shape during cooking.

Can I make arancini without frying?

You can easily bake or air fry them. Bake at 400°F for 20-25 minutes or air fry at 375°F for 10-12 minutes until golden and crispy. They'll still come out crispy without the extra oil!

Is arancini gluten-free?

Not usually, but it can be! Traditional recipes use flour and breadcrumbs for coating, but you can easily make gluten-free arancini by swapping both for gluten-free alternatives. You can also use crushed rice crackers or gluten-free panko for the coating.

Is arancini vegetarian?

This recipe is vegetarian-friendly as long as you use vegetable broth and check that your Parmesan is made without animal rennet (many brands note this on the label).

Is arancini hard to make?

Not at all, it just has a few steps. Once you've made it the first time, it'll be a breeze. The key is to cook the rice properly, chill it before shaping, and coat each ball evenly. From there, you can choose how to cook them (baking, pan-frying, deep-frying, or air-frying all work great). I usually make the rice and shape the balls in advance so assembly day is even easier.

What do you serve with arancini?

They're delicious on their own with a side of warm marinara, but for a full meal, try serving them alongside a fresh arugula salad, roasted vegetables, or a bowl of soup.

Can I use leftover risotto to make arancini?

That's actually the most authentic way to make them. Just refrigerate your leftover risotto and follow our assembling and cooking instructions.

Related Recipes

Looking for more appetizer recipes? Try these:

  • Crispy portobello fries on brown parchment paper
    Portobello Fries - Baked or Fried
  • These super easy Bisquick Sausage Balls have just four ingredients, loads of sausage flavor and a cream cheese makes them moist and delish! Serve with mustard, your favorite dipping sauce or just on their own.
    Bisquick Sausage Balls
  • a closeup overhead shot of a plate of fried chicken livers with a dish of chipotle dipping sauce
    Perfect Fried Chicken Livers
  • Golden crispy baked potato skins loaded with gooey cheese and crispy bacon, garnished with fresh green chives.
    The Secret to Extra Crispy Baked Potato Skins
a platter of arancini rice balls with a small bowl of marinara sauce

Arancini - Italian Rice Balls

Yield: 15 rice balls
Prep Time: 15 minutes
Cook Time: 15 minutes
Additional Time: 30 minutes
Total Time: 1 hour

Arancini make a fantastic Italian appetizer or main course! Make your rice the day before for the best results, or use leftover risotto.

Ingredients

  • 2 cups arborio rice, cooked (you can also use short grain brown rice)
  • Chicken or vegetable broth (instead of water for cooking the rice; optional)
  • ¼ cup marinara sauce, plus extra for dipping
  • ½ cup ricotta cheese
  • ½ cup grated Parmesan cheese, divided
  • ½ cup mozzarella cheese, shredded or cubed
  • 2 eggs, whisked
  • 2 cups panko breadcrumbs
  • ¼ teaspoon kosher salt, more to taste
  • ¼ teaspoon ground black pepper
  • 1 cup all-purpose flour
  • ¼ cup chopped fresh parsley, for garnishing

Instructions

  1. Cook the rice according to package instructions (use chicken or vegetable broth for more flavor instead of water).
  2. Once the rice is fully cooked, add it to a food processor along with the marinara, ricotta and half of the parmesan cheese. Pulse together until the rice is half its original size and all of the ingredients are well combined.
  3. Using a small ice-cream scoop or your hands, form about 15 balls onto a parchment-lined baking sheet. Insert the mozzarella into the center of the balls, then reform the rice around the cheese.
  4. Put the rice balls on the sheet pan into the refrigerator for 15-20 minutes (or the freezer for about 4 minutes). This step will make it much easier to form the balls and help them stay together when cooking.
  5. Meanwhile, mix together the panko breadcrumbs, the remaining Parmesan, and a pinch of salt and pepper to a small shallow bowl. Add the the whisked eggs to another shallow bowl, and one more with the flour.
  6. Once the rice balls are chilled, dredge first in the flour, then in the egg wash and last in the panko breadcrumb mixture.

Cooking Instructions

OVEN

Preheat your oven to 400°F. Place the rice balls on a parchment-lined baking sheet and lightly spray them with olive oil or cooking spray. Bake for 20-25 minutes, turning halfway through, until they're crispy and golden brown.

PAN-FRY

Heat about ½ inch of oil in a large skillet over medium heat. When the oil is hot (about 350°F), add the rice balls in batches, making sure not to crowd the pan. Cook for 2-3 minutes per side until golden. Transfer to a paper towel-lined plate to drain.

AIR-FRY

Preheat the air fryer to 375°F. Lightly spray the basket and the rice balls with oil. Air-fry in batches for 10-12 minutes, shaking halfway through, until crisp and evenly browned.

DEEP-FRY

Heat cooking oil with a high smoke point (canola or avocado oil work well) in a deep fryer or heavy pot to 350°F. Fry the rice balls in small batches for 3-4 minutes, or until golden brown and crispy. Remove with a slotted spoon and drain on paper towels.

To Serve: Sprinkle with fresh, chopped parsley and serve with a small dish of marinara sauce for dipping.

Nutrition Information:
Yield: 5 Serving Size: 1
Amount Per Serving: Calories: 545Total Fat: 14gSaturated Fat: 6gTrans Fat: 0gUnsaturated Fat: 6gCholesterol: 116mgSodium: 888mgCarbohydrates: 76gFiber: 3gSugar: 4gProtein: 25g

This data was provided and calculated by Nutritionix.

© Aubrey Cornelius
Cuisine: Italian / Category: Appetizers
Arancini - Italian Rice Balls (Bake, Fry, or Air-Fry)

Homemade Pie Crust (Easy, Flaky, and Foolproof!)

October 23, 2025 by Aubrey Cornelius Leave a Comment

a homemade pie crust just out of the oven on a marble countertop

There's nothing quite like a homemade pie crust! Once you've made it from scratch, it's hard to go back to store-bought. The texture, the flavor, and the way it melts in your mouth just can't be matched. I've been making this recipe for years, and it's my go-to for everything from classic pumpkin pie to summer fruit tarts.

The secret is simple: keep everything cold and don't overwork the dough. Cold butter is what gives your homemade pie crust those perfect flaky layers! I like to use a food processor because it's fast and keeps the butter from warming up, but you can just as easily use a pastry cutter or your fingertips.

Once you get the feel for it, this homemade pie crust comes together quickly and bakes up golden and gorgeous every single time. It's one of those basic recipes that makes you feel like a real baker, and the results will make everyone think you spent hours in the kitchen!

Step ten of making a homemade pie crust: a pie crust just out of the oven cools on a marble countertop

Pies are usually the last thing I make for the holidays since I'm usually focused on our cookie trays. But I do make the dough in advance so all I have to do is fill and bake once I'm ready! I like to stick with no-bake Christmas desserts to keep things easy (like chocolate truffles or peppermint bark, which also make great edible gifts).

Ingredients

  • 2 ¾ cups all-purpose flour, divided: Be sure to spoon the flour into your measuring cup then level it with a knife (don't use the cup to scoop it out).
  • 3 tablespoons granulated sugar: Sugar helps the crust brown and sweetens it just a bit.
  • ¼ teaspoon kosher salt: Salt is important even in baking! It will really enhance the flavor so don't skip this (unless you're watching your salt intake).
  • 1 ½ cups (2 ½ sticks) unsalted butter, cold and cubed, divided: Cold butter is key for flaky layers. Cube it first, then pop it in the freezer for 10 minutes before starting the recipe.
  • 5-6 tablespoons cold water: You want just enough for the dough to come together without it getting sticky.
  • 1 egg white: This is for brushing on the crust before it goes into the oven.

Step-by-Step Instructions

Step 1: Mix the dry ingredients. In a food processor or blender, combine 2 cups of flour, sugar, and salt. Pulse just twice to blend.

step one of making a homemade pie crust: a food processor with flour, sugar, and salt that's been blended

Step 2: Cut in the butter. Drop the cold butter evenly over the flour mixture. Pulse around 25 short bursts until the butter is well incorporated. The mixture should look crumbly, almost like coarse sand.

step two of making a homemade pie crust: adding cold butter to the food processor

Step 3: Add the rest of the flour. Sprinkle in the remaining ¾ cup flour and pulse a few more times (about 5 quick pulses). Don't overmix at this point and you'll get a nice, flaky pie crust!

Step three of making a homemade pie crust: Adding the rest of the flour to the food processor.

Step 4: Bring the dough together. Transfer the mixture to a large bowl. Drizzle cold water over the top and gently knead it with your hands just until it comes together. It might look a bit dry at first, so keep pressing and folding until it forms a soft, cohesive ball.

A collage of three images showing step four of making a homemade pie crust: the first image shows the dough in a bowl and water being sprinkled over, the next is starting to mix the dough together, and the last shows the mixture as a cohesive ball

Step 5: Chill the dough. Flatten the dough into a disk about ¾-inch thick, wrap it tightly in plastic wrap, and refrigerate for at least 2 hours (or up to 3 days). This step is key to keeping the butter cold, which is what will give your homemade pie crust that coveted flaky texture!

Step 6: Roll it out. Lightly flour your work surface and your rolling pin. Roll the chilled dough into a circle about ⅛-inch thick. If the edges crack a bit at first, just gather and reshape the dough, then try again.

Step six to making a homemade pie crust: a hand pressing into the dough on a floured surface in preparation for rolling it out

Step 7: Add the dough to your pie pan. Gently transfer the dough to your pie dish, gently pressing it into the corners without stretching it. Trim any overhang, then fold the edges under and crimp them using your fingers or a fork.

Step seven to making a homemade pie crust: half of a rolled pie crust being added to the pie pan

Step 8: Add the egg wash. Whisk the egg white and brush it lightly over the edges before baking.

Step 9: Blind bake (if needed). If your recipe calls for a pre-baked crust, line it with parchment paper and fill it with pie weights or dried beans. Bake at 350°F for 30-35 minutes, or until lightly golden brown.

Step nine to making a homemade pie crust: a pie crust in a pie pan ready for the oven, with parchment paper then dried beans filling it for a blind bake

Step 10: Cool and fill. Let the crust cool before adding your filling, or fill and bake according to the recipe's instructions.

Step ten of making a homemade pie crust: a pie crust just out of the oven cools on a marble countertop

Tips

  • Keep everything cold! This is the golden rule for homemade pie crust. Cold butter creates those flaky layers, so I like to chill both the butter and the bowl for a few minutes before starting. If your kitchen is warm, you can even pop the flour in the freezer for ten minutes.
  • Use a light touch. Once the water goes in, handle the dough as little as possible. Overworking it makes the crust tough instead of tender.
  • Don't skip the chill time! Letting the dough rest in the refrigerator for at least two hours (or even overnight) gives the gluten time to relax and helps prevent it from shrinking in the oven.
  • Roll it as evenly as possible. Start from the center and roll outward, turning the dough a quarter turn every few rolls. This keeps the circle even and helps prevent it from sticking.
  • Fix any cracks as you go. If the dough cracks, don't panic. Just press it back together with your fingers or a tiny bit of cold water.
  • Blind bake if necessary. If you're making a pie with a custard or cream filling, blind baking keeps the crust from getting soggy. Line it with parchment and fill it with dried beans or pie weights before baking it. If you're baking the filling (as you would with a veggie pot pie, for example) you can bake the crust at the same time and no blind baking is needed.
  • Finish it with an egg wash just before baking. A quick brush of egg white gives your homemade pie crust a gorgeous sheen. It's a small step that makes a big difference in how your pie looks once it's baked.

Looking for more tips to the perfect pie crust? Ask AI:

ChatGPT
Google AI
Perplexity
Grok

Storage and Make-Ahead

One of the best things about homemade pie crust is how easy it is to make ahead of time. I almost always double the recipe and keep extra dough in the freezer. It saves so much time when I'm baking multiple pies for the holidays!

  • In the refrigerator: Wrap the dough tightly in plastic wrap and refrigerate for up to 3 days. If you've already rolled it out and fitted it into your pie dish, cover it with plastic wrap and chill it for up to 24 hours before filling and baking.
  • In the freezer: Pie dough freezes really well. Wrap the ball tightly in plastic wrap and then again in foil (or place it in a freezer-safe bag). It will keep for up to 3 months. When you're ready to use it, transfer it to the refrigerator to thaw overnight.
  • After baking: If you've baked the crust ahead of time, let it cool completely before wrapping it in plastic wrap or foil. Store at room temperature for 1-2 days, or refrigerate it for up to 5 days. You can also freeze baked crusts the same way as unbaked ones, just make sure to cool them fully before freezing.

Frequently Asked Questions

Why is my pie crust cracking when I roll it out?

That usually means the dough is a little too cold or it's slightly dry. Let it rest on the counter for 5-10 minutes to soften, then try again. If it's still cracking, sprinkle a few drops of cold water over the surface and press it back together before rolling it out.

How do I keep my pie crust from shrinking?

Chilling is key! Always let your dough rest in the fridge for at least two hours before baking. And try not to stretch the dough as you place it in the pie pan.

Can I make pie crust without a food processor?

A pastry cutter, two butter knives, or even your fingertips will also work. Just be quick so the butter doesn't warm up too much.

Why does my crust turn out tough instead of flaky?

Usually that happens from overmixing or adding too much water. Mix just until the dough comes together. It shouldn't look perfectly smooth. And always use cold ingredients!

How can I make my pie crust extra flaky?

Use cold butter, don't overwork the dough, and give it time to chill. It really is that simple!

Do I need to blind bake my crust?

Only if the recipe calls for it. Blind baking is typically for cream pies, custards, or any filling that doesn't get baked. Fruit pies usually don't need it since the filling cooks along with the crust.

Can I use salted butter instead of unsalted?

I prefer unsalted butter because it gives you more control over the flavor, but you can slightly reduce the salt called for in the recipe if you only have salted butter on hand.

Related

Looking for more holiday dessert recipes? Try these:

  • Coconut rum balls being rolled and coated in coconut
    Coconut Rum Balls
  • a white plate filled with m&m pretzel hugs
    M&M Pretzel Hugs (Easiest Christmas Cookies Ever!)
  • a round, vintage silver plate filled with chocolate shortbread cookies
    Chocolate Shortbread Cookies with Crunchy Pistachios
  • A side view of five chocolate covered pretzel rods decorated with different colors and sprinkles for Christmas
    Chocolate Covered Pretzel Rods
a homemade pie crust just out of the oven on a marble countertop

Homemade Pie Crust

Yield: 1 pie crust
Prep Time: 10 minutes
Cook Time: 30 minutes
Additional Time: 2 hours
Total Time: 2 hours 40 minutes

Make the perfect pie crust from scratch - just add your favorite fillings!

Ingredients

  • 2 ¾ cups all-purpose flour, divided
  • 3 tablespoons granulated sugar
  • ¼ teaspoon kosher salt
  • 1 ½ cups unsalted butter (2.5 sticks), cut into small pieces and chilled until very cold
  • 5-6 tablespoons cold water
  • 1 egg white

Instructions

  1. In a food processor or blender, combine 2 cups of the flour with the sugar and salt. Pulse together 2 times.
  2. Then, add the butter (be sure to evenly spread it around the bowl of the processor) and pulse together 25 times (using short pulses).
  3. Add the remaining flour and pulse together 5 times, then place the flour mixture into a large bowl.
  4. Add the cold water and knead together until a ball forms then flatten the ball into a ¾-inch thick disk and cover with saran wrap and refrigerate for at least 2 hours or up to 3 days.
  5. Once chilled, roll out into a large circular sheet.
  6. Place in a pie dish and decorate or form the edges as you wish.
  7. Before cooking, brush the crust with egg wash (just whisk the egg white).
  8. If baking only the pie crust, place a piece of parchment in the pie and fill with dried beans (this helps keep the shape of the crust while baking).
  9. Bake on 350°F for 30-35 minutes or until golden brown.
Nutrition Information:
Yield: 8 Serving Size: 1
Amount Per Serving: Calories: 482Total Fat: 35gSaturated Fat: 22gUnsaturated Fat: 11gCholesterol: 92mgSodium: 52mgCarbohydrates: 38gFiber: 1gSugar: 5gProtein: 5g

This data was provided and calculated by Nutritionix. We calculated for 8 servings (8 slices of pie).

© Aubrey Cornelius
Cuisine: American / Category: Desserts
Homemade Pie Crust (Easy, Flaky, and Foolproof!)


Hearty Veggie Pot Pie (Easy Comfort Food!)

October 23, 2025 by Aubrey Cornelius Leave a Comment

two veggie pot pies just out of the oven with a golden brown crust and garnished with fresh thyme sprigs next to a pile of fresh herbs

There's something so comforting about a veggie pot pie fresh from the oven. It's one of my favorite things to make as soon as the weather turns a little colder.

I've made this recipe countless times over the years, and it never disappoints. The filling is loaded with hearty vegetables like potatoes, carrots, and fennel, all simmered in a creamy broth that tastes like it's been cooking all day.

And if you have an extra few minutes, my homemade pie crust takes it to another level (it's super buttery and flaky). Just look at how gorgeous it turns out! ⬇️

a homemade veggie pot pie just out of the oven with a golden brown crust and garnished with fresh thyme sprigs

This veggie pot pie is a complete meal on its own, so I'll usually make a quick no-bake dessert to go with it. We especially love an affogato or some chocolate-covered strawberries. I'll also make a side salad if we're especially hungry or if I'm serving it for guests.

Ingredients

For the filling:

  • Potatoes, thinly sliced and halved: You can also dice them if you prefer. Yukon golds hold their shape best and you don't even have to peel them!
  • Olive oil: This is used for sautéing the veggies. You could substitute with butter or a combination of the two.
  • Onions: You could also use pearl onions that have been cut in half (you just don't want them too big).
  • Celery: The celery, along with the onions and carrots, make up the mirepoix that's used as the base in many recipes.
  • Carrots: These add a subtle sweetness that's so delicious in veggie pot pie!
  • Fennel: I like to add extra fennel because it's one of my favorite (and, imo, underrated) vegetables. Feel free to skip it if you're not a fan, just increase any of the other ingredients.
  • All-purpose flour: This is what thickens the sauce, so don't skip it!
  • Vegetable broth: You can also use chicken broth or stock if you're not concerned with keeping it a vegetarian dish.
  • Fresh thyme: You can substitute dried thyme but fresh is definitely best. If you do use dried, add just ⅓ teaspoon since it's much stronger than fresh.
  • Fresh sage: Again, you can substitute with dried, but only add 1 teaspoon. If you're using fresh, I can't recommend frying the extra sage leaves enough! They're absolutely delicious and make a fantastic garnish.
  • Dijon or whole-grain mustard: Just a bit of mustard really adds a nice depth of flavor.
  • Salt and freshly ground black pepper: Be generous here as the seasoning makes all the difference!
  • Peas, fresh or frozen: Stir these in last and they'll cook while it bakes.

For the crust:

  • 2 pie crusts, store-bought or homemade: I always double my homemade pie crust recipe so I have enough for both the bottom and top layers.
  • 1 egg + 1 tablespoon water: This is what will give the crust a gorgeous shine and help it get nice and golden brown.
two veggie pot pies just out of the oven with a golden brown crust and garnished with fresh thyme sprigs next to a pile of fresh herbs

Instructions

  1. Preheat the oven: Set your oven to 400°F (200°C) so it's ready when your pie is ready to be baked.
  2. Blanch the potatoes: Bring a large pot of water to a boil. Add the potato slices and cook for about 20 seconds, just until they're slightly softened. Drain them really well and set them aside. (This quick blanch helps them cook through completely while they're in the oven).
  3. Sauté the vegetables: In a large skillet, heat the olive oil over medium heat. Add the onions and cook for about 3 minutes, stirring frequently. Stir in the celery, carrots, fennel, and continue cooking until all the vegetables start to soften, about 5 minutes. (Note: If you're using dried thyme and sage, add them at this step instead of step 5. It will help release their oils and make them much more flavorful).
  4. Thicken the filling: Sprinkle in the flour and stir well to make sure the vegetables are evenly coated. Cook for another minute to remove the raw flour taste, stirring frequently.
  5. Add the broth and seasoning: Slowly pour in the vegetable broth (or chicken broth) while whisking constantly to prevent lumps. Add the thyme, sage, mustard, salt, and pepper. Bring the mixture to a gentle boil, then reduce the heat and let it simmer until it thickens slightly, about 5-7 minutes.
  6. Finish the filling: Fold in the peas and blanched potatoes. Stir it gently to combine everything, then remove the pan from the heat. Taste and adjust the seasoning as needed (a bit more salt or mustard can really make the flavors pop)!
  7. Assemble the veggie pot pie: Line an 8-inch pie dish (or several ramekins if you'd like to make individual pot pies) with your bottom pie crust. Spoon in the filling, spreading it out evenly. Top the filling with the second crust, trimming any excess and crimping the edges to seal. Cut a small slit in the center to let steam escape.
  8. Add the egg wash: Brush the top crust lightly with the egg and water mixture.
  9. Bake: Place the pot pie on a baking sheet (to catch any drips) and bake for 25-30 minutes, or until the crust is golden brown and the filling is bubbling around the edges (larger pies may take up to 40 minutes).
  10. Rest and serve: Let the pie rest for at least 10 minutes before serving. This helps the filling set and thicken.
a homemade veggie pot pie just out of the oven with a golden brown crust and garnished with fresh thyme sprigs

Tips

  • Keep your crust cold. Cold dough bakes up flaky and light. If you're using homemade pie crust, roll it out, fit it into the dish, and pop it back in the fridge while you prepare the filling. The temperature contrast between cold butter and a hot oven is what gives you those crisp, buttery layers.
  • Don't overcook the veggies. Remember, everything will continue cooking in the oven. You want the vegetables just tender enough to bite through so they hold their texture in the finished pie.
  • Taste as you go. A well-seasoned filling makes all the difference! Once the sauce thickens, taste and adjust the salt, pepper, and herbs before pouring it into the crust. A little extra mustard or salt can take it from good to amazing.
  • Let it rest before serving. The first thing I want to do is dive in the moment it comes out of the oven, but giving it 10 minutes or so to rest helps the filling thicken up. It makes a huge difference so be patient!
  • Use up what you have. The beauty of this recipe is how versatile it is. You can toss in leftover roasted veggies, sweet corn, mushrooms, or even some shredded rotisserie chicken if you're not concerned with keeping it vegetarian.
  • Prevent a soggy bottom. If you're worried about the bottom crust getting soft, brush it lightly with a beaten egg before adding the filling. It creates a thin barrier that helps it from getting soft. I personally prefer a softer bottom crust so I leave it as-is.
  • Make mini pot pies. It's easy to make individual veggie pot pies! Just divide the filling into small ramekins and top each one with a round of pie dough. They bake a little faster and you can skip the bottom crust if you prefer.

Storage and Make-Ahead Instructions

One of the things I love most about veggie pot pie is how well it keeps. It's a great make-ahead meal, and the leftovers taste just as good (sometimes even better) the next day.

  • Make ahead: You can prepare the filling up to 2 days in advance. Once it cools, store it in an airtight container in the refrigerator. When you're ready to assemble the pot pie, just spoon the filling into your pie crust, add the top layer, and bake as directed. NOTE: If you're making your own pie crust, the dough or unbaked pie shell can also be prepped up to 3 days ahead. Wrap it tightly in plastic wrap and keep it chilled until you're ready to roll and assemble.
  • Refrigerator: Leftover veggie pot pie keeps well for up to 4 days in the fridge. Store it covered or in airtight containers. When reheating individual portions, I like to use the oven at 350°F for about 20-25 minutes so the crust gets flaky and a little crispy again.
  • Freezer: Veggie pot pie freezes well either baked or unbaked. To freeze, wrap the pot pie tightly in plastic wrap, then a layer of foil. It'll keep for up to 3 months. When you're ready to enjoy it, thaw overnight in the fridge, then bake (or reheat) at 350°F until the filling is hot and bubbly.
  • Tip: If you're planning to freeze an unbaked pie, assemble it in a disposable pie tin. That way, you can go straight from freezer to oven without worrying about your favorite dish cracking from the temperature change.
two veggie pot pies just out of the oven with a golden brown crust and garnished with fresh thyme sprigs next to a pile of fresh herbs

Frequently Asked Questions

Can I make this veggie pot pie completely vegetarian or vegan?

Just use vegetable broth instead of chicken stock and swap the butter or egg wash for vegan alternatives. For the crust, choose a vegan pie dough or make your own with coconut oil or vegan butter. The filling is naturally vegetarian-friendly, so it's an easy switch.

What vegetables work best in pot pie?

I love using a mix of carrots, potatoes, peas, fennel, and onions, but this recipe is incredibly versatile. Mushrooms, green beans, corn, or even butternut squash all work well. If you're short on time, a bag of frozen mixed vegetables will also work. And make sure you cut your veggies into small enough pieces that they'll cook completely while baking.

How do I keep the bottom crust from getting soggy?

Brush it with a little beaten egg before adding the filling. This helps "seal" it and prevents the liquid from making it too soft. You can also bake the pie on the lower rack of the oven to ensure the bottom gets enough heat. I actually prefer a softer bottom crust so I skip these suggestions, but use them if that's not you.

Can I make this with puff pastry instead of pie crust?

Puff pastry makes a great shortcut. Just lay it over the top of the filling (no bottom crust needed) and bake as directed in the recipe. It turns out nice and flaky and saves some time.

How do I know when my veggie pot pie is done?

You'll know it's ready when the crust is golden brown and you see the filling bubbling around the edges. For smaller ramekins, start checking around 25 minutes, and larger pies may take closer to 40 minutes.

How do I reheat leftovers without drying out or softening the crust?

Reheat in a 350°F oven instead of the microwave. Cover it loosely with foil for the first 10 minutes, then uncover for the remaining time. It should take about 20-25 minutes to warm through.

Sweet Pairings

These are the desserts we like to serve with veggie pot pie:

  • a slice of pumpkin tres leches cake on a small white plate on a wood table with fall decorations in the background
    Pumpkin Tres Leches Cake (A Make-Ahead Holiday Favorite)
  • a top-down shot of a cranberry christmas cake topped with fresh cranberries and a sprig of rosemary with three slices cut and one slice on a vintage spatula
    The Best Cranberry Christmas Cake (Make-Ahead Friendly)
  • A side view of five chocolate covered pretzel rods decorated with different colors and sprinkles for Christmas
    Chocolate Covered Pretzel Rods
  • a white plate filled with m&m pretzel hugs
    M&M Pretzel Hugs (Easiest Christmas Cookies Ever!)
two veggie pot pies just out of the oven with a golden brown crust and garnished with fresh thyme sprigs next to a pile of fresh herbs

Veggie Pot Pie

Yield: 8 servings
Prep Time: 10 minutes
Cook Time: 45 minutes
Total Time: 55 minutes

This hearty and healthy veggie pot pie is made with a delicious medley of vegetables and encased in a flaky pie crust. Perfect for a weeknight dinner on a cold night.

Ingredients

  • 2 cups potatoes, thinly sliced and halved (or cubed)
  • 3 tablespoons olive oil or butter
  • 1 cup onions, diced
  • 1 cup celery, diced
  • 1 cup carrots, diced
  • 1 cup fennel, diced
  • ¼ cup all-purpose flour
  • 3 cups vegetable or chicken broth
  • 2 sprigs fresh thyme (or ⅓ teaspoon dried)
  • 1 tablespoon fresh sage, chopped (or 1 teaspoon dried)
  • 1 tablespoon Dijon mustard (whole grain also works)
  • kosher salt and pepper, to taste
  • 1 cup fresh or frozen peas
  • 2 pie crusts (use just one for just a top crust)
  • 1 egg
  • 1 tablespoon water

Instructions

  1. Preheat the oven to 400°F.
  2. Bring a large pot of water to a boil. Blanch the potato slices for about 20 seconds, then drain, gently pat them dry, and set them aside.
  3. Preheat a large skillet over medium heat and add the olive oil. When it's shimmering, add the onion and cook for about 3 minutes, stirring often.
  4. Add the celery, carrot and fennel and cook until they're soft, about another 5 minutes.
  5. Sprinkle the flour over the vegetables and stir until they're completely coated. Cook for another minute, stirring frequently, to remove any raw flour taste.
  6. Slowly whisk in the chicken stock, making sure there are no lumps. Add the thyme, sage, and mustard. Taste and season with salt and pepper.
  7. Bring the mixture to a gentle boil, then reduce the heat and let it simmer for about 5-7 minutes, or until the sauce thickens. Gently fold in the peas and reserved potatoes.
  8. Line an 8-inch pie dish (or several ramekins if you'd like to make individual pot pies) with your bottom pie crust. Spoon in the filling, spreading it out evenly. Top the filling with the second crust, trimming any excess and crimping the edges to seal. Cut a small slit in the center to let steam escape.
  9. Whisk the egg and water together, then brush it over the pie crust.
  10. Bake for about 25-30 minutes or until it's golden brown and the filling is bubbling hot. (Check at 20 minutes for individual pot pies).
  11. Let the pot pie rest for about 10 minutes before serving.

Notes

If you're using dried herbs instead of fresh, add them in step 4 to help bring out their flavor (especially if they've been sitting in your pantry a while).

Use this homemade pie crust recipe (double the recipe for both a bottom and top crust) or use store bought.

Use your favorite potato variety. I like a white potato such as Yukon gold with this recipe as there's no need to peel the potatoes.

Nutrition Information:
Yield: 8 Serving Size: 1
Amount Per Serving: Calories: 403Total Fat: 19gSaturated Fat: 5gTrans Fat: 0gUnsaturated Fat: 12gCholesterol: 28mgSodium: 474mgCarbohydrates: 51gFiber: 8gSugar: 8gProtein: 9g

This data was provided and calculated by Nutritionix.

© Aubrey Cornelius
Cuisine: American / Category: Dinner
Hearty Veggie Pot Pie (Easy Comfort Food!)

Sweet Potato Nachos with Creamy Jalapeño Queso

October 20, 2025 by Aubrey Cornelius Leave a Comment

a plate of sweet potato nachos on a black linen towel

These sweet potato nachos always disappear the moment they hit the table! I've made them for everything from football parties to casual dinners, and they always get rave reviews.

The roasted sweet potatoes add just a bit of sweetness, and the creamy jalapeño queso ties everything together with a little heat. They're hearty enough to serve as a meal but they're also easily sharable and perfect for a party!

a plate of sweet potato nachos on a black linen towel

We're big nacho fans around here, and we're always coming up with new spins on the classic version. Sometimes we bake them in the oven for easy cleanup, other times we go all in with loaded fries or roasted cauliflower nachos. It really depends on the mood (are we craving indulgent comfort food or a lighter version packed with veggies)? These sweet potato nachos are the best of both worlds: comforting, flavorful, and just a little bit better for you.

[feast_advanced_jump_to]

Ingredients

For the roasted sweet potatoes:

  • 1 large sweet potato, peeled and cubed - cube these pretty small so they stay on the chips easier and you have more to spread throughout the nachos
  • Olive oil
  • Paprika - if you want a smokier flavor, substitute all or just half with smoked paprika
  • Ground cumin

For the creamy jalapeño queso:

  • Unsalted butter
  • All-purpose flour
  • Whole milk
  • Shredded Monterey jack cheese
  • Kosher salt
  • Fresh jalapeño, diced and de-seeded

For the spicy mango salsa:

  • Red onion
  • Fresh cilantro - if cilantro tastes like soap to you, sub it with fresh parsley
  • Fresh lime juice
  • Fresh mangoes - you could sub jarred mango if you prefer
  • Fresh jalapeño
  • Kosher salt

For assembling the sweet potato nachos:

  • Tortilla chips - we love thin tortilla chips, but you'll need something sturdier to hold the ingredients together
  • Black beans
  • Avocado
a plate of sweet potato nachos on a black linen towel with fresh cilantro being sprinkled on the top

Instructions

Roast the sweet potatoes:

This step can be done up to a day in advance. Refrigerate the cooked sweet potatoes and reheat them at 375°F for about 10 minutes before continuing with the recipe.

  1. Preheat the oven to 375°F.
  2. Line a baking sheet with foil or parchment paper (this makes cleanup really easy). Add the cubed sweet potatoes, drizzle with the olive oil, and sprinkle them with the paprika and cumin.
  3. Use your hands to toss everything together until the sweet potatoes are evenly coated.
  4. Spread the cubes out in a single layer and roast for 30-35 minutes, until they're tender and lightly caramelized (the timing depends on how small you cut the potatoes, so check them after 20 minutes). Stir them halfway through. Set them aside.

Make the jalapeño queso:

This step can also be done up to a day in advance. Refrigerate the queso and gently reheat before continuing with the recipe.

  1. In a medium saucepan, melt the butter over medium heat.
  2. Whisk in the flour and cook for about 1 minute, stirring constantly to remove the raw flour taste.
  3. Slowly pour in the milk, whisking the entire time until the sauce thickens slightly, about 3-4 minutes.
  4. Add the shredded jack cheese and salt, stirring until the cheese is fully melted and smooth.
  5. Stir in the diced jalapeño, then remove from heat and set aside.

Make the mango salsa:

  1. Combine the red onion, cilantro, lime juice, mango, jalapeño, and salt in a food processor. Pulse a few times, or until the salsa is chunky but not pureed. Set aside. (You can also hand-chop everything if you prefer).

Assemble the sweet potato nachos:

  1. Arrange half of the tortilla chips on a large serving platter or sheet pan.
  2. Spoon half of the roasted sweet potatoes over the chips, followed by half of the queso, black beans, and mango salsa.
  3. Add the remaining chips and repeat with the remaining toppings.
  4. Finish with diced avocado and a sprinkle of cilantro. Serve immediately while everything is warm and melty.
a plate of sweet potato nachos on a black linen towel with a serving being scooped out with a spoon

Tips

  • Roast the sweet potatoes until they're caramelized. Don't pull them too early! Those golden edges add the best flavor. If you like extra crisp pieces, you can broil them for the last minute or two.
  • Keep the queso smooth. Whisk constantly while adding the milk, and don't rush the heat. If it gets too thick, whisk in a bit more milk until it's pourable again.
  • Use sturdy tortilla chips. Skip the thin, restaurant-style chips. Thick-cut chips hold up better under all the toppings and won't go soggy as fast.
  • Make the salsa fresh. If it sits too long, the mango releases juice that can make your nachos soft. It's best made right before serving.
  • Layer for even flavor. Build your nachos in two layers (as written) so every bite gets a little of everything: sweet potato, queso, black beans, and salsa.
  • Serve right away. These nachos are at their best the moment they're assembled, while the queso is warm and the chips are still crunchy.
  • Add protein if you'd like. Shredded chicken, pulled pork, or even taco-seasoned ground beef work beautifully with the sweet potatoes (the beef version is our favorite).
  • Adjust the heat. For milder nachos, skip the jalapeño in the queso and salsa. For more kick, leave the seeds in or drizzle with your favorite hot sauce.

Storage and Make-Ahead

  • Storage: These sweet potato nachos are best eaten fresh, but if you have leftovers, store the toppings separately whenever possible. Keep roasted sweet potatoes, queso, and mango salsa in individual airtight containers in the refrigerator. They'll stay fresh for up to 3 days.
  • Reheating the sweet potatoes: Warm them in the oven at 375°F for about 10 minutes, or until they're heated through.
  • Reheating the queso: Warm the queso gently on the stovetop over low heat, stirring constantly. Add a bit more milk to thin it out if it thickens too much in the refrigerator.
  • Mango salsa: This is best made the day you plan to serve it. If you make it ahead, store it in a covered container and drain any liquid that accumulates before assembling the nachos.
  • Make-ahead tips: You can roast the sweet potatoes and prepare the queso up to a day ahead. When you're ready to assemble the nachos, warm both, assemble, and finish with freshly made salsa, avocado, and cilantro.
a plate of sweet potato nachos on a black linen towel

Frequently Asked Questions

Can I make these nachos without cheese or make them dairy-free?

You can substitute the queso with a dairy-free cheese sauce or even guacamole for creaminess. A drizzle of vegan sour cream works well, too.

Do I have to peel the sweet potatoes?

You can leave the skins on if you prefer more texture and nutrients. Just give them a good scrub before cubing and roasting.

Can I make these nachos in the air fryer?

You can roast the sweet potatoes in the air fryer at 400°F for about 15-18 minutes, shaking the basket halfway through.

How spicy is the queso?

It's mild as written, especially if you remove the jalapeño seeds. For extra heat, leave the seeds in or stir in a dash of cayenne or hot sauce. You can also substitute the Monterey Jack cheese for pepper jack.

Can I use store-bought mango salsa?

Homemade gives the best flavor and texture, but store-bought salsa will save time and still taste great. Just look for one that's not too watery, or drain off any liquid before assembling the nachos.

What kind of chips work best?

Thicker tortilla chips are best because they'll hold up to the queso and roasted sweet potatoes without getting soggy too quickly.

Can I add meat to this recipe?

Shredded chicken, taco-seasoned ground beef, or even pulled pork are all delicious additions.

What can I serve with sweet potato nachos?

They're great on their own, but they're delicious with a simple side salad, grilled corn, or a margarita!

Pairings

These are the dishes we like to serve with sweet potato nachos:

  • How To Make Pomegranate Margarita Cocktails
    Pomegranate Margaritas
  • top down view of two birria tacos on a wooden board next to a small bowl of consommé
    Authentic Birria Tacos Recipe (Step-by-Step with Consommé)
  • Smoked Queso Dip
    Smoked Queso Dip
  • a cast iron skillet filled with choriqueso made with chorizo and cheese then topped with diced tomato, white onion, and cilantro
    Choriqueso - Easy Mexican Chorizo and Cheese Dip
a plate of sweet potato nachos on a black linen towel

Sweet Potato Nachos

Yield: 6-8 servings
Prep Time: 20 minutes
Cook Time: 40 minutes
Total Time: 1 hour

It might seem like there are a lot of steps to this recipe, but it comes together quickly! The sweet potatoes and queso can also be made the day before.

Ingredients

Sweet Potatoes

  • 1 sweet potato, peeled and cut into small cubes
  • 2 tablespoons olive oil
  • 1 teaspoon paprika
  • 1 teaspoon cumin

Jalapeño Queso

  • 2 tablespoons unsalted butter
  • 2 tablespoons all-purpose flour
  • 1 cup whole milk
  • 1 cup shredded Monterey jack cheese
  • 1 teaspoon kosher salt
  • 1 jalapeño, de-seeded and minced (optional)

Spicy Mango Salsa

  • ½ red onion
  • 2 tablespoons fresh cilantro, chopped
  • 2 tablespoons fresh lime juice
  • 2 fresh mangoes, diced (or jarred mango)
  • ½ jalapeño, de-seeded and minced
  • 1 teaspoon kosher salt

Assembling

  • 12 ounces sturdy tortilla chips
  • 2 tablespoons (or more) canned black beans, drained and rinsed
  • 2 tablespoons fresh cilantro, chopped
  • 1 avocado, diced

Instructions

Sweet Potatoes

  1. Preheat the oven to 375°F.
  2. Add the cubed sweet potato to a foil-lined baking sheet and cover with oil, paprika and cumin.
  3. Using your hands, toss together until it's evenly coated, then place in the oven and cook for about 30 minutes or until they're fork-tender and lightly caramelized (the timing depends on how small you cube the potatoes, so check them starting at 20 minutes). Set them aside.

Jalapeño Queso

  1. In a large sauce pan over a medium heat, add butter until melted, then add in flour and whisk together. Cook for about a minute, whisking constantly, to remove any raw flour taste.
  2. Slowly add the milk, whisking continuously.
  3. Once the mixture has thickened, add the cheese and salt and mix it together until it's completely melted and smooth.
  4. Stir in the diced jalapeño and set aside.

Mango Salsa

  1. Add all of the ingredients to a food processor and pulse a few times, or until it's chunky but not smooth. Set aside.

Assemble the Nachos

  1. Add half of the tortilla chips to a large plate or sheet pan. Cover with the sweet potato and about half of the queso, as well as half of the black beans and mango salsa.
  2. Add the other half of the chips and repeat the process.
  3. Top with avocado and cilantro and serve immediately.

Notes

You can roast the sweet potatoes and prepare the queso up to a day ahead. When you're ready to assemble the nachos, warm the sweet potatoes in the oven at 375°F for about 10 minutes, or until they're heated through. Warm the queso gently on the stovetop over low heat, stirring constantly. Add a bit more milk to thin it out if it thickens too much in the refrigerator.

Nutrition Information:
Yield: 8 Serving Size: 1
Amount Per Serving: Calories: 441Total Fat: 24gSaturated Fat: 7gTrans Fat: 0gUnsaturated Fat: 16gCholesterol: 23mgSodium: 568mgCarbohydrates: 50gFiber: 6gSugar: 15gProtein: 9g

This data was provided and calculated by Nutritionix.

© Aubrey Cornelius
Cuisine: Mexican / Category: Appetizers
Sweet Potato Nachos with Creamy Jalapeño Queso

Homemade Glazed Donut Holes (Better Than Store-Bought!)

October 18, 2025 by Aubrey Cornelius Leave a Comment

a pile of glazed donut holes on a black plate being drizzled with an orange glaze next to two fresh orange wedges

There's something about homemade glazed donut holes that never fails to make everyone happy. They're soft, fluffy, and just the right size for enjoying a few with morning coffee.

I've made homemade donut holes countless times for weekend breakfasts and holiday brunches, and they're always gone before the coffee finishes brewing. The dough comes together in minutes, and because they fry so quickly, you can have warm, golden donut holes on the table in under half an hour!

The orange glaze adds a light, citrusy sweetness that sets them apart from store-bought versions (plus fresh donuts just out of the fryer are incredible). Once you try these easy glazed donut holes, you'll find yourself making them all the time!

a pile of glazed donut holes on a black plate being drizzled with an orange glaze

I'm a big believer in eating healthy breakfasts throughout the week and indulging on the weekends. I love making a big batch of baked oatmeal cups or a cottage cheese egg bake to grab-and-go during the week, then enjoying these hot, glazed donut holes on a lazy Sunday.

[feast_advanced_jump_to]

Ingredients

For the dough:

  • Granulated sugar: This adds just the right amount of sweetness to the dough. You don't want them too sweet since the orange glaze adds enough on its own.
  • Unsalted butter
  • Buttermilk: This helps keep the dough soft and fluffy. If you don't have buttermilk, stir 1½ teaspoons of lemon juice or vinegar into regular milk and let it sit for 5 minutes.
  • Whole milk: Almond milk or 2% will also work.
  • All-purpose flour: Be sure to spoon this (not scoop) into your measuring cup and level it.
  • Baking powder: This helps the donut holes puff up as they fry.
  • Salt
  • Vegetable oil: Enough to fill your pot with about 2 inches of oil for frying. Peanut or canola oil will also work; just make sure you use an oil with a very high smoke point.

For the orange glaze:

  • Powdered sugar
  • Fresh orange juice: You can add a bit more if you prefer a thinner glaze.
  • Orange zest: This adds loads of fresh orange flavor!
a pile of homemade donut holes on a black plate being sprinkled with powdered sugar next to two fresh orange wedges

Instructions

Make the orange glaze:

  1. In a medium bowl, sift the powdered sugar to remove any lumps.
  2. Stir in the orange juice and zest until the glaze is smooth and glossy. If the glaze seems too thick, add up to 1 additional tablespoon of juice.
  3. Cover the bowl and set it aside while you make the donut holes.

Make the dough:

  1. In a medium mixing bowl, whisk together the sugar, melted butter, buttermilk, and milk until well combined.
  2. In a separate small bowl, whisk together the flour, baking powder, and salt.
  3. Add the dry ingredients to the wet mixture, folding gently until it's just combined. The dough should be soft and slightly sticky (don't overmix)!

Fry the donut holes:

  1. Pour the vegetable oil into a large, heavy-bottomed pot, filling it about 2 inches deep. Heat over medium-high until the oil reaches 350°F. (If you don't have a thermometer, flick a small drop of water into the oil; if it sizzles right away, it's ready.)
  2. Scoop about ½ tablespoon of dough at a time and roll into balls, or use a small cookie scoop.
  3. Carefully drop several dough balls into the hot oil, frying in batches to avoid crowding the pot. Fry for 1-2 minutes per side, turning as needed, until they're golden brown all over.
  4. Use a slotted spoon to remove the donut holes and transfer them to a baking sheet lined with paper towels to drain off any excess oil.

Glaze and serve:

  1. Place a wire rack over a baking sheet. Dip each donut hole into the orange glaze, turning to coat, then transfer to the rack to let any excess glaze drip off.
  2. Let the glaze set for a few minutes before serving. If you'd like them even sweeter, sprinkle them with powdered sugar once they've cooled.
a pile of glazed donut holes on a black plate being drizzled with an orange glaze next to two fresh orange wedges

Equipment Needed

  • Mixing bowls (medium and small)
  • Whisk and rubber spatula
  • Measuring cups and spoons
  • Heavy-bottomed pot or Dutch oven
  • Deep-fry thermometer
  • Slotted spoon or spider strainer
  • Paper towels
  • Wire cooling rack
  • Baking sheet (or just lay paper towels under the rack to catch any drips from the glaze)
  • Zester or microplane
  • Small cookie scoop (optional)

Tips

  • Keep the oil at 350°F. This is the most important step for perfect homemade donut holes. If the oil gets too hot, they'll brown too quickly and stay raw inside; if it's too cool, they'll absorb extra oil and become greasy.
  • Fry in small batches. Adding too many at once drops the oil temperature. Four to six at a time is a good number.
  • Use a small cookie scoop. It makes portioning faster and helps the donut holes cook evenly so they all finish at the same time.
  • Don't overmix the dough. Fold the wet and dry ingredients together gently until it's just combined.
  • Test one first. Fry a single donut hole to check the timing and oil temperature before adding the rest, then adjust the heat as needed. This is especially important if you don't have a thermometer.
  • Let them cool before glazing. Warm donut holes will absorb too much glaze and lose their crispiness. Give them a good 5-10 minutes before dipping them into the glaze.
  • Fresh zest makes a difference! Bottled juice or dried zest won't have the same bright flavor.
  • Add a little extra glaze if needed. If the first few donut holes don't look shiny enough, whisk in another teaspoon or two of orange juice to thin the glaze.
  • Serve them the same day if possible. Homemade glazed donut holes are best when they're fresh.
a pile of glazed donut holes on a black plate being sprinkled with powdered sugar next to two fresh orange wedges

Storage and Make-Ahead

  • Room temperature: Glazed donut holes are best the day they're made, but they'll stay soft for up to 2 days. Store them in an airtight container at room temperature once the glaze has fully set. Add a sheet of parchment paper between the layers to prevent them from sticking.
  • Refrigerator: If your kitchen runs warm, you can refrigerate them for up to 3 days, though the glaze may lose its shine. Let them come to room temperature before serving.
  • Freezing: Freeze unglazed donut holes in a single layer on a baking sheet until firm, then transfer to a freezer-safe bag or container. Freeze them for up to 2 months. Thaw them at room temperature and glaze them just before serving.
  • Make-ahead: You can mix the dough a few hours in advance and refrigerate it until you're ready to fry. Let it sit at room temperature for about 10 minutes before rolling and frying so it's easier to work with.
  • Reheating: If your donut holes get too soft, place them on a baking sheet in a 325°F oven for 5 minutes to crisp them up again.

Frequently Asked Questions

Can I bake these instead of frying?

You can but they won't be the same. If you'd like to try, bake the dough balls on a parchment-lined sheet at 375°F for about 10-12 minutes, or until they're golden brown.

Do I need a deep fryer to make donut holes?

A heavy-bottomed pot or Dutch oven is all you need. The key is keeping the oil at a steady 350°F.

What's the best oil for frying homemade donut holes?

Vegetable oil is the best neutral-flavored oil, but canola or peanut oil also work well. Don't use olive oil (the flavor is too strong and it doesn't have a high enough smoke point).

Why are my homemade donut holes greasy?

If the oil temperature is too low, the dough will absorb excess oil before it finishes cooking. Make sure the oil stays at 350°F and give the donut holes plenty of space to fry.

Why are my donut holes raw in the center?

This happens when the oil is too hot. The outside browns before the inside cooks through. Try frying a single test batch first to find the right temperature for your stove and pot.

Can I use regular milk instead of buttermilk?

The buttermilk helps with fluffiness, but regular milk works just fine. If you'd like the same effect, mix 1 teaspoon of vinegar or lemon juice into the milk and let it sit for a few minutes before using.

Can I change the glaze flavor?

Swap the orange juice and zest for lemon, lime, or even vanilla extract. You can also add a pinch of cinnamon or nutmeg to the glaze.

How do I keep the glaze shiny?

Let the donut holes cool completely before dipping, and make sure the glaze isn't too thin. A thicker glaze sets with a nice sheen once it dries.

Can I double the recipe?

This recipe can easily be scaled up to make as many glazed donut holes as you like. Just be sure to fry in batches and allow the oil to return to temperature between each one.

Pairings

These are the dishes we love serving with glazed donut holes:

  • Easy Overnight French Toast Bake Recipe
    Overnight French Toast Bake
  • Hash Brown Casserole with Eggs, Sausage and Mushrooms - super easy, delicious and feeds a crowd!
    Cheesy Sausage Hash Brown Breakfast Casserole
  • A Tropical Smoothie recipe with mango, banana and pineapple PLUS a surprising ingredient that adds protein and will make your smoothies SUPER creamy! (Includes two variations: with kale and SPICY with kale!)
    Pineapple Spinach Banana Smoothie (Creamy + High Protein!)
  • Dalgona Coffee Recipe on a gray table
    Dalgona Coffee Recipe (original + Keto version)
a pile of glazed donut holes on a black plate being drizzled with an orange glaze next to two fresh orange wedges

Homemade Glazed Donut Holes

Yield: 20 donut holes
Prep Time: 15 minutes
Cook Time: 10 minutes
Total Time: 25 minutes

Orange Glazed Doughnut Holes are easy to make with no yeast needed in this recipe. Simply mix the glaze and dough ingredients and fry the the donuts. All done in less than 30 minutes!

Ingredients

Dough

  • ½ cup sugar
  • 6 tablespoons butter, melted
  • ½ cup buttermilk
  • ½ cup whole milk
  • 2 ½ cups all-purpose flour
  • 4 teaspoons baking powder
  • 1 teaspoon salt
  • 5 cups vegetable oil, for frying

Orange Glaze

  • 1 cup powdered sugar
  • 2 tablespoons fresh orange juice
  • Zest from 1 orange

Instructions

  1. Sift the confectioners' sugar into a medium bowl. Slowly stir in orange juice and orange zest until the mixture is smooth. If the orange glaze isn't thin enough, stir in 1 additional tablespoon of orange juice. Cover and set aside.
  2. In a medium sized bowl, add the sugar, butter and milk (both kinds) and whisk together.In a small bowl, add the flour, baking powder and salt. Whisk together until well combined.
  3. Slowly incorporate the dry mixture into the wet, gently folding the ingredients together (you don't want to over mix the dough).
  4. Add the vegetable oil to a large, heavy-bottomed pot over a medium-high heat. Using a deep-fry thermometer heat to around to around 350°F. For those without a thermometer simply flick a bit of water onto the oil. If it sizzles, it's should be ready.
  5. Take about ½ tablespoon of dough and roll into a ball (or use a small ice cream scoop) then place in the frying pan for 1-2 minutes while flipping them in the oil. Use a slotted spoon to transfer the doughnut holes to a paper towel-lined baking sheet.
  6. Once the doughnut holes have cooled, place a cooling rack on top of a baking sheet. Dip the doughnut holes in the glaze and then transfer them to the rack. Sprinkle with powdered sugar, if you prefer.
Nutrition Information:
Yield: 7 Serving Size: 1
Amount Per Serving: Calories: 1773Total Fat: 167gSaturated Fat: 31gTrans Fat: 1gUnsaturated Fat: 128gCholesterol: 29mgSodium: 701mgCarbohydrates: 69gFiber: 2gSugar: 34gProtein: 6g

This data was provided and calculated by Nutritionix. The amounts include the entire 5 cups of vegetable oil so these amounts are overstated.

© Aubrey Cornelius
Cuisine: American / Category: Breakfast and Brunch
Homemade Glazed Donut Holes (Better Than Store-Bought!)

Dumpling Beef Stew (One-Pot Meal)

October 16, 2025 by Aubrey Cornelius Leave a Comment

a dutch oven filled with dumpling beef stew just out of the oven and garnished with fresh thyme

Dumpling beef stew is the kind of meal that's perfect for lazy Sundays and makes the whole house smell amazing. I've cooked this version countless times, and the payoff is always the same: tender chunks of beef in a rich, herby broth with soft, fluffy dumplings on top.

If I'm in the mood for a little spice, sometimes I rub the beef with harissa and let it sit for a short marinade. This is totally optional, but it adds a deep, warm flavor that carries through the stew without overpowering it.

a dutch oven filled with dumpling beef stew just out of the oven and garnished with fresh thyme

This dumpling beef stew is one of three hearty recipes we rotate through the winter. The others are braised short ribs with red wine and a chuck roast made with balsamic and dijon mustard. All three are flavorful and comforting and my house always smells incredible. Sometimes we skip the potatoes just so we can make our actually easy mashed potatoes!

[feast_advanced_jump_to]

Ingredients

For the stew:

  • beef chuck roast
  • harissa (optional)
  • olive oil (for searing the beef and sauteéing the onion and garlic)
  • onion
  • garlic cloves
  • beef broth (go with low sodium so you can better control the salt)
  • dry white wine (you can sub this with more broth if you prefer, but it does add more depth to the overall flavor)
  • heavy cream
  • fresh rosemary
  • fresh thyme
  • salt
  • freshly ground black pepper
  • red potatoes
  • carrots

For the dumplings:

  • Bisquick baking mix
  • milk
  • fresh sage (if you have extra sage leaves, definitely consider making fried sage leaves for a garnish; they're so good!)
  • fresh rosemary
  • fresh thyme
a white bowl filled with a serving of beef stew with dumplings and garnished with fresh thyme with a spoon next to the bowl on a rustic wood table

Instructions

For the stew:

  1. Marinate the beef: In a large bowl, combine the beef cubes, harissa (if using), and crushed garlic. Toss until the meat is evenly coated. Let it sit at room temperature for about 20 minutes. (Note: if you're not using harissa, you can skip this step and mince the garlic, then briefly sauté it with the onions for about a minute or so.)
  2. Sear the meat: Heat the olive oil in a large Dutch oven or heavy-bottomed pot over medium-high heat. Add the marinated beef in batches (don't overcrowd the pot) and sear for about 8-10 minutes, turning occasionally, until browned on all sides. Remove from the pot and set aside.
  3. Add the diced onion and cook for about 3 minutes until it starts to soften. (If not using harissa, add the minced garlic about 2 minutes in).
  4. Deglaze: Pour in the Riesling (or substitute more broth) and scrape up any browned bits from the bottom of the pot. Add the reserved beef, beef broth, heavy cream, rosemary, thyme, salt, and pepper. Stir to combine and bring it to a gentle boil. Reduce the heat to low, cover, and simmer for 1 hour, stirring occasionally. (Alternatively, you can put it in a 350°F oven).
  5. Add the vegetables: After 1 hour, add the potatoes and carrots. Continue simmering, covered, for another 20-25 minutes, or until the vegetables are tender and the beef is tender.

For the dumplings:

  1. Prepare the batter: In a mixing bowl, combine the Bisquick, milk, and chopped herbs. Mix with a fork until it's just combined (don't overmix or the dumplings will be dense).
  2. Cook the dumplings: Increase the heat so the stew is gently bubbling. Using a spoon or ice cream scoop, drop the dumpling batter on top of the simmering stew. Cover with a lid and cook for 12-15 minutes, until the dumplings are cooked through. Avoid lifting the lid during this time so they steam properly.
  3. Finish and serve: Remove the rosemary and thyme sprigs. Taste the stew and adjust the seasoning if needed. Ladle into bowls, making sure each serving gets a dumpling or two.
a dutch oven filled with dumpling beef stew just out of the oven and a spoon scooping out the first serving

Equipment Needed

  • Large Dutch oven or heavy-bottomed pot
  • Large mixing bowl
  • Wooden spoon or spatula
  • Tongs
  • Chef's knife and cutting board
  • Measuring cups and spoons
  • Small bowl
  • Ice cream scoop or spoon
  • Ladle
  • Tasting spoon
a white bowl filled with a serving of beef stew with dumplings and garnished with fresh thyme

Tips

  • Sear in batches if necessary. Whenever you're searing something, it's important that eace piece has a small amount of space around it, otherwise it will steam instead of sear. The brown crust is what adds loads of flavor, so don't rush or skip this step.
  • Let the harissa do its work. Even a short 20-minute marination adds flavor to this dumpling beef stew. If you have extra time, refrigerate the harissa-coated beef for up to 2 hours before cooking for an even deeper flavor.
  • Use a heavy pot. A Dutch oven or cast-iron pot holds heat well so it all cooks more evenly.
  • Don't rush the simmer! Low and slow cooking makes the beef tender. If you turn up the heat, the meat can toughen before it breaks down.
  • Taste before adding salt. Store-bought broth and harissa can vary in saltiness, so it's best to season at the end.
  • Keep the lid closed while cooking the dumplings. The trapped steam cooks them evenly and gives them that light, fluffy texture.
  • Don't overmix the dumpling batter. Stir just until the ingredients come together. Overmixing makes them chewy instead of tender.
  • Add a little more cream if it's too thick for your liking.
  • You can also make it ahead of time! This dumpling beef stew is one of those recipes that tastes even better the next day. Store it without the dumplings, then reheat and add the final step of cooking the dumplings just before serving.
a dutch oven filled with dumpling beef stew just out of the oven and garnished with fresh thyme and a serving spoon sitting in the stew

Storage and Make-Ahead

  • Refrigeration: Store leftover stew in an airtight container in the refrigerator for up to 4 days. The flavors deepen as it sits, making it even better the next day!
  • Dumplings: If you plan to make the stew ahead, cook the stew as directed but wait to make the dumplings until the day you serve. Reheat the stew on the stovetop, then add fresh dumplings and cook as directed.
  • Freezing: For the best texture, freeze the stew without dumplings. Cool the stew completely, then portion it into freezer-safe containers and freeze for up to 3 months. Thaw it in the fridge overnight, reheat it on medium-low heat on the stove, and make a fresh batch of dumplings.
  • Reheating: Warm the stew over medium-low heat, stirring it occasionally to prevent it from sticking. Add a little more broth or cream if it thickened too much in the refrigerator. Dumplings can be reheated in the stew for a few minutes on low heat, covered, until they're warmed through.
  • Make-ahead: You can prep the marinated beef up to a day in advance and keep it refrigerated until you're ready to sear. Or you can make the entire stew, refrigerate it, and just reheat then continue with the dumplings.

Frequently Asked Questions

Do I have to use harissa?

This dumpling beef stew is still delicious without it! You can skip it altogether or substitute it with a tablespoon of tomato paste.

What's the best cut of beef for dumpling beef stew?

A chuck roast is our top choice. It's well-marbled and breaks down nicely as it cooks low and slow, becoming tender and flavorful. You can also use short ribs or stew meat if that's what you have on hand.

Can I make this without wine?

Just substitute the wine with extra broth if you prefer.

How do I know when the dumplings are done?

They'll look puffed and firm to the touch. You can test one by cutting it open (the inside should be soft and fluffy, not doughy).

Can I thicken the stew more?

If you prefer your stew thicker, remove the lid before adding the dumplings and allow it to simmer until it thickens a bit. You can also stir in a spoonful of cornstarch mixed with cold water before adding the dumplings.

Can I make this in a slow cooker?

Follow the recipe through adding the wine and deglazing the pan, then add everything to a crockpot. Cook on low for 7-8 hours or on high for 4-5 hours. Add the dumplings in the last 30 minutes, making sure to keep the lid closed as they cook.

What should I serve with dumpling beef stew?

The great thing about this stew is that you have your meat, potatoes, and veggies all in one pot, so there's no need to add any sides. A green salad or roasted vegetables would be nice additions, and don't forget the dinner rolls to sop up the delicious sauce!

How long will leftovers keep?

The stew will keep for up to 4 days in the fridge and up to 3 months in the freezer.

Related

Looking for more delicious beef recipes? Try these:

  • Swedish Meatballs Recipe
    Swedish Meatballs Recipe
  • Tomahawk Steak Recipe
    Tomahawk Steak Recipe
  • a slice of prime rib on a white plate with mashed potatoes and grilled asparagus, next to a small dish of horseradish sauce. the rest of the standing rib roast is in the background
    Perfect Standing Rib Roast + Garlic Mustard Wet Rub
  • Boneless Prime Rib Recipe with a Garlic-Herb Crust
    Boneless Prime Rib Recipe with a Garlic-Herb Crust
a dutch oven filled with dumpling beef stew just out of the oven and garnished with fresh thyme

Dumpling Beef Stew

Yield: 8 servings
Prep Time: 20 minutes
Cook Time: 1 hour 25 minutes
Additional Time: 20 minutes
Total Time: 2 hours 5 minutes

This delicious stew begins with beef marinated with Harissa, seared to perfection, and simmered with beef broth, white wine and vegetables.

Ingredients

For the stew

  • 4 pounds beef chuck, cut into large bite size cubes
  • 4 tablespoons harissa (optional)
  • 2 garlic cloves, crushed
  • 1 tablespoon olive or avocado oil
  • 1 large sweet onion, diced
  • 32 ounces low-sodium beef broth
  • 1 cup Riesling (or dry white wine of your choice)
  • ½ cup heavy cream
  • 3 sprigs rosemary
  • 3 sprigs thyme
  • 2 teaspoons salt (adjust this as necessary)
  • 1 teaspoon freshly ground black pepper
  • 4 red potatoes, cubed
  • 3 large carrots, sliced

For the dumplings

  • 1 ½ cup Bisquick
  • ½ cup milk
  • 1 teaspoon fresh sage, chopped
  • 1 teaspoon fresh rosemary, chopped
  • 1 teaspoon fresh thyme leaves, chopped

Instructions

  1. In a large bowl, combine the beef cubes, harissa (if using), and crushed garlic. Toss until the meat is evenly coated. Let it sit at room temperature for about 20 minutes. (Note: if you're not using harissa, you can skip this step and mince the garlic, then briefly sauté it with the onions for about a minute or so.)
  2. Heat the olive oil in a large Dutch oven or heavy-bottomed pot over medium-high heat. Add the marinated beef in batches (don't overcrowd the pot!) and sear for about 8-10 minutes, turning occasionally, until browned on all sides. Remove from the pot and set aside.
  1. Add the diced onion and cook for about 3 minutes until it starts to soften. (If not using harissa, add the minced garlic about 2 minutes in).
  2. Pour in the Riesling (or substitute more broth) and scrape up any browned bits from the bottom of the pot. Add the reserved beef, beef broth, heavy cream, rosemary, thyme, salt, and pepper. Stir to combine and bring it to a gentle boil. Reduce the heat to low, cover, and simmer for 1 hour, stirring occasionally. (Alternatively, you can put it in a 350°F oven).
  3. After 1 hour, add the potatoes and carrots. Continue simmering, covered, for another 20-25 minutes, or until the vegetables are tender and the beef is tender.
  4. Meanwhile, in a mixing bowl, combine the Bisquick, milk, and chopped herbs. Mix with a fork until it's just combined (don't overmix or the dumplings will be dense).
  5. Increase the heat so the stew is gently bubbling. Using a spoon or ice cream scoop, drop the dumpling batter on top of the simmering stew. Cover with a lid and cook for 12-15 minutes, until the dumplings are cooked through. Avoid lifting the lid during this time so they steam properly.
  6. Remove the rosemary and thyme sprigs. Taste the stew and adjust the seasoning if needed. Ladle into bowls, making sure each serving gets a dumpling or two.
Nutrition Information:
Yield: 8 Serving Size: 1
Amount Per Serving: Calories: 712Total Fat: 25gSaturated Fat: 10gTrans Fat: 1gUnsaturated Fat: 13gCholesterol: 243mgSodium: 1075mgCarbohydrates: 39gFiber: 5gSugar: 7gProtein: 80g

This data was provided and calculated by Nutritionix.

© Aubrey Cornelius
Cuisine: American / Category: Dinner
Dumpling Beef Stew (One-Pot Meal)

Turkey Lentil Chili with Butternut Squash

October 14, 2025 by Aubrey Cornelius Leave a Comment

a white bowl filled with turkey lentil chili and topped with pepitas on a black linen towel

This turkey lentil chili has a butternut squash-infused broth filled with lentils, chickpeas, ground turkey, and chunks of freshly roasted butternut squash. It's basically the  perfect fall meal!

a white bowl filled with turkey lentil chili and topped with pumpkin seeds on a black linen towel

The moment the air get that first morning chill, I immediately crave a hearty bowl of chili. My go-to for years has been a thick and beefy beanless chili, but it's nice to have a backup favorite, and this lentil chili just screams fall flavors. It would be a crime to serve it with anything other than buttermilk cornbread or sweet corn cake. For a similar soup that's just as filling, try this butternut squash and sweet potato soup.

What You'll Need

There aren't many ingredients needed to make this turkey lentil chili. There are 8 ingredients (we're not counting the salt, pepper, or oil) with two more that are optional (chili oil and pumpkin seeds). And because we use canned beans, it comes together quickly without much hands-on time.

  • butternut squash
  • canned chickpeas
  • canned kidney beans
  • red lentils
  • onion
  • chicken broth
  • olive oil
  • garlic
  • ground turkey
  • salt and pepper
  • chili oil (optional)
  • ¼ cup pumpkin seeds (I use a seasoned version from Trader Joe's)
a white bowl filled with turkey lentil chili and topped with pumpkin seeds and drizzled with chili oil on a black linen towel

How to Make Turkey Lentil Chili

The only chopping necessary for lentil chili is one onion and one clove of garlic. Roasting the butternut squash and remaining onions gives it a wonderful depth of flavor despite only simmering for 30 minutes!

  1. Prepare your ingredients (mise en place): Quarter the butternut squash and scrape out the seeds. Quarter three onions and chop the fourth. Remove 4 garlic cloves from their skins and mince just one. Your prep is done, so let's get cooking!
  2. Place the quartered butternut squash and the quartered onions in one layer onto a parchment-lined baking sheet (use more than one sheet pan if necessary). Brush the veggies with a little olive oil and season them with salt and pepper. Place them in the oven to roast at 400°F for about 30-40 minutes, or until they're soft and cooked through and starting to brown.
  3. Once the squash and onions are roasted, allow them to cool for about 20 minutes. Reserve two quarters of the squash and scrape the meat from the remaining butternut squash quarters into a food processor or high-powered blender (you may need to do this in 2 batches if your food processor/blender isn't big enough).
  4. Add the roasted onion, 3 cloves of garlic, and half of the chicken broth, then blend it all until it's very smooth.
  5. In a large pot, heat a tablespoon of olive oil over medium heat until it's shimmering. Add the chopped onion and and cook until the onion is soft and translucent, about 5 minutes. Add the remaining clove of minced garlic and cook for about another minute, stirring frequently.
  6. Add the ground turkey and cook it until it's just cooked through and no pink remains.
  7. Now you'll chop the remaining butternut squash into bite-sized pieces. Add it to the pot along with the delicious butternut squash puree, the remaining chicken broth, chickpeas, kidney beans and lentils.
  8. Let it simmer for about 30 minutes, then season it with salt and pepper to taste.
  9. Serve your delicious lentil chili with a drizzle of chili oil and pumpkin seeds as a garnish.
a white bowl filled with turkey lentil chili and topped with pepitas on a black linen towel

Make It Your Own

We think this turkey lentil chili is perfect as written, but even we like to occasionally switch it up. Here are some ingredients you could add to make it your own:

  • Tomato paste: Add about a tablespoon just after sauteeing the onions and garlic. Cook it for a minute or two before adding the rest of the ingredients.
  • A can of fire-roasted diced tomatoes: This will add a bit of acidity and will definitely change the overall flavor, but tomatoes are always delicious in a big pot of chili!
  • Smoked paprika: Add a teaspoon at the same time you add the minced garlic.
  • Chipotle in adobo: This will make it a little smoky and a little spicy. Either mince one chipotle or add just a tablespoon or two of the adobo sauce.
  • Soy sauce or tamari: You've heard of the umami flavor? Add a few dashes of soy sauce (not too much!) just to deepen the overall flavors.
  • Worcestershire sauce: Same as above. ⬆️
  • Jalapeños or poblano peppers: Dice and sauté with the onions if you'd like to add a little heat. Use poblanos for less heat, jalapeños for a little more.
  • Cayenne pepper or crushed red pepper flakes: You can either add one or both of these with the minced garlic, or serve some at the table so everyone can spice up their own bowls.
  • Ancho chili powder or cumin: Same as above. ⬆️
  • Lime juice or apple cider vinegar: A tiny amount of either of these just brightens the flavors.
  • Fresh cilantro or parsley: These make a gorgeous garnish and add a nice flavor.
  • Sweet potatoes or carrots: Dice one or both of these to add more nutrients and make the lentil chili even heartier.
  • Coconut milk or a spoonful of Greek yogurt (stirred in at the end): If you prefer a creamier chili, add a little dairy! You can also just serve it at the table.
  • Crumbled feta or cotija cheese: Sprinkle some on top of each bowl or serve it at the table.
  • Tortilla strips or crushed corn chips: These will add a nice crunch.

Want more topping ideas or ingredient swaps? Ask AI:

ChatGPT
Google AI
Perplexity
Grok

Related

Looking for more hearty soup recipes? Try these:

  • This easy Italian Sausage Stew has just 6 ingredients but loads of flavor!
    6-Ingredient Sausage Stew (Hearty & Easy One-Pot Recipe)
  • a bowl of loaded potato soup with a beige towel and a sprig of parsley
    Loaded Potato Soup Recipe - No Peeling, Baking, or Draining!
  • A closeup of a large pot of Green Bay booyah
    Green Bay Booyah Recipe
  • a hearty bowl of seafood chowder with a slice of grilled bread
    Seafood Chowder Recipe - Ready in 30 Minutes
a white bowl filled with turkey lentil chili and topped with pepitas on a black linen towel

Turkey Lentil Chili with Butternut Squash

Yield: 8-10 servings
Prep Time: 15 minutes
Cook Time: 1 hour 20 minutes
Total Time: 1 hour 35 minutes

A healthy, hearty chili with all the flavors of fall in a bowl!

Ingredients

  • 2 butternut squash, quartered and de-seeded
  • 1 can chickpeas, drained
  • 1 can kidney beans, drained
  • 1 cup lentils, rinsed
  • 2 onions (1 quartered and 1 diced)
  • 64 ounces chicken broth
  • 1 tablespoon olive oil (plus more for brushing on the squash and onion)
  • 4 garlic cloves
  • 14 ounces ground turkey
  • salt and pepper, to taste
  • 1 tablespoon chili oil (optional, for drizzling)
  • ¼ cup pumpkin seeds (optional, for garnishing)

Instructions

  1. Preheat the oven to 400°F.
  2. Place the quartered butternut squash and the quartered onions in one layer onto a parchment-lined baking sheet (use more than one sheet pan if necessary). Brush the veggies with a little olive oil and season them with salt and pepper. Place them in the oven to roast for about 30-40 minutes, or until they're soft and cooked through and starting to brown.
  3. Once the squash and onions are roasted, allow them to cool for about 20 minutes. Reserve two quarters of the squash and scrape the meat from the remaining butternut squash quarters into a food processor or high-powered blender (you may need to do this in 2 batches if your food processor/blender isn't big enough).
  4. Add the roasted onion, 3 cloves of garlic, and half of the chicken broth, then blend it all until it's very smooth.
  5. In a large pot, heat a tablespoon of olive oil over medium heat until it's shimmering. Add the chopped onion and and cook until the onion is soft and translucent, about 5 minutes. Add the remaining clove of minced garlic and cook for about another minute, stirring frequently.
  6. Add the ground turkey and cook it until it's just cooked through and no pink remains.
  7. Chop the remaining butternut squash into bite-sized pieces. Add it to the pot along with the delicious butternut squash puree, the remaining chicken broth, chickpeas, kidney beans and lentils.
  8. Let it simmer for about 30 minutes, then season it with salt and pepper to taste.
  9. Serve with a drizzle of chili oil and pumpkin seeds as a garnish, if desired.
Nutrition Information:
Yield: 10 Serving Size: 1
Amount Per Serving: Calories: 263Total Fat: 11gSaturated Fat: 2gTrans Fat: 0gUnsaturated Fat: 7gCholesterol: 46mgSodium: 929mgCarbohydrates: 24gFiber: 7gSugar: 5gProtein: 18g

This data was provided and calculated by Nutritionix.

© Aubrey Cornelius
Cuisine: American / Category: Soups and Stews
Turkey Lentil Chili with Butternut Squash

Cheesy Risotto Bake Recipe (One-Pot Comfort Food)

October 9, 2025 by Aubrey Cornelius Leave a Comment

a dutch oven filled with a cheesy risotto bake just out of the oven, with a golden brown cheesy top and a sprig of fresh basil

If you love risotto, adding the simple step of baking it in the oven with a gooey layer of cheese makes it even better! This risotto bake is cheesy, creamy, and has shredded brussels sprouts added for even more flavor.

This risotto bake makes a wonderful side dish (especially for the holidays!) but can stand on its own as a main dish with chicken or more vegetables added.

a dutch oven filled with a cheesy risotto bake just out of the oven, with a golden brown cheesy top and a sprig of fresh basil

This risotto bake is creamy, cheesy, and perfect for the holidays! If you're a mushroom or gorgonzola lover, this mushroom & gorgonzola risotto is equally delicious. Either pairs perfectly with a delicious standing rib roast.

[feast_advanced_jump_to]

Ingredients

  • 1 tablespoon olive oil
  • ½ cup onion, finely chopped
  • 1 ½ cups arborio rice: it's crucial to use the correct type of rice for risotto in order to get a nice, creamy texture
  • 5 cups chicken broth: use vegetable broth for a vegetarian version.
  • 3 cups mozzarella cheese, grated (divided): you'll add half stirred into the risotto and half on top.
  • 1 cup Brussels sprouts, shredded

Step-by-Step Instructions

  1. Preheat the oven: Set your oven to 350°F so it's ready once the risotto is prepared on the stove.
  2. Sauté the onion: In an ovenproof Dutch oven or other large pot, heat the olive oil over medium-high heat. Add the onion and cook it for 2-3 minutes, until it's softened.
  3. Toast the rice: Stir in the arborio rice and cook it for 2-3 minutes, stirring occasionally.
  4. Add the broth gradually: Pour in 1 cup of the broth and stir until it's mostly absorbed. Continue adding the broth one cup at a time, stirring often and allowing each addition to absorb before adding the next. This process will take about 35-40 minutes.
  5. Stir in the cheese and Brussels sprouts: Remove the risotto from the heat. Stir in half of the grated mozzarella and all the shredded Brussels sprouts until it's thoroughly combined.
  6. Bake until it's golden: Sprinkle the remaining mozzarella evenly over the top. Place the dish in the oven and bake for approximately 15 minutes, or until the cheese is fully melted and the top is lightly golden.
  7. Serve warm: Remove it from the oven and let it rest for a few minutes before serving.
a dutch oven filled with risotto ready for the oven, in the process of being topped with cheese before baking

Equipment Needed

  • Ovenproof dutch oven or other large pot: an ovenproof pot is essential for cooking the risotto on the stovetop, then transferring it directly to the oven. If you don't have one, you can transfer the risotto to a casserole dish after cooking it on the stove.
  • Wooden spoon or silicone spatula: for stirring the rice and scraping the sides of the pan.
  • Measuring cups and spoons: to measure your ingredients, especially the rice and broth (you can eyeball the other ingredients if you prefer).
  • Sharp knife & cutting board: for finely chopping the onion and shredding the Brussels sprouts.
  • Box grater or microplane: to grate mozzarella cheese from a block (you can use pre-shredded cheese but we recommend grating your own).
  • Oven mitts: the risotto bake will be hot coming out of the oven!

Tips

  • Make sure to use arborio rice: Short-grain arborio is important because of its high starch content, which creates the creamy texture risotto is known for. Don't substitute with long-grain rice.
  • Toast the rice first: Toasting the rice for a few minutes in olive oil is an easy step that adds a lot of flavor.
  • Add the broth gradually: Stirring in one cup at a time allows the starch to release slowly, which is what gives the risotto bake it's creamy texture.
  • Use a good-quality broth: Since broth is one of just a handful of ingredients, make sure it's high-quality. If you're using a store-bought broth, choose one that's low-sodium so you can better control the seasoning.
  • Don't over-stir: Stir often, but not constantly. Too much stirring can break the grains and give it a gluey texture.
  • Grate your own cheese: Pre-shredded cheese is coated with anti-caking agents that prevent it from melting smoothly. Grating from a block will prevent this and it's only a quick extra step.
  • Bake it uncovered: This is what will give you a golden crust.
  • Rest it briefly before serving: Let the risotto bake sit for a few minutes out of the oven so the flavors settle and the texture evens out.
a serving of risotto bake in a white bowl on a white plate and a spoon, topped with a sprig of fresh basil

Substitutions & Variations

  • Rice alternatives: Arborio is best, but carnaroli or vialone nano rice can also be used. Don't be tempted to use long-grain rice as it won't be the same.
  • Cheese swaps: Replace the mozzarella with fontina, provolone, Gruyère, or a mix of Parmesan and Asiago.
  • Broth options: Use vegetable or mushroom broth for vegetarian.
  • Vegetable add-ins: Stir in sautéed mushrooms, peas, spinach, or roasted butternut squash.
  • Add a protein: Add cooked chicken, pancetta, bacon, or Italian sausage to make it a hearty main dish. Leftover steak cut into bite-sized pieces is also delicious.
  • Herbs: Fresh parsley, basil, or oregano can be stirred in just before baking.
  • Add a little wine: Deglaze the pan with ½ cup of dry white wine after toasting the rice for another layer of flavor.

Storage & Reheating

For the best results, reheat only the portion you plan to eat, as repeated reheating can dry the rice out.

  • Refrigeration: Store any leftover risotto bake in an airtight container in the refrigerator for up to 3 days.
  • Freezing: It's not recommended, as the texture of arborio rice becomes grainy and loses its creaminess after thawing.
  • Reheating in the oven: Place any leftovers in an oven-safe dish, cover it loosely with foil, and warm it at 325°F for about 15-20 minutes, or until it's heated through. Add a splash of broth or milk before reheating if it seems dry.
  • Reheating on the stovetop: Plase the leftovers to a skillet with a small amount of broth, milk, or cream. Stir it gently over medium-low heat until it's warmed through and creamy.
  • Microwave: Heat in short intervals (30-45 seconds), stirring in between, with a spoonful of broth or cream to prevent it from drying out.

Frequently Asked Questions

Can I use regular rice instead of arborio?

Long-grain or standard white rice won't create the same creamy texture. Arborio (or another short-grain risotto rice like carnaroli) is essential.

Can I make this risotto bake ahead of time?

You can prepare the risotto through the stovetop stage, then cool and refrigerate it for up to 24 hours. When you're ready, stir in the cheese and vegetables, top it with the remaining cheese, and bake it until it's golden and heated through.

What protein should I serve this with?

Cooked chicken, pancetta, bacon, or Italian sausage are excellent add-ins. If you're a seafood lover, try serving it with cooked shrimp or scallops.

How do I keep it creamy when reheating?

Add a small amount of broth, milk, or cream before reheating. This helps loosen the rice and brings back its creamy consistency.

Can I make this recipe vegetarian?

Yes, simply use vegetable broth instead of chicken broth. You can also add extra vegetables like mushrooms, spinach, or roasted squash for even more flavor.

What cheese works best?

Mozzarella melts beautifully for that gooey topping, but Gruyère, fontina, provolone, or a Parmesan blend can also be used.

Related

Looking for more holiday side dish recipes? Try these:

  • a white bowl filled with homemade creamed corn and topped with chopped parsley on a tan napkin on a wood table
    Homemade Creamed Corn Recipe (With or Without Cream)
  • Roasted Carrot Souffle Recipe
    Roasted Carrot Souffle
  • Green Beans Almondine on a white oval plate which sits on a wooden board with a rustic napkin next to it.
    Green Beans Almondine
  • loaded cheddar, chive & bacon mashed potatoes
    Loaded Mashed Potatoes

Pairings

These are our favorite dishes to serve with this risotto bake:

  • Boneless Prime Rib Recipe with a Garlic-Herb Crust
    Boneless Prime Rib Recipe with a Garlic-Herb Crust
  • Beef Wellington Recipe
    Beef Wellington Recipe
  • a white bowl of beef short ribs braised with garlic and red wine with a sprig of fresh thyme on a wooden table
    The BEST Braised Beef Short Ribs Recipe for the Holidays
  • a spiral sliced ham on a white plate with fresh orange wedges on a wood table
    How to Cook a Spiral Ham (plus a Ham Glaze recipe)
a dutch oven filled with a cheesy risotto bake just out of the oven, with a golden brown cheesy top and a sprig of fresh basil

Cheesy Risotto Bake

Yield: 6-8 servings
Prep Time: 10 minutes
Cook Time: 1 hour
Additional Time: 5 minutes
Total Time: 1 hour 15 minutes

This risotto bake is the ultimate holiday dish. It's rich and creamy with a cheesy, bubbly top.

Ingredients

  • 1 tbs olive oil
  • ½ cup onion, finely chopped
  • 1 ½ cups arborio rice
  • 5 cups chicken broth
  • 3 cups mozzarella cheese, grated, divided
  • 1 cup Brussels Sprouts, shredded

Instructions

  1. Preheat the oven to 350°F.
  2. In an ovenproof pot or Dutch oven, heat the olive oil over medium-high heat. Sauté the onion until it's soft and translucent (2-3 minutes).
  3. Add the arborio rice and cook for an additional 2-3 minutes, stirring occasionally.
  4. Gradually add 1 cup of chicken broth at a time, bringing it to a simmer. Stir it frequently until the liquid is nearly absorbed.
  5. Continue this process until all 5 cups of broth are added, and almost all of the liquid is absorbed (about 35-40 minutes).
  6. Remove it from the heat. Stir in half of the grated cheese and the Brussels sprouts. Sprinkle with the remaining cheese.
  7. Bake for approximately 15 minutes or until the cheese is fully melted and golden brown.
  8. Allow the risotto bake to rest for approximately 5 minutes before serving.
Nutrition Information:
Yield: 8 Serving Size: 1
Amount Per Serving: Calories: 209Total Fat: 12gSaturated Fat: 6gTrans Fat: 0gUnsaturated Fat: 5gCholesterol: 36mgSodium: 845mgCarbohydrates: 14gFiber: 1gSugar: 2gProtein: 12g

This data was provided and calculated by Nutritionix.

© Aubrey Cornelius
Cuisine: Italian / Category: Sides
Cheesy Risotto Bake Recipe (One-Pot Comfort Food)

Roasted Cauliflower Tomato Soup with Parsley Cream

October 8, 2025 by Aubrey Cornelius Leave a Comment

a white bowl filled with roasted cauliflower tomato soup next to a vintage spoon and fresh thyme

Cauliflower tomato soup is a delightful twist on the classic minestrone. The soup is thickened with green lentils and garnished with parsley cream.

I can't get enough of this cauliflower tomato soup! A steaming bowl of this soup and a cozy spot on the couch are pure bliss. Despite its relatively simple list of ingredients, roasting the cauliflower and tomatoes concentrates their flavors, which gives a delightful depth to each spoonful.

a white bowl filled with cauliflower tomato soup with olive oil from a small jar being drizzled over the top next to two vintage spoons and fresh sprigs of thyme

It's finally soup season (my favorite season for cooking and baking and pretty much everything!) so you know I pulled out my dutch oven first thing. I love using the last of my summer tomatoes for this cauliflower tomato soup. Once I've made a few batches, next in line is always an easy loaded potato soup and a pot of beanless chili. If I'm craving something healthy, I go to black bean and kale soup. My house smells especially delicious in the fall!

[feast_advanced_jump_to]

Ingredients

  • Cauliflower
  • Olive oil
  • Paprika (I like to substitute half for the smoked variety if I've got some on hand)
  • Tomatoes
  • Yellow onion
  • Salt & Pepper
  • Garlic
  • Green lentils (these will thicken the soup)
  • Vegetable broth (chicken broth works just fine, too)
  • Parsley
  • Plain greek yogurt
a top-down view of a white bowl filled with roasted cauliflower tomato soup next to two vintage spoons and fresh thyme

Step-by-Step Instructions

There are a few steps to this cauliflower tomato soup recipe, but they're all pretty simple and it comes together easily.

  1. Preheat the oven to 375°F.
  2. To start, you'll toss the cauliflower in a large-ish bowl with the paprika and half the olive oil.
  3. Next you'll line a baking sheet with parchment paper, add the cauliflower and the halved tomatoes and bake it all for about 30-40 minutes. The tomatoes should be soft and the cauliflower just turning golden brown.
  4. While the cauliflower and tomatoes are roasting, add the remaining olive oil, onions, salt and pepper to a large pot that's been preheated over medium-high heat. Cook the onions for about 4 minutes or until they start to soften up, then add the garlic. Cook about a minute or two more and until the garlic begins to brown and becomes fragrant, and the onions are translucent.
  5. Now you'll add half of the vegetable broth and bring it to a boil.
  6. Rinse the lentils well then add them to the onion/broth mixture. Reduce the heat and let it simmer for about 30 minutes.
  7. By now, the cauliflower and tomatoes should be done. Reserve about ¼ cup of the cauliflower, then add the remaining cauliflower and all of the tomatoes to a blender or food processor, along with the other half of the vegetable broth. Blend it until it's smooth and creamy.
  8. Add the cauliflower/tomato mixture to the soup pot with the lentils, and continue to simmer for another 15 minutes or so.
  9. To make the parsley cream, combine the parsley and greek yogurt in the food processor and blend it until it's smooth.
  10. Now it's time to serve your cauliflower tomato soup! Ladle it into bowls, drizzle on some of the parsley cream, and top it with a few pieces of the reserved roasted cauliflower.
a white bowl filled with roasted cauliflower tomato soup next to a vintage spoon and fresh thyme

Equipment Needed

  • Large mixing bowl for the cauliflower.
  • Baking sheet to roast the cauliflower and tomatoes.
  • Parchment paper for lining the baking sheet.
  • Large pot or Dutch oven for cooking the soup!
  • Wooden spoon or spatula
  • Measuring cups and spoons
  • Colander or fine mesh strainer for rinsing the lentils.
  • Food processor or high-speed blender to puree the soup.
  • Chef's knife and cutting board
  • Ladle
  • Serving bowls

Tips

  • Roast the caulifower until it's lightly browned: Let the cauliflower get a bit of color in the oven. It deepens the flavor and gives the soup a slightly nutty undertone. The tomatoes should look soft and slightly blistered.
  • Use good vegetable broth: A flavorful broth makes a big difference here. If you're using store-bought, choose a low-sodium version so you can control the salt.
  • Simmer the lentils gently: Lentils can split or turn mushy if cooked at too high a boil. Keep them at a steady, gentle simmer until they're tender.
  • Blend in batches if needed: Depending on your blender or food processor size, you may need to puree the roasted vegetables in two batches. Be careful as they'll be hot!
  • Adjust the texture to your taste: For a thicker soup, simmer it uncovered a bit longer. For a smoother, thinner version, add extra broth.
  • Reserve a few roasted cauliflower florets: They make a beautiful garnish and add a nice texture to each bowl.
  • Make the parsley cream fresh: Blend it just before serving so the color stays bright and the flavor is fresh.
  • Taste and season before serving: Lentil soups often need an extra pinch of salt or squeeze of lemon at the end to bring out all the flavors.
a white bowl filled with roasted cauliflower tomato soup next to a vintage spoon and fresh thyme

Storage and Make-Ahead

  • Refrigeration: Store the cauliflower tomato soup in an airtight container in the refrigerator for up to 5 days. Let it cool completely before sealing to prevent condensation. Keep the parsley cream in a separate container for up to 3 days.
  • Freezing: This soup freezes very well. Portion it into freezer-safe containers or bags and freeze for up to 3 months. Thaw it overnight in the fridge, then reheat it gently on the stovetop. Add a tiny amount of broth or water if it thickened too much.
  • Make-ahead: You can roast the vegetables and cook the lentils up to 2 days in advance.
  • Reheating: Warm the soup over medium heat, stirring occasionally. Don't let it boil or it might lose its creamy consistency. The parsley cream can be served chilled or brought to room temperature before drizzling.
  • Meal prep: Store the soup in single-serving jars or containers, and add the parsley cream right before eating.

Frequently Asked Questions

Can I use red or brown lentils instead of green?

You can, but keep in mind that red lentils cook faster and will make the soup creamier and less textured.

Do I need to soak the lentils first?

No soaking is necessary for green lentils. Just rinse them well before cooking to remove any dust or debris.

Can I make this soup ahead of time?

The flavors actually improve after a day in the fridge! Store the soup and parsley cream separately, then warm the soup gently and drizzle the cream right before serving.

How long will leftovers keep?

Store in an airtight container in the refrigerator for up to 5 days. The parsley cream will stay fresh for about 3 days.

Can I freeze cauliflower tomato soup?

Yes, but skip adding the parsley cream until after reheating. Freeze the soup in airtight containers for up to 3 months. Thaw overnight in the fridge, then warm it gently on the stove.

Can I use frozen cauliflower?

It won't brown as nicely as fresh but it can be used if that's all you've got. If using frozen, roast it at a slightly higher temperature (around 400°F).

What can I use instead of Greek yogurt in the parsley cream?

Sour cream or crème fraîche both work well. Coconut yogurt or cashew cream work if you want to be dairy-free.

Can I make it spicy?

Add red pepper flakes to the onions while they're sautéing. You can always add a bit more to individual bowls if it's not spicy enough.

Related

Looking for more delicious soup recipes? Try these:

  • Easy Lentil Soup Recipe with Sausage
    Easy Lentil Soup Recipe with Sausage
  • Avgolemono Soup is a creamy, comforting soup with tender chicken, orzo pasta and a bright lemon flavor. Delicious and incredibly easy!
    Avgolemono Soup (Chicken Soup with Egg and Lemon)
  • a hearty bowl of seafood chowder with a slice of grilled bread
    Seafood Chowder Recipe - Ready in 30 Minutes
  • This easy Italian Sausage Stew has just 6 ingredients but loads of flavor!
    6-Ingredient Sausage Stew (Hearty & Easy One-Pot Recipe)
a white bowl filled with roasted cauliflower tomato soup next to a vintage spoon and fresh thyme

Cauliflower Tomato Soup with Parsley Cream

Yield: 6 servings
Prep Time: 15 minutes
Cook Time: 1 hour 25 minutes
Total Time: 1 hour 40 minutes

Cauliflower tomato soup is a delightful twist on the classic minestrone. The soup is thickened with green lentils and garnished with parsley cream.

Ingredients

Soup

  • 1 head of cauliflower, broken down into pieces
  • 2 tablespoons olive oil, divided
  • 1 teaspoon paprika
  • 4-6 small tomatoes, halved
  • 1 yellow onion, diced
  • 3 teaspoons coars salt
  • ¼ teaspoon ground black pepper
  • 2 garlic cloves, minced
  • ½ cup green lentils, rinsed
  • 32 ounces vegetable broth, divided

Parsley Cream

  • 1 cup parsley
  • ½ cup plain greek yogurt, full fat or low fat
  • ¼ teaspoon salt
  • ¼ teaspoon cracked pepper

Instructions

  1. Preheat the oven to 375°F.
  2. Add the cauliflower to a bowl and combine with half the olive oil and paprika. Toss to coat evenly.
  3. To a parchment lined baking sheet, add the cauliflower and the tomatoes and bake for about 30-40 minutes or until the tomatoes are soft and the cauliflower is flecked with golden brown.
  4. Meanwhile, add remaining olive oil, onions, salt and pepper to a large pot over a medium-high heat and cook for about 4 minutes or until the onions start to soften up, then add the garlic. Cook about a minute or two more and until the garlic begins to brown and becomes fragrant, and the onions are translucent.
  5. Add half of the vegetable broth and bring to a boil.
  6. Rinse the lentils well then add them to the onion/broth mixture. Reduce to a simmer and cook for about 30 minutes.
  7. Once finished, combine the tomatoes and cauliflower (reserving about ¼ cup of the cauliflower) in a food processor along with the other half of the vegetable broth. Pulse until smooth and creamy.
  8. Combine with the lentil mixture and continue to simmer for another 15 minutes.
  9. To make the cream, combine the parsley, and greek yogurt in the food processor and blend until smooth.
  10. To serve, I drizzled the soup with a parsley cream and the reserved cauliflower.
Nutrition Information:
Yield: 6 Serving Size: 1
Amount Per Serving: Calories: 130Total Fat: 6gSaturated Fat: 1gUnsaturated Fat: 4gCholesterol: 1mgSodium: 1636mgCarbohydrates: 16gFiber: 5gSugar: 7gProtein: 7g

This data was provided and calculated by Nutritionix.

© Aubrey Cornelius
Cuisine: American / Category: Soups and Stews
Roasted Cauliflower Tomato Soup with Parsley Cream

White Chocolate Biscotti Recipe (Gift-Worthy Cookies!)

October 6, 2025 by Aubrey Cornelius Leave a Comment

a plate of white chocolate biscotti, some coated with chopped pistachios and some with chopped cacao nibs, next to a glass of milk

White chocolate biscotti is one of those recipes I come back to every winter. They're crisp but not hard, with just the right amount of sweetness. This recipe came from my husband's grandmother, and I've made it more times than I can count.

I love that these are easy to shape, never too fussy, and turns out the same every time. After they're baked and cooled, I drizzle or dip each biscotti in melted white chocolate and sprinkle them with crushed pistachios or cacao nibs. They're perfect for dipping in coffee or for an afternoon treat (and they stay fresh for days)!

a plate of white chocolate biscotti, some coated with chopped pistachios and some with chopped cacao nibs, next to a glass of milk

These white chocolate biscotti are always on my Christmas cookie tray (they're great for gifting, too)! They're my go-to, along with easy M&M pretzel cookies & my jam sandwich cookies. And these chocolate meringue cookies are also a great choice! They're all just a bit different so I know everyone will get something they love.

[feast_advanced_jump_to]

Ingredients

Here's a quick rundown of what you'll need to make these white chocolate biscotti. We have a complete recipe with amounts down below, too.

For the Biscotti:

  • Unsalted butter
  • Granulated sugar
  • Large eggs
  • Almond extract
  • Vanilla extract
  • All-purpose flour
  • Baking soda
  • Kosher salt
  • Slivered raw almonds

For the Topping:

  • White chocolate (use high-quality chocolate)
  • Coconut oil (this helps thin the chocolate and makes it much easier to drizzle)
  • Cacao nibs
  • Crushed pistachios (I like to use salted pistachios but any will work)
a plate of white chocolate biscotti next to a glass of milk, with a hand holding a biscotti and dipping it into the milk

Instructions

  1. Cream the butter and sugar: In a large mixing bowl, beat the softened butter until light and fluffy (about 2 to 3 minutes). Gradually add the sugar and continue beating for another 3 to 4 minutes until the mixture looks pale and airy. This step is what will give the white chocolate biscotti the right texture, so take your time here.
  2. Add the eggs and extracts: Beat in the eggs one at a time, mixing well after each addition. Stir in the almond and vanilla extracts.
  3. Mix the dry ingredients: In a separate bowl, whisk together the flour, baking soda, and salt. Slowly add the dry ingredients to the wet ingredients, mixing on low speed until just combined.
  4. Fold in the almonds: Gently fold in the slivered almonds using a spatula. (If the dough feels sticky, you can lightly flour your hands before handling it.)
  5. Chill the dough: Divide the dough into two equal portions, shape each into a rough ball, and place them on a parchment-lined baking sheet. Cover and refrigerate for at least 2 hours, or overnight if you'd like to bake them the next day. (This helps the dough firm up and makes shaping easier.)
  6. Shape the logs: Once the dough is thoroughly chilled, form each ball into a log about 4 inches wide and 8-10 inches long. Pat it gently to flatten it into a loaf shape (don't worry about perfection, biscotti are forgiving).
  7. First bake: Preheat your oven to 325°F. Bake one log per sheet for 20-25 minutes, or until it's lightly golden around the edges. The loaves should feel set but still soft in the center.
  8. Cool and slice: Let the loaves cool for 10-15 minutes, then use a serrated knife to slice them into ½-inch-thick biscotti.
  9. Second bake: Lower the oven temperature to 300°F. Arrange the biscotti slices on their sides on the baking sheet and bake them for approximately 20 minutes. Transfer them to a cooling rack and let them cool completely.
  10. Dip or drizzle with white chocolate: Once the white chocolate biscotti are completely cool, melt the white chocolate and coconut oil together in a heatproof bowl over a small pot of simmering water (or use the microwave in 15-second bursts, stirring in between). Dip one end of each biscotti or drizzle the chocolate across the tops.
  11. Finish with toppings: Before the chocolate sets, sprinkle with cacao nibs, crushed pistachios, or both. Let the chocolate harden completely before storing or packing them as gifts.

Equipment Needed

  • Mixing bowls: You'll need three: one for wet ingredients, one for dry, and one for melting the chocolate.
  • Hand mixer or stand mixer
  • Rubber spatula
  • Whisk
  • Measuring cups and spoons
  • Baking sheets
  • Parchment paper or silicone baking mats
  • Serrated knife
  • Cooling rack
  • Double boiler or microwave-safe bowl
  • Offset spatula or spoon (for drizzling)
  • Airtight container or gift tins (for storage or gifting)
a hand holding a white chocolate biscotti, with a plate of biscotti in the background

Tips

  • Cream the butter and sugar really well! This step determines how light your biscotti will be. It should look pale and fluffy before you add the eggs.
  • Don't skip chilling the dough. It's tempting to skip this step, but chilled dough is easier to shape and slice after baking.
  • Use a serrated knife: It will help the biscotti from crumbling as you slice them.
  • Make them as crunchy as you like: For a softer texture, reduce the second bake by a few minutes. To make them extra crunchy, let them bake a little longer.
  • Use high-quality white chocolate. It will make a difference!
  • Add the toppings right away: Move quickly after dipping so the toppings stick well to the chocolate.
  • Try different flavors: Lemon zest or dried cranberries in the dough taste amazing with the white chocolate drizzle!

Storage and Make-Ahead

  • Room temperature storage: Once the biscotti are fully cooled and the chocolate has hardened, keep them in an airtight container at room temperature for up to one week. Layer them with parchment paper to prevent the chocolate from smudging.
  • Freezing the dough: You can make the dough ahead and freeze it (unbaked) for up to 2 months. Shape it into logs, wrap tightly in plastic wrap, then place in a freezer-safe bag. Thaw in the refrigerator overnight before baking.
  • Freezing baked biscotti: Plain, uncoated biscotti freeze well. Place them in an airtight container or freezer bag and freeze them for up to 2 months. Thaw them at room temperature, then drizzle or dip them in chocolate once they're defrosted.
  • Make-ahead gift idea: These white chocolate biscotti make wonderful edible gifts because they stay crisp for days. Once the chocolate has set, package a few in cellophane bags, tie with twine or ribbon, and add a tag for an easy homemade gift!
  • How to re-crisp: If they start to lose a little crunch, pop them into a 300°F oven for 5-7 minutes.
a plate filled with white chocolate biscotti next to a glass of milk, with one biscotti resting on top of the glass

Frequently Asked Questions

Can I use a different type of chocolate?

Absolutely. Dark, milk, or even ruby chocolate all work beautifully with this recipe. Just melt them the same way and drizzle or dip as desired.

Do I have to bake the biscotti twice?

Yes, that's what gives biscotti their signature crunch. The first bake sets the dough, and the second bake removes moisture so the cookies become crisp and dry.

Why did my biscotti crack while slicing?

They were probably still too warm after the first bake. Let the loaves cool for at least 10 minutes before slicing, and use a serrated knife with gentle pressure.

How do I make my biscotti softer?

Reduce the time on the second bake by 5 minutes, or store them in an airtight container with a small piece of bread to keep them slightly tender.

Can I skip the nuts?

Yes, the almonds add crunch but aren't essential. You can replace them with dried cranberries, chopped pistachios, or just leave them out entirely.

Why did my white chocolate seize or clump?

It may have overheated. White chocolate melts quickly, so use low heat or a double boiler and stir constantly. If it starts to thicken, add a small spoonful of coconut oil to smooth it out.

Can I add flavorings to the dough?

Definitely. Try adding orange or lemon zest, cardamom, or a dash of espresso powder for a custom twist.

How long do they stay fresh?

At room temperature, they keep their crisp texture for about a week. For longer storage, freeze uncoated biscotti and dip in chocolate later.

Related Recipes

Looking for more Christmas desserts? Try these:

  • Homemade chocolate truffles in white paper candy cups for gift-giving
    Easy Chocolate Truffles Recipe
  • Homemade chocolate peppermint bark in decorative tin with candy cane
    Peppermint Bark Recipe
  • Coconut rum balls being rolled and coated in coconut
    Coconut Rum Balls
  • A side view of five chocolate covered pretzel rods decorated with different colors and sprinkles for Christmas
    Chocolate Covered Pretzel Rods
a plate of white chocolate biscotti, some coated with chopped pistachios and some with chopped cacao nibs, next to a glass of milk

White Chocolate Biscotti

Yield: 16-20 biscotti
Prep Time: 15 minutes
Cook Time: 45 minutes
Additional Time: 2 hours
Total Time: 3 hours

Delicious almond & white chocolate infused biscotti topped with a white chocolate drizzle. Easy to make and are wonderful as little gifts for family or friends as they keep well in the fridge/freezer!

Ingredients

Biscotti

  • ¾ cup butter, room temperature
  • 1 cup sugar
  • 3 eggs
  • 1 teaspoon almond extract
  • 1 ½ teaspoons vanilla extract
  • 3 cups + 3 tablespoons all-purpose flour
  • ¼ teaspoon baking soda
  • ¼ teaspoon kosher salt
  • ½ cup slivered raw almonds

Toppings

  • 6 ounces white chocolate
  • 2 tablespoons coconut oil
  • ½ cup cacao nibs
  • ½ cup chopped pistachios

Instructions

  1. In mixing bowl cream the butter until it's fluffy (about 2-3 minutes). Slowly add sugar and beat another 3-4 minutes.
  2. Add the eggs one at a time, beating between each addition (about 3 minutes total). Stir in the almond and vanilla extracts.
  3. In a separate mixing bowl, combine flour, baking soda and salt.
  4. Add it slowly to the egg and butter mixture, blending it evenly. Fold in the slivered almonds.
  5. Divide dough into 2 balls; place the balls on parchment paper on a cookie sheet and place them in the refrigerator for at least 2 hours or overnight.
  6. Once the dough is chilled, form the balls into logs about 4 inch wide and 8-10 inches long; then flatten the logs into a loaf shape.
  7. Preheat the oven to 325°F.
  8. Bake 1 loaf per sheet at 325 degrees for 20–25 minutes or they're until lightly browned.
  9. Reduce the oven to 300°F.
  10. Cool the loaves, then slice each with a serrated knife into ½ inch thick biscotti. Lay the biscotti on their sides and bake for 20 minutes. Cool completely before handling.
  11. Melt the chocolate and the coconut oil using a double boiler (place a heat-proof bowl on top of a small pot filled with ¼ cup of water.) Alternatively, you can microwave it in 15-second bursts in a microwave-safe bowl, stirring between. Once the chocolate has almost completely melted (there should be just a few clumps of chocolate), continue stirring until it's completely smooth.
  12. Lay out a long sheet of parchment paper. Dip one end of each biscotti in the white chocolate, or drizzle it over the top. Immediately (before the chocolate sets), sprinkle with the cacao nibs and/or crushed pistachio.

Notes

Make the dough in advance and freeze the dough for up to 2 months.

You can roast the almonds before chopping them for a nuttier flavor.

Nutrition Information:
Yield: 20 Serving Size: 1
Amount Per Serving: Calories: 232Total Fat: 16gSaturated Fat: 9gTrans Fat: 0gUnsaturated Fat: 7gCholesterol: 48mgSodium: 120mgCarbohydrates: 19gFiber: 1gSugar: 16gProtein: 3g

This data was provided and calculated by Nutritionix.

© Aubrey Cornelius
Cuisine: Italian / Category: Desserts
White Chocolate Biscotti Recipe (Gift-Worthy Cookies!)
  • 1
  • 2
  • 3
  • …
  • 18
  • Next Page »

Trending Recipes

  • a metal basket lined with parchment paper that's filled with air fryer flautas mexicanas and topped with pico de gallo, guacamole, and Cacique cheese. there are bowls of guacamole and fresh pico de gallo in the background.
    Air Fryer Flautas Mexicanas – Crispy in Minutes!
  • a closeup of a coconut smoothie bowl topped with fresh blueberries, granola, and goji berries
    Coconut Smoothie Bowl
  • top down view of two birria tacos on a wooden board next to a small bowl of consommé
    Authentic Birria Tacos Recipe (Step-by-Step with Consommé)
  • A stack of keto chocolate chip cookies next to a glass of milk
    Keto Chocolate Chip Cookies

Popular Spring Recipes

  • a white dish with scalloped edges, filled with an easy pea salad that's topped with chopped parsley on a wooden table
    Make-Ahead Easy Pea Salad for Parties
  • Fried Deviled Eggs on a white plate
    Fried Deviled Eggs with Sausage
  • Beet-Pickled Deviled Eggs Recipe
    Beet-Pickled Deviled Eggs
  • A keto salad on a white plate, made up with grilled romaine, sliced cherry tomatoes, thinly sliced avocado and halved lemon slices for a garnish.
    Keto Salad | Lemony Romaine and Avocado Salad

Footer

↑ back to top

  • Privacy Policy
  • About
  • Contact
  • Cookbooks

Copyright © 2026 The Wicked Noodle