The Wicked Noodle

  • All Recipes
  • Freezer Meals
  • Dinner Ideas
menu icon
go to homepage
  • All Recipes
  • Freezer Meals
  • Dinner Ideas
search icon
Homepage link
  • All Recipes
  • Freezer Meals
  • Dinner Ideas
×

Homemade Easy Caramel Sauce (Salted & Unsalted)

November 25, 2022 by Kristy Bernardo Leave a Comment

Salted and Unsalted Homemade Caramel Sauce

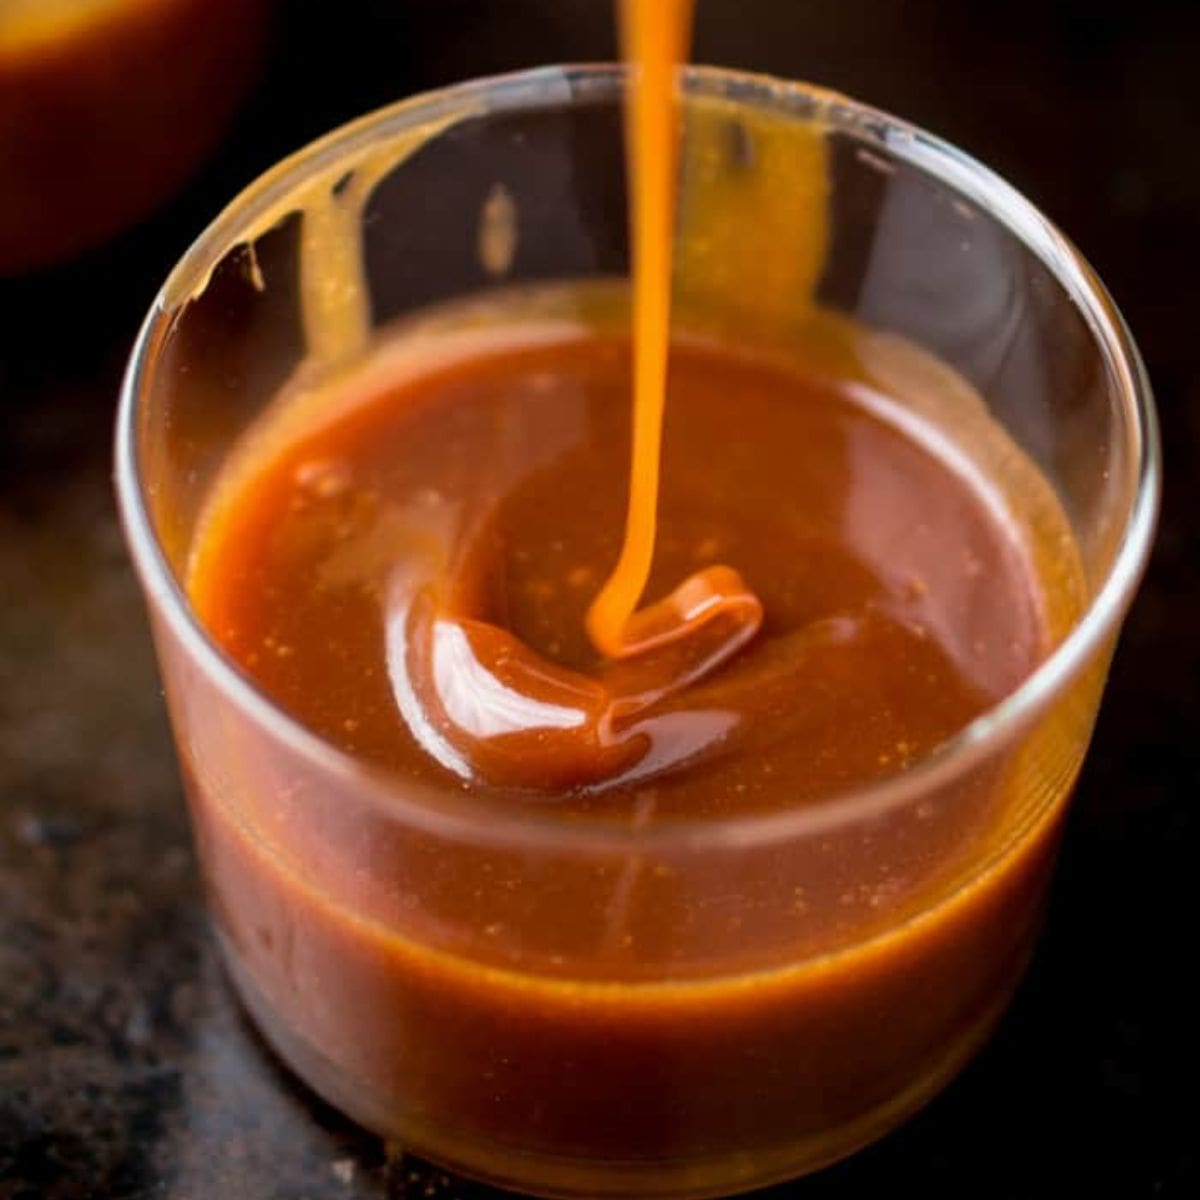
Have you ever wondered how to make homemade caramel sauce? This easy and delicious recipe will have you wondering how you ever tolerated the jarred version!

Caramel sauce is a delicious topping for your favorite desserts or the perfect homemade holiday Christmas gift. Plus, this recipe comes together in just 10 minutes with only 4 ingredients.

This sweet and delicious caramel sauce can be used as topping to add flavor to cakes, ice cream and many other desserts.

Caramel Sauce Ingredients

This caramel recipe use only 4-ingredients and only 5 if you're making a salted version!

  • Unsalted Butter: Unsalted butter allows you to control the amount of salt you're adding whether it's salted or unsalted caramel sauce.
  • Brown Sugar: Brown sugar adds complexity with notes of molasses.
  • Heavy Cream: Heavy cream adds creaminess to the caramel and consistency to be used as a sauce. Use full fat heavy cream for best results.
  • Vanilla Extract: A touch of vanilla enhances the flavor, use real vanilla extract if you can or one of these substitutes.
  • Sea Salt (optional): Adding sea salt is the only difference between salted and unsalted caramel sauce. Add sea salt if you prefer a sweet and salty combination or a recipe calls for salted caramel vs unsalted caramel.

(Scroll down to the bottom for the printable recipe card with exact measurements and recipe instructions.)

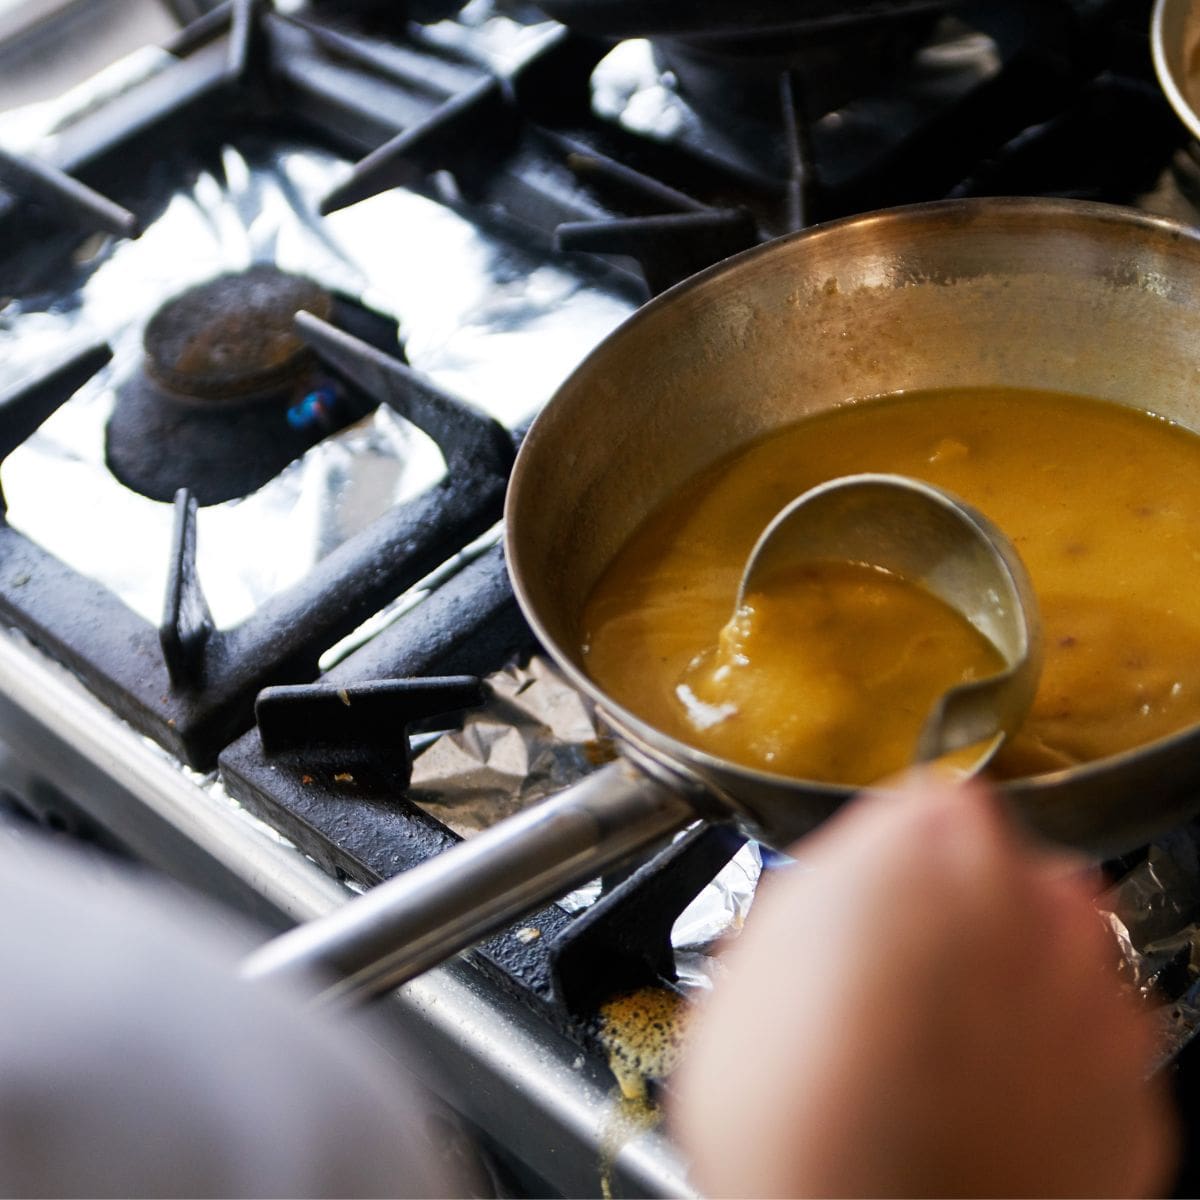
How To Make Caramel Sauce

This recipe is ready in under 10 minutes!

Use a small heavy bottom sauce pan to allow for more even and quicker cooking. 

  1. Melt the butter in a saucepan.
  2. Add the brown sugar; whisk for two minutes. 
  3. Add the cream; whisk for another two minutes.
  4. Mix in the vanilla extract and sea salt, if making salted caramel.
  5. Pour into a container and refrigerate.
How To Use Homemade Caramel Sauce

Uses For Caramel Sauce

There are plenty of uses for homemade caramel sauce, including:

  • Burnt Sugar Caramel Cake
  • Butterscotch Pudding
  • Snickers Caramel Tart
  • Cinnamon Rolls
  • Caramel Dipped Pretzels
  • Pumpkin spice or Chai spice Cheesecake
  • Chocolate Bars
  • Salted Caramel Apple Pie
  • Chocolate Bread Pudding
  • Caramel Apples
  • Cheesecake
  • Pancakes (great with chocolate chips)
  • Popcorn
  • Coffee Based Ice Cream
  • Bacon

Some scoff at that last entry, but caramel bacon is an amazing brunch item and could be a major hit for your next gathering. Pro-tip on that dish--fry the bacon FIRST and add the caramel AFTER the bacon is done cooking.

You add bacon to caramel or pour the caramel on top of the bacon. And some adventurous souls like to pour a bit of cayenne pepper onto the bacon before the caramel comes out.

One quick and easy use for caramel sauce not found in the list above? Making turtle brownies and turtle cheesecake.

The most no-frills version of this is to make an ordinary cheesecake or brownie recipe and top it with pecans and caramel sauce. The preparation can be more elaborate than that, but in a pinch these two desserts with their usual ingredients can be greatly enhanced with the caramel sauce.

This sweet and delicious caramel sauce can be used as topping to add flavor to cakes, ice cream and many other desserts.

How to Store Caramel Sauce

You can store homemade caramel sauce in an airtight container or mason jar, in the refrigerator for up to 4 weeks and up to 3 days at room temperature.

You can store caramel sauce in a jar or freezer-safe container for up to 2 months. Let the caramel sauce completely cool at room temperature before freezing.

How to Reheat Caramel Sauce

Reheat caramel sauce in a microwave-safe bowl for 30 second bursts at 50%, stirring in between. It should take about 1 to 2 minutes to reheat, depending on if it's at room temperature or cold.

Caramel sauce can also be reheated on a stovetop at a low-medium heat by adding a little water and stirring frequently until desired warmth.

This sweet and delicious caramel sauce can be used as topping to add flavor to cakes, ice cream and many other desserts.

Easy Caramel Sauce (unsalted & salted)

Yield: 20 tablespoons
Prep Time: 5 minutes
Cook Time: 5 minutes
Total Time: 5 minutes

This 4 ingredient sweet and delicious caramel sauce can be used as topping to add flavor to cakes, ice cream and many other desserts. This is the best homemade version I've tried, and it just so happens to also be the easiest.  It's a rare day that there isn't a jar of this in my fridge!

Ingredients

  • ½ cup unsalted butter
  • 1 cup light brown sugar
  • ⅔ cup heavy cream
  • 1 teaspoon vanilla extract (or add to taste)
  • 2 teaspoon sea salt (optional, for salted caramel version)

Instructions

    1. Melt the butter in a small heavy bottom sauce pan. 
    2. Add the brown sugar; whisk for two minutes. 
    3. Add the cream; whisk for another two minutes.
    4. Mix in the vanilla extract and sea salt, if making salted caramel
    5. Pour into a container and refrigerate.


Notes

Use a heavy bottom sauce pot to allow for more even and quicker cooking. 

Your caramel sauce will thicken as the cooling process continues, don’t worry if the mix seems a bit thin when it’s still very warm.

Nutrition Information:
Yield: 20 Serving Size: 1
Amount Per Serving: Calories: 103Total Fat: 7gSaturated Fat: 5gTrans Fat: 0gUnsaturated Fat: 2gCholesterol: 21mgSodium: 41mgCarbohydrates: 9gFiber: 0gSugar: 9gProtein: 0g

This data was provided and calculated by Nutritionix.

© Kristy Bernardo
Cuisine: American / Category: Desserts
Homemade Easy Caramel Sauce (Salted & Unsalted)

Christmas Sangria

November 25, 2022 by Kristy Bernardo Leave a Comment

Fall and winter sangria with apples, oranges, pomegranate and cinnamon

Christmas Sangria is a crowd pleaser and so easy to make in advance! Keep your holidays easy and delicious with this festive holiday cocktail. Plus, add some champagne and make it a Christmas Sangria Mimosa!

Christmas Sangria is a crowd pleaser and so easy to make in advance! Keep your holidays easy and delicious.

What Is In Sangria?

Sangria originates from Spain in the 18th century and the word comes from "sangre", meaning blood and it refers to the red color of the drink. The basic ingredients of sangria are wine, a sweetener, liqueur, soda water or other mixer, and fruit. While traditionally red, sangria blanca (white wine sangria) is popular as well.

Christmas Sangria Ingredients

  • Dry Red Wine: Drier, full bodied wines work best with this cocktail such as a Cabernet Sauvignon, Merlot, and Zinfandel, Sangiovese, Tempranillo, Cabernet Franc, Malbec. Syrah and Pinot Noir are light wines that can work as well. Use what you like to drink and a lot of other ingredients go in this drink so no need to go with anything fancy.
  • Brandy: Brandy is the most common liquor added to Sangria and is made from fermented fruit juice, which enhances the Sangria flavors. Choose the brandy in your alcohol cabinet or go with whatever you're feeling is compatible with the rest of these ingredients. Cognac is a type of brandy so that would work as well but just keep in mind it's made from white grapes. Again, no need to splurge on the brandy, save the nice brandy for sipping.
  • Fruit: This sangria features the three most common fruits in Spain: oranges, lemons and green apples plus red grapes. Feel free to add in or substitute other juicy fruits that you happen to have on hand.
  • Soda Water: Sparkling water or club soda adds some refreshing fizz to this cocktail. Fruit flavored sparkling soda that pairs well with the fruit can be used as well. I have used lemon-lime and plain soda water for this recipe and both tasted great.

(Scroll down to the bottom for the printable recipe card with exact measurements and recipe instructions.)

How to Make Christmas Sangria

This easy holiday Sangria recipe makes a gorgeous pitcher of drinks for the holidays! Triple or quadruple the batch for a crowd.

  1. Chop the Fruit: Slice the oranges, lemons and green apples.
  2. Combine Ingredients: Add the sliced fruit, red grapes, wine, brandy.
  3. Cover & Refrigerate: Refrigerate for at least 4 hours before serving. Sangria is meant to be chilled and it allows the fresh fruits to infuse the wine and enhance the flavor.
  4. Add the Fizz: For maximum sparkle add the fizz right before serving.
  5. Serve: Pour into festive holiday glasses and enjoy! Optionally, serve over ice.

Garnish by rimming the glasses with cinnamon sugar and fresh cranberries on toothpicks, or make it extra festive with these sugared cranberries. You can also garnish this sangria with cinnamon sticks, pomegranate arils or sprigs of fresh rosemary.

Christmas Sangria Mimosas

Christmas Sangria Mimosas are a bubbly twist on this refreshing cocktail. Sangria mimosas are made with champagne (or your favorite prosecco) and the bubbly makes everything feel more festive!

Simply substitute the sparkling water with champagne, cava or prosecco. You can either swap out all the sparkling water with a 750 ml bottle of champagne or go half and half with a 350 ml bottle of champagne and 12 oz of sparkling water.

Since sangria has many flavors, there's no need splurge on the bubbly. I would, however, suggest you go for something with a flavor you enjoy and also I recommend a dry Brut. 

Fall and winter sangria with apples, oranges, pomegranate and cinnamon

Sangria Hacks

The beauty of a sangria is its flexibility! Try these unique twists to make this drink even more fun and festive.

  • Make it Spicy: Add jalapeño slices to give this cocktail some extra kick.
  • Different Liqueur: If you don't have any brandy try using an orange liqueur such as Cointreau, Grand Marnier or Triple Sec.
  • Add Different Fruit: Sangria work with many different fruits including leftover and frozen fruits. Try using berries, pears, pomegranate, cranberries, or your favorite fruit.
  • Sweeten it Up: If you like a sweeter sangria try sweetening it up with sugar, brown sugar, maple syrup or honey.

Don't be afraid to taste and adjust this Christmas sangria recipe to your liking. Enjoy the journey of finding the perfect balance for you!

Make Ahead of Time

You can make sangria up to 2 days in advance. Just store the sangria in an airtight container and refrigerate if you are planning to keep it in the fridge for more than 6 hours.

Fall and winter sangria with apples, oranges, pomegranate and cinnamon

Christmas Sangria

Yield: 8 servings
Prep Time: 10 minutes
Additional Time: 4 hours
Total Time: 4 hours 10 minutes

Christmas Sangria is the best cocktail for holidays, parties, and celebrations. Perfect for Thanksgiving, Christmas and New Years (Eve & Day!), it's a fantastic cocktail to add to your holiday menu.

Ingredients

  • 1 bottle red wine
  • 2 shots brandy
  • Fruit - sliced oranges, limes, green apples (about one each), a handful of red grapes (frozen, if you prefer)
  • 24 oz Sparkling soda water or champagne

Instructions

  1. Put fruit in the bottom of a serving pitcher. Add red wine and brandy, stir gently. Refrigerate for 4 - 24 hours. When ready to serve, stir in the soda and pour into glasses with a little ice and fruit in each glass.

Notes

Make it a Christmas sangria mimosa by substituting the sparkling water with champagne.

Nutrition Information:
Yield: 8 Serving Size: 1
Amount Per Serving: Calories: 181Total Fat: 0gSaturated Fat: 0gTrans Fat: 0gUnsaturated Fat: 0gCholesterol: 0mgSodium: 14mgCarbohydrates: 23gFiber: 2gSugar: 17gProtein: 1g

This data was provided and calculated by Nutritionix.

© Kristy Bernardo
Cuisine: Spanish / Category: Drinks
Christmas Sangria

More Festive Drink Recipes

  • 30 Champagne Cocktail Recipes
  • 20 Moscow Mule Variations
  • Pomegranate Mojito
  • Pomegranate Margaritas
  • Poinsettia Drink (Cranberry Mimosa)
  • White Christmas Cocktail with Bourbon

Coq au Vin

November 24, 2022 by Kristy Bernardo 2 Comments

Coq Au Vin Recipe with carrots, mushroom

Hearty and comforting, Coq au Vin is a French chicken stew slowly braised in red wine, pancetta (Italian bacon), mushrooms, onions and much more.

Coq au vin might sound fancy but it's easy enough to make for a Sunday dinner and decadent enough for a Christmas or Valentine's Day dinner. This dish will surely impress friends and family with its fancy name, interesting origins and delicious, layered, rich flavors.

Pot of Coq Au Vin

What is Coq au Vin?

Coq au vin is a hearty French chicken stew braised in red wine and garnished with mushrooms, onions, pancetta (Italian bacon) and much more. Its preparation is similar to Beef Bourguignon and the beauty of this dish lies in its simplicity.

Coq au Vin literally means "cock (rooster) with wine" in French, and was traditionally made from a whole cut-up old rooster to make the tougher meat edible. The stew started out as a peasant dish that originated in the Burgundy region of France. It was made with simple, inexpensive ingredients, that over time, evolved into more refined versions. Coq au Vin is pronounced cohk oh vah(n).

Coq au Vin Ingredients

Here's what you'll need to make this stew:

  • Chicken: Traditional Coq au Vin recipes call for a whole cut-up rooster but this recipe uses drumsticks and thighs. The dark meat enhances the flavor while the meat remains tender and succulent.
  • Coarse Salt & Freshly Ground Black Pepper: The salt enhances flavor while the pepper adds flavor.
  • Chicken Stock: The stock adds a richer flavor than chicken broth.
  • Red Wine: Traditionally this dish is made with Burgundy or Pinot Noir but any light or medium bodied red wine will work. Other popular choices include merlot, zinfandel, shiraz, côtes du rhône or beaujolais. You don't need to use an expensive bottle but rather focus on a wine varietal you enjoy drinking.
  • Brandy: Brandy aids in the braising process while adding fruity flavors and oaky notes.
  • Bay Leaf: The bay leaf enhances the flavor of the sauce.
  • Pancetta: Pancetta is Italian bacon where it cured instead of smoked. Bacon absolutely works too. The Pancetta or bacon should be cut into lardons (fancy word for slices). About ¼-inch thick to 1-inch long, the thicker the better.
  • Mushrooms: This recipe uses Cremini aka baby bellas but you also use button, portobello, shitake or your favorite wild mushroom.
  • Yellow Onion: These onions have a mild sweet flavor that add to the sauce.
  • Carrots: Cut them into bite sized pieces or leave them out, if you prefer.
  • Garlic Cloves: Garlic just makes everything better.
  • Tomato Paste: Tomato paste makes the sauce thicker, adds flavor and helps balance the bitterness from the red wine.
  • All-purpose Flour: This is what thickens the sauce.
  • Fresh Thyme: More for garnish, if desired. Fresh parsley works well too.
  • Pearl Onions:  These onions add a savory, sweet, and slightly less pungent flavor than larger onions.

(Scroll down to the bottom for the printable recipe card with exact measurements and recipe instructions.)

How to Make Coq au Vin

Braising & Marinating

  1. Marinate Chicken: Marinate the chicken at least 4 hours or up to 24 hours. For the best flavor marinate overnight.
  2. Dry Chicken, Save Wine: Pat the chicken dry while reserving the wine.
  3. Cook Pancetta & Sear Chicken: Cook the pancetta and then sear the chicken on both sides until golden brown.

Coq au Vin Stew

Coq au vin is best cooked in a Dutch oven or cast iron braising dish.

  1. Sauté Mushrooms: Sauté the ingredients separately starting with the mushrooms in the bacon fat
  2. Onions, Carrots, Garlic: Add the onions, carrots and garlic.
  3. Tomato Paste & Flour: Enhance the flavor with the tomato paste and thicken the sauce with the flour.
  4. Reserve Marinade: Slowly stir in the marinade and bring to boil.
  5. Chicken, Thyme, Pancetta: Reduce the heat and bring to simmer while adding the remaining ingredients.
  6. Pearl Onions: Uncover the pot and add the pearl onions after an hour of simmering.
Best Coq Au Vin

Variations & Cooking Tips

  • Substitute chicken broth or stock for half of the wine for a milder flavor or if you simply prefer less wine.
  • Although not as flavorful but more convenient and quicker, substitute skinless/boneless thighs by adjusting the cooking time to about half as boneless chicken does not take as long to cook.
  • Garnish with bread croutons.
  • Coq au Vin Blanc or Poulet au Vin Blanc: If you prefer white wine you can make this dish with a white wine. A dry white wine is best such as a Sauvignon Blanc, Pinot Gris, or Pinot Blanc.
  • Turkey au Vin: Perfect for Thanksgiving leftovers, simply substitute chicken for turkey with this dish.

What to Serve with Coq au Vin

Coq au vin is traditionally served with mashed potatoes and is delicious with anything that can soak up all the delicious sauce.

  • French bread
  • Hasselback Baked Potatoes
  • Mashed Cauliflower
  • Scalloped Potatoes
  • Smashed Brussels Sprouts
  • Green Beans Almondine
Coq Au Vin in a Pan

Storage & Freezer Tips

Leftovers can be refrigerated and stored in an airtight container for up to 5 days or you can freeze for up to 3 months. If frozen, defrost overnight in the fridge before reheating.

How to Reheat

Optionally, before reheating, spoon off any solidified fat on the surface.

Coq au Vin can be reheated on a stove over a medium-low heat, stirring occasionally and adding more stock or wine, as needed. The stew can also be reheated in an oven at 350ºF, until heated through (about 30 minutes).

Although the results won't be as good, a microwave can also be used in a pinch. This method is best for small or individual servings. Place the stew in a covered microwave-safe bowl and heat in 30 second bursts, stirring in between.

Coq Au Vin in a Pan

Coq au Vin

Yield: 4-6 servings
Prep Time: 10 minutes
Cook Time: 2 hours
Additional Time: 4 hours
Total Time: 6 hours 10 minutes

Coq au Vin has a rich sauce with loads of flavor. This isn't a recipe for a weeknight as it needs to spend a good amount of time marinating then simmering on the stove. It is, however, quite simple to make and is perfect for a Sunday dinner or an elegant-yet-easy dinner party. Serve over mashed potatoes.

Ingredients

  • 3 lb chicken legs and thighs
  • 1 ½ teaspoon coarse salt, divided
  • ¼ teaspoon freshly ground black pepper
  • ½ cup chicken stock
  • 2 ½ cups red wine
  • 2 tablespoon brandy
  • 1 bay leaf
  • 4-6 oz pancetta, lardons (or bacon)
  • 1 lb cremini mushrooms, thickly sliced
  • 1 large yellow onion, chopped
  • 2 large carrots, cut into bite-sized pieces
  • 4 garlic cloves, minced
  • 1 tablespoon tomato paste
  • 1 tablespoon all-purpose flour
  • 3 sprigs fresh thyme (more for garnish, if desired)
  • 8 oz frozen pearl onions, thawed
  • more salt and pepper to season, if necessary

Instructions

  1. Place the chicken in a large bowl and season it with the salt and the pepper. Add the chicken stock, wine, brandy, and the bay leaf to the bowl, then combine it all gently with clean hands. Cover the bowl and refrigerate at least 4 hours and up to 24 hours.
  2. Remove the chicken from the marinade and pat it dry, reserving the marinade.
  3. Preheat a large dutch oven over medium heat. Add the pancetta and cook, stirring occasionally, until it's well-browned. Remove the pancetta with a slotted spoon and set it aside.
  4. Turn the heat up to medium-high. Place the chicken pieces skin-side down into the pot and cook until it's nicely browned, about 5 minutes. Flip to brown the other side and cook about another 3 minutes. (Do this in batches if necessary). Remove the chicken and set it aside, then drain all but 3 tablespoon of the fat from the pot.
  5. Add the mushrooms to the pot and cook, stirring occasionally, until all their liquid has released and evaporated and the mushrooms are starting to brown, about 5-6 minutes.
  6. Turn the heat back down to medium. Add the chopped onion and carrots to the pot and cook, stirring occasionally, until the onions are just starting to brown, about 5 minutes. Add the garlic to the pot and cook, stirring frequently, about 1 more minute.
  7. Add the tomato paste and flour to the pot and cook for another minute, stirring frequently.
  8. Pour about a cup of the reserved marinade into the pot and stir to scrape up any browned bits at the bottom. Add the remaining marinade. Bring it to a boil and cook for about 10 minutes, or until it's reduced by almost half.
  9. Reduce the heat to low. Add the chicken, thyme sprigs, and reserved pancetta to the pot, submerging it as much as possible in the sauce. Cover the pot and simmer for an hour.
  10. Uncover the pot and add the pearl onions. Cook uncovered for about another 30 minutes or until the sauce has thickened.

Notes

The Pancetta or bacon should be cut into lardons (fancy word for slices). About ¼-inch thick to 1-inch long.

Feel free to simmer this much longer in the final step if you have more time before dinner. I've simmered it as long as 2 hours (once the sauce is at the perfect stage, cover it so it doesn't reduce more). It's perfectly delicious at just 30 minutes, however!

Nutrition Information:
Yield: 6 Serving Size: 1
Amount Per Serving: Calories: 1209Total Fat: 84gSaturated Fat: 28gTrans Fat: 0gUnsaturated Fat: 49gCholesterol: 398mgSodium: 977mgCarbohydrates: 16gFiber: 2gSugar: 6gProtein: 74g

This data was provided and calculated by Nutritionix.

© Kristy Bernardo
Cuisine: French / Category: Dinner
Coq au Vin

Easy Dry Rub for Ribs - 5 Fabulous Spices!

November 24, 2022 by Kristy Bernardo 15 Comments

This is the BEST dry rub for ribs - and just five ingredients!

This is the BEST dry rub for ribs - and just five ingredients! Brown sugar, smoked paprika, coarse salt, freshly-crushed black peppercorns and some garlic powder to bring it all together.

This is the BEST dry rub for ribs - and just five ingredients!

If you have never tried using a dry rub seasoning for ribs and barbecue, you're in for a treat; rubs can be simple, like this five-ingredient recipe below or they can be elaborate 12-ingredient blends. If you're making a rub for the first time, simpler is better but it won't be long before you begin experimenting and adding your own optional ingredients.

What is the key to a good rub? In many cases a combination of sweet and salty. Our version has brown sugar and smoked paprika together along with peppercorns, garlic powder, and salt. The brown sugar brings just enough sweetness to the blend to enhance the flavor without overpowering the meat.

The exterior of dry rub ribs begin to form a crisp crust when exposed to heat. This crust is called the "bark," and it provides the backbone to the tender ribs.

Which Is Better, Dry Rub Or Marinades?

Some people swear by a dry rub for ribs and other dishes, but some prefer a marinade. Is there an advantage? Marinades are often acidic and can be used to tenderize meat. If you marinate a more delicate cut of meat it is crucial to time it well--too long in the marinade and a piece of seafood could get tough.

A rub is good for any meat you don't need to tenderize with a marinade, and there are those who feel a rub is best added just before cooking. And with that in mind, a rub could be the less time-consuming option if you have a busy kitchen or grill to deal with when preparing your meal.

How To Apply The Dry Rub For Ribs

To begin, don't confuse a dry rub with a dry brine. The difference between the two is that a dry brine is rinsed off after having coated the meat for an extended period of time. Dry rubs do NOT get washed off. They are cooked with the rub still on the food.

  1. Remove the membrane from ribs (quick guide here).
  2. Blot the meat dry with paper towels.
  3. Use the "wet hand/dry hand" method. Use one hand to apply the seasoning and the other to thoroughly rub it into the meat.
  4. You can coat the ribs with olive oil or mustard first to help it stick, if you prefer.
  5. Apply the rub to the top side or both sides of the rib racks and generously or not. This is to preference, whether you prefer a very flavorful exterior which can be too powerful for some and delicious to others.

The recipe below comes together very quickly, and applying it to the meat is just as easy. The trick to remember with a dry rub is that the more it is rubbed into the meat, the better the flavor. You want to dust the surface of the ribs lightly with the rub; avoid over-coating the meat for best results.

How Long To Dry Rub Ribs?

As a general rule wait at least fifteen minutes prior to cooking and two hours if you can. This will enhance the flavor and create a delicious crust. Ribs can sit in dry rub overnight, up to 12 hours. Any longer and you risk drying them out. Always refrigerate rubbed meat during this process.

Smoked Paprika

The recipe below specifies smoked paprika, which adds some extra flavor to the ribs. If you need to use regular paprika instead, feel free to switch them and you can always add a bit of natural liquid smoke from burning hardwood to your barbecue sauce if you're missing that smoky component.

Those who make their ribs on the grill likely won't opt for that, but if you're baking the ribs it may be worth considering.

Glaze

You don't have to glaze a rack of dry-rubbed ribs, but some do like to apply a glaze to chicken after a dry rub. The presence of the glaze isn't "cheating" because it isn't dry. It's more of a finishing touch. Some enjoy a glaze made of equal parts maple syrup and soy sauce but you'll find your own ratio and flavor combinations to use with the rub with a little experimentation.

Dry Rub for Ribs     

The amount of dry rub in this recipe is enough to cover the top of a large rack of ribs; if you prefer more rub to your ribs then, by all means, double the spices--especially if you're not planning on finishing your ribs with a good barbecue sauce. You can serve these dry rub ribs with no sauce, but some will want it no matter how good the ribs themselves may be.

This is the BEST dry rub for ribs - and just five ingredients!

Dry Rub for Ribs

Yield: about ½ cup
Prep Time: 5 minutes
Total Time: 5 minutes

This recipe will make enough for a thick coating on the top of a large rack of meaty ribs. If you prefer your rub on both sides of your ribs (or just like a LOT of rub, feel free to double the recipe).

Ingredients

  • 3 tablespoons light Brown Sugar
  • 1 tablespoon kosher salt
  • 1 ½ tablespoons crushed black peppercorns
  • 1 ½ tablespoons smoked paprika
  • 2 teaspoons garlic powder

Instructions

  1. Mix all ingredients together. Rub over 2 racks of ribs and prepare ribs as desired.
  2. Refrigerate for at least 2 to 4 hours and up to 12 hours.

Notes

It's ok to substitute smoked paprika for regular paprika. Add a bit of liquid smoke to your barbecue sauce if you’re missing that smoky component.

Store any leftover dry rub in a cool dark place. Dry rubs are generally good for six months.

Nutrition Information:
Yield: 8 Serving Size: 1
Amount Per Serving: Calories: 25Total Fat: 0gSaturated Fat: 0gTrans Fat: 0gUnsaturated Fat: 0gCholesterol: 0mgSodium: 475mgCarbohydrates: 6gFiber: 1gSugar: 4gProtein: 0g

This data was provided and calculated by Nutritionix.

© Kristy Bernardo
Cuisine: American / Category: Seasonings
Easy Dry Rub for Ribs - 5 Fabulous Spices!

How to Cook Ribs in the Oven – Tender, Juicy & Easy

November 24, 2022 by Kristy Bernardo 21 Comments

a closeup of st louis style oven-baked ribs just out of the oven on a white plate

Learning how to cook ribs in the oven means you can enjoy tender, juicy, fall-off-the-bone ribs any time of year, with no grill required. With the right seasoning and low-and-slow cooking method, oven-baked ribs turn out just as tender and flavorful as those made outdoors.

A simple dry rub, a few hours in the oven, and a final brush of barbecue sauce under the broiler creates ribs that are smoky, caramelized, and perfect for serving with your favorite sides.

oven baked BBQ ribs with a rich, sticky glaze on a white plate, showcasing tender, flavorful meat perfect for barbecue lovers.

I make these oven-baked ribs with an easy rub for ribs that has just 5 spices in the mix. I love serving them with stuffed baked potatoes!

[feast_advanced_jump_to]

Ingredients

You really only need three ingredients for oven-baked ribs: a spice rub, barbecue sauce, and the ribs themselves. I like to cover the ribs in a thin layer of yellow mustard before adding the spice mix, too!

Ribs

  • 2 racks St. Louis style ribs: Baby back ribs can also be used, but they're leaner and cook faster (see time chart below).

Mustard (optional): Slather on some yellow mustard to help the spice mix stick better. You can also use a little cooking oil if you prefer.

Spice Rub (or use your favorite barbecue rub)

  • 3 tablespoons light brown sugar: adds sweetness and helps caramelize the crust.
  • 1 tablespoon kosher salt - enhances flavor throughout the meat.
  • 1 ½ tablespoons crushed black peppercorns - for a little bite.
  • 1 ½ tablespoons smoked paprika - gives a smoky depth without the grill.
  • 2 teaspoons garlic powder - adds savory balance.

Barbecue Sauce

  • This pomegranate-chipotle barbecue sauce is our favorite! Any will work (homemade or store-bought). Brush it on before broiling for a sticky, caramelized finish.
a platter of st louis style barbecue ribs just out of the oven on a white plate that's on a wooden table

How to Cook Ribs in the Oven

Learning how to cook ribs in the oven is an easy process that you'll have down after doing it just once. Here are the easy steps:

  1. Preheat the oven: Set the oven to 300°F. Line a large baking sheet with foil for easy cleanup.
  2. Prep the ribs: Remove the thin membrane from the bone side (this helps the seasoning soak in and keeps the ribs tender). Pat them dry with paper towels.
  3. Season generously: Cover the ribs with a thin layer of yellow mustard. Rub the ribs all over with the dry rub, massaging it into the meat. Place the ribs on the foil-lined baking sheet (you can cut the ribs in half or quarters to make them fit easier).
  4. Cover and bake: Lay a piece of foil loosely over the ribs and crimp it around the edges. Bake the ribs until the meat is tender and starting to pull back from the bones, about 2 ½-3 ½ hours depending on how thick they are. Start checking at the 2-hour mark.
  5. Sauce the ribs and broil: Remove the foil and brush the ribs generously with barbecue sauce. Broil on high for 5 minutes or so, or until the sauce is caramelized and sticky to your liking.
  6. Rest and serve: Let ribs rest a few minutes before slicing between the bones. Serve with extra BBQ sauce and your favorite sides.
a slab of st louis style ribs on a cutting board covered in a spice rub, for step 2 in how to cook ribs in the oven

Oven Ribs Cooking Time & Temperature Chart

We recommend cooking ribs in the oven at 300F or lower to get the best results. We've included higher temperatures for reference but can't guarantee the same tender ribs.

Please remember that these cooking times are dependent on how thick your ribs are, so adjust as necessary. The biggest advantage of knowing how to cook ribs in the oven is that you can control the temperature and get perfectly consistent results every time.

Oven TemperatureBaby Back RibsSt. Louis Ribs
225 °F Degrees5 Hours6 Hours
250 °F Degrees4 Hours5 Hours
300 °F Degrees2 ½ - 3 Hours2 ½ - 3 ½ Hours
350 °F Degrees2 Hours2 ½ Hours
400 °F Degrees1 Hour1 ½ Hours
450 °F Degrees45 Minutes1 Hour

Tips

  • Remove the membrane: Taking off the thin layer on the back of the ribs allows the seasoning and sauce to soak in. Plus the ribs will be much more tender, so this small step makes a big difference!
  • Low and slow is key: Cooking at a lower temperature for a longer time gives you juicy, fall-off-the-bone ribs.
  • Check for doneness by look, not just time: The meat should pull back from the bones and a toothpick should slide in easily. Internal temperature should be 185-200°F for tender ribs.
  • Use a dry rub for flavor: Even if you plan to sauce the ribs, a rub adds a lot of flavor and helps form a tasty crust.
  • Add the sauce at the end: Brushing on barbecue sauce during the last few minutes prevents it from burning while still giving you that sticky, caramelized finish.
  • Let them rest: Allow the ribs to sit for a few minutes before slicing to lock in the juices.
  • Line your pan with foil: Makes cleanup much easier, especially once the sauce caramelizes under the broiler.
How to Cook Ribs in the Oven – Tender, Juicy & Easy

Substitutions & Variations

  • Rib types: This recipe is written for St. Louis style ribs, but baby back ribs also work (just adjust the cook time using the chart). Beef ribs can be used, though they'll need longer cooking times.
  • Dry rub: Use a store-bought barbecue rub if you don't want to mix your own. For a smoky flavor, add chipotle powder or extra smoked paprika. For a little more sweetness, increase the brown sugar.
  • Sauce options: Any barbecue sauce you love will work! You can also serve these oven-baked ribs with just the rub and no sauce.
  • Liquid smoke: If you want more of that outdoor barbecue taste, mix a few drops of liquid smoke into your barbecue sauce.
  • Cooking method: Instead of finishing under the broiler, finish the ribs on a grill over a high heat for a few minutes to add a charred, smoky flavor.
  • Spicy ribs: Add cayenne or chili powder to your rub or sauce for spicier ribs.
  • Keto-friendly option: Swap brown sugar for a low-carb sweetener like Swerve in the dry rub, and choose a sugar-free BBQ sauce.

Equipment Needed

  • A baking sheet (or two) that's sturdy enough to hold two racks of ribs.
  • Aluminum foil for covering ribs while they bake and lining the pan for easy cleanup.
  • A sharp knife to loosen and remove the membrane.
  • Paper towels to help grip the membrane when pulling it off and to pat the ribs dry.
  • A mixing bowl for mixing the dry rub.
  • A pastry brush for applying barbecue sauce evenly before broiling.
  • A meat thermometer to make sure the ribs reach an internal temperature of 185-200°F.
  • Tongs to safely handle the hot ribs.
a closeup of st louis style oven-baked ribs just out of the oven

Storage & Reheating

  • Refrigerator: Store any leftover ribs in an airtight container or wrap them tightly in foil. They'll keep for 3-5 days.
  • Freezer: Ribs can be frozen for 2-3 months. Wrap them in foil, then place in a freezer-safe bag or container. Thaw them overnight in the fridge before reheating.
  • Oven reheating (best method): Preheat to 250°F, brush ribs with extra BBQ sauce to keep them moist, wrap them in foil, and heat for 20-30 minutes, or until they're warmed through.
  • Air fryer: Reheat the ribs at 350°F for 5-8 minutes (brush with extra barbecue sauce before heating).
  • Microwave: Place the ribs in a microwave-safe dish, cover, and heat in 30-second increments just until they're hot. Don't overheat them or they can dry out.

Tip: Add a little extra barbecue sauce before reheating to prevent the ribs from drying out.

Frequently Asked Questions

What temperature is best for how to cook ribs in the oven at home?

We recommend cooking your ribs in the oven at 300F for that sweet spot between cooking time and tender, juicy ribs. See the cooking chart above for more temperature and cooking times.

How do I know when ribs cooked in the oven are done?

Ribs are ready when the meat has pulled back from the ends of the bones, a toothpick slides in easily, and the internal temperature is between 185-200°F.

Do I really need to remove the membrane?

The thin membrane on the back of the ribs can make them tough and chewy. Removing it also lets any seasonings and sauce soak in better.

Can I make oven-baked ribs ahead of time?

Yes, just cook the ribs until they're tender, let them cool, then wrap them in foil and refrigerate. Before serving, brush them with the barbecue sauce and reheat them in the oven for 20-30 minutes, then run them under the broiler to caramelize the sauce.

What's the difference between St. Louis style ribs and baby back ribs?

St. Louis style ribs are larger, meatier, and take longer to cook, while baby back ribs are smaller, leaner, and cook faster. Both can be cooked in the oven using the time chart above.

Should I cook ribs covered or uncovered?

Start by covering ribs with foil so they stay moist while they're baking. Remove the foil at the end and broil with barbecue sauce to caramelize.

Can I make ribs without barbecue sauce?

Yes, just season with a dry rub and bake as directed. They'll develop a tasty crust on their own, and you can also serve sauce on the side for dipping.

Once you learn how to cook ribs in the oven, you'll be able to enjoy barbecue-style flavor all year round, no matter the weather!

Related

Looking for more recipes like this one? Try these:

  • a pork butt sits on the smoker
    Smoked Pork Butt Recipe (Tender, Juicy & Full of Flavor!)
  • Blackened Salmon with Roasted Tomatoes just out of the oven on a cast iron pan
    Blackened Salmon with Roasted Tomatoes
  • Broiled Salmon with Honey and Garlic - just 5 ingredients and SO flavorful!
    Broiled Salmon with Honey and Garlic
  • Tomahawk Steak Recipe
    Tomahawk Steak Recipe

Pairings

These are my favorite dishes to serve with ribs cooked in the oven:

  • potato wedges
    Crispy Baked Potato Wedges
  • loaded cheddar, chive & bacon mashed potatoes
    Loaded Mashed Potatoes
  • Sauteed Green Beans and Mushrooms
    Sauteed Green Beans and Mushrooms
  • Easy Sweet Corn Cake Recipe
    Mexican Sweet Corn Cake - Soft, Buttery & Scoopable!
a closeup of st louis style oven-baked ribs just out of the oven on a white plate

How to Cook Ribs in the Oven

Yield: 4-6 servings
Prep Time: 15 minutes
Cook Time: 2 hours 30 minutes
Total Time: 2 hours 45 minutes

Once you make ribs in the oven, you'll be making them all year long. They're so simple with minimal cleanup and will rival any made on the grill!

Ingredients

  • 2 racks St. Louis style ribs
  • Salt and pepper
  • ¼-1/2 cup yellow mustard
  • 2 cups barbecue sauce

Dry Rub (or use your favorite store-bought rub)

  • 3 tablespoons light Brown Sugar
  • 1 tablespoon kosher salt
  • 1 ½ tablespoons crushed black peppercorns
  • 1 ½ tablespoons smoked paprika
  • 2 teaspoons garlic powder

Instructions

  1. Preheat the oven to 300ºF. Line a large sheet pan with foil.
  2. Remove the membrane from the bony, back side of the ribs.
  3. Pat the ribs dry with paper towels and place on the foil-lined baking sheet.
  4. Rub the top and sides with a thin layer of the mustard. Sprinkle the dry rub over the ribs, covering them completely.
  5. Cover the ribs with foil and crimp the edges of the pan to make it's sealed.
  6. Bake the ribs until the bone starts to be exposed, about 21/2-3 hours. Start checking after two hours.
  7. Remove the aluminum foil and slather the ribs in barbecue sauce (reserve some to be served on the side, if desired).
  8. Broil on high for 5 minutes or so to caramelize the the sauce.
  9. Let the ribs rest a few minutes, then slice between the bones and serve.
Nutrition Information:
Yield: 6 Serving Size: 1
Amount Per Serving: Calories: 235Total Fat: 4gSaturated Fat: 1gTrans Fat: 0gUnsaturated Fat: 2gCholesterol: 6mgSodium: 1998mgCarbohydrates: 48gFiber: 3gSugar: 37gProtein: 4g

This data was provided and calculated by Nutritionix.

© Kristy Bernardo
Cuisine: American / Category: Dinner
How to Cook Ribs in the Oven – Tender, Juicy & Easy

Loaded Mashed Potatoes

November 23, 2022 by Kristy Bernardo 47 Comments

loaded cheddar, chive & bacon mashed potatoes

These Cheesy Chive Bacon Loaded Mashed Potatoes are smooth and creamy loaded with 2 different kinds of cheese, bacon and chives!

This is an easy make-ahead dish as well as a creative solution for what to do with leftover mashed potatoes. Take your mashed potato game up a notch with this loaded recipe.

Best Loaded Mashed Potatoes

Why You'll Love These Loaded Mashed Potatoes

These potatoes - these mashed potatoes! - are such a rich indulgence and there is no resisting these once they're out.

  • Simplicity: Mashed potatoes in general are just simple to make and this loaded mashed potato casserole is perfect for any home chef.
  • Everything is Better with Bacon (& Cheese): Crispy, salty bacon is the candy bar of meats and the only thing better is a cheesy bacon flavor.
  • Make Ahead: This recipe is ideal for making up to 2 days ahead off of Thanksgiving, Christmas or any big feast.
  • Perfect Year-Round: This is perfect side dish from a family gathering and summer BBQ to a holiday potluck and on a Thanksgiving dinner table.
  • Delicious as a Leftover Mashed Potato Recipe: You can easily transform your leftover mashed potatoes from a holiday meal or Sunday dinner into this easy side dish. Just skip the first 2 steps and start at step 3 from the recipe card below!

Loaded Mashed Potato Ingredients

These ingredients take this loaded side dish to the next level of deliciousness!

  • Russet Potatoes: Getting the potatoes right is important, and that means Russets or Yukon Golds. Consider using a combination of both for a taste of starchy and waxy potatoes.
  • Bacon Crumbles: Preferably make your own bacon crumble (try this bacon on a grill hack) but ready-made bacon bits can be used in a pinch. See a quick bacon crumble how-to below.
  • Sharp Cheddar Cheese: Shredded cheddar cheese adds a classic loaded mashed potato flavor. Freshly shredded or use a pre-shredded variety.
  • Cream Cheese: The tangy, creamy flavor really enhances this side dish.
  • Sour Cream: Full-fat versions tastes best, but lower fat sour cream or even plain Greek yogurt, works as well.
  • Fresh Chives: Adds a pop of color, flavor and freshness.
  • Unsalted Butter: This recipe calls for Kosher salt so unsalted butter allows more control over the type and amount of salt added. This recipe is loaded so use the any butter or salt in your pantry, if you prefer.
  • Kosher Salt & Freshly Ground Pepper: Add kosher salt and freshly ground pepper, to taste. The perfect complement to potatoes.

 Sliced jalapeños or another chili variety is always a great idea for an extra kick!

How to Make Loaded Mashed Potatoes

(Scroll down to the bottom for the printable recipe card with exact measurements and recipe instructions.)

  1. Peel and cook and boil the potatoes.
  2. Mash the potatoes in a pan until light fluffy.
  3. Add the loaded ingredients.
  4. Bake until slightly golden brown.
  5. Garnish and serve
Loaded Mashed Potato Casserole

How to Make Bacon Crumbles

Start with quality bacon!

  1. Partially freeze the bacon.
  2. Stack the bacon strips directly on top of one another and cut the bacon strips into lardons (fancy word for slices). About ¼-inch thick to 1-inch long.
  3. Place the bacon into a medium-hot skillet and stir as it cooks to break the bacon apart.

Make Ahead of Time

This loaded mashed potato casserole can be made the night before and up to 2 days in advance.

  1. Simply follow the recipe card (steps 1-3) and boil the potatoes, mash the potatoes in a baking dish and add the the loaded mix-ins. Let the potatoes completely cool before adding the mix-ins and storing.
  2. Cover with plastic wrap or foil and place in the fridge for up to 2 days.
  3. Remove from the fridge 30 minutes before cooking.
  4. Complete Step 4 in the recipe card. Add remaining cheese and bake until top is slightly golden and potatoes are heated through, about 30 minutes. Garnish with bacon bits and chives.

How to Reheat Loaded Mashed Potatoes

Store leftover loaded potatoes in an airtight container in the refrigerator for up to 4 days.

Leftovers can be reheated in an oven, stove top, slow cooker and even a microwave for individual servings or in a pinch. To reheat them, it's best to let them sit for about 30 minutes.

The best way to reheat mashed potatoes is with a low heat on a stove top. If using an oven, preheat the oven to 350°F, place the potatoes in a baking dish and heat for 15-30 minutes or until warmed through. The microwave is best for small portions and should be placed in a microwave-safe bowl and reheated in 30-second bursts until warmed through.

Loaded Mashed Potatoes

Loaded Mashed Potatoes

Yield: 12 servings
Prep Time: 10 minutes
Cook Time: 50 minutes
Total Time: 1 hour

If you love loaded baked potatoes, you’ll love these loaded mashed potatoes with bacon, cheddar cheese, cream cheese, butter, sour cream, and chives.

Ingredients

  • 5 pounds russet potatoes
  • 1 lb bacon, cooked and crumbled
  • 1 8 ounce package cream cheese, softened
  • ½ cup unsalted butter, melted
  • 1 cup sour cream
  • 8 chives stalks, minced (about ¼ cup)
  • 3 cups shredded sharp cheddar cheese, divided
  • 2 teaspoons kosher salt
  • ½ teaspoon freshly ground black pepper

Instructions

  1. Preheat oven to 350°F. Peel potatoes, and cut into 1-inch chunks. Place in a large saucepan, and add enough cold water to cover by about 2 inches. Bring to a boil over medium-high heat, and reduce to a simmer. Cook until tender and easily pierced with a paring knife, about 20 minutes. Transfer to a colander to drain; return to pan, cover, and set aside.
  2. Using a fork, mash the potatoes in pan until light and fluffy (putting them through a ricer or food mill will get the best results).
  3. Add the cream cheese, butter, and sour cream, and stir until combined and smooth. Add two cups cheddar cheese, half the bacon, salt, and pepper.
  4. Transfer to a greased baking dish. Top with remaining ½ cup cheese. Bake until top is slightly golden and potatoes are heated through, about 30 minutes. Remove from oven; garnish with chives and remaining bacon.

Notes

To make these on the grill as I did, simply place the dish alongside whatever you're grilling on the cool side of the grill with the lid down to heat through and melt the cheese (20-30 minutes). The burner underneath the dish should be turned to off. If making the dish ahead of time, bring to room temperature before baking.

Nutrition Information:
Yield: 12 Serving Size: 1
Amount Per Serving: Calories: 647Total Fat: 41gSaturated Fat: 20gTrans Fat: 0gUnsaturated Fat: 17gCholesterol: 116mgSodium: 1124mgCarbohydrates: 44gFiber: 4gSugar: 4gProtein: 26g

This data was provided and calculated by Nutritionix.

© Kristy Bernardo
Cuisine: American / Category: Sides
Loaded Mashed Potatoes

Try the side dishes next:

  • Mashed Potatoes
  • Creamed Onions
  • Crispy Smashed Potatoes
  • Sweet Potato with Marshmallow Pecan
  • Green Beans Almondine
  • Smashed Brussels Sprouts

Crispy Baked Buffalo Wings

November 22, 2022 by Kristy Bernardo 24 Comments

Why fry when you can have Baked Chicken Wings that are just as crispy with tender, juicy meat, too? A 2-ingredient sauce makes it even better!

These crispy baked buffalo wings are everything you love about the classic - tangy, spicy, and finger-licking good - without the mess of deep frying. With only a few simple ingredients, you'll get perfectly crispy skin and juicy meat, tossed in a quick 2-ingredient buffalo sauce. Ideal for game day, parties, or an easy weeknight meal!

🕒 Prep Time: 10 mins | ⏳ Cook Time: 40 mins | 🔥 Cooking Method: Oven | 🍗 Serves: 4-6 | 🌶️ Flavor: Classic Buffalo

buffalo wings just out of the oven are in a vintage metal dish lined with parchment paper next to a small dish of blue cheese dressing

Why You'll Love These Buffalo Wings

  • Crispy without the deep fryer - These baked buffalo wings come out perfectly crispy thanks to the high heat of your oven. Why deal with deep frying if you can get the same results without the mess?
  • Classic buffalo flavor - Tossed in a 2-ingredient buffalo sauce made with hot sauce and melted butter, these wings are tangy, spicy, and perfectly delicious. We have other must-try chicken wing flavors, too, so add another flavor if you're serving a crowd!
  • Easy to make - With just a few basic ingredients, this recipe is incredibly simple - just bake, toss, and serve. It's just as easy as the method we use for our easy baked lemon pepper wings!
  • Perfect for parties - If you're hosting a Super Bowl bash, a backyard BBQ, or just having friends over for game night, these wings are always a hit. You can easily double (or triple!) the batch to feed a crowd.
  • Oven and air fryer friendly - Prefer to use your air fryer? No problem! These wings work well in both the oven and air fryer, giving you crispy results no matter how you prefer to cook them.

Oven Baked vs Air Fryer Wings

If you know how to cook wings right (or just follow this recipe) you can get juicy, super crispy wings using an air fryer or oven. The forced circulating hot air of an air fryer does make it easier and air fried chicken wings cook 3 times faster than a conventional oven.

The oven, however, wins for cooking large amounts of wings (about 1 lb or more) due to the size limitations of an air fryer. You don't want to overcrowd chicken wings as it can result in unevenly cooked wings and cooking wings in batches with an air fryer is not ideal.

If you're set on using your air fryer, we can teach you how to cook frozen wings in the air fryer!

crispy baked buffalo wings are in a vintage metal dish lined with parchment paper next to a small dish of blue cheese dressing

Ingredients You'll Need

Baking chicken wings only requires two ingredients: Wings and cooking oil. This recipe is for buffalo hot sauce recipe but you can use any sauce, dry rub seasoning or leave them "naked" and just follow the cooking instructions.

  • Chicken Wings: Use fresh or thawed frozen drumettes and wingettes.
  • Cooking Oil (Olive, Avocado, Vegetable or Cooking Spray): The oil creates that crispy texture that makes chicken wings so irresistible. For a healthier version and still get super crispy wings, substitute the oil for aluminum free baking powder.
  • Kosher Salt & Freshly Ground Pepper (optional): This is for the buffalo sauce, feel free to season as you prefer.

(Scroll down to the bottom for the printable recipe card with exact measurements and recipe instructions.)

How to Make Baked Buffalo Wings

  • Dry the wings: One of the secrets to crispy wings is to remove as much moisture from the wings before baking.
  • Bake the Wings: Place the wings skin side up on a wire rack and bake for 40-50 minutes. The wings should reach an internal temperature of 165°F.
  • Toss in Sauce: Toss the wings in the buffalo sauce but keep about a ¼ of the sauce in reserve for dipping.
spicy baked chicken wings are in a vintage metal dish lined with parchment paper next to a small dish of blue cheese dressing

How to Make Homemade Buffalo Sauce

Buffalo sauce is easily made with equal parts of hot sauce and melted butter. Simply add the two ingredients to saucepan and stir it occasionally until the butter is melted and the sauce is smooth. Sometimes I'll add a smidge of garlic powder or cayenne but try starting with just those two ingredients first to see how you like it.

  • Hot Sauce: You can't go wrong with Frank's RedHot Sauce but use any brand of hot sauce that you prefer.
  • Butter: Butter adds a layer of richness to the buffalo sauce.
  • Cayenne Pepper (optional): If you want to turn up the heat even more, add some cayenne pepper. You can also skip the cayenne pepper and go with Frank's Red Hot Cayenne Pepper Hot Sauce.
  • Garlic Powder (optional): Add a powerful bite with a smidge of garlic powder.

Variations & Cooking Tips

  • You can use any sauce, dry rub or seasoning you like.
  • Use a wire rack so air flows underneath the wings and gets them extra crispy.
  • The wings will be crispier with less moisture. Dry the wings with papers towels by blotting and firmly pressing on the wings.
  • Baking powder is a great hack if you prefer not to use oil and works well as a crisping agent. You won't taste the baking powder.
  • For extra crispy wings set the oven to "warm" after they're done.
  • Line your pan with foil to catch the drippings.
  • Use the instructions for these easy smoked wings and toss in the buffalo sauce at the end. So incredibly good!

These baked buffalo wings are perfect for game day parties including the Super Bowl. Make a big batch - they'll go quickly!

Why fry when you can have Baked Chicken Wings that are just as crispy with tender, juicy meat, too? A 2-ingredient sauce makes it even better!

Crispy Baked Buffalo Wings

Yield: 6
Prep Time: 10 minutes
Cook Time: 40 minutes
Total Time: 50 minutes

Crispy, baked buffalo chicken wings are easy to make, absolutely delicious and no need to hassle with the grease. Plus, without the deep frying, you get much healthier wings that are lower in fat and total calories!

Ingredients

Chicken Wings

  • 3 pounds chicken wing pieces
  • 2 tablespoons vegetable oil
  • Kosher salt & freshly ground black pepper

Buffalo Sauce

  • ½ cup Frank's Original Red Hot Sauce or your favorite sauce
  • ½ cup butter (melted)

Instructions

Chicken Wings

  1. Preheat oven to 400°F.
  2. Place a wire rack inside a baking sheet lined with foil. Toss chicken wings with vegetable oil, season with salt and pepper. Place wings in a single layer skin side up on top of rack. Bake for 40-50 minutes or until wings are browned and crispy.

Buffalo Sauce

  1. In a saucepan combine hot sauce and butter.
  2. Stir occasionally, until the butter is melted and the sauce is smooth.
  3. Toss cooked wings with 1 cup of the sauce, reserving the rest to serve at the table. Serve immediately.
    Nutrition Information:
    Yield: 6 Serving Size: 1
    Amount Per Serving: Calories: 867Total Fat: 72gSaturated Fat: 29gTrans Fat: 1gUnsaturated Fat: 37gCholesterol: 207mgSodium: 1171mgCarbohydrates: 21gFiber: 1gSugar: 2gProtein: 35g

    This data was provided and calculated by Nutritionix.

    © Kristy Bernardo
    Cuisine: American / Category: Appetizers
    Crispy Baked Buffalo Wings

    Air Fryer Frozen Chicken Wings

    November 22, 2022 by Kristy Bernardo Leave a Comment

    Air Fryer Frozen Chicken Wings Coated With Seasonings

    These air fryer frozen chicken wings are the ultimate easy snack or dinner - no thawing required! Just pop frozen wings straight into your air fryer and cook them until they're crispy and juicy in under 25 minutes. Customize them with your favorite sauces or dry rubs for a delicious wing night!

    a closeup of lemon pepper frozen chicken wings made in the air fryer

    Why You'll Love These Easy Air Fryer Frozen Chicken Wings

    Making wings in the air fryer straight from frozen is just one extra step and you don't need to defrost the wings before air frying. It's so convenient not to have to plan to defrost something for dinner!

    The air fryer is perfect for cooking 1 pound or less of chicken wings. If making a big batch, try cooking the chicken wings in an oven instead otherwise you'll need to cook the wings in batches. Try one of these crowd-pleasing chicken wing recipes for ideas!

    Ingredients You'll Need

    To cook air fryer frozen chicken wings you only need two ingredients: Wings and cooking oil.

    • Chicken Wings: Use either bone-in or boneless wings. Uncooked store bought seasoned wings or plain chicken wings all work and Costco, Tyson, Foster Farms, Perdue or your favorite frozen chicken wing brand can be used.
    • Cooking Oil (Olive, Avocado or Cooking Spray): You could get by without the oil but it does help get that crispy texture that makes air fryer wings so irresistible. You can also substitute oil for aluminum free baking powder and still get super crispy wings.

    How to Cook Air Fryer Frozen Chicken Wings

    Defrost in the Air Fryer

    Set the air fryer to 400°F and cook the frozen block of wings for 6 minutes or until defrosted and enough to separate.

    Toss With Seasonings

    Toss the wings with just enough oil to coat and place back into the air fryer basket. If you're making "naked" wings, season them with salt after coating them with oil (black pepper works too but that's optional). Seasoning your chicken is almost always a good idea but keep in mind that if you're adding seasoning later, you might want to skip it depending on the salt content of the seasoning mix you're using.

    Cook the Wings

    Cook for an additional 12 minutes, then flip and cook for another 5 minutes. Air fryer brands cook differently so keep an eye on the chicken wings as it cooks and adjust time accordingly until they reach 165°F.

    (Scroll down to the bottom for the printable recipe card with exact measurements and recipe instructions.)

    Air Fryer Frozen Chicken Wings Tossed With Buffalo Sauce

    Air Fryer Wing Flavors & Sauces

    The sauce and wing flavor is up to you but we've added a few ideas and suggestions below. You can use your favorite brand of sauce, seasoning or dry rub or make one from scratch!

    Dry Rub Seasoning Ideas

    • Lemon-Pepper seasoning (add it to melted butter like these Lemon Pepper Wings)
    • Cajun
    • Sweet chili or garlic chili
    • Dry ranch dressing mix
    • Garlic Parmesan (mix a little garlic powder with grated parmesan)
    • The sauce from these sweet and spicy hot honey wings
    • Jerk seasoning
    • Dried chipotle powder then drizzle with maple syrup
    • Garlic powder and/or onion powder

    If you're adding a flavor after they're cooked then you'll want to baste the wings with a melted butter and seasoning mixture.

    All you do is mix together the melted butter and seasonings then brush it onto the cooked wings once they're fully cooked.

    Dipping Sauce and Glaze Ideas

    • Buffalo sauce (try the easy sauce recipe from these spicy baked chicken wings!)
    • Teriyaki
    • Honey and Balsamic
    • Buttermilk Ranch Dressing
    • Korean wing sauce from these sticky korean chicken wings
    • BBQ sauce
    • Warmed cherry jam with adobo sauce (from a can of chipotle peppers)
    • Curry sauce
    • Straight hot sauce (such as Sriracha) for the bold spice lovers
    • Whatever your favorite wing sauce is - the sky's the limit!

    Simply baste the wings in the sauce after cooking or dip the wings in a sauce!

    Air Fryer Frozen Chicken Wings Coated With Seasonings

    Tips for Perfect Air Fryer Frozen Chicken Wings

    • This same method works for fresh wings, too! Skip the first step for defrosting; the remaining recipe steps will work just fine. Keep an eye on cook time though!
    • If your wings are coated with a lot of ice, be sure to drain any melted water from the bottom of your air fryer as they cook. Simply check for any melted ice and drain it off whenever you're checking/flipping the wings.
    • Because different brands - and even different models - of air fryers cook slightly differently, keep a close eye on your wings the first time you make them. They might take a little longer or even less time depending on the air fryer model you use and even just the size of your wings.
    • Use just enough oil to lightly coat the wings - they don't need much to help them get super crispy.
    • Make sure the wings are in one layer and, if possible, a little space around each one for air to circulate. Overcrowding may result in unevenly cooked wings.
    • Make sure your wings have reached an internal temperature of 165°F.
    • Did you know if you prefer your wings with no sauce on them you can order dry or "naked" wings at a restaurant? It's a great hack if you prefer dipping dry wings in a sauce or have kids who don't like flavored wings.

    How to Store and Reheat Leftovers

    Store leftover chicken wings in an airtight container for up to 5 days.

    To reheat the chicken wings set the air fryer 165°F and fry the wing for 5 to 6 minutes until they're reheated through. For best results flip the wings halfway through and make sure internal temperature is 165°F before serving.

    Be sure to explore all of our favorite air fryer recipes to get dinner and snacks on your table fast!

    Air Fryer Frozen Chicken Wings

    Air Fryer Frozen Chicken Wings

    Yield: 3-4 servings (1 pound)
    Prep Time: 3 minutes
    Cook Time: 22 minutes
    Total Time: 25 minutes

    Making crispy chicken wings straight from the freezer has never been easier. Experiment with different seasonings and sauces for something different every time! For a quick weeknight meal I'll throw together a salad and these frozen wings and call it a night.

    Ingredients

    • 1 lb frozen chicken wings
    • Cooking oil, such as olive or avocado oil (cooking spray will also work)
    • 1-2 tablespoon melted butter
    • 2-3 teaspoon of your favorite seasoning mixture OR enough buffalo sauce, etc. to coat the wings (see the post for ideas)

    Instructions

    1. Preheat Air Fryer to 400°F
    2. Place the frozen block of wings in the air fryer basket and set the timer for 6 minutes. Check the wings to see if they're defrosted enough to separate; if not, air fry them for another minute until you can pull them apart.
    3. Toss the wings with just enough oil to coat. If you're making "naked" wings, season them with salt after coating them with oil (black pepper works too but that's optional). Seasoning your chicken is almost always a good idea but keep in mind that if you're adding seasoning later, you might want to skip it depending on the salt content of the seasoning mix you're using.
    4. Put them in one layer in the air fryer basket and air fry them for another 12 minutes, flipping them over halfway through the cooking time. Flip the wings one more time and cook for about another 5 minutes or so, or until they're cooked to an internal temperature of 165°F and as crispy as you like them!
    5. Seasoning (Optional): Mix together the melted butter and your favorite seasoning mixture. Place the wings on a serving plate and baste each wing with some of the mixture or with your chosen sauce. Serve immediately.

    Notes

    Air fryer brands cook differently so keep an eye on the chicken wings as it cooks and adjust time accordingly.

    Nutrition Information:
    Yield: 4 Serving Size: 1
    Amount Per Serving: Calories: 511Total Fat: 42gSaturated Fat: 15gTrans Fat: 1gUnsaturated Fat: 24gCholesterol: 114mgSodium: 2835mgCarbohydrates: 13gFiber: 1gSugar: 0gProtein: 21g

    This data was provided and calculated by Nutritionix.

    © Kristy Bernardo
    Cuisine: American / Category: Main Dish
    Air Fryer Frozen Chicken Wings

    12 Best Whole Milk Substitutes for Recipes

    November 21, 2022 by Monique McArthur 2 Comments

    Whole Milk Substitutes

    If you don't have whole milk on hand, or can't use it for dietary purposes, you may find yourself looking for alternatives. There are several whole milk substitutes that you can use, and that you may already have in your kitchen.

    Whole milk is commonly used in cooking and baking to provide rich texture and flavor. Whole milk is thick because its fat content has not been removed. This adds body to the recipes it is used in. It is used in many different types of recipes, both in baking and cooking. You can find whole milk in soups, ice cream, soft cheeses, cakes, sauces, mashed potatoes, and more.

    The Best Whole Milk Substitutes For Your Recipes

    The Best Whole Milk Substitutes

    Using whole milk in baking is a little different than in regular cooking. Whole milk provides moisture content and contributes to the texture and density of your baked goods. When you use substitutions for whole milk, keep in mind that the texture and flavor may be slightly different.

    Cooking sauces, soups, and other regular savory dishes won't require you to be quite as exact. Still, you'll want to keep in mind that any substitutions you use may result in a different texture or taste.

    Here are some of the best whole milk substitutes that you can use in your recipes. We're including dairy-based and non-dairy options so that you have alternatives in case you're avoiding whole milk for dietary purposes.

    Reduced-Fat Milk

    You can generally use any other milk regardless of the fat content (non-fat or 0%, 1%, 2% milk, etc.). Use the same measurement of your substitute as is called for in the recipe. So, you would use 1 cup of fat free milk in place of 1 cup of whole milk. Because it is milk, this substitution won't change the flavor or texture of the recipe much if at all.

    All variations of cow's milk can be substituted for whole milk in baking and cooking recipes without significantly changing the finished product.

    You can also add fat back into a reduced-fat milk to create a better equivalent to whole milk. Butter, whipping cream, heavy cream, half and half all contain more fat than whole milk so adding a small amount of one of these to a reduced-fat milk will create whole milk.

    • Butter (About 80% butterfat): Add about 1 ½ teaspoons to 1 cup of fat-free milk.
    • Heavy Cream (no less than 36% milk fat): Add about 1 ½ tablespoons to 1 cup of fat-free milk.
    • Whipping Cream (30% to 35% milk fat): Add about 2 tablespoons to 1 cup of fat-free milk.
    • Half & Half (10.5% to 18% milk fat): Add about 2 ½ tablespoon to 1 cup of fat-free milk.

    Note: These are approximations since fat percentages vary. For reduced-fat milks at higher fat percentages adjust the amount added lower.

    Heavy Cream

    If you have heavy cream on hand, you can replace whole milk with ½ cup of water and ½ cup of heavy cream. Because heavy cream is high in fat content, this substitution will render very similar results in your recipe as whole milk would.

    Because heavy cream is still dairy based, you can use this in all cooking and baking recipes that call for whole milk without affecting the finished product.

    Half and Half

    You may use this for your coffee and have plenty of it in the fridge. Good news: you can use it in place of whole milk. To replace one cup of whole milk, you can use ¼ cup of water and ¾ cup of half and half.

    Again, this dairy-based whole milk substitute can be used in all recipes for baking and cooking without affecting the flavor and texture of the end product.

    Cream Cheese

    Cream cheese is a good whole milk substitute for sauces, or hot dishes like mashed potatoes and mac and cheese. You probably don't want to use it in cakes. But in a pinch, you can melt it, thin it out with water, and add it to your recipes as needed.

    Cream cheese is very thick, with a bit of a tang, and when used in recipes, you can see a bit of the cheese pull from the stickiness of it. It's perfect for any hot, cheese-based dish, can be added to sauces as a thickener, and can be used in some soups. If you don't want that rich, cheesy effect, don't use this one in place of your whole milk.

    Of course there are exceptions for every rule, and many baked goods call for cream cheese, like cheesecake, some brownies, etc. But know your recipe - those call for cream cheese as a main ingredient, not as a milk substitute, so when in doubt, leave it out.

    Almond Milk

    This non-dairy substitute is used in place of milk, but has a consistency closer to water. It won't provide the creamy texture that whole milk adds, but you can use it as a substitute for cooking and baking in equal measurements.

    Opt for the plain almond milk, not the flavored versions. Even the plain may change the flavor of your recipe a bit, as it has slightly sweet undertones. I love using it as a substitute in some soups and in baked goods, but I don't like it as much in mashed potatoes or mac and cheese.

    Coconut Milk

    This non-dairy substitute has a high-fat content so it will have a similar consistency to whole milk and serves as a great substitute. Coconut milk does have a distinct flavor though, and will be noticeable in your recipe if you're using it in large quantities. Small amounts as substitution shouldn't affect the flavor much.

    Also keep in mind that there is a difference between canned coconut milk and versions that are sold as ready to drink beverages. I recommend canned coconut milk as a whole milk substitute. It is a great alternative for soups and sauces.

    Coconut Cream

    A thicker version of coconut milk, coconut cream can be thinned out with one tablespoon of water to three tablespoons of coconut cream and used as a non-dairy replacement for whole milk in baking and cooking. Like coconut milk, when used in large quantities, the coconut flavor may be noticeable in your dish.

    Use canned coconut cream as a substitute for whole milk if you're looking for a vegan option or to avoid dairy all together. It's a great alternative for sauces, soups, curries, custards, cakes, and other baked goods.

    Soy Milk

    This is a good non-dairy substitute for whole milk. Soy milk is creamy and can be used in equal measurements as a replacement in your recipes without affecting the flavor too much.

    Use soy milk as a whole milk substitute in sauces, both savory and sweet, as well as soups and baked goods. This is a good vegan alternative to dairy.

    Oat Milk

    If you need a non-dairy substitute for whole milk without changing the flavor of your dish, you can swap your whole milk for oat milk in a 1:1 ratio. It works great for cooking, baking, and adding to smoothies and coffee drinks.

    Oat milk can get frothy so keep that in mind when using it in your recipes. It works well for sauces, soups, curries, and baked goods.

    Sour Cream

    You can use sour cream as a whole milk substitute. Just thin it out with water until you reach the desired consistency similar to that of whole milk and add it to your recipe in the appropriate called-for measurement.

    Sour cream is great for adding moisture to baked goods, and is perfect for creating rich, thick sauces for pasta and potatoes.

    Plain or Greek Yogurt

    This is another great alternative for your baked goods and the tanginess may actually give your goodies a flavor boost. You can use this as an equal parts substitute, but you'll want to thin it with water to the consistency of milk. Remember to add water to thin it out first, and then measure out what you need. Some sources say you can tame the yogurt tang by adding a drop of vanilla to the yogurt, but this is not essential.

    Evaporated Milk

    If you happen to have a can of evaporated milk in your pantry, thin it out with equal parts water to evaporated milk, and use it as a substitute for whole milk in equal measure.

    How To Choose The Best Whole Milk Substitute

    Are you looking for a substitute for whole milk because you don't have any on hand or for dietary purposes?

    If you are trying to find an alternative based on what you have in the house, rather than going to the store to buy it, your options will be limited to what you have currently available. In this case, if you have other milk, that works just fine. And other things you most likely have in your fridge like yogurt and sour cream work equally as well with just a step or two to thin them out prior to adding to your recipe.

    If you are trying to find a whole milk substitute to avoid dairy because of allergies or dietary preferences, your considerations will be different. In this case, you'll want to consider substitutes that work best with the recipe you are planning on making. How will it affect the texture or flavor profile of the dish overall?

    Dietary Considerations

    If you have dairy allergies or dietary preferences and would like to consider alternatives to whole milk, you'll want to choose one of the plant-based substitutes. Almond milk, oat milk, soy milk, coconut milk, and coconut cream are your primary options listed here. Other alternatives in the plant-based category include hemp milk, cashew milk, and rice milk.

    Flavor

    If you're looking for something that is closest in flavor to that of whole milk, you'll want to try oat milk or soy milk. Oat milk is thick and creamy and tends to froth a bit, with a mild flavor that closely resembles cow milk. Soy milk is a close second. It is thinner than whole milk, more like nonfat milk, but its flavor is mild and has a similar nutrition profile.

    In any case, when choosing plant based milks, they often come in unsweetened, plain, and flavored varieties. Choose unsweetened or plain for baking and cooking. While it could be fine for baked goods in a pinch, you don't want to add vanilla or chocolate flavored milk to your savory sauces.

    Our Top Picks

    Considering the alternatives, if you are looking for a whole milk substitute, go with any other milk or half and half. These are basically the same as whole milk, and if you have them available, use these first.

    If you're looking for a non-dairy alternative, go with oat milk. It is most like whole milk in consistency, and it has a mild flavor that won't overpower the flavor profile of your recipe.

    What Percent is Whole Milk?

    Whole milk is typically 3.25% to 3.5% milkfat or put another way, the entire weight of the milk contains 3.25% to 3.5% milkfat. Whole milk is milk straight from the cow where no fat is removed from it before processing. Therefore, the whole milk milkfat percentage can vary and also be much higher.

    What to do When Recipe Calls for "Milk"?

    When a recipe doesn't specify the kind of milk in a recipe, you'll generally get the same results with whole milk, reduced fat (2% milk), or even low-fat (1% milk). Fat-free (or skim) milk may be too low in fat while half and half and heavy cream may have too much fat, unless watered is added.

    Perfect Standing Rib Roast + Garlic Mustard Wet Rub

    November 20, 2022 by Kristy Bernardo 42 Comments

    a slice of prime rib on a white plate with mashed potatoes and grilled asparagus, next to a small dish of horseradish sauce. the rest of the standing rib roast is in the background

    This is the foolproof standing rib roast you've been looking for that steals the holiday show. Juicy, tender prime rib with an incredible crust, and it all starts with this wet prime rib rub made with just Dijon mustard, garlic, and cracked peppercorns.

    I'll walk you through exactly how to bring the roast to room temperature, tricks to get that gorgeous crust, and how to finish perfectly pink (we even have a downloadable temperature chart just for prime rib). We'll cover bone-in vs. boneless, the exact internal temps to aim for, and the easy, creamy horseradish sauce.

    a slice of prime rib on a white plate with mashed potatoes and grilled asparagus, next to a small dish of horseradish sauce. the rest of the standing rib roast is in the background

    I've made this standing rib roast on every holiday for years. If I find a good deal on a boneless roast, then I'll make this boneless prime rib with a garlic-herb crust, but a prime rib roast is always on the menu. And I always pair it with this easy mushroom risotto with gorgonzola!

    [feast_advanced_jump_to]

    Ingredients

    For the Roast

    • 1 bone-in standing rib roast (prime rib), about 8 pounds (4-7 ribs works; adjust the cook time per the prime rib temperature chart below)

    Prime Rib Wet Rub (Dijon-Garlic-Peppercorn Wet Rub)

    • ½ cup Dijon mustard
    • 1 heaping tablespoon chopped garlic (3-4 cloves; make a paste with the salt)
    • 2 tablespoons coarse kosher salt
    • 1-2 tablespoons coarsely ground black pepper

    Horseradish Cream

    • 1 cup sour cream
    • ¼ cup prepared horseradish (more or less to taste)
    • Kosher salt & freshly ground black pepper, to taste
    • 1 spoonful Dijon mustard (optional)
    a standing rib roast on parchment paper on a cutting board, ready to be seasoned before going into the oven

    What to Buy

    • Bone-in vs. boneless: Bone-in roasts (true "standing" rib roasts) deliver the most flavor and juiciness, plus the bones act as a natural roasting rack. Boneless is easier to carve but tends to cook slightly faster.
    • Rib count & weight: Each rib serves about 2 people. A 4-rib roast weighs around 8 lbs and serves 8-10, while a full 7-rib roast can serve up to 14.
    • Grade matters: Prime grade has more marbling and tenderness, but choice grade is still excellent if cooked properly.
    • Ask your butcher: Request the roast be tied for even cooking and easier carving, and have them French the bones if you want a show-stopping presentation.

    Step-by-Step Instructions

    1. Bring the roast to room temperature: Remove the prime rib from the refrigerator and let it sit out for 1½-2 hours before cooking. This allows for more even roasting and prevents the center from being undercooked while the outside overcooks.
    2. Preheat the oven: Set your oven to 450°F (232°C).
    3. Prepare the wet rub: On a cutting board, mash the chopped garlic and salt together with the flat side of your knife to create a paste. In a small bowl, mix the garlic paste with the Dijon mustard and coarsely ground black pepper. Let the mixture sit for 15 minutes to allow the flavors to meld.
    4. Apply the wet rub: Place the roast on a rack in a roasting pan (ribs down). Slather the mustard mixture over the entire surface of the roast, making sure to coat all sides.
    5. Initial high-heat sear: Place the roast in the oven and roast for 20-30 minutes at 450°F until the outside has browned.
    6. Lower the oven temperature: Reduce the oven temperature to 325°F (163°C) without opening the oven door. Continue roasting until the internal temperature reaches 120-125°F for medium-rare. See the temperature chart for prime rib below to make any adjustments. Always use a reliable meat thermometer for accuracy!
    7. Rest the roast: Remove the roast from the oven and tent it loosely with foil. Let it rest for 20-30 minutes before carving (the temperature will rise by about 5-10°F as it rests).
    8. Carve & serve: Slice between the bones for large rib portions, or remove the bones and carve thin slices. Serve it with the horseradish cream.

    Temperature Chart

    Here is a temperature chart for prime rib that you can use to make sure your standing rib roast turns out perfectly every time. You can also download the chart to keep it handy.

    Perfect Standing Rib Roast + Garlic Mustard Wet Rub
    a slice of prime rib on a white plate with mashed potatoes and grilled asparagus, next to a small dish of horseradish sauce. the rest of the standing rib roast is in the background

    Tips for the Perfect Standing Rib Roast

    • Choose the right cut: Select a well-marbled prime rib for maximum flavor and tenderness. Both bone-in and boneless work, but bone-in is a true "standing" rib roast.
    • Let It come to room temperature: This step is key for even cooking. Take the roast out of the refrigerator 1½-2 hours before roasting.
    • Use a meat thermometer: Guessing is risky when cooking an expensive cut like prime rib. Invest in a meat thermometer so you can monitor the roast without opening the oven repeatedly. They're inexpensive and can alert you once the standing rib roast reaches your chosen temperature, making it truly stress-free!
    • Don't skip the high-heat sear: That initial blast at 450°F locks in juices and creates a beautifully browned crust.
    • Season generously: The wet rub should coat every inch for the best and most consistent flavor. It has plenty of salt already, so unless you use a different rub or skip it entirely, you should be good to go.
    • Plan for resting time: Resting allows the juices to redistribute and keeps the meat moist. Tent with foil for at least 20 minutes before carving.
    • Carving technique: For large servings, slice between the bones. For thinner slices, remove the bones first, then slice it across the grain.
    • Save the drippings: Use the flavorful drippings in the roasting pan to make au jus for serving alongside your horseradish cream. See below for more detailed instructions.
    • Adjust for the size & shape of your roast: If your roast is unusually short, long, or thick, adjust the cooking time and start checking temperatures earlier than the chart suggests.

    How to Make Au Jus

    Au jus ("with juice") is a simple, flavorful sauce made from the roast's drippings. I don't usually make the au jus, opting instead to go with just the horseradish sauce, but here are the instructions if you'd like to make both:

    Ingredients

    • Pan drippings from your cooked prime rib
    • 1-2 cups beef broth (low-sodium)
    • ½ cup red wine (optional but adds a lot of flavor)
    • Salt & freshly ground black pepper, to taste

    Instructions

    1. Collect the drippings: After removing the roast from the pan, pour the drippings into a heatproof measuring cup. Let them sit for a few minutes so the fat rises to the top. Skim off most of the fat.
    2. Deglaze the pan: Place your roasting pan over medium heat on the stovetop. Pour in the red wine (if using) or a small amount of the beef broth, scraping up any browned bits from the bottom of the pan.
    3. Add the broth: Stir in the beef broth and the reserved drippings, then simmer for about 5 minutes or so.
    4. Strain it for a smooth sauce: Pour the au jus through a fine-mesh strainer into a serving bowl or gravy boat.
    5. Taste & adjust: Season with salt and pepper as needed. Serve warm alongside the prime rib.
    6. Note: If you like a slightly thicker au jus, whisk 1 teaspoon cornstarch into 2 tablespoons cold water and stir it in during the simmering step.

    How to Use Leftovers

    One of the best things about making prime rib is having leftovers - and they're just as luxurious the next day. Here are some delicious ways to use them:

    • Reheated and served with sides: We always have loads of leftovers after the holidays, so we usually just reheat our prime rib with leftover risotto, mashed potatoes, etc.
    • Prime Rib Sandwiches: Thinly slice leftover prime rib and pile it onto crusty bread or a toasted baguette. Add horseradish cream, caramelized onions, and maybe a slice of provolone or Swiss for the ultimate sandwich.
    • French Dip: Serve those sandwiches with a side of warm au jus for dipping.
    • Breakfast Hash: Dice leftover beef and toss it with crispy potatoes, onions, and bell peppers. Top with a fried or poached egg.
    • Steak and Eggs: Reheat slices of prime rib and serve alongside eggs and buttered toast.
    • Prime Rib Tacos: Shred or slice the meat, warm it briefly, and tuck it into tortillas with chimichurri, pico de gallo, or pickled onions.
    • Beef & Barley Soup: Use chopped leftovers as the base for a hearty soup!

    Reheating Leftovers

    The key to reheating prime rib is retaining moisture and avoiding overcooking so it stays tender and juicy. If you have time, bring the meat to room temperature first, and slice only what you plan to eat.

    • Oven method (best overall): Wrap slices or the whole roast in foil with a splash of au jus or beef broth. Warm it at 250°F until the internal temperature reaches 165°F.
    • Sous Vide (most precise): Seal slices in a bag with au jus or broth and heat in a 165°F water bath for 1 hour.
    • Steamer (fastest): Wrap slices in foil with a little broth, then steam for 3-6 minutes until heated through.
    • Air Fryer (best for unsliced roast): Wrap it in foil with broth and heat at 225°F, checking every 10 minutes until it's warmed through.
    • Microwave: This is usually what we do at our house, even if it's the most unreliable (it's just too easy and most of the time everyone's making a plate at different times). Just make your plate with any sides, and microwave for 1 minutes, adding 15 seconds at a time until it's warmed through.

    Frequently Asked Questions

    What is a standing rib roast?

    A standing rib roast is the same cut of beef as prime rib (it comes from the primal rib section of the cow). It's called "standing" because it's roasted upright on the rib bones.

    What's the difference between prime rib and ribeye?

    Prime rib is the whole roast, including the rib bones, while ribeye is a steak cut from that roast before cooking.

    How much prime rib should I serve per person?

    Plan on about ½ pound per person. Keep in mind that you'll likely be serving sides with this, so that amount should be plenty.

    What internal temperature should prime rib be cooked to?

    For medium-rare (recommended), cook until the internal temperature is 120°F-125°F. The temperature will rise another 5-10°F while it's resting. See our downloadable temperature chart for prime rib for more details.

    Can I use a different rub instead of the mustard-garlic one?

    A classic salt and pepper rub works really well, especially if you're serving it with both the au jus and horseradish sauce.

    How long should I rest the roast before carving?

    At least 20 minutes to allow the juices to redistribute.

    What's the best way to store leftovers?

    Wrap any leftovers tightly in foil or store in an airtight container in the fridge for up to 4 days, or freeze it for up to 3 months.

    Related

    Looking for other recipes like this? Try these:

    • a white bowl of beef short ribs braised with garlic and red wine with a sprig of fresh thyme on a wooden table
      The BEST Braised Beef Short Ribs Recipe for the Holidays
    • Beef Wellington Recipe
      Beef Wellington Recipe
    • Beef Bourguinon Recipe
      Beef Bourguignon Recipe
    • Tomahawk Steak Recipe
      Tomahawk Steak Recipe

    Pairings

    These are my favorite dishes to serve with a standing rib roast:

    • a white bowl filled with homemade creamed corn and topped with chopped parsley on a tan napkin on a wood table
      Homemade Creamed Corn Recipe (With or Without Cream)
    • Roasted Carrot Souffle Recipe
      Roasted Carrot Souffle
    • Green Bean Casserole Recipe
      Easy Green Bean Casserole with Blue Cheese
    • Green Beans Almondine on a white oval plate which sits on a wooden board with a rustic napkin next to it.
      Green Beans Almondine
    a slice of prime rib on a white plate with mashed potatoes and grilled asparagus, next to a small dish of horseradish sauce. the rest of the standing rib roast is in the background

    Standing Rib Roast with Garlic-Mustard Wet Rub

    Yield: 8-10 servings
    Prep Time: 10 minutes
    Cook Time: 2 hours 30 minutes
    Additional Time: 20 minutes
    Total Time: 3 hours

    A standing rib roast is a perfect holiday recipe: it's stress-free, impressive, and most importantly, incredibly delicious!

    Ingredients

    For the Roast

    • 1 Prime Rib Roast, about 8 pounds
    • 1 heaping tablespoon chopped garlic
    • 2 tablespoons coarse kosher salt
    • 1-2 tablespoons coarsely ground black pepper
    • ½ cup dijon mustard

    For the Horseradish Cream

    • 1 cup sour cream
    • ¼ cup prepared horseradish
    • kosher salt & freshly ground black pepper, to taste
    • a spoonful of dijon, optional

    For Au Jus

    • Pan drippings from your cooked prime rib
    • 1–2 cups beef broth (low-sodium)
    • ½ cup red wine (optional but adds a lot of flavor)
    • Salt & freshly ground black pepper, to taste

    Instructions

    1. Preheat oven to 450°F.
    2. Bring roast to room temperature (allow to sit on counter for at least an hour).
    3. Put chopped garlic and salt together onto a cutting board. Using the side of your chef's knife, press down firmly while sliding your knife, making a paste. Mix garlic paste with mustard and pepper. Set aside for at least 15 minutes to allow flavors to meld.
    4. Place roast on a rack in a roasting pan. Slather roast with mustard mixture, covering all sides. Roast for approximately 20-30 minutes or until the outside is nicely browned.
    5. Reduce heat to 350°F. Continue cooking roast for approximately 2 hours more or until an internal temperature reaches 120-125°F (this will give you a medium-rare roast which, for prime rib, is recommended). Remove from oven and let rest for 20 minutes. Carve and serve with horseradish cream on the side.

    For the Horseradish Cream

    1. Mix all ingredients together. Allow to sit at room temperature while the roast is cooking. Can also be made in advance and chilled in the refrigerator.

    For Au Jus

    1. After removing the roast from the pan, pour the drippings into a heatproof measuring cup. Let them sit for a few minutes so the fat rises to the top. Skim off most of the fat.
    2. Place your roasting pan over medium heat on the stovetop. Pour in the red wine (if using) or a small amount of the beef broth, scraping up any browned bits from the bottom of the pan.
    3. Stir in the beef broth and the reserved drippings, then simmer for about 5 minutes or so.
    4. Pour the au jus through a fine-mesh strainer into a serving bowl or gravy boat.
    5. Season with salt and pepper as needed. Serve warm alongside the prime rib.
    6. Note: If you like a slightly thicker au jus, whisk 1 teaspoon cornstarch into 2 tablespoons cold water and stir it in during the simmering step.

    Notes

    Rub for rib roast from chow.com.

    Nutrition Information:
    Yield: 8 Serving Size: 1
    Amount Per Serving: Calories: 113Total Fat: 9gSaturated Fat: 4gTrans Fat: 0gUnsaturated Fat: 3gCholesterol: 26mgSodium: 2126mgCarbohydrates: 5gFiber: 1gSugar: 2gProtein: 4g

    I use Nutritionix to calculate the recipes on this website. This recipe was calculated for 8 servings but seems grossly under in calories. I'm not a nutritionist and prepare this information as a courtesy, so for this particular recipe, I'd encourage you to do further research if the nutritional amounts are important to your health and diet.

    © Kristy Bernardo
    Cuisine: American / Category: Dinner
    Perfect Standing Rib Roast + Garlic Mustard Wet Rub

    Buttermilk Blue Cheese Dressing + 30 Amazing Ways to Use it

    November 20, 2022 by Kristy Bernardo 33 Comments

    Blue cheese sauce in a portion with fresh vegetables and lime and green parsley. Wooden background and natural napkin.

    Buttermilk Blue Cheese Dressing is so much more delicious than store-bought. Try this 5 minute easy recipe and get your list of 30 ways to use it!

    Blue cheese sauce in a portion with fresh vegetables and lime and green parsley. Wooden background and natural napkin.

    Buttermilk Blue Cheese Dressing has got to be my all-time, hands-down favorite salad dressing. Store-bought tends to have too much of a plastic flavor for me (although there are rare exceptions).

    Ingredients

    • Crumbled Blue Cheese: A pungent cheese with a distinctive salty and sharp flavor. Opt for wedges over pre-made crumbles.
    • Buttermilk & Mayonnaise: Buttermilk adds a tangy flavor to offset the richness of mayonnaise (store-bought or homemade mayo).
    • Worcestershire sauce: Worcestershire sauce adds a tasty layer of flavor.
    • Seasoning: Garlic, kosher salt and fresh ground black pepper to make the flavor pop.

    How to Make Buttermilk Blue Cheese Dressing

    It takes just 5 minutes to make this easy blue cheese dressing recipe. Just mix all ingredients in a medium-sized bowl and chill for at least an hour before using to allow flavors to meld. Yes it's that easy!

    The printable recipe card with exact measurements can be found below.

    Type of Blue Cheese to Use

    Use a blue cheese that you like best and if you're unsure visit the deli at your grocery store and ask if you can sample the blue cheese on hand. I always opt for wedges that crumble well instead of pre-crumbled cheese for best quality.

    A spicy Maytag and pungent French Roquefort are classic choices. A strong blue veined Danish blue and California's Point Reyes Original Blue pair well with dressings as well. Gorgonzola is a type of blue cheese that isn't very chunky so I would save it for other recipes.

    How to Store Blue Cheese Dressing

    Homemade buttermilk blue cheese dressing will last up to 7 days in the refrigerator, if stored in an airtight container.

    30 Unique Ways to use Buttermilk Blue Cheese Dressing

    Fresh doesn't keep long, and as much as I love this Buttermilk Blue Cheese Dressing, tossing it over a mound of lettuce just isn't going to keep me interested long enough to finish the batch. Which means I need to find some creative uses for it!

    Roasted zucchini or eggplant with a little blue cheese dressing? Grilled chicken and a side of the buttermilk blue? Oh yeah...lots of possibilities!

    1. Mix some into potato salad for a subtle blue cheese twist.
    2. Make some buffalo wings and use it for the dip.
    3. Top your burger with a heaping spoonful and add extra blue cheese crumbles.
    4. Add some to a piping hot baked potato.
    5. Use it as a sandwich spread in place of mayonnaise.
    6. Drizzle it on your pizza!
    7. Use it as a dip for pretzels.
    8. As dressing on a classic Cobb salad.
    9. A combination of fried chicken and blue cheese.
    10. Make some juicy rib-eye steaks, then drizzle Buttermilk Blue Cheese Dressing over the top.
    11. Dollop some on no-bean chili instead of sour cream.
    12. Spread some on toasted garlic bread.
    13. Pair with crunchy, salty chips.
    14. Make pork chops and rice then top it all with a little blue cheese dressing.
    15. Mix it into coleslaw!
    16. Balance crispy, salty french fries with thick, creamy dressing. Try with onions rings too!
    17. Take that blue cheese coleslaw you just made and use it to top Shredded Buffalo Chicken Sliders.
    18. Or wrap shredded buffalo chicken and some dressing in lettuce for a healthy, low-carb lunch or dinner.
    19. Mix it into your mac and cheese.
    20. Use a dip with crunchy chicken nuggets.
    21. Drizzle it on top of bruschetta.
    22. Toss it with pasta, top it with crumbled bacon and a few grinds of black pepper.
    23. Introduce your kids to blue cheese by using it as a dip for their chicken fingers.
    24. Shave brussels sprouts and toss with some Buttermilk Blue Cheese Dressing.
    25. Toss some with hot roasted cauliflower or broccoli.
    26. As a dip for buffalo cauliflower wings.
    27. Make a cobb-style egg salad sandwich by adding bacon, avocado, and blue cheese dressing!
    28. Level up and substitute store bought blue cheese dressing for homemade dressing on a wedge salad.
    29. Make a tortilla wrap with blue cheese dressing and hot pepper sauce.
    30. Combine almost any dish with blue cheese dressing and buffalo sauce including lasagna, pasta, pizza, poppers, dip, sloppy joes, meatballs, sliders, mac and cheese bites, deviled eggs, portobello mushrooms and more.
    A creamy Buttermilk Blue Cheese Dressing - plus a list of 20 ways to use it that doesn't include a salad!

    Buttermilk Blue Cheese Dressing

    Yield: about 5 cups dressing
    Prep Time: 5 minutes
    Total Time: 5 minutes

    Easy Homemade Blue Cheese Dressing is made with tangy buttermilk and tastes great on salads, sandwiches, wings, dips and more.

    Ingredients

    • 2 cups crumbled blue cheese, or more if preferred
    • 1 garlic clove, minced
    • 2 cups mayonnaise, store-bought or homemade
    • 2 cups buttermilk
    • 2 dashes Worcestershire sauce
    • 1 teaspoon kosher salt, or to taste
    • 1 teaspoon freshly ground black pepper, or to taste

    Instructions

    1. Mix all ingredients in a medium-sized bowl. Chill for at least an hour before using to allow flavors to meld. Store in refrigerator for up to two weeks.

    Notes

    This recipe makes a lot of dressing, cut in half if preferred.

    Nutrition Information:
    Yield: 40 Serving Size: 1
    Amount Per Serving: Calories: 104Total Fat: 10gSaturated Fat: 3gTrans Fat: 0gUnsaturated Fat: 7gCholesterol: 10mgSodium: 202mgCarbohydrates: 1gFiber: 0gSugar: 1gProtein: 2g

    This data was provided and calculated by Nutritionix.

    © Kristy Bernardo
    Cuisine: American / Category: Salads
    Buttermilk Blue Cheese Dressing + 30 Amazing Ways to Use it

    Wedge Salad with Bacon, Blue Cheese and Balsamic

    November 19, 2022 by Kristy Bernardo 7 Comments

    A simple Wedge Salad with Bacon, Blue Cheese and a 5-minute Balsamic Syrup Drizzle!

    Classic Wedge salads are super simple and easy to make yet incredibly delicious and they pair well with almost any main dish.

    The secret to this simple wedge salad is taking a few minutes to reduce your balsamic into a sweet, syrupy treat! Impress your guests with this restaurant quality wedge salad recipe!

    A simple Wedge Salad with Bacon, Blue Cheese and a 5-minute Balsamic Syrup Drizzle!

    Wedge Salad Ingredients

    The trick to a killer wedge salad is - wait for it - high-quality ingredients. It's easy to forget that when you're making something with so few ingredients, those ingredients matter much more than if you were able to "hide" one amidst the others. There's no hiding with a wedge salad. Fresh tomatoes off the vine, crunchy fresh lettuce and way to go.

    • Head of iceberg lettuce: Iceberg lettuce is the main event of the dish! Look for super fresh, extra crisp and cold iceberg lettuce is a must in this salad.
    • Blue cheese dressing: Use your favorite blue cheese salad dressing but really, homemade buttermilk blue cheese dressing is the best way to go!
    • Fresh blue cheese: Blue cheese crumbles add tangy zing to the salad.
    • Crumbled bacon: Crumbles beat store-bought every time. See below for how make bacon crumbles.
    • Cherry tomatoes: Leave them whole and get them fresh off the vine if you can.
    • Balsamic Glaze: Balsamic dressing can be used but Balsamic glaze is a perfect balance of sweet and tangy, and adds a delicious, deep rich color and intense flavor. See below for how make a Balsamic glaze.

    Pro Tip: For extra-crisp, chilled lettuce, soak the lettuce in an ice water bath for 10 - 15 minutes before preparing the wedge salad and serving.

    (Scroll down to the bottom for the printable recipe card with exact measurements and recipe instructions.)

    How to Make a Wedge Salad

    Making a wedge salad is very easy but making the best wedge salad takes a few extra steps that are well worth it!

    1. Cut lettuce head in half, then cut each half into quarters.
    2. Drizzle each lettuce wedge with blue cheese dressing and balsamic glaze (reduction).
    3. Place on serving tray (or individual plates) and sprinkle with blue cheese, crumbled bacon and cherry tomatoes.

    Serve immediately.

    How to Cut the Lettuce

    Iceberg lettuce is the star of the show so first let's cover how to cut this classic, restaurant-style iceberg lettuce just like you get at a steakhouse.

    1. Remove the Core by placing head of the lettuce on its side. Cut about 1 inch into the core and discard.
    2. Remove the outer leaves that are thin or even slightly wilted.
    3. Cut the head in half, then place the halves flat-side down and cut each half into quarters.
    4. Run cold water over each quarter to remove sand, dirt and bugs.

    You can easily adjust the servings for this salad, too, just by cutting your head of lettuce into eight wedges instead of four. I prefer that size anyway; who needs that much lettuce? Everyone knows it's the toppings that matter 🙂 But however you take your wedge salad, I'm confident you'll love this one.

    Easy Wedge Salad

    How to Make Balsamic Glaze (Reduction)

    I like to take my wedge salad even one step further and drizzle balsamic glaze on top. Balsamic Glaze, also known as balsamic reduction, only takes a few minutes to boil down your vinegar into a sweet, syrupy treat. You can add regular balsamic but it won't be the same; take the time to reduce it, trust me on this one!

    1. Add balsamic vinegar to a saucepan over medium heat and bring to a boil.
    2. Then, reduce to a medium-low heat and simmer, stirring often so that the vinegar doesn't burn, until the vinegar thickens to your desired thickness. Keep in mind that it will continue to thicken as it cools.
    3. Allow to completely cool before drizzling.

    How to Make Bacon Crumbles

    Start with great quality bacon!

    1. Partially freeze the bacon.
    2. Stack the bacon strips directly on top of one another and cut the bacon strips into lardons (fancy word for slices). About ¼-inch thick to 1-inch long.
    3. Place the bacon into a medium-hot skillet and stir as it cooks to break the bacon apart.
    A simple Wedge Salad with Bacon, Blue Cheese and a 5-minute Balsamic Syrup Drizzle!

    Wedge Salad with Bacon, Blue Cheese and Balsamic

    Yield: 4
    Prep Time: 10 minutes
    Total Time: 10 minutes

    The trick to a Classic Wedge Salad is fresh, quality ingredients with crunchy lettuce, creamy dressing, salty bacon, sweet cherry tomatoes!

    Ingredients

    • 1 head iceberg lettuce
    • High-quality blue cheese dressing, preferable homemade
    • Crumbled blue cheese
    • ½-1 pound bacon, cooked and crumbled
    • ¼ cup balsamic reduction (glaze)
    • 16 or so cherry tomatoes, quartered

    Instructions

    1. Remove core from lettuce. Cut lettuce head in half, then cut each half into quarters. Place on serving tray (or individual plates).
    2. Drizzle each lettuce wedge with dressing and balsamic reduction. Sprinkle with blue cheese, crumbled bacon and cherry tomatoes.
    3. Serve immediately.

    Notes

    This recipe can be made with store bought blue cheese dressing, balsamic dressing and crumbled bacon but for the ultimate wedge salad I recommend a homemade buttermilk blue cheese dressing, boiling the balsamic dressing into a balsamic glaze (reduction) and making your own bacon crumbles from high quality bacon.

    Nutrition Information:
    Yield: 4 Serving Size: 1
    Amount Per Serving: Calories: 645Total Fat: 44gSaturated Fat: 15gTrans Fat: 0gUnsaturated Fat: 27gCholesterol: 119mgSodium: 2037mgCarbohydrates: 18gFiber: 2gSugar: 14gProtein: 42g

    This data was provided and calculated by Nutritionix.

    © Kristy Bernardo
    Cuisine: American / Category: Salads
    Wedge Salad with Bacon, Blue Cheese and Balsamic

    Wedge Salad Pairing Options

    • Tomahawk Steak
    • Baked Tilapia
    • Cilantro Lime Chicken
    • Hot and Spicy Queso Fresco Burgers
    • Boneless Prime Rib
    • Braised Beef Short Ribs

    Easy Creamed Onions

    November 17, 2022 by Monique McArthur 3 Comments

    Easy Creamed Onions

    This easy creamed onions recipe is baked with butter, whole milk, and crushed crackers for a delicious side dish to serve with ham, turkey, or any roast.

    Winter holidays bring with them a variety of traditional foods; turkey and stuffing, ham, pumpkin pie, and many other options. If you haven't already made creamed onions au gratin a tradition at your holiday table, you're going to want to after making this dish!

    Creamed Onions

    Why Make Creamed Onions

    Full of creamy goodness this is an American classic Christmas and Thanksgiving recipe. This side dish is made with yellow onions and served in a béchamel sauce (fancy word for equal parts butter and flour, and milk mixture).

    This easy recipe only takes a few pantry ingredients to make the sauce and most ingredients are incredibly flexible and easily substituted.

    Creamed Onions Ingredients

    • Yellow Onions - These onions have a mild sweet flavor to go with a rich, indulgent creamy sauce (see substitute guide for other onions below).
    • Flour - All-purpose flour works just fine for this recipe.
    • Whole Milk & Butter - These ingredients are responsible for the creaminess of the dish.
    • Salt & Pepper - Use this to taste - if you like a lot of salt & pepper, add what you prefer.
    • Tabasco Sauce - I like a little spice to my creamed onions but you can leave it out, if you prefer.
    • Saltine Crackers - Baked crushed crackers add a crunchy flavor to this dish.

    Can I use any Onion to make Creamed Onions?

    With the creamy rich sauce all onions are delicious in this creamed onions recipe. 2 onions equals about 1 pound so use 3 pounds of any onion as a substitute for 6 yellow onions. Here's a flavor guide for choosing:

    • Yellow Onions - The all-around onion. The flavor is pungent, yet milder and sweeter than other onions.
    • Sweet Onions (Vidalia, Walla Walla, Bermuda, Maui) - As the name suggests these onions taste sweeter and are less pungent than other onions.
    • White Onions - Softer and milder than yellows and reds.
    • Pearl Onions - A savory, sweet, and slightly less pungent flavor than full-sized onions when cooked. The main challenge with working with pearl onions is peeling them! Frozen pearl onions are a great workaround from having to peel.
    • Red Onions - Sharper and spicier than yellow onions.

    How to Make Creamed Onions

    (Scroll down to the bottom for the printable recipe card with exact measurements and recipe instructions.)

    First, the onions are boiled until soft and translucent. The onions are then tossed in a rich and creamy sauce with a bit of Tabasco and topped with buttery cracker crumbs. The results are baked into a bubbling golden brown dish so good you'll wish you made enough for leftovers.

    Boil Onions Until Soft
    Boil Onions Until Soft
    Mix Onions with Sauce and Add to Baking Dish
    Mix onions with cream sauce, and add to baking dish
    Add Crackers To Onions & Bake
    Add Cracker Topping To Onions and Bake

    Variations & Substitutions

    This recipe is great as is but if you're looking for a little variation for taste or dietary concerns try these variations and substitutes.

    • Substitute Worcestershire sauce for Tabasco to go from spicy to tangy, savory, sweet, and salty or for a little of both add Tabasco Worcestershire Sauce, yes that's a thing!
    • Add fresh parsley, thyme or rosemary and grated parmesan cheese over the cracker crumbs.
    • Mix crushed crackers with grated cheese such as Parmesan, Pecorino, Gruyère, or cheddar.
    • Panko, Ritz crackers (or your favorite cracker), and breadcrumbs are all wonderful substitutes.
    • Mix fried dried onions with crushed crackers for a bit of extra savory sweetness.
    • Sprinkle chopped bacon on top of the gratin crust.
    • Make gluten-free by substituting flour with almond, buckwheat or another gluten-free flour and go with the parsley and parmesan instead of crackers.

    Make Ahead

    Creamed onions can be made up to 3 days ahead of time! Just remove from the fridge 30 minutes before baking and sprinkle with crushed saltine crackers. Bake in the oven for 50 minutes or until the top is brown and bubbly.

    Store in the refrigerator covered with foil or saran wrap. Do not add the crackers before storing to keep the crackers from getting soft.

    Easy Creamed Onions

    Easy Creamed Onions

    Yield: 12
    Prep Time: 10 minutes
    Cook Time: 1 hour 15 minutes
    Total Time: 1 hour 25 minutes

    Creamed onions are a combination of sweet and savory flavors in a rich, buttery cream sauce topped with a browned crust. You can also call this dish Creamed Onions au Gratin because it's sprinkled with crackers that get browned in the oven for a crunchy complement to the soft onions.

    Ingredients

    • 6 Large onions
    • 3 Tablespoons butter
    • 3 Tablespoons flour
    • 1 ½ Cups whole milk
    • Tabasco sauce (optional), 3-4 drops or to taste
    • Salt and pepper, to taste
    • Saltine crackers or panko crumbs

    Instructions

      1. Preheat oven to 300 °F
      2. Slice onions into thirds (root ends trimmed, skin removed)
      3. Pour salted water into a medium pot and bring to a boil; add onions and cook until, onions are soft, translucent and separated, about 15-20 minutes.
      4. Drain in a colander; set onions aside in ungreased baking dish.
      5. Melt butter in a pot over medium heat; whisk in flour. Add milk mixture slowly, stirring constantly; add Tabasco, salt and pepper and cook until thickened, about 5 minutes.
      6. Pour sauce over onions, sprinkle with crushed saltine crackers or panko breadcrumbs.
      7. Bake in oven for 50 minutes or until the top is brown and bubbly.
    Nutrition Information:
    Yield: 12 Serving Size: 1
    Amount Per Serving: Calories: 89Total Fat: 4gSaturated Fat: 2gTrans Fat: 0gUnsaturated Fat: 1gCholesterol: 11mgSodium: 112mgCarbohydrates: 11gFiber: 1gSugar: 5gProtein: 2g

    This data was provided and calculated by Nutritionix.

    © Monique McArthur
    Cuisine: American / Category: Sides
    Easy Creamed Onions

    Try these Holiday Dishes Next!

    • Green Bean Casserole
    • Sweet Potato Casserole with Marshmallow Pecan Topping
    • Spiral Ham with a Ham Glaze
    • Juicy Turkey with Crispy Skin
    • Smoked Mac and Cheese

    How to Reheat Gravy

    November 17, 2022 by Monique McArthur Leave a Comment

    How To Reheat Gravy

    If you know how to reheat gravy properly, it will taste as delicious as if it had been prepared at that exact moment!

    Winter holidays bring with them a variety of traditional foods; turkey and stuffing, cranberry sauce, pumpkin pie, and many other options.

    Gravy is also a traditional Thanksgiving and Christmas dinner staple, but it doesn't get as much love as the other traditional foods thanks in part, no doubt, to the fact that it's not a side dish or entrée.

    But gravy still has an important place at the holiday table, and knowing how to store and reheat gravy is just as important as knowing how to store and reheat turkey, mashed potatoes, or casserole.

    How To Reheat Gravy

    The Best Way to Reheat Gravy

    Choosing the best to way to reheat gravy depends on a few factors. If you're in a hurry or only preparing a single-serving, a microwave is probably the best option.

    The following advice applies to all kinds of options from sausage gravy to turkey gravy. White gravy or brown, it doesn't matter. There are a few basic techniques to try.

    The 4 best options to reheat gravy are:

    • Skillet: Best tasting, my favorite way.
    • Pot: Less risk of burning than with a skillet.
    • Microwave: Good for single-servings, small quantities or if you're in a rush.
    • Oven: Slowest method but good if oven is already heated up and ready to use.

    You'll notice a few reheating methods are missing from the list above, such as air fryers, pressure cookers, or Ninja blenders (some of those come with a heating element to make soups with).

    That's because reheating gravy in these devices takes far more time than it's worth or it's not what they're best at. You're better off with a stovetop, pan, or microwave for better or faster results and less cleanup.

    For all methods gravy should reach a temperature of at least 165°F.

    Storing Leftover Gravy

    Before you can reheat it, you have to find a way to store gravy properly. Gravy can be made in a number of ways, but it is typically made with juices from cooking meat, and tends to separate when stored. You will need to refrigerate any leftover gravy in an airtight container and use it within five days.

    Another option is freezing. If there's no dairy, like cream or milk, gravy can be stored in an airtight container for up to 4 to 6 months. Some choose to put the gravy in a blender prior to freezing to reduce any separation.

    When gravy gets cold it can get a jelly-like layer on top due to congealed fats and other things. Reheating the gravy should reduce that significantly, if not entirely.

    How to Reheat Gravy in a Skillet

    A skillet can help you get more even heating, and the thicker the pan the better when it comes to not burning the gravy. Select a skillet rather than a pan to increase the gravy's surface area to reheat it evenly and gently.

    Steps

    1. Spoon the gravy into a cold pan; This breaks up any congealed, jelly-like gravy.
    2. Turn the skillet on low heat and let the gravy come up to temperature slowly.
    3. Stir or whisk frequently to avoid the gravy getting burnt and remove any lumps, until simmering. Serve immediately.

    Low and slow is the best way to go when reheating gravy.

    Is your gravy thinning out? Try adding the same thickening agent (many use corn starch) you made the gravy with originally, a little at a time. Add stock or milk if the gravy is too thick.

    It's best to keep your stove top temps low to keep the gravy from breaking up.

    How to Reheat Gravy in a Pot

    Reheating gravy in a skillet carries a higher risk of burning than doing it in a pot. Why? Because you can use a double-boiler technique, putting water in the pot, and putting your gravy in a separate container that rests in the pot while it is heating.

    1. Spoon the gravy into a cold pan.
    2. Heat the gravy over low heat, stirring often.

    The double boiler trick is great because, yes you do still need to stay with the gravy and whisk it as you go to avoid singeing it, but the risk of burning is far less with the double boiler or a pot with a separate heat-safe container like a Pyrex bowl. Add at least two inches of water, stir until the gravy is hot enough and serve!

    How to Reheat Gravy in a Microwave

    Reheating in the microwave isn't quite as simple as putting a container in the unit, and hitting start. You'll want to use the shallowest container possible (a plate is ideal in some cases but if you have a lot of gravy this might not work)

    1. Spoon the gravy into a shallow microwave-safe container and cover it with a splatter lid or damp paper towel.
    2. Use a medium or medium-low heat for 30-second bursts and stir the gravy in between.
    3. If the gravy seems thick, add a spoonful of stock to thin it out.

    How to Reheat Gravy in an Oven

    This is likely the slowest way to go unless you are already using the oven, so chances are good that this technique is better for Turkey Day or your favorite December holiday meal the day-of when your oven is getting a lot of use and won't have time to cool back down to room temperature soon. Use an oven-safe pan, cover the pan with foil, stir halfway through, reheating for 5-10 minutes.

    1. Preheat the oven to 350°F.
    2. Spoon the gravy into an oven-safe pan or baking dish and cover with foil.
    3. Heat for 5-10 mins, stirring halfway through until simmering.

    The shallower the pan, the more quickly it will heat up.

    Make Ahead Gravy

    Now that you have these reheating instructions, there is no need to be running around trying to roast a turkey and preparing the sides, plus the homemade gravy. You can make a homemade gravy up to five days ahead!

    Easy Chocolate Fudge (no bake, 3-ingredients)

    November 15, 2022 by Kristy Bernardo Leave a Comment

    3 Ingredient Chocolate Fudge Recipe

    You're just 3 ingredients away from enjoying this smooth, rich & EASY chocolate fudge!

    Why You'll Love This Chocolate Fudge Recipe

    This easy chocolate fudge recipe with condensed milk has been made at our house many, many times over the years.

    Years ago, my go-to chocolate fudge recipe was more old fashioned, using granulated sugar, bringing it to a boil and stirring, stirring, stirring... My arms used to practically fall off every year from so many batches of fudge! I'd give them as gifts, which everyone loved, but man it was a lot of work.

    This no-stove, no-bake chocolate fudge recipe is the best and vastly different in terms of the work involved. The first time I tried making it using sweetened condensed milk instead of granulated sugar, I almost cried with happiness at how simple it was!

    No more furious stirring until my arms ached. No more wiping down the sides of my pot in an effort to remove every last bit of sugar stuck to its side.

    Just smooth, rich fudge and a whole lotta happy people.

    Easy Chocolate Fudge Recipe

    Chocolate Fudge Ingredients

    Three-ingredient fudge is quick and easy to make and prepared in just ten minutes! 

    • Chocolate - Use semi-sweet chocolate or dark chocolate or semi-sweet chocolate chips in a pinch.
    • Sweetened Condensed Milk - The sweet condensed milk will thicken the mixture in no time.
    • Vanilla Extract - Enhances all of the other flavors!
    • Nuts (optional) - Try adding chopped pecans, walnuts, peanuts or a combination.

    How to Make Chocolate Fudge

    (Scroll down to the bottom for the printable recipe card with exact measurements and recipe instructions.)

    For starters, you don't even have to turn on your stove. All you have to do is mix together the chocolate chunks and sweetened condensed milk, then pop it in the microwave for a minute or so. Stir it until it's smooth, mix in a little vanilla extract and pour it into your pan. So simple and fast!

    The most time-consuming part is waiting for it to cool completely. It's a test of willpower, for sure, but what doesn't kill ya' makes ya' stronger, right?

    Homemade No Bake Chocolate Fudge Recipe

    Easy Chocolate Fudge Tips

    • Use high-quality chocolate that's either semi-sweet or dark. Milk chocolate doesn't work in this recipe, plus it's much too sweet.
    • I like to use a bar of good chocolate that I cut into small pieces, but chocolate chips will work just fine.
    • Use the right size pan. 8x8 or 9x9 is best. You can double the recipe and use a 9x13, although it's a bit harder to remove the entire block for uniform cutting, and your fudge will be much thicker.
    • Make sure it's cooled completely before cutting into pieces. I've been a bit too anxious once or twice and I ended up with gooey middles and pieces that didn't have smooth edges.
    • Don't cut the refrigeration short. The fudge needs time to set and it's well worth the wait.
    • For gift-giving, a sheet of parchment inside a tin box looks very pretty. You can also pick up some Christmas paper that works perfectly with any number of holiday treats.
    • Rocky Road Fudge: For a rocky road-inspired fudge mix nuts and min-marshmallows.
    • S'mores Fudge: Mix in mini marshmallows, crushed graham crackers, and optionally, chocolate chunks.
    3 Ingredient Chocolate Fudge Recipe
    Easy Chocolate Fudge

    How to Store Chocolate Fudge

    Chocolate fudge is the perfect make ahead dessert or gift. It can be stored at room temperature for up to 10 days or in the fridge for up to 3 weeks. Store in an airtight container and place parchment paper or foil in between each layer of fudge.

    To freeze, cut the fudge into squares, use plastic wrap to wrap each piece and store in a zip-loc freezer bag or airtight container for up to 3 months. Fudge can be thawed overnight.

    FUN FACT: Before 1886, the origin and history of fudge are unclear, but Fudge is thought to be an American invention. Most believe the first batch was a result of an accidental "fudged" batch of caramels, hence the name "fudge".

    3 Ingredient Chocolate Fudge Recipe

    Easy Chocolate Fudge

    Yield: 24 pieces
    Prep Time: 10 minutes
    Cook Time: 1 minute
    Additional Time: 4 hours
    Total Time: 4 hours 11 minutes

    This 3-ingredient, no-bake chocolate fudge is perfect for the gift-giving during the holidays!

    Ingredients

    • 12 oz high-quality chocolate, broken into very small pieces (or chocolate chips)
    • 1 14 oz can sweetened condensed milk
    • 1 teaspoon pure vanilla extract
    • ½ Chopped nuts optional

    Instructions

    1. Place a sheet of parchment paper in an 8x8 or 9x9 pan, pressing to "form" it as best you can.
    2. Place the chocolate and sweetened condensed milk in a microwave-safe bowl and stir it to combine. Microwave for one minute, then stir it until it's smooth. You can put it back in the microwave in 15-second intervals if necessary. Stir in the vanilla.
    3. Pour the fudge mixture into the pan and spread it out evenly. Allow the fudge to cool completely, then cut it into 24 pieces.
    4. Refrigerate for at least 4 hours or overnight.

    Notes

    You can add in a ½ cup of chopped nuts. Just stir in the nuts and vanilla at the same time.

    Nutrition Information:
    Yield: 24 Serving Size: 1
    Amount Per Serving: Calories: 148Total Fat: 6gSaturated Fat: 4gTrans Fat: 0gUnsaturated Fat: 2gCholesterol: 11mgSodium: 40mgCarbohydrates: 21gFiber: 0gSugar: 19gProtein: 3g

    This data was provided and calculated by Nutritionix.

    © Kristy Bernardo
    Cuisine: American / Category: Desserts
    Easy Chocolate Fudge (no bake, 3-ingredients)

    More Christmas dessert recipes:

    • Chocolate Covered Pretzel Rods
    • Coconut Rum Balls
    • Chocolate Truffles
    • Peppermint Bark Recipe
    • Easy Christmas Cookies with Holiday Pretzels

    How to Reheat Turkey

    November 8, 2022 by Monique McArthur Leave a Comment

    How To Reheat Turkey

    What is the best way to reheat turkey so it's moist and juicy? This is a big question around Thanksgiving, the holiday season, or after a big feast. I've tested four methods and I'll show how to do all four plus the pros and cons of each.

    How To Reheat Turkey

    Best Way to Reheat Turkey

    Choosing the best to way to reheat cold cooked turkey depends on a few factors. I have found the best way to recreate that fresh-from-the-oven flavor is by using the oven itself. However, if the skin is still on the turkey, then a stovetop may be best to get the skin nice and crispy. If you're in a hurry or only preparing a single-serving, a microwave or air fryer is probably the best option.

    We'll explain the different ways and let you choose, but first here are all the ways we tested:

    • Oven: Best tasting, great for large portions but slow.
    • Stove: Great for crispy skin, close to oven results, some argue it's better.
    • Microwave: Good for single-servings or if you're in a rush.
    • Air Fryer: Faster than an oven but tough to not accidentally dry out the meat.

    The key to reheating turkey is to keep it from drying out. You'll find this is an issue no matter which method you try. There are some things you can do before you want to eat your leftovers that will help you enjoy your reheated turkey more the next day.

    To begin, you'll want to set your Thanksgiving meal and leftovers up for success by cooking a juicy, crispy turkey or trying this tasty smoked turkey breast recipe.


    Storing Turkey

    Storage is a big issue. If you shove a plate full of leftover turkey in the fridge with no cover or container, the turkey will begin to dry out and by the time you get to it again it could be an unappetizing, near-mummified bird.

    How to Store Turkey

    1. For food safety refrigerate the turkey within two hours.
    2. Store turkey, stuffing and gravy in separate containers.
    3. Carve the turkey meat off the bone. You can leave drumsticks on the bone.
    4. If you have larger pieces of turkey, like an unsliced turkey breast, store it intact to keep in the juices until the meat is reheated. Larger pieces like the turkey breast should be sliced prior to reheating.
    5. Wrap in aluminum foil or plastic wrap before storing in a sealed container or resealable bag.

    Some people choose to freeze their leftover turkey--this is possible but it is even more crucial to protect your leftovers from drying out in cold storage. Cooked turkey will start to dry out quickly in the freezer (10°F or less), so I recommend using within one month.

    How long to Store Turkey

    According to the USDA, cooked turkey can be refrigerated (40°F or less) for up to 3 to 4 days and frozen for up to 3 to 4 months. Frozen turkey can safely be stored longer but may lose moisture and flavor beyond 3 to 4 months.


    Rehydrating for a Moist, Juicy Turkey

    Rehydration is an important factor, frozen leftovers or not. Even fully sealed, your turkey leftovers may get a bit dry in storage and the reheating process won't help. It's smart to re-baste your leftovers with broth, stock, butter, duck fat, gravy, or similar before and (depending on your method) even during the reheating process.

    Alternative fluids that will moisten turkey while adding flavor include white wine, apple cider, orange or pomegranate juice, olive oil, herb-infused oil, tomato sauce and maple syrup or honey glaze.

    How to Moisten Leftover Turkey

    1. Let the turkey come to room temperature for 15 to 20 minutes.
    2. Slice any larger pieces into desired but similar sized sizes.
    3. Place the turkey in a single layer in a roasting pan, baking dish, skillet or other suitable "dish" for reheating method of choice.
    4. Pour 1 cup of turkey, vegetable, or chicken broth or stock over the turkey for up to 10 pounds of turkey, add more for larger turkeys.
    5. If your turkey was a bit over-cooked already dot the turkey with unsalted butter too.

    Another way to moisten turkey is to brush gravy on top of the turkey. Again, if the turkey is dried out add butter, to the gravy before brushing it on top. The turkey is dried out because it's lacking fat and the butter will help restore the bird.

    Now choose your reheating method...


    How to Reheat Whole or Smoked Turkey in the Oven

    Reheating a pre-prepared fully cooked whole turkey, smoked turkey, or leftover turkey, whether it's the entire bird or specific pieces like legs, thighs, or breast slices, is best accomplished using an oven. The key is to reheat low and slow while adding moisture to prevent it from drying out. You will need a cooking thermometer for the best results (precision in the oven is a good thing).

    1. Preheat oven to 325°F.
    2. Prepare & Cover: Place the turkey in a roasting pan and cover with aluminum foil or oven bag. To prevent the turkey from drying out it's important to keep the turkey covered while reheating.
    3. Moisten: Pour 1 cup of turkey, vegetable, or chicken broth or stock over the turkey for up to 10 pounds of turkey, add more for larger turkeys. I recommend broth or stock but water will suffice. (see more moistening tips above).
    4. Reheat: Reheat the turkey for 12-15 minutes per pound of turkey or until leftovers reach an internal temperature of 160°F-165°F.
    5. Rest: Rest reheated turkey for 20-30 minutes before carving and serving.

    Tip: The USDA recommends heating turkey to an internal temperature of 165°F. Personally, I prefer removing the turkey at 160°F, allowing for residual cooking during the resting period where the temperature continues to rise. Less cooking time minimizes the risk of dry turkey meat.


    How to Reheat Turkey Leftovers in the Oven

    These instructions are for reheating sections of turkey meat such as the legs, thighs, or breast slices in an oven. Whole turkey breasts should be sliced prior to reheating. Legs and thighs can remain intact and on the bone.

    1. Preheat oven to 325°F.
    2. Prepare to Cook: Place the leftover turkey pieces in a roasting pan and cover with aluminum foil. To prevent the turkey from drying out it's important to keep the turkey covered while reheating.
    3. Moisten Pour ¼ to 1 cup of turkey, vegetable, or chicken broth or stock over the turkey depending on the amount turkey. I recommend broth or stock but water will suffice. (see more moistening tips above).
    4. Reheat: Reheat the turkey for 10 minutes per pound of turkey or until leftovers reach an internal temperature of 165°F.

    How To Reheat Turkey On The Stove

    Some feel this approach is faster and better than the oven option, and some swear by it for turkey that still has the skin on. You can indeed get juicier leftovers from reheating on the stovetop than in the microwave (depending on your equipment) but you will need to remember to add stock/gravy as you go to keep the turkey moist.

    1. Prepare and moisten the turkey in a skillet or pan (see instructions above).
    2. Cover the skillet or pan, bring the broth to a simmer, and cook until heated through and a temperature of at least 160°F-165°F.

    You can make the skin a bit crispier using this method if you empty the skillet after heating, add oil and cook again for three to five minutes. You'll want to cook this to the level of crispy you prefer, and it pays to babysit the turkey when crisping it up.


    How to Reheat Turkey in the Microwave

    Best for single-serving leftover meals or if you're in a rush, cooking turkey in a microwave is efficient but you won't be able to return the same moisture as in an oven or skillet.

    1. Let the turkey come to room temperature for 15 to 20 minutes.
    2. Prepare and moisten the turkey in a baking dish and cover with a damp paper towel or a microwave-safe lid (see instructions above).
    3. Heat on low power for 2 to 6 minutes, or until warm.

    Turkey meat on the bone is not recommended in the microwave as it may result in uneven heating.

    It's fairly obvious to remind people to use a microwave safe container, but a less-obvious trick is to cook the leftovers on low power instead of full power. Reheating in the microwave can be tricky if you aren't sure how powerful your unit is or how hot it can get at full power.


    How to Reheat Turkey in an Air Fryer

    The air fryer fad is a bit like the pressure cooker fad that happened around the same time; it's an alternative cooking option that can make for healthier dishes (depending on the recipe) and save you some time in the prep process.

    1. Preheat the air fryer or Ninja Foodi to 300°F.
    2. Prepare and moisten the turkey in a baking dish that fits in your air fryer and cover with aluminum foil (see instructions above). You can also wrap it in foil instead of a baking dish.
    3. Reheat the turkey for 8-10 minutes per pound of meat or until leftovers reach a minimum of 160°F-165°F. 8-10 minutes is based on two cups of turkey or about 1 pound. Add more or less time based on the amount of turkey.

    Note: Both the size and power of your air fryer and the size of the leftovers can make the cooking times vary slightly. The temperatures and times are a guide and make adjustments as needed.

    Now that you know how to reheat leftover turkey here are the best ways to reheat gravy.


    Skip Reheating, Serve Cold

    Consider skipping reheating pre-cooked turkeys and serving them cold. To serve cold, take the turkey meat out of the refrigerator and let it stand for 30 minutes before serving.

    The BEST Carrot Cake Recipe

    November 5, 2022 by Kristy Bernardo 99 Comments

    The BEST carrot cake recipe I have ever found! A buttermilk glaze seeps into the warm cake layers making it extra moist. Then a delicious cream cheese frosting is added to bring all the flavors together. It's even BETTER the next day!

    The BEST carrot cake recipe I have ever found! A buttermilk glaze seeps into the cake layers and a cream cheese frosting brings all the flavors together.

    Southern Living's Carrot Cake
    ★★★★★

    "I can't begin to tell you how much I love this cake! I have friends that expect this cake for their birthdays year after year. I toast the coconut and walnuts for a bit of extra to an already extraordinary dessert! The glaze adds a chewy goodness!"

    - Lynda B.

    I made a cake.

    Carrot Cake.

    It was also the BEST Carrot Cake recipe I have ever found. 

    And I desperately wish that this recipe for the BEST Carrot Cake of all time was actually mine. But I am not the one who created this perfect gem. Nope...I got this recipe from Southern Living. I'm also not the only one who love this cake. Chrissy Teigen raved about this cake on social media and John Legend described it as "Heavenly." Seriously, it's that good!

    Ingredients & Equipment

    Here are the kitchen items you'll need:

    • 3 (9-inch) round cakepans
    • Bowls and electric mixer (or whisks) for mixing
    • Oven

    Your ingredients:

    Cake: This 3-layer cake is a mix of lots of carrots, crushed pineapple, coconut flakes and pecans or walnuts. Making a cake with pineapple makes it incredibly moist and the coconut and nuts add both flavor and texture.

    Buttermilk Glaze: This particular carrot cake also has a lick-the-spoon-and-bowl-clean buttermilk glaze that seeps down into the cake while it's still warm from the oven, making it incredibly moist.

    Cream Cheese Frosting: The cream cheese frosting brings it all together as the smooth and tangy frosting seeps into the layers, creating an even more tender bite.

    (Scroll down to the bottom for the printable recipe card with exact measurements and recipe instructions.)

    Best Carrot Cake Recipe

    How to Make Carrot Cake

    The full step-by-step instructions are below but this recipe couldn't be easier to follow. Just mix the wet and dry ingredients in separate bowls while folding in the fruits, nuts and vegetables all into one bowl. Pour the batter into the pans and bake for 25 to 30 minutes.

    You drizzle buttermilk glaze over the warm layers right out of the oven and the layers absorb every bit of glaze, then you frost with cream cheese.

    I know you're going to enjoy it as much as I did! And if you have a Best Carrot Cake Recipe that you think rivals this one, feel free to link to it (or share the recipe) in the comments section. The more Carrot Cake the merrier!

    The BEST carrot cake recipe I have ever found! A buttermilk glaze seeps into the warm cake layers making it extra moist. Then a delicious cream cheese frosting is added to bring all the flavors together. It's even BETTER the next day!

    Best Carrot Cake Recipe

    Yield: 12
    Prep Time: 25 minutes
    Cook Time: 25 minutes
    Additional Time: 1 hour
    Total Time: 1 hour 50 minutes

    This is my favorite recipe for carrot cake! It has three layers. And homemade frosting that I spread between each layer and then all over the top and the sides.

    Ingredients

    Carrot Cake

    • 2 cups all-purpose flour
    • 2 teaspoons baking soda
    • ½ teaspoon salt
    • 2 teaspoons ground cinnamon
    • 3 large eggs
    • 2 cups sugar
    • ¾ cup vegetable oil
    • ¾ cup buttermilk
    • 2 teaspoons vanilla extract
    • 2 cups grated carrot
    • 1 (8-ounce) can crushed pineapple, drained
    • 1 (3 ½-ounce) can flaked coconut
    • 1 cup chopped pecans or walnuts

    Buttermilk Glaze

    • 1 cup sugar
    • 1 ½ teaspoons baking soda
    • ½ cup buttermilk
    • ½ cup butter or margarine
    • 1 tablespoon light corn syrup
    • 1 teaspoon vanilla extract

    Cream Cheese Frosting

    • ½ cup butter or margarine, softened
    • 11 ounces cream cheese, softened (about a block and a half)
    • 1 (16-ounce) package powdered sugar
    • 1 ½ teaspoons vanilla extract

    Instructions

    Cake

    1. Preheat oven to 350°F and line 3 (9-inch) round cakepans with parchment paper rounds.
    2. Use floured spray or lightly grease and flour parchment paper. Set aside.
    3. Stir flour, baking soda, salt and cinnamon in small bowl. Set aside.
    4. Add eggs, sugar, oil, buttermilk and vanilla extract to a mixer bowl and mix at medium speed with an electric mixer until smooth.
    5. Add flour mixture, beating at low speed until blended.
    6. Fold in carrot, pineapple, coconut and walnuts. Pour batter into cakepans.
    7. Bake for 25 to 30 minutes or until toothpick inserted in center comes out clean.
    8. Cool in pans on wire racks for 15 minutes.
    9. While in pans drizzle Buttermilk Glaze evenly over layers.
    10. Remove from pans, and cool on parchment paper or wire racks for 30 minutes.
    11. Cool layers in freezer or fridge to speed up the final cooling process.
    12. Spread Cream Cheese Frosting between layers and on top and sides of cake.

    Buttermilk Glaze

    1. Bring sugar, baking soda, buttermilk, butter (or margarine) and light corn syrup to a boil in a large Dutch oven over medium-high heat.
    2. Boil, stirring often, 4 minutes.
    3. Remove from heat, and stir in vanilla extract.

    Cream Cheese Frosting

    1. Beat butter and cream cheese at medium speed with an electric mixer until smooth and creamy.
    2. Add powdered sugar and vanilla extract; beat at high speed 10 seconds or until smooth.

    Notes

    Poke holes in layers with toothpick to aid in absorbing glaze.

    Ensure layers are fully cooled to prevent frosting from melting as it's applied.

    Keep cake in refrigerator until ready to serve.

      Nutrition Information:
      Yield: 12 Serving Size: 1
      Amount Per Serving: Calories: 810Total Fat: 48gSaturated Fat: 19gTrans Fat: 1gUnsaturated Fat: 26gCholesterol: 114mgSodium: 760mgCarbohydrates: 91gFiber: 3gSugar: 70gProtein: 8g

      This data was provided and calculated by Nutritionix.

      © Kristy Bernardo
      Cuisine: American / Category: Desserts
      The BEST Carrot Cake Recipe

      Famous Queen's Cake Vs Southern Living's Best Carrot Cake

      When the Buckingham Palace chefs shared the exact carrot cake recipe they used to make for the Queen of England many rushed to make this recipe at home. So who has the best carrot cake? Southern living staffer Ivy Odom had fun putting this question to the test. You'll have to watch to see which one she picks!

      More delicious dessert recipes:

      • Lemon Cream Cheese Pound Cake with Fresh Berries
      • Pumpkin Pie Cake
      • Peppermint Bark Recipe
      • Chocolate Truffles
      • Easy Chocolate Fudge

      Instant Pot Mac and Cheese - 2 Ways

      November 4, 2022 by Kristy Bernardo Leave a Comment

      Instant Pot Mac and Cheese Recipe

      Instant Pot Mac and Cheese is even easier than making it from a box but we'll show you a homemade recipe plus how to make Instant Pot boxed mac and cheese.

      Mac 'n' cheese is loved by kids and adults but most kids are partial to the simple boxed mac and cheese while adults are looking for something more elevated. Below we'll show you how to make Boxed Instant Pot Mac and Cheese plus an easy Adult Mac and Cheese recipe!

      How fast do these recipes go? Once you have the Instant Pot up to full pressure, prep time is about sixty whole seconds and cooking time is only 4 to 5 minutes!

      Adult Instant Pot Mac and Cheese

      Instant Pot Mac & Cheese Ingredients

      This adult version is made with whole milk and sharp cheddar which lends to a more velvety, decadent feel. Yes, you can substitute the whole milk for 2%, but if you really need the protein, that whole milk is a great source along with the cheeses.

      • Macaroni
      • Sharp cheddar cheese                                         
      • Parmesan cheese
      • Whole milk
      • Yellow mustard
      • Coarse salt
      • Water
      • Hot sauce (optional)

      You can opt for no hot sauce or even substitute with chili powder, Sriracha, Sambal Oelek, Harissa or any other similar hot sauce ingredient. Buffalo sauce in mac and cheese is a tasty alternative too!

      How to Make Instant Pot Mac and Cheese

      If you have never used an Instant Pot, it's basically a pressure cooker and it can make amazing pasta and rice dishes that are perfect every time once you learn how fast this gadget cooks even the thickest, sturdiest noodles.

      You literally just dump it in the pot, set the timer, wait until the timer goes off, stir in some cheese and milk, and some people find they don't even have to strain the macaroni first! Add to that the fact that making your own mac and cheese without the additives and preservatives you'll get in those little cheese dust pouches the store-bought versions often come with.

      Occasionally I've had a bit too much water left in the pot, but I just tilt the pot, hold the macaroni in with my spatula and let that small amount of water go into the sink. Takes 20 seconds, tops.

      How to Make Instant Pot Kraft Mac N Cheese

      You can make Kraft Mac and Cheese or your favorite boxed macaroni and cheese in your pressure cooker in just a few minutes!

      1. Add the macaroni, pinch of kosher salt, 1 ¼ cup water in the Instant Pot. Do not stir.
      2. Seal lid, and set to Pressure Cook or High/Manual mode, depending on your Instant Pot model. Set timer for 4 minutes.
      3. Once done quick release the pressure (turn steam release from Sealing to Venting position)
      4. Stir in the package recommended amounts of milk, butter, and cheese packet until smooth and creamy

      No need to drain or babysit the pasta while it cooks and everything simply mixes together in one pot.

      Best Instant Pot Mac and Cheese

      Instant Pot Mac and Cheese Hacks

      The first hack is to know that your Instant Pot will need time to come to full pressure, and you can't get to full pressure until all the ingredients are in and the lid is locked down. The prep times listed here don't include the pressurization time. But while you wait, you can clean up from the prep.

      When it comes to the ingredients themselves? Sometimes I'll add a little extra cheese and broil it for a few minutes for a crispy top. You could do some buttery bread crumbs, too (that might be my favorite version). Some will add some cooked sausage, hot dogs, chicken or even veggies.

      Vegan-Friendly

      This recipe can be made vegan-friendly, but as always you will need to experiment with your cheese and milk substitutes to get the right texture and consistency.

      Some vegans know their alternatives well--if you struggle to find replacement cheese, for example, it may be a question of buying a larger amount of a lesser cheese substitute, and a smaller amount of a pricier, really GOOD vegan cheese, and putting the best on top, and last--the first impression factor of the really good cheese will make the not-so-awesome variety less noticeable.

      Easy Instant Pot Mac and Cheese Recipe

      Instant Pot Mac and Cheese

      Yield: 4 servings
      Prep Time: 1 minute
      Cook Time: 4 minutes
      Total Time: 5 minutes

      I am completely Instant Pot obsessed. NO ONE is more surprised by that than me. This Instant Pot Mac and Cheese is just the latest in a long list of dishes I’ve made that absolutely amaze me.

      Ingredients

      • 1 teaspoon hot sauce (optional)
      • 2 teaspoon yellow mustard
      • 1 teaspoon coarse salt
      • 4 cups water
      • 1 lb box macaroni
      • 1-2 cups whole milk
      • 1 lb sharp cheddar
      • ½ cup shaved parmesan

      Instructions

      1. Mix the hot sauce, mustard, salt and water in your Instant Pot. Pour in macaroni and make sure it's all submerged. Close and lock the lid of the Instant Pot. Press “Manual” and immediately adjust the timer to 4 minutes (or half the time on the package cooking directions if different). Check that the cooking pressure is on “high” and that the release valve is set to “Sealing”.
      2. When time is up, open the IP using “Quick Pressure Release”. Stir the pasta to break it up (tilt the pan to drain any excess liquid; you can leave a small amount). Add 1 cup the milk and cheese; stir until completely incorporated the and cheese has melted and coated the pasta, adding the remaining milk in increments, if desired, until sauce is as thick and creamy as you like.
      3. Season to taste with salt and pepper, then serve immediately.

      Notes

      If desired, you can transfer to a baking dish, top with more cheese and broil a few minutes until the cheese has browned. NOTE: Cook time does not include the time it take the IP to come to pressure and release it.

      Nutrition Information:
      Yield: 4 Serving Size: 1
      Amount Per Serving: Calories: 773Total Fat: 47gSaturated Fat: 26gTrans Fat: 1gUnsaturated Fat: 14gCholesterol: 135mgSodium: 1659mgCarbohydrates: 45gFiber: 2gSugar: 7gProtein: 42g

      This data was provided and calculated by Nutritionix.

      © Kristy Bernardo
      Cuisine: American / Category: Dinner
      Instant Pot Mac and Cheese - 2 Ways

      Try these Instant Pot recipes next!

      • Instant Pot Beef Stroganoff
      • Instant Pot Chicken Pot Pie
      • Instant Pot Scalloped Potatoes
      • Instant Pot Pulled Pork
      • Instant Pot Pumpkin Cheesecake

      Easy Green Bean Casserole with Blue Cheese

      November 4, 2022 by Kristy Bernardo 63 Comments

      Green Bean Casserole Recipe

      This Easy Green Bean Casserole recipe is creamy and full of flavor with a crunchy topping made with panko breadcrumbs and french fried onions.

      Green bean casserole is one of those side dishes that everyone loves and has stood the test of time. The Green Bean Casserole recipe was originally developed as an everyday side dish by Campbell Soup employee, Dorcas Reilly, in the 1950s! Amazingly it didn't take off as a Thanksgiving favorite until the 1960s when Campbell's put the recipe on the Cream of Mushroom soup can label.

      Best Green Bean Casserole Recipe

      Why Make Green Bean Casserole

      I do love the classic version, but I also love blue cheese and this recipe makes for a great twist to the standard Green Bean Casserole recipe.

      I switched up the french fried onion topping just a bit, too. Instead of just piling the onions on, I chopped some up then mixed them with some panko breadcrumbs and melted butter.

      I serve extra french fried onions on the side - I don't want to take away too much tradition (plus they're good to just snack on). The topping could easily be doubled, too, and either use it all on the casserole or serve some extra on the side (just toast the extra in a skillet instead of the oven).

      Ingredients

      Green Beans: Fresh, frozen, or canned green beans can be used for this recipe. If using canned green beans drain them very well. If using fresh or frozen, blanch (boil) the beans for about 5-7 minutes until partially cooked. Fresh or frozen green beans will not soften enough while baking alone. Whether you opt for regular green beans or the french cut green beans is your preference.

      Blue Cheese Casserole Sauce: I've taken this classic holiday side dish and eliminated the canned soup. The sauce is so fast and easy to make that I promise you won't mind. It comes together super fast and has a more sophisticated flavor thanks to the creamy blue cheese sauce - perfect for Thanksgiving or anytime!

      Panko Breadcrumbs & French Fried Onions: I love a good, crunchy topping and crunchy breadcrumbs and golden brown onions add a delicious twist on green bean casserole. If you prefer, skip the french fried onions and just use all panko bread crumbs or vice versa.

      How to Make Green Bean Casserole

      • Cook or Drain Beans: If fresh or frozen, cook the beans. If canned, drain the green beans in a colander. Allow to drain thoroughly.
      • Prepare the Sauce: Slowly combine the ingredients over a medium heat and pour into a baking dish.
      • Mix and Top: Mix the casserole with french fried onions and breadcrumbs and top it off.
      • Bake: Bake until hot and bubbly and the topping is nicely browned.

      Substitutions & Tips

      For a different spin on this recipe try these ideas.

      • The same recipe can also be applied to almost any vegetable. Broccoli, cauliflower and brussels sprouts are great twists on this classic!
      • Cut the green beans in half or thirds for easier eating or leave them whole.
      • If you simply must have mushrooms in your casserole feel free to add your favorite mushroom. About 8 ounces should do it and mix in at the same time as the onions.
      • Substitute blue cheese with goat cheese.
      • Sprinkle on crumbled cooked bacon right before serving.
      • Spicy Fried Onions - Mix fried onions with a Cajun seasoning for a spicy topping.
      • Add-in Ideas:
        • Meat: Bacon, sausage
        • Heat: Jalapeños, red chili flakes
        • Vegetables: Mushrooms, green chiles
        • Nuts: Almonds, pecans
      Blue Cheese Green Bean Casserole Recipe

      Make Ahead of Time

      This Thanksgiving side dish can be made ahead of time and placed in the freezer. Before baking, wrap the dish without the topping, cover with plastic wrap or foil and refrigerate. If you add the topping before refrigerating, they'll turn out soggy instead of crispy.

      When you're ready to bake, cool to room temperature, add the topping and a couple minutes to your timer to adjust to the colder temperature.

      Storage & Reheating

      Store any leftovers in an airtight container or cover the casserole dish with plastic wrap or foil and refrigerate. This side dish will last up to three or four days refrigerated and leftovers can be reheated in the microwave or oven.

      The best way to reheat green bean casserole is in the oven at 350°F for 15-30 minutes. Try adding more panko breadcrumbs and french fried onions before baking to bring back the crunch.

      The quickest way to reheat this side dish in a microwave at 30 seconds intervals until hot.

      Green Bean Casserole Recipe

      Easy Green Bean Casserole with Blue Cheese

      Yield: 10 servings
      Prep Time: 10 minutes
      Cook Time: 20 minutes
      Total Time: 30 minutes

      This easy Green Bean Casserole that is so delicious you’re going to want to make it all year long, not just for the holidays!

      Ingredients

      • 2 tablespoons extra-virgin olive oil
      • 1 sweet onion, chopped
      • 2 garlic cloves, minced
      • ½ cup butter, divided
      • 2 tablespoons flour
      • 1 pint heavy cream
      • ½ cup crumbled blue cheese
      • 7 cups green beans or 4 cans
      • 1 cup french fried onions, chopped
      • 1 cup panko breadcrumbs
      • kosher salt and freshly ground black pepper

      Instructions

      1. Preheat oven to 400F.
      2. If fresh or frozen, cook the beans. If canned, drain the green beans in a colander. Allow to drain thoroughly.
      3. Heat EVOO in a large skillet. Add onions and cook over medium heat until soft and translucent, about 5 minutes. Add garlic, cook one minute more. Add ¼ cup butter to pan, melt and stir into onions. Sprinkle flour over butter mixture, stir and cook flour for another 1-2 minutes. Slowly stir in heavy cream. Bring to a simmer, add blue cheese and turn off heat. Stir until blue cheese is incorporated (small pieces are okay). Season to taste with salt and pepper.
      4. Gently add green beans to skillet and mix until well-coated. Pour mixture into a baking dish.
      5. In a small bowl, melt remaining butter in microwave. Add chopped french fried onions and breadcrumbs, mix thoroughly. Sprinkle mixture over casserole.
      6. Bake for 10-15 minutes or until hot and bubbly and topping is nicely browned. Serve immediately.

      Notes

      If your blue cheese is very strong, start by adding a lesser amount then adding more to taste.

      Nutrition Information:
      Yield: 10 Serving Size: 1
      Amount Per Serving: Calories: 418Total Fat: 34gSaturated Fat: 19gTrans Fat: 1gUnsaturated Fat: 13gCholesterol: 83mgSodium: 345mgCarbohydrates: 24gFiber: 4gSugar: 7gProtein: 7g

      This data was provided and calculated by Nutritionix.

      © Kristy Bernardo
      Cuisine: American / Category: Sides
      Easy Green Bean Casserole with Blue Cheese

      Sauteed Green Beans and Mushrooms

      November 3, 2022 by Kristy Bernardo 18 Comments

      Sauteed Green Beans and Mushrooms

      Sautéed Green Beans and Mushrooms with Parmesan - four ingredients and SO healthy and perfect for weeknights and holidays!

      A delicious vegetarian, keto and gluten-free recipe made with a few simple ingredients and incredibly easy to make!

      Sauteed Green Beans and Mushrooms

      Why You'll Love This Green Beans and Mushrooms Recipe

      This is what you need for this recipe:

      Ingredients

      • Green Beans: Fresh and snapped, either slender French green beans or regular green beans.
      • Mushrooms: This recipe calls for portobello mushrooms. Most mushrooms will work including Crimini (aka baby bellas), shiitake, white button and wild mushrooms. Gills should be removed and thickly sliced.
      • Canola or vegetable oil: Use for sautéing. Ghee can also be used.
      • Garlic cloves: Minced garlic adds wonderful flavor.
      • Parmigiano Reggiano: Finely grated parmesan.
      • Kosher Salt & Black Pepper: Use freshly ground black pepper and season to taste.

      (Scroll down to the bottom for the printable recipe card with exact measurements and instructions.)

      How to Make Green Beans and Mushrooms

      Just Blanch, Shock, Sauté and you're done!

      1. Blanch: Add beans to a pot of boiling water and cook for two minutes.
      2. Shocking: Rinse in cold water, drain and set aside (shocking immediately stop the cooking process).
      3. Sauté: Heat oil in a large skillet over HIGH heat. Add mushroom slices and cook, stirring occasionally until well browned, about 8 minutes. (Cook until mushrooms release their water and it's evaporated, then allow to continue to brown).
      4. Reduce heat to medium. Add green beans and minced garlic; cook, stirring frequently, for another two minutes, tasting and seasoning with kosher salt and freshly ground black pepper.
      5. Place on serving plate and grate parmesan cheese over the top.

      Can you use Canned or Frozen Green Beans?

      Fresh anything almost always yields the a better flavor but frozen green beans are perfectly acceptable. Just add a minute or two to boil since they green beans start off frozen. I would avoid canned green greens as the flavor is just not as good plus they have less nutrients and sodium is added.

      Why Blanch Before Sautéing?

      Blanching, along with shocking is an important step for tenderizing hard vegetables and producing perfectly crisp, tender green beans.

      The best part is that you can blanch the green beans ahead of time then toss them at room temperature into the hot pan; they'll heat up in no time. Be sure to keep them crisp; I like to take them out of the boiling water after no more than two minutes.

      What to Serve Them With?

      This green beans and mushrooms recipe works well with so many main dishes such as meat, chicken, seafood and veggie dishes. For a full dinner menu try this recipe with Prime Rib and a Garlic-Peppercorn Crust, Carrot Souffle and Loaded Mashed Potatoes. This dish adds something bright and colorful plus a different texture and a slight bit of crunch.

      This is a bit of a cheater recipe, if only because it starts with another of my much-requested recipes, Garlic Portobellos with Pecorino Romano. But it's one of my personal favorites and I make it so often that I was bound to make a twist on it at some point.

      Sauteed Green Beans and Mushrooms

      Sauteed Green Beans and Mushrooms

      Yield: 8
      Prep Time: 5 minutes
      Cook Time: 12 minutes
      Total Time: 17 minutes

      Easy, healthy and fast!

      Ingredients

      • 2 tablespoons canola or vegetable oil, can also use ghee
      • 4 portobello mushrooms, gills removed and thickly sliced
      • 3-4 cups fresh green beans, snapped
      • 4-5 garlic cloves, minced
      • ¼ cup or more finely grated Parmigiano Reggiano
      • kosher salt & freshly ground black pepper, to taste

      Instructions

      1. Bring a large pot of water to a boil. Add beans and cook for two minutes. Rinse in cold water, drain and set aside.
      2. Heat canola oil in a large skillet over HIGH heat. Add mushroom slices and cook, stirring occasionally until well browned, about 8 minutes. (Cook until mushrooms release their water and it's evaporated, then allow to continue to brown).
      3. Reduce heat to medium. Add green beans and minced garlic; cook, stirring frequently, for another two minutes, tasting and seasoning with kosher salt and freshly ground black pepper.
      4. Place on serving plate and grate cheese over the top.

      Notes

      Always cook mushrooms over HIGH heat. Allow them to release their water, evaporate then brown!

      Nutrition Information:

      Amount Per Serving: Calories: 66Saturated Fat: 3gCholesterol: 2mgSodium: 56mgCarbohydrates: 5gFiber: 1gSugar: 2gProtein: 2g
      © Kristy Bernardo
      Cuisine: American / Category: Sides
      Sauteed Green Beans and Mushrooms

      Sweet Potato Casserole with Pecan Topping AND Melted Marshmallow Drizzle

      November 3, 2022 by Kristy Bernardo 7 Comments

      Sweet Potato Casserole with Marshmallow Drizzle and a Buttered Pecan Topping

      This Sweet Potato Casserole with Pecans and Marshmallows is the best of both worlds: a crunchy, buttery pecan topping and a gooey, golden marshmallow drizzle. Roasted sweet potatoes are whipped until silky smooth and sweetened just enough, then topped with a crunchy streusel and finished with a warm, creamy marshmallow topping. It's a beloved Thanksgiving and Christmas side dish with a delicious twist!

      an overhead shot of Sweet Potato Casserole with pecans and Marshmallows melted and drizzled over the top

      Why You'll Love This Recipe

      • Two toppings in one! Can't decide between pecans or marshmallows? You don't have to.
      • Roasted sweet potatoes have a deep, caramelized flavor.
      • Perfect texture combo: Creamy base, crunchy topping, soft marshmallow finish.
      • Make-ahead friendly: for stress-free holidays.
      • Crowd favorite: this dish disappears fast every time!

      Ingredients You'll Need

      For the Sweet Potato Base

      • 5 medium sweet potatoes
      • Cooking oil
      • ½ cup granulated sugar
      • 2 eggs, beaten
      • 1 (5 oz) can evaporated milk
      • ¼ cup butter, softened
      • 1 teaspoon vanilla extract
      • ½ teaspoon salt

      For the Pecan Topping

      • ½ cup all-purpose flour
      • ½ cup light brown sugar
      • ¼ cup butter, very soft
      • 1 cup chopped pecans

      For the Marshmallow Drizzle

      • 2 tablespoon butter
      • 10 regular-sized marshmallows
      a closeup of Sweet Potato Casserole with pecans and Marshmallows melted and drizzled over the top

      How to Make Sweet Potato Casserole with Pecans and Marshmallows

      Roast the Sweet Potatoes

      • Preheat oven to 400°F.
      • Rub each sweet potato with a little oil and prick them several times with a fork.
      • Place them on a foil-lined baking sheet and roast for about 1 hour, or until very soft.
      • Remove from the oven, let them cool, then remove the skins and discard.

      Prepare the Sweet Potato Mixture

      • Place the peeled sweet potatoes in a bowl.
      • Add the sugar, eggs, evaporated milk, butter, vanilla, and salt.
      • Use a hand mixer until the mixture is smooth and fluffy.
      • Spread the mixture evenly into a greased baking dish.

      Make the Pecan Topping

      • In a small bowl, mix the flour and brown sugar.
      • Cut in the butter with a fork until small pea-sized crumbles form.
      • Stir in the chopped pecans.
      • Sprinkle the pecan mixture over the sweet potato mixture.

      Bake

      • Bake uncovered at 350°F for 30 minutes, until hot and lightly golden on top.

      Add the Marshmallow Drizzle

      • Melt the marshmallows and butter in a saucepan over low heat until smooth.
      • Coat the inside of a heat-resistant resealable plastic bag (you can find these online) with cooking spray, then CAREFULLY pour in the hot marshmallow mixture. You will likely need oven mitts or heat-resistant gloves as the mixture will be VERY HOT.
      • Snip one corner of the bag and drizzle the mixture over the baked casserole.
      • Serve warm.

      Tips for Success

      • Roasting vs. boiling: Roasting concentrates flavor and keeps potatoes from becoming watery.
      • Don't skip the salt: It balances the sweetness and enhances the flavor.
      • Use room-temperature ingredients for easier blending.
      • To save time, you can roast and mash the sweet potatoes up to 3 days ahead.
      an overhead side shot of Sweet Potato Casserole with pecans and Marshmallows melted and drizzled over the top

      Make Ahead Instructions

      • Prepare the sweet potato filling and spread into the baking dish.
      • Mix the pecan topping and store separately in an airtight container at room temp.
      • Refrigerate the sweet potato base up to 3 days.
      • When ready to bake, bring to room temp, add the pecan topping, and bake as directed.
      • Prepare and drizzle the marshmallow topping just before serving.

      Frequently Asked Questions

      Can I use canned sweet potatoes?
      Fresh roasted sweet potatoes are best for texture and flavor, but canned sweet potatoes (drained and mashed) can work in a pinch.

      What size baking dish should I use?
      A 9x13-inch dish or 2-quart baking dish works great for this recipe.

      Can I use mini marshmallows instead of a drizzle?
      Yes! Simply sprinkle them on top during the last 5 minutes of baking instead of using the melted drizzle.

      Can I make it nut-free?
      Absolutely. Just leave off the pecans or substitute with oats or crushed pretzels for crunch.


      If you're building out your holiday menu, I've got a few more showstoppers! For a classic appetizer that never fails to impress, try these Oysters Rockefeller - they're incredible and always disappear fast. And Beef Wellington Bites are elegant and bite-sized.

      For the main course, these Braised Beef Short Ribs are simmered in red wine and garlic, and they're a very popular recipe on this site. A couple of other popular recipes are this Boneless Prime Rib with a Garlic-Herb Crust or a this Rib Roast with a Wet Rub - both are very simple to make and practically fool-proof! And if you're going the traditional route, don't miss my guide on How to Cook a Spiral Ham, complete with a sweet and savory ham glaze recipe that's holiday magic.

      an overhead side shot of Sweet Potato Casserole with pecans and Marshmallows melted and drizzled over the top

      Sweet Potato Casserole with Marshmallow Pecan Topping

      Yield: 8-12 servings
      Prep Time: 30 minutes
      Cook Time: 1 hour 35 minutes
      Total Time: 2 hours 5 minutes

      This sweet potato casserole recipe is sprinkled with a delicious marshmallow pecan topping for crunchy and soft contrast. It's a traditional Christmas AND Thanksgiving side dish at our dinner table.

      Ingredients

      For the sweet potatoes

      • 5 medium sweet potatoes
      • vegetable or canola oil
      • ½ cup white sugar
      • 2 eggs, beaten
      • 1 5- ounce can evaporated milk
      • ¼ cup butter, very soft
      • 1 teaspoon vanilla extract
      • ½ teaspoon salt

      For the Pecan Topping

      • ½ cup all-purpose flour
      • ½ cup light brown sugar
      • ¼ cup butter, very soft
      • 1 cup pecans, chopped

      For the Marshmallow Drizzle

      • 2 tablespoons butter
      • 10 regular-sized marshmallows

      Instructions

      1. Preheat oven to 400F.
      2. Rub each potato with a small amount of oil. Pierce each potato several times with a fork. Place on sheet pan lined with foil. Roast potatoes for approximately one hour or until soft (time depends on size of potatoes). Remove from oven and set aside until cool enough to handle.
      3. Remove skins from potatoes and discard. Place potatoes in medium-sized bowl then add sugar, eggs, evaporated milk, butter, vanilla extract and salt. Use a hand mixer to thoroughly whip. Pour into greased baking dish, leveling top.
      4. Make the topping: Mix together flour and sugar in small bowl. Cut in butter with a fork until only small pea-sized clumps remain. Stir in pecans. Spread topping over sweet potato mixture, covering casserole completely.
      5. Bake for 30 minutes or until heated through and topping is lightly browned.
      6. Melt marshmallows and butter in a saucepan until smooth. CAREFULLY place marshmallow mixture into a resealable plastic bag coated with cooking spray on the inside (CAREFUL!! MIXTURE WILL BE VERY HOT!!). Using a hot pad to protect your hands, snip one corner off of the bag and drizzle mixture over pecan topping.
      7. Serve immediately.

      Notes

      • Piercing the potatoes allows the steam to escape when baking.
      • Instead of removing skins you can also slice each one in half and use a big spoon to scoop the insides out.

      Nutrition Information:
      Yield: 12 Serving Size: 1
      Amount Per Serving: Calories: 332Total Fat: 19gSaturated Fat: 8gTrans Fat: 0gUnsaturated Fat: 10gCholesterol: 60mgSodium: 217mgCarbohydrates: 38gFiber: 3gSugar: 24gProtein: 5g

      This data was provided and calculated by Nutritionix.

      © Kristy Bernardo
      Cuisine: American / Category: Sides
      Sweet Potato Casserole with Pecan Topping AND Melted Marshmallow Drizzle

      Homemade Turkey Gravy Recipe

      October 28, 2022 by Heidi Deal 1 Comment

      Homemade Turkey Gravy Recipe

      No turkey is complete without a side of homemade gravy. Thankfully, making turkey gravy with drippings is super easy. Here are a few methods to make your own homemade turkey gravy to accompany your juicy turkey, whether you're serving your bird for Christmas or Thanksgiving dinner or any time of the year.

      Turkey Gravy Recipe

      How To Make Turkey Gravy from Drippings

      To Strain Or Not To Strain

      Some people strain their turkey drippings before adding it to a pot to make gravy. This is not a right or wrong issue, it's strictly personal preference.

      If you like smooth gravy with no lumps or bits of turkey, you'll want to separate the liquid from the solids. To strain your pan drippings, you'll need a medium bowl and a fine mesh strainer.

      • Place the mesh strainer over the bowl.
      • Use a ladle to scoop pan drippings out of the roasting pan and into the strainer, allowing the liquid to drain into the bowl.
      • Strain the pan drippings until you have 3 cups of liquid in the bowl.
      • Discard the solids.

      If you don't mind the solids, you can simply use a ladle to gently stir the pan drippings in the roasting pan, and scoop out 3 cups of liquid. Pour the pan drippings into a medium bowl.

      Pan Drippings From Roasted Turkey To Use For Homemade Turkey Gravy

      Preparing Gravy

      • Collect your pan drippings and set them aside in a separate bowl.
      • Melt about ¼ cup of butter over medium heat in a medium saucepan.
      • Whisk in ¼ cup of flour to make a roux.
      • You can add 2 teaspoons of thyme (ground, dried or fresh, chopped) during this step as well. Whisk butter, flour, and thyme together for about one minute.
      • Slowly whisk in your pan drippings about ½ cup at a time. Continue to whisk, bring the gravy to a boil.
      • When gravy comes to a boil, reduce heat slightly and continue whisking until thickened. This can take 5 to 10 minutes.
      • Add salt and pepper to taste.

      A few notes on pan drippings: If you don't have enough pan drippings to make three cups, use as much as you can, then add chicken broth to make up the difference. If you have a lot of fat (the oily layer on the pan drippings), you can spoon off as much of that as you can before scooping out your pan drippings.

      Alternate Thickening Method

      • An alternative thickening technique is to add 2 tablespoons of cornstarch to ¼ cup of room temperature chicken broth. Stir until cornstarch is mixed well into the broth.
      • Bring butter, thyme, and pan drippings to a boil over medium heat.
      • Slowly stir cornstarch mixture into pan drippings and simmer until thickened. *Don't put all of the cornstarch mixture in at once. To avoid over thickening, or jelly-like gravy, pour in a little at a time, stir it around and simmer it for a minute to see how much it thickens. Continue adding the cornstarch mixture until you reach the desired consistency.
      • Continue to stir until gravy has thickened.
      • Turn off heat and season with salt and pepper to taste.

      If your gravy gets too thick, add a little more broth, a splash at a time until you get back to your desired thickness.

      Turkey Gravy Ingredients

      • Pan drippings from the turkey roasting pan
      • ¼ cup butter
      • ¼ cup of flour (if making roux)
      • 2 Tablespoons of cornstarch (if using alternate thickening method)
      • ¼ cup of chicken broth (if using cornstarch to thicken)
      • Thyme - I prefer 1 to 2 teaspoons of ground, dried thyme. If you use fresh thyme, chop it finely and sauté it in the butter to soften it before adding other ingredients
      • Salt and pepper

      Trimmings: If you prefer, add the trimmings and anything used to flavor the turkey to elevate the gravy. Chop any vegetables, herbs or bacon and add any turkey trimmings including parson's nose, giblets (I love this giblet gravy recipe), wing, and drumstick tips.

      What To Add To Homemade Turkey Gravy

      If you want to add more seasoning to your homemade turkey gravy, you can add more herbs, fresh or dried. You may want to try:

      • Garlic
      • Rosemary
      • Sage
      • Parsley
      • White wine, sherry or dry cider
      • Soy sauce or Worcestershire sauce
      • Lemon juice or vinegar
      • Brewed coffee (redeye gravy)
      • Crushed walnuts (just before serving)

      If you like onions, sauté ¼ cup of finely chopped onion in ¼ cup of butter in the sauce pan with the fresh or ground herbs. Cook until onions are soft, then add the other ingredients and pan drippings.

      While we like our homemade turkey gravy pretty basic for our Thanksgiving turkey since we are topping it on stuffing, mashed potatoes, mac and cheese, and other Thanksgiving sides. But if you are adventurous and want to try adding something else to your gravy, here are a few things you can experiment with:

      • 2-3 tablespoons of of heavy cream
      • 2 tablespoons of sour cream
      • 2 tablespoons of Dijon mustard
      • ¼ cup of chopped mushrooms (sauté in butter before adding the rest of the ingredients)

      Can You Make Turkey Gravy Without Drippings?

      Yes! You can make gravy with this recipe by using chicken or turkey broth, or vegetable broth if you prefer.

      How To Store Leftover Gravy

      Leftover turkey gravy can be stored in an airtight container in the fridge for 3 to 5 days, and in the freezer for up to six months.

      How To Use Leftover Gravy

      You probably have leftover turkey (and mashed potatoes) to smother with gravy, but you can add it to other recipes too. Pour it over a casserole, use it as the sauce in a chicken pot pie, use it as a dip for crescent rolls or french fries, make a poutine, add it to cooked and crumbled breakfast sausage and serve it over biscuits, make chicken and dumplings.

      Here are the best ways to reheat gravy and a list of Creative Thanksgiving Leftover Recipes if you need inspiration!

      Easy Homemade Turkey Gravy

      Homemade Turkey Gravy

      Yield: 3 ½ Cups
      Prep Time: 5 minutes
      Cook Time: 15 minutes
      Total Time: 20 minutes

      Use the pan drippings from your roasted turkey to make this easy homemade turkey gravy recipe.

      Ingredients

      • 3 Cups Pan Drippings from Roasted Turkey
      • ¼ Cup Butter
      • ¼ Cup Flour
      • 2 Teaspoons dried, ground Thyme
      • Salt & Pepper to taste

      Instructions

      1. Collect your pan drippings and set them aside in a separate bowl.
      2. Melt about ¼ cup of butter over medium heat in a medium saucepan.
      3. Whisk in ¼ cup of flour to make a roux.
      4. You can add 2 teaspoons of thyme during this step as well. Whisk butter, flour, and thyme together for about one minute.
      5. Slowly Whisk in your pan drippings about ½ cup at a time. Continue to whisk, bringing the gravy to a boil.
      6. When gravy comes to a boil, reduce heat slightly and continue whisking until thickened. This can take 5 to 10 minutes.
      7. Add salt and pepper to taste.
      © Heidi Deal
      Cuisine: American / Category: Dinner
      Homemade Turkey Gravy Recipe

      Juicy Turkey Recipe with Crispy Skin!

      October 25, 2022 by Kristy Bernardo 25 Comments

      Juicy Turkey Recipe

      This juicy turkey recipe with crispy skin is easy! The secret is to start out low-and-slow then crank up the heat to crisp up the skin for the finish.

      Juicy Turkey Recipe

      Juicy Turkey Ingredients

      • 12 pound turkey
      • Butter, melted
      • Kosher salt & freshly ground black pepper
      • Handful each of fresh thyme and rosemary
      • Carrots
      • Celery
      • Vegetable, chicken or turkey stock

      If you like a tinge of lemon with your turkey, add lemon wedges inside the turkey to help the meat stay moist.

      Why Make this Turkey Recipe

      Dry turkey is the death of a truly great, memorable Thanksgiving meal, so it's no wonder that it's known to make even seasoned cooks a little nervous. It doesn't need to, though, as it's really quite simple to prepare a perfect Thanksgiving turkey every single year if you use this easy juicy turkey recipe!

      The problem is that for really juicy, tender turkey meat, you need to cook it low and slow. But doing so prevents the skin from getting crispy and achieving that deep, gorgeous brown color that makes your turkey look like something off the cover of Food and Wine magazine. To get crispy, deeply browned skin you need to cook your turkey over a high heat so the fat renders and gets crispy.

      So how do you get a juicy bird AND crispy skin?

      How to Cook a Turkey in Oven

      Scroll down to the bottom for the printable step-by-step recipe but here's a brief overview on cooking a turkey for Thanksgiving, Christmas, or any meal year round.

      1. Season the Turkey: Pat the turkey dry with paper towels then season the inside and out with kosher salt and freshly ground pepper. Place herbs, carrots and celery into turkey cavity. Place breast-side up in a roasting pan and brush all over with melted butter. Pour stock into bottom of roasting pan.

      2. Roast the Turkey: Tent with foil and roast for 2 ½ hours (add 15 minutes for each additional pound).

      How to Make Turkey Crispy Skin in Oven

      The trick is to start out low and slow then crank up your heat during the last hour or so, allowing the skin to crisp and brown while keeping the meat tender and juicy.

      3. Remove & Baste: Remove the foil and baste with remaining melted butter.

      4. Increase Oven Temperature: For crispy skin increase the oven temperature to 425°F. Place the turkey back in the oven and roast for another hour or until the meat at the thigh registers 165°F. Add more stock to bottom of roasting pan, if needed.

      I've been using this juicy turkey recipe for years and it has never, ever failed me.

      Juicy Turkey Tips

      • Flavored butter: Enhance the flavor with herb-butter by combining softened butter with chopped herbs, citrus zest, garlic, and any other seasonings.
      • Pin the skin: Use toothpicks to keep the skin from shrinking back during cooking and drying out the meat.
      • Move the oven rack: The turkey should be in the center of the oven which may mean moving your oven rack up or down.
      • Rest before carving: Prior to carving, rest the turkey in a warm place so the heat evenly transfers throughout the turkey.
      • Extra meat: I like to serve additional white meat by preparing a separate turkey breast. This smoked turkey breast recipe not only offers extra meat but also introduces a distinct smoky flavor.

      Juicy Turkey with Gravy

      No Thanksgiving turkey (or table) is complete without a side of homemade gravy. Making gravy from the pan drippings is super easy. Check out our simple recipe to make your own gravy to accompany this juicy turkey recipe.

      How to Thaw a Turkey

      1. Allow at least one day of thawing for every 5 lbs. of turkey
      2. Thaw turkey breast side up, in its original wrapping on tray or baking pan (40°F or below)
      3. Cook the turkey within three days after thawing

      You can also thaw a turkey in its original wrapping in cold water and completely submerged in a bucket or sink. Allow approximately 30 minutes for every pound of turkey.

      What Size of Turkey Should I Get?

      1 lb. per person is the minimum recommended size turkey to buy but to avoid any fear of not having enough, I suggest buying about 1 ¼ lb. turkey per person. Maybe consider 1 ½ lbs. for a Thanksgiving dinner in case you and your family love leftover turkey.

      Other factors to consider are little kids that might not eat much or growing teens and a family full of football players that will eat more than their fair share. If you're serving other meats like a holiday ham, you may want to consider less as well.

      An alternative solution to cooking a larger turkey is to accompany a whole turkey with a turkey breast.

      How to Store Turkey Leftovers

      For many, leftover turkey after Thanksgiving dinner is the best part of the Thanksgiving holiday. Before sitting back to spend time with family and friends, it is important to store the leftovers within 2 hours after being in room temperature.

      To store the turkey, remove the turkey from the bone, cut into smaller pieces and store in airtight containers or freezer-safe bags. Leftover turkey in the refrigerator should be used within three to four days and frozen turkey should be used within 6 months.

      The trick to keeping leftover turkey moist and juicy is to add moisture and fat. Chicken broth, turkey stock and butter will work!

      And lastly, if here are the best ways to reheat turkey for juicy, moist leftover turkey.

      Talk Turkey? Did you know Butterball offers a Turkey Talk Line where live turkey experts will answer your turkey questions. Call 1-800-BUTTERBALL or text 844-877-3456 to chat.

      Juicy Turkey Recipe

      Easy Juicy Roasted Turkey with Crispy Skin

      Yield: 12 servings
      Prep Time: 10 minutes
      Cook Time: 3 hours 30 minutes
      Total Time: 3 hours 40 minutes

      This recipe for a juicy roasted turkey is so simple yet foolproof!

      Ingredients

      • 1 12- pound turkey
      • 1 cup butter, melted
      • kosher salt & freshly ground black pepper
      • handful each of fresh thyme and rosemary
      • 2 carrots, cut into 6 pieces
      • 1 celery stalk, cut into 6 pieces
      • 4-6 cups vegetable, chicken or turkey stock

      Instructions

      1. Preheat the oven to 325°F.
      2. Remove the neck and giblets from the cavity. Pat the turkey dry with paper towels then season the inside and out with kosher salt and freshly ground pepper. Place herbs, carrots and celery into turkey cavity.
      3. Place breast-side up in a roasting pan and brush all over with ½ cup melted butter. Pour 4 cups stock into bottom of roasting pan. Tent with foil and roast for 2 ½ hours (add 15 minutes for each additional pound). Remove the foil, baste with remaining melted butter. Increase oven temperature to 425°F. Place turkey back in oven and roast for another hour or until the meat at the thigh registers 165°F. Add more stock to bottom of roasting pan, if needed.
      4. Remove from oven and loosely tent turkey with foil. Allow to rest for 45 minutes before serving.
      Nutrition Information:
      Yield: 12 Serving Size: 1
      Amount Per Serving: Calories: 1115Total Fat: 51gSaturated Fat: 20gTrans Fat: 1gUnsaturated Fat: 27gCholesterol: 542mgSodium: 742mgCarbohydrates: 22gFiber: 9gSugar: 8gProtein: 137g

      This data was provided and calculated by Nutritionix.

      © Kristy Bernardo
      Cuisine: American / Category: Dinner
      Juicy Turkey Recipe with Crispy Skin!

      Try these Thanksgiving sides, drinks and desserts with your juicy turkey:

      • Homemade Turkey Gravy
      • Stuffing
      • Mashed Potatoes
      • Cranberry Sauce
      • Creamed Onions
      • Easy Pumpkin Bread
      • Pumpkin Pie Cake
      • Sweet Potato Casserole with a Crunchy Pecan Topping and a Marshmallow Drizzle
      • Holiday Cocktails

      Cranberry Oatmeal Chocolate Chip Cookies

      October 24, 2022 by Kristy Bernardo Leave a Comment

      cranberry oatmeal chocolate chip cookies that have just been drizzled with melted chocolate

      When you've got fresh cranberries to use during the holidays, these cranberry oatmeal chocolate chip cookies are perfect! The addition of fresh cranberries adds a bright flavor that's perfect with the sweet, rich chocolate.

      cranberry oatmeal chocolate chip cookies cooling on a wire rack

      I found your recipe for the fresh cranberry & chocolate chip cookies and I've been making them every Christmas since 2011! They are a hit! I replace half of the chocolate chips with white chocolate chips and they're amazing both ways. - jkuip77 on Instagram

      The addition of fresh cranberries and drizzled chocolate makes these cranberry oatmeal chocolate chip cookies perfect for a Christmas cookie tray! They can be made all year long (and I often do) but they're perfect for the holidays. I usually pair them with almond crescent cookies and jam sandwich cookies so there's something for everyone!

      They're also really fun to make with kids. I let my kids measure and stir and put the dough on the cookie sheets. It can be messy and sometimes the cookies come out all different sizes (I may make slight adjustments before they go in, but please don't tell)! We listen to Christmas music and enjoy a cookies warm from the oven.

      cranberry oatmeal chocolate chip cookies that have just been drizzled with melted chocolate

      Ingredients

      • All-purpose flour
      • Baking soda
      • Cinnamon: This might seem like an unexpected ingredient, but the subtle, warm cinnamon flavor adds so much!
      • Salt: This really brings out all the flavors.
      • Unsalted butter: Make sure your butter has softened to room temperature or it won't cream properly.
      • Granulated sugar
      • Light brown sugar
      • A whole egg
      • Vanilla extract: You can also use vanilla bean paste.
      • Old-fashioned oats
      • Semi-sweet chocolate chips
      • Milk chocolate: I usually just use a chocolate bar for this (Hershey's is fine)!
      • Fresh cranberries: These are so inexpensive during the holidays, so I'll pick up a few extra bags and toss them in the freezer so I can make these cookies year-round. Dried cranberries can be substituted for fresh cranberries, but I highly recommend using fresh if you can get them. They add a soft texture that works really well with the chewiness of the cookie.
      • Milk chocolate or white chocolate, chopped (for drizzling)
      a closeup of cranberry oatmeal chocolate chip cookies that have just been drizzled with melted chocolate are cooling on a wire rack

      Instructions

      1. Preheat the oven first so it's ready when you are. Then line a large rimmed baking sheet with parchment paper and set it aside.
      2. Next you'll whisk the dry ingredients together (flour, baking soda, cinnamon, and salt). A whisk is the best for this!
      3. Now you'll want to beat the butter and both sugars until they're very smooth. I like to use a stand mixer for this, but a large mixing bowl and a hand mixer will also do the job just fine. Once you've creamed the butter and sugars, beat in the egg and vanilla until it's all combined.
      4. All that's left to make the dough is to combine the dry and wet ingredients! Add the flour mixture and the oats and mix just until it's blended, then stir in the chocolate chips, chocolate bar pieces and the chopped, fresh cranberries.
      5. Drop the dough by rounded tablespoonfuls onto the prepared sheet pan, approximately two inches apart. Bake the cookies until the edges are light brown, about 16 minutes. Cool for 5 minutes then transfer to a wire rack to cool completely.
      6. Optional: Using small spoon, drizzle melted chocolate over the cookies in zigzag pattern. Let them stand about an hour or until the milk chocolate sets.
      cranberry oatmeal chocolate chip cookies drizzled with melted chocolate are cooling on a wire rack

      Make Ahead

      Cranberry oatmeal chocolate chip cookies can be made ahead of time. Store them in an airtight container for up to 3 days at room temperature, or pop them in the freezer for up to 3 months (make sure to wrap them tightly and label the freezer bag).

      The cookie dough can also be frozen and baked when you're ready. I like to use the Souper Cubes cookie tray for portioning when I'm going to be freezing these, but you can also just make the balls without the tray.

      Just form the balls and freeze for about an hour, then put them into labeled freezer bags. The frozen dough balls can go straight from the freezer into the oven - no need to defrost! Just add a minute or two of extra baking time.

      Related Recipes

      Looking for more Christmas dessert recipes? Try these:

      • a white plate filled with m&m pretzel hugs
        M&M Pretzel Hugs (Easiest Christmas Cookies Ever!)
      • Coconut rum balls being rolled and coated in coconut
        Coconut Rum Balls
      • A side view of five chocolate covered pretzel rods decorated with different colors and sprinkles for Christmas
        Chocolate Covered Pretzel Rods
      • a round, vintage silver plate filled with chocolate shortbread cookies
        Chocolate Shortbread Cookies with Crunchy Pistachios

      Have you made these cranberry oatmeal chocolate chip cookies? We'd really appreciate if you could add your review below!

      cranberry oatmeal chocolate chip cookies that have just been drizzled with melted chocolate

      Cranberry Oatmeal Chocolate Chip Cookies

      Yield: 24 cookies
      Prep Time: 20 minutes
      Cook Time: 16 minutes
      Total Time: 36 minutes

      Fresh cranberries, oatmeal and chocolate chips all in one delicious cookie that's perfect for the holidays!

      Ingredients

      • 1 cup all purpose flour
      • ½ teaspoon baking soda
      • ½ teaspoon cinnamon
      • ¼ teaspoon salt
      • 10 tablespoons (1 ¼ sticks) unsalted butter, room temperature
      • ½ cup sugar
      • ½ cup packed light brown sugar
      • 1 large egg
      • 1 teaspoon vanilla extract
      • 1 cup old-fashioned oats
      • ½ cup semisweet chocolate chips
      • 1.5 - 2 ounces milk chocolate, chopped (a chocolate bar is perfect for this)
      • ½ cup coarsely chopped fresh cranberries
      • 2 ounces milk chocolate or white chocolate, melted (for drizzling; optional)

      Instructions

        1. Preheat the oven to 350°F and line a large rimmed baking sheet with parchment paper.
        2. In a medium-sized mixing bowl, add the flour, baking soda, cinnamon, and salt and whisk it to combine.
        3. In a large mixing bowl or the bowl of a stand mixer, beat the butter and both sugars until they're very smooth. Beat in the egg and vanilla.
        4. Add the flour mixture and the oats and mix just until it's blended. Stir in the chocolate chips, chocolate bar pieces and the chopped, fresh cranberries.
        5. Drop the dough by rounded tablespoonfuls onto the prepared sheet pan, approximately two inches apart. Bake the cookies until the edges are light brown, about 16 minutes. Cool for 5 minutes then transfer to a wire rack to cool completely.
        6. Optional: Using small spoon, drizzle melted chocolate over the cookies in zigzag pattern. Let them stand about an hour or until the milk chocolate sets.
      Nutrition Information:
      Yield: 24 Serving Size: 1
      Amount Per Serving: Calories: 221Total Fat: 9gSaturated Fat: 5gUnsaturated Fat: 4gCholesterol: 21mgSodium: 66mgCarbohydrates: 33gFiber: 2gSugar: 16gProtein: 3g

      This data was provided and calculated by Nutritionix.

      © Kristy Bernardo
      Cuisine: American / Category: Desserts
      Cranberry Oatmeal Chocolate Chip Cookies

      Crispy Smashed Potatoes

      October 22, 2022 by Kristy Bernardo 68 Comments

      Smashed Potatoes in Oven

      This easy Smashed Potato recipe will become your go-to recipe! Smashed Potatoes can be made mostly ahead of time then just toss them in the oven or air fryer.

      Smashed potatoes, also known as crash hot potatoes in Australia, are a tasty side dish or party snack for everyone to love and enjoy. Essentially, they are small potatoes that are cooked, smashed, and then roasted in the oven or an air fryer with oil.  The result is a delicious almost crispy French fry on the outside and a fluffy, creamy potato on the inside.

      Crispy Smashed Potatoes Recipe

      What kind of Potatoes should I use?

      I used baby red potatoes but you can really use any variety of small, round potato including small yellow potatoes.

      How to Make Smashed Potatoes

      Simply cook the potatoes by boiling until tender, give them a smash with your palm, fork, cup or potato masher and refrigerate until ready to toss in the oven.

      By roasting them over a high heat with olive oil and a little salt, you're ensuring your smashed potatoes will turn out crispy on the outside yet melt-in-your-mouth soft on the inside.

      (Scroll down to the bottom for the printable recipe card with exact measurements and recipe instructions.)

      How to Make Air Fryer Smashed Potatoes

      Smashed potatoes can be made in an air fryer. No boiling required!

      1. Rinse, scrub (if necessary) and dry the potatoes.
      2. Set the air fryer to 400ºF and cook for 15-20 minutes.
      3. Place the potatoes on a non-stick baking sheet and gently press each on with your palm, fork, cup or mug to flatten. Drizzle with olive oil and sprinkle generously with salt.
      4. Set the air fryer to 400ºF and cook for 15-20 minutes until the potatoes are crispy golden brown.

      Different types and sizes of air fryers cook faster or slower. Adjust cook times accordingly.

      Air Fryer Smashed Potatoes

      Smashed Potatoes Tips

      • Use small potatoes.
      • You can substitute a non-stick baking sheet by lining a baking sheet with foil and lightly grease it.
      • For maximum crispiness:
        • Drain the potatoes before baking to reduce moisture and any soggy results.
        • Let the potatoes steam dry after smashing them.

      Smashed Potato Variations

      These smashed potatoes taste great with this simple recipe but these variations and substitutes can enhance the flavor to your liking.

      • Try yellow potatoes e.g., Yukon Gold, instead of baby red potatoes.
      • Add garlic and herbs like smoked paprika, rosemary, chive, thyme, garlic powder and onion powder. 
      • Add crumbled bacon on top.
      • Substitute extra-virgin olive oil with butter, garlic butter, extra light olive oil or garlic infused oil.
      • Try adding salt and pepper to the olive oil.
      • Creamy or herbed sauces like a buttermilk ranch dressing really enhance the flavor and presentation.
      • Cheese lovers can add parmesan, cheddar, Romano or any cheese on top.
      • Add a dollop of sour cream.
      Crispy Smashed Potatoes

      How to Store

      Refrigerate leftover potatoes in an airtight container for up to 3 to 4 days. Reheat in a microwave, oven or air fryer.

      What Are Baby Red Potatoes

      Red potatoes are thin-skinned, small round or oval shaped potatoes with a light, buttery, earthy flavor and a creamy texture. They are sometimes called new potatoes, because they are young potatoes that commonly arrive in markets soon after they are harvested

      The main varieties in the red potato family are well suited to baking, roasting and boiling and also popular as a seasoned potato and in many types of dishes and potato salads.

      Red potatoes contain vitamin C, vitamin B6, fiber (particularly when eaten with the skin on), and some iron and are low in fat and high in potassium.

      Try these delicious potato recipes next!

      • Air Fryer Tater Tots
      • Crispy Baked Potato Wedges
      • Hasselback Baked Potatoes
      • Loaded Potato Skins
      • Patatas Bravas (Spanish Roasted Potatoes)
      • Twice Baked Potatoes
      Crispy Smashed Potatoes

      Crispy Smashed Potatoes Recipe

      Yield: 4 side servings
      Prep Time: 15 minutes
      Cook Time: 1 hour
      Total Time: 1 hour 15 minutes

      Smashed Potatoes are like a combination of a crispy French fry and a fluffy baked potato. The perfect side dish or appetizer for just about any party or dinner!

      Ingredients

      • 12 Baby Red Potatoes or yellow potatoes (about 1.5 lbs)
      • ½ cup extra-virgin olive oil
      • kosher salt & freshly ground black pepper

      Instructions

      1. Rinse, scrub (if necessary) and dry the potatoes.
      2. Fill a pot, dutch oven or deep skillet with water and place the potatoes in one layer. Add enough water to cover by an inch. Bring to a boil, then simmer until potatoes are cooked through and can be pierced easily with a fork (20-25 minutes).
      3. Preheat oven to 450°F.
      4. Drain potatoes well and pat dry. Place on non-stick baking sheet and gently press each on with your palm, fork, cup or potato masher to flatten. Drizzle with olive oil and sprinkle generously with salt.
      5. Roast potatoes for 20 minutes. Remove from oven, flip each potato over, drizzling with more olive oil if any look dry and seasoning with more salt, if necessary. Roast for another 20 minutes or until potatoes are sizzling and crispy.

      Notes

      Olive oil (or any oil or butter) helps the potatoes become crisp and golden brown.

      Nutrition Information:
      Yield: 4 Serving Size: 1
      Amount Per Serving: Calories: 1077Total Fat: 28gSaturated Fat: 4gTrans Fat: 0gUnsaturated Fat: 23gCholesterol: 0mgSodium: 186mgCarbohydrates: 185gFiber: 17gSugar: 13gProtein: 22g

      This data was provided and calculated by Nutritionix.

      © Kristy Bernardo
      Cuisine: American / Category: Sides
      Crispy Smashed Potatoes

      Nutella Mousse + Cake + Pie Variations

      October 22, 2022 by Kristy Bernardo 62 Comments

      Nutella Mousse Cake Recipe

      2 ingredient Nutella Mousse is a winner. Or add a few more ingredients & make a gorgeous, show-stopping Nutella Mousse cake or pie that will definitely impress!

      Let me just say that I was beyond excited when I made this awesome Nutella Mousse.  It takes all of five minutes (minus chill time) and yet it turns out a creamy, delicious Nutella Mousse with endless possibilities.

      Best Nutella Mousse Recipe

      What is Mousse?

      Mousse originated in the 18th century in France, where the word mousse translates as "foam." At its most basic mousse is made by made by folding aerators into a base to create a "foam". These aerators can be whipped cream, meringue, pâte à bombe, or a combination. The base can be many things including Nutella, chocolate, fruit curd, custard and much more.

      Why Make These Recipes

      This one is a major winner, folks.  And who doesn't love Nutella hazelnut spread?  This Nutella Mousse is right up there with my other Nutella favorite - Nutella Hot Chocolate - but I have to admit that I'm torn over which one I love most.  Possibly this one since it's something that, with a few minor tweaks, you could actually serve at the end of a nice holiday meal or dinner party.

      I made Nutella Mousse Cake for a dinner party and it was a showstopper! It's so simple that no one would believe it when I told them.

      Creamy, sweet Nutella Pie has whipped cream on top and a thick Oreo cookie crust. A delicious combination of chocolate and Nutella flavors.

      All these recipes are beyond easy to make, no baking is required and they're perfect for a last minute dessert idea or when you're feeling too lazy to cook but still want to impress.

      Ingredients

      Nutella Mousse Ingredients

      Nutella Mousse is only two ingredients!

      • Nutella
      • Whipping cream

      Try adding a layer or two of strawberries or raspberries, with a nice dollop of fresh whipped cream and some chocolate shavings to top it off. I usually just make it and enjoy it as is but it's always nice to have easy ways to dress up your recipes.

      Easy Nutella Mousse - uses just two ingredients!

      Nutella Mousse Cake Ingredients

      • Nutella
      • Whipping cream
      • Raspberries
      • Pound Cake (store bought, make your own, I went store bought)

      Nutella Mousse Cake is only four ingredients!

      Nutella Mousse Pie Ingredients

      • Nutella
      • Whipping cream
      • Oreo Pie Crust or Graham Cracker Pie Crust (store bought)

      How to Make Nutella Mousse

      Place Nutella and whipping cream in a mixing bowl. Whip cream and Nutella together until stiff peaks form. Chill for at least two hours. Serve as-is or layer with fresh berries and top with whipped cream and chocolate shavings.

      How to Make Nutella Mouse Cake

      Nutella Mousse Cake Recipe

      Cut the store-bought pound cake in half to get the circles which will make three cakes. Double the Nutella Mousse recipe, too (one cup Nutella and one cup whipping cream) and it will be about perfect. Any extra can just be cut up and layered the same way!

      So simple yet so impressive!

      How to Make Nutella Mousse Pie

      Triple the ingredients (1 ½cups Nutella/1 ½ cups whipping cream) and using a store-bought Oreo Pie Crust pour the mousse filling into the pie crust. Cover loosely and chill until just before serving.

      For garnishment try adding chocolate shavings, berries or other delicious toppings.

      Try yet another easy recipe with these 3-Ingredient Nutella Cookies.

      Nutella Mousse Cake Recipe

      Nutella Mousse + Cake + Pie Recipes

      Yield: 4
      Prep Time: 5 minutes
      Additional Time: 2 hours
      Total Time: 2 hours 5 minutes

      Three easy recipes in one. Impress your guests with Nutella Mousse, Nutella Mousse Cake or a Nutella Mousse pie. So simple, yet no one will know.

      Ingredients

      • ½ cup Nutella
      • ½ cup whipping cream

      Instructions

      1. Place Nutella and whipping cream in a mixing bowl. Whip cream and Nutella together until stiff peaks form.
      2. Chill for at least two hours. Serve as-is or layer with fresh berries and top with whipped cream and chocolate shavings.

      FOR NUTELLA MOUSSE CAKE:

      1. Double the ingredients (1 cup Nutella/1 cup whipping cream).
      2. Using a store-bought pound cake, cut circles out with food rings (see this video for instructions. Layer with mousse filling and raspberries. Cover loosely and chill until just before serving.

      FOR NUTELLA MOUSSE PIE:

    1. Triple the ingredients (1 ½cups Nutella/1 ½ cups whipping cream).
    2. Using a store-bought Oreo Pie Crust pour the mousse filling into the pie crust. Cover loosely and chill until just before serving.
    3. Nutrition Information:
      Yield: 4 Serving Size: 1
      Amount Per Serving: Calories: 255Total Fat: 19gSaturated Fat: 15gTrans Fat: 0gUnsaturated Fat: 3gCholesterol: 34mgSodium: 20mgCarbohydrates: 18gFiber: 2gSugar: 16gProtein: 2g

      This data was provided and calculated by Nutritionix.

      © Kristy Bernardo
      Cuisine: American / Category: Desserts
      Nutella Mousse + Cake + Pie Variations

      How To Reheat Sushi

      October 17, 2022 by Monique McArthur Leave a Comment

      How To Reheat Sushi

      Leftover sushi from your favorite restaurant is a common occurrence for many. The good news is that there are many ways to reheat sushi including in a microwave, oven, air fryer, toaster and more. Here is our guide on how to reheat sushi.

      Many people want to know how to reheat sushi. This is a loaded subject because it's easy to get certain technical aspects of Japanese cuisine wrong as a newcomer; what is the difference between sushi and sashimi, for example?

      How To Reheat Sushi

      Both involve prepared raw fish, but sashimi is raw fish with no rice. Sushi can be rolls known as maki-sushi, it can be a bowl of rice with raw fish on top, also known as chirashi, and the cone rolled sushi is called temaki. The type with a piece of raw fish on top of a little mound of rice is known as nigiri, or onigiri.

      Reheating sashimi may be the trickiest and not necessarily the best idea, but reheating a maki sushi roll, temaki, or even some leftover chirashi may not.

      Our article will include tips that can be used for most varieties of sushi but it's important to note that traditionally, sushi can and often does include cooked ingredients.

      But does that mean you should reheat your sushi to make it HOT, or to bring it back to the room temperature it was created in? It would be easy to assume "reheating" in this case means "make it hot".

      Why Reheat Sushi?

      Just because some sushi ingredients are cooked does not necessarily mean those ingredients show up on your plate hot or even warm. There are exceptions, such as with unagi, which is typically cooked in a toaster oven before being made into a roll or cone.

      So in many cases what we are talking about isn't reheating sushi as much as getting the food out of the cold fridge and softening up the rice, getting more flavor out of the meal, etc.

      Why "reheat" sushi? The motivation is mainly about temperature. If you store sushi in the fridge overnight, the rice can get hard and the ingredients will have a lack of flavor typical of food that is served cold.

      Basically, the colder a dish, the more potentially restricted the flavors can be, at least for sushi rolls and similar options. As the food approaches room temperature, more flavors and aromas are released.

      The ideal serving temps for sushi? Basically room temperature, so the process of reheating sushi should add as little actual heat as possible; the goal is to get the food to room temperature without cooking the raw fish.

      Tips for Reheating Sushi

      • Adjust the heating time based on the amount of sushi that is being reheated.
      • Include a glass of water in the microwave, this will help to make crunchy rice soft again.
      • If possible remove ingredients that are not suitable for reheating.
      • Reheat large quantities in smaller batches.
      • Heat in burst and check sushi as you go.
      • Roll the sushi in a nori sheet before reheating.
      • Separate ingredients such as rice and fish and reheat, if possible.

      Microwave

      Likely the best method; you can control the heat using a microwave in ways that aren't as efficient in an oven or toaster oven. Cover the sushi with a damp paper towel, this will trap steam and moisture and allow the sushi to heat more evenly and not dry out. Try microwaving the sushi in ten-second intervals on medium heat (medium for a 500-watt microwave oven), for up to three bursts.

      Between each 10 second burst, check the sushi to see if it has come to room temperature or not. You should adjust the heating time based on the amount of food--a single sushi roll won't take 30 seconds to get to room temperature the way a microwave full of rolls might. Pro tip:

      How To Reheat Sushi in an Air Fryer

      Preheat the air fryer to 325°F and air fry the sushi for four minutes, then turn the sushi over for another four minutes.

      Different types and sizes of air fryers cook faster or slower. Adjust cook times accordingly.

      How To Reheat Sushi in Oven

      Preheat a conventional oven to 325°F and put the sushi in for four minutes, then turn the sushi over for another four minutes.

      Be sure to let your oven preheat fully and err on the side of cooler temps if you aren't sure about your kitchen equipment in terms of accuracy, etc. The idea is, as mentioned above, to get your sushi back to room temperature from the fridge rather than heating up the meal like a hot dog.

      How To Reheat Sushi in Toaster Oven

      Similar to the conventional oven, for eight minutes put the sushi in a toaster oven set between 300°F and 325°F. Your experience may vary, but it's important to remember that a toaster oven will heat faster than a typical kitchen oven. You may need to adjust the heat accordingly if it feels like the sushi will get too warm.

      Time To Reheat Sushi

      Some prefer to simply remove their sushi from the fridge and place it on a stovetop and wait for it to warm back up to room temperature with no added heat. Some use the stovetop, but turn the oven on to let a small amount of heat contribute to the "natural" return to room temperature.

      Reheating Sushi Hacks

      It's smart to remove certain ingredients from a sushi roll or other leftovers that won't do so well the next day. One important culprit you find in some sushi--especially fusion sushi? Lettuce. Do yourself a favor and just pluck out the limp, wilted greens from your sushi before you try to reheat it. It may be smart to separate rice from fish if you are dealing with nigiri, heating them separately is a good thing to try first.

      Some suggest deep-frying sushi or sushi rolls as an alternative to these methods, but this creates a fully cooked option, and departs from sushi in some ways there. In other ways, deep frying means potentially making fusion sushi, and the possibilities there are endless. It all depends on what aesthetic you are after.

      If you are reheating sushi rolls, or any other type of raw fish and crispy seaweed combination, one thing you will note right away is that it's impossible to make sushi seaweed or nori crispy again if it goes soggy. Some prefer to discard it altogether and eat what remains.

      Instead of dining out and reheating your leftovers later, give making sushi at home a try. Here are a few easy sushi ideas you can make yourself.

      Sushi Recipes To Make At Home

      Try these sushi recipes at home and surprise your friends and family with your skills.

      Homemade Sushi Recipe

      Homemade Sushi Recipe

      Photo Credit: www.fifteenspatulas.com

      If you've never made sushi at home before, this is a super simple recipe with great step-by-step instructions is perfect for getting you started. Then you can use the basic idea to expand your skils and add more ingredients.

      Dragon Roll Recipe

      Dragon Roll Recipe

      Photo Credit: www.justonecookbook.com

      The Dragon Roll is one of the most popular rolls in American sushi restaurants. It's not as easy as making a basic California roll, but you'll impress everyone with your skills if you serve up a home version of this famous roll.

      Japanese Rice

      Japanese Rice

      Learn about Japanese rice, the variety used for sushi, and tips for how to best prepare it at home.

      Temaki Sushi (Hand Roll Sushi)

      Temaki Sushi (Hand Roll Sushi)

      Photo Credit: foodieandwine.com

      If you want to start with an easier mat-free roll, try these homemade Hand Rolls (temaki) for an easy at-home sushi making introduction.

      Rainbow Roll Sushi

      Rainbow Roll Sushi

      Photo Credit: izzycooking.com

      Rainbow rolls are a popular menu item at most sushi restaurants. Generally, it's a California roll topped with a variety of fish. Here's one version you can make at home.

      How to make spicy tuna rolls

      How to make spicy tuna rolls

      Photo Credit: makemysushi.com

      These spicy tuna rolls are phenomenal and you'll add these to your weekend meal rotation. They are fun to make, so you can turn it into a fun family or date night at home activity. If you make too much, these keep well overnight, and are pretty easy to quickly bring back to temp and eat the next day for lunch.

      Ahi Tuna Sashimi

      Ahi Tuna Sashimi

      If you're craving sashimi, try ahi at home. Get some super fresh, slice it just right, and serve it with soy sauce or ponzu. Perfection! And if you have leftover ahi to stash in the fridge, you can sear it the next day.

      Burning Volcano Sushi Roll Recipe with Lava Topping

      Burning Volcano Sushi Roll Recipe with Lava Topping

      Photo Credit: howdaily.com

      Start by making a basic California roll, and top it with "lava" to make these uber-delicious Volcano Rolls.

      Easy Sushi Bake Recipe

      Easy Sushi Bake Recipe

      Photo Credit: www.foxyfolksy.com

      This one kind of blows my mind. Sushi in a casserole? I'll take it. If you like baked rolls as much as I do, give this one a try. And since it's a warm dish anyway, reheating it won't be as much of an issue as the rolls with raw fish. You can even step this up by adding a slice of raw tuna or salmon to the nori hand roll before topping it with the casserole.

      This article discusses preparing and eating raw fish. With any such article, the usual caveats apply; eating raw or undercooked food can potentially lead to food-borne illness. It is typically best to consume sushi and other raw fish meals the day they are prepared. Storing them overnight is typically fine but the longer you store raw fish in the fridge, the greater the likelihood that bacteria or other issues could become a problem.

      34 Creative Thanksgiving Leftover Recipes

      October 17, 2022 by Kristy Bernardo Leave a Comment

      Creative Thanksgiving Leftover Recipes

      Give your Thanksgiving leftovers a delicious makeover with these creative Thanksgiving recipe ideas that are almost as good as Thanksgiving dinner! Skip simply reheating those recipes and transform those leftovers into a delicious snack or breakfast, lunch, or dinner meal.

      Reinvent turkey into delicious sandwiches, with layers of cranberry sauce, turkey and melted cheese between slices of bread. Breath new life into leftover mashed potatoes into a turkey shepherd's pie topping. Enjoy a casserole using a leftover turkey, stuffing, and vegetables for a quick and easy dinner meal. Elevate your breakfast game eggs, turkey, and leftover vegetables for a savory frittata. Whether you're craving a hearty soup with turkey and vegetables or a tasty pumpkin pie parfait, these recipes will reinvent your Thanksgiving leftovers.

      If you're anything at all like me, you make waaay too much food for every party, gathering, and holiday. Which is great except that leftovers can get old quickly. Not to worry - I've rounded up 34 FABULOUS Thanksgiving leftover recipes for you to keep you out of the leftover rut!

      Here are all our Thanksgiving recipes to help get you to the leftover part.

      36 Thanksgiving Leftover Recipes

      Thanksgiving leftovers rivals Thanksgiving dinner with all the incredible options for breakfast, lunch and dinner for the days to Come.

      Thanksgiving Leftover Casserole

      Thanksgiving Leftover Casserole

      Photo Credit: www.favfamilyrecipes.com

      Thanksgiving Leftover Casserole is a perfect way to use almost all your leftovers into one dish.

      Leftover Ham and Brie Sandwich with Cranberry Sauce

      Leftover Ham and Brie Sandwich with Cranberry Sauce

      Photo Credit: nutritiontofit.com

      This Thanksgiving leftover ham recipe is a perfect combination of ham, cheese and cranberry on a roll.

      One Pot Turkey Tetrazzini Soup Recipe

      One Pot Turkey Tetrazzini Soup Recipe

      Photo Credit: www.thereciperebel.com

      I have my own recipe for Turkey Tetrazzini (below) but I've never thought to turn it into a soup!

      Easy as Chicken, Green Chile and Potato Pie! A lost recipe that a reader requested get recreated - yep, it's that good!

      Turkey, Green Chile and Potato Pie

      You'll love this simple recipe and it couldn't be more simple to throw together! This recipe calls for chicken but just substitute with turkey.

      Leftover Crescent Roll Thanksgiving Ring Recipe

      Leftover Crescent Roll Thanksgiving Ring Recipe

      Photo Credit: www.delish.com

      Thanksgiving leftovers stuffed inside a crescent roll. Sound delicious.

      Image for Loaded Mashed Potatoes

      Loaded Mashed Potatoes

      Turn leftover mashed potatoes into loaded mashed potatoes with bacon, cheddar cheese, cream cheese, butter, sour cream, and chives.

      Turkey Cranberry Sandwiches Recipe (Dairy-Free, optionally Gluten-Free)

      Turkey Cranberry Sandwiches Recipe (Dairy-Free, optionally Gluten-Free)

      Photo Credit: www.godairyfree.org

      Everyone loves a good Thanksgiving leftover sandwich.

      a closeup shot of turkey tetrazzini with parmesan panko topping in a white casserole dish and an antique silver spoon

      Turkey Tetrazzini with Parmesan-Panko Topping

      Total Time 50 minutes Yield 8-10 servings

      You just add a Parmesan-Panko crust. You'll love it!

      Turkey Pot Pie Recipe

      Easy Turkey Pot Pie Recipe

      Turkey pot pie is a tasty twist on a classic homecooked meal, packed with a creamy, flavorful sauce, colorful vegetables, and tender leftover turkey.

      Immunity Boosting Berry Orange Smoothie {Dairy Free}

      Immunity Boosting Berry Orange Smoothie {Dairy Free}

      Photo Credit: www.cottercrunch.com

      We all need a little extra help staving off colds and flu this time of year. Do it the delicious way with this awesome-looking smoothie!

      Turkey Wild Rice Chili

      Turkey Wild Rice Chili

      Photo Credit: www.nutmegnanny.com

      Wild rice in chili sounds amazing!

      15+ Ways to Use Leftover Cranberry Sauce

      15+ Ways to Use Leftover Cranberry Sauce

      Photo Credit: cookthestory.com

      If that bread didn't catch your fancy, here are 12 more ways to use up cranberry sauce.

      Old Fashioned Turkey And Noodles Recipe

      Old Fashioned Turkey And Noodles Recipe

      Total Time 15 minutes Cuisine American

      A spin on chicken and noodles, this old fashioned turkey and noodles recipe is a hearty and comforting classic just like grandma used to make.

      An easy recipe for killer Chicken Enchiladas. Makes a great use out of leftover Thanksgiving turkey, too!

      Turkey Enchiladas with Roasted Jalapenos

      I'm always craving something spicy after Thanksgiving and this easy recipe always fits the bill! This recipe calls for chicken but just substitute with turkey.

      Creamy Turkey Pumpkin Pasta

      Creamy Turkey Pumpkin Pasta

      Photo Credit: www.itsyummi.com

      Super creative and looks so delicious!

      Turkey and Cranberry BBQ Sauce Pizza

      Turkey and Cranberry BBQ Sauce Pizza

      Photo Credit: reciperunner.com

      Pizza is always a good thing and especially so when it uses leftovers so creatively.

      Thanksgiving Leftovers Crescent Dough Bombs

      Thanksgiving Leftovers Crescent Dough Bombs

      Photo Credit: www.sizzlingeats.com

      These Thanksgiving Crescent Dough Bombs are delicious as a snack, or for lunch or dinner.

      Turkey Chili

      Turkey Chili

      Photo Credit: www.kitchenkonfidence.com

      If you're not into wild rice, I've provided another chili recipe alternative!

      Creamy White (leftover) Turkey Chili

      Creamy White (leftover) Turkey Chili

      Photo Credit: theviewfromgreatisland.com

      And one more, but this time it's creamy and soul-soothing!

      Cranberry Cheesecake Streusel Bars - Gluten-Free

      Cranberry Cheesecake Streusel Bars - Gluten-Free

      Photo Credit: peasandcrayons.com

      More dessert in case you didn't get enough pie.

      Slow Cooker Leftover Thanksgiving Turkey Pie Soup

      Slow Cooker Thanksgiving Turkey Pie Soup

      Photo Credit: www.bakedbyrachel.com

      This slow cooker turkey soup is hearty, flavorful and loaded with Thanksgiving flavors.

      Leftover Turkey Shepherd's Pie

      Leftover Turkey Shepherd's Pie

      Photo Credit: www.jocooks.com

      Skip making the mashed potato topping with your Thanksgiving leftovers.

      Image for Mexican Mashed Potato Cakes with Avocado Sauce & Cotija Cheese

      Mexican Mashed Potato Cakes with Avocado Sauce & Cotija Cheese

      No one will ever be able to recognize your mashed potatoes this way!

      Leftover Ham & Cheese Casserole

      Leftover Ham & Cheese Casserole

      Photo Credit: www.sizzlingeats.com

      This recipe is a perfect idea for a meal with leftovers of spiral ham.

      Mashed Potaffles

      Mashed Potaffles

      Photo Credit: simplerootswellness.com

      So clever and fun!

      Leftover Sweet Potato Turkey Bake

      Leftover Sweet Potato Turkey Bake

      Photo Credit: thetoastedpinenut.com

      If you have a lot of sweet potatoes leftover than this sweet potato turkey bake is the perfct meal after a long day of Black Friday shopping.

      Leftover Turkey Frittata Recipe

      Leftover Turkey Frittata Recipe

      Photo Credit: www.lifeasastrawberry.com

      Don't forget about breakfast when thinking about what to do with your leftovers. This breakfast frittas is a perfect idea for the morning after.

      Thanksgiving Leftovers Breakfast Burrito

      Thanksgiving Leftovers Breakfast Burrito

      Photo Credit: cravingsbychrissyteigen.com

      Stuffing, cranberry sauce, leftover veggies, and turkey with eggs and cheese for breakfast. Yum!

      Leftover Thanksgiving Sandwich with Cranberry

      Leftover Thanksgiving Sandwich

      Photo Credit: www.nutmegnanny.com

      Another delicious sandwich recipe.

      Turkey Gumbo Recipe

      Turkey Gumbo Recipe

      Photo Credit: littlespoonfarm.com

      Because everyone needs a good gumbo recipe!

      Thanksgiving Leftovers Croque Madame

      Thanksgiving Leftovers Croque Madame

      Photo Credit: www.halfbakedharvest.com

      This looks so good you'll be making extra leftovers next year!

      Leftover Thanksgiving Stuffing: Crunchy Mozzarella Balls

      Leftover Thanksgiving Stuffing: Crunchy Mozzarella Balls

      Photo Credit: steamykitchen.com

      You can use leftover stuffing or mashed potatoes to make these tasty crunchy mozzarella balls.

      Thanksgiving Air Fryer Hand Pies

      Air Fryer Hand Pies Recipe Using Thanksgiving Leftovers

      Photo Credit: www.awortheyread.com

      Air Fryer Hand Pies

      Leftover Thanksgiving Salad

      Leftover Thanksgiving Salad

      Photo Credit: www.delish.com

      For something on the lighter side try this leftover Thanksgiving salad.

      Thanksgiving Leftovers Breakfast Hash

      Thanksgiving Leftovers Breakfast Hash

      Photo Credit: www.familyfoodonthetable.com

      Thanksgiving leftovers breakfast hash has turkey, dressing or stuffing, veggies and gravy, all topped with a fried egg!

      Leftover Pie Parfaits

      5-Minute Leftover Pie Parfaits

      Photo Credit: www.homemakershabitat.com

      Use any leftover pies of your choice to make these delicious pie parfaits.

      Easy Pull-Apart Monkey Bread Recipe

      October 17, 2022 by Kristy Bernardo 22 Comments

      Crescent Dough Monkey Bread

      Monkey Bread is an easy way to make something special on a lazy weekend. Warm, soft & gooey, monkey bread is something your entire family will love!

      Monkey bread always looks so good and I'm always scratching my head trying to figure out how I can fit in one more workout that day to make it worth it.

      This recipe is made with canned biscuit dough which not only results in a fluffy, soft and buttery texture but is quicker to bake because there is no yeast involved. It takes about 30 minutes to bake so you can have a little coffee and kick back while sweet smells fill your kitchen. It's also a really fun recipe for kids to help with!

      warm, soft, gooey monkey bread. super easy to make and even easier to enjoy :)

      What Is Monkey Bread?

      There are endless variations to this bread but at its most basic monkey bread is a pull-apart bread made with bite-size pieces of dough coated with sugar and cinnamon and baked with a buttery brown sugar sauce. Bisquits, butter, sugar, and cinnamon are the most common ingredients but you'll find many variations with ingredients such as chopped and peeled apples, raisins, and/or nuts.

      Monkey Bread Ingredients

      • Sugar
      • Cinnamon
      • 2 cans (16.3 oz buttermilk biscuits)
      • 1 cup firmly packed brown sugar
      • ¾ cup butter or margarine (melted)
      • large pinch kosher salt

      I use the refrigerated and canned Pillsbury Grands Flaky Layers Buttermilk biscuits but feel free to use your favorite buttermilk biscuit brand. You can use any style of biscuits as well but I have found the non-flaky biscuits work best for monkey bread.

      Use a 10" or 12-cup bundt pan.

      How to Make Monkey Bread

      • Grease and Flour the Bundt pan: Lightly grease a bundt pan with cooking spray.
      • Mix the Dry Ingredients: In a large resealable plastic bag, mix together sugar and cinnamon.
      • Cut, Shake, Place. Cut the biscuits into quarters and shake them in the sugar and cinnamon resealable bag. Remove from bag and place the pieces into the bundt pan.
      • Mix the Other Ingredients: In small bowl or glass measuring cup melt the butter and mix the brown sugar, butter, and salt; pour over biscuit pieces.
      • Bake: Bake at 350°F for 28 to 32 minutes or until golden brown and no longer doughy in center.
      • Serve: Turn upside down onto the serving plate; pull apart or slice into pieces to serve. Serve warm.

      How to Make Air Fryer Monkey Bread

      Making monkey bread in an air fryer is incredibly easy with this recipe. Simply follow the directions prior to baking and use two small 7 inch bundt pans. Bake in each bundt pan in the air fryer for about 25 minutes. Since air fryers baking times vary greatly, keep an eye on the air fryer and check for doneness prior to 25 minutes. You can also cut this recipe in half and use just one small bundt pan.

      No Bundt Pan Monkey Bread

      Instead of a bundt pan you can use any baking pan that is similar in volume and follow the directions. Here are few pans that all hold 12 cups, same as a bundt pan:

      • Square pan (10x2 inches)
      • Springform pan (10x2.5 inches)
      • Jelly roll pans (12x17 inches)
      • Fluted tube pan (9.5-inch (12-Cup))

      Keep in mind the presentation will look different and that baking times and temperature may need to be adjusted because the dimensions will change. Keep an eye on the oven and begin checking for doneness earlier than the recipe states.

      As a general rule, raise the temp and decrease the baking time on shallower pan and lower the temp and increase the baking time on a deeper pan.

      Filling pans around ⅔ full is the best practice. This leaves room for rising.

      Make Ahead Monkey Bread

      You can make this easy monkey bread recipe ahead of time and even overnight! Simply prepare the monkey bread and arrange it in the pan. Tightly cover the pan with foil and refrigerate until you're ready to bake.

      How to Store Monkey Bread

      Homemade Monkey Bread can be stored at room temperature for 1-2 days if tightly covered. For freshness up to 3-4 days, store in the fridge. To save for later, freeze for up to 2 months.

      To quickly reheat monkey bread individual servings place in a microwave-safe plate and heat on 50% power for 20 seconds, adjusting as needed based on your microwave's strength. Reheating times may vary.

      For reheating larger portions or a whole monkey bread, set it on a baking sheet and bake at 350 degrees for 10-15 minutes, or until warmed through. Adjust time based on portion size and oven strength.

      warm, soft, gooey monkey bread. super easy to make and even easier to enjoy :)

      Not Just For The Holidays

      Christmas morning is the most traditional time to make monkey bread but it's just as perfect on a lazy weekend morning or for a holiday brunch. Either way, if you haven't already, you'll want to make this a tradition in your family!

      warm, soft, gooey monkey bread. super easy to make and even easier to enjoy :)

      Easy Monkey Bread Recipe

      Yield: 8 servings
      Prep Time: 10 minutes
      Cook Time: 32 minutes
      Total Time: 42 minutes

      Warm, soft & gooey, monkey bread is something your entire family will love!

      Ingredients

      • ¾ cup sugar
      • 1 ½ teaspoon cinnamon
      • 2 cans (16.3 oz buttermilk biscuits)
      • 1 cup firmly packed light brown sugar
      • ¾ cup butter or margarine (melted)
      • large pinch kosher salt

      Instructions

      1. Heat oven to 350°F. Lightly grease a 10" bundt pan with cooking spray. In a large resealable plastic bag, mix together sugar and cinnamon.
      2. Separate each biscuit into two by pulling apart; cut each into quarters. Shake in bag to coat with sugar and cinnamon (it’s helpful to put a few in, shake the bag a little and keep adding as you go to keep them from sticking together; do this in several batches). As you finish each batch, place the pieces into the bundt pan.
      3. Melt the
      4. In small bowl or glass measuring cup melt the butter than mix the brown sugar, butter and salt; pour over biscuit pieces.
      5. Bake 28 to 32 minutes or until golden brown and no longer doughy in center. Cool in pan 10 minutes. Turn upside down onto serving plate; pull apart or slice into pieces to serve. Serve warm.

      Notes

      Use refrigerated dough and work quickly as it rise better the cooler it is as the pan goes into the oven or refrigerate before baking..

      Nutrition Information:
      Yield: 8 Serving Size: 1
      Amount Per Serving: Calories: 313Total Fat: 17gSaturated Fat: 11gTrans Fat: 1gUnsaturated Fat: 5gCholesterol: 46mgSodium: 160mgCarbohydrates: 42gFiber: 0gSugar: 41gProtein: 0g

      This data was provided and calculated by Nutritionix.

      © Kristy Bernardo
      Cuisine: American / Category: Breakfast and Brunch
      Easy Pull-Apart Monkey Bread Recipe

      More delicious breakfast recipes:

      • Air Fryer Desserts
      • Crescent Cinnamon Rolls
      • Raspberry Almond Flour Pancakes
      • Baked Oatmeal Cups
      • Lemon Blueberry Yogurt Bread
      • Overnight French Toast Bake
      • Hash Brown Casserole
      • Tropical Smoothie Recipe (3 ways)
      • Ideas for an easy brunch

      Crescent Roll Dinner Recipes + The Ultimate Guide

      October 15, 2022 by Kristy Bernardo 3 Comments

      Crescent Roll Dinner Recipes + The Ultimate Guide

      Welcome to our detailed guide on all things crescent rolls. Find out what crescent roll dough is, how to make a homemade version, how to shape them and more! Plus we have all the crescent roll recipes you can imagine: Crescent Roll Appetizers, Dinners, Desserts, Breakfasts and Rings. These are the best crescent roll hacks to an easy meal!

      Scroll Down for the Crescent Roll Dinner Recipes ⬇

      Crescent Roll Dinner Recipes

      Contents

      1. What is crescent dough?
      2. Is crescent dough the same as puff pastry?
      3. Can I make my own crescent rolls?
      4. How do you shape crescent rolls?
      5. All the Crescent Roll Recipes You'll Ever Need

      What is Crescent Dough?

      Crescent dough is a pre-made, ready-to-bake dough found in the refrigerated section of grocery stores. It typically is made using a combination of flour, water, baking soda, baking powder, vegetable oil or butter, and often other ingredients.

      Crescent dough is made very similarly to how you'd make regular bread dough except without yeast. The difference comes in when you spread softened butter over rolled-out dough, fold it several times, roll it again, fold it, and so forth.

      This results in buttery, flaky layers that melt in your mouth. Warm, fresh-from-the-oven crescent rolls are unbeatable when it comes to pretty much anything.

      Benefits of Crescent Roll Dough

      Crescent Dough Sheets & Triangles: The ready-to-use, pre-cut and pre-portioned crescent roll sheets save time and effort, making recipes instructions easier.

      Quick Rising: The dough contains chemical leavening agents such as baking powder or baking soda. Carbon dioxide gas gets trapped in the dough allowing it to rise quickly and become light and fluffy during baking, without the need for yeast and long fermentation times.

      Versatility: From breakfast lunch and dinner and all the way to dessert, classic dishes can be adapted to use crescent roll dough or unique creations can be crafted.

      No Experience Necessary: Using crescent roll dough eliminates the need for creating the dough in any recipe and the uniformity of each sheet and triangle ensures even baking, uniform serving sizes and an easier presentation setup.

      Is crescent dough the same as puff pastry?

      I've gotten this question a lot so I thought I'd answer it for you here. Yes, it's similar in ingredients but very different in labor intensity. Both use the "laminated dough" process, which is essentially the layering of butter and dough, then rolled out, as described above.

      To achieve puff pastry, you'll need to create over seven hundred layers of butter and dough. Crescent rolls have just a few layers, making the final product very different. Although you can certainly use them interchangeably in crescent roll recipes, some will work better than others, as puff pastry won't have the same soft texture after baking as the crescent dough. 

      Can I make my own crescent rolls?

      If the above descriptions have you wanting to run out and buy the ingredients to make homemade crescent rolls, by all means, do it! Once you've mastered the technique, you can still purchase refrigerated dough for everyday crescent roll meals and save the labor for special occasions.

      This video will show you the easiest way to make homemade crescent rolls, which only has you rolling out the dough one time. If you'd rather take the extra steps, you can try this recipe for Extra Flaky Homemade Crescent Rolls.

      How do you shape crescent rolls?

      These are the most common shapes used for crescent dough:

      • THE CRESCENT: The most common way to shape crescent rolls is, well, into the crescent shape. This is the shape you'd use when just baking the dough into rolls or making stuffed crescent rolls. This tutorial can be used whether you're using store-bought dough or making your own.
      • THE BRAID: This is another common shape used with crescent dough and it looks quite impressive after baking. It's easier than it sounds and can be mastered pretty quickly. Although the video uses refrigerated pie crust, the method for forming the braid is the same, plus you get a bonus recipe!
      • THE RING: This might be our personal favorite. With crescent roll rings, you can fill the center with more ingredients or a bowl of dipping sauce. For example, a taco ring might be filled with guacamole or lettuce, tomatoes, and chopped onions. A pizza ring might have a small dish of marinara sauce in the center. The possibilities with this shape are only limited to your imagination. And...bonus!! The video we linked to has a bonus recipe for the "Ring of Fire", which would make a great addition to a Super Bowl party!

      More ways to shape crescent dough:

      Pillsbury has a great article that will show you how to shape five less common shapes. The best part is that they're all simple but look impressive!

      • Swirled Crescent Bun
      • Slice Crescent Triangle
      • Roll Up Crescent
      • Twist into a Bun
      • Easy Crescent Stars

      All the Crescent Roll Recipes You'll Ever Need

      Now that you've got the basics of crescent rolls down, it's time get baking! Below you'll find crescent roll recipes for dinner, plus links to our crescent roll rings, appetizers, desserts and breakfast recipes.

      Using crescent roll hacks for a simple appetizer, dinner, or dessert is so easy!

      Crescent Roll Dinner Recipes

      When you're not in the mood to cook, don't have much time or simply want an easy but tasty meal to be on your dinner table fast, turn to ready-made crescent rolls!

      This section starts with crescent roll recipes using chicken or ground beef, then ends with an assortment of deliciously different ideas, such as a Wellington, a waffle sandwich an even one to use up that leftover ham.

      CRESCENT ROLL RECIPES WITH CHICKEN or TURKEY

      Pick up a rotisserie chicken or use up some leftovers to make these recipes even easier and faster!

      Image for Chicken Pillows with Black Bean Avocado Salsa

      Chicken Pillows with Black Bean Avocado Salsa

      Photo Credit: www.5boysbaker.com

      These look pretty enough to serve to company!

      Image for Buffalo Ranch Chicken Pizza

      Buffalo Ranch Chicken Pizza

      Photo Credit: www.julieseatsandtreats.com

      Flaky crescent rolls piled with cream cheese, buffalo chicken, lettuce, cheese, and blue cheese dressing.

      Image for Chicken Alfredo Roll Ups

      Chicken Alfredo Roll Ups

      Photo Credit: damndelicious.net

      The easiest, no-fuss chicken alfredo you will ever make, conveniently stuffed in the butteriest roll ever!

      Image for Cheesy Turkey Pesto Rolls

      Cheesy Turkey Pesto Rolls

      Photo Credit: www.bakerita.com

      These make a great meal that's perfect for tailgating or the holidays! Only four ingredients.

      Image for Hot Chicken Salad Crescent Braid

      Hot Chicken Salad Crescent Braid

      Photo Credit: www.julieseatsandtreats.com

      Flaky crescent rolls stuffed with chicken, celery, cheese, almonds, and chow mein noodles.

      Image for Chicken Parmesan Crescent Bake

      Chicken Parmesan Crescent Bake

      Photo Credit: www.thisisnotdietfood.com

      Breaded chicken with marinara sauce and mozzarella cheese topped with crescent roll dough.

      Image for Chicken Puffs Recipe: Enchilada Style

      Chicken Puffs Recipe: Enchilada Style

      Photo Credit: erhardtseat.com

      Mexican flavors rolled into crescent rolls and topped with cheese.

      Image for 5-Ingredient Crescent Roll Chicken Casserole

      5-Ingredient Crescent Roll Chicken Casserole

      Photo Credit: www.theseasonedmom.com

      You only need 5 ingredients and about 10 minutes to pull together this easy Crescent Roll Chicken Casserole.

      Image for Easy Chicken Pot Pie Casserole

      Easy Chicken Pot Pie Casserole

      Photo Credit: www.julieseatsandtreats.com

      Quick comfort food at its best!

      CRESCENT ROLL RECIPES WITH GROUND BEEF

      We're always looking for different and creative ways to cook with ground beef for an easy weeknight supper. These recipes will help you get dinner on the table fast and you're sure to find a new favorite!

      Image for Sloppy Joe Stuffed Crescent Rolls

      Sloppy Joe Stuffed Crescent Rolls

      Photo Credit: wearychef.com

      Your childhood favorite with a fun, delicious twist.

      Image for Ground Beef Broccoli Pie with Crescent Roll Crust

      Ground Beef Broccoli Pie with Crescent Roll Crust

      Photo Credit: www.thekitchenismyplayground.com

      What's not to love about a creamy, cheesy ground beef and broccoli filling all surrounded in a tasty, flaky crust?

      Crescent Roll Lasagna

      Crescent Lasagna

      Photo Credit: spicysouthernkitchen.com

       It's like a lasagna sandwich! Super easy to make for a weeknight meal.

      Image for Beef Taco Roll-Ups

      Beef Taco Roll-Ups

      Photo Credit: www.delish.com

      These hand-held treats are filled with flavorful ground beef and gooey cheese.

      Image for Taco Croissants

      Taco Croissants

      Photo Credit: whitneybond.com

      Put a delicious dinner twist on Taco Tuesday with this easy recipe. 

      Image for Ground Beef Stroganoff Bake

      Ground Beef Stroganoff Bake

      Photo Credit: www.thespruceeats.com

      Ground beef and mushrooms are combined with sour cream and then topped with shredded cheese just before baking. 

      Image for BBQ Beef Braid

      BBQ Beef Braid

      Photo Credit: www.mommysfabulousfinds.com

      Each slice is packed with ground beef, barbecue sauce, and cheese. It pairs well with a salad for an easy family dinner

      Image for 20-minute Taco Pie

      20-minute Taco Pie

      Photo Credit: feastandfarm.com

      No need to make a crust or fuss with fancy fillings–you can even make this ahead and bake it off when you’re ready.

      Image for Italian Crescent Casserole

      Italian Crescent Casserole

      Photo Credit: www.realmomkitchen.com

      You're just five little ingredients away from dinner.

      Image for 5-Ingredient Taco Casserole

      5-Ingredient Taco Casserole

      Photo Credit: www.theseasonedmom.com

      This 5-ingredient dinner is on the table in less than 30 minutes.

      MORE CRESCENT ROLL DINNER RECIPES

      Using your waffle iron with crescent rolls? Making an upscale meal for guests? Make sure you have an extra few cans of rolls on hand so you can try every one of these unique and delicious recipes!

      Image for Cheesy Hot Ham & Broccoli Crescent Pockets

      Cheesy Hot Ham & Broccoli Crescent Pockets

      Photo Credit: www.thecreativebite.com

      A family-friendly dinner idea that's perfect for using up leftover ham!

      Image for Monte Cristo Sandwich Loaf

      Monte Cristo Sandwich Loaf

      Photo Credit: www.tasteandtellblog.com

      A favorite sandwich takes a different form in this sandwich loaf that has layers of crescent dough, turkey, ham, cheese, and raspberry jam.

      Image for Cheesesteak Crescent Rolls

      Cheesesteak Crescent Rolls

      Photo Credit: www.favfamilyrecipes.com

      Flaky crescent rolls are stuffed with sliced beef, sauteed onions, peppers, and lots of gooey cheese.

      Image for Prime Tri Tip Wellington

      Prime Tri Tip Wellington

      Photo Credit: www.slapyodaddybbq.com

      For a holiday or any special occasion, serve this Tri-Tip Wellington.

      Image for Sausage and Pepperoni Crescent Roll Pizza

      Sausage and Pepperoni Crescent Roll Pizza

      Photo Credit: www.theseasonedmom.com

      Just 15 minutes of prep for this easy dinner that the whole family will love.

      a picture of a crescent braid

      Italian Sausage Spinach And Havarti Crescent Braid

      Photo Credit: www.melissassouthernstylekitchen.com

      Italian sausage, fresh spinach and a generous sprinkling of creamy Havarti cheese, it’s then baked until the outer crescent crust is golden brown.

      Turkey Club Waffle Sandwich

      Turkey Club Waffle Sandwich

      Photo Credit: insidebrucrewlife.com

      We added this one just because it's a waffle sandwich, which you definitely needed to see!

      Image for Broccoli Crescent Wrap

      Broccoli Crescent Wrap

      Photo Credit: www.trialandeater.com

      No meat here, just broccoli and cheese goodness all wrapped up in crescent roll dough. Easy, quick dinner, made healthy by swapping out the mayonnaise!

      Image for Sausage Rolls with Arugula

      Sausage Rolls with Arugula

      Photo Credit: wearychef.com

      Simple sausage rolls stuffed with cheese and arugula are perfect for dinner or a party snack.

      Image for Bacon, Broccoli, and Cheddar Roll-Ups

      Bacon, Broccoli, and Cheddar Roll-Ups

      Photo Credit: www.delish.com

      A threesome of flavors we can always get behind.

      Don't miss these delicious recipe roundups:

      • 21 Pork Loin Recipes
      • Pork Chop Recipes (plus the ultimate guide on how to cook them)
      • 53 Scallop Recipes
      • 14 Fantastic Mahi Mahi Recipes
      • 21 Inspiring Ramen Noodle Recipes

      50 Deliciously Simple Chicken Drumstick Recipes

      October 15, 2022 by Kristy Bernardo 50 Comments

      Deliciously Simple Chicken Drumstick Recipes

      With 50 chicken drumstick recipes to choose from, you're sure to discover a few new favorites and some creative ways to grill, bake, air fry and slow-cook them.

      I'm always eyeing those huge, inexpensive packages of chicken drumsticks at the store. They're good in theory but - for my family - unless I'm freezing half the package, I often find myself at a loss for new and interesting ways to prepare them. If you're anything like me, you'll appreciate having this list of delicious, easy chicken drumstick recipes at your fingertips whenever you need them!

      There are tons of different ways to coat your drumsticks. Whether you're looking for a classic Buffalo sauce, an air fryer alternative, or something else entirely (think habanero, bacon wrapped, smoked or Korean BBQ drumsticks) you'll find something in the chicken drumstick recipes below.

      Deliciously Simple Chicken Drumstick Recipes

      Go ahead and buy those drumsticks in bulk. Now you have 50 Deliciously Simple Chicken Drumstick Recipes to choose from!

      Crispy Asian Baked Chicken Drumsticks

      Baked Garlic and Ginger Chicken Drumsticks

      Photo Credit: www.jocooks.com

      Marinated garlic and ginger chicken drumsticks is an easy and delicious dinner.

      Baked Asian Chicken Drumsticks

      Crispy Asian Baked Chicken Drumsticks

      Crispy chicken drumsticks are tossed with a killer 5-minute asian sauce – incredibly delicious.

      Air Fryer Fried Chicken Drumsticks

      Air Fryer Fried Chicken Drumsticks

      Photo Credit: www.sparklestosprinkles.com

      Air Fryer Fried Chicken Drumsticks, a healthier alternative for chicken drumstick lovers.

      Pomegranate Glazed Chicken Drumsticks

      Pomegranate Glazed Chicken Drumsticks And Brussels Sprouts

      Photo Credit: yummyaddiction.com

      Juicy, flavorful pomegranate glazed chicken drumsticks look gorgeous and taste equally as good.

      paleo baked chicken drumsticks

      Paleo Baked Chicken Drumsticks

      Photo Credit: www.recipefiction.com

      Tender fall-off-the-bone drumsticks made with coconut flour for a Paleo friendly meal.

      Easy Teriyaki Baked Chicken Legs

      Easy Teriyaki Baked Chicken Legs

      Photo Credit: whiskitrealgud.com

      These teriyaki chicken legs are extremely easy to make and very tasty.

      Mango Habanero Chicken Drumsticks

      Mango Habanero Drumsticks

      Photo Credit: www.goodlifeeats.com

      These chicken wings are deliciously basted in mango Habenero BBQ sauce.

      CRISPY Baked Lemon Pepper Chicken Wings! FOUR ingredients, so much FLAVOR! Double the batch, they go FAST!

      Crispy Baked Lemon Pepper Wings – 4 ingredients!

      Photo Credit: www.thewickednoodle.com

      These lemon pepper wings are baked until crispy then basted with lemon pepper seasoning and melted butter. 

      Asian Glazed Drumsticks

      Asian Glazed Drumsticks

      Photo Credit: www.homesweetjones.com

      These drumsticks are glazed with a Sriracha hot sauce, soy, sesame and garlic for sticky, sweet, salty and spicy flavor all-in-one drumstick.

      Barbecued Chicken Drumsticks

      Barbecued Chicken Drumsticks

      Photo Credit: www.mygoldenpear.com

      These mouth watering BBQ drumsticks are made with an easy homemade BBQ sauce.

      Air Fryer Chicken Drumsticks

      Air Fryer Panko Breaded Fried Chicken Drumsticks (Legs)

      Photo Credit: www.staysnatched.com

      Air Fryer Panko Breaded Fried Chicken Drumsticks are crispy, crunchy and have up to 80% less fat.

      Easy Harissa chicken with tabbouleh

      Easy Harissa Chicken

      Photo Credit: www.supergoldenbakes.com

      Harissa is a spicy, smoky, peppery red chili paste and a perfect marinade on chicken.

      Slow-Cooked Chicken Drumsticks

      Slow-Cooked Chicken Drumsticks

      Photo Credit: www.allrecipes.com

      These fall-off-the-bone chicken drumsticks are delicious way to make drumsticks.

      Gluten Free Fried Chicken

      Gluten Free Spicy Fried Chicken

      Photo Credit: www.nutmegnanny.com

      Fried in a gluten free flour and corn meal crust these drumsticks are spicy and packed full of flavor.

      Spicy Honey Citrus Chicken Recipe

      Spicy Honey Citrus Chicken Recipe

      Photo Credit: www.anediblemosaic.com

      A marinade of citrus, garlic, ginger, crushed red pepper flakes, honey, and provides a a balance of many flavors.

      Korean Glazed Chicken Drumsticks

      Korean Glazed Chicken Drumsticks

      Photo Credit: thestayathomechef.com

      Try this easy homemade Korean BBQ sauce and you'll want to put this on all your meats.

      Cilantro Lime Chicken Drumsticks

      Cilantro Lime Chicken Drumsticks

      Photo Credit: www.budgetbytes.com

      These Southwest inspired drumsticks are marinated in delicious cilantro lime sauce.

      Jamaican Jerk Chicken

      Jamaican Jerk Chicken

      Photo Credit: www.nutmegnanny.com

      This Jerk Chicken is wet marinated for a spicy mixture that is full of flavor.

      Grenadian Chicken Stew Drumsticks

      Grenadian Chicken Stew

      Photo Credit: www.nutmegnanny.com

      A Caribbean chicken dish with a twist, bone-in chicken legs, vegetables, and tons of flavorful spices.

      Air Fryer Marinated Drumsticks

      Air Fryer Marinated Chicken Drumsticks

      Photo Credit: drdavinahseats.com

      Air Fryer Marinated Chicken Drumsticks are a perfect non-breaded way to cook drumsticks in an air fryer.

      Baked Marinade Chicken Legs

      Baked Chicken Legs (with Best Marinade)

      Photo Credit: natashaskitchen.com

      These marinade baked chicken drumsticks have a crispy skin and a juicy center.

      LunaCafe's Spicy Fried Chicken

      Luna Cafe's Spicy Fried Chicken

      Photo Credit: www.thelunacafe.com

      A simple southern-style fried chicken recipe from a Kentucky born chef.

      Whiskey Orange Chipotle Chicken Thighs & Drums

      Whiskey Orange Chipotle Chicken Thighs & Drums

      Photo Credit: www.alwaysorderdessert.com

      A wild combination of whiskey, orange and chipotle for a very balanced marinade.

      Filipino Chicken Adobo

      Filipino Chicken Adobo

      Photo Credit: www.whattheforkfoodblog.com

      The chicken legs stewed in a mixture of soy sauce, vinegar and garlic are savory and delicious.

      Grilled BBQ Chicken Drumsticks

      Grilled BBQ Chicken Drumsticks

      Photo Credit: cookathomemom.com

      Grilled BBQ chicken drumsticks are super juicy and perfectly sticky work great at a cookout or as an easy weeknight dinner.

      Baked Drumsticks

      Baked Drumsticks

      Photo Credit: healthyrecipesblogs.com

      Skinless, baked chicken drumsticks with olive oil and spices are juicy and healthy alternative to eating chicken.

      Easy Baked Buffalo Chicken Drumsticks

      Easy Baked Buffalo Chicken Drumsticks

      Photo Credit: eatsimplefood.com

      This recipe combines two great flavors, buffalo sauce and chicken drumsticks. This recipe even includes a Gluten Free / Whole30 / Paleo / Low Carb variation.

      Instant Pot Chicken Drumsticks

      Instant Pot Chicken Drumsticks

      Photo Credit: littlesunnykitchen.com

      Yes, you can make drumsticks in an instant pot, they're a delicious way to make chicken drumsticks.

      Cajun Chicken Drumsticks

      Cajun Chicken Drumsticks

      Photo Credit: thestayathomechef.com

      These easy crispy-skinned Cajun chicken drumsticks have just the right amount of Cajun seasoning.

      Baked Hawaiian Chicken

      Baked Hawaiian Chicken

      Photo Credit: myorganizedchaos.net

      This Hawaiian chicken drumsticks are marinated in a ginger, honey, and pineapple juice.

      Buffalo Wild Wings Garlic Parmesan Chicken

      Buffalo Wild Wings Garlic Parmesan Chicken Wings

      Photo Credit: www.crockpotsandflipflops.com

      Wow, cooking drumsticks in a crock with BWWs Garlic Parmesan sauce. What a great idea!

      Bacon Wrapped Chicken Drumsticks

      Bacon Wrapped Chicken Drumsticks

      Photo Credit: www.sandraseasycooking.com

      Bacon or drumsticks can complete any meal so this recipe is can't miss.

      Ranch Seasoned Baked Chicken Drumsticks

      Ranch Seasoned Baked Chicken Drumsticks

      Photo Credit: healthyschoolrecipes.com

      Ranch seasoning gives these tender drumsticks a great taste and even better dipped in ranch dressing.

      Flamin Hot Chicken Lollipops

      Flamin Hot Chicken Lollipops

      Photo Credit: overthefirecooking.com

      Flamin’ Hot chicken drumsticks are an inventive, unique, twist and perfect for Flamin' Hot Cheetos lovers.

      Slow Cooker General Tso’s Chicken

      Slow Cooker General Tso’s Chicken

      Photo Credit: slowcookingperfected.com

      General Tso’s chicken recipe in a slow cooker is easy to make.

      Keto Chicken Drumsticks

      Keto Chicken Drumsticks

      Photo Credit: kicking-carbs.com

      Keto chicken drumsticks are not only Keto-friendly but can be made in an air fryer, Ninja Foodi, grilled, or baked.

      Instant Pot Mongolian Drumsticks

      Instant Pot Mongolian Drumsticks

      Photo Credit: foodunderpressure.com

      These Marinated Instant Pot Mongolian drumsticks are served with a tasty sweet and sticky Mongolian sauce.

      Thai Chicken Wings - CopyCat Recipe From Houlihan's

      Thai Chicken Wings - CopyCat Recipe From Houlihan's

      Photo Credit: www.awortheyread.com

      If you're a Houlihan’s fan than this drumstick and wings recipe will be a delight.

      Smoked Chicken Wings

      Smoked Chicken Wings

      Photo Credit: www.thewickednoodle.com

      Fans of anything smoked will love these smoked chicken wings.

      Easy Baked Chicken Drumsticks Recipe

      Easy Baked Chicken Drumsticks Recipe

      Photo Credit: www.thedinnerbite.com

      Easy baked chicken Drumsticks with a dry rub. Easy to make and delicious to eat.

      Dry Rub Smoked Chicken Drumsticks

      Dry Rub Smoked Chicken Drumsticks

      Photo Credit: bbqingwiththenolands.com

      Dry rub on smoked meats is awesome and these drumsticks live up to the reputation.

      Baked Salt and Pepper Chicken Drumsticks

      Baked Salt and Pepper Chicken Drumsticks

      Photo Credit: www.yeprecipes.com

      A simple recipe with ingredients easily found in the house.

      Honey Garlic Chicken Drumsticks

      Honey Garlic Chicken Drumsticks

      Photo Credit: www.julieseatsandtreats.com

      Honey garlic chicken drumsticks are crispy, full of flavor and very easy to make.

      Tandoori Chicken Drumsticks

      Tandoori Chicken Drumsticks

      Photo Credit: www.foodandwine.com

      These are nicely spiced, super-crispy and served with a cilantro relish for a vibrant flavor.

      Zesty Italian Chicken Drumsticks

      Zesty Italian Chicken Drumsticks

      Photo Credit: flawlessfood.co.uk

      Zesty Italian chicken drumsticks are full of Italian seasoning and can be cooked in an oven, air fryer or grill.

      Sesame Soy Chicken Drumsticks

      Sesame Soy Chicken Drumsticks

      Photo Credit: joeats.net

      These are sticky, savory and a little bit sweet as you would expect with a combination of sesame and soy.

      Lemon Garlic Roasted Chicken Legs

      Lemon Garlic Roasted Chicken Legs

      Photo Credit: www.jocooks.com

      Lemon garlic roasted chicken legs have a ton of flavor with lemon, garlic, oregano and thyme.

      Baked Curried Chicken Drumsticks

      Baked Curried Chicken Drumsticks

      Photo Credit: www.aheadofthyme.com

      The curry packs a lot of flavor into these drumsticks.

      Jalapeno Lime Chicken Drumsticks

      Jalapeno Lime Chicken Drumsticks

      Photo Credit: spicysouthernkitchen.com

      A 3-ingredient recipe packed full of spicy and sweet citrus flavor.

      Ahi Tuna Sashimi

      October 14, 2022 by Monique McArthur Leave a Comment

      Ahi Tuna Sashimi

      Rich and delicately full-flavored ahi tuna sashimi is incredibly easy to make. Simply slice it up and serve with a side of soy sauce and wasabi.

      Ahi Tuna Sashimi
      Pacific Bluefin tuna featuring both Akami and Toro cuts

      What is Sashimi?

      Sashimi is raw, fresh, quality, seafood, like tuna or salmon and is often partnered with soy sauce, ginger, and wasabi. The addition of rice turns sashimi into nigiri and the addition of rice and other ingredients like seaweed, vegetables and crab meat turns sashimi into sushi.

      Common Types of Tuna in Ahi Tuna Sashimi

      • Pacific Bluefin Tuna - Honmaguro or Kuro Maguro
      • Southern Bluefin Tuna - Minami Maguro or Indo Maguro
      • Northern or Atlantic Bluefin Tuna - Taiseiyou Maguro
      • Bigeye Tuna - Mebachi Maguro
      • Yellowfin Tuna - Kihada
      • Albacore Tuna - Bintoro Maguro or Binnago Maguro or Binchou Maguro
      • Skipjack Tuna - Katsuo Maguro or Aku

      Akami vs Toro Sashimi

      Maguro is the Japanese term for "tuna". There are two main parts of the maguro, akami and toro:

      • Akami - This is the most common sushi, its color which is red is relevant to its name "akami", meaning "red part" in Japanese. When you see "maguro" on a sushi or sashimi menu, it refers to this part.
      • Toro - This is the fatty part of the tuna, found in the belly of maguro. It has a soft texture and means to melt. It is a delicacy, and the fattier the better and the more it melts in your mouth.

      Cuts of Tuna Sashimi

      There are specific cuts of akami and toro that further vary in the part of the tuna, quality, fattiness, color, and price.

      • Akami (back)
        • Senaka (highest-quality akami) - A combination of superb and standard red meat, which is fatty, but a bit fibrous.
        • Sekami (medium-quality akami) - Semi-fatty with less red meat and fat. More fatty and tender than Senaka.
        • Seshimo (lowest-quality akami) - Deep red-colored, with little fat, along with many fine fibers.
      • Toro (belly or abdomen)
        • Noten (Top of the head) - This is the light pink cut just above the tuna's head and is considered a very rare cut.
        • Hoho-Niku (Cheek) - This cut has a distinctive flavor and texture, and is highly sought after.
        • Kama-toro (Back cheek) - "Kama" refers to the flesh collar, jaw, and gill area of the tuna and is one of the fattiest parts.
        • Otoro (Extra fatty) - This is the fattiest portion of the tuna, found on the very underside of the fish. It is more expensive than chutoro.
        • Chutoro (fatty) - The belly area of the tuna along the side of the fish between the akami and the otoro. It is often preferred because it is fatty but not as fatty as otoro.
        • Harashimo (least superior toro) - Semi-fatty tuna and red meat from the lower belly.

      Choosing the Best Ahi Sashimi

      When buying raw fish to make sashimi at home, make sure it is as fresh as possible. Sashimi-grade ahi tuna when fresh, should not smell like fish. "Sushi-grade" or "Sashimi-grade" labels are a good indication of quality, fresh fish but there are no government regulations for these labels. Ensure you're buying from a seafood market, or seafood or sushi restaurant you trust.

      Best Types of Tuna for Sashimi

      Bluefins are widely regarded as the Kings of the Tuna family, and rightfully so. Here is our list of the best types of tuna sashimi to buy.

      1. Bluefin Tuna ($$$$$)
      2. Bigeye Tuna ($$$$)
      3. Yellowfin Tuna ($$$)
      4. Albacore ($$)

      Look for Ahi Tuna Saku Blocks, saku means block in Japan, which are uniform cuts of center tuna loin and ideal for cutting sashimi.

      What to Serve with Sashimi

      At its most basic, sashimi is enjoyed with just soy sauce or soy sauce, ginger, and wasabi. Traditionally, sashimi is served on a bed of daikon radish and garnished with shiso leaves. The garnishments are meant to be eaten and serve as a palette cleanser. There are also many variations of serving sashimi such as with wakame seaweed, jalapeño, sesame seeds, chives, fresh garlic, seasonal vegetables, flowers, or edible wild plants.

      Soy sauce is the most traditional dipping sauce but some prefer karashi mustard, ponzu, or even a garlic ponzu sauce. Sashimi is also typically accompanied with fresh or pickled ginger, wasabi, and sometimes sliced cucumber.

      Seasoned seaweed flakes or tempura flakes are not traditional but can add a more crunchy and fuller taste, if you prefer.

      As you can see, sashimi can be served many ways but the most important way to serve and eat sashimi is the way you and your guests enjoy it.

      How to Cut Tuna Sashimi

      1. Cut 2 inches by 8 inches and ¾ thick.
      2. Cut against the grain (fiber) and in a single stroke.
      3. Cut in half into smaller pieces.
      4. How thick you want is up to you.
      5. Refrigerate or serve immediately with your favorite garnishments and dipping sauces.

      Here is a quick guide on searing Ahi Tuna, if you prefer.

      Try these delicious seafood dishes next:

      • Spicy Tuna Salad with Bell Peppers
      • Mexican Tuna Salad Stuffed Avocados
      • Imitation Crab Ceviche
      • Hot Crab and Artichoke Dip
      • Gambas al Ajillo (Shrimp in Garlic Sauce)
      Sashimi - Ahi Tuna

      Ahi Tuna Sashimi

      Yield: 2
      Prep Time: 10 minutes
      Total Time: 10 minutes

      These hand-cut portions of ahi sashimi are served raw to enjoy the full texture and flavor of the fish.

      Ingredients

      • 1 lb fresh sashimi-grade ahi tuna
      • 3-4-inch piece of fresh ginger or pickled ginger
      • Soy sauce
      • Wasabi to taste

      Instructions

      1. Always use a sharp knife and cut immediately after removing from the refrigerator.
      2. Cut 2 inches by 8 inches and ¾ thick (or to preference)
      3. Cut against the grain (fiber) and in a single stroke.
      4. Cut in half into smaller pieces.
      5. Refrigerate or serve immediately with your favorite garnishments and dipping sauces.
      Nutrition Information:
      Yield: 2 Serving Size: 1
      Amount Per Serving: Calories: 397Total Fat: 12gSaturated Fat: 3gTrans Fat: 0gUnsaturated Fat: 7gCholesterol: 222mgSodium: 1247mgCarbohydrates: 13gFiber: 1gSugar: 4gProtein: 56g

      This data was provided and calculated by Nutritionix.

      © Monique McArthur
      Cuisine: Japanese / Category: Appetizers
      Ahi Tuna Sashimi

      22 Crescent Roll Breakfast Recipes

      October 13, 2022 by Heidi Deal Leave a Comment

      Crescent Roll Breakfast Recipes

      Breakfast is one of our favorite meals. If you're like us, you also have breakfast for dinner on a regular basis. And one of the best parts of breakfast is the doughy goodness of biscuits, muffins, toast, and other breads we consume. We also like to make crescent roll breakfast recipes. Using canned crescent roll dough, we can make a variety of fast, easy, and delectable breakfast dishes.

      Crescent rolls for breakfast? Yes! They are soft and fluffy, and Pillsbury even sells crescent roll dough sheets if you prefer not to use the perforated triangle dough sheets. Crescent dough seets are perfect for making stuffed crescent rolls, breakfast casseroles, muffins, pockets, rings, souffles, and even waffles!

      Scroll Down For Crescent Roll Breakfast Recipes ⬇

      Crescent Roll Breakfast Recipes

      Types of Crescent Roll Dough

      When you think of crescent dough, you might think of the Pillsbury cans in the refrigerated section at your grocery store. Understandably so. If you have a large grocery store, you may be surprised to find that there are many different brands and flavors of crescent roll dough.

      Pillsbury sells the following types of crescent roll dough:

      • Original Crescent Rolls
      • Reduced Fat Crescent Rolls
      • Butter Flake Crescent Rolls
      • Honey Butter Crescent Rolls
      • Original Crescent Rounds
      • Original Crescent Dough Sheets
      • Big & Buttery Crescent Rolls
      • Grands! Original Crescent Rolls
      • Sweet Hawaiian Crescent Rolls

      Some of the Pillsbury products are vegan, if that is something you're looking for. If so, you can pick up Original Pillsbury Crescent Rolls to avoid any animal derived products.

      If you need gluten free dough, Pillsbury does not have any options currently available. Instead, try Mom's Place Gluten-Free Crescent Rolls. These are made with white rice flour, potato starch, tapioca flour, organic evaporated cane sugar, salt, xanthan gum, and yeast. All you need to do is add milk, butter, and an egg white.

      Crescent roll dough is also available from other brands including Immaculate Baking Company, Annie's Organic, and many major grocery store brands.

      Crescent Roll Breakfast Tips

      One thing you can do with crescent roll dough, is make personal grab and go breakfasts. Roll out the dough, add a mound of bacon, eggs, and cheese, seal it up like a hot pocket, and bake until golden brown. Once the pockets have cooled, pop them in a Ziploc or Tupperware and throw them in the fridge. Make a batch of these on Sunday, and your family can grab one in the morning, zap it in the microwave to warm it up, and they're on their way. Easy peasy.

      Another quick grab and go breakfast is pigs in a blanket with a morning twist -- instead of hot dogs, wrap your crescent roll around a piece of sausage.

      Want something sweet to dip in your coffee? Roll your crescents according to package directions, or make them into twists and cover them in cinnamon and sugar before baking.

      Make breakfast fun for the kids by rolling the dough out flat and using cookie cutters to cut festive shapes out of the dough. Bake them plain, then top them with peanut butter and jelly or jam, fresh fruit, cream cheese, icing, or any other fun toppings you like. You can even make your shapes into your own variation of avocado toast.

      You can make crescent rolls in the air fryer! Just spray the bottom of the air fryer basket with cooking spray, roll your crescents, and air fry 4 rolls (per 6-quart air fryer) at a time at 300 degrees. You do not need to preheat the air fryer! Cook for five minutes, turn them over with tongs, then cook an additional four minutes, or just until golden brown and the inside is cooked through.

      Ready to get started making breakfast with crescent roll dough? Check out this list of crescent roll breakfast recipes to try.

      Try these other delicious Crescent Roll recipes!

      • Crescent Roll Ring Recipes
      • Crescent Roll Appetizers
      • Crescent Roll Dinner Recipes
      • Crescent Roll Dessert Recipes

      22 Crescent Roll Breakfast Recipes

      These crescent roll breakfast recipes are so simple, you can be enjoying them by the time you're finished with your first cup of coffee! We've included recipes that can be used for both a weekday breakfast or a leisurely brunch with friends.

      Image for Goat Cheese Scrambled Eggs and Bacon Stuffed Crescent Rolls

      Goat Cheese Scrambled Eggs and Bacon Stuffed Crescent Rolls

      Photo Credit: www.waystomyheart.com

      Warm flaky crescent rolls stuffed with goat cheese scrambled eggs and bacon, topped with everything bagel seasoning.

      Image for Tex Mex Sausage Breakfast Casserole

      Tex Mex Sausage Breakfast Casserole

      Photo Credit: www.isabeleats.com

      This Tex Mex Sausage Breakfast Casserole is made with crescent roll dough, breakfast sausage, peppers, and onions.

      Vegan Everything Bagel Pigs in a Blanket

      Vegan Everything Bagel Pigs in a Blanket

      Photo Credit: labelessnutrition.com

      These vegan breakfast pigs in a blanket are made with vegan breakfast sausages and are the perfect on the go breakfast!

      Image for Bacon Egg and Cheese Crescents

      Bacon Egg and Cheese Crescents

      Photo Credit: www.bitchinbrunch.com

      Bacon Egg & Cheese Stuffed Crescent Rolls - Made in a muffin tin. Perfect for breakfast or brunch.

      5-Ingredient-Bacon-Egg-and-Cheese-Crescent-Roll-Casserole-20.jpg

      Breakfast Casserole With Bacon, Egg, Cheese And Crescent Rolls

      Photo Credit: www.theseasonedmom.com

      This 5-Ingredient Bacon, Egg & Cheese Crescent Roll Casserole comes together with just 10 minutes of prep!

      Image for Sausage, Egg, and Cheese Crescent Rolls

      Sausage, Egg, and Cheese Crescent Rolls

      Photo Credit: www.mymoderncookery.com

      Skip the busy drive-thru in the morning and opt for these easy and cheesy Sausage, Egg, and Cheese Crescent Rolls instead!

      Air-Fryer Ham and Egg Pockets

      Air-Fryer Ham and Egg Pockets

      Photo Credit: www.tasteofhome.com

      So much better than store-bought hot pockets, these ham and egg pockets are perfect for grab and go breakfasts, and made easy in the air fryer.

      Image for Crescent Waffles: How to Make Waffles with Crescent Roll Dough

      Crescent Waffles: How to Make Waffles with Crescent Roll Dough

      Photo Credit: dessertswithbenefits.com

      These 90-calorie Crescent Waffles are crispy on the outside, soft and fluffy on the inside -- just like your favorite crescent roll!

      Image for Sunny Side Up Hash Brown Breakfast Pizza

      Sunny Side Up Hash Brown Breakfast Pizza

      Photo Credit: www.kudoskitchenbyrenee.com

      Make this Sunny Side Up Hash Brown Breakfast Pizza for breakfast, brunch or even dinner. Whichever you choose, it's always a winner!

      Image for Denver Omelette Crescent Bake

      Denver Omelette Crescent Bake

      Photo Credit: www.girlversusdough.com

      Made with crescent rolls, eggs, diced veggies, ham and cheese, this is the best big-batch breakfast treat!

      Image for Candy Cane Crescent Roll Breakfast Pastry

      Candy Cane Crescent Roll Breakfast Pastry

      Photo Credit: www.3yummytummies.com

      This could definitely qualify as a dessert, but who doesn't want a special treat on Christmas morning? Plus it's gorgeous!

      Image for Sausage and Egg Breakfast Rolls

      Sausage and Egg Breakfast Rolls

      Photo Credit: www.jocooks.com

      Sausage and Egg Breakfast Rolls – easy and quick to make grab-and-go-breakfast.

      Image for Spinach and Cheese Egg Souffle {Copycat Panera Recipe}

      Spinach and Cheese Egg Souffle {Copycat Panera Recipe}

      Photo Credit: www.tastesoflizzyt.com

      Crescent rolls are the base of these cheesy souffles. Add in some eggs, fresh spinach, bacon, and 4 cheeses.

      Image for Crescent Roll Breakfast Stacks

      Crescent Roll Breakfast Stacks

      Photo Credit: www.lanascooking.com

      A one-dish breakfast built atop refrigerated crescent rolls makes a perfect breakfast or dinner for any day of the week.

      Crescent Roll Breakfast Pizza Recipe

      Crescent Roll Breakfast Pizza

      Photo Credit: plowingthroughlife.com

      Pizza for breakfast! Well at least a pizza shaped breakfast made from Crescent roll. There is a lot more to the shape though with this delicious recipe.

      Bacon and Egg Crescent Squares

      Bacon and Egg Crescent Squares

      Photo Credit: www.tablespoon.com

      These are super easy to make, and the portions are already individually made so everyone can grab one and enjoy. These are easy to customize too, by adding different toppings.

      Air Fryer Cinnamon Rolls Recipe

      Air Fryer Cinnamon Rolls Recipe

      Photo Credit: www.thekitchn.com

      These crescent roll cinnamon rolls are easy to make, cook up quickly in the air fryer, and are topped with a sweet and delicious icing.

      Air Fryer Cinnamon Sugar Crescent Rolls

      Air Fryer Cinnamon Sugar Crescent Rolls

      Photo Credit: airfryerfanatics.com

      A super simple treat to dip in your coffee, and cooks up just right in the air fryer to be crispy on the outside and fluffy on the inside.

      Air Fryer Crescent Bacon Breakfast Ring

      Air Fryer Crescent Bacon Breakfast Ring

      Photo Credit: forktospoon.com

      If you haven't tried crescent roll rings before, this one is bound to be a new favorite, stuffed with bacon, eggs, and cheese, and cooked to crispy perfection in the air fryer.

      Air Fryer Cherry Cream Cheese Crescent Roll Danish Recipe

      Air Fryer Cherry Cream Cheese Crescent Roll Danish Recipe

      Photo Credit: wondermomwannabe.com

      The perfect addition to your weekend brunch, these cherry cream cheese crescent roll danishes are soft and buttery with a cheesy, fruity filling. They're easy to make right in your air fryer.

      Crescent Roll Breakfast Rings Recipe

      Crescent Roll Breakfast Rings Recipe

      Photo Credit: veganinthefreezer.com

      These vegan crescent roll breakfast rings are easy to make and filled with just a few ingredients that blend perfectly together.

      Raspberry Vegan Crescent French Toast Casserole

      Raspberry Vegan Crescent French Toast Casserole

      Photo Credit: makeitdairyfree.com

      This vegan french toast is a beautiful dish, tastes so good, and is perfect for a holiday breakfast or brunch.

      Nutella Hot Chocolate (just 2 ingredients!)

      October 13, 2022 by Kristy Bernardo 69 Comments

      2-ingredient Nutella hot chocolate

      Nutella Hot Chocolate is easy to make and uses just two ingredients - Nutella and hot milk! Creamy, rich and a wonderfully indulgent dessert.

      Two-ingredient recipes sometimes beg for extras, and if you want to enhance this simple approach there are a few great ways to do it. But in a pinch you aren't missing out just by making it as-is; Nutella is one of those indulgences you can savor all by itself as well as an ingredient in something more elaborate than eating it with a spoon right out of the jar. That never happens around here. Ever. Maybe.

      2-ingredient Nutella hot chocolate

      Ingredients

       Two ingredients and less than ten minutes will award you with creamy, drinkable Nutella Hot Chocolate.

      • Nutella
      • Any kind of milk including almond, soy, hemp, etc.

      How to Make Nutella Hot Chocolate

      It really is as simple as the first time I tried this recipe; it was the middle of winter and we'd had a huge snowstorm - over 14 inches and counting. I put some in a pan and added some milk. My first batch of Nutella Hot Chocolate had a bit too much milk which, thankfully, adding another tablespoon or two of Nutella fixed that problem pretty quickly. Which only produced more of the Nutella Hot Chocolate so who was I to complain?

      After a bit of experimentation I arrived at the right ratios for an easy-drinking mug; one and half cups of milk and between two and three tablespoons of Nutella. The measurements are more or less "to taste" so no precision is needed if you taste as you go.

      Hot To Make Microwave Nutella Hot Chocolate

      This recipe is for making Nutella hot chocolate on a stove but a microwave is just as easy. Just combine the Nutella and the milk in a microwave-safe mug. Microwave on full power until just hot. Remove from the microwave and stir to dissolve the Nutella.

      Fun Nutella Hot Chocolate Variations

      The thing to remember about Nutella is that in spite of how rich it is, this is one ingredient that always seems to invite you to add something extra to make it even MORE indulgent.

      Like adding a little naughty scoop of real vanilla ice cream on top of the hot chocolate. Some swear by adding some full-fat coconut milk or replacing the milk with it entirely, but that's a move that could have you going for a nap, post-Thanksgiving Dinner style.

      But that said, the ice cream hack is a great one to try if you are running out of Nutella but want to use whatever is left for your hot chocolate. You put a scoop of ice cream into the mostly empty Nutella jar and swirl it around until all the decadence is combined and ready to be poured into a mug full of hot milk--but not TOO full, you'll want to save room for the ice cream!

      Has anyone ever tried FREEZING a bit of leftover Nutella hot chocolate? Probably not likely since this treat doesn't really seem to HAVE any leftovers. But if you do get tempted to try it, let us know how it works out in the comments!

      Things to Put in Nutella Hot Chocolate

      • Whipped cream
      • Marshmallows or flavored marshmallows
      • Chocolate or milk chocolate shavings
      • Vanilla or almond extract
      • Peppermint
      • Cookies
      • Cinnamon, ginger, nutmeg or cardamon
      • Coat the rim with crushed nuts
      • Caramel, butterscotch or dulce de leche
      • Coffee or espresso
      • Splash of splash of Irish cream, Kahlua, whiskey, amaretto

      A few more delicious Nutella recipes:

      • 3-ingredient Nutella Cookies
      • Best Ever Mini-Cheesecakes (with a Nutella crust)
      • Mini Chocolate-Whoopie Pies with Nutella
      2-ingredient Nutella hot chocolate

      Nutella Hot Chocolate (just 2 ingredients!)

      Yield: 2 servings
      Prep Time: 1 minute
      Cook Time: 6 minutes
      Total Time: 7 minutes

      In less than ten minutes you will be rewarded with creamy, drinkable Nutella Hot Chocolate.

      Ingredients

      • 2 – 3 Tablespoons Nutella
      • 1 ½ cups milk, I like to use Almond Milk but any milk will do

      Instructions

      1. Place ingredients in a small saucepan and heat until steaming hot. Whisk vigorously until frothy and serve.
      2. Sometimes I put freshly whipped cream and chocolate shavings for presentation but the hot chocolate is so rich and creamy on its own that it really doesn’t need it.

      Notes

      Add whipped, marshmallows or chocolate shavings, as desired.

      Nutrition Information:
      Yield: 2 Serving Size: 1
      Amount Per Serving: Calories: 296Total Fat: 14gSaturated Fat: 10gTrans Fat: 0gUnsaturated Fat: 3gCholesterol: 24mgSodium: 157mgCarbohydrates: 32gFiber: 1gSugar: 31gProtein: 12g

      This data was provided and calculated by Nutritionix.

      © Kristy Bernardo
      Cuisine: American / Category: Drinks
      Nutella Hot Chocolate (just 2 ingredients!)

      26 Crescent Roll Appetizers

      October 11, 2022 by Heidi Deal Leave a Comment

      Crescent Roll Appetizers

      The glorious appetizer. We all love snacking, and there's nothing better than enjoying tiny portions of deliciousness meant to be consumed in one or two bites. Crescent roll appetizers are perfect for parties, events, small plates, weekend snacks, or packing in your lunchbox.

      Crescent roll appetizers are super versatile and easy to customize. You can fancy them up, or keep them basic, so you'll be able to make something for both kids and adults with a range of palates. Picky eaters? No problem. Fancy night hosting the boss? Done. Crescent dough rolls have got you covered.

      Crescent Roll Appetizer Recipes TWN

      Scroll Down For Easy Crescent Roll Appetizer Recipes ⬇

      Appetizers or Hors d'oeuvres

      The word appetizer appeared in the Americas and England around the mid 1800s and originally referred to small bites served between courses as a refresher. Over time, the pre-meal portions took over as the more common definition. In many cases, appetizers are considered the first course of a meal once you are seated at the table.

      Hors d'oeuvres, a term that dates back to 17th century France, is a term that is sometimes used interchangeably with appetizers. However, this French word more specifically refers to small snack-sized portions served prior to a meal, usually with cocktails, and are meant to be eaten easily in one bite while standing and socializing.

      Two major differences that you may consider? According to "experts" appetizers are usually eaten in 3 to 4 bites with a fork or spoon, while hors d'oeuvres are eaten with the fingers in two bites or less.

      Does it matter which word you use? That depends. We love this type of food regardless of the terminology, so it probably won't matter in a casual environment. But if you're hosting something fancy, you may want to be more specific.

      For the purpose of this page, we're going to include recipes that apply to both terms.

      What Are The Most Popular Appetizers?

      We've come a long way from pigs in a blanket -- although these are still a popular finger food at many American celebrations and events. What are some other classic appetizers?

      • Wings
      • Deviled Eggs
      • Cocktail Meatballs
      • Cheese or Chili Dip
      • Cocktail Shrimp
      • Hush Puppies
      • Cheese Balls
      • Tea Sandwiches
      • Pimiento Cheese
      • Roasted and Seasoned Nuts
      • Crab Cakes

      While you still see most of these served as appetizers from time to time, modern food trends have ramped up the appetizer game. Now, you're likely to see some form of:

      • Charcuterie Boards
      • Sushi
      • Ceviche
      • Pinwheels
      • Skewers
      • Crostini
      • Fruit & Cheese Plates
      • Fried Mac & Cheese Balls
      • Buffalo Chicken Dip
      • Jalapeño Poppers

      This is obviously not a list that we can complete here as the options are nearly endless. Crescent roll dough is ideal for creating appetizers and hors d'oeuvres. The dough is versatile; it can be used in a number of ways and paired with almost any flavor profile. The dough can be formed into cups, pockets, rolls, swirls, twists, rings, braids, and more. Need inspiration? Check out Pillsbury's Crescent Roll Hacks to learn how to fold or twist new shapes with your dough.

      Most crescent roll appetizer recipes require baking in the oven. But they can also be made in the air fryer, so we're including some recipes for that too, because a quick prep recipe that can be cooked in minutes in the air fryer makes things that much easier.

      Crescent Roll Dough and Dietary Restrictions

      Vegan & Paleo Crescent Roll Dough

      Did you know that Pillsbury's Original Crescent Roll Dough is vegan? That's right. If you are cooking vegetarian or vegan, you can use the brands original crescent roll dough because it is free of any animal derived ingredients.

      If you're looking for a Paleo alternative to crescent roll dough, try these Paleo yeast free crescent rolls. They are gluten free, dairy free, refined-sugar free, yeast free, and made with all-natural ingredients.

      Gluten Free Crescent Roll Dough

      Pillsbury does not have a gluten-free crescent roll dough alternative. If you want to try another brand that does have a gluten free option, Mom's Place Gluten-Free Crescent Rolls are made with white rice flour, potato starch, tapioca flour, organic evaporated cane sugar, salt, xanthan gum, and yeast. All you need to do is add milk, butter, and an egg white.

      If you prefer to make gluten-free crescent roll dough yourself, try this Best Ever Gluten Free Crescent Rolls recipe. These are as close to the real thing as you can get.

      Ready to get started on your crescent roll appetizers? Check out the recipe ideas below.

      Try these other delicious crescent roll recipes!

      • Crescent Roll Dinner Recipes
      • Crescent Roll Rings
      • Crescent Roll Breakfast Recipes
      • Crescent Roll Dessert Recipes

      26 Crescent Roll Appetizers

      Crescent dough is the perfect vehicle for making an array of delicious appetizers for any occasion! Whether it's the holiday season, an upscale dinner party or you're heading out to tailgate, these crescent roll appetizers are just what you'll need.

      Best Pigs in a Blanket

      Pigs in a Blanket

      Starting things off with a classic! This easy appetizer is always a hit with young and old alike. We like to serve ours with yellow mustard, but ketchup, honey-mustard or even a cheese dip are all solid choices.

      Image for Caramelized Pigs in a Blanket

      Caramelized Pigs in a Blanket

      Photo Credit: www.5boysbaker.com

      Upping our pigs-in-a-blanket game with these mini smokies, wrapped in crescent roll strips and then baked in a sweet and buttery sauce.

      Image for Mini Lap Cheong Sausage Pigs in a Blanket

      Mini Lap Cheong Sausage Pigs in a Blanket

      Photo Credit: whattocooktoday.com

      OR maybe you're more in the mood for some Chinese food? (We think it would be fun to make ALL of these pigs-in-a-blanket recipes and have a pigs-in-a-blanket party!)

      BBQ Chicken Rollups

      BBQ Chicken Rollups

      Photo Credit: life-in-the-lofthouse.com

      These tasty shredded BBQ Chicken and Colby-Jack cheese are perfect for a game day party!

      Image for Bacon Cream Cheese Crescent Rolls

      Bacon Cream Cheese Crescent Rolls

      Photo Credit: www.garlicandzest.com

      The most swoon-worthy game-day snack, party appetizer and secret eat-in-private indulgence you’ll ever have. True story.

      Image for Butternut Squash & Spinach Crescent Roll-Ups

      Butternut Squash & Spinach Crescent Roll-Ups

      Photo Credit: www.cookwithmanali.com

      Vegetarian Crescent Roll-Ups filled with butternut squash & spinach. An easy appetizer for entertaining!

      Image for Cheesy Bacon Pinwheels

      Cheesy Bacon Pinwheels

      Photo Credit: www.simplystacie.net

      Serve up some cheesy bacon goodness to your family and friends. This appetizer is quick to make and always a hit.

      Image for Crescent Roll Veggie Bars

      Crescent Roll Veggie Bars

      Photo Credit: www.justataste.com

      Whip up a quick-fix appetizer or snack with this family favorite recipe for veggie bars made with crescent rolls.

      Image for Cranberry Brie Crescent Wreath -

      Cranberry Brie Crescent Wreath -

      Photo Credit: www.mymoderncookery.com

      This Cranberry Brie Crescent Wreath is the perfect holiday appetizer for entertaining.

      Image for EASY Cheesy Jalapeno Poppers

      EASY Cheesy Jalapeno Poppers

      Photo Credit: theblondcook.com

      Incredibly easy Cheesy Jalapeno Poppers- a game day appetizer everyone will love!

      Image for Crescent-Wrapped Asparagus

      Crescent-Wrapped Asparagus

      Photo Credit: www.simplysated.com

      That parmesan! Also, Boursin cheese. Enough said.

      Image for Cheesy Sausage Pinwheels

      Cheesy Sausage Pinwheels

      Photo Credit: www.reneeskitchenadventures.com

      Sausage, cheese, banana peppers and more cheese "Man Candy" for your big game celebration or a fun appetizer anytime!

      Image for Pizza Pinwheels

      Pizza Pinwheels

      Photo Credit: www.livewellbakeoften.com

      These pizza pinwheels are easy to make and a fun appetizer for your Superbowl party!

      a picture of a crescent pinwheel

      Bacon Spinach Blossoms: Festive Holiday Appetizer

      Photo Credit: www.kenarry.com

      Great for Christmas cocktail parties! Bacon Spinach Blossoms with roasted red peppers and Italian cheeses are a festive holiday appetizer.

      Image for Blackberry Brie Bites

      Blackberry Brie Bites

      Photo Credit: insidebrucrewlife.com

      Melted Brie cheese is amazing with blackberry jelly and fresh Blackberries.

      Image for Cranberry Brie Bites

      Cranberry Brie Bites

      Photo Credit: www.thecountrycook.net

      These little bites would be a perfect appetizer for Thanksgiving or your holiday tray.

      Air Fryer Garlic Cheese Stuffed Crescent Rolls Recipe

      Air Fryer Garlic Cheese Stuffed Crescent Rolls Recipe

      Photo Credit: www.simplystacie.net

      Stuffed with ooey-gooey cheese and luscious garlic butter, these are a great party appetizer, and super addictive!

      Air Fryer Sausage and Cream Cheese Crescents

      Air Fryer Sausage and Cream Cheese Crescents

      Photo Credit: www.thecountrycook.net

      Perfectly cooked in the air fryer, these crescents are crispy on the outside and filled with flavorful sausage and cream cheese.

      Sweet and Sour Shrimp Puffs

      Sweet and Sour Shrimp Puffs

      Photo Credit: www.pillsbury.com

      Sweet and sour shrimp puffs are the perfect flavor combination packed into a single bite. These will be a hit at your next get together.

      Smoked Salmon and Asparagus Puffs

      Smoked Salmon and Asparagus Puffs

      Photo Credit: www.foodnetwork.com

      Easy and delicious, these dressed up crescent rolls are perfect for an adult dinner party or holiday meal.

      Crack Chicken Crescent Bites

      Crack Chicken Crescent Bites

      Photo Credit: www.plainchicken.com

      These crack chicken crescent bites will be the star of every party. Make extra because they won't last long.

      Baked Cheese Pear and Prosciutto Puff Pastry

      Baked Cheese Pear and Prosciutto Puff Pastry Appetizers

      Photo Credit: julieblanner.com

      These pear and prosciutto crescent roll appetizers are delicious and elegant so they are ideal if you want something a little more sophisticated for an adult appetizer.

      Meatball Sliders (only 4 Ingredients)

      Meatball Sliders (only 4 Ingredients)

      Photo Credit: www.plainchicken.com

      One bite meatball sliders will be every kids new favorite party food, and you'll love them too. They're just four ingredients and ready in less than 30 minutes.

      Best Crab & Cream Cheese Crescent Rolls

      Best Crab & Cream Cheese Crescent Rolls

      Photo Credit: centslessdeals.com

      We already shared the crack chicken recipe, this is the crack crab. These are a party favorite and won't last long.

      Air Fryer Roasted Tomato-Goat Cheese Tarts

      Air Fryer Roasted Tomato-Goat Cheese Tarts

      Photo Credit: forktospoon.com

      Pop these in the air fryer for crispy crescent dough filled with goat cheese and tomato. These are easy to make and perfect for any occasion.

      26 Crescent Roll Dessert Recipes

      October 11, 2022 by Heidi Deal Leave a Comment

      Crescent Roll Dessert Recipes

      Crescent roll dough is buttery, flaky, and melt-in-your-mouth delicious. They are perfect to serve with dinner as a side, or to soak up soup broth or pasta sauce. But these little doughy gems are super versatile and can be used in a variety of recipes. Including desserts.

      Crescent Roll Dessert Recipes

      Scroll Down for the Easy Crescent Roll Dessert Recipes ⬇

      Thanks to their flaky goodness, crescent rolls are perfect for creating dessert recipes. What kind of dessert recipes? ALL kinds of dessert recipes! Sweet rolls, twists, pies, popovers, pockets, strudels, and tarts are all perfect made with classic crescent rolls.

      Crescent roll dough does not have to be used strictly in their crescent form. The dough can be rolled out and cut into a variety of shapes and sizes to form pie crusts and shells, rolls, pinwheels, rings, braids, twists, and more.

      Pillsbury added this great article to show you how to make different shapes including rosettes, stalks, and swirls.

      Crescent Roll Dough For Desserts

      Crescent dough is easy to work with and can be purchased pre-made from the refrigerated case. The most popular brand is Pillsbury, but other brands have made it to market including Immaculate Baking Organic Crescent Rolls and Annie's Organic. Most major grocers have their own line of crescent rolls as well such as Kroger and Aldi.

      There are also many varieties of crescent dough. Pillsbury sells crescent roll dough in original, reduced fat, butter flake, honey butter, crescent rounds, big & buttery, and sweet hawaiian. They also sell crescent roll dough sheets. What your store carries will vary. Generally for dessert recipes you can use the original or butter, but any will work. The sweet hawaiian will change the flavor of the recipe since it is not the normal buttery flavored dough.

      There may be a time that you prefer to make your own crescent dough. If you don't mind the extra steps, try this recipe for Extra Flaky Homemade Crescent Rolls.

      Gluten Free Crescent Roll Dough

      Do you have dietary restrictions? Pillsbury does not currently have a gluten-free crescent roll dough. If you would like to try another brand that does have a gluten free alternative, Mom's Place Gluten-Free Crescent Rolls are made with white rice flour, potato starch, tapioca flour, organic evaporated cane sugar, salt, xanthan gum, and yeast. All you need to do is add milk, butter, and an egg white.

      If you would like to make gluten-free crescent roll dough from scratch, try this Best Ever Gluten Free Crescent Rolls recipe from This Vivacious Life. These are as close to the real thing as you can get. Working from a mix will take more time than the traditional canned crescent dough, but the end result will be worth it.

      Paleo & Vegan Crescent Roll Dough

      If you're looking for a Paleo alternative so that you can enjoy crescent roll dough without (as much) guilt, try these Paleo yeast free crescent rolls. They are gluten free, dairy free, refined-sugar free, yeast free, and clean eating, made with all-natural ingredients.

      Are Pillsbury Crescent Rolls vegan? Yes! You can use Pillsbury's Original Crescent Roll dough if you are cooking vegan as they do not contain any animal derived ingredients such as milk, eggs, or honey.

      Using pre-made crescent roll dough makes many desserts fast and easy, and while they are usually baked in the oven, crescent rolls can also be made in the air fryer.

      Ready to get started with crescent roll desserts? Here's a collection of recipes for you to try.

      Try these other crescent roll recipes!

      • Crescent Roll Dinner Recipes
      • Crescent Roll Appetizers
      • Crescent Roll Rings
      • Crescent Roll Breakfast Recipes

      26 Crescent Roll Dessert Recipes

      Dessert is where crescent dough truly shines. The flaky, buttery crust pairs so well with any number of ingredients and flavors. You'll be proud to serve any one of these crescent roll dessert recipes on your table!

      Image for S'mores Crescent Rolls

      S'mores Crescent Rolls

      Photo Credit: www.lemontreedwelling.com

      S’mores Crescent Rolls stuffed with chocolate chips, marshmallows, graham crackers, and Nutella and topped with Nutella drizzle. Our favorite new way to enjoy s’mores!

      Strawberry Cheesecake Crescent Rolls

      Strawberry Cheesecake Crescent Rolls

      Photo Credit: www.jocooks.com

      These strawberry cheesecake crescent rolls take just 25 minutes to make. They're creamy and delicious with the pairing of fresh strawberries and strawberry jam.

      Image for Raspberry Crescent Twists

      Raspberry Crescent Twists

      Photo Credit: www.sohowsittaste.com

      These sweet little twists are so pretty! We think they'd be perfect for a luncheon or a special brunch.

      Magic Crescent Bars

      Magic Crescent Bars

      Photo Credit: www.plainchicken.com

      Magic crescent bars are made with semi-sweet and white chocolate, or any combination of chocolate chips you desire. They're super tasty and easy to customize to whatever you're craving.

      Cheesecake Nutella Twists

      Cheesecake Nutella Twists

      Photo Credit: insidebrucrewlife.com

      The sweet filling in these Cheesecake Nutella Twists is so good that you'll be wanting two!

      Lemon Curd Crescent Danish Recipe

      Lemon Curd Crescent Danish Recipe

      Photo Credit: www.sizzlingeats.com

      These are so pretty to look at so they are perfect for serving at your next gathering...but you probably won't want to wait for that because they're absolutely delicious and worth making just because.

      Image for Raspberry Almond Crescents with Chocolate Recipe

      Raspberry Almond Crescents with Chocolate Recipe

      Photo Credit: littlespicejar.com

      The inside of these crescent rolls are stuffed with fresh raspberries and bittersweet chocolate. The outside is topped with toasty sliced almonds and a big drizzle of chocolate.

      Mexican Cheesecake Recipe

      Sopapilla Cheesecake Bars

      Sopapilla Cheesecake has wonderful flavor and texture. A creamy cheesecake filling pairs with a slightly crunchy top from butter and cinnamon.

      Red Velvet Cream Cheese Danish

      Red Velvet Cream Cheese Danish

      Photo Credit: www.tasteandtellblog.com

      If you love red velvet, you'll love this crescent roll danish with a red velvet cream cheese filling and a sweet glaze.

      Image for Crescent Roll Coffee Cake

      Crescent Roll Coffee Cake

      Photo Credit: spicysouthernkitchen.com

      Crescent Roll Coffee Cake with raspberry preserves, pecans, and a sugary glaze makes an easy breakfast or dessert.

      Image for Blueberry Cream Cheese Danish with Crescent Rolls

      Blueberry Cream Cheese Danish with Crescent Rolls

      Photo Credit: www.cookiedoughandovenmitt.com

      Need a dessert that will feed a crowd? This blueberry cream cheese danish with crescent rolls is perfect!

      Air Fryer Cherry Crescent Rolls

      Air Fryer Cherry Crescent Rolls

      Photo Credit: forktospoon.com

      If you love those cherry pie pocket pastries from when you were a kid, you'll love these. All you need is your air fryer, 5 minutes, and four ingredients!

      Image for Easy White Chocolate Graham Croissants

      Easy White Chocolate Graham Croissants

      Photo Credit: asprinkleandasplash.com

      These Easy White Chocolate Graham Croissants are a fun alternative to a standard chocolate croissant. And the best part…they are so easy!

      Image for Delectable Raspberry Lemon Pastry Strudels

      Delectable Raspberry Lemon Pastry Strudels

      Photo Credit: www.thebakingchocolatess.com

      These golden-buttery, flaky strudel lovelies are filled with raspberry pastry filling, frosted with a delectable lemon glaze!

      Air Fryer Donut Sticks Recipe

      Air Fryer Donut Sticks Recipe

      Photo Credit: www.allrecipes.com

      There's something homey about treats with cinnamon sugar, so these air fryer donut sticks should hit the spot when you're craving a comforting treat.

      Image for Easy Apple Cream Cheese Tart

      Easy Apple Cream Cheese Tart

      Photo Credit: www.thebakingchocolatess.com

      This stunning Apple Cream Cheese Tart touts a crescent roll crust, cream cheese filling, cinnamon-sugar apples baked to a golden brown.

      Image for Blueberry Pastry Delights

      Blueberry Pastry Delights

      Photo Credit: whitneybond.com

      This Blueberry Pastry is guaranteed to make your mornings more delicious & it’s easy to make with a can of crescent roll dough!

      Image for Iced Apple Crescent Roll Danish

      Iced Apple Crescent Roll Danish

      Photo Credit: www.savvysavingcouple.net

      Iced Apple Crescent Roll Danish is a delicious dessert that can be easily made at home with crescent roll dough and fresh apples.

      Image for Mini Pumpkin Pie Crescent Rolls

      Mini Pumpkin Pie Crescent Rolls

      Photo Credit: omgchocolatedesserts.com

      Mini Pumpkin Pie Crescent Rolls are a quick and easy recipe and the perfect way to use leftover pumpkin.

      Image for 5-Ingredient Brown Butter Cinnamon Rolls

      5-Ingredient Brown Butter Cinnamon Rolls

      Photo Credit: www.cookingforkeeps.com

      5-Ingredient Brown Butter Cinnamon Rolls are a cinnamon-roll lover’s dream – and they take MINUTES to prepare.

      Image for Stuffed Crescent Rolls With Berries & Cream Cheese

      Stuffed Crescent Rolls With Berries & Cream Cheese

      Photo Credit: funmoneymom.com

      With just four main ingredients, these Stuffed Crescent Rolls with cheese and berries are just as easy as they are delicious.

      Image for Mini Caramel Rolls

      Mini Caramel Rolls

      Photo Credit: www.julieseatsandtreats.com

      These Mini Caramel Rolls are made with crescent rolls for a quick and easy dessert hack!

      Orange Cinnamon Crescent Rolls

      Orange Cinnamon Crescent Rolls (Mini Sized)

      Photo Credit: pizzazzerie.com

      The easiest trick to making delicious miniature orange cinnamon rolls!

      Bacon Maple Breakfast Rolls

      Bacon Maple Breakfast Rolls

      Photo Credit: grumpyshoneybunch.com

      Quick Maple Bacon Cinnamon Buns?  No, don’t run for your reading glasses, these rolls are the shorthand version.

      Image for Baked "Deep Fried" Oreos

      Baked "Deep Fried" Oreos

      Photo Credit: www.somethingswanky.com

      No need to wait for the county fair when you can whip these in a flash!

      Image for Easy Mint Chip Sweet Rolls

      Easy Mint Chip Sweet Rolls

      Photo Credit: www.crazyforcrust.com

      You need these in your life. Breakfast or dessert? You choose.

      26 Crescent Roll Ring Recipes

      October 11, 2022 by Heidi Deal Leave a Comment

      Crescent Roll Ring Recipes

      This might be our personal favorite use of crescent rolls. Crescent roll rings are a great way to serve a variety of foods as an appetizer or main course for meals, and they are a hit with both kids and adults.

      Crescent Roll Ring Recipes

      How Do You Make Crescent Roll Rings?

      Crescent roll rings are made by arranging the crescent roll dough in a circular form, layering one corner over the other. Pillsbury, the crescent roll experts, shared this photo which is a great visual for anyone who hasn't made crescent roll rings before:

      Scroll Down for the Easy Crescent Roll Rings Recipes ⬇

      How To Make Crescent Roll Rings
      📸Photo Courtesy of Pillsbury

      Once the dough has been layered, you'll add your main filling around the ring, leaving enough of the triangle tips bare to wrap up and over the filling. Tuck the tip of each triangle under the bottom of the ring, pinching slightly to secure the dough together. Wrap and tuck each triangle over the filling. When the ingredients are wrapped with the dough, the ring is ready to bake.

      If you want the crescent roll ring to have a glossy finish, beat an egg with a tablespoon of water in a small dish, then use a basting brush to coat the outer layer of dough before putting it in the oven to bake.

      If you are using ingredients that are wet or that create moisture when cooking (like mushrooms), you can bake your crescent rolls on a pizza stone. The pizza stone helps pull moisture away from the dough so that it won't be soggy. Instead you'll have a nice, crisp bottom.

      Pro Tip! Crescent roll rings can also be cooked in the air fryer.

      How To Serve Crescent Roll Rings

      Crescent roll rings are super versatile. If you can imagine it, you can probably create it. With crescent roll rings, you can also fill the center with more ingredients or a bowl of dipping sauce (after baking). Here are just a few examples:

      • Taco Ring: Fill the center with guacamole or lettuce, tomatoes, and chopped onions.
      • Pizza Ring: Serve with a small dish of marinara sauce or ranch in the center.
      • Dessert Ring: Fill the center with dippable frosting and sprinkles.
      • Olympic Rings: Pick a recipe or five to symbolize the Olympic rings and serve these circle-shaped foods at a winter or summer Olympic viewing party.
      • New Year's Day Good Luck Rings: On New Year's Day ring-shaped foods are often eaten in an effort to bring a year of luck full circle.

      Other things to put in the center of a crescent roll ring:

      • Peanut butter
      • Condiments, depending on the ring, like: BBQ sauce, buffalo sauce, ranch dressing, spicy mustard, teriyaki sauce
      • Cheese sauce
      • Pesto
      • Spinach and artichoke dip
      • Crab dip
      • Salsa
      • Whipped cream

      Ready to get started creating crescent roll rings that everyone will love? Check out these recipe ideas!

      See these other delicious Crescent Roll Recipes:

      • Crescent Roll Dinner Recipes
      • Crescent Roll Breakfast Recipes
      • Crescent Roll Appetizers
      • Crescent Roll Dessert Recipes

      26 Crescent Roll Rings Recipes

      Crescent roll rings are one of those fun meals that always look impressive yet couldn't be easier to make! Dinner? Check. Breakfast? Check. Gorgeous desserts that taste so fantastic you'll be passing around the recipe? Check and check.

      Image for Beef Taco Ring

      Beef Taco Ring

      Photo Credit: princesspinkygirl.com

      This Beef Taco Ring made with Crescent Rolls is all that and more. Great appetizer for a crowd for your next party or game day!

      Cheesy Spinach Jalapeno Crescent Ring

      Cheesy Spinach Jalapeno Crescent Ring

      Photo Credit: iwashyoudry.com

      A beautiful crescent ring filled with fresh spinach and cheese.

      Image for Buffalo Chicken Dip Crescent Ring

      Buffalo Chicken Dip Crescent Ring

      Photo Credit: www.theseasonedmom.com

      For an easy, crowd-pleasing appetizer or a quick weeknight dinner, this Buffalo Chicken Dip Crescent Ring is always a winner!

      Image for Strawberry Lemon Crescent Ring

      Strawberry Lemon Crescent Ring

      Photo Credit: www.averiecooks.com

      Strawberries galore in this EASY crescent ring that's filled w/ lemony cream cheese & topped with glaze!

      Image for Ultimate Crescent Roll Taco Ring

      Ultimate Crescent Roll Taco Ring

      Photo Credit: bitzngiggles.com

      Ultimate Crescent Roll Taco Ring – Filled with corn chips, guacamole, sour cream, cheese and tomatoes – easy and delicious!

      Nutella Banana

      Nutella Banana Crescent Ring

      Photo Credit: tipbuzz.com

      This Nutella Banana Crescent Ring combines three classic flavors into one mouthwatering dessert.

      Image for Philly Cheesesteak Crescent Ring

      Philly Cheesesteak Crescent Ring

      Photo Credit: iwashyoudry.com

      Wrap your favorite Philly Cheesesteak Sandwich in a warm and flaky crescent roll ring! Party food!

      Image for Chicken Enchilada Crescent Ring

      Chicken Enchilada Crescent Ring

      Photo Credit: sharedappetite.com

      This is the only way we'll be eating our enchiladas from now on.

      Image for Sweet Hawaiian BBQ Chicken Crescent Ring

      Sweet Hawaiian BBQ Chicken Crescent Ring

      Photo Credit: www.pillsbury.com

      Whether you make it for dinner or for a game day appetizer, this 5-ingredient crescent ring will deliver every. single. time.

      Image for Meat Lover's Crescent Roll Pizza Ring

      Meat Lover's Crescent Roll Pizza Ring

      Photo Credit: www.foodnetwork.com

      Cheesy and triple-meat-filled, this crescent ring is like a stromboli only flaky, thanks to the crescent dough.

      Image for Bacon Crescent  Roll Breakfast Ring

      Bacon Crescent Roll Breakfast Ring

      Photo Credit: www.jocooks.com

      This beautiful Crescent Bacon Breakfast Ring will be everyone’s weekend breakfast of choice, it’s loaded with bacon, eggs and cheese.

      Image for Jalapeno Popper Crescent Roll Ring

      Jalapeno Popper Crescent Roll Ring

      Photo Credit: soufflebombay.com

      Like poppers? Then this is for you - with no fussy stuffing your peppers!

      Image for Cheeseburger Ring

      Cheeseburger Ring

      Photo Credit: bakeatmidnite.com

      Skip the grill and make cheeseburgers for everyone!

      Image for Italian Sub Crescent Roll Ring

      Italian Sub Crescent Roll Ring

      Photo Credit: www.thetwobiteclub.com

      An Italian Sub Crescent Roll Ring is packed full of ham, salami, capicola, and provolone cheese all tucked inside a ring of golden crescent rolls.

      Image for Chicken Taco Crescent Ring

      Chicken Taco Crescent Ring

      Photo Credit: www.fivehearthome.com

      This one would be great to use up your leftover Thanksgiving turkey, too!

      Image for Antipasto Cresent Ring Recipe

      Antipasto Cresent Ring Recipe

      Photo Credit: www.lemonsforlulu.com

      This easy appetizer is filled with a blend of meats and cheeses that makes it so tasty and delicious!

      Image for Mediterranean Crescent Ring · Erica's Recipes

      Mediterranean Crescent Ring · Erica's Recipes

      Photo Credit: ericasrecipes.com

      The classic crescent ring, made over using delicious Mediterranean-inspired ingredients.

      Image for Pillsbury Lemon-Cream Cheese Crescent Ring

      Pillsbury Lemon-Cream Cheese Crescent Ring

      Photo Credit: www.thebakingchocolatess.com

      This gorgeous dessert is SO simple to make and it requires little effort to pull it all together.

      Image for Cherry Cream Cheese Crescent Ring

      Cherry Cream Cheese Crescent Ring

      Photo Credit: cincyshopper.com

      If you are feeding a crowd breakfast or even dessert, this danish type ring is going to work perfectly. Since this ring uses store bought crescent dough, it can be whipped up in no time at all.

      Image for Apple Crescent Ring

      Apple Crescent Ring

      Photo Credit: whoneedsacape.com

      This apple crescent ring can be made in minutes, perfect for holidays and weekend brunch. Great for dessert too, you’ll love this fruity treat!

      Ham and Cheese Crescent Ring

      Ham and Cheese Crescent Ring

      Photo Credit: www.feastforafraction.com

      Ham and cheese sandwiches, crescent ring style! Just three ingredients and 20 minutes and you've got a delicious and easy lunch.

      Cream Cheese and Sausage Crescent Roll Ring

      Cream Cheese and Sausage Crescent Roll Ring

      Photo Credit: realhousemoms.com

      This can be served as an appetizer or for breakfast. It's super easy, and wonderfully cheesy and will be a new crowd favorite.

      Reuben Crescent Ring

      Reuben Crescent Ring

      Photo Credit: garysquicksteak.com

      Reuben sandwich meets crescent rolls. This ring will be a regular on your meal rotation.

      Broccoli Cheddar Crescent Ring

      Broccoli Cheddar Crescent Ring

      Photo Credit: www.foodnetwork.com

      If you love broccoli cheddar soup or broccoli cheese casserole, add this one to your list. This broccoli cheddar ring is warm and cozy, super sharable, and the perfect option if you need a vegetarian option for your next get together.

      Easy Spinach Artichoke Dip

      October 10, 2022 by Kristy Bernardo 41 Comments

      Easy Spinach Artichoke Dip Recipe

      This recipe for Easy Spinach Artichoke Dip takes just a few minutes to throw together. A great appetizer that's hot and cheesy with a ton of flavor!

      Easy Spinach Artichoke Dip Recipe

      I have been making this Easy Spinach Artichoke Dip for so many years now I've lost count. It's that one appetizer recipe that I always come back to; partly because of how easy and fast it is to make but also because everyone seems to love it. Every time.

      Spinach Artichoke Dip Ingredients

      • Frozen chopped spinach, thawed squeezed thoroughly in a hand towel
      • Frozen artichoke hearts, thawed (can also use a can, very well-drained)
      • Mayonnaise
      • Shredded mozzarella cheese
      • Grated parmesan cheese
      • Garlic clove, minced
      • Kosher salt

      (Scroll down to the bottom for the printable recipe card with exact measurements and recipe instructions.)

      How to Make this Easy Spinach Artichoke Dip

      With just six ingredients, this easy spinach artichoke dip is something you can fall back on for a last minute dinner party commitment, and one that's on the cheaper side, too! Frozen spinach, artichoke hearts, mayo, mozzarella, parmesan and garlic (and a little salt but that goes without saying) all come together to make a creamy, cheesy hot dip that goes so well with crunchy tortilla chips or crostini.

      1. Thoroughly dry the spinach in a kitchen towel
      2. Mix all ingredients together and place in a baking dish.
      3. Sprinkle with more parmesan cheese, if desired.
      4. Bake for 20 minutes at 375F or until hot and bubbling.

      Serve immediately or prep ahead and bake in the oven before serving.

      This dip is also great for a snack later by briefly reheating in a microwave.

      Spinach Artichoke Dippers

      • Tortilla chips
      • Crackers: Ritz, Triscuits, rice crackers, chickpea crackers, Toasteds, crackerbread, Carr's, Breton's and more
      • Breads: Pita bread, French bread, baguette, naan, garlic bread, stale bread, crostini, sourdough, Grissini bread sticks, soft pretzel, pretzel chips, bagel
      • Veggies: Cucumbers, carrots, celery, bell peppers

      It's even wonderful as a sandwich spread with fresh tomatoes. However you enjoy it, I know you're going to love this easy spinach artichoke dip as much as my family does!

      Vegan Options

      It is a simple thing to swap out the cheese and mayo in this recipe, but if you are after a really creamy alternative, try using vegan cheese made from coconut milk in addition to soy-based cheese. Some may prefer to use all coconut milk varieties for this reason, others may not.

      But you should experiment with the ratio of soy-based cheese to those that are heavy on the coconut milk, the texture differences may surprise you!

      Applebees' Spinach And Artichoke Dip

      Some people are fans of Applebees' Spinach and Artichoke dip and want to know how to make their own copycat Applebees version at home. The actual recipe used by the national restaurant chain is likely copyrighted, so we won't reproduce that here. But on tasting, you may notice that the Applebees version relies on chicken stock, cream cheese, and sour cream in addition to the ingredients listed below for our easy version.

      There's a reason why this recipe is labeled an "easy" dip; minus the sour cream and cream cheese present in the at-home version of the Applebees' dip, our version is likely to be a wee bit healthier, too!

      Try these amazing spinach artichoke dips with a twist!

      • Hot Crab and Artichoke Dip
      • Spinach Artichoke Dip with Shitake Mushrooms
      Easy Spinach Artichoke Dip Recipe

      Easy Spinach Artichoke Dip

      Yield: 8
      Prep Time: 10 minutes
      Cook Time: 20 minutes
      Total Time: 30 minutes

      This spinach artichoke dip recipe has just six ingredients, takes 10 minutes to prepare and 20 minutes to bake and is incredibly creamy, cheesy and delicious.

      Ingredients

      • 10 oz frozen spinach (1 box), thawed squeezed thoroughly in a hand towel
      • 14 oz frozen artichoke hearts, thawed (can also use a can, very well-drained)
      • 1 cup good-quality mayonnaise
      • 1 cup shredded mozzarella cheese
      • 1 cup grated parmesan cheese, plus more for sprinkling on top (optional)
      • one garlic clove, minced
      • ½ teaspoon kosher salt

      Instructions

      1. Preheat oven to 375F
      2. Mix all ingredients together and place mixture in baking dish. Sprinkle with more parmesan cheese, if desired.
      3. Bake for 20 minutes at 375F or until hot and bubbling. Serve immediately with tortilla chips or crostini.

      Notes

      More or less of spinach and artichoke can be used depending on preference.

      Some like to add an optional dusting of onion powder to the above. But not too much!

      Nutrition Information:
      Yield: 8 Serving Size: 1
      Amount Per Serving: Calories: 311Total Fat: 27gSaturated Fat: 6gTrans Fat: 0gUnsaturated Fat: 19gCholesterol: 29mgSodium: 616mgCarbohydrates: 11gFiber: 4gSugar: 1gProtein: 9g

      This data was provided and calculated by Nutritionix.

      © Kristy Bernardo
      Cuisine: American / Category: Appetizers
      Easy Spinach Artichoke Dip

      Spinach Artichoke Dip with Shiitake Mushrooms

      October 9, 2022 by Kristy Bernardo 3 Comments

      Warm Spinach Artichoke Dip with Shitake Mushrooms - the mushrooms take this ubiquitous dip up a delicious notch!

      Hot and Creamy Spinach Artichoke Dip with Shiitake Mushrooms - the mushrooms take this ubiquitous dip up a delicious notch!

      Hot and Creamy Spinach Artichoke Dip with Shitake Mushrooms - the mushrooms take this ubiquitous dip up a delicious notch!

      Cheesy, gooey, and warm; that sounds like the perfect game day spinach artichoke dip to me! It's true that this recipe is a favorite during football season, but it's great for any type of gathering. By adding mushrooms to this dip, you get a heartier, earthy flavor that goes well with game day beverages of any kind.

      Spinach Artichoke Mushroom Dip Ingredients

      • Canola oil                                                       
      • Shiitake mushrooms
      • Garlic
      • Cream cheese
      • Sour cream    
      • Mayonnaise
      • Artichoke hearts
      • Frozen spinach
      • Mozzarella or jack cheese                                                     
      • Parmesan                  
      • Kosher salt                                                     
      • Black pepper  

      Note: Any type of mushroom would be good in this Spinach Artichoke Dip, so use your favorite!

      (Scroll down to the bottom for the printable recipe card with exact measurements and instructions.)

      How to Make Spinach Artichoke Mushroom Dip

      This spinach artichoke mushroom dip is a perfect twist for those accustomed to the typical spinach artichoke dip.

      1. Cook the mushrooms in a skillet.
      2. Thoroughly dry the spinach in a kitchen towel
      3. Mix all ingredients together and place in a baking dish.
      4. Bake for 15-20 minutes at 400F or until hot and bubbling.

      Serve immediately or prep ahead and bake in the oven before serving.

      Hot and Creamy Spinach Artichoke Dip with Shitake Mushrooms - the mushrooms take this ubiquitous dip up a delicious notch!

      Spinach Artichoke Mushroom Dip Hacks

      I've mentioned this in other recipes but it is well worth repeating here; when you are done preparing your dip you MUST resist the temptation to put artichoke bits and other fibrous foods down the garbage disposal. You will wind up with a nasty clog. But that's advice for AFTER you make the dip. What about during?

      The first hack I learned for this recipe was adding the mushrooms. You can use any variety of them for this recipe, Shiitake mushrooms are a favorite around here. If you have to buy mushrooms ahead of time, don't store them in an airtight container in the fridge prior to cooking.

      This makes them rubbery. Instead, try storing them in the refrigerator in a paper bag. You can use dehydrated mushrooms in this recipe, but you will need to soak them and rehydrate them prior to cooking.

      I increased the garlic in this recipe and subbed a bit of sour cream for a portion of the mayonnaise, you may also wish to adjust to taste--some like it with more garlic, others prefer less. If you have had trouble with this recipe in the past with it coming out too watery, try wringing out your spinach first to remove as much excess moisture as possible.

      If you get watery results, you can always thicken your dip with some extra sour cream, and some sources report good results with cornstarch, but around here we prefer the extra sour cream.

      What Serve with Spinach Artichoke Mushroom Dip

      Some aren't sure what to serve with this dip. As a delivery system for the dip itself, feel free to use any or all of the following:

      • Potato chips
      • Tortilla chips
      • French fries
      • Bread bowls
      • Crackers
      • Potato wedges
      • Naan
      • Tortillas
      • Pita bread
      • Crostini
      • Vegetables e.g. cucumbers, carrots, celery, bell peppers
      • Italian or French bread

      Try these other amazing spinach artichoke dips!

      • Easy Spinach Artichoke Dip
      • Hot Crab and Artichoke Dip
      Warm Spinach Artichoke Dip with Shitake Mushrooms - the mushrooms take this ubiquitous dip up a delicious notch!

      Hot and Creamy Spinach Artichoke Mushroom Dip

      Yield: 10
      Prep Time: 15 minutes
      Cook Time: 20 minutes
      Total Time: 35 minutes

      This spinach artichoke mushroom dip recipe is a tasty twist on the traditional spinach artichoke dip.

      Ingredients

      • 1 tablespoon canola oil
      • 16 oz shitake mushrooms, stems removed and chopped
      • 3-4 cloves garlic, minced
      • 8 oz cream cheese, softened
      • 8 oz sour cream
      • 8 oz mayonnaise
      • 1 14oz can of artichoke hearts, NOT bottoms, drained, patted dry and chopped
      • 1 10 oz package frozen spinach, thawed and squeezed thoroughly to remove excess water
      • 8 oz finely shredded mozzarella or jack cheese
      • 8 oz shredded parmesan
      • 1 teaspoon kosher salt
      • ½ teaspoon coarsely ground black pepper

      Instructions

      1. Preheat oven to 400F.
      2. Preheat a skillet over high heat and add canola oil. Add shitake mushrooms and cook until any water has been released and evaporated and mushrooms are golden brown. Reduce heat to medium-low and add garlic; cook for 2 minutes longer, stirring often. Remove from heat and set aside.
      3. In a mixing bowl, thoroughly combine cream cheese, sour cream and mayonnaise. Stir in remaining ingredients until well-mixed. Dip can be refrigerated at this point for up to 24 hours before baking; bring back to room temperature then continue with step 4.
      4. Bake dip in preheated oven for 15-20 minutes or until hot and bubbly. Serve immediately with tortilla chips.

      Notes

      Any type of mushroom would be good so use your favorite!

      Nutrition Information:
      Yield: 10 Serving Size: 1
      Amount Per Serving: Calories: 510Total Fat: 43gSaturated Fat: 17gTrans Fat: 0gUnsaturated Fat: 23gCholesterol: 80mgSodium: 959mgCarbohydrates: 14gFiber: 4gSugar: 4gProtein: 20g

      This data was provided and calculated by Nutritionix.

      © Kristy Bernardo
      Cuisine: American / Category: Appetizers
      Spinach Artichoke Dip with Shiitake Mushrooms

      Chicken Empanada Recipe

      October 8, 2022 by Kristy Bernardo Leave a Comment

      Chicken Empanada Recipe

      Try this easy and unique chicken empanada recipe. It will become your favorite!

      Chicken Empanada Recipe

      Empanadas are delicious little hand pies filled with savory ingredients. They're similar to pastechi in that it's dough stuffed with flavorful ingredients that are then baked or fried.

      Ingredients

      • Whole chicken legs, including thighs
      • Spanish chorizo
      • Reduced-sodium chicken broth
      • Pitted green olives
      • Spanish smoked paprika
      • Dry white wine
      • Extra-virgin olive oil
      • Large onions
      • Garlic cloves
      • Bay leaf
      • Salt
      • Black pepper
      • Refrigerated pie crust (or substitute with puff pastry)

      (Scroll down to the bottom for the printable recipe card with exact measurements and recipe instructions.)

      How to Make Chicken Empanadas

      Pat the chicken dry and sprinkle with salt and pepper while heating olive in a 12-inch heavy skillet. Brown the chicken and transfer to a plate.

      Sauté onions, garlic, and bay leaf in fat remaining in a skillet, stirring frequently, until onions are softened. Add chorizo and paprika and cook. Add olives, raisins, wine, and broth and bring to a boil.

      Return the chicken to the skillet along with any juices accumulated on plate, then reduce heat to moderately low and simmer chicken, covered, turning over once, until tender.

      Transfer chicken to a clean plate and when chicken is cool enough to handle, discard skin and bones and coarsely chop meat. Stir chicken into sauce and discard bay leaves. Season with salt and pepper, then cool filling, uncovered, about 30 minutes.

      Using 4-inch round cutters (I used mini tart pans with a scalloped edge), cut out circles and place a tablespoon or two of filling in center. Fold over and seal edges with a fork. Deep-fry empanadas at 375F for 1- minutes per side until golden brown.

      Note: These keep really well up to 24 hours before frying. Just keep them in a single layer on a baking sheet tightly sealed.

      Chicken Empanada Recipe

      Empanada Sauces & Dips

      These empanadas are great as is but adding your favorite dipping sauce can add extra bit of deliciousness. Here are a few suggestions for inspiration.

      • Marinara sauce
      • Red pepper sauce
      • Gruyere cheese Sauce
      • Avocado sauce
      • Chimichurri sauce
      • Cilantro dipping sauce
      • Cilantro lime sauce
      • Ranch dressing
      • Garlic aioli
      • Chipotle dipping sauce
      • Sweet & sour sauce
      • Soy ginger sauce
      • Mango dipping sauce
      • Greek yogurt
      • Blue cheese sauce
      • Salsa verde
      • Mango chili sauce
      • Buffalo sauce
      Chicken Empanadas

      Easy Chicken Empanadas (Empanadas de Pollo)

      Yield: 24 empanadas
      Prep Time: 15 minutes
      Cook Time: 40 minutes
      Additional Time: 30 minutes
      Total Time: 1 hour 25 minutes

      Empanadas are tasty little hand held pies.  These empanadas are filled with chicken, chorizo and seasoned with smoked paprika, garlic cloves, bay leaf, salt and black pepper. 

      Ingredients

      • 3 whole chicken legs, including thighs (2 to 2 ¼ pounds total)
      • 1 teaspoon salt
      • ¼ teaspoon black pepper
      • 4 ½ tablespoons extra-virgin olive oil
      • 2 large onions, halved lengthwise, then cut lengthwise into ¼-inch-wide strips
      • 2 large garlic cloves, minced
      • 1 bay leaf
      • ⅓ cup finely diced Spanish chorizo
      • ½ teaspoon Spanish smoked paprika (not hot)
      • ½ cup chopped pitted green olives
      • ½ cup dry white wine
      • ½ cup reduced-sodium chicken broth
      • 1 15oz refrigerated pie crust

      Instructions

          1. Pat chicken dry and sprinkle with salt and pepper.
          2. Heat 2 tablespoons oil in a 12-inch heavy skillet over moderately high heat until hot but not smoking, then brown chicken, turning over once, about 6 minutes total, and transfer to a plate.
          3. Sauté onions, garlic, and bay leaf in fat remaining in skillet, stirring frequently, until onions are softened, 4 to 5 minutes.
          4. Add chorizo and paprika and cook, stirring, 1 minute. Add olives, raisins, wine, and broth and bring to a boil, stirring and scraping up any brown bits.
          5. Return chicken to skillet along with any juices accumulated on plate, then reduce heat to moderately low and simmer chicken, covered, turning over once, until tender, 25 to 30 minutes total.
            Transfer chicken to a clean plate. (Sauce in skillet should be the consistency of heavy cream; if it's not, briskly simmer until reduced).
          6. When chicken is cool enough to handle, discard skin and bones and coarsely chop meat. Stir chicken into sauce and discard bay leaves. Season with salt and pepper, then cool filling, uncovered, about 30 minutes.
          7. Using 4-inch round cutters (I used mini tart pans with a scalloped edge), cut out circles and place a tablespoon or two of filling in center. Fold over and seal edges with a fork.
          8. Deep-fry empanadas at 375F for 1-2 minutes per side until golden brown.

      Notes

      Instead of deep frying use an air fryer.

      Nutrition Information:
      Yield: 24 Serving Size: 1
      Amount Per Serving: Calories: 362Total Fat: 23gSaturated Fat: 7gTrans Fat: 0gUnsaturated Fat: 15gCholesterol: 81mgSodium: 444mgCarbohydrates: 12gFiber: 1gSugar: 1gProtein: 25g

      This data was provided and calculated by Nutritionix.

      © Kristy Bernardo
      Cuisine: Mexican / Category: Appetizers
      Chicken Empanada Recipe

      Hot and Spicy Queso Fresco Burgers

      October 5, 2022 by Kristy Bernardo 18 Comments

      Hot and Spicy Queso Fresco Burgers

      These Hot and Spicy Queso Fresco Burgers are so much more than your typical burger! Cooled down with a creamy buttermilk dressing, it will be your new favorite!

      This burger is different from the typical with the same old toppings. Roasted jalapenos, queso fresco cheese and a creamy buttermilk dressing combine with bacon & beef to create awesome flavor!

      It's definitely spicy but the creaminess from the buttermilk dressing helps to cool things down. Another difference is the crispy bacon is added to the meat instead of its usual spot as a topping which adds a great texture to the meat. You won't go wrong with this recipe as long as you decide in advance how hot you want it to be--you can prep the jalapenos to remove much of the heat if you want to (see below).

      Hot and Spicy Queso Fresco Burgers

      What is Queso Fresco?

      If you haven't heard of queso fresco before, allow me to introduce you to this light, airy Mexican cheese. Queso fresco, Spanish for fresh cheese, is a soft, moist cheese made from raw cow milk and sometimes a combination of cow and goat milk. The milkiness wonderfully offsets the heat from the chiles and is perfect on a hot summer day.

      Ingredients                                                          

      • Jalapeños
      • Bacon
      • Ground beef
      • Queso fresco
      • Mayonnaise
      • Buttermilk
      • Extra-virgin olive oil
      • Avocados
      • Cilantro
      • Onion, thinly sliced
      • Kosher salt
      • Black pepper
      • Hamburger buns

      How To Make Hot and Spicy Queso Fresco Burgers

      This queso fresco recipe may sound like a bit of work, but it's actually quite simple and there are some good hacks (see below) you can try to make this recipe even better. We like to make our burgers slider size and let everyone go burger crazy! You'll love the spicy jalapenos and cool buttermilk dressing (not to mention the creamy avocado). It's perfect for summer and is delicious paired with summer vegetables. If you like a larger burger, remember to try to keep the patties all the same size when cooking for the most consistent results. If you like smaller burgers, it's best to babysit them until they are ready--they will cook much faster than the larger variety.

      Hot and Spicy Queso Fresco Burger Hacks

      The first piece of advice you typically get from food blogs about making burgers is to select the best cut of beef you can afford and grind it up at home.

      But that doesn't work for those who are pressed for time; the best substitute you can make is to get a decent type of beef, or tell the butcher you are making burgers and ask for a recommendation.

      It doesn't pay to use the best cut of steak if you are going to grind it up into sliders, but good quality beef can enhance the burger. In other words, using Wagyu beef for a slider is a bit of a waste--that's a type of meat you should experience all on its own to enjoy the full measure of flavor from that pricey cut of beef. It's like using the world's most expensive chocolate to make Toll House cookies with.

      Typically, the beef fat content should be 30% for a good burger, but you can get away with lower fat content (10% to 20%) if you aren't making well-done burgers. Toasting the bun for these burgers is an excellent idea since the toppings are wet--the toasted bread helps keep the burger from getting soggy.

      If you don't want the heat of jalapeno the oldest trick in the book is to scrape all the seeds and white flesh out of the peppers. But remember that sugar tends to kick up the heat in some recipes.

      Some scratch their heads at that advice until you remind them that tomato ketchup, that classic burger condiment, has its share of sugar and you'll want to be a bit mindful of that if you decide not to kill the heat in your jalapeños.

      When working with raw meat of any kind, you'll want to keep your cutting boards separate. Don't cut the veg on the same board you just prepped raw meat on. It's ok to prep veggies first, then meat, but be sure to rinse your cutting board--especially after cutting hot peppers!

      And about prepping those jalapenos, if your hands begin to burn when deseeding jalapenos, you can wash your hands in vinegar to neutralize any burning sensations. You can also try using a baking soda and water paste mixture.

      This burger pairs well with this macaroni salad recipe.

      Hot and Spicy Queso Fresco Burgers

      Hot and Spicy Queso Fresco Burgers

      Yield: 6
      Prep Time: 20 minutes
      Cook Time: 22 minutes
      Total Time: 42 minutes

      These Hot and Spicy Queso Fresco Burgers were made at one of our "burger barbecues" where we serve - you guessed it - a whole lotta burgers! You'll love the spicy jalapeño and cool buttermilk dressing (not to mention the creamy avocado).

      Ingredients

      • 6 jalapeños
      • 6 slices bacon, cooked and crumbled
      • 1 ½ pounds ground beef
      • ½ cup about 2 ounces crumbled queso fresco
      • ½ cup mayonnaise
      • ¼ cup buttermilk
      • 2 tablespoons extra-virgin olive oil
      • 2 avocados, pitted and thinly sliced
      • 1 bunch cilantro, chopped
      • ½ onion, thinly sliced
      • kosher salt & freshly ground black pepper
      • 6 hamburger buns, split

      Instructions

      1. Grill or roast the jalapenos until softened and the skin is charred, about 10 minutes. Transfer the chiles to a bowl, cover and let cool slightly. Remove and discard the stems, skin and seeds; finely chop the chiles.
      2. In a large bowl, combine the crumbled bacon, the reserved bacon fat, the beef and half of the chiles. Form into 6 patties; season with salt and pepper.
      3. In a medium bowl, combine the queso fresco, mayonnaise, buttermilk, 1 tablespoon olive oil and the remaining chiles. Season with salt and pepper, cover and refrigerate.
      4. In another bowl, toss the avocados, cilantro, onion and remaining 1 tablespoon olive oil; set aside.
      5. Grill the burgers, flipping once, for about 10 minutes for medium-rare. Just before the burgers are finished cooking, grill the buns until toasted, about 1 minute.
      6. Place a burger on each bun bottom, top with some of the avocado salad, drizzle with some of the queso fresco dressing and set a bun top in place.

      Notes

      Adapted from Robert Del Grande, executive chef of RDG & Bar Annie

      Nutrition Information:
      Yield: 6 Serving Size: 1
      Amount Per Serving: Calories: 803Total Fat: 56gSaturated Fat: 15gTrans Fat: 1gUnsaturated Fat: 36gCholesterol: 127mgSodium: 791mgCarbohydrates: 32gFiber: 6gSugar: 5gProtein: 43g

      This data was provided and calculated by Nutritionix.

      © Kristy Bernardo
      Cuisine: American / Category: Main Dish
      Hot and Spicy Queso Fresco Burgers

      Try these burger recipes next!

      Best Spicy Chicken Burgers
      Best Turkey Burgers
      Blue Cheese Burger Totchos

      Stuffed Bacon Wrapped Hot Dogs

      October 2, 2022 by Kristy Bernardo Leave a Comment

      Stuffed Bacon Wrapped Hot Dogs

      These Stuffed Bacon Wrapped Hot Dogs are so easy to make with three ways to cook them: Grill, Air Fryer or Oven. We'll show you all 3 ways.

      Bacon Wrapped Hot Dogs Stuffed with Peppers & Pickles

      Ingredients

      • 8 hot dogs
      • 8 hot dog buns, butter them first if you like
      • 8 slices bacon, not thick-cut
      • Jalapeños & pickles, for stuffing (cut into pieces small enough to fit, if necessary)
      • Toothpicks

      The pickles I used were SO good! They're called Wickles Pickles and I picked a jar up at my local grocery store. Warning they're spicy but feel free to use your favorite pickles.

      Instructions

      These are really easy to do as you can see from the photo. Just make a lengthwise slit about ¾ of the way through the hot dogs then add pieces of whatever you like.

      For the bacon-wrapped hot dogs, you will need a couple of toothpicks per hot dog. A tip for this is to make sure both toothpicks go in the same direction so they'll easily lie flat on the grill and you can flip them easily. I also don't suggest a thick-cut bacon as it will take too long to cook and its harder to roll.

      These hot dogs can be grilled or cooked in the over or an air fryer. Just preheat any of the three options to 400° F and follow the instructions in the printable recipe card below.

      Air Fryer Bacon Wrapped Hot Dogs

      Variations

      We stuffed our hot dogs with jalapeños & pickles but there are many delicious options for stuffing a hot dog. Here are a few more to try!

      • Cheese Stuffed (any cheese)
      • Crushed potato chips
      • Onion rings
      • Pineapple
      • Buffalo sauce & blue cheese
      • Pimento cheese & pickled jalapeños
      • Chipotle cheese sauce, queso or Sriracha
      • Caramelized onions and cream cheese
      • Bell peppers & onions
      • Sautéed mushrooms & caramelized onions
      • No-bean chili is a great topping!
      Stuffed Bacon Wrapped Hot Dogs

      Healthier Versions

      If you're looking for a healthier version to this recipe substitute the bacon with turkey or veggie bacon and/or use turkey or veggie franks instead pork or beef hot dogs.

      These Bacon-Wrapped Hot Dogs are so much better than just regular ol' dogs. They're quick to make and you could have a tray of regular, stuffed, etc. for a fun barbecue. You can also check out my Cheesy Bacon, Beef Hot Dogs, Buffalo Blue Cheese Frankfurters or Cheesy Mexican Gourmet Hot Dogs, too!

      Bacon Wrapped Hot Dogs Stuffed with Peppers & Pickles

      Stuffed Bacon Wrapped Hot Dogs

      Yield: 8
      Prep Time: 10 minutes
      Cook Time: 12 minutes
      Total Time: 22 minutes

      They're incredibly delicious and super easy to make in an air fryer, grill or oven.

      Ingredients

      • 8 hot dogs
      • 8 hot dog buns, butter them first if you like
      • 8 slices bacon, not thick-cut
      • Jalapeños & pickles, for stuffing (cut into pieces small enough to fit, if necessary)
      • toothpicks

      Instructions

      Grilled Bacon Wrapped Hot Dogs

      1. Preheat grill to 400° F
      2. Cut a slit lengthwise along each hot dog about ¾ through. Place peppers, pickles or whatever you can think of into slits, taking care not to overfill. W
      3. Wrap each dog tightly with bacon, securing each end with two toothpicks that go in same direction.
      4. Grill hot dogs for 2-3 minutes on each side until bacon is cooked to desired crispness.
      5. Toast the buns on the grill until lightly browned (butter the buns first if preferred). Serve immediately.

      Oven Bacon Wrapped Hot Dogs

      Complete steps 1-3 above (oven temp is 400° F for all)

      1. Place the hot dogs on parchment paper lined baking sheet.
      2. Bake hot dogs for 12 to 15 minutes or until desired crispness. Flipping is optional.

      Air Fryer Bacon Wrapped Hot Dogs

      Complete steps 1-3 above (oven temp is 400° F for all)

      1. Spray air fryer basket with cooking spray.
      2. Cook hot dogs in the air fryer for 8 minutes.
      3. Flip hot dogs and air fry for another 2 to 5 minutes or until desired crispness.
      Nutrition Information:
      Yield: 8 Serving Size: 1
      Amount Per Serving: Calories: 374Total Fat: 22gSaturated Fat: 8gTrans Fat: 0gUnsaturated Fat: 11gCholesterol: 43mgSodium: 926mgCarbohydrates: 28gFiber: 1gSugar: 4gProtein: 15g

      This data was provided and calculated by Nutritionix.

      © Kristy Bernardo
      Cuisine: American / Category: Dinner
      Stuffed Bacon Wrapped Hot Dogs
      • « Previous Page
      • 1
      • …
      • 7
      • 8
      • 9
      • 10
      • 11
      • …
      • 18
      • Next Page »

      Trending Recipes

      • a metal basket lined with parchment paper that's filled with air fryer flautas mexicanas and topped with pico de gallo, guacamole, and Cacique cheese. there are bowls of guacamole and fresh pico de gallo in the background.
        Air Fryer Flautas Mexicanas – Crispy in Minutes!
      • a closeup of a coconut smoothie bowl topped with fresh blueberries, granola, and goji berries
        Coconut Smoothie Bowl
      • top down view of two birria tacos on a wooden board next to a small bowl of consommé
        Authentic Birria Tacos Recipe (Step-by-Step with Consommé)
      • A stack of keto chocolate chip cookies next to a glass of milk
        Keto Chocolate Chip Cookies

      Popular Spring Recipes

      • a white dish with scalloped edges, filled with an easy pea salad that's topped with chopped parsley on a wooden table
        Make-Ahead Easy Pea Salad for Parties
      • Fried Deviled Eggs on a white plate
        Fried Deviled Eggs with Sausage
      • Beet-Pickled Deviled Eggs Recipe
        Beet-Pickled Deviled Eggs
      • A keto salad on a white plate, made up with grilled romaine, sliced cherry tomatoes, thinly sliced avocado and halved lemon slices for a garnish.
        Keto Salad | Lemony Romaine and Avocado Salad

      Footer

      ↑ back to top

      • Privacy Policy
      • About
      • Contact
      • Cookbooks

      Copyright © 2026 The Wicked Noodle