The Wicked Noodle

  • All Recipes
  • Freezer Meals
  • Dinner Ideas
menu icon
go to homepage
  • All Recipes
  • Freezer Meals
  • Dinner Ideas
search icon
Homepage link
  • All Recipes
  • Freezer Meals
  • Dinner Ideas
×

How to Find Recipezaar Recipes

October 1, 2022 by Kristy Bernardo 33 Comments

grandmothers_cookbook

The Recipezaar website was bought by Scripps Network in 2007 and became Food.com. See below for a more complete history and how to find Zaar recipes.

History of Recipezaar

1999: Two ex-Microsoft technologists and a husband-and-wife team, Gay Gilmore and Troy Hakala, created Recipezaar.

2007: Scripps Network bought the recipe site for $25 million. At the time Recipezaar was generating 30 million monthly page views on 2.5 million uniques. Gilmore and Hakala remained at Recipezaar as part of the deal but quit three months later.

2010: Scripps changed the domain name from Recipezaar.com to Food.com.

2017: Scripps Network changed the domain name again to GeniusKitchen.com which was intended to be a "multiplatform digital-media brand aimed at young adults (ages 21-35) who are passionate about food, cooking and culture."

2019: Scripps again reversed course and shuttered the Genius Kitchen brand and returned to using Food.com as the domain.

How to Find Recipezaar Recipes

Maybe you weren't aware, but Kittencal ended up creating RecipeZazz.com for those members who wanted all those old features back. That was back around 2011 or 2012. Her and her partners worked on it and grew a very helpful and loyal community there for the last 10+ years.

Many people still miss their Zaar account and all the wonderful recipes they collected. While you can't get that there are still ways to find Zaar recipes. Here are a few ways.

  1. Search Food.com. The Zaar recipes were moved to food.com and can still be found today, if you know what you're looking for. Here are a few ways.
    1. Search by the recipe name.
    2. Search by the user name: The original recipe submission is credited to the Zaar user who posted it. Looking at a users profile where the activity is pre-2010 indicates that the user and recipe came from Zaar. Food_Lush and Kittencal are good examples of an old Zaar account with recipe submissions.
    3. There are also numbers at the end of the URL. The lower the number the more likely it was a Zaar recipe.
  2. Search the Wayback Machine: The wayback machine archives websites over time. It's clunky and a specific recipe/url isn't always in their database but some can be found.
  3. Check out this Pinterest account with a collection of Zaar recipes.

You can also check out Recipezaar's Twitter account which is still live although no posts since 2010.

Examples of former Recipezaar recipes now on Food.com

  • Homemade Poultry Seasoning - 23966
  • Kittencal's Famous Caesar Salad - 116849
  • "One Bowl" Perfect Pound Cake - 26835

Why I Love(d) Recipezaar

This was published in 2009 when the Recipzaar site was still live.

If you've read my About page, then you're pretty much caught up on my personal life as well as the history of how I came to love cooking.  I told you how I watched FoodTV to learn different techniques, discover great recipes and learn valuable tips - but I neglected to mention the other major influence during this time of my life: Recipezaar.

I stumbled upon 'zaar quite by accident one chilly winter evening.  I needed a recipe for soup and was coming up zilch.  I didn't have many ingredients in my cupboard and it was beginning to look as if I'd never find the recipe I was looking for. 

Then I clicked on Google's link to Recipezaar, and it was love, love, LOVE at first click.  So many recipes, so many reviews, and so much great advice for a novice cook like me. 

Games like 'zaar tag, food friends & fun, pick-a-chef, and 'zaar world tour had me hooked.  Looking up recipes by ingredient?  Being able to ask questions to seasoned chefs in the forum?  I knew it would never get better than this!

Recipezaar has gone through many changes over the past few years.  They've added new features and changed the look of the site several times.  In 2007, Recipezaar was purchased by Scripps, the company that owns Food Network, HGTV and DIY, among others. 

When I first learned of this I was not happy at all.  I was convinced that the small community feel that I - and many others - loved about our beloved 'zaar would be lost forever.  'Zaar assured us that nothing would change, not to be alarmed.  And I'm happy to say that once again they didn't let me down; there have been no noticeable changes in the way they operate, and it remains my top go-to recipe site for just about every occasion.

(Updated to add: Recipezaar no longer exists. But read on to find out why this site was so special and how the big food and recipe sites can learn from it.)

So what makes this place so darn special?  Here is a list of the top ten reasons I love it so much:

  1. The Recipe Sifter Tool - need a breakfast dish with meat, that's good for kids but you don't like pork?  I just used the sifter tool and found 62 recipes for you - in about 20 seconds.  I once found a recipe for muffins using cantaloupe - that's right, cantaloupe muffins - using this tool, and they were some of the best I've ever made.  I should post that recipe here soon!  Wait, you don't need me - you've got the recipe sifter tool!
  2. The camaraderie between 'zaar members.  This cannot be stressed enough.  Whenever I've needed a question answered, a recipe suggestion, or even support with something completely unrelated to cooking, my 'zaar friends have always been there.
  3. The GAMES!!  There are so many of them and anyone can jump in at any time.  Sometimes I'm too busy to play (and truth be told, it's been a long time since I've had time and I miss it!), but I highly suggest taking a look around and joining in the fun.  It's a great way to make friends and expand your cooking repertoire!
  4. The recipes!  There are currently 355,000 recipes to choose from!
  5. The ability to review recipes.  This feature is certainly not unique to Recipezaar, but what is unique is the number of reviews you'll find.  'Zaar members take pride in their site and most members love seeing their recipes reviewed and almost always return the favor.  I've often changed the way I've prepared a recipe solely based on posted reviews, and I've picked up some great tips, too!
  6. The ability to read through the most recently reviewed recipes.  I love this feature!  It's so much fun to read through what other members have recently made and if they enjoyed it.  I've prepared food I otherwise never would have, and it's really improved my cooking.
  7. The ability to save my recipes in "cookbooks".  I can't possibly make all the delicious recipes I find all at once, so being able to organize them for future reference is really nice.  When I need something that's fun for kids or I'm just craving Chinese, all my favorites are right there for me whenever I need it.
  8. Post photos of your recipes for everyone to admire and enjoy!  Not only that, but you can sort recipes to show only those recipes with photos first.  Nice!
  9. Plan a menu, post it for public viewing if you desire, and browse other member's public menus, too.  A great way to find inspiration if you have a special dinner or event coming up.
  10. Chef of the Day - formerly called Featured Chef.  Yes, that's me below in the summer of 2007 on the "cover" of Recipezaar.  I was pretty darn excited to see my mug up in lights!  It's a lot of fun to read the profile for the current Chef of the Day, and I've found some great 'zaar friends that way!
recipezaar-where-the-worlds-recipes-are_1181953809281

The bottom line is that you really need to check out Recipezaar for yourself.  They've been an amazing resource for me and I have a serious soft spot for them.  No matter how much experience I gain over the years to come, I know that I will always return to my 'Zaar.  Nothing else will ever compare!

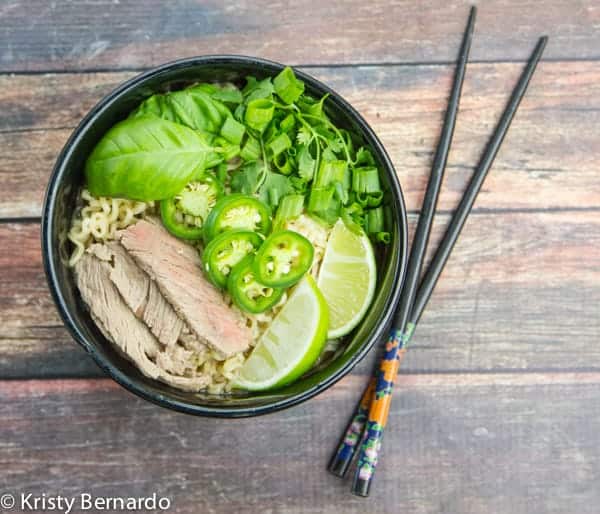
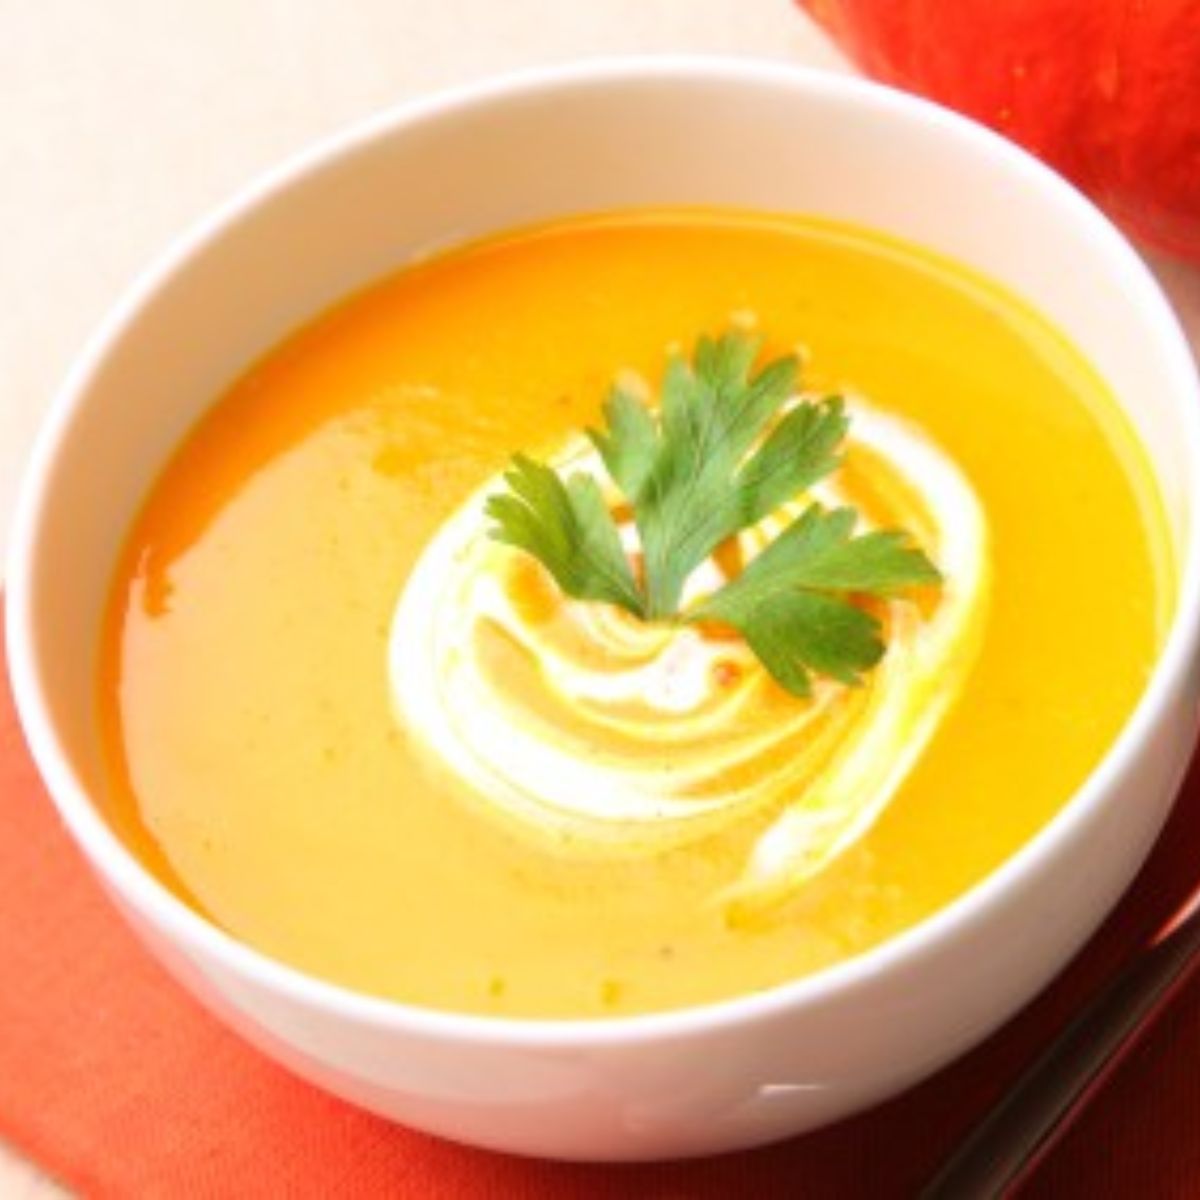
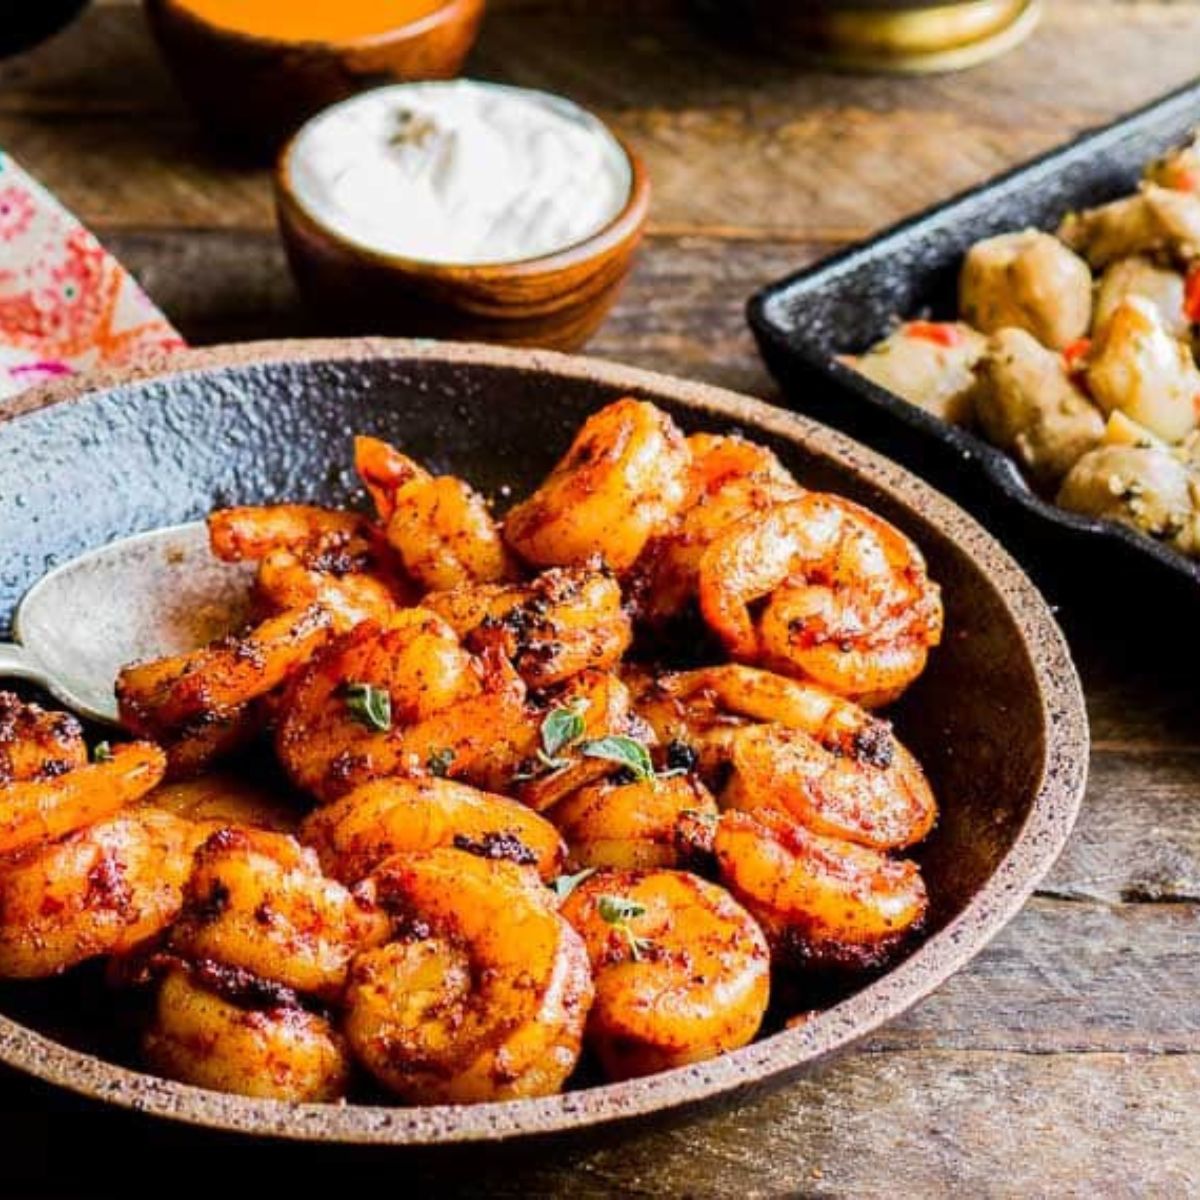
Here's a picture of my most recent dinner creation from 'Zaar, borrowed from Kittencal (who always has fantastic recipes):

img_1653_edited-1

I'd love to hear about your favorite recipe site and why you love it!

Easy Pumpkin Bread Recipe

September 29, 2022 by Monique McArthur Leave a Comment

Easy Pumpkin Bread Recipe

This easy pumpkin bread recipe is super moist, tender, and perfectly spiced and the most delicious pumpkin bread you will ever taste.

Pumpkin Bread

My mother-in law got this recipe from a friend back in the 70's and I immediately loved it. Now I bake this recipe and it's become a fall tradition in our home. Keep reading and we'll share how to make this tasty bread, provide a few tips on baking it to perfection, and cover a few creative toppings and uses for pumpkin bread. You can also try your hand at making a pumpkin brioche!

Ingredients

  • Flour: The all purpose forms the foundation and structure.
  • Granulated Sugar: The sugar not only adds sweetness but also keeps the bread soft and moist.
  • Cinnamon: The cinnamon lends a spicy, earthy and warm flavor.
  • Nutmeg: Another fall spice that adds warm spice with slightly nutty, woody flavors.
  • Kosher Salt: Enhances the flavor of the other ingredients.
  • Baking soda: The leavening agent for this bread recipe.
  • Pumpkin puree: Mashed pumpkins, the star of this recipe.
  • Vegetable oil: The oil adds texture, moisture and flavor as well prolongs storage time.
  • Water: The water is the solvent to other the other ingredients.
  • Eggs: The eggs will make the bread lighter and fluffier.
  • Nuts or chocolate chips (optional): Purely optional for a little extra sweetness or nutty flavor.

(Scroll down to the bottom for the printable recipe card with exact measurements and recipe instructions.)

How to Make Pumpkin Bread

  1. In two bowls mix wet and dry ingredients, then pour wet into dry and mix.
  2. Pour mix into two greased 9x5 loaf pans, or divide into smaller pans and reduce time.
  3. Bake for 1 hour and 15 minutes

Serve at room temperature or warm, right out of the oven.

How to Know When Pumpkin Bread Is Done

Check the center of the loaf by inserting a toothpick. The pumpkin bread is done when the toothpick comes out clean. Cracks in the middle and off to the sides are another indication that the bread is done.

If the bread is cooked too long it will not be moist.

Toppings

Pumpkin bread is perfect in its simplicity and delicious to eat plain. However, if you are looking for a little extra flavor or something sweeter, you can serve your this bread with one of the following:

  • Butter or apple butter
  • Cinnamon honey butter
  • Pecan topping
  • Crumb topping
  • Maple brown butter frosting
  • Maple syrup
  • Caramel glaze
  • Melted chocolate
  • Brown butter glaze
  • Mini chocolate chips
  • Ice cream
  • Nutella
  • Peanut butter
  • Cream cheese (or flavored cream cheese)
  • Whipped cream with cinnamon
Easy Pumpkin Bread

Uses for Pumpkin Bread

This recipe is for two loaves so here are some creative ways to use any leftover pumpkin bread:

  • Pumpkin bread pudding
  • Pumpkin bread croutons
  • Pumpkin bread sundaes
  • Pumpkin bread stuffing
  • Pumpkin bread crumbs
  • French toast pumpkin bread

How to Store Pumpkin Bread

The pumpkin and oil create perfect conditions for storing this bread at room temperature. Once the bread cools, cover the bread in plastic wrap or aluminum foil and store in a cool, dry place for up to 3 days.

It can be stored for up to a week, wrapped, in the refrigerator.

If you like bread warm quickly re-heat in a microwave, toaster oven, or oven.

How to Freeze Pumpkin Bread

To freeze, wrap in heavy-duty foil, plastic wrap and then place in a tightly sealed container or heavy-duty resealable freezer bag. Freeze for up to 2 months.

To thaw, unwrap the bread and let sit at room temperature overnight.

Easy Pumpkin Bread Sliced

Easy Pumpkin Bread Recipe

Yield: 2 Loafs
Prep Time: 20 minutes
Cook Time: 1 hour 15 minutes
Total Time: 1 hour 35 minutes

Homemade pumpkin bread is a fall favorite and equally as perfect as a snack or served with a Thanksgiving meal.

Ingredients

  • 3 ⅓ cups all purpose flour
  • 3 cups granulated sugar
  • 1 ½ teaspoons cinnamon
  • 1 ½ teaspoons nutmeg
  • ½ teaspoon kosher salt
  • 2 teaspoons baking soda
  • 2 cups pumpkin puree
  • 1 cup vegetable oil
  • ⅔ cups water
  • 4 eggs
  • nuts or chocolate chips (optional)

Instructions

  1. Preheat oven at 350F.
  2. In two bowls mix wet and dry ingredients.
  3. Pour wet into dry and mix.
  4. Grease two 9x5 inch loaf pans.
  5. Pour mix into two loaf pans, or divide into smaller pans and reduce time.
  6. Bake for 1 and 15 minutes.

Notes

Once the liquid and dry ingredients are mixed be careful not to over-mix. Over-mixing can cause the bread to be too tough. There should still be lumps in the batter.

Nutrition Information:
Yield: 24 Serving Size: 1
Amount Per Serving: Calories: 276Total Fat: 11gSaturated Fat: 1gTrans Fat: 0gUnsaturated Fat: 9gCholesterol: 31mgSodium: 166mgCarbohydrates: 42gFiber: 1gSugar: 27gProtein: 3g

This data was provided and calculated by Nutritionix.

© Monique McArthur
Cuisine: American / Category: All Our Recipes
Easy Pumpkin Bread Recipe

Ghee Explained: Uses, Benefits, and 20 Must-Try Recipes

September 22, 2022 by Heidi Deal 2 Comments

Recipes With Ghee

Ghee has earned its spot as a pantry essential, and for good reason. This rich, golden fat has roots in ancient Indian cooking, but it's just as at home in modern recipes, from bulletproof coffee to buttery roasted veggies. With its high smoke point, nutty flavor, and long shelf life, it's one of the most versatile fats you can cook with. If you're avoiding dairy, following a keto or Whole30 diet, or simply looking to upgrade your butter game, it delivers big flavor with added nutritional perks.

In this guide, we'll cover what ghee is, how it compares to butter and olive oil, whether it's dairy-free, how to store it, plus tons of ideas for cooking with it, including 20+ delicious recipes for you to try. Here's everything you need to know about this "liquid gold."

a jar of homemade ghee

Table of Contents

  • What Is Ghee?
  • Ghee vs Butter: What's the Difference?
    • Quick Reference Table
  • Ghee vs Olive Oil: Which One Should You Use?
    • Quick Reference Table:
  • Is Ghee Keto?
  • Does Ghee Need to Be Refrigerated?
  • How Long Does Ghee Last?
  • How to Use Ghee
    • Everyday Cooking Substitutions
    • Finishing & Flavor Boosting
    • In Beverages
    • Quick Substitution Guide
  • Where to Buy Ghee
    • Grocery Stores
    • Online Retailers
    • Recommended Ghee Brands
  • Frequently Asked Questions
    • Is ghee the same as clarified butter?
    • Can people with dairy allergies eat ghee?
    • Is ghee healthier than butter?
    • How do I know if ghee has gone bad?
    • Can I make ghee at home?
    • What are some good recipes that use ghee?
  • 20 Recipes That Use Ghee

What Is Ghee?

Ghee is a type of clarified butter that's been simmered to remove water and milk solids, leaving behind pure, golden butterfat. It originated in ancient India and has been used for thousands of years! Compared to clarified butter, it's cooked a little longer, allowing the milk solids to caramelize before being strained out, which is what gives ghee its signature nutty, toasty flavor.

Because the milk solids are removed, it has a higher smoke point (around 450°F), making it a perfect choice for high-heat cooking like frying, sautéing, and roasting. It also doesn't require refrigeration (more on that below), and it's shelf-stable for months when it's stored properly.

It's also incredibly versatile! You can spread it on toast, stir it into soups, fry eggs in it, or even melt it into your morning coffee (yes, ghee coffee is a thing!). If you're looking for a more flavorful alternative to butter or oil, it's a worthy staple to have in your kitchen.

Ghee vs Butter: What's the Difference?

At first glance, ghee and butter might seem almost identical: they both come from cream, they both taste rich and buttery, and both can be used in everything from toast to sauté pans. But there are some important differences in how they're made and how they behave in cooking.

  • How It's Made: Butter is churned cream that contains butterfat, water, and milk solids. Ghee, on the other hand, is butter that has been slowly simmered until the water evaporates and the milk solids are removed. This process gives ghee a longer shelf life, a more concentrated flavor, and a higher smoke point.
  • Flavor: Butter is creamy, slightly sweet, and rich, with a milder flavor. Ghee is more intense; it's nutty, toasty, and caramelized thanks to the browning of milk solids before they're strained out. This makes it a flavor powerhouse, especially in sautéed and roasted dishes.
  • Smoke Point: Ghee has a much higher smoke point (~450°F) compared to butter (~350°F), making it a better choice for high-heat cooking like frying, grilling, or searing. Butter tends to burn more easily due to its water and milk solid content.
  • Shelf Life & Storage: Butter needs refrigeration and has a shorter shelf life. Ghee is shelf-stable and can be stored in your pantry for months without going bad, thanks to its low moisture content.

    Quick Reference Table

    FeatureButterGhee
    Contains Milk SolidsYesNo
    Smoke Point~350°F~450°F
    Shelf StableNo (must refrigerate)Yes
    FlavorMild, creamyNutty, rich, toasty
    Lactose-FreeNoOften, yes
    Best ForBaking, spreadingHigh-heat cooking

    In short, use butter when you want creamy richness for spreading or baking, and reach for ghee when you're cooking at a high heat or want that extra layer of nutty flavor.

    Recipes With Ghee To Make

    Ghee vs Olive Oil: Which One Should You Use?

    Both ghee and olive oil are kitchen staples. But while they both offer benefits, they're quite different in how they taste and behave when used in cooking.

    • Smoke Point: One of the biggest differences between ghee and olive oil is how they handle heat. Ghee has a high smoke point of about 450°F, which makes it excellent for high-heat cooking methods like frying, roasting, or searing. Extra virgin olive oil, in contrast, has a lower smoke point (about 375°F) and can break down at high temperatures, losing its nutritional benefits and developing a bitter taste.
    • Flavor: Ghee has a rich, nutty, and buttery flavor thanks to the caramelization of milk solids during its preparation. Olive oil, particularly extra-virgin, brings a grassy, fruity, or peppery flavor. It works really well in Mediterranean-style dishes and is a wonderful choice if you're serving fresh ingredients.
    • Diets: Ghee is a great choice for keto, paleo, and Whole30 diets due to its fat content and lack of dairy solids. Olive oil is preferred for Mediterranean, vegan, and plant-based diets because it's derived from olives and is completely dairy-free.

      Quick Reference Table:

      FeatureOlive OilGhee
      Smoke Point~375°F (extra virgin)~450°F
      FlavorFruity, grassy, pepperyNutty, rich, buttery
      Dairy-FreeYesYes (if properly strained)
      Fat CompositionMostly monounsaturated fatsSaturated + some healthy fats
      Best ForDressings, low-to-medium heatHigh-heat cooking, roasting
      Diet-FriendlyMediterranean, VeganKeto, Paleo, Whole30

      Use ghee when you want a rich, buttery flavor and are cooking at high heat. Use olive oil for drizzling, dressing, or dishes where you're cooking at a lower heat. Both deserve a spot in your pantry but for different reasons!

      Is Ghee Keto?

      Yes, ghee is 100% keto-friendly and a favorite fat source for many people following a ketogenic diet. Since it's pure fat with zero carbs and no sugar, it fits perfectly into a low-carb, high-fat lifestyle.

      Here's why it's such a great fit for keto:

      • It's high in healthy fats: One tablespoon of ghee contains about 14 grams of fat, which helps fuel your body in the absence of carbs.
      • Zero carbs: Ghee contains no carbohydrates, so it won't knock you out of ketosis.
      • It's stable at high heat: Ghee has a high smoke point (around 450°F), making it ideal for sautéing, frying, or roasting without breaking down into harmful compounds.
      • Many followers of the keto diet even add ghee to their coffee or blend it with MCT oil for a creamy "bulletproof-style" boost that keeps their hunger at bay and energy up.

      Does Ghee Need to Be Refrigerated?

      Ghee does not need to be refrigerated, which is one of the many reasons it's such a convenient pantry staple. Because the milk solids and water have been removed during the clarification process, it's shelf-stable and highly resistant to spoilage.

      Make sure to keep it in a cool, dark place away from direct sunlight or heat, and always use a clean, dry spoon to avoid introducing moisture or contaminants.

      Refrigeration won't hurt it, but it will make it firmer and more difficult to scoop. If you like it soft and spreadable, the pantry is usually your best bet.

      How Long Does Ghee Last?

      Ghee has an impressively long shelf life thanks to its lack of water and milk solids, which makes it more stable than regular butter.

      • Unopened: It can last up to 1 year at room temperature and even longer if refrigerated.
      • Opened: It will stay fresh for up to 3 months when stored in a cool, dark pantry, and up to 1 year in the refrigerator

      For best results, always:

      • Use a clean, dry spoon when scooping
      • Keep the container tightly sealed
      • Store it away from heat and direct sunlight

      Tip: If it ever smells off or develops mold (it's rare, but possible if it somehow becomes contaminated), it's time to toss it.

      How to Use Ghee

      Ghee is one of the most versatile fats you can keep in your kitchen. With its high smoke point (around 450°F/232°C) and rich, nutty flavor, it can be used for everything from high-heat searing to delicate finishing touches. Here's a breakdown of how to use it in your cooking:

      Everyday Cooking Substitutions

      • Use it anywhere you'd normally use butter, oil, or margarine. It adds a deeper flavor and handles high heat cooking much better.
      • Sautéing & Stir-Frying: It won't burn as quickly as butter, making it perfect for sautéing veggies, onions, garlic, or spices.
      • Pan-Frying & Searing: It's ideal for eggs, meat, seafood, and tofu because it crisps your ingredients without smoking or breaking down.
      • Roasting: Toss veggies or potatoes with melted ghee and seasoning before roasting for a caramelized finish.
      • Baking: Swap it 1:1 for butter or oil in baked goods like cookies, muffins, and biscuits. It works especially well in shortbreads and flaky crusts.
      • Popcorn: Melt it and drizzle it over freshly popped popcorn for that classic movie theater flavor!

      Finishing & Flavor Boosting

      • Its rich, roasted flavor can add a lot of flavor to your dishes even after cooking!
      • Drizzle it over cooked rice or lentils (especially in Indian dishes like dal or khichdi)
      • Melt it over baked potatoes, roasted veggies, or corn on the cob
      • Stir it into soups and stews for a buttery finish
      • Brush it onto toast or naan with a sprinkle of salt or herbs
      • Toss it with pasta or noodles

      In Beverages

      Ghee Coffee: Add 1-2 teaspoons of ghee to hot coffee (optionally blended with MCT oil) for a creamy, energizing boost. It's a favorite among keto and Whole30 followers.
      Golden Milk (Turmeric Latte): Whisk it into warm milk with turmeric, ginger, and cinnamon.

      Quick Substitution Guide

      UseSwap For Ghee
      High-heat cookingVegetable oil, canola oil
      BakingButter, coconut oil
      Finishing saucesOlive oil, finishing butter
      Coffee additionButter, MCT oil
      what is ghee

      Where to Buy Ghee

      Ghee has become widely available and is no longer limited to specialty or international markets. You can now find it in many mainstream grocery stores, health food stores, and online retailers. Here are some of the best places to shop for high-quality ghee:

      Grocery Stores

      • Whole Foods Market: They have a wide selection of organic and grass-fed brands.
      • Trader Joe's: They have a house-brand that's affordable and delicious (it's where I typically buy my ghee). It's not always available, however, so call ahead to check.
      • Sprouts Farmers Market: They often stock both plain and flavored versions.
      • Kroger, Ralphs, and other major chains: Look for it in the oils section or natural/organic aisles.
      • Indian and International Markets: Great for finding traditional brands you can't get elsewhere.

      Online Retailers

      • Amazon: Wide variety of brands, sizes, and subscription options.
      • Thrive Market: Carries curated, organic options for members.
      • Vitacost & iHerb: Good for health-focused brands and international shipping.

      Recommended Ghee Brands

      • Vital Farms Ghee: Grass-fed and rich in flavor.
      • 4th & Heart: Known for their vanilla bean and Himalayan pink salt flavors.
      • Ancient Organics: Artisanal ghee made in small batches.
      • Pure Indian Foods: Family-owned, traditional Indian ghee.

      Frequently Asked Questions

      Is ghee the same as clarified butter?

      They're very similar but not exactly the same. Both are forms of butterfat, but ghee is simmered longer than clarified butter, allowing the milk solids to caramelize. This gives it a nuttier flavor and a deeper golden color.

      Can people with dairy allergies eat ghee?

      Many people with lactose intolerance or casein sensitivity tolerate ghee because the milk solids (where lactose and casein are found) are removed. However, if you have a severe dairy allergy, you should DEFINITELY consult your doctor before using it.

      Is ghee healthier than butter?

      Ghee contains more healthy fats, vitamins A and E, and a higher smoke point than butter. However, it's still a fat source, so moderation is key.

      How do I know if ghee has gone bad?

      Spoiled ghee may develop a sour smell, taste off, or show discoloration or mold. Always store it in a clean, airtight container and use clean utensils to scoop it.

      Can I make ghee at home?

      Homemade ghee is easy to make by simmering unsalted butter until the milk solids separate and brown slightly. Strain, cool, and store!

      What are some good recipes that use ghee?

      Try it in butter chicken, sautéed green beans, pan-fried eggs, or even drizzled over popcorn or stirred into coffee. Scroll down for 20 delicious recipe ideas!


      In addition to the recipes we've linked to below, we have quite a few on our own site that call for ghee. These garlic portobello mushrooms are a perfect example of when to use ghee since mushrooms should be cooked over high heat. Both Green Beans Almondine and Sauteed Green Beans and Mushrooms are super easy and full of flavor. And if you're looking for something cozy and comforting, this Booyah recipe is a hearty, Midwestern stew that's perfect for feeding a crowd!

      20 Recipes That Use Ghee

      Paleo Lemon Butter Chicken

      Paleo Lemon Butter Chicken

      Photo Credit: www.realfoodwithjessica.com

      This lemon ghee chicken is paleo and whole 30 friendly, but that's just one of the great things about it. You'll add this to your favorites list and it's versatile enough to serve with rice, pasta, or potatoes.

      This Texas Chili may be an Award Winning Chili Recipe but I do believe I've improved upon it! This all-beef chili is a recipe you won't want to miss.

      Texas Chili - Award Winning Chili Recipe

      This award-winning chili recipe is one you must try! It makes a LOT, so feel free to cut the recipe in half if you're not feeding a crowd. Ghee is used to sear the beef and vegetables.

      Green Beans Almondine on a white oval plate which sits on a wooden board with a rustic napkin next to it.

      Green Beans Almondine

      This green beans almondine dish is easy, fast, and delicious!

      Butter Poached Lobster

      Butter Poached Lobster

      Photo Credit: thewoodenskillet.com

      Lobster tails poached in rich, flavorful ghee is simple and delicious but tastes extravagant.

      Melt-in-Mouth Butter Cookies (Egyptian Ghorayebah)

      Melt-in-Mouth Butter Cookies (Egyptian Ghorayebah)

      Photo Credit: www.themediterraneandish.com

      These perfectly sweet bite-sized treats are made with just three ingredients.

      Semolina Ghee Balls

      Semolina Ghee Balls

      Photo Credit: www.justapinch.com

      Semolina ghee balls are a traditional Indian dessert with ghee-roasted cashews for a rich, nutty flavor.

      Ghee Caramelized Banana Oatmeal

      Ghee Caramelized Banana Oatmeal

      Photo Credit: www.trulygrassfed.com

      Take your breakfast to a new level with caramelized bananas in this quick and delicious oatmeal recipe.

      Savory Zucchini Fritters

      Savory Zucchini Fritters

      Photo Credit: therealfooddietitians.com

      These savory zucchini fritters are fried in ghee to crispy perfection, made with just eight ingredients, they're perfect as a side, appetizer, or for breakfast.

      Brown Butter Ghee Chocolate Chip Cookies

      Brown Butter Ghee Chocolate Chip Cookies

      Photo Credit: www.rachelmmolenda.com

      If you love chocolate chip cookies, give these brown butter ghee chocolate chip cookies a try.

      Healthy Garlic Scallops Recipe

      Healthy Garlic Scallops Recipe

      Photo Credit: ciaoflorentina.com

      If you love scallops as much as I do (or even just a little bit), this recipe will make your mouth water. So simple, but so delicious!

      Maple Bacon Doughnuts

      Maple Bacon Doughnuts

      Photo Credit: ash-eats.com

      Maple. Bacon. Donuts. Is there anything else we need to say? You'll just need 5 ingredients to make these delicious, airy, sweet and salty donuts.

      Authentic Chicken Curry Recipe

      Authentic Chicken Curry Recipe Made Easy

      Photo Credit: www.munatycooking.com

      You'll love this authentic chicken curry recipe. This version is a thick, flavorful gravy with tender skin-on chicken drumsticks.

      Homemade Butter Chicken

      Homemade Butter Chicken

      Photo Credit: bellyfull.net

      Butter chicken is a popular traditional Indian dish with tender chicken in a flavorful sauce. Serve it over rice and soak up the extra sauce with naan.

      Ghee Rice Recipe

      Ghee Rice Recipe

      Photo Credit: www.indianhealthyrecipes.com

      If you haven't tried ghee rice, you should. This South Indian dish is aromatic and tasty. Made with ghee, onions, raisins, cashews, and spices, this rice dish is perfect on its own or as a side and can be made on the stove or in an instant pot.

      Mysore pak recipe, Soft Mysore pak

      Mysore pak recipe, Soft Mysore pak

      Photo Credit: www.jeyashriskitchen.com

      This is a traditional Indian sweet recipe. This version is made with just three ingredients and can be made in just 20 minutes!

      Lamb Curry Recipe

      Lamb Curry Recipe

      Photo Credit: soulfulandhealthy.com

      This traditional lamb curry recipe with a ghee base is a perfect blend of spices and tender meat. Like other curries, it is best served with rice and naan.

      Banana Ghee Pancakes

      Banana Ghee Pancakes

      Photo Credit: blog.pureindianfoods.com

      These pancakes are made with ghee and sweet, ripe bananas are moist with a rich, buttery flavor. Fry them in ghee for a golden, crispy finish and top them with a dollop of ghee.

      Turkish Poached Eggs Recipe

      Turkish Poached Eggs Recipe {Primal, GF)

      Photo Credit: www.wickedspatula.com

      Poached eggs are one of my favorite things, so eggs poached in ghee? Yes, please. Perfectly spiced butter with a chimichurri style sauce and a yogurt base can be served with bread or hash browns and make the ideal brunch dish.

      herbed ghee pasta

      Herbed Ghee Pasta

      Photo Credit: simplyghee.com

      If you love buttery pasta, this herbed ghee pasta will be one of your new go-to dishes with a slight kick and from the chili peppers. Perfect served on its own or with chicken or fish and fresh veggies.

      Ghee Mashed Potatoes

      Ghee Mashed Potatoes – Instant Pot Recipes

      Photo Credit: recipes.instantpot.com

      This will be in your regular rotation. Flavorful, buttery mashed potatoes made in minutes with your instant pot. Make a batch to keep on hand for quick meals during the week.

      35 Easy Air Fryer Desserts

      September 18, 2022 by Monique McArthur Leave a Comment

      Easy Air Fryer Desserts

      We've collected 35 air fryer desserts that really show off the amazing versatility of an air fryer with treats like cookies, pies, doughnuts, and much more.

      When you think of cooking with your air fryer, you may naturally gravitate to items like chicken, tater tots, onion rings, and other dinner foods. But did you know you can make desserts in your air fryer as well? That's a whole other world of possibilities, right?! What kind of desserts can you make in the air fryer?

      Think cookies, cakes and cupcakes, quick breads, donuts and cinnamon rolls, and more!

      The possibilities are endless, and your only real limitation is space. You'll make smaller portions or smaller quantities with an air fryer than with a traditional oven, but it's perfect for a few servings of delicious treats to satisfy your sweet tooth.

      Here's a list that we've rounded up featuring a wide variety of air fryer friendly recipes including easy, 3-ingredient options, fruity and healthy treats, and keto dessert recipes.

      Air Fryer Desserts

      Easy Air Fryer Dessert Recipes

      Putting easy and air fryer in the same sentence almost seems redundant and air fryer desserts are another quick way to satisfy that sweet tooth.

      Air Fryer Churros

      Air Fryer Churros

      Photo Credit: platedcravings.com

      Air fryer churros are lighter than traditional churros but still the same golden outside and perfectly coated with cinnamon sugar.

      Air Fryer Oreos Recipe

      Air Fryer Oreos Recipe

      Photo Credit: therecipecritic.com

      Made with crescent roll dough, get the same fried Oreos without all the oil.

      Air Fryer Cake

      Air Fryer Cake

      Photo Credit: www.everydayfamilycooking.com

      Yes, you can make a cake in an air fryer (and in less time) and this air fryer chocolate cake is rich and decadent.

      Air Fryer S’mores

      Super Easy Air Fryer S’mores

      Photo Credit: www.myforkinglife.com

      Take the s'mores indoors with this incredibly easy air fryer s'mores recipe.

      Air Fryer Donuts

      Air Fryer Donuts

      Photo Credit: thebigmansworld.com

      This air fryer donut recipe skips the frozen biscuit dough or pre-made dough and gets the job done in just 10 minutes and three ingredients - flour, yogurt, and powdered sugar.

      Air Fryer Blueberry Crumble

      Air Fryer Blueberry Crumble

      Photo Credit: theseasidebaker.com

      A quick and easy fruity dessert with fresh blueberries and apples and topped with a buttery crumble.

      Air Fryer Banana Chips

      Air Fryer Banana Chips

      Photo Credit: airfryereats.com

       Air fryer banana chips are a guilt-free, healthy, low-calorie snack.

      Easy Air Fryer Keto Brownies

      Easy Air Fryer Keto Brownies

      Photo Credit: www.buttertogetherkitchen.com

      Easy air fryer keto brownies are a chocolatey, low carb, keto-friendly dessert.

      Air Fryer Apple fritters with Brown Butter Glaze

      Air Fryer Caramel Apple Empanadas

      Photo Credit: wondermomwannabe.com

      These air fryer caramel apple empanadas are simple to make with store bought pie crust, flour, egg and caramel pie filling.

        Air Fryer Apple fritters with Brown Butter Glaze

        Air Fryer Apple fritters with Brown Butter Glaze

        Photo Credit: winealittlecookalot.com

        These easy air fryer apple fritters are made with brown butter glaze for a healthier, but still very tasty, old fashioned fritter.

        Air Fryer Chocolate Molten Lava Cakes

        Air Fryer Chocolate Molten Lava Cakes

        Photo Credit: www.myforkinglife.com

        Individual air fryer lava cakes are a decadent chocolate dessert with a warm, gooey center and can be made in under 20 minutes.

        Air Fryer Apple Wedges

        Air Fryer Apple Wedges (Gluten Free, Vegan)

        Photo Credit: thatgirlcookshealthy.com

        These air fryer apple wedges are a perfect vegan and gluten free dessert.

        Air Fryer Beignets

        Air Fryer Beignets

        Photo Credit: www.sparklestosprinkles.com

        This pillowy, fluffy New Orleans treat is incredibly easy to make with an air fryer.

        Air Fryer Funnel Cake

        Insanely Good Funnel Air Fryer Funnel Cake

        Photo Credit: air-fried.com

        Skip the deep fried funnel cake at the state fair and try a healthier but still delicious air fryer funnel cake.

        Air Fryer Cookies

        Air Fryer Cookies

        Photo Credit: thebigmansworld.com

         Make these perfectly thick, soft, chewy air fryer cookies in just 10 minutes.

        3 Ingredient Air Fryer Peanut Butter Cookies

        Easy 3 Ingredient Air Fryer Peanut Butter Cookies

        Photo Credit: twokidsandacoupon.com

        These 3 ingredient air fryer peanut butter cookies are a quick and easy treat to make.

        Italian Air Fryer Cannoli

        Italian Air Fryer Cannoli

        Photo Credit: annainthekitchen.com

        Air fryer cannolis have crisp flaky shells filled with sweet ricotta cream and are sprinkled with chocolate chips.

        Air Fryer Cinnamon Rolls

        Air Fryer Cinnamon Rolls

        Photo Credit: airfryerfanatics.com

         Crescent dough cinnamon roll bites are super easy to make in the air fryer.

        Air Fryer Apples

        10 Minute Air Fryer Apples

        Photo Credit: lemonsandzest.com

        This simple air fryer apple recipe is quickly air fried and mixed with butter, vanilla, cinnamon, and sugar.

        Copycat Domino’s Cinnamon Bread Twists

        Copycat Domino’s Cinnamon Bread Twists

        Photo Credit: masonfit.com

        A healthier copycat recipe for Domino's cinnamon bread twists with a simple sauce to brush on the bread twists.

        Air Fryer Scones

        Air Fryer Scones

        Photo Credit: www.cookitrealgood.com

        Try these tasty air fryer scones for a delicious breakfast treat.

        Air Fryer Bread Pudding

        Air Fryer Bread Pudding

        Photo Credit: www.kitchenathoskins.com

        Homey and comforting soft and gooey bread pudding cooked up quickly in the air fryer and topped with ice cream.

        Homemade Air Fryer Pop Tarts

        Air Fryer Puff Pastry Pop Tarts

        Photo Credit: www.lifeslittlesweets.com

        These homemade air fryer pop tarts have a crisp flakey crust with a tender sweet filling, and topped with frosting.

        Air Fryer Blueberry Muffins

        Air Fryer Blueberry Muffins

        Photo Credit: entertainingwithbeth.com

        Air fryer blueberry muffins are a perfect breakfast treat.

        Air Fryer Gingerbread Bites

        Air Fryer Gingerbread Bites

        Photo Credit: airfryereats.com

        This perfect holiday dessert is made with a crescent roll and filled with gooey cream cheese, ginger, cinnamon, allspice, nutmeg, cardamom, and cloves.

        Air Fryer Pumpkin Spice Bites

        Air Fryer Pumpkin Spice Bites

        Photo Credit: airfryereats.com

        Air fryer pumpkin spice donut Holes are a perfect fall seasonal treat and these are made with crescent rolls, sugar, cream cheese and of course pumpkin spice.

        Air Fryer Pumpkin Pie

        Air Fryer Pumpkin Pie

        Photo Credit: airfryereats.com

        Air fryer pumpkin pie is spicy, sweet and delicious and another incredibly easy dessert to make.

        Air Fryer Apple Pie Bombs

        Air Fryer Apple Pie Bombs

        Photo Credit: iambaker.net

        Crunchy, golden Air Fryer Apple Pie Bombs are coated in sugar and apple pie spice with a delicious apple pie filling.

        Air Fryer Twix Cheesecake

        Air Fryer Twix Cheesecake

        Photo Credit: savorandsavvy.com

        This air fryer cheesecake recipe has a cookie crust with caramel cheesecake, and topped with chocolate ganache.

        Easy Air Fryer Banana Bread

        Easy Air Fryer Banana Bread

        Photo Credit: scrummylane.com

        Air fryer banana bread is classic breakfast treat and this recipe is a fun twist with mini loaves.

        Air Fryer Cherry Pie Bombs

        Air Fryer Cherry Pie Bombs

        Photo Credit: www.pinkwhen.com

        Made with just four easy ingredients, these Air fryer cherry pie bombs are made with just four ingredients - Cherry pie filling, Grands biscuits, cinnamon and sugar.

        Air Fryer Gingerbread Man Cookies

        Air Fryer Gingerbread Man Cookies

        Photo Credit: recipesfromapantry.com

        This quick air fryer gingerbread cookie recipe takes just 20 minutes to prep and 9 minutes to air fry.

        Air Fryer Hand Pies Recipe

        Air Fryer Hand Pies Recipe - S'Mores, Blueberry, Caramel Apple, Cherry

        Photo Credit: showmetheyummy.com

        This air fryer hand pie recipe details a quick and easy way to make four different flavors of mini pies - Caramel Apple, S'Mores, Blueberry, and Cherry

        Air Fryer Homemade Snickerdoodle Cookies

        Air Fryer Homemade Snickerdoodle Cookies

        Photo Credit: forktospoon.com

        Air fryer snickerdoodle cookies are so soft and chewy and easy to prepare with this recipe that calls for just a few basic ingredients.

        Air Fryer Easter Eggs

        Air Fryer Easter Eggs

        Photo Credit: forktospoon.com

        Making Easter eggs in an air fryer is a unique twist on this classic Easter tradition.

        Easy 3 Ingredient Peanut Butter Cookies

        September 14, 2022 by Kristy Bernardo Leave a Comment

        3 Ingredient Peanut Butter Cookies

        3 ingredient peanut butter cookies are an easy flourless recipe. Rich peanut butter flavor and naturally gluten-free!

        3 Ingredient Peanut Butter Cookies

        Peanut butter cookies are a fall and winter classic, but this variation on the humble peanut butter cookie has only THREE INGREDIENTS and comes together faster than the time it takes to bake them.

        3 Simple Ingredients

        Yes, just three pantry staple ingredients!

        • Smooth Peanut Butter: Crunchy or reduced fat peanut will result in dry and crumbly cookies
        • Granulated Sugar
        • Egg: Ideally a fresh egg

        (Scroll down to the bottom for the printable recipe card with exact measurements and instructions.)

        3 Ingredient Peanut Butter Cookies

        Flourless cookies = potentially gluten-free dessert, yes? You'll need to check the ingredients and the label on your peanut butter, but in theory this dessert has no ingredients containing wheat gluten. It can be tough to make desserts for people with food allergies or other conditions but with a bit of care, it is deliciously possible.

        There are plenty of reasons people go gluten-free. Some are diagnosed with wheat allergies, others go to the doctor only to find out they suffer from Celiac disease and must eliminate wheat and other ingredients to maintain a normal quality of life.

        That's one reason why this recipe is so exciting; the first question you'll get from people with food allergies is about your ingredients list. A three-ingredient recipe makes for an easy dessert--both in the prep and the consumption for people with food allergies. And you can always add a few extras to this very simple recipe, as we'll discuss below.

        Flourless Peanut Butter Cookies are an easy 3-ingredient recipe. Rich peanut butter flavor and naturally gluten-free!

        What Makes Peanut Butter Cookies Dry & Crumbly?

        Some make this recipe and complain that the cookies are a bit too crumbly. This could be due to altitude, or it could be the variety of peanut butter used isn't quite up to the task. Some brands are better than others; some swear by Jif and use no other brand. Others may try Peter Pan or their favorite alternative. It may take some trial and error to get the right type. For the record, we like Jif for this recipe.

        If your cookies are too dry, you may need to add a bit of extra egg next time. Other moisture added is also fine (vanilla extract, for example), but add in small increments--a teaspoon at a time for a start and where vanilla extract is concerned, one teaspoon might be all you want to add, period.

        Another problem that can lead to dry, crumbly cookies? Storing the cookie mix in the fridge. It's best to make these as soon as possible after the dough is mixed. Some report the raw cookie dough being a bit greasy due to peanut oil. Don't let this deter you as the end result is likely to be far less greasy than you might expect.

        Why do Peanut Butter Cookies Have Fork Marks?

        Adding fork marks to the cookie dough balls makes them bake more evenly. Plus, it's a classic look at this point.

        Flourless Peanut Butter Cookies are an easy 3-ingredient recipe. Rich peanut butter flavor and naturally gluten-free!

        This recipe is nearly the same as my 3-ingredient Nutella cookies except that the primary ingredient here is peanut butter. And now that we are talking about it, the temptation to combine BOTH recipes using equal amounts Nutella and peanut butter is strong. If you try this, do let me know how it worked out!

        Although I love your run-of-the-mill peanut butter cookies that do contain flour, these flourless peanut butter cookies have a soft, moist texture that you just couldn't get if you added flour. They only make about a dozen cookies per batch so double or triple the recipe if you need to. These cookies tend to freeze really well, too.

        Personally, I'll eat the entire batch no matter how many there are so I'll stick to a dozen per batch. They're just too good to pass up while still warm!

        Does Gluten Free = Safe To Eat?

        But I should extend a little caveat; while you can check the back of a peanut butter label to make sure it has no ingredients that could aggravate a food allergy, there is no way of knowing whether gluten contamination has happened during processing.

        I mention this to say that those with food allergies sometimes have a go-to peanut butter they have tested and know is safe for them. If you are making this recipe for guests with food allergies, it's smart to ask what their preferred brand may be.

        Flourless Peanut Butter Cookies are an easy 3-ingredient recipe. Rich peanut butter flavor and naturally gluten-free!

        Flourless Peanut Butter Cookies

        Yield: 12
        Prep Time: 10 minutes
        Cook Time: 10 minutes
        Total Time: 20 minutes

        These flourless peanut butter cookies have a soft, moist texture that you just couldn't get if you added flour

        Ingredients

        • 1 cup creamy peanut butter
        • 1 cup sugar
        • 1 large egg

        Instructions

        1. Preheat oven to 350F.
        2. Drop cookies onto baking sheet then gently flatten with a fork. Bake for 6-10 minutes (start checking at 6 minutes in case your oven runs hot as it's important not to over bake). Cookies are done when lightly browned on the bottom.
        3. Remove immediately from baking sheet and allow cookies to cool on a wire rack.
        Nutrition Information:
        Yield: 12 Serving Size: 1
        Amount Per Serving: Calories: 197Total Fat: 11gSaturated Fat: 2gTrans Fat: 0gUnsaturated Fat: 7gCholesterol: 16mgSodium: 108mgCarbohydrates: 22gFiber: 1gSugar: 18gProtein: 5g

        This data was provided and calculated by Nutritionix.

        © Kristy Bernardo
        Cuisine: American / Category: Desserts
        Easy 3 Ingredient Peanut Butter Cookies

        More Tasty Cookie Recipes

        • 3 Ingredient Nutella Cookies
        • Keto Chocolate Chip Cookies
        • Lemon Cake Mix Cookie
        • Almond Crescent Cookies
        • Lemon Shortbread Cookies
        • Secret Ingredient Chocolate Chip Cookies

        Mango Margarita Recipe

        September 10, 2022 by Kristy Bernardo 86 Comments

        Mango Margarita

        This mango margarita recipe is refreshing and perfect for a backyard party or Cinco de Mayo celebration! Serve as-is or spice them up with a little muddled jalapeño.

        Mango Margarita

        Frozen Mango Margarita Ingredients

        • Frozen Mango
        • Lime Juice from fresh limes
        • Tequila Blanco (aka Silver)
        • Grand Marnier
        • Sugar
        • Ice
        • Jalapeño Slices (optional)

        Fresh or canned mangos can be used in place of frozen mango but you may need more ice or try freezing the mango prior. Pineapple would also be delicious substitute.

        (Scroll down to the bottom for the printable recipe card with exact measurements and instructions.)

        Mango Margarita Recipe Tips

        • Salt the Rim: Add margarita salt or sea salt to the rim of your glass, if you prefer. Tajin or a any chili salt is great too especially when it's a spicy mango margarita.
        • Rim the Cocktail Glass with Lime: Before adding the salt rim the glass with lime first.
        • Make Mocktails: Switch the tequila and Grand Marnier in equal portions with water and orange juice for a virgin Mango Margarita.
        • Don't Overdo the Ice: The frozen mango reduces the need for a lot of ice. Add a small quantity of ice, adding more until the texture is right.
        • Don't Overblend: Over-blending can turn the margarita into juice
        • Keep the Margaritas Slushy: Chill the glasses and the blender pitcher before preparing the drinks.

        Make it a Spicy Mango Margarita

        Simply adding jalapeño as a garnish alone will not give this drink heat that is needed to make it spicy. If you prefer your margarita hot, then you'll need to add the jalapeño before blending. Here are several ways to do this.

        Different Ways to Make it Spicy

        1. Blend the jalapeño slices and then add rest of ingredients to the blender.
        2. Muddle the jalapeños and add to blender with all ingredients.
        3. Use jalapeño simple syrup.

        Make it a Mango Margarita on the Rocks

        If you prefer a mango margarita on the rocks, substitute the frozen mango with ¾ cup mango juice and stir and shake instead of blending.

        Spicy Mango Margarita

        Best Tequila for Margaritas

        Tequila Blanco also known as Silver is the perfect tequila for a margarita. Tequila Reposado and Tequila Añejo are great tequilas for sipping or on the rocks but generally too pricey to be used in a margarita, where the taste difference is diminished by all the ingredients.

        Grand Marnier Substitute

        This recipe calls for Grand Marnier which is an orange liqueur. The orange liqueur balances out the lime juice with its sweetness and of course, add notes of orange to the mango margarita. There are also hints of vanilla and oak in Grand Marnier.

        Did you know adding a shot of Grand Marnier to any margarita makes it a "Cadillac Margarita."

        Grand Marnier Substitute

        If you don't have Grand Marnier, any orange flavored liqueur will work. Of course, this may slightly change the flavor but will work just fine.

        • Triple Sec
        • Cointreau
        • Orange Curaçao

        Alcohol Free Substitute

        These substitutes will work in a pinch and are more affordable options to the higher priced orange liqueurs.

        • Orange Extract
        • Orange Juice
        • Orange Concentrate

        Try some with this Cherry-Chipotle Salsa - they're great together!

        Here are more tasty Margaritas and South of the Border recipes to try:

        • Cucumber Margarita
        • Beer Margarita
        • Pomegranate Margarita
        • Cinco de Mayo Recipes
        • Taco Recipes for Taco Night
        • Mexican Dessert Recipes
        Mango Margarita

        Mango Margarita

        Yield: 3
        Prep Time: 10 minutes
        Total Time: 10 minutes

        This mango margarita is the most delicious margarita and can be made frozen, on the rocks, spicy and even as a mocktail.

        Ingredients

        • 1 10-ounce bag frozen diced mango
        • ¼ cup fresh lime juice
        • ¾ cup (6oz) silver tequila
        • 2 tablespoons Grand Marnier
        • 2 tablespoons sugar
        • 2 cups ice
        • jalapeño slices (optional)

        Instructions

          1. Place all ingredients except for jalapeño slices in high-powered blender (such as a Vitamix). Blend on high until smooth. Serve immediately.
          2. Optional jalapeño slices: Muddle a jalapeño slice (or more to taste) in the bottom of your serving glass before adding blended margarita. Stir well to incorporate jalapeño.

        Notes

        Add more ice, if necessary, to get the consistency you want.

        Nutrition Information:
        Yield: 3 Serving Size: 1
        Amount Per Serving: Calories: 120Total Fat: 0gSaturated Fat: 0gTrans Fat: 0gUnsaturated Fat: 0gCholesterol: 0mgSodium: 8mgCarbohydrates: 25gFiber: 2gSugar: 22gProtein: 1g

        This data was provided and calculated by Nutritionix.

        © Kristy Bernardo
        Cuisine: Mexican / Category: Drinks
        Mango Margarita Recipe

        Easy Raspberry Panna Cotta

        September 8, 2022 by Kristy Bernardo 119 Comments

        Christmas Panna Cotta

        This creamy, super light Raspberry Panna Cotta is the perfect make-ahead dessert and incredibly easy to make.

        Raspberry Panna Cotta

        The holiday season is perfect for experimenting with new desserts you have never tried to make, and for some people that dessert is Christmas raspberry panna cotta. A fruity, creamy treat that takes far longer to set in the fridge than it does to assemble. Panna cotta, "cooked cream" in Italian, is a classic, and in spite of a bit of waiting time for it to set, it's quick and delicious.

        Making Raspberry Panna Cotta

        It's simple to do: make one batch of vanilla panna cotta (takes about 5 minutes to put together - so easy), pour into dishes and chill. Top with raspberry filling then with another batch of Panna Cotta mixture, then chill until ready! I like to hide the filling a bit so that only when you try the dessert do you realize that there was more to it than just the creamy Panna Cotta.

        I also like it layered so that you can see the raspberry. Here I serve it in tiny dessert dishes with sprinkles of chocolate; you could serve a big crowd if you used these! The raspberry in this dish pairs well with red wine, likewise with the added chocolate sprinkles.

        Raspberry Panna Cotta Ingredients

        • Heavy Cream
        • Sugar
        • Pure Vanilla Extract
        • Plain Powdered Gelatin
        • Cold Water
        • Raspberry Cake
        • Pastry Filling (or crushed fresh raspberries)
        • Chocolate Shavings (garnish)
        • Mint (garnish)

        (Scroll down to the bottom for the printable recipe card with exact measurements and instructions.)

        Raspberry Panna Cotta Recipe

        Panna Cotta Hacks

        The texture of panna cotta will depend on the amount of gelatin you use and it is typically a "just firm enough" dessert. It should wobble a bit, but if you are new to making this recipe you may find it tricky to get just the right consistency. This is common. If your panna cotta doesn't "set" properly, try the mixture up again and adding more gelatin.

        But do not bring the mix to a boil when reheating. Some feel panna cotta is too rich for them, and one popular hack is to swap half-and-half for the heavy cream. You could make this panna cotta recipe and feel it is TOO firm, which may typically be due to a bit too much gelatin in the mix.

        Some people like to put their panna cotta in the freezer to set. If you try this, give it about half an hour in the freezer and check on it--chances are good it will be ready to come out of the freezer.

        This recipe can be covered in plastic wrap and stored in the refrigerator for up to three days, though your experience may vary depending on a variety of factors including whether or not you have made substitutions in the recipe. And speaking of substitutions, some will want to know whether it's possible to make this panna cotta recipe vegetarian or vegan-friendly.

        Gelatin isn't vegetarian, and the milk and cream obviously need to be substituted to make this a vegan-friendly dessert.

        You can experiment with full-fat coconut milk, almond milk, and cornstarch as replacement menu items but when making this dessert a vegan or vegetarian-friendly option for the first time, do it without the pressure of having to serve it to guests. Make an experimental batch of raspberry panna cotta with these menu swaps before you're on the hook to make one for others.

        How Far in Advance can Panna Cotta be Made?

        One the things about this dessert is that its perfect for making in advance since it needs to set in the fridge. Panna cotta is best prepared up to three or four days ahead and stored in the fridge. If panna cotta is stored any longer it may lose flavor or go rubbery.

        Creamy Panna Cotta

        Raspberry Panna Cotta

        Yield: 12 servings
        Prep Time: 5 minutes
        Additional Time: 4 hours
        Total Time: 4 hours 5 minutes

        This Raspberry Panna Cotta has a surprise filling! It's delicious and simple to make for the holidays.

        Ingredients

        • 4 cups heavy cream, divided
        • ½ cup sugar, divided
        • 2 teaspoons pure vanilla extract, divided
        • 2 packets plain powdered gelatin, divided
        • 6 tablespoons cold water, divided
        • 1 cup Raspberry Cake & Pastry Filling (or use fresh raspberries, crushed)
        • chocolate shavings and some mint for garnishing, if desired

        Instructions

          1. Heat 2 cups of the heavy cream, ¼ cup of sugar and 1 t vanilla in a saucepan, stirring occasionally until sugar is dissolved.
          2. Sprinkle 1 packet gelatin over 3 T cold water in a let stand at least 5 minutes.
          3. Stir the gelatin into the warm cream mixture until it’s completely dissolved.
          4. Pour into dessert molds or dishes, cover lightly and chill three hours.
          5. About 20 minutes before panna cotta in the fridge is set, repeat steps 1-3 with remaining cream, sugar, vanilla, water, and gelatin. Allow to cool to lukewarm while panna cotta in the fridge finishes setting.
          6. Remove panna cotta from the fridge. Spoon raspberry pastry filling over set panna cotta, dividing evenly between dishes (spread to edges to allow the filling to show through or leave in the center to “hide” filling).
          7. Gently pour cooled cream mixture over filling. Place back in the fridge and allow to set for 4-5 hours.
          8. Remove from the fridge when ready to serve. Garnish with shaved chocolate and sprigs of mint.
        Nutrition Information:
        Yield: 12 Serving Size: 1
        Amount Per Serving: Calories: 364Total Fat: 31gSaturated Fat: 19gTrans Fat: 1gUnsaturated Fat: 10gCholesterol: 98mgSodium: 64mgCarbohydrates: 18gFiber: 1gSugar: 15gProtein: 4g

        This data was provided and calculated by Nutritionix.

        © Kristy Bernardo
        Cuisine: Italian / Category: Desserts
        Easy Raspberry Panna Cotta

        More Delicious Panna Cotta Recipes

        • Panna Cotta with Summer Peaches & Grand Marnier
        • 2-Ingredient Panna Cotta with Fresh Berries
        • Lemon Panna Cotta with Raspberry Sauce

        Asian Ramen Noodle Salad

        September 8, 2022 by Kristy Bernardo 24 Comments

        Asian Ramen Noodle Salad

        A homemade sesame dressing with healthy chopped kale and Serrano pepper make this updated Asian Ramen Noodle Salad the best one yet.

        Asian-inspired noodle salad is a flexible, easy-to-make recipe that can be modified to be as healthy or as indulgent as you like. Some prefer to swap the almonds (the protein in the recipe) for something heartier like chicken or beef, but for our purposes here we're erring on the healthy side and sticking with almonds for the protein.

        This ramen noodle salad features chopped kale, which is sturdier than ordinary lettuce; kale can last for days in the refrigerator without wilting. Kale does have a distinct flavor, but it's tempered by the cilantro, onion, cabbage, and serrano pepper.

        Asian Ramen Noodle Salad Recipe

        How do you make Ramen Noodle Salad?

        Making Asian ramen noodle salad begins by making the dressing. Let it sit while you work on the salad itself. For best results with this recipe, toast the noodles before boiling them; crush the noodles with your hands, or by using a jar.

        Place the dry noodles on a sheet pan along with some sliced almonds and sesame seeds then gently toss. Toast it all in the oven until it's lightly browned, about 10 minutes or so.

        Toss some chopped kale, shredded green cabbage, chopped green onions, thinly sliced serrano pepper, and a cup of chopped cilantro in a big bowl. Add the toasted noodle mixture, pour over the dressing, and toss it so the dressing coats everything.

        Pop it in the refrigerator for at least an hour to allow the flavors to meld. It will keep well for a few days, making it a great make-ahead dish to keep on hand for easy lunches or dinners all week or to take to a potluck.

        Asian Ramen Salad

        Asian Ramen Noodle Salad Hacks

        A homemade sesame dressing is also key to maximum flavor. Our recipe includes only seven ingredients and is just as quick to make as the salad itself. When it comes to kale, many people find it more edible when chopped fine.

        Large hunks of kale can be a bit challenging to get through, texture-wise. When boiling the ramen noodles it's important not to overcook them (as with any noodle), so a three-minute boiling time is likely ideal.

        And what to do with the flavor packet in the ramen you buy for this dish? You actually don't have to buy an instant ramen packet if you have an Asian grocery nearby; you may be able to buy plain ramen noodles with no seasonings. Alternatively, you can buy Simply Asia brand ramen noodles without seasoning. This is not a plug for an advertiser, it's just a hack I personally use.

        If you do buy a package of instant ramen, you don't need to use the flavor pack, but if you are feeling brave, you might try a LIGHT dusting of it over the cooked noodles if you want an extra kick. But most will set the ramen seasonings aside for this recipe, no doubt.

        This recipe calls for green cabbage to be used but any cabbage can be used. A Chinese cabbage such as the widely available Napa cabbage is a great substitute. Red cabbage works as well but Savoy is best for cooking. Shredded cabbage blends will also work in a pinch.

        Are Ramen Noodles bad for you?

        In general, ramen noodles aren't something you want to eat every day, and it pays to read the labels when selecting your ramen. Some brands are far healthier than others; Simply Asia ramen has the following ingredients:

        • Wheat Flour
        • Water
        • Salt
        • Potassium Carbonate
        • Sodium Carbonate

        Compare that to the Sanyo Foods official site description of the ingredients list in Sapporo ramen noodles:

        • Enriched wheat flour
        • Palm oil (tbhq & citric acid added to protect flavor)
        • Tapioca starch
        • Soy sauce (water, wheat, soybeans, salt, sodium benzoate-preservative)
        • Salt
        • Guar gum
        • Sodium carbonate
        • Tocopherols
        • Potassium carbonate.

        A longer ingredients list does not necessarily mean Sapporo ramen noodles are less healthy, but if you need to avoid salt, palm oil, or added starch, you may wish to compare multiple brands to see which ones have the most agreeable ingredients list.

        Can Asian Ramen Noodle Salad be served as a main dish?

        We mentioned adding a different protein instead of almonds at the start of this recipe. If you want to make this Asian-inspired noodle salad an entree, add the protein of your choice--a good quick option is to use shredded, store-bought rotisserie chicken. You could use leftover steak or even shrimp. If you want to keep this recipe vegan or vegetarian-friendly, try sauteeing some firm tofu in garlic, cumin, and maybe even a bit of ginger.

        You'd be surprised how many things can be made with ramen noodles! Here's a list of 21 recipes that use ramen noodles - there are main dishes, soups, and even instructions for how to make your own ramen noodles. There's even a dessert recipe that looks incredible. They're so inexpensive and last forever, so stock up and give one of these recipes a try!

        Asian Ramen Salad with Kale and Serrano Pepper plus a homemade dressing

        Asian Ramen Salad

        Yield: 6 servings
        Prep Time: 10 minutes
        Cook Time: 10 minutes
        Additional Time: 1 hour
        Total Time: 1 hour 20 minutes

        A homemade sesame dressing with healthy chopped kale and Serrano pepper make this updated Asian Ramen Noodle Salad the best one yet.

        Ingredients

        For the salad:

        • 2 cups chopped kale
        • 3 cups finely shredded green cabbage
        • 1 cup chopped cilantro
        • 2 packages ramen noodles, seasoning discarded or saved for another use
        • 1 ½ cup sliced almonds, I use a 6-ounce bag which is about the same
        • 1 handful sesame seeds, about a tablespoon or two
        • 2 green onions, chopped
        • 1 serrano pepper, very thinly sliced (optional)

        For the dressing:

        • ½ cup canola or vegetable oil
        • ¼ cup rice vinegar
        • 1 teaspoon Truvia Baking Blend, or a tablespoon and a half of sugar
        • 2 tablespoons soy sauce
        • 2 teaspoons freshly grated ginger, or to taste
        • 1 garlic clove, minced
        • 2 tablespoons sesame oil

        Instructions

        1. Preheat oven to 300F.
        2. Mix together all dressing ingredients. Set aside.
        3. While still in package, crush noodles into small pieces.
        4. Place crushed noodles on baking sheet along with almonds and sesame seeds; gently toss with your hands.
        5. Toast in oven until lightly browned, about 10 minutes or so. Remove from oven and allow to cool.
        6. Place remaining salad ingredients into a large serving bowl and gently toss.
        7. Add ramen noodle mixture and toss again. Pour dressing over and thoroughly toss.
        8. Allow to sit for about an hour for flavors to blend, then serve.

        Notes

        Feel free to use Napa or Chinese cabbage in place of the green cabbage.

        Nutrition Information:
        Yield: 6 Serving Size: 1
        Amount Per Serving: Calories: 588Total Fat: 47gSaturated Fat: 6gTrans Fat: 0gUnsaturated Fat: 38gCholesterol: 0mgSodium: 920mgCarbohydrates: 36gFiber: 9gSugar: 5gProtein: 13g

        This data was provided and calculated by Nutritionix.

        © Kristy Bernardo
        Cuisine: Asian / Category: Salads
        Asian Ramen Noodle Salad

        Imitation Crab Ceviche Recipe

        September 2, 2022 by Monique McArthur 2 Comments

        Imitation Crab Ceviche Recipe

        This quick and easy imitation crab ceviche recipe is loaded with fresh tomatoes, onions, and cilantro; all marinated in fresh lime juice.

        Imitation crab ceviche, also called Ceviche de Jaiba, can be served as an appetizer with tortilla chips, as a crab ceviche taco, crab salad or on a tostada as a light, refreshing meal. It's already low-carb and low-fat but can also be served up on lettuce wraps for the ultimate guilt free meal.

        Imitation Crab Ceviche

        What is Imitation Crab Made Of?

        Imitation crab is typically made from Alaska Pollack, water, egg whites, starch, sugar, salt, vegetable oil and natural crab meat. Flavoring like snow crab extract color and shape the meat to take on the appearance of real crab meat.

        Ingredients vary by brands but generally are consistent except for minor variations. Most imitation crab meat is gluten-free, fat free, low calorie, low in cholesterol and a source of Omega-3.

        Imitation crab can also be found in fish sticks, crab cakes, California rolls and other type of sushi rolls with imitation crab, Kanikama in Japanese.

        Do you have to Cook Imitation Crab?

        Imitation crab meat is precooked and while there is no need to precook seafood for ceviche, the "crab meat" can be eaten straight from the package or added to cold dishes.

        Additionally, all ceviche is "cooked" by marinating in citrus juice through a process called denaturation. The citric acid acts as a cooking agent similar to heat.

        Imitation Crab Ceviche Recipe Substitutions & Variations

        • Substitute Globe (standard) tomatoes for Roma tomatoes
        • Make it mild or spicy by adding jalapenos (hot) or serrano peppers (hotter)
        • 1 green bell pepper or cucumber can be substituted for peppers
        • Add 1 avocado but don't mix in until serving
        • Substitute onions for shallots
        • Use less ½ or 1 red onion depending on how much onion you like
        • Replace some lime juice with lemon juice
        • Add mango
        • Substitute any other type of fish, shrimp or real crab meat
        • Try parsley instead of cilantro
        • Add ¼ cup Clamato juice and ½ tablespoon ketchup

        How Long Should you Marinate Imitation Crab Ceviche?

        Imitation crab ceviche should be marinated at least 1 hour in a refrigerator but for a more flavorful taste marinate at least 4 hours. Unlike other types of ceviche, imitation crab ceviche can be marinated overnight. In fact, sometimes I have found it tastes even better.

        Since imitation crab ceviche is precooked, it is safe to eat immediately without marinating but will have a blander taste.

        Imitation Crab Ceviche Diced Tomatoes
        Step 1: Dice tomatoes
        Chopped Imitation Crab
        Step 2: Chop imitation crab
        Imitation Crab Ceviche Mix Ingredients
        Step 3: Mix Tomatoes, crab, cilantro, onions, and lime juice

        Leftover Ceviche Ideas

        • As a topping on toast or avocado toast
        • On top of eggs
        • Make crab salad or use as a side salad with steak or sandwiches
        • Make lettuce cups
        • On top of cucumber slices or just dip
        • Eat with white, brown, Mexican, cauliflower or cilantro rice
        • As a soup topping
        • Rice cake topping
        • Mix into guacamole
        • Enjoy with beans or quinoa
        • Tortilla, potato chips, toasted bread or crackers
        • Add to a taco, burrito or a tostada

        How Long is Imitation Crab Ceviche Good For?

        One of the best things about imitation crab ceviche is that it lasts longer than ceviche with other fish, shrimp, or real crab, and takes longer for a fishy taste or odor to develop. I always double the recipe so we have it for days as an afternoon snack with chips or on our eggs for breakfast.

        Imitation crab ceviche can be refrigerated and stored in an airtight container for up to 3 to 5 days. Ceviche is considered a processed food plus the ceviche marinates in acidic citrus juice. These two factors extend the time to eat.

        Try this quick and easy Shrimp ceviche recipe next!

        Imitation Crab Ceviche Recipe

        Imitation Crab Ceviche Recipe

        Yield: 8
        Prep Time: 25 minutes
        Additional Time: 1 hour
        Total Time: 1 hour 25 minutes

        Imitation crab ceviche is incredibly easy to prepare, delicious and an affordable option compared to other seafood ceviches.

        Ingredients

        • 1 (8 ounce) package flaked imitation crabmeat
        • 1 tablespoon olive oil
        • 2 large tomatoes, chopped
        • ¾ red onion, chopped
        • ½ bunch cilantro, chopped
        • 2 limes, juiced
        • Salt & Pepper to taste
        • 3 jalapeno or serrano peppers (optional)

        Instructions

        1. Add imitation crab to a large bowl and mix in olive oil.
        2. Add chopped tomatoes, onion, cilantro and peppers (optional) and mix.
        3. Splash fresh lime juice and mix.
        4. Add salt and pepper to taste.
        5. Chill in refrigerator for at least 1 hour.

        Notes

        For best results refrigerate at least 4 hours before serving. It's best served cold.

        Imitation crab can be shredded, chopped or blended.

        Nutrition Information:
        Yield: 8 Serving Size: 1
        Amount Per Serving: Calories: 47Total Fat: 2gSaturated Fat: 0gTrans Fat: 0gUnsaturated Fat: 2gCholesterol: 14mgSodium: 99mgCarbohydrates: 5gFiber: 1gSugar: 2gProtein: 3g

        This data was provided and calculated by Nutritionix.

        © Monique McArthur
        Cuisine: Mexican / Category: Appetizers
        Imitation Crab Ceviche Recipe

        Try these Delicious Seafood Recipes:

        • Seafood Mac and Cheese
        • Gambas al Ajillo
        • Beer Battered Fish Tacos
        • Ahi Tuna Sashimi
        • Ahi Tuna Steaks
        • Spam Musubi

        Cranberry Orange Sauce Recipe

        September 1, 2022 by Kristy Bernardo Leave a Comment

        Cranberry Orange Sauce Recipe

        This easy Homemade Cranberry Orange Sauce recipe has just four ingredients - perfect for your holiday table!

        Cranberry Orange Sauce Recipe

        There's nothing quite like homemade cranberry orange sauce. Yes, you can buy it from the store and save yourself some food prep time, but when you make it yourself you get to experiment with the basic concept and modify it to be far more "you" than store-bought.

        Food Network's Sunny Anderson knows this all too well--her own approach is to go ahead and purchase store-bought cranberry sauce and add her own extra ingredients. At least that was her approach for her Food Network recipe. Anderson whisks her store-bought, and adds fresh cranberries to jazz up the dish.

        We aren't suggesting you take that approach with this recipe, but if you find yourself in a pinch and you need to really stretch some cranberry sauce, that's not the worst idea in the world.

        Homemade Cranberry Sauce with Orange

        This recipe is so easy and fast to make, and it is perfect for your night-before food prep. You don't have to wait until Thanksgiving to make this--make it ahead of time and stash it in the fridge!

        This cranberry sauce recipe has a subtle orange flavor and there is no "spin" on the fruit-forward approach here--no cinnamon or other spices. This is a good recipe for anyone who prefers a "straightforward" cranberry flavor with a subtle citrusy twist that will pair well with your juicy turkey!

        If you prefer a homemade cranberry sauce without oranges try this recipe.

        Orange Cranberry Sauce Ingredients

        • Fresh cranberries: Tart cranberries are the featured ingredient providing a tangy element.
        • Granulated sugar: Granulated white sugar gives this sauce just the right amount of sweetness to balance out the tartness.
        • Orange juice & orange zest: The addition of orange juice and orange zest brings a lively, citrusy brightness to the sauce.
        • Salt: A little bit of salt enhances the flavors of the other ingredients.

        If you wish to add your own touch to this recipe try adding cinnamon, honey, nuts, dried fruits, vanilla or even jalapeños for a touch of heat.

        Find the complete ingredients list with amounts in the recipe card below.

        How to Make Cranberry Orange Sauce

        1. Place all ingredients into a medium saucepan over medium-low heat.
        2. Stir gently and frequently until sugar dissolves. Increase heat to medium. Continue to stir frequently and cook until cranberries start to pop and split.
        3. Remove from heat and allow to cool. Remove orange zest and chill until ready to serve.

        Using Frozen Cranberries

        Some may be tempted to swap out frozen cranberries for fresh ones. If you do this here, be sure to thaw them completely before using. It may be a lot more difficult to deal with partially frozen cranberries during the prep stage.

        Why Cook This Recipe?

        Some want to know why the cooking stage is necessary with this recipe. Why not just mix all the ingredients together cold? There are many reasons to cook this recipe but one of the biggies is the fact that raw cranberries may simply be too bitter for some. Cranberries, like wine, contain tannins. Some of those will cook off and that's exactly what you want with this recipe.

        Sweet Homemade Cranberry Sauce with Orange for Thanksgiving Dinner

        Cranberry Stains

        There is one little aspect about cooking with cranberries that tends to annoy many--the stains. Cranberry juice is notorious for leaving stains on clothing, countertops, and dish towels. Want to know how to get rid of those stains?

        Attack them as soon as possible and do not let them set. The University Of Illinois Extension official site has a cranberry cleanup recipe that includes the following instructions:

        1. Mix one tablespoon of white vinegar with ⅔ cup of rubbing alcohol.
        2. Sponge the stain with the vinegar/alcohol solution.
        3. Blot until the liquid is absorbed.
        4. Repeat Steps 2 and 3 until the stain disappears.

        Leftover Cranberry Orange Sauce Ideas

        Leftover orange cranberry sauce works well with a many dishes. Here are some ideas:

        • Spread on toast or sandwiches
        • Use the sauce as a marinade or glaze prior to roasting or grilling
        • Make a smoothie with yogurt, ice cream, juice or fruits
        • Use a salad dressing with olive oil, vinegar and other seasonings
        • Stir into oatmeal or cream of wheat
        • Add an orange cranberry layer in a parfait
        • Make an orange cranberry cream cheese dip
        • Use as a cold or warm waffle, pancake or ice cream topping
        Put down that can opener! Homemade Cranberry Sauce couldn't be more simple yet tastes amazing. This version can be made with or without the additional flavor of orange - delicious!

        Homemade Cranberry Sauce with Orange

        Yield: 6-8 Servings
        Prep Time: 5 minutes
        Cook Time: 15 minutes
        Total Time: 20 minutes

        Skip the canned cranberry sauce and make this delicious cranberry orange sauce!

        Ingredients

        • 1 12- ounce package fresh cranberries
        • 1 cup sugar
        • 2 tablespoons orange juice
        • 3 large strips orange zest
        • large pinch of salt

        Instructions

        1. Place all ingredients into a medium saucepan over medium-low heat.
        2. Stir gently and frequently until sugar dissolves. Increase heat to medium. Continue to stir frequently and cook until cranberries start to pop and split.
        3. Remove from heat and allow to cool. Remove orange zest and chill until ready to serve.
        Nutrition Information:
        Yield: 8 Serving Size: 1
        Amount Per Serving: Calories: 120Total Fat: 0gSaturated Fat: 0gTrans Fat: 0gUnsaturated Fat: 0gCholesterol: 0mgSodium: 18mgCarbohydrates: 31gFiber: 2gSugar: 27gProtein: 0g

        This data was provided and calculated by Nutritionix.

        © Kristy Bernardo
        Cuisine: American / Category: Sauces
        Cranberry Orange Sauce Recipe

        Try these Delicious Cranberry Recipes:

        • Roasted Cranberry Chicken
        • Cranberry Pecan Cheese Balls
        • Baked Camembert with Cranberry & Walnuts
        • Sugared Cranberries

        Homemade Ricotta Cheese Recipe

        September 1, 2022 by Kristy Bernardo Leave a Comment

        Homemade Ricotta Cheese Recipe

        Making this homemade ricotta cheese recipe doesn't take much more effort than boiling water! Once you try it, you'll never go back.

        The first time I put my milk, cream & salt in a pot I was pretty sure I'd end up with nothing more than hot milk, cream & salt. Then it boiled, I added some lemon juice and watched it turn into something that I was certain I'd be dumping down the drain.

        Even as I poured it into the cheesecloth I thought it can't be this easy. But as the whey drained off and only silky, creamy curds remained…I realized that I'd been wasting countless years hunting down a better ricotta when it was right here in my own kitchen the entire time! Once you try warm, fresh ricotta you'll never, ever buy it again.

        Spoonful of fresh homemade ricotta cottage cheese made from milk, draining on muslin cloth

        Making Homemade Ricotta: At a Glance

        1. Prep: Line a large sieve with a layer of cheesecloth and place it over a large bowl.
        2. Boil: Bring the milk, cream, and salt to a boil in a large pot over medium heat, stirring occasionally, add lemon juice until the cheese curdles.
        3. Drain: Let the cheese drain 1 hour.
        4. Enjoy!

        (Scroll down to the bottom for the printable recipe card with exact measurements and instructions.)

        Tools for Homemade Riccotta

        • Cheesecloth
        • Lined sieve or colander

        Cheesecloth Substitutes

        If you need a cheesecloth substitute in a pinch many cotton fabrics will work. Substitute with pantyhose, pillow cases, bandanas/handkerchiefs, paper towels, socks, cotton kitchen towels, coffee filters, gauze, fine mesh bag, and other types of cotton fabrics.

        Homemade Ricotta Cheese Recipe Tips

        • Use lemon juice, regular lemons or replace with an equal amount of white vinegar.
        • Use pasteurized milk. Unpasteurized varieties are not for the beginner, and not necessary for this recipe. Using unpasteurized milk has many caveats that are beyond the scope of this recipe. Use store-bought pasteurized milk and you will be fine.
        • You could attempt to make ricotta from low-fat milk or reduced fat milk. But your results may vary and it's a good idea to try making the full-fat version first to get an idea of how the recipe should look and taste. Then you can experiment with swapping out healthier ingredients such as lower-fat milk.

        How to Store

        Homemade ricotta can last up to 4-5 days in the refrigerator, but in my experience you'll get best results consuming this amazing homemade cheese in a couple of days after making it. It's so easy to make that you really don't need to prepare huge batches of it. Make just enough for your needs over the next couple of days.

        Using Leftover Ricotta

        Some make their ricotta for a specific meal but then feel stumped about what to do with the leftover cheese. Here are some ideas you can use for the remainder--fresh ricotta is amazingly tossed with fresh pasta or spread on puff pastry with fresh vegetables. Dollops of fresh ricotta on a pizza just out of the oven is an amazing thing indeed.

        • Drizzle with honey and fresh figs
        • Ricotta grilled cheese
        • Ricotta gnocchi!
        • Ricotta pie!
        • Ricotta cheesecake!
        • On crostini with a smidge of raspberry jam & black pepper
        • Add some to quiche to make it extra creamy
        • Good for stuffing zucchini or portobello mushrooms

        The Difference Between Ricotta And Other Homemade Cheeses

        This recipe does not call for an aging process. Aging other types of home made cheese is important because there are food borne illnesses that can be transmitted through unaged cheese like homemade cheddar.

        The aging process waits out the bacteria and other nasties that reside in the aging cheese--three months of aging at a minimum and listeria and other pathogens die out over this time. Aging cheese is a bit of a science-heavy process; we're not after the long-haul version of home made cheese, this recipe is for more instant gratification.

        Do you have a favorite way you like to use ricotta? Let me know in the comments below!

        Try these delicious Ricotta Cheese Recipes:

        • Bruschetta Recipe with Peaches, Lemon Ricotta and Honey
        • Lemon Ricotta Pasta
        • Slow Cooker Lasagna with Ricotta Cheese
        • Lemon Ricotta Pancakes with Fresh Raspberries
        Spoonful of fresh homemade ricotta cottage cheese made from milk, draining on muslin cloth

        Easy Homemade Ricotta Cheese Recipe

        Yield: About 2 cups
        Prep Time: 5 minutes
        Cook Time: 25 minutes
        Additional Time: 1 hour
        Total Time: 5 minutes

        Five ingredients and a half hour is all you need to make this fresh, creamy homemade ricotta.

        Ingredients

        • 2 quarts whole milk
        • 1 cup heavy cream
        • ½ teaspoon kosher salt
        • 3 tablespoons fresh lemon juice
        • 2 sheets cheesecloth, big enough to cover strainer

        Instructions

        1. Line a large sieve or colander with a layer of cheesecloth and place it over a large bowl.
        2. Bring the milk, cream, and salt to a boil in a large pot over medium heat, stirring occasionally.
        3. Add the lemon juice, then reduce the heat to low and simmer, stirring constantly, until the mixture curdles, about 2 minutes.
        4. Pour the mixture into the lined sieve and let it drain 1 hour.
        5. After discarding the liquid, chill the ricotta, covered; it will keep in the refrigerator for up to 2 days.
        Nutrition Information:
        Yield: 8 Serving Size: 1
        Amount Per Serving: Calories: 251Total Fat: 19gSaturated Fat: 11gTrans Fat: 0gUnsaturated Fat: 6gCholesterol: 58mgSodium: 245mgCarbohydrates: 13gNet Carbohydrates: 13gFiber: 0gSugar: 13gProtein: 9g

        This data was provided and calculated by Nutritionix.

        © Kristy Bernardo
        Cuisine: Italian / Category: Sauces
        Homemade Ricotta Cheese Recipe

        The Best Spicy Chicken Burgers

        August 31, 2022 by Kristy Bernardo Leave a Comment

        The Best Spicy Chicken Burgers

        We're calling this the best spicy chicken burger recipe for good reason! These juicy and flavorful ground chicken burgers are made up of just the right ingredients.

        Chicken Burgers

        What Type of Chicken to Use for Ground Chicken

        Store bought ground chicken is much easier than ground chicken and is more than suitable for chicken burgers. Most butchers will ground the meat for you if you can't find pre-ground chicken in the meat section.

        DIY Ground Chicken

        If you're willing to put in the extra effort I prefer a mixture of boneless skinless chicken breasts and thighs for homemade patties. This way you know what the meat is made of, there are no fillers, and you'll have more flavor.

        Thighs are less dry so the mixture of thighs and breasts creates a juicier patty. Skinless chicken helps to avoid any connective tissue and other tough pieces in the patty.

        A food processor, by hand, or a meat grinder can be used to grind the chicken. Be careful not to over blend the chicken with a food processer too much and turn it into paste.

        Chicken Burgers with caramelized onions and cheese

        How to Cook Chicken Burgers

        This recipe calls for using a BBQ grill to cook the patties however there are many ways these burgers can be cooked. Here are a few options:

        • Oven: Preheat oven to 400˚ F, place patties on a baking sheet and bake for 20 minutes.
        • Air Fryer: Preheat air fryer to 365°F and cook for 8 to 10 minutes.
        • Pan, Skillet, Frying Pan: Preheat to a medium high for about 4 to 6 minutes on each side on a non-stick surface

        For all options cook chicken until the internal temperature is 165˚ F.

        Grilled Ground Chicken Burger Tips & Tricks

        • Mix ingredients for a better mixture.
        • Don't flatten the burgers on a the grill. It presses the juices right out of them.
        • This recipe calls for adding bacon to the ground chicken for added flavor and to make sure they stay really moist. For healthy chicken burgers omit the bacon.
        • Oil the grill so patties don't stick.

        Pre-Making and Freezing Chicken Burgers

        • Make the chicken burger mix up to a day ahead and store in the fridge.
        • Let the mixture come to room temperature before you shape and cook the patties.
        • Freeze the chicken burgers for up to 3 months before or after cooking. Stack between wax or parchment paper in a freezer-safe container.

        Try these burger recipes next!

        • Best Turkey Burgers
        • Blue Cheese Burger Totchos
        • Hot and Spicy Queso Fresco Burgers
        • More ground chicken recipes
        Best Ground Chicken Burgers

        Spicy Chicken Burger

        Yield: 4
        Prep Time: 15 minutes
        Cook Time: 10 minutes
        Total Time: 25 minutes

        I topped these chicken burgers with caramelized onions, green leaf lettuce, sliced heirloom tomatoes and a Mexican-blend cheese. The meat was so flavorful and juicy that no condiments were necessary.

        Ingredients

        • 1 pound ground chicken breast
        • ½ jalapeno (no seeds) or ⅓ bell pepper
        • ½ cup chopped cilantro
        • 2 slices uncooked bacon, chopped (optional)
        • 1 Tablespoon Lawry's Fire Roasted Chile & Garlic spice mixture or another seasoning of your choice
        • 2 Tablespoon olive oil

        Instructions

          1. Chop the cilantro and jalapenos (or bell pepper) and cut the bacon into small pieces.
          2. A the ground chicken, jalapeno, cilantro, uncooked bacon, seasoning and olive oil to a large bowl and mix by hand or food processor.
          3. Pre-heat to medium-high heat and oil the grill.
          4. Form into four large patties. Cook immediately or place in fridge until ready.
          5. Cook to a 165F internal temperature for about 4-5 minutes on each side (turn only once).
          6. Place on toasted buns with desired toppings and serve immediately.

        Notes

        If grounding the chicken use 6 boneless, skinless chicken thighs and breasts (3 each) and chop into bite-sized pieces (or use a food processor, don't over process!).

        Either add toppings or let guests top as they like.

        Replace jalapenos with bell peppers for a mild chicken burger.

        Nutrition Information:
        Yield: 4 Serving Size: 1
        Amount Per Serving: Calories: 338Total Fat: 25gSaturated Fat: 6gTrans Fat: 0gUnsaturated Fat: 17gCholesterol: 131mgSodium: 274mgCarbohydrates: 1gFiber: 0gSugar: 1gProtein: 28g

        This data was provided and calculated by Nutritionix.

        © Kristy Bernardo
        Cuisine: American / Category: Dinner
        The Best Spicy Chicken Burgers

        Easy S'mores Pie

        August 30, 2022 by Monique McArthur 2 Comments

        Easy S'mores Pie

        This s'mores pie "recipe" is layers of graham crackers, marshmallows, and melted chocolate that is perfect for any season, indoors or outdoors. In under 15 minutes this 3-ingredient classic combo can be enjoyed by all!

        Easy S'mores Pie Featured

        How to Make S'mores Pie

        Scroll down to the bottom for the printable recipe card with exact measurements and recipe instructions.

        1. Create the Pie - Break apart the chocolate pieces and place them onto the bottom of the graham cracker crust.
        2. Layer the Marshmallows - Cover the chocolate pieces with marshmallows.
        3. Bake - For 8 minutes or until marshmallows are golden brown on top.

        S'more's Pie Substitutions & Hacks

        Some of these variations won't be found at your local grocery store but can easily be purchased on Amazon or other online stores.

        Smores Marshmallow Variations

        Use mini, regular or jumbo marshmallows. Mini marshmallows will give the most consistent and even roasting results but any will work. Marshmallow creme can also be used in a pinch. Kitchen shears can be used to cut marshmallows down to size as well.

        Jet-Puffed, Stuffed Puffs, Dandies, Campfire or any grocery store brand of marshmallows will work as will homemade marshmallows. Peeps are a great substitute as well and the seasonal and holiday themed Peeps look great.

        There are a ton of marshmallow flavors and varieties you can experiment with such as vanilla, birthday cake, candy corn, pumpkin spice, coconut, holiday cinnamon & vanilla, ginger bread, peppermint, Swedish fish, chocolate coated with graham cracker, strawberry, stuffed chocolate, and fruit flavored.

        Vegan marshmallows can also be substituted. Yes, that's right, most store bought marshmallows are not vegan or vegetarian because they contain gelatin.

        Smores Chocolate Variations

        Hershey chocolate bars are a classic s'more ingredient however you can use any chocolate including white, dark, with nuts, flavored or other chocolate bars that are similar to Hershey. Other types of chocolate bars can be fun to try too, such as Krackel, Mr. Goodbar, Kit Kat, and Reese's Peanut Butter Cups.

        Hershey has many varieties to try out as well such as Special Dark, Cookies 'n' Creme, Milk Chocolate with Almonds, Toffee, and Toffee and Almonds. There are Hershey bar size choices to make too, king, regular and mini will all work. If you use king size keep in mind that the bars are thicker and a little bit less chocolate is needed unless you like it really chocolatey.

        Smores Pie Crust Variations

        This recipe calls for a pre-made 10" graham cracker crust but a smaller 9" pie crust can be used as well. Crumbled up graham crackers in a pie tin works equally as well. If you don't have any crust or graham crackers you can get creative with bread, cookie dough, crackers, Oreos, cookies, waffles, pancakes, brownies, vanilla wafers, pretzels, cereal, donuts, ice cream cones or chips.

        Keebler Graham Cracker crust is the brand most people use but any brand will work, including grocery chain brands. Some may prefer to make their own pie crust which is perfectly acceptable.

        Graham cracker mini pie crusts are a fun option for individual mini s'mores pies. Portion control! Keebler makes mini pie crusts but they are often not widely available in grocery stores and best bought online.

        Pie crust variations to experiment with or use in a pinch include a pecan, standard dough, or Oreo pie crust.

        Skip the pie crust and make S'mores Nachos in a cast iron skillet or pan by breaking up graham crackers and layering on top with marshmallows and chocolate. Create two layers if desired.

        S'mores Pie Ingredients

        Toppings & Decorations

        Here some seasonal and holiday S'mores pie decorating ideas.

        • Valentine's Day S'mores: Use vanilla and strawberry marshmallows.
        • Easter S'mores: Use Easter Peeps for a S'mores dip with chicks and bunnies.
        • Summer S'mores: Use Summer Peeps for a S'mores dip with snowmen and Christmas trees.
        • 4th of July S'mores: Add red, white and blue sprinkles on top of the marshmallows. Works for Memorial Day and Veterans Day too!
        • Halloween S'mores 1: Stretch the marshmallows so they're rectangular and place in pie. Use semi-sweet chocolate chips for the eyes and nose.
        • Halloween S'mores 2: Use Halloween Peeps for a S'mores dip with Frankenstein, ghosts, skulls and pumpkins.
        • Christmas S'mores: Use Christmas Peeps for a S'mores dip with snowmen and Christmas trees.
        • Rainbow S'mores: Add different rainbow color sprinkles on top of individual marshmallows.

        S'Mores Dip

        A s'mores pie is a perfect dip with a traditional graham cracker or almost any other type of dipper such as ginger snaps, vanilla or chocolate wafers, Oreo cookies, shortbread or sugar cookies, crackers, pretzels, strawberries or apple slices. A pie crust is not necessary for this version but works equally as well.

        Easy S'mores Pie

        Easy S'Mores Pie

        Yield: 6
        Prep Time: 5 minutes
        Cook Time: 8 minutes
        Total Time: 8 minutes

        This campfire classic, also known as rainy day s’mores or indoor s'mores, is a quick and easy dessert that even the kids can have fun making!

        Ingredients

        • 10" Pre-made graham cracker crust
        • 3 Standard Size Hershey Chocolate Bars
        • 1 Cup marshmallows, or as needed to fill pie tin

        Instructions

        1. Preheat oven to 350°.
        2. Break apart the chocolate pieces and place them onto the bottom of the graham cracker crust.
        3. Cover the chocolate pieces with marshmallows.
        4. Bake for 8 minutes or until marshmallows are golden brown on top.
        5. Remove from oven and serve.

        Notes

        Oven times will vary, keep an eye on the marshmallow topping and pull from oven once brown.

        An air fryer at 375° for 4 minutes can be used instead of an oven.

        If you want extra chocolate, use an extra bar or place chocolate chips on top.

        Serve as pie slices or use graham cracker as "chip" for dipping.

        Nutrition Information:
        Yield: 6 Serving Size: 1
        Amount Per Serving: Calories: 1643Total Fat: 80gSaturated Fat: 17gTrans Fat: 0gUnsaturated Fat: 59gCholesterol: 2mgSodium: 1491mgCarbohydrates: 214gFiber: 6gSugar: 67gProtein: 17g

        This data was provided and calculated by Nutritionix.

        © Monique McArthur
        Cuisine: American / Category: Desserts
        Easy S'mores Pie

        More Delicious Dessert Recipes!

        • Lemon Cake Mix Cookies
        • Mini Oreo Cheesecakes
        • 5-Ingredient No-Bake Peanut Butter Bars
        • Twinkie Pops
        • OREO Pops

        And check out our guide for ways to roasts marshmallows without a fire.

        Creamy Pumpkin Soup Recipe

        August 30, 2022 by Kristy Bernardo 20 Comments

        Creamy Pumpkin Soup Recipe

        Fall recipes can be more unique than their spring and summer counterparts. A good fall soup is hearty, warming, and flavorful. This easy, healthy pumpkin soup recipe fits the bill nicely and you don't have to wait until the season is right to make it--you can substitute canned pumpkin for fresh roasted pumpkin in a pinch.

        Creamy Pumpkin Soup Recipe

        For some the dilemma is what to have for dessert? It would be tempting for some to pair this soup with a pumpkin spice cheesecake or even a pumpkin spice brownie bar, but for others pairing with something heavy on the citrus (for contrast) might play better.

        Pumpkin Types

        You can make this recipe with almost (see below) any type of pumpkin or butternut squash.

        Remember that carving pumpkins aren't the same as baking pumpkins and if you choose the flesh from a jack-o-lantern type pumpkin you may find the flavor wanting. It's better to select the smaller, intended-for-baking pumpkins when choosing fresh ones.

        Depending on when a pumpkin is harvested and what the conditions were like, some pumpkins may last for weeks before cooking. Carving pumpkins have a shorter shelf life. In general, it may be best to plan to use your cooking pumpkin within the week of purchase but much depends on variables such as humidity, the coolness of your storage area, etc.

        Easy Pumpkin Soup Hacks

        One of the easiest hacks involved with making pumpkin soup is the roasting. Try to get all your pumpkin slices or chunks to roughly the same size as they will roast more evenly and consistently. You'll avoid the problem of overcooking smaller pieces and undercooking bigger ones during the roasting process if all the pieces are identically sized.

        And that's the thing about pumpkin; you might not be able to blend away the texture of under-roasted pumpkin. Try to get the consistency as soft as possible.

        I recommend allowing the roasted pumpkin to cool before you add it to the mix and blend it. You don't necessarily have to wait for it to reach room temperature, but letting it cool for a bit may make for a smoother blend.

        Using Canned Pumpkin

        And finally, if you are using canned pumpkin, know that it has already been cooked and is ready to use right out of the can. You will not need to soften it by roasting. However, you can get a deeper flavor if you roast canned pumpkin anyway--it's something to consider since some complain that canned varieties aren't as tasty right out of the can. I would agree!

        Canned pumpkin, once opened, will last up to seven days (five could be more likely) but it's smart to use it as soon as it's been opened.

        Pumpkin Soup Flavor Variations

        Pumpkin soup is one of those dishes where the natural flavor allows for it to be kept simple. However, experimenting with new flavors is all part of the joys of cooking as well. Here are a few twists to try out.

        • Curry Pumpkin Soup: Add curry powder.
        • Spicy Pumpkin Soup: Stir in red chili powder, cayenne, red chili flakes, jalapeno or Hatch Chile and adjust to your spice tolerance.

         Cinnamon, nutmeg, cloves, ginger, cumin and chile all pair well with pumpkin soup.

        Pumpkin Soup Toppings, Garnishes & Dippers

        • Breads: Focaccia, toasted baguette, naan, melba, cheesy garlic bread, stale bread, crostini, sourdough
        • Toppings: Heavy or coconut cream, pesto, blue cheese, toasted seeds or nuts, croutons, chickpeas, fresh herbs, grated cheese, kale, sage leaves, pepitas, French fried onions, diced pancetta, root vegetable crisps

        Enjoy!

        More delicious soup recipes:

        • Wild Mushroom Brie Soup with Parmesan-Pepper Croutons
        • Cheesy Broccoli Soup
        • Healthy Broccoli Soup
        • Lentil Soup Recipe with Parmesan and Smoked Sausage
        Creamy Pumpkin Soup Recipe

        Creamy Roasted Pumpkin Soup

        Yield: 8
        Prep Time: 20 minutes
        Cook Time: 40 minutes
        Total Time: 1 hour

        This pumpkin soup recipe is easy and healthy and the perfect starter or side dish at a quiet dinner or a Thanksgiving feast.

        Ingredients

        • 1 tablespoon extra-virgin olive oil
        • 1 large onion, chopped
        • 3 cloves garlic, minced
        • ¼ teaspoon dried thyme (or 1 teaspoon fresh)
        • 4 cups roasted pumpkin (or 2 15 oz canned pumpkin)
        • 6-7 cups reduced sodium chicken stock (depending on how thick you like your soup)
        • 1 teaspoon salt & freshly ground black pepper (both approximate, season to taste - don't be afraid to season liberally)
        • garnish with finely minced parsley

        Instructions

          1. Heat olive oil in a Dutch oven.
          2. Sauté onions over medium heat until translucent.
          3. Add garlic and thyme and sauté a few minutes more.
          4. Add pumpkin and chicken stock, stir to combine.
          5. Simmer for 15-20 minutes, then blend with an immersion (hand) blender. Alternatively you can use a standard blender.
          6. Season with kosher salt and freshly ground pepper.
          7. Garnish with finely minced parsley.

        Notes

        This pumpkin soup recipe is without cream or milk but add a small dollop of crème fraîche and swirl for an extra hint of tastiness. Small amounts of milk, butter, yogurt or non-dairy coconut milk will do the job too.

        Nutrition Information:
        Yield: 8 Serving Size: 1
        Amount Per Serving: Calories: 167Total Fat: 5gSaturated Fat: 1gTrans Fat: 0gUnsaturated Fat: 4gCholesterol: 0mgSodium: 3192mgCarbohydrates: 14gFiber: 1gSugar: 6gProtein: 19g

        This data was provided and calculated by Nutritionix.

        © Kristy Bernardo
        Cuisine: American / Category: Soups and Stews
        Creamy Pumpkin Soup Recipe

        White Christmas Cocktail with Bourbon

        August 30, 2022 by Kristy Bernardo 110 Comments

        White Christmas Cocktail Recipe

        If you're looking for a comforting, warm Christmas cocktail then you've found your recipe! This delicious Christmas cocktail pairs coconut milk and bourbon for something really festive yet very easy to make! It's the ultimate warm holiday drink.

        The winter holidays are great for trying new things, and for revisiting old favorites. Thanksgiving and Christmas both have their share of holiday-themed mixed drinks, and eggnog is at the top of the list for many.

        This cold-weather cocktail with bourbon and coconut milk is my all-time favorite! Keep it warm on the stove or in the slow-cooker...delicious with or without alcohol

        But I find that this Warm Christmas Cocktail recipe has some big advantages over the good old eggnog option; some prefer the velvety texture of the coconut milk in recipes like the one below over the texture of eggnog.

        Not for everyone, mind you, but for those who are converted, this holiday cocktail can be made with or without alcohol just like "the nog".

        And there's the added bonus of not worrying people who get concerned about a bit of raw egg in their cocktail glass from a homemade eggnog recipe-there's at least one at every party who may be a bit squeamish on that front. This recipe is a GREAT alternative!

        White Christmas Cocktail With Coconut Milk & Bourbon

        Enjoy this one next to a warm fire with some holiday music playing, or gather the family around the kitchen table for cards or board games. This is a great sipping drink, and if your cup gets lukewarm you can always reheat it in the microwave.

        Adding the bourbon at the very end, in each individual cup to taste is a great way to go, but if you need to travel with a batch of these cocktails pre-mixed, it may be good to err on the side of "just enough" bourbon with a bottle handy for those who might want theirs a bit stronger.

        And finally, If you make two batches of this, one with bourbon and one without for the kids, it's handy to clearly identify each container and to keep the bourbon next to or in the same bag as the adult version separate from the rest of the kid-friendly drinks or food you pack up or place on the table.

        Selecting a Bourbon

        There is no need to splurge on "the good stuff." The rich, complex flavors of vanilla extract, brown sugar and nutmeg will overwhelm even the best bourbon.

        Feel free to substitute the bourbon with any dark, amber colored spirit such as Irish, Scotch or Tennessee whiskey, brandy, cognac, rye or dark rum.

        For a mocktail or non-alcoholic version simply don't add bourbon and it's still a great drink. Add a little extract vanilla extract or maple syrup, if you like.

        Keep in mind there is alcohol in vanilla extract (approximately 70 proof!) so unless you're using alcohol-free vanilla extract this isn't a strict non-alcoholic drink, even without the bourbon. However, the small amounts of vanilla extract combined with the heating process will leave only trace amounts of alcohol, as with adding vanilla extract to most recipes.

        Non-alcoholic almond extract and ginger beer will work as alcohol-free bourbon substitutes as well.

        Christmas Cocktail Substitutions & Hacks

        • Maple Syrup: Add real maple syrup for a flavorful spin.
        • Brown Sugar: If you try to adjust the brown sugar to taste to keep the sweetness just right. You may not have time to finesse this, so it might be smart to make a batch and try adding a bit to a cup of the cocktail in small amounts to see how you like it.
        • Non-Dairy Variation: For a non-dairy cocktail substitute the whole milk for oat milk, almond milk, soy milk or any other non-dairy milk. Coconut milk can also be substituted but the recipe already calls for this milk and the taste might be too overwhelming.
        • Warm-Weather Variation: Try a fun warm-weather variation of this drink simply by putting it on ice; brown sugar, vanilla, and nutmeg are all ingredients that can be found in iced pumpkin lattes in the fall, why not try this one cold after you've enjoyed it warm over the winter holidays?
        • If you're looking for a non-alcoholic drink to serve alongside this cocktail, try this Italian Blood Orange Soda - it's delicious and perfect for the holidays!

        Cheers! {clink}

        Warm Christmas Cocktail

        Bourbon Coconut Milk Cocktail

        Yield: 2-3 Cocktails
        Prep Time: 5 minutes
        Cook Time: 10 minutes
        Total Time: 15 minutes

        This cocktail combines coconut milk and the smokey caramel flavor of bourbon into one delicious cocktail. With a sprinkle of freshly grated nutmeg, this drink is perfect for the holiday season.

        Ingredients

        • 2 cups whole milk
        • 1 can coconut milk
        • ¼ cup light brown sugar
        • 3 teaspoons vanilla extract
        • 3 - 6 oz. bourbon, or to taste
        • freshly grated nutmeg, to garnish

        Instructions

        1. Heat all ingredients (except nutmeg) in large saucepan over medium-high heat until steaming.
        2. Whisk until frothy.
        3. Heat mugs in microwave.
        4. Add bourbon (start with 1 oz. per mug and let others add more if desired).
        5. Top with milk mixture and garnish with grated nutmeg.
        6. Serve immediately.
        Nutrition Information:
        Yield: 3 Serving Size: 1
        Amount Per Serving: Calories: 433Total Fat: 34gSaturated Fat: 28gTrans Fat: 0gUnsaturated Fat: 3gCholesterol: 16mgSodium: 92mgCarbohydrates: 27gFiber: 0gSugar: 24gProtein: 8g

        This data was provided and calculated by Nutritionix.

        © Kristy Bernardo
        Cuisine: American / Category: Drinks
        White Christmas Cocktail with Bourbon

        Try the tasty Holiday Cocktail Recipes:

        • 30 Champagne Cocktail Recipes
        • 31 Festive Holiday Cocktails
        • Christmas Sangria
        • Pomegranate Mojito
        • Pomegranate Margarita
        • Poinsettia Drink (Cranberry Champagne Cocktail)

        Killer Beer Margarita

        August 29, 2022 by Kristy Bernardo 10 Comments

        Killer Beer Margarita

        This perfectly blended beer margarita has just the right balance of lime and tequila to make it margarita season all year round. While it's called a beer margarita, you won't even taste the beer.

        Just add a few splashes of beer - about a quarter cup to a pitcher - and it will cut down on the tartness and makes it much more smooth and drinkable. This certainly isn't a new revelation - the "beerita" has been around for some time - but this version is the perfect blend.

        Beer Margarita Recipe

        What's in a Beer Margarita?

        • Limeade
        • Tequila
        • Triple Sec
        • Juice and zest of one lime
        • Light Beer
        • Ice
        • Kosher salt
        • Grand Marnier (optional)

        What Type of Tequila is Best for Margaritas?

        There are three main types of tequila to choose from and they offer different flavor profiles and price points.

        Tequila Blanco aka Silver

        Tequila Blanco has not been aged and has a classic, clean agave taste with notes of pepper and citrus with a spicy finish.

        Tequila Reposado

        Tequila Reposado is aged 2 to 12 months in oak barrels and has a smooth flavor with hints of oak, vanilla, and caramel.

        Tequila Añejo

        Tequila Añejo is aged 1 to 4 years in oak barrels and tastes richer, with notes of vanilla and cinnamon. Añejo is intended more for sipping straight or on the rocks.

        Since Añejo is not intended for margaritas that leaves two main types of tequila to use in a margarita: reposado or blanco. Blanco will give your margarita more of a true agave flavor while reposado has a rich, distinctive, smoother taste.

        Blanco is generally the more affordable tequila and is the most widely used tequila in a margarita. However, you can find affordable, mid and top-shelf tequila blanco or resposado so add the tequila that you prefer.

        What Kind of Beer Goes in a Beer Margarita?

        Any Mexican lager or ale works, like a Corona, Pacifico, Tecate or Modelo, but any kind of light beer will do.

        What is a Beer Margarita Called?

        A beer margarita goes by many names but you can call it a Beerita, Beergarita, Coronita Margarita, Mexican Bulldog, Iceberg Margarita or a Margarita Beer Shandy.

        Enjoy!

        Margarita with Beer Recipe

        Margarita with Beer

        Yield: 2 margaritas
        Prep Time: 5 minutes
        Total Time: 5 minutes

        Whether it’s Cinco de Mayo, the 4th of July, or cocktail hour at home this is the perfect margarita all year round!

        Ingredients

        • 1 (6 ounce) Can frozen limeade concentrate
        • 6 Fluid ounces tequila (blanco or reposado)
        • 2 Fluid ounces Triple Sec
        • Juice and zest of one lime
        • ¼ cup of beer (a light beer, nothing dark)
        • Ice
        • Coarse salt
        • Grand Marnier (optional)

        Instructions

          1. Pour the coarse salt onto small plate and mix with lime zest.
          2. Wet rims of glasses and dip rims into salt mixture.
          3. Fill blender with crushed ice.
          4. Pour in limeade concentrate, tequila, triple sec, lime juice and beer.
          5. Blend until smooth.
          6. Pour into margarita glasses, drizzle a small amount of grand marnier on top (a “float”), if desired.

        Notes

        This is a frozen margarita recipe, but you can absolutely make it on-the-rocks! Just Combine the ingredients in a cocktail shaker instead of a blender and give it a good shake for about 10 seconds or until chilled. Use a measuring cup and stir if you don't have a shaker.

        Add Jalapeno slices to make it spicy.

        Nutrition Information:
        Yield: 2 Serving Size: 1
        Amount Per Serving: Calories: 412Total Fat: 0gSaturated Fat: 0gTrans Fat: 0gUnsaturated Fat: 0gCholesterol: 0mgSodium: 370mgCarbohydrates: 44gFiber: 1gSugar: 39gProtein: 1g

        This data was provided and calculated by Nutritionix.

        © Kristy Bernardo
        Cuisine: Mexican / Category: Drinks
        Killer Beer Margarita

        Here are more tasty Margaritas and South of the Border recipes to try:

        • Cucumber Margarita
        • Mango Margarita
        • Pomegranate Margarita
        • Cinco de Mayo Recipes
        • Taco Recipes for Taco Night
        • Mexican Dessert Recipes

        Fall Fruit Salad with Crunchy Pecans and Creamy Dressing

        August 29, 2022 by Kristy Bernardo Leave a Comment

        Fall Fruit Salad

        This Fall Fruit Salad is everything you want in a seasonal side dish: it's fresh, crisp, creamy, and good for you. Made with apples, pears, grapes, and crunchy pecans, it's all tossed in a maple-sweetened cinnamon yogurt dressing that tastes like autumn in a bowl.

        It's quick to make, easy to customize, and just as perfect for a weekday breakfast as it is on your Thanksgiving table. Even though it's packed with fall flavors, the ingredients are available year-round, so you can enjoy it anytime!

        a metal bowl filled with fall fruit salad on a wooden table, next to a tan and burgundy towel, two silver spoons, and two red pears

        Why You'll Love It

        • It's so fresh and flavorful! Crisp apples and pears, juicy grapes, and crunchy pecans make every bite crunchy and delicious.
        • Forget pumpkin - maple and cinnamon is where it's at. The maple cinnamon yogurt dressing ties it all together with delicious, seasonal flavor.
        • It's quick and easy! Just a little chopping and stirring, no cooking required.
        • It's great for any occasion. It's perfect for an easy breakfast, a special brunch, or as a light, refreshing side dish at holiday meals.
        • It's easy to customize. Use your favorite fruits and nuts, or adjust the sweetness to match what's in season.
        • It's make-ahead friendly. Prep the components in advance and toss them together when you're ready to serve.
        • Scale up as much as you like. The recipe is for 2 servings, but it's simple to make it for as many people as you need.

        Ingredients You'll Need

        For the Fruit Salad

        An apple: Choose a crisp variety like Honeycrisp, Pink Lady, or Granny Smith; chop it into bite-sized pieces.
        A pear: D'Anjou or Bartlett work well; they're juicy but still hold their shape.
        ½ cup seedless grapes: Red, green, or any variety you like; slice them in half to make them easier to eat. Try cotton candy grapes when you can get them!
        ¼ cup chopped pecans: Adds a crunchy texture and a nutty flavor (feel free to sub with walnuts or almonds).

        For the Creamy Dressing

        ¼ cup vanilla yogurt: Use your favorite dairy or non-dairy brand.
        1 tablespoon real maple syrup: For a natural, seasonal sweetness (adjust to taste).
        ¼ teaspoon ground cinnamon: A warm fall spice that ties the flavors together.

        a small dish with yogurt, maple syrup, and cinnamon ready to be mixed together to form a creamy dressing for a fall fruit salad

        How to Make Fall Fruit Salad

        This easy fall fruit salad comes together in just minutes, with no cooking required!

        1. Prep the fruit: Wash and dry the apple, pear, and grapes. Core and dice the apple and pear into bite-sized pieces. Slice the grapes in half.
        2. Combine the fruit and pecans: Place the chopped apple, pear, grapes, and pecans into a medium-sized bowl.
        3. Make the dressing: In a small bowl, whisk together the vanilla yogurt, maple syrup, and cinnamon until smooth and creamy.
        4. Toss it all together: Pour the dressing over the fruit and pecans. Gently toss it until everything is evenly coated.
        5. Serve or chill: Serve immediately or chill it for 15-30 minutes if you prefer it really cold.

        Tips & Variations

        • Swap the fruit: Not a fan of apples or pears? Try thinly sliced bananas, oranges, or even chopped persimmons. Just aim for a mix of sweet, crisp, and juicy fruits.
        • Use different nuts: Pecans are classic, but chopped walnuts, slivered almonds, or roasted hazelnuts work beautifully, too. For a nut-free version, try pumpkin seeds (pepitas) or sunflower seeds.
        • Add a crunchy topping: Sprinkle with granola or pumpkin spice granola just before serving.
        • Make it dairy-free: Use your favorite plant-based vanilla yogurt to keep this salad completely dairy-free and vegan-friendly.
        • Sweeten to taste: If your fruit is super ripe and sweet, you might not need much maple syrup. Taste the dressing and adjust it to your preference.
        • Add a fall spice blend: For a deeper autumn flavor, try adding a pinch of nutmeg, allspice, or pumpkin pie spice to the dressing. A little goes a long way.
        • Make it spicy: Add a pinch of cayenne to the creamy dressing for a little spice.
        a closeup of a metal bowl filled with fall fruit salad on a wooden table

        What to Serve It With

        This fall fruit salad is incredibly versatile. It's light enough for breakfast but festive enough for holiday meals. Here are some delicious ways to enjoy it:

        • Breakfast or brunch: This is how I choose to enjoy it all season long. If I'm making it for guests, I'll serve it alongside baked oatmeal, pancakes, or egg casseroles.
        • Thanksgiving dinner: It's a refreshing contrast to rich dishes like stuffing, mashed potatoes, and roasted turkey.
        • Light lunch: Pair with a slice of quiche, a grain bowl, or a simple sandwich.
        • Holiday potlucks or gatherings: It travels well and adds a healthy option to any fall spread.
        • Sweet snack or dessert: Enjoy a bowl on its own or with a scoop of Greek yogurt or cottage cheese.

        It's one of those dishes that fits in just about anywhere. It's easy, pretty, and always well loved!

        Make-Ahead Tips

        This salad is easy to prep ahead with just a few simple tricks:

        • Chop the fruit in advance: Dice the apples and pears and slice the grapes up to one day ahead. To keep the fruit from browning, toss it in a little lemon juice and store in an airtight container in the fridge.
        • Mix the dressing separately: Whisk together the yogurt, maple syrup, and cinnamon and store in a sealed jar or container for up to 2-3 days.
        • Assemble just before serving: Combine the fruit, pecans, and dressing right before serving to keep everything crisp and fresh. Waiting to mix it helps prevent the salad from becoming watery or mushy.
        a metal bowl filled with fall fruit salad on a wooden table, next to a tan and burgundy towel and two red pears

        Frequently Asked Questions

        Can I make this fall fruit salad the night before?

        Yes, just keep the chopped fruit and the dressing stored separately in the fridge. Combine everything just before serving to prevent the salad from getting soft or watery.

        What kind of apples work best?

        Crisp, firm varieties like Honeycrisp, Pink Lady, Gala, or Granny Smith work best, as they hold their shape and have a good balance of sweet and tart.

        Is this fall fruit salad gluten-free?

        This fall fruit salad is naturally gluten-free. Just double-check your yogurt label if you're using flavored or plant-based versions.

        Can I use Greek yogurt?

        Greek yogurt will make the dressing a little thicker and tangier, so feel free to thin it out with a splash of milk or orange juice if needed.

        Can I substitute the maple syrup?

        You can use honey or agave syrup if you prefer. Just adjust the amount to taste depending on your sweetness preference.

        How long does it keep in the fridge?

        Once combined, the salad is best eaten the same day, but leftovers can be stored in the refrigerator for up to 1 day. The fruit may soften slightly but will still taste great.

        If you love this Fall Fruit Salad, here are a few recipes for you to try next. The bacon blue cheese wedge salad is a classic that never disappoints. For something with even more flavor, this coconut curry Thai salad is packed with crunch and a creamy, spicy-sweet dressing you'll want to drizzle on everything. A simple pea salad with cheese is a nostalgic favorite that's always a hit at potlucks, and this refreshing cucumber pineapple salad hits that perfect balance of sweet and spicy. They're all simple to make and delicious to eat, just like a good salad should be!

        Autumn Fruit Salad with Yogurt Dressing

        Fresh Fall Fruit Salad

        Yield: 2 servings
        Prep Time: 10 minutes
        Total Time: 10 minutes

        The crisp, crunchy texture of this Fall Fruit Salad pairs well with its creamy dressing. It uses produce that's available year round, so don't limit it to only the fall season.

        Ingredients

        • 1 apple, diced
        • 1 pear, diced
        • ½ cup seedless grapes, halved
        • ¼ cup chopped pecans
        • ¼ cup vanilla yogurt
        • 1 tablespoon maple syrup, or to taste
        • ¼ teaspoon ground cinnamon, or to taste

        Instructions

        1. Wash the fruit thoroughly, core the apples and pears, remove any seeds and slice into cubes.
        2. Place the apple, pear, grapes and pecans in a bowl.
        3. Mix together the vanilla yogurt, maple syrup and cinnamon.
        4. Pour over the fruit and mix it until the fruit is thoroughly coated. Serve immediately.
        Nutrition Information:
        Yield: 2 Serving Size: 1
        Amount Per Serving: Calories: 269Total Fat: 11gSaturated Fat: 1gTrans Fat: 0gUnsaturated Fat: 9gCholesterol: 1mgSodium: 23mgCarbohydrates: 46gFiber: 7gSugar: 34gProtein: 3g

        This data was provided and calculated by Nutritionix.

        © Kristy Bernardo
        Cuisine: American / Category: Salads
        Fall Fruit Salad with Crunchy Pecans and Creamy Dressing

        Wild Mushroom Stuffing Recipe

        August 26, 2022 by Kristy Bernardo 36 Comments

        How To Make Wild Mushroom Stuffing

        A fantastic stuffing recipe using three types of mushrooms and plenty of Parmigiano-Reggiano for a delicious fall or holiday side dish.

        Three Mushroom and Parmesan Thanksgiving Stuffing Recipe

        About The Wild Mushroom & Parmesan Thanksgiving Stuffing Recipe

        Why do people like this thanksgiving stuffing? The earthiness of the mushrooms combined with the unique flavor profile of Parmigiano-Reggiano cheese makes it unforgettable. And you could have some leftover cheese from this recipe that you should try on a homemade pizza or salad as a topping--you won't regret it!

        And yes, if you cannot find Parmigiano-Reggiano, ordinary parmesan will do. This wild mushroom and parmesan cheese Turkey Day stuffing goes so well with juicy roasted turkey that you'll be surprised you haven't had this Thanksgiving recipe sooner.

        This recipe calls for using ghee instead of "regular" or unclarified butter. Ghee lets you cook at higher temperatures than ordinary butter so if you prefer not to use ghee, remember to lower the heat so your butter does not burn.

        Some recipes you can skimp a bit on ingredients; a pizza made with half the usual cheese will likely still be edible and fun if the other toppings are good. But for this recipe do NOT skimp on the shrooms or the cheese, and the higher-quality of both ingredients the better you will like it.

        This is one to splurge a bit on, and in the spirit of Thanksgiving, that indulgence will pay off at the table the same as all the other ones we save for once or twice a year.

        This stuffing recipe gets high marks when paired with other Thanksgiving fare like sweet potatoes, and you will be pleased at how unique your turkey day feast will be thanks to this fun spin on a traditional approach.

        Stuffing Substitutes & Variations

        • Bread Substitutes: Brioche, challah, sourdough, no-knead. Make sure bread is dry.
        • Meat lovers can add sausage or bacon.

        Mushroom Substitutes

        Disclaimer: Do not harvest wild mushrooms unless you are with someone who can safely recognize the difference between safe and poisonous mushrooms.  

        This recipe calls for using shiitake, porcini and button (aka white) mushrooms which are available in most grocery stores. You can also make this recipe using Chicken of the Woods, oyster, maitake (aka hen of the woods), and other wild mushroom varieties. Tougher to find varieties can be found at Whole Foods, farmers markets and many online storefronts that sell certified wild mushrooms.

        Try using these mushroom variety substitutes instead, if any of the three are unavailable:

        Shitake Mushroom Substitutes: Equal amounts Portobello or Cremini (aka baby bellas) mushrooms.

        Porcini Mushroom Substitutes: Equal amounts shiitake mushrooms or mixed mushrooms.

        Button Mushroom Substitutes: Equal amounts portobello, Cremini, or oyster mushrooms.

        I don't recommend canned or dried mushrooms but sometimes you have to work with what is available. Use about 3 ounces of dried mushrooms or 5 ounces canned mushrooms for a pound of fresh mushrooms.

        A Word On Mushroom Stems

        This recipe calls for mushrooms with the stems removed. Below you will find our instructions include "discard stems". And for the purpose of this specific recipe that is fine, but some people do prefer to save the stems and use them for stock.

        If you're not that far into your cooking journey and don't feel like making vegetable stock, just throw out the stems but if you do have an interest, mushroom stems can be an important ingredient in any stock. It's really down to your own personal preference.

        Try the bread stuffing "dressing" next!

        Three Mushroom and Parmesan Thanksgiving Stuffing Recipe

        Wild Mushroom Thanksgiving Stuffing Recipe

        Yield: 8
        Prep Time: 40 minutes
        Cook Time: 55 minutes
        Total Time: 1 hour 35 minutes

        This wild mushroom stuffing is easy to make and mushroom lovers and vegetarians alike will love this recipe!

        Ingredients

        • 1 ½ cups hot water
        • ½ ounce dried porcini mushrooms
        • 1 cup ghee, can use butter but cook over a lower heat so butter doesn't burn
        • 1 pound fresh shiitake mushrooms, sliced (discard stems)
        • 1 pound button mushrooms (about 22-34), sliced
        • 2 leeks, white and pale green parts only, chopped
        • 6 garlic cloves, minced
        • 2 cups dry white wine
        • 2 teaspoons fresh thyme, chopped
        • 1 large baguettes, cut into small, bite-sized pieces (about 12 ounces)
        • 1 large egg, beaten
        • ½ cup finely grated parmesan, divided (Parmigiano Reggiano recommended)
        • kosher salt & freshly ground black pepper

        Instructions

        1. Preheat oven to 350F.
        2. Place dried porcini in small bowl. Pour hot water over mushrooms and let stand until mushrooms soften, about 30 minutes.
        3. Pour mixture through a fine mesh strainer (leaving any sediment behind), reserving liquid.
        4. Chop mushrooms and set aside.
        5. Melt ghee in a large skillet over high heat.
        6. Add shiitake and button mushrooms; stir to coat all the mushrooms Stir occasionally, allowing the mushrooms to brown well (about 10 minutes).
        7. Reduce heat to medium, add leeks and garlic then cook another 5 minutes.
        8. Add wine, thyme, and porcini mushrooms, increase heat to medium-high. Cook until almost all wine evaporates, stirring occasionally, about 5 minutes.
        9. Transfer mixture to very large bowl. Add enough reserved mushroom soaking liquid to stuffing to moisten (¾ cup to 1 ¼ cups).
        10. Add bread to mushroom mixture and stir gently.
        11. Season with salt and pepper; mix in egg. Grate ¼ cup parmesan into mixture and gently mix in.
        12. Generously butter an 11x7 baking dish. Transfer stuffing to prepared dish. Grate remaining parmesan over the top.
        13. Cover and bake for 20 minutes, then remove cover and bake uncovered until heated through, about 20 minute more.
        Nutrition Information:
        Yield: 8 Serving Size: 1
        Amount Per Serving: Calories: 492Total Fat: 32gSaturated Fat: 19gTrans Fat: 0gUnsaturated Fat: 11gCholesterol: 102mgSodium: 440mgCarbohydrates: 34gFiber: 4gSugar: 6gProtein: 10g

        This data was provided and calculated by Nutritionix.

        © Kristy Bernardo
        Cuisine: American / Category: Sides
        Wild Mushroom Stuffing Recipe

        This stuffing is perfect with this juicy turkey recipe along with a cranberry orange sauce and don't forget the season cocktails! Also, check out our simple recipe for making your own gravy.

        Creamy Pumpkin Cheesecake (with Caramel Pecan Topping!)

        August 23, 2022 by Kristy Bernardo 34 Comments

        Mini Pumpkin Cheesecake Recipe

        There's something about pumpkin cheesecake that just screams fall, and this Pumpkin Cheesecake with Bourbon Pecan Caramel Sauce is a decadent twist on the classic. Rich, creamy pumpkin filling meets a buttery graham cracker crust, then it's all topped with a warm drizzle of homemade bourbon caramel loaded with toasted pecans.

        Pumpkin cheesecake topped with chopped pecans and a thick drizzle of caramel sauce

        Why You'll Love This Recipe

        • It has a perfectly balanced pumpkin spice flavor: This recipe isn't overly sweet and highlights the pumpkin with just the right blend of cinnamon and nutmeg. It's just the thing you need when you're craving fall flavors!
        • Two baking options: mini or full-size: Make them as individual cheesecakes for parties and serving a crowd, or bake the filling in a standard 9-inch springform pan for a classic pumpkin cheesecake. Either way, the flavor is incredible.
        • That Bourbon Pecan Caramel Sauce!: The homemade caramel adds incredible flavor with just a hint of bourbon. It's very simple to make and really takes this recipe over the top.
        • It's a great make-ahead dessert: Pumpkin cheesecake actually tastes better after chilling, which makes it a great option for stress-free holidays!
        • It's versatile: Don't want to make the caramel? Swap in whipped cream, candied nuts, chocolate sauce, or even a maple drizzle. It's easy to adapt to your tastes or whatever's in your pantry.

        Ingredients

        For the Graham Cracker Crust

        • 1 sleeve graham crackers, crushed (about 12 full crackers)
        • ⅓ cup unsalted butter, melted
        • ¼ cup granulated sugar

        Note: For a full 9-inch cheesecake, you can slightly increase the crust to 1½ sleeves of graham crackers, 6 tablespoons butter, and ⅓ cup sugar.

        For the Pumpkin Cheesecake Filling

        • 3 (8-ounce) packages cream cheese, softened
        • ½ cup sour cream
        • ¾ cup granulated sugar
        • 1 teaspoon vanilla extract
        • 2 large eggs, room temperature
        • 1 cup canned pumpkin puree (not pumpkin pie filling)
        • ¾ teaspoon ground cinnamon
        • ⅛ teaspoon freshly ground nutmeg

        Optional Bourbon Pecan Caramel Sauce

        Yes, the caramel sauce is optional, but it's so perfect with the pumpkin cheesecake that you won't regret making it!

        • 1½ cups granulated sugar
        • ½ cup water
        • 1 cup heavy cream
        • Pinch of salt
        • 1 teaspoon vanilla extract
        • 2 tablespoons bourbon
        • 1 cup chopped pecans
        Spoon pouring caramel onto pumpkin cheesecake with pecans on a white plate

        How to Make Pumpkin Cheesecake (Mini or Full-Size)

        Make the Cheesecake

        1. Preheat and Prep
        • Preheat your oven to 350°F (175°C).
        • Lightly grease a mini cheesecake pan or line a 9-inch springform pan with parchment on the bottom and lightly grease the sides.
        1. Make the Crust
        • In a bowl (or resealable bag), combine the graham cracker crumbs, melted butter, and sugar. Mix well.
        • For mini cheesecakes: Add about 1 heaping teaspoon of crust to each well and press down firmly.
        • For a full cheesecake: Press the mixture evenly into the bottom of the springform pan and slightly up the sides.
        • Bake the crust for 5 minutes, then set aside to cool while you prepare the filling.
        1. Make the Cheesecake Filling
        • In a large bowl, beat the cream cheese, sour cream, and sugar until smooth and fluffy.
        • Add the vanilla extract and eggs and mix until just combined.
        • Scoop out about 1 cup of the plain cheesecake batter and set aside (this becomes the swirl layer).
        • To the remaining batter, add the pumpkin puree, cinnamon, and nutmeg. Mix until fully incorporated.
        1. Assemble and Bake

        For mini cheesecakes:

        • Add a spoonful of the reserved plain batter to each crust.
        • Fill the rest of each well with the pumpkin cheesecake mixture.
        • Bake for 13-15 minutes, or until centers are just set.
        • Cool for 10 minutes, then remove and chill fully before topping.

        For a full cheesecake:

        • Pour the pumpkin batter over the crust in the springform pan.
        • Dollop the reserved plain batter on top and gently swirl with a knife or toothpick.
        • Bake for 50-60 minutes, or until the center is just slightly jiggly.
        • Let it cool at room temperature for 1 hour, then chill in the fridge for at least 4 hours or overnight.

        Make the Bourbon Pecan Caramel Sauce

        • In a heavy-bottomed saucepan, combine 1½ cups sugar and ½ cup water over medium-high heat.
        • Without stirring, allow the sugar to dissolve and bubble. Swirl the pan occasionally until the mixture turns a deep amber color (about 10-12 minutes).
        • Remove from the heat. Slowly whisk in 1 cup heavy cream (be careful as it will bubble up vigorously).
        • Stir in a pinch of salt, 1 teaspoon vanilla, and 2 tablespoons bourbon (optional but delicious).
        • Mix in 1 cup chopped pecans, or reserve them for sprinkling on top of the cheesecake.
        • Let the sauce cool slightly before using, or store in a jar in the fridge for up to a week.
        Close-up of caramel being poured over a mini pumpkin cheesecake topped with pecans

        Tips Perfect Cheesecake

        • Use room temperature ingredients: Cold cream cheese or eggs can create a lumpy batter. Let all your dairy ingredients come to room temp for a silky-smooth texture.
        • Don't overmix the batter: Mix it just until it's combined, especially after adding the eggs. Overmixing can cause cracks as the cheesecake bakes and cools.
        • Use a water bath (for full-size cheesecake): A water bath helps the cheesecake bake evenly and reduces cracking. Wrap the outside of your springform pan in foil, then place it in a larger pan filled with hot water about halfway up the sides.
        • Watch for the wobble: Cheesecake is done when the center is set but still slightly jiggly. It will firm up as it cools.
        • Chill completely before slicing: For clean slices and the best texture, refrigerate the cheesecake for at least 4 hours or overnight before serving.

        Storage, Freezing & Make-Ahead

        Storing Leftovers

        Pumpkin cheesecake should always be stored in the refrigerator. Cover the cheesecake tightly with plastic wrap or transfer individual slices to an airtight container. It will keep well for 3 to 4 days in the fridge.

        Freezing

        Cheesecake freezes beautifully. For best results:

        • Chill the cheesecake completely in the fridge first.
        • Wrap individual slices or the entire cheesecake (without toppings) in plastic wrap, then in foil.
        • Place in a freezer-safe container or zip-top bag.
        • Freeze for up to 3 months.
        • Thaw overnight in the fridge before serving. Add toppings just before serving for the best texture.

        Make-Ahead Tips

        Pumpkin cheesecake is a perfect make-ahead dessert:

        • Full cheesecake: Bake up to 2 days in advance, cover, and refrigerate until ready to serve.
        • Mini cheesecakes: Store in the fridge (or freeze if needed), and top with caramel sauce just before serving.
        • Caramel sauce: Make up to a week in advance. Store it in a jar in the fridge and reheat it gently before drizzling.
        Mini pumpkin cheesecakes on a plate with pecan topping and golden caramel drizzle

        Frequently Asked Questions

        Can I make these without the bourbon?

        Yes! You can easily omit the bourbon from the caramel sauce without affecting the texture. Just skip it if it's not your thing!

        Can I use a muffin tin instead of a mini cheesecake pan?

        Yep, just line each muffin cup with paper liners for easy removal. The cheesecakes may need an extra minute or two of baking time, so be sure to watch for slight "puffing" and set centers.

        Can I make these ahead for a party?

        They're perfect for making ahead of time. You can prepare the cheesecakes (and even the caramel sauce) 1-2 days in advance and store them in the refrigerator. Add the toppings just before serving.

        How long does pumpkin cheesecake last in the fridge?

        Pumpkin cheesecake will stay fresh in the refrigerator for 3 to 4 days when stored in an airtight container or wrapped tightly in plastic wrap.

        Can I skip the caramel sauce or use store-bought?

        The homemade bourbon pecan caramel adds something special, but store-bought caramel works just fine in a pinch. You can also serve the cheesecakes plain or with whipped cream, chocolate sauce, or maple syrup.

        Is pumpkin cheesecake gluten-free?

        The filling is naturally gluten-free, but traditional graham cracker crusts usually contain gluten. Use gluten-free graham crackers to make this dessert fully gluten-free.

        Is pumpkin cheesecake keto-friendly?

        Not as written, but you can adapt it! Use a keto sweetener like erythritol, a low-carb almond flour crust, and sugar-free caramel to bring it into keto territory.


        Here are a few of my other favorite recipes in case you love cheesecake as much as I do! This pumpkin tres leches cake is perfect for the holidays, and you can never go wrong with pumpkin pie cake! For a little twist, my cinnamon sugar cheesecake recipe is a fun mashup of creamy cheesecake and cinnamon-sugar pastry - think churro meets cheesecake. And this carrot cake recipe is the best I've ever had and is a must-try. Try them all and let me know your favorite!

        Mini Pumpkin Cheesecakes with Bourbon Pecan Caramel Sauce - so simple yet so pretty and delicious! Great for serving a crowd!

        Pumpkin Cheesecake with Bourbon Pecan Caramel Sauce

        Yield: 24 mini cheesecakes
        Prep Time: 15 minutes
        Cook Time: 25 minutes
        Total Time: 40 minutes

        Mini Pumpkin Cheesecakes with Bourbon Pecan Caramel Sauce - so simple yet so pretty and delicious. An easy fall dessert to serve to a crowd!

        Ingredients

        For the crust

        • 1 sleeve graham crackers, crushed into crumbs (about 12 crackers)
        • ⅓ cup melted butter
        • ¼ cup sugar

        For the filling

        • 3 8- oz packages cream cheese, softened to room temperature
        • ½ cup sour cream
        • ¾ cup sugar
        • 1 teaspoon vanilla extract
        • 2 eggs, room temperature
        • 1 cup pumpkin puree
        • ¾ teaspoon ground cinnamon
        • ⅛ teaspoon freshly ground nutmeg
        • freshly whipped cream, for serving

        For the Bourbon Pecan Caramel Sauce

        • 1 ½ cups sugar
        • ½ cup water
        • 1 cup heavy cream
        • pinch of salt
        • 1 teaspoon vanilla extract
        • 2 tablespoons bourbon
        • 1 cup pecans, chopped

        Instructions

        1. Preheat oven to 350F. Lightly grease mini-cheesecake pan.
        2. Mix together graham cracker crumbs, melted butter and sugar (I just use a ziploc baggie and smush it around until it's mixed thoroughly).
        3. Place a heaping teaspoon of cookie mixture (more or less, depending on how much you like crust) in each cheesecake well. Press down with tamper.
        4. In a mixing bowl, beat cream cheese, sour cream and sugar until well mixed. Add eggs and vanilla; beat until light and fluffy.
        5. Remove a cup of batter and reserve.
        6. Add pumpkin puree, cinnamon and nutmeg to batter left in bowl; mix thoroughly.
        7. Place a teaspoon of reserved batter on top of crust in each well. Fill with the rest of the batter. Bake for 13-15 minutes. Cool for 10 minutes then remove each cheesecake from its well. Cool completely, then chill completely in refrigerator.
        8. Place cheesecakes on a serving platter.Top each cheesecake with a few pecans then drizzle over caramel sauce. Top with freshly whipped cream, if desired.

        To Make The Bourbon Pecan Caramel Sauce     

        1. Pour sugar and water into a large saucepan over medium-high heat. DO NOT STIR.
        2. Swirl the pan occasionally and cook until the color changes to a dark amber.
        3. Turn off the heat and whisk in remaining ingredients. (Pecans can be stirred into the sauce at this point or topped separately on cheesecakes with sauce poured over).
        4. Allow sauce to cool then pour into a jar and refrigerate.

        Notes

        Recipe changes to make a full cheesecake:

        • Increase the crust to 1½ sleeves of graham crackers, 6 tablespoons butter, and ⅓ cup sugar.
        • Pour the pumpkin batter over the crust in the springform pan.
        • Dollop the reserved plain batter on top and gently swirl with a knife or toothpick.
        • Bake for 50–60 minutes, or until the center is just slightly jiggly.
        • Let it cool at room temperature for 1 hour, then chill in the fridge for at least 4 hours or overnight.

        Nutrition Information:
        Yield: 12 Serving Size: 1
        Amount Per Serving: Calories: 447Total Fat: 28gSaturated Fat: 14gTrans Fat: 1gUnsaturated Fat: 12gCholesterol: 92mgSodium: 138mgCarbohydrates: 48gFiber: 2gSugar: 45gProtein: 4g

        This data was provided and calculated by Nutritionix.

        © Kristy Bernardo
        Cuisine: American / Category: Desserts
        Creamy Pumpkin Cheesecake (with Caramel Pecan Topping!)

        40 Easy Family Dinner Ideas for Busy Weeknights

        August 21, 2022 by Heidi Deal Leave a Comment

        Busy Weeknight Dinners

        We've rounded up 40 of the best easy family dinner ideas from the Instant Pot to 30 minutes or less meals, we've got you covered.

        Weeknights are busy for families. Juggling jobs, school, extracurricular activities, errands, and other commitments. While dinner should be a time for families to relax and connect, it's sometimes one more stressful element of the day. We often throw in the towel and zip through the drive through or call in for take-out so we can just get everyone fed.

        Easy Family Dinner Ideas For Busy Weeknights Featured

        Scroll Down for Easy Family Dinner Recipes for Families ⬇

        We've put together a list of recipes for meals that can be prepared in the Instant Pot or slow cooker, recipes that are 10 ingredients or less, 30-minute meals, sheet pan meals, and more. Some are healthy, some maybe not as much, but we guarantee they are all delicious. We've even thrown in a few that make large portions so you can save some for a heat-and-eat meal later, and as many as possible that won't come with an excessive grocery bill.

        Enjoy your family meals again with these weeknight dinner ideas. You might find your new favorite recipe, or even one that the kids can throw together themselves (score!).

        Weeknight Dinner Tips

        When we say easy, we mean easy -- We all know that when a recipe calls for time spent skewering cubes of meat, spiralizing vegetables, or lining individual cups of the muffin pan, the time commitment significantly increases for us home cooks. Stick to dinner recipes that don't require these extra steps.

        Buy pre-sliced products. Seriously. You won't regret it. I used to think whole was fresher and better, but the stress I've saved myself by eliminating that extra time spent cleaning and chopping (not to mention the extra cutting boards and knives that I'll have to clean up later) has been a sanity saver. Shredded carrots, sliced mushrooms, prechopped broccoli, shredded lettuce - it's all in my veggie drawer so I can just throw a handful in and go.

        The same goes for shredded cheese. Yes, some recipes will say freshly-grated. It's 100% acceptable to use pre-grated cheese.

        Use your slow cooker, pressure cooker, instant pot, and air fryer. I have one of those combo rice-cooker/slow cooker machines from Costco and I randomly throw rice in the pot to keep in the fridge for when we need a quick side dish. I also regularly use it for slow cooker carnitas, pot roast, mongolian beef, and soups. It's a lifesaver.

        Make things ahead of time, and double the batch. I know you've heard it before, but making an extra meal on Sunday night will get you fed fast on Tuesday, and when there are leftovers in the fridge, you've always got something to take for lunch or for tomorrow nights meal.

        Easy Family Dinner Ideas for Busy Weeknights

        When weeknights get busy, get dinner done in minutes. Here's a list of easy meals that will feed the family quickly, so you can enjoy less time cooking and more time together.

        a pan of chili mac and cheese

        Easy One-Pot Chili Mac and Cheese

        Chili Mac and Cheese combines the best of two beloved dishes for a truly outstanding yet quick-to-make comfort food. Make this one-pot meal on a weeknight for an easy, filling meal in under 30 minutes!

        Salmon and Peas Pasta Primavera

        Salmon & Pea Pasta Primavera

        The whole family will love this fresh pasta primavera dish with roasted salmon and English peas.

        Closeup of Instant Pot Beef Stroganoff with Blue Cheese and Chives on a white Plate

        Instant Pot Beef Stroganoff with Blue Cheese & Chives

        Instant Pot Beef Stroganoff is a classic comfort food that’s quick and easy to get on the dinner table. You can even start with frozen beef! 

        Honey Soy Salmon Recipe

        Best Honey Soy Salmon Recipe - How to Make Honey Soy Salmon

        While the rice is cooking in the rice cooker, you can make these sweet, delicious salmon filets. Dinner is served in under 30 minutes.

        Walking Taco Casserole In A Serving Dish

        Walking Taco Casserole

        This Walking Taco Casserole recipe is an easy weeknight meal that has all the flavors of tacos with the crunch of corn chips, too. It’s a favorite with our family (and especially me since it’s so quick and simple to make)!

        Cashew Chicken Recipe

        Easy Cashew Chicken Recipe

        Serve up one of your favorite take-out meals in less time than it takes to go pick it up. So good you'll want to add this to your weekly rotation!

        instant pot jambalaya on a silver plate

        Instant Pot Jambalaya with Chicken & Sausage

        This easy Instant Pot Jambalaya is the BEST! It has chicken breast and Cajun sausage for a wonderful flavor, and you can easily add shrimp. All your Jambalaya questions are also answered, so don’t miss this one.

        White Bean & Sun-Dried Tomato Gnocchi

        White Bean & Sun-Dried Tomato Gnocchi

        Step up your gnocchi game (without all the extra time) with this fast and easy skillet recipe that the family is sure to love.

        Don't throw away that leftover rice! Easy Fried Rice is so much better for you than takeout and a lot tastier, too! | the wicked noodle | #dinner #asian #cheapeats

        Easy Fried Rice {cheap eats}

        Make an extra batch of fried rice on the weekend, then use leftover chicken to whip up this easy fried rice recipe for a quick weeknight meal.

        Weeknight Veggie-and-Bean Burritos Recipe

        Easy Weeknight Veggie-and-Bean Burritos Recipe

        These easy veggie burritos are fresh, healthy, and delicious, Make a few extra to have on hand for lunch tomorrow!

        pulled pork on a cutting board with two forks and half of the roast ready to be pulled

        Instant Pot Pulled Pork

        Make a batch of this Instant Pot pulled pork and use it for multiple meals -- pulled pork sandwiches, tacos or quesadillas, or throw it on top of a baked potato. We even love ours crisped up in the pan and scrambled into eggs for breakfast.

        Fresh Broccoli Rice Casserole with Chicken

        No-Peek Chicken (Just 5 Ingredients)

        Five ingredients, one pan, and ten minutes of prep. Need we say more?

        Homemade Mississippi Pot Roast Sandwich with Cheese

        Instant Pot Mississippi Pot Roast

        This Instant Pot Mississippi Pot Roast has just a few extra ingredients which makes the best version you’ll ever try! Serve it sandwich style, or with your choice of potatoes.

        Chicken Caprese Salad

        Chicken Caprese Salad

        Add left-over chicken to this couscous salad and serve it with bread for a quick and easy dinner with all the deliciousness of a Caprese salad.

        A Plate of Szechuan Gourmet Beef Pasta on a Black Table with Greens and Chopped Peanuts

        Szechuan Beef Pasta

        This easy recipe for Szechuan Gourmet Beef Pasta is a family staple and a reader favorite. Flavorful ground beef and pasta make it easy to skip the takeout and still keep weeknight dinners delicious! So much simpler than traditional Szechuan Beef and just as flavorful.

        Easy White Chicken Chili

        White Chicken Chili {Easy!}

        Leftover rotisserie chicken is the hero making this mouth-watering white chicken chili an easy weeknight meal that the whole family will love. We serve ours with cornbread and honey butter.

        Sausage & Parmesan Broccoli Rabe Sheet Pan Dinner on a wooden table with a rustic napkin.

        Sausage & Broccolini Sheet Pan Dinner

        This easy sausage and broccolini sheet pan meal is fast, and easy to customize. Toss everything in the oven and dinner is ready in 20 minutes!

        Mushroom & Onion Grilled Cheese Sandwiches

        Mushroom & Onion Grilled Cheese Sandwiches

        Kick your grilled cheese up a notch with this easy recipe for a fun, comfort-food style weeknight dinner.

        a pot of easy an brunswick stew recipe on striped towel

        Brunswick Stew (Stovetop or Crockpot)

        This easy Southern Brunswick Stew recipe is a great way to use leftover meat and it’s on the dinner table in about half an hour!

        30-Minute Portobello Pizzas

        30-Minute Portobello Pizzas

        A fun and healthy twist on mini-pizzas, take this basic recipe and let the family customize each to their liking.

        Instant Pot Lasagna - a basic recipe for everyone!

        Instant Pot Lasagna

        If lasagna is a dish you avoid unless you have several hours to devote to it, then this easy Instant Pot Lasagna recipe will change your mind!

        Vegetarian Lasagna Instant Pot Recipe

        Instant Pot Lasagna Recipe with Zucchini & Eggplant

        If you love Instant Pot lasagna but want to swap out the noodles for veggies, try this quick and easy recipe.

        20 Minute Ground Chicken Tacos

        Easy Ground Chicken Tacos (in 20 Mins!)

        Tacos are always a hit, and they are usually a pretty quick meal to get on the table. These use ground chicken, which we use a lot in our house.

        Spicy Avocado Pasta with Jalapenos and Queso Fresco

        Avocado Pasta with Jalapeños and Queso Fresco

        Ten minutes to dinner? Yep! Avocado Pasta is one of the simplest pasta dishes you can make. Try it tonight for a flavorful, easy dinner!

        One Pot Ground Beef Stroganoff

        One-Pot Ground Beef Stroganoff Recipe by Tasty

        We're adding a second beef stroganoff recipe because we love it. Also, this variation is with ground beef and is made in one pot. Super easy. Super quick. Super delicious.

        Fresh Broccoli Rice Casserole with Chicken - Cheesy, hearty and has a ton of flavor and crunch from the buttery cracker topping!

        Fresh Broccoli Rice Casserole with Chicken

        This Fresh Broccoli Rice Casserole with Chicken is cheesy, hearty and has a ton of flavor and crunch from the buttery cracker topping!

        20-Minute Sausage and Pepper Ravioli Skillet

        20-Minute Sausage and Pepper Ravioli Skillet

        It'll taste like it's takeout from your favorite Italian spot. Everyone loves ravioli and this meal will be on the table in just 20 minutes.

        This simple and healthy Salsa Chicken is made with just one pan and has minimal ingredients (but maximum flavor)! Cooks in just 30 minutes with only one pan to clean!

        One-Pan Salsa Chicken & Vegetables

        This simple and healthy Salsa Chicken cooks in just 30 minutes with only one pan to clean!

        One-pan oven baked chicken thighs with potatoes and your side, plus a technique that easily allows for a different flavor chicken for each member of the family (and it only takes a minute)!

        Crispy Baked Chicken Thighs

        One-pan oven baked chicken thighs with potatoes and your side, plus a technique that easily allows for a different flavor chicken for each member of the family (and it only takes a minute)!

        Chicken and Broccoli Recipe

        Chicken and Broccoli Recipe

        A spin on takeout beef and broccoli, chicken and broccoli stir fry is always a hit.

        Corn Casserole with Chicken and Rice - so easy to throw together and healthy, too!

        Corn Casserole with Chicken and Rice

        This Corn Casserole with Chicken and Rice is delicious, healthy and easy to make even on a busy weeknight!

        Pad Thai with Shrimp

        Easy Pad Thai Recipe - How to Make Best Pad Thai

        This Pad Thai with shrimp recipe cooks up quickly for a take-out inspired dinner.

        This Italian Garlic Chicken Skillet with olives, rosemary, onions, and mushrooms is the perfect dinner for the entire family. 30 minutes is all you need.

        Italian Garlic Chicken Skillet

        This Italian Garlic Chicken Skillet with olives, rosemary, onions, and mushrooms is the perfect dinner for the entire family. 30 minutes is all you need.

        Pancake Tacos with Cheese and Bacon

        Pancake Tacos with Cheese and Bacon

        Make this even quicker by prepping a batch of pancakes on the weekend to use for meals during the week. We let them cool, throw them in a Ziplock bag, and put them in the fridge for the kids to heat and eat.

        pot roast just out of the oven with carrots and potatoes on a wooden table

        Amazing Pot Roast with Balsamic and Dijon (Chuck Roast)

        This pot roast recipe uses a chuck roast, then adds balsamic and Dijon for an amazing flavor twist. Make it in your slow cooker or the Instant Pot for a complete and delicious comforting home cooked meal with minimal prep time.

        Italian Sausage Hoagies

        Italian Sausage Hoagies

        This calls for Italian sausage, but we've also used a jar of marinara and frozen meatballs to make quick and delicious meatball hoagies.

        5-minute faux pho recipe | www.thewickednoodle.com | #pho #ramen

        5-minute Quick Faux Pho Recipe

        Got 5 minutes and some leftover steak? Then you’ve got time for this seriously delicious Faux Pho recipe. This recipe is for two servings, so if you're cooking for a family you'll want to double the recipe.

        Chicken with Sun-Dried Tomato Cream Sauce

        Chicken with Sun-Dried Tomato Cream Sauce

        I started making this a few years ago and my daughter still requests it on the regular. We actually used to make it Whole 30 style with no butter, cream, or cheese and it was equally outstanding.

        A bowl of instant pot potato soup on a green place, topped with bacon, jalapeño and green onion.

        EASY Instant Pot Potato Soup

        No canned soup. No draining potatoes. So simple and flavorful. Instant Pot Potato Soup is the best thing you’ll make in your pressure cooker! Serve it with garlic bread or a salad and you've got a hearty meal in minutes.

        This easy Italian Sausage Stew has just 6 ingredients but loads of flavor!

        6-Ingredient Italian Sausage Stew

        This Italian Sausage Stew has just 6 ingredients but so much flavor! Complete step one, then throw everything in the slow cooker and dinner will be ready when you get home.

        Tomahawk Steak Recipe

        August 21, 2022 by Kristy Bernardo 2 Comments

        Tomahawk Steak Recipe

        This easy Tomahawk Steak recipe comes out perfect every time. Find out exactly what they are, where to buy them, and even how to store any leftovers!

        a tomahawk steak out of the oven on a cutting board next to fresh rosemary

        What is a tomahawk steak

        First, let's talk about what it isn't.

        A tomahawk steak - also called a "cowboy ribeye" - isn't an obscure cut of beef that's particularly unique or special. It's actually a very common cut (although arguably also one of the best) known as the bone-in ribeye or a tomahawk ribeye. It's very flavorful with incredible marbling throughout, which is why it's widely considered one of the most delicious cuts of beef to order out or to cook at home.

        A ribeye and a tomahawk have two distinct differences. On a bone-in ribeye, the bone is cut off so that the only bone present is surrounded by the actual cut of meat. On a tomahawk steak, that bone is left attached and cleaned for a french cut, making for a gorgeous presentation.

        The second difference is that the tomahawk cut is typically much thicker than a ribeye. A ribeye is normally 1 - 1.5 inches thick whereas a tomahawk falls around 2 inches. This results in up to double meat per steak, and at least up to 50% more.

        Tomahawk steak prices and where to buy

        They're not cheap and you're mostly paying for the presentation, regardless whether you buy them to cook at home or order one at a restaurant. That said, they're a luxurious cut of beef and might be worth the indulgence if you're looking for something special and impressive.

        I did a little research for what they cost at different restaurants in my area of DC/Northern VA. I also searched for places to purchase a tomahawk ribeye to cook at home, so you can make the decision for yourself.

        In a restaurant

        • Ruth's Chris - 40 oz - $135.00 ($3.38 oz) (steak only)
        • Flemings - 35 oz - $102 ($2.91 oz) (steak only)
        • Morton's - 36 oz - $129 ($3.56 oz) (steak only)

        Cooking at home (buying in-store or online)

        • Amazon - Prices range from $3.25 oz to $4.50 oz
        • Costco - Pack of 4 steaks at approximately 9.5 lb (152 oz)- $329.99 ($2.17 oz)
        • Costco Delivery - U.S.D.A Choice steaks at appr. 5 lbs ($1.01 oz)
        • Huntspoint - Pack of 2 steaks at 3.5 lb each - $139.95 ($2.50 oz)
        • Omaha Steaks - 36 oz - $200.00 ($2.78 oz)
        • Kansas City Steaks - 2 34 oz steaks - $209.95 ($3.09 oz)
        • Snake River Farms - American Wagyu 28 oz $155.00 ($5.54 oz)

        Steak prices last updated on Nov. 6, 2023.

        Note: The steaks linked to above are not endorsements as I haven't personally tried them. I've provided them for price references only.

        a tomahawk steak on parchment paper next to a dish of salt and pepper with fresh rosemary

        How to Cook Tomahawk Steak

        Hands down, the best way to cook a cowboy ribeye steak, or tomahawk, is to sear it on the grill over high heat then finish it in the oven. This is true for many cuts of beef, but especially this one.

        There's very little hand-on time which makes it a very easy recipe. First, you'll want to remove the steaks from the refrigerator for about 30 minutes so they're not completely cold when they go on the grill.

        Next, you'll rub the steaks all over with olive oil (this will raise the temperature of the meat's surface which will help it get a nice, even sear). Season the steaks very generously with a high-quality coarse salt and freshly ground black pepper.

        Sear the steaks on a VERY HOT grill grate (a gas grill is most common but a charcoal grill will work, too, and will add a lot of flavor) directly over the flames for about 3-4 minutes per side. Remove them from the grill, place them on a sheet pan, and insert a digital meat thermometer into the thickest part of the meat, as close to the center as you can get.

        Put them in the oven and cook them for about 30 minutes, or to an internal temperature of 130° F. Remove the steaks from the oven, place them on a cutting board, tent them gently with aluminum foil, and allow them to rest for 10-15 minutes.

        See? This tomahawk steak recipe uses a very simple process that will give your steaks a seasoned crust on the outside while being done to perfection on the inside!

        Can you sear it on the stove instead of the grill?

        Yes, absolutely, especially if you use a cast iron skillet. The issue there is that these babies are pretty large with the bone extending out, and a grill has a lot more surface area to ensure you get a good sear. If you decide to go forth and use the stove, be sure you preheat your pan over high heat.

        a closeup of a steak just out of the oven from a tomahawk steak recipe

        How to know when they're done

        I mentioned this once already, and I'm going to remind you again at least one more time, but the easiest and most accurate way to get them to the perfect doneness is to use an oven-safe meat thermometer. I highlight this twice in the tomahawk steak recipe below because it's that crucial to consistent success.

        I use one that has an alarm and I would never be without it. I couldn't find mine on Amazon but this one has an alarm as well as many wonderful reviews.

        Cooking tomahawk (or cowboy steak) to 130° F is our preference, but of course you can cook it to your desired doneness if it happens to be different. Use this chart to help you decide on rare to well-done (although I don't recommend anything more than medium at most). Here are the temperatures for each, keeping in mind that the temperature will rise another 5 degrees while its resting:

        • Rare 125°
        • Medium-Rare 135°
        • Medium 145°
        • Medium-Well 150°
        • Well done 160°
        steak doneness chart

        Tips for the BEST Tomahawk Steaks

        • Use an oven-safe meat thermometer. One more time, for the people in the back: use an oven-safe meat thermometer!
        • Season it VERY well with salt and pepper.
        • Top it with a compound butter (more on that below).
        • If you have a steak rub or seasoning that you can't live without, feel free to use it in place of the salt and pepper.
        • Be sure to sear over high heat, directly over the flame.
        • Let the meat rest both before hitting the hot grill and after it comes out of the oven.
        • Add some fresh herbs, such as rosemary, to the sheet pan to infuse some additional flavor.

        How to store and reheat

        Cover and refrigerate leftover steak for up to 4 days. It's always best eaten the day you make it, but if you do end up with leftovers, make sure you reheat it gently. I'll often just let it come to room temperature and call it a day, but you can add it to a preheated skillet on medium-low heat just to warm it.

        a tomahawk steak out of the oven on a cutting board next to fresh rosemary

        How to serve

        A big ol' Tomahawk rib steak is impressive no matter how you serve it. You might just want to put each steak on a plate and call it a day!

        Another option, especially if you're feeding more than 2 people with a steak each, is to slice it before plating, leaving the meat closer to the bone unsliced for presentation.

        As for what to serve with this tomahawk steak recipe, any of your typical steak side dishes will work here. Our favorites are Smoked Mac and Cheese and Crispy Baked Potato Wedges.

        I highly suggest topping each steak with some compound butter! It adds incredible flavor - especially truffle butter - and a bit of sophistication with little effort. Check out these 9 Compound Butter recipes to choose your favorite. They also work with chicken and fish! You can also make an easy blue cheese steak sauce.

        If you're still undecided about whether these are worth the price, or if you're nervous about cooking something yourself with such a hefty price tag, you might consider making a prime rib roast instead. It's practically fool-proof yet it's still delicious and impressive!

        A Tomahawk Steak

        Tomahawk Steak Recipe

        Yield: 2 steaks
        Prep Time: 5 minutes
        Cook Time: 40 minutes
        Additional Time: 45 minutes
        Total Time: 1 hour 30 minutes

        Also known as the "cowboy ribeye", a tomahawk steak is a tender, flavorful cut with an amazing presentation!

        Ingredients

        • 2 Tomahawk steaks
        • Olive oil
        • Coarse salt and freshly ground black pepper
        • Compound Butter, room temperature

        Instructions

        1. Remove the steaks from the refrigerator and leave them on the counter for 30 minutes.
        2. About 15 minutes before you're ready to cook, preheat your oven to 375° F and your grill to 500° F.
        3. Rub the steaks all over with olive oil in a thin layer. Season them really well with a high-quality coarse salt and freshly-ground black pepper (coarse pepper is best).
        4. Place the steaks on the grill directly over the flames. Cook them for about 3-4 minutes per side, or until both sides have a good sear and they release easily from the grates.
        5. Remove the steaks from the grill and place them on a large sheet pan. Put them in the oven and cook them for about 30 minutes (this will vary depending on the size and thickness of the steaks), or until they reach an internal temperature of 130° F (keep in mind that they'll continue cooking after removing them from the heat so the temperature will still raise somewhat).
        6. Remove the steaks from the oven, place them on a cutting board, tent them gently with foil, and allow them to rest for 10-15 minutes.
        7. Serve immediately after resting, or top with compound butter before serving.

        Notes

        It's highly recommended to use an oven-safe thermometer inserted into the thickest part of the steak prior to going into the oven.

        Although this recipe is written for 2 people, it will easily serve 4 (or more!) since tomahawk steaks are usually between 30 ounces to 42 ounces. If serving for more than 2, consider slicing the steaks after they rest but before serving (leaving some meat unsliced near the bone to keep the gorgeous presentation).

        This recipe is for a 2" thick tomahawk. Adjust cook times if the steak is a thinner or thicker cut.

        Nutrition Information:
        Yield: 2 Serving Size: 1
        Amount Per Serving: Calories: 1950Total Fat: 132gSaturated Fat: 50gTrans Fat: 0gUnsaturated Fat: 63gCholesterol: 660mgSodium: 501mgCarbohydrates: 0gFiber: 0gSugar: 0gProtein: 178g

        Amounts do not include compound butter.

        © Kristy Bernardo
        Cuisine: American / Category: Dinner
        Tomahawk Steak Recipe

        30 Inspiring Ramen Noodle Recipes

        August 21, 2022 by Kristy Bernardo 13 Comments

        30 Inspiring Ramen Noodle Recipes

        Ramen Noodles are cheap yet so easy to turn into a hearty meal. Here are 30 fantastic and easy Ramen Noodle Recipes for you to try for your next easy, delicious meal!

        When I first had my Asian Ramen Noodle Salad, ramen noodles were on my list to pick up at the store. And - correct me if I'm wrong - it's impossible to purchase just one package. I always buy at least two or three for a quick lunch with poached eggs, spinach and hot sauce.

        Scroll Down for the Ramen Noodle Recipes ⬇

        You'll want to browse all the recipes below, but here are a few suggestions for easy additions in just a few seconds:

        • Eggs - crack an egg or two into the simmering water about a minute before the noodles are done.
        • Add a handful of spinach just before serving
        • A dash or two of your favorite hot sauce. I recommend Sriracha. Red pepper flakes or aleppo pepper are also wonderful.
        • A dash of soy sauce
        • A drop or two of sesame oil
        • Bok choy instantly makes a meal out of instant noodles. They need about 4 minutes to cook so add them first and the noodles a couple of minutes later.
        • Stir in some chopped bell pepper
        • Bean sprouts, sesame seeds, and/or a sliced scallion are great as toppings in combination with any of the above.
        • Make a quick ramen noodle stir fry with drained, cooked noodles, leftover chopped chicken or beef, a little hoisin sauce, and any combination of the ingredients above.

        But there are so many other amazing ramen noodle recipes out there (wait until you see the dessert, yowza!) that I decided to put some of my favorites together.

        How do you make Instant Ramen noodles?

        You can ask just about any college kid this question and they'll give you the answer. But since you're here, I'll save you the trouble.

        Pick up a package of Maruchan, Top Ramen or whatever your favorite brand is. There will be directions on the package, but basically, you boil two cups of water, add the noodles and cook a few minutes, then add a seasoning packet that comes inside the package.

        How do you cook Ramen noodles in the microwave?

        For this method, you'll basically cook the noodles and water together for a few minutes until the noodles are cooked through, then you'll add the seasoning packet. But be sure to read the directions for the brand you've purchased as this may vary.

        Are Ramen noodles bad for you?

        I'm not a doctor, dietician or otherwise a person in a position to offer medical or nutritional advice. What I can tell you is that ramen noodles are incredibly high in sodium and are far from "natural" food.

        Still, I love the stuff. I eat them in moderation and add some healthy toppings to balance things out. Using it as a base for something even more delicious is what recipes are all about, so choose toppings and additions that are good for you whenever possible.

        Ramen Noodle Recipes

        Ramen Noodle Recipes

        I asked some of my favorite food blogging friends for their own delicious ramen noodle recipes using this fast and economical ingredient. I think you'll be pleased with what they offered up. Others I've tried personally and some just look too good not to share.

        Check out these tips for reheating ramen leftovers!

        30 Inspiring Ramen Noodle Recipes

        Ramen Noodles are cheap yet so easy to turn into a hearty meal. Here are 30 fantastic Ramen Noodle Recipes for you to try for your next easy, delicious meal!

        Birria Ramen Recipe

        Birria Ramen Recipe

        Make way for birria ramen, tender beef, and perfectly cooked ramen noodles to create a perfect blend of two popular dishes.

        Asian Ramen Noodle Salad Recipe

        Asian Ramen Noodle Salad

        A homemade sesame dressing with healthy chopped kale and Serrano pepper make this updated Asian Ramen Noodle Salad the best one yet.

        Garlic Parmesan Ramen Noodles

        One-Pan Garlic Parmesan Ramen Noodles

        Photo Credit: thesaltymarshmallow.com

        This one is loaded with veggies and smothered in a creamy garlic sauce.

        Ramen Noodles

        Garlic Ginger Sesame Soy Noodle Sauce

        Photo Credit: www.lordbyronskitchen.com

        Here's a ramen noodle dinner idea that is ready in less than 15 minutes–yes, it’s possible! Garlic Ginger Sesame Soy Noodle Sauce is all the proof you need!

        5-minute faux pho recipe | www.thewickednoodle.com | #pho #ramen

        5-minute Faux Pho

        Got 5 minutes? Then you've got time for this seriously delicious Faux Pho recipe.

        Thai Peanut Chicken and Ramen Noodle Soup

        Thai Peanut Chicken and Ramen Noodle Soup

        This can be made on either the stove or in the crockpot.

        Beef Ramen Noodles

        Beef Ramen Noodles (Stir Fry)

        This recipe is super comforting and comes together fast! You’ll love the tender ground beef with an addictive sweet and savory peanut sauce. Ready in only 30 minutes!

        Instant Pot Chicken Ramen

        Instant Pot Chicken Ramen

        Chewy ramen noodles combined with shredded chicken, egg, green onions, and a flavorful homemade broth. It's the perfect comfort food!

        Ramen Noodle Soup

        Shortcut Mushroom Ramen Bowls

        This shortcut mushroom ramen tastes like it’s been simmering on the stove for hours but comes together in just 30 minutes!

        Cabbage Stir Fry

        Ramen Noodle Cabbage Stir Fry Recipe

        An easy and delicious recipe with carrots, stir fry sauce, and fresh garlic and onion. Serve topped with sweet chili sauce for the perfect bite!

        Bacon & Eggs Ramen

        Homemade Ramen Noodles with Bacon & Soft-Boiled Eggs

        Bacon & Eggs Ramen? Yes, please!

        Crockpot Crispy Caramelized Pork Ramen Noodle Soup With Curry Roasted Acorn Squash

        Crockpot Crispy Caramelized Pork Ramen Noodle Soup

        The caramelized pork, the egg and the curry roasted acorn squash...together they honestly make the most perfect bowl of ramen.

        Spicy Shrimp Saucy Guacamole Ramen Noodle Bowl

        Spicy Shrimp and Saucy Guacamole Ramen Noodle Bowl

        Creole spiced shrimp, fresh herbs and vegetables, and a luscious guacamole sauce top this shrimp ramen noodle bowl.

        Spicy Pumpkin and Butternut Ramen

        Spicy Thai-Style Pumpkin and Butternut Ramen

        This Spicy Ramen Noodle recipe is the most DELICIOUS soup on the planet. For real. It's packed with a spicy curry broth, tons of chewy ramen noodles, sweet butternut squash, and hearty shiitake mushrooms.

        Ramen

        Spicy Peanut Ramen with Quick Pickled Cucumbers

        Spicy peanut ramen is the grownup version of your favorite college staple. Get these spicy, savory, noodles in your life today.

        Noodles

        Homemade Ramen Noodles

        When you can't get to the store, make your own!

        5 Ingredient Ramen Carbonara

        5-Ingredient Ramen Carbonara

        5-Ingredient One Pot Ramen Carbonara: 15 minutes to creamy, salty, AMAZING carbonara!

        Tan Tan Noodles

        Tan Tan Noodles (Tantanmen Ramen or Dan Dan Noodles)

        Tan Tan Noodles combine delicious ramen noodles & ground pork with a spicy, creamy broth.

        Chow Mein Ramen

        Chow Mein Ramen Noodles

        The FASTER way to make Chow Mein using a couple of cheeky shortcuts: pre-shredded Coleslaw mix and instant ramen noodles!

        Chicken Ramen

        Chicken Ramen

        This chicken ramen is an easy and flavorful 30-minute skillet dinner! With veggies, noodles, chicken, and an addictive sauce coating it all!

        Chashu Pork Ramen Recipe

        Pork Chashu Ramen – Mike's Mighty Good

        You may have had pork Chashu and also Ramen but have you ever had Pork Chashu Ramen? You'll love the full-flavor of adding braised pork belly to Ramen!

        Chicken Chashuj Ramen Recipe

        Chicken Chashu for Ramen

        This is a less fat option to the popular Pork Belly Chashu ramen.

        Tofu Ramen Bowls Recipe

        Tofu Ramen Bowls (Vegan + Vegetarian)

        Enjoy this vegan Tofu ramen packed with veggies for a tasty midweek meal in just 30 minutes.

        Soki Soba (Okinawan Pork Rib Ramen)

        Soki Soba (Okinawan Pork Rib Ramen with a Light Dashi Pork Broth)

        The genius of this recipe is the mashup of delicious Asian flavors with another favorite, ribs!

        Hiyashi Chuka (Cold Ramen)

        Hiyashi Chuka (Cold Ramen) 冷やし中華

        When the heat is too high for hot ramen relax with a bowl of cold ramen in just 30 minutes. This recipe is also vegan adaptable.

        Spicy Miso Ramen Soup

        Spicy Miso Ramen Soup

        Photo Credit: ministryofcurry.com

        These next four recipes will cover the main types of ramen: Miso (bean paste), Tonkotsu (pork), Shoyu (soy sauce), Shio (salt). This 30 minute miso ramen recipe is for those those love an extra spicy kick in their ramen.

        Easy Tonkotsu Ramen

        EASY Real Tonkotsu Recipe & Video

        This delicious Tonkotsu ramen is made with a pork bone broth—ton means pork and kotsu means bone. This is a quick and easy 20 minute version as making authentic Tonkotsu ramen takes about a ½ day, including cook time.

        Shoyu Ramen (Soy Sauce Ramen)

        Quick and Easy Shoyu Ramen

        Photo Credit: abountifulkitchen.com

        This easy Shoyu Ramen recipe can be made in just 30 minutes. Shoyu means soy sauce in so Shoyu ramen is a ramen dish with a broth made of soy sauce.

        Shio Ramen (Salt Flavored Ramen)

        Shio Ramen (Salt Flavored Ramen – 塩ラーメン)

        This traditional Hakodate inspired ramen will not disappoint especially since it takes less than 30 minutes to make! Shio also has a simple translation as it means salt thus Shio Ramen is salt flavored ramen.

        Shirataki Noodle Ramen (Vegan + Gluten Free)

        Shirataki Noodle Ramen (Vegan + Gluten Free)

        Photo Credit: www.rhiansrecipes.com

        Shirataki noodles are naturally gluten free and combined with all the other ingredients this is one low calorie, healthy but very delicious ramen recipe.

        Paleo & Keto Shirataki Ramen Recipe

        Paleo & Keto Shirataki Ramen Recipe

        Photo Credit: www.gnom-gnom.com

        Another "Americanized" version of ramen that is paleo and keto-friendly that is very easy to customize.

        Ramen Noodle Bars

        Chocolate Peanut Butter Ramen Bars

        Ramen noodles may not be your typical dessert ingredient, but after you try this sweet no-bake treat, you’ll see why it just works!

        I'd love to hear what ramen tricks you all have up your sleeves. Share an easy ramen noodle recipe, a link or a tip for what you do with your ramen!

        How To Stop Broccoli From Smelling While Cooking

        August 20, 2022 by Monique McArthur 1 Comment

        Stop Broccoli Smells

        Cooking broccoli can result in a distinctive odor you may wish to avoid, but how do you stop broccoli from smelling during the cooking process? There are a few tips and tricks you can try, but it helps to understand why the smell happens in the first place.

        Basically, when you cook certain vegetables such as cauliflower, cabbage, and broccoli to a certain point, they don't release as much sulfur or the smell of sulfur as they will when the vegetables start to overcook. That is why some people pre-soak cabbage and sometimes even broccoli.

        But pre-soaking does run the risk of diminishing some of the flavor, it's basically a question of how unpleasant you find the smell of cooking broccoli if it does start to reach an overcooked state. Pre-soaking isn't your only option, fortunately.

        Stop Broccoli Smells

        How to Stop Broccoli From Smelling While Cooking

        Time is the first key to reducing the smell of cooking broccoli. While it's tempting to think only of cooking time, the freshness of your raw ingredients will definitely matter. Broccoli can stink when cooking if it isn't as fresh as it should be, so getting the freshest ingredients possible is the first step.

        Overcooking: Avoid, Avoid, Avoid

        Then there's that overcooking issue. When broccoli is overcooked, it begins to smell like sulfur. How do you tell if you are getting close to the end of the cooking process here?

        Broccoli is essentially ready when you can pierce it with a fork. The cooking time may vary with the size of the florets but it does not take very long at all. You may find that it only takes two to three minutes to boil. Some sources say steaming takes about as long while others report it may take as long as five minutes to steam broccoli to the right level of "done".

        Many believe that steaming is the superior prep method as boiling can potentially reduce the levels of certain nutrients in cruciferous vegetables like broccoli and cauliflower. Keep this in mind if you are concerned about the quality of the nutrients in your cooking.

        Absorbing Odors

        It's not possible to steam or otherwise cook broccoli to perfection each and every time, which is why some add absorbing agents like bread or rice into the mix. You can use chunks of bread or rice in a boiling pot with your broccoli to absorb some of the odor.

        Masking Odors

        Method 1: Pour undiluted white vinegar to a small bowl and set it nearby while you are cooking the broccoli. The white vinegar actually helps to neutralize the broccoli smell from the air as it cooks. You can also add a diluted solution of white vinegar to a spray bottle.

        Method 2: Add lime juice, lemon juice, or red wine vinegar to a boiling pot or steamer. You can also add bay leaf extract to the water of a steamer or boiling pot.

        Other Options To Stop Broccoli From Smelling While Cooking

        Why does broccoli stink when you cook it? Aside from the technical issues related to the release of sulfur-type odors during the cooking process, sometimes it's all about how those odors are dealt with during the process. If your cooking lid or steamer lid isn't tightly fitted onto the pot, even minor odors may escape.

        If you are using a steamer with an exhaust port you may wish to try putting a damp towel over the lid to absorb the escaping steam which should also help mitigate the smell somewhat. And don't forget to wipe down your surfaces afterward, especially any splash guard or backsplash area that might have been subject to the steam from cooking your broccoli.

        Opening the kitchen windows is a no-brainer if you start to smell more sulfur than you'd like, but don't forget that your stove vent fan can also help speed up the dissipation of cooking smells in general. You can also try adding a small personal fan to a safe spot in your cooking area.

        Here are some delicious recipes with broccoli to try!

        • Fresh Broccoli Rice Casserole With Chicken
        • Better For You Broccoli Soup
        • The Secret to Amazing Cheesy Broccoli Soup
        • Sausage & Broccolini Sheet Pan Dinner
        • Roasted Frozen Broccoli with an Easy Asian Sauce

        Udon Noodle Recipe

        August 19, 2022 by Kristy Bernardo 68 Comments

        Udon Noodle Recipe

        Udon noodles are a staple of Japanese cooking, but some sources note that udon may have come from China circa the year 700. So our discussion here should really note that this is an Asian-inspired dish, not necessarily traditional and not necessarily from Japan.

        You'll notice that green curry paste is part of this recipe; green curry is a tradition thought to originate in Thailand. We offer this caveat to say our recipe is a blending of multiple types of Asian cooking, and the results may have you coming back for more!

        asian noodle bowls - healthy & amazingly delicious!! | www.thewickednoodle.com

        What are Udon Noodles?

        If you have experience with Asian cuisine, you likely already know that udon noodles are thicker than traditional soba or spaghetti noodles. If you have never had udon before, imagine a thicker, rounder noodle than you'd get in yakisoba, lo mein, etc.

        Udon noodles are comfort food for many. Eating Asian-inspired noodle dishes means getting used to a variety of thicknesses and textures--some are made of buckwheat, others are made from rice flour or wheat flour.

        Udon is on the thick side of the spectrum. Some manufacturers make udon that seems almost as thick as a #2 pencils, others make it slightly thinner. Some prefer the big noodles, others prefer the smaller variety.

        asian noodle bowls - healthy & amazingly delicious!! | www.thewickednoodle.com

        Udon Noodle Bowl Hacks

        Some disagree about when and how to boil the noodles. If you get dry udon, try cooking it separately in boiling water and add to the bowl before you add the broth. Some prefer to add the noodles directly to the broth and soften them that way. Which approach you use really depends on what you prefer but one thing is true--noodles can eventually start to break down if they are boiled too long or stay too long in the broth.

        Buying the pre-cooked noodles will speed up your prep time. Some believe that dried udon noodles leave something to be desired but if you aren't very experienced with Asian cooking you may not notice a difference at first.

        The freshness of certain ingredients is key for Udon. Fresh ginger and fresh lime make a LOT of difference in the final product. Prepackaged ginger loses some of its bite, as does processed lime juice.

        If you need to add heat to this dish but want to avoid adding more sodium, consider fresh jalapeno or dried red pepper flakes. The green curry paste is distinctive, but may not add as much heat as you might expect.

        Also, when buying green curry paste, select a brand that was made in Thailand. This isn't as hard as you might think as one of the leading brands of Thai curry paste, Thai Kitchen, is made there and exported to the USA. The brands made in Thailand seem to be superior.

        asian noodle bowls - healthy & amazingly delicious!! | www.thewickednoodle.com

        Udon Noodle Tips, Tricks & Hacks

        • If you can't find the ingredients at the Asian section of your grocery store, Asian markets or Amazon should have everything you need
        • Udon Toppings: Top the soup with kakiage (tempura), kamaboki (fish cake), wakame (seaweed), scallions, shiitake mushrooms, green onion, chili flakes, egg (raw or boiled), dried seaweed, or vegetables.
        • Store the noodles and broth in separate containers.  Udon soup stored this way lasts about 2 to 3 days.

        Although these noodle bowls aren't quite as quick as my 5-minute Faux Pho, it's only 20 minutes from start-to-table. Not too shabby, right? Especially for a dish with so much flavor!

        Any one of these 21 Japanese Desserts would make a wonderful ending to your meal.

        Asian Udon Noodle Bowls

        Udon Noodle Soup Recipe

        Yield: 3
        Prep Time: 15 minutes
        Cook Time: 15 minutes
        Total Time: 15 minutes

        This easy udon noodle soup recipe is a flavorful and light meal for lunch or dinner.

        Ingredients

        • 2 tablespoons ghee or vegetable oil
        • 2 cups thinly sliced shallots (about 4 large)
        • 3-4 tablespoons minced fresh ginger
        • 2 tablespoons green curry paste
        • 1 32 ounce container low-sodium beef broth
        • ¼ cup fresh lime juice
        • 1 red bell pepper (sliced into strips)
        • 1 bunch scallions
        • 1 package udon noodles (about 20 ounces)

        Instructions

        1. Preheat a large skillet over medium-high heat.
        2. Add ghee or vegetable oil and heat until shimmering.
        3. Add shallots and cook, stirring occasionally, until lightly browned (turn down heat if it starts to brown too quickly).
        4. Add ginger and curry paste, cook 2 more minutes, stirring frequently. Add beef broth and lime juice; simmer 5 minutes.
        5. Meanwhile, grill pepper strips and scallions until crisp-tender.
        6. Chop scallions into bite-sized pieces and set peppers and scallions aside.
        7. Prepare udon noodles according to package directions.
        8. Divide udon noodles, broth, pepper strips and scallions between four bowls and serve.

        Notes

        You could easily add chicken, beef, pork chashu, fried tofu, shrimp tempura to this recipe for an even more hearty meal. Grilled shitake mushrooms also make a nice addition; grill and add in with the red bells and scallions.

        Nutrition Information:
        Yield: 3 Serving Size: 1
        Amount Per Serving: Calories: 315Total Fat: 14gSaturated Fat: 6gTrans Fat: 0gUnsaturated Fat: 7gCholesterol: 22mgSodium: 1037mgCarbohydrates: 41gFiber: 5gSugar: 12gProtein: 10g

        This data was provided and calculated by Nutritionix.

        © Kristy Bernardo
        Cuisine: Asian / Category: Soups and Stews
        Udon Noodle Recipe

        Easy Pumpkin Pie Cake Recipe (Better Than Pie!)

        August 19, 2022 by Kristy Bernardo 21 Comments

        a closeup of a slice of pumpkin pie cake on a black plate topped with fresh whipped cream

        It sounds like a contradiction: a pumpkin pie cake? But it really is a combination of the two, which is what makes it the perfect dessert recipe when you're looking for something fun and new but still has the old familiar fall flavors we all know and love.

        If you make just one pumpkin dessert this fall, let this pumpkin pie cake be the one you choose. Many of our tasted testers prefer this recipe over pumpkin pie (and I'm one of them)!

        a slice of pumpkin pie cake on a black plate topped with fresh whipped cream

        This easy cake has it all: it's gooey in the middle with a crunchy, flavorful topping, and is so incredibly good you'll want to make it all season long. We also like to make this pumpkin tres leches cake once fall hits; with these two pumpkin recipes in your arsenal, there's no need for any more (well, maybe pumpkin cheesecake - you can never have too many pumpkin desserts)!

        [feast_advanced_jump_to]

        Ingredients

        • Pumpkin puree - canned is fine and actually preferred, since homemade pumpkin puree tends to be more watery (you could drain it through a cheesecloth if you really prefer homemade)
        • Eggs
        • Evaporated milk - don't be tempted to substitute regular milk as it just won't be the same!
        • Granulated sugar
        • Salt
        • Pumpkin pie spice
        • Boxed spiced cake mix - Yellow will work but spiced is by far our favorite.
        • Butter
        • Chopped pecans - they'll toast in the oven, so no need to take the extra step to toast them!
        an overhead shot of pumpkin pie cake with a spatula lifting out a slice, next to cinnamon sticks and a glass of apple cider

        Step-by-Step Instructions

        This is quite possibly the easiest fall dessert you'll ever make. And have we mentioned how incredibly delicious it is?

        1. As with any recipe that uses the oven, preheat it before starting so it's ready when you are.
        2. Next you'll mix together the pumpkin puree, eggs, evaporated milk, sugar, salt and pumpkin pie spice in a large mixing bowl until it's thoroughly combined.
        3. Grease a 13x9 baking dish and pour the mixture in, spreading it out so it's even (it's a thin batter, so it should mostly spread out on its own).
        4. Now sprinkle the dry cake mis on the top, taking care to make sure the batter is completely covered. Don't stir it in!
        5. Pour some melted butter over the top of the dry cake mix, then sprinkle the chopped pecans on the top. Again, don't stir it or it won't have the yummy, crunchy top.
        6. Now just bake it for approximately one hour or just until the cake is set. Top each slice with a dollop of whipped cream and enjoy your new favorite pumpkin dessert!

        Video

        Check out our video that shows just how simple it is to make this pumpkin pie cake:

        Equipment Needed

        • 13x9-inch baking dish
        • Large mixing bowl
        • Whisk or electric hand mixer
        • Measuring cups and spoons
        • Rubber spatula or wooden spoon
        • Small bowl (for melting the butter; you can also use a microwave-safe measuring cup)
        • Oven mitts
        • Knife and serving spatula

        Tips for Making Pumpkin Pie Cake

        • Don't stir in the dry cake mix: Sprinkling it evenly over the pumpkin mixture and leaving it as-is is what creates that deliciously crunchy topping.
        • Use canned pumpkin puree: This is one of the few times when using a shortcut is definitely the better option. Canned pumpkin puree is thicker and more consistent than homemade, which can be watery.
        • Distribute the melted butter evenly over the top of the dry cake mix: Drizzle the melted butter slowly over the cake mix so it covers as much of the surface as possible.
        • Check for doneness early: It's always a good idea to start checking for doneness 5-10 minutes earlier than the time suggested. The cake should look set in the center with a golden brown top. Start checking around the 50-minute mark and every 5 minutes from there.
        • Let it cool slightly before slicing: This helps the layers firm up and makes it easier to serve clean slices.

        Try swapping the pecans for walnuts (or a combination of the two!) if you prefer.

        a slice of pumpkin pie cake on a black plate topped with fresh whipped cream, next to a glass of apple cider

        Storage and Make-Ahead

        • Make-ahead: The flavor gets even better after it's had a few hours to cool and settle, so it's a great dessert to make the day before serving (and just another reason it's a great choice for your Thanksgiving dessert)!
        • Refrigeration: It can be stored (covered in foil or plastic wrap) in the refrigerator for up to 5 days.
        • Serving leftovers: It can be served chilled straight from the fridge, or let slices sit at room temperature for 15-20 minutes first.
        • Freezing: You can freeze baked pumpkin pie cake in individual slices. Wrap the slices tightly in plastic wrap and place them in an airtight container. Thaw them overnight in the fridge before serving.

        Frequently Asked Questions

        Can I use homemade pumpkin puree instead of canned?

        Canned is preferred because it's thicker and more consistent. If you're set on using homemade, be sure to drain any excess liquid through some cheesecloth first.

        Do I have to use spice cake mix?

        Spice cake mix will give you the best flavor, but yellow or butter cake mix will also work. If you use plain yellow, add a teaspoon of pumpkin pie spice to the mix.

        What kind of nuts work best?

        Pecans are hands-down the best in this recipe, but walnuts or hazelnuts are also delicious. You can also leave the nuts out if you prefer a nut-free version.

        Can I make Pumpkin Pie Cake without butter?

        Butter is key to getting that crunchy topping. You can substitute margarine, but the flavor won't be quite the same.

        How do I know when the cake is done baking?

        The center of the cake should look set and the topping should be golden brown. If it jiggles too much when you shake the pan, it needs a little more time.

        Can I serve it warm?

        It's wonderful served warm with a scoop of vanilla ice cream or a dollop of freshly whipped cream.

        Pairings

        These are the main dishes we love to serve with this easy fall dessert:

        • pot roast just out of the oven with carrots and potatoes on a wooden table
          Chuck Roast with Balsamic and Dijon - The BEST Pot Roast!
        • Juicy Turkey Recipe
          Juicy Turkey Recipe with Crispy Skin!
        • a spiral sliced ham on a white plate with fresh orange wedges on a wood table
          How to Cook a Spiral Ham (plus a Ham Glaze recipe)
        • a white bowl of beef short ribs braised with garlic and red wine with a sprig of fresh thyme on a wooden table
          The BEST Braised Beef Short Ribs Recipe for the Holidays
        a closeup of a slice of pumpkin pie cake on a black plate topped with fresh whipped cream

        Pumpkin Pie Cake

        Yield: 8 servings
        Prep Time: 10 minutes
        Cook Time: 1 hour
        Additional Time: 15 minutes
        Total Time: 1 hour 25 minutes

        You'll love this combination of pumpkin pie and cake! It has a gooey center with a crunchy top, and will become your go-to fall dessert recipe.

        Ingredients

        • 2 14.5-ounce cans pumpkin puree
        • 3 large eggs
        • 1 12-ounce can evaporated milk
        • 1 cup sugar
        • ½ teaspoon salt
        • 4 teaspoons pumpkin pie spice
        • 1 box spice cake mix
        • 1 cup butter, melted
        • 1 ½ cups chopped pecans

        Optional but recommended, for topping

        • 2 cups heavy whipping cream
        • ¼ cup powdered sugar

        Instructions

        1. Preheat the oven to 350F.
        2. In large mixing bowl, mix together pumpkin puree, eggs, evaporated milk, sugar, salt and pumpkin pie spice until it's thoroughly combined (use either a whisk or a hand/stand mixer).
        3. Pour the mixture into a greased 13x9 inch baking dish.
        4. Sprinkle the dry cake mix on top, taking care to cover the batter completely.
        5. Slowly pour the melted butter over the cake mix, taking care to cover as much of the dry cake mix as possible. Sprinkle the chopped pecans over the top.
        6. Bake the cake for approximately one hour or until it's set (there can still be a slight jiggle in the center, but barely).
        7. Let the cake rest for 10-15 minutes. Meanwhile, whip the heavy whipping cream and powdered sugar together just until stiff peaks form.
        8. Cut individual slices and top with dollops of freshly whipped cream.

        Notes

        • Cool Whip can be used in place of the freshly whipped cream.

        Nutrition Information:
        Yield: 8 Serving Size: 1
        Amount Per Serving: Calories: 799Total Fat: 46gSaturated Fat: 20gTrans Fat: 1gUnsaturated Fat: 23gCholesterol: 144mgSodium: 872mgCarbohydrates: 92gFiber: 87gSugar: 61gProtein: 11g

        This data was provided and calculated by Nutritionix.

        © Kristy Bernardo
        Cuisine: American / Category: Desserts
        Easy Pumpkin Pie Cake Recipe (Better Than Pie!)

        21 Incredible Moscow Mule Recipes

        August 18, 2022 by Kristy Bernardo 8 Comments

        Moscow Mule Recipes

        The Moscow Mule is a pretty simple drink, you just need three ingredients: vodka, ginger beer and lime. Its simplicity is what makes it so appealing since it takes little effort to make yet results in a cocktail with fantastic flavor. So why not add a little twist to the same old thing now and then?

        Scroll Down for the Moscow Mule Recipes ⬇

        Moscow Mule Recipes

        Moscow Mule Ingredients

        Ginger Beer

        Ginger beer dominates the flavor of the three ingredients so this is the most important ingredient unless you're worried about hangovers from cheap vodka (I won't suggest any here). Fever-Tree makes a "Refreshingly Light" ginger beer with half the sugar, calories, and carbs as other ginger beers. If you go with another brand look for real ginger in the ingredients.

        Bonus Tip: While the name Ginger Beer may suggest that this beverage has alcohol in it, ginger beer is actually a non-alcoholic drink. In a grocery or liquor store you won't find it next to the vodka and tequila. Look for it next to other products for mixed drinks, such as soda or tonic water, the soda section or sometimes it's in both sections.

        Vodka

        My go to is Tito's vodka (40% ABV) with a grainy, earthy sweetness that really brings out the flavor. Tito's is made from yellow corn, rather than potatoes or wheat and also happens to be gluten free and affordable. You can't go wrong with top shelf vodkas like Ketel One or Grey Goose but it just isn't necessary with a mixed drink.

        Limes

        Bottled lime juice will work but I'd suggest squeezing fresh limes. Persian limes (Bearss Limes), Key limes (Mexican limes), Kaffir limes and other limes will all work. Unless you're a true lime connoisseur (who is) you probably won't notice the difference between any fresh lime used.

        Ice

        Ice is another subtle element of a Moscow mule. Crushed ice is recommended and cubed ice will work as well. Large Ice mold squares or balls are great too especially if it's hot and you're looking to keep the ice from melting.

        Copper Mugs

        A decent copper mug is key to the Moscow Mule experience as the Copper helps take on the temperature of the drink by keeping it cold. Looks refreshing too! Unfortunately copper mugs are not cheap and many bars have stopped using copper mugs because they are often stolen. You can get by with a regular cocktail glass at home or a bar.

        Including ice, an ideal copper mug has 16 to 20 ounces of space.

        Types of Moscow Mules with Different Alcohol

        • Mexican Mule - Swap out vodka with tequila.
        • Kentucky Mule - Might be too obvious but this mule is made with whiskey. Switch out your whiskey for a Tennessee mule, Irish mule, or a Glasgow mule.
        • Jamaican or Cuban Mule - Rum instead of vodka.
        • Dark & Stormy Mule - Now spiced rum instead of vodka.
        • London or Gin-Gin Mule - As the name London might imply this version is with gin.
        • French Mule - This one is exchanged for brandy.

        Other mule variations include using cognac, absinthe, and much more.

        Moscow Mule Garnishments, Twists & Variations

        These twists and garnishments are perfect for any night or seasonal and holiday Moscow Mules. Find the recipes for many of the ideas below.

        • Blackberries and cucumbers pair well with ginger.
        • Add sprigs fresh mint, rosemary, or cilantro, or muddle Thai basil.
        • Balance out the sweetness with a dash of bitters e.g. Angostura Aromatic or Orange Bitters.
        • If you must substitute ginger beer for ginger ale, bitters are a perfect addition to reduce the sweetness.
        • Try a grapefruit or orange instead of a lime.
        • Add pumpkin spice, syrup, pumpkin puree or even pumpkin apple juice.
        • Splash some cranberry, apple or any fruit drink or cider into the mule.
        • Add some heat with Jalapenos.
        • Muddle and your favorite fruit to the drink e.g. cranberry, cherry, blood orange, pomegranate.
        • Instead of vodka Jello shots make Moscow Mule Jello shots.

        Don't forget to name your Moscow Mule creation!

        A little history: The mule was originally created as a marketing scheme to sell copper mugs and it sure worked more than the person who came up with the idea could have possibly imagined.

        21 Incredible Moscow Mule Variations

        We've got 21 easy Moscow Mule variations here for you, starting with a classic mule then on to spring and summer flavors, a few for fall and ending with all you'll need for a perfect Moscow Mule holiday during the winter time!

        Moscow Mule

        Classic Moscow Mule

        Photo Credit: cookieandkate.com

        You can't go wrong with a classic mule on a hot summer day!

        Blueberry Cucumber Moscow Mule

        Blueberry Cucumber Moscow Mule

        Photo Credit: www.gastronomblog.com

        Blackberries pair perfectly with ginger with the this awesome mule.

        Verry Cherry Moscow Mule

        Very Cherry Moscow Mule

        Photo Credit: homemadehooplah.com

        Super sweet if you if you add the amount of maraschino cherries called for!

        Tuaca Mule

        Cocktail Idea :: Tuaca Mule

        Photo Credit: asideofsweet.com

        Made with a a vanilla citrus liqueur, Tuaca, it's a great variation on the popular Moscow Mule .

        Mexican Moscow Mule

        Mexican Mule

        Photo Credit: www.imbored-letsgo.com

        Swap out vodka with tequila and you have a Mexican mule. Add Jalapenos and you have a spicy Mexican mule.

        Candied Jalapeno Cocktails

        Candied Jalapeno Moscow Mule aka Cowboy Candy Mule

        This recipe uses the syrup and jalapeno slices from candied jalapenos (cowbody candy) to add a bit of sweet and spicy to your cocktail.

        Mediterranean Mule

        Mediterranean Mule

        Photo Credit: omgfood.com

        This delicious beverage is made with fig vodka, limoncello, and ginger beer.

        Kentucky Mule

        Kentucky Mule Recipe

        Photo Credit: foolproofliving.com

        Kentucky bourbon drinkers will this twist with bourbon instead of vodka.

        Spice Pear Moscow Mule

        Spiced Pear Moscow Mule

        Photo Credit: www.strawberryblondiekitchen.com

        The perfect fall cocktail,  this Spiced Pear Moscow Mule features spiced pear simple syrup, vodka, lime and ginger beer.

        Moscow Mule with Apple

        Cider Mule - The Missing Lokness

        Photo Credit: www.themissinglokness.com

        Apple cider is a fall favorite and this drink will get your fall vibes going.

        Spiced Apple Moscow Mule

        Spiced Apple Moscow Mule Cocktail Recipe

        Photo Credit: homecookingmemories.com

        Another fall drink, this Spiced Apple Moscow Mule cocktail recipe is made with vodka, apple cider, ginger beer, and a spiced simple syrup.

        Caramel Apple Moscow Mule

        Caramel Apple Moscow Mule Cocktail

        Photo Credit: www.gastronomblog.com

        Caramel apples are a fall favorite and this recipe combines caramel apples with another favorite, Moscow mules.

        Halloween Moscow Mules for Halloween

        Blackberry Moscow Mule for Halloween

        Photo Credit: www.cupcakesandcutlery.com

        This black-colored blackberry cocktail with rum is the perfect cocktail for Halloween.

        Cranberry Vanilla Moscow Mule

        Festive Cranberry Vanilla Moscow Mule Recipe

        Photo Credit: anerdcooks.com

        The festive cranberry vanilla moscow mule is sweet, spicy, and totally refreshing. Perfect for a Thanksgiving or Christmas dinner!

        Moscow Mule with Cranberry

        Cranberry Moscow Mules

        Photo Credit: basilandbubbly.com

        Another perfectly festive drink for your next holiday gathering

        Champagne Moscow Mules

        Champagne Moscow Mule

        Photo Credit: www.homemadeinterest.com

        Celebrate New Year's Eve with this Champagne Moscow Mule and start the new year off right!

        Pumpkin Spice Moscow Mule

        Pumpkin Spice Moscow Mule

        Photo Credit: www.cupcakesandcutlery.com

        Perfect for a fall , Halloween or Thanksgiving cocktail, this mule variation adds pumpkin pie spice and canned pumpkin to a traditional mule.

        Strawberry Moscow Mule

        Strawberry Moscow Mules

        Photo Credit: www.thespeckledpalate.com

        Simply muddle strawberries for a spring or summertime cocktail. Other fruits are great to experiment with as well.

        Moscow Mule Jello Shots

        Moscow Mule Jello Shots

        Photo Credit: feastandwest.com

        These Moscow Mule Jello shots are perfect for taking Jello shots to the next level. Add cranberry juice for a holiday twist.

        Frozen Moscow Mule

        Frozen Moscow Mules

        Photo Credit: feastandwest.com

        This simple twist is perfect on a hot day and quick and easy with just one extra step. Freeze the ginger in ice trays and blend with vodka and lime juice.

        Moscow Mule with Bitters

        Moscow Mule with Bitters

        Photo Credit: www.theparentspot.com

        Adding bitters to a Moscow Mule is perfect for balancing out the sweetness and adding a little more flavor.

        Chocolate Pots de Crème Recipe

        August 18, 2022 by Kristy Bernardo 48 Comments

        chocolate pots de creme

        This easy dessert recipe for pots de crème makes for a perfect super creamy chocolate dessert. There is nothing better than these very easy to prepare, cute and delicious tiny dessert cups.

        What is Chocolate Pots de Crème?

        Pots de crème (pronounced "poh-day-krem") is a French dessert dating to the 17th or 18th century and translates to "pot of cream" or "pot of custard." 

        chocolate pots de creme

        Different Types of Pots de Crème

        The variations are endless with pots de crème but here some of the more popular and interesting ones to try.

        • Pots de Crème with Espresso and espresso flavored whipped cream (add 1 ½ teaspoons instant espresso powder)
        • Pots de Crème with Fresh Berries and Whipped Cream
        • Peanut Butter Pots de Crème
        • Milk Chocolate Pots de Crème
        • White Chocolate Pots de Crème
        • Irish Chocolate Pots de Crème
        • Butterscotch Pots de Crème
        • Salted Caramel Pots de Crème
        • Vanilla Pots de Crème also Vanilla Bean and Honey Vanilla
        • Kahlua Pots de Crème
        • Coffee Pots de Crème

        Pots de Crème Toppings & Decorations

        This dessert can stand on its own without the need for toppings but who doesn't like adding some extra deliciousness and flare to their dessert?

        • Whipped cream also try flavored whipped creams
        • Chocolate shavings (hint: use a vegetable peeler)
        • Sprinkles of cocoa powder
        • Berries e.g. strawberries, boysenberries
        • Pomegranate arils
        • Sauces e.g. chocolate, caramel, espresso, raspberry, lemon, port wine
        • Sprinkles
        • Chocolate wafers or other types of wafers
        • Cookies

        Where to Find Pots de Crème at Disneyworld?

        There are actually two places to find pot de crème. First Cinderella's Royal Table inside Cinderella's Castle serves up coffee pot de crème topped with passion fruit and for vegans there is the vegan and gluten free coconut pot de crème at Gasparilla Island Grill at Disney's Grand Floridian Resort & Spa.

        chocolate pots de creme

        Chocolate Pots de Crème

        Yield: 8
        Prep Time: 25 minutes
        Cook Time: 30 minutes
        Additional Time: 4 hours
        Total Time: 4 hours 55 minutes

        Chocolate Pots de Crème is a delicious and simple recipe for dessert or special occasions.

        Ingredients

        • 6 oz 60% cacao bittersweet chocolate or high quality dark chocolate, finely chopped
        • 1 ⅓ cups heavy cream
        • ⅔ cup whole milk
        • 6 large egg yolks
        • 2 Tablespoons sugar

        Instructions

        1. Preheat oven to 300F with rack in the middle of oven.
        2. Put chocolate in a heatproof bowl.
        3. Bring cream, milk, espresso powder and a pinch of salt (a pinch is three fingers!) just to a boil in a small heavy saucepan, stirring until powder dissolves.
        4. Pour over chocolate; whisk until chocolate is melted and mixture is smooth.
        5. Whisk together yolks, sugar and a pinch of salt in another bowl; add warm chocolate mixture in a slow stream, whisking.
        6. Pour custard mixture through a fine-mesh sieve into a 1-qt glass measure; cool completely, stirring occasionally, about 15 minutes.
        7. Line bottom of a baking pan (large enough to hold 8 4-5 oz ramekins) with a folded kitchen towel and arrange ramekins on towel.
        8. Poke several holes in a large sheet of foil with a skewer.
        9. Divide custard among ramekins, then bake custards in a hot water bath*, pan covered tightly with foil, until custards are set around edges but still slightly wobbly in center, 30-35 minutes.
        10. Transfer ramekins to a rack to cool and set, uncovered, about 1 hour. Chill, covered, until cold, at least 3 hours.

        Notes

        8 ramekins (porcelain cups) are also needed to hold the Pots de Crème.

        Ramekins can be substituted with mugs, teacups, muffin tins, baking dishes, small bowls, custard cups and glass jars.

        © Kristy Bernardo
        Cuisine: French / Category: Drinks
        Chocolate Pots de Crème Recipe

        The Char-Broil Signature Series TRU-Infrared 4-Burner Gas Grill

        August 18, 2022 by Kristy Bernardo 9 Comments

        Char-Broil’s Commercial Series TRU-Infrared 3-Burner Gas Grill

        We made the most tender ribs and juicy steaks on our new Char Broil Infrared Grill! Get a real-world review with pros and cons before you buy.

        UPDATE FOR 2026: We're still using this Char-Broil grill 10 years later, and it's still going strong!

        Six years ago, my parents were in the market for a new propane grill. We knew we wanted to go with propane gas versus a natural gas grill, and I'd had a Weber gas grill in the past and wanted them to have something new and different.

        After a lot of research online and looking at what felt like hundreds of gas grills, we settled on a Char Broil infrared grill. More specifically, the Char-Broil Signature Series Amplifire 4-Burner Gas Grill.

        Char-Broil’s Commercial Series TRU-Infrared 3-Burner Gas Grill
        The Char Broil Infrared Grill on my parent's patio

        What does Char Broil tru infrared grill mean?

        A tru infrared grill, renamed "Amplifire" in 2022, converts the hot air generated in traditional gas grills into infrared heat. The heat is distributed evenly over the entire grill surface and flare ups are prevented from happening entirely.

        To me, this means that the meats I grill will get a nice sear, which as a chef is very important. Check out these grill marks from the first time we used it:

        Char-Broil's Commercial Series TRU-Infrared 3-Burner Gas Grill

        Here's what I said about this grill right after we first used it almost six years ago:

        There are so many things we love about the new stainless steel Char-Broil grill. The first thing I noticed are the porcelain-coated grates which are great for preventing your food from sticking. There is also 525 square-inches of grilling space which means you can cook up to 29 burgers at once.

        Next was the side burner (that comes with a griddle; I'd never seen that before but how awesome is that??) which makes it so nice to just heat up a side dish or quickly reduce a sauce. It's also dual fuel enabled, which means you can connect to natural gas at home. We haven't done that yet but we're definitely going to try it.

        But it's the Amplifire Cooking System that really separates this grill from any others I've cooked on. It allows your food to cook evenly with no flare-ups. The night before our barbecue, my parents grilled some steaks. They both raved that they were the best they'd ever had on a grill and neither could believe how evenly they cooked.

        Updated review of our Char Broil Infrared Grill

        Here are the key features of the grill from the Char-Broil website, along with our thoughts on each, having owned this grill for almost 6 years now. I called my dad, read him each listed feature, and typed out his thoughts exactly as he shared them. I shared my thoughts, too, since I've spent a lot of time grilling with it over the years.

        • Amplifire TRU-Infrared cooking technology prevents flare-ups, delivers even-heat and creates up to 50% juicier food - DAD: "It does give you juicier food, I don't know about 50%. The steaks are very good on there." ME: "This is an accurate statement from my experience. I've cooked on a lot of grills in my time, everything from a weber grill to a charcoal grill, and this bbq grill makes some really juicy steaks and burgers."
        • Integrated LED lights and sleek lid, handle & cabinet design for distinctive style - Both my dad and I were sort of "meh" on this one. Sure, it's probably true, but it's not important enough to either one of us to really notice. I will say that it's a smart-looking grill though!
        • SureFire® electronic ignition for quick and reliable starts at the push of a button - DAD: "Very good." ME: "It's always started very easily for me."
        • Intuitive design with keyhole slots and common hardware makes assembly quick and easy - We actually don't remember assembling it so can't comment on this. Having said that, it must not have been difficult since we don't have any frustrating memories about it!
        • Porcelain-coated, cast-iron grates are durable, rust-resistant and easy-to-clean - DAD: "I agree with that." ME: "I definitely agree with this. Part of the reason that it's easy to clean is likely because the food doesn't stick to the porcelain grill grate in the first place, so it's a WIN-WIN."
        • Warranty: 10-year burner, 3-year grates/Firebox, 1-year all other parts
        • Dual Fuel: This grill can be converted from liquid propane to natural gas with a conversion kit that is sold separetly.
        • Tank gauge to monitor fuel level
        Char-Broil's Commercial Series TRU-Infrared 3-Burner Gas Grill

        I asked a few more questions just to round things out:

        Has it held up well? DAD: "So far, we haven't had to do any repair work on it. It's not rusted out, it's given us good service." ME: "Definitely."

        How well do the burners work? DAD: "No problems to this point. They heat up well and quickly. They do a good job." ME: "I've made a lot of sauces using the burners and they've worked just as well or better than any other propane burners I've used."

        Anything you don't like about it? DAD: "The cover that came with it drops little specks or granules that are hard to clean off the grill." ME: "I probably haven't used it enough to experience any major cons. It's the propane gas grill I plan on purchasing next."

        My dad told me something else that I hadn't known prior to our call: my brother-in-law used it at my parent's house and loved it so much that he bought one just like it.

        Char-Broil's Commercial Series TRU-Infrared 3-Burner Gas Grill

        Difference Between 2-Burner, 3-Burner, 4-Burner Char Broil Signature Series Amplifire Grills

        Note: There are no 5-burner or 6-burner Signature Series Amplifier grills. Char Broil does make Signature Series 5-burner grill and 6-burner grills.

        Feature3-BURNER GAS GRILL4-BURNER GAS GRILL
        BTU25,00032,000
        Side BurnerYes (13,000 BTU)Yes (13,000 BTU)
        Tank GaugeYesYes
        Stainless SteelYesYes
        AmplifireYesYes
        LED LightsYesYes
        Electronic IgnitionYesYes
        Grill Space420 Square Inches525 Square Inches
        Storage2 Door Cabinet2 Door Cabinet

        How do you clean an infrared grill?

        We clean our char broil infrared grill the same way we've always cleaned our gas grills: using the "burn off method". Turn the burners to high, close the lid and leave it alone for about 10 minutes. This will "burn off" any residual food stuck to the grates. Turn off the grill and use a brush to remove anything stuck to the grates.

        Summary

        This is a fantastic grill that's held up well for almost six years now. The only negative we've found is with the cover itself, so you might want to consider buying a separate cover and avoid that hassle. If you want juicier steaks, ribs, and burgers, as well as a great sear, you really can't go wrong with this Char Broil infrared grill.

        A few things I've made on this grill over the years:

        • These baby back ribs with this blackening seasoning and/or this pomegranate chipotle barbecue sauce
        • This Smoked Mac and Cheese which might be my favorite side dish ever
        • Grilled Pineapple No-Bake Cheesecake
        • Teriyaki Grilled Chicken Wings
        • Bacon-Wrapped Hot Dogs

        28 Easy Spanish Tapas Recipes

        August 15, 2022 by Kristy Bernardo 6 Comments

        Easy Tapas Recipes

        This tapas recipe collection has something for everyone from fried potatoes to spicy seafood and delicious desserts, this list will rival even the best tapas bar!

        Easy Tapas Recipes

        Scroll Down for the Easy Tapas Recipes ⬇

        What I'm sharing with you guys today is my favorite way to entertain. Simple Spanish tapas dishes, some good wine, and a handful of great friends.

        Spanish tapas dishes are perfect for easy entertaining. Everyone can have just enough of everything to enjoy throughout the evening without the need for a big sit-down meal. When I entertain, I don't want to be stuck in the kitchen; I want to be laughing and enjoying the time with my guests.

        I typically throw together two to three dishes that couldn't be simpler (no, really): Gambas al Ajillo (Shrimp with Garlic), Patatas Bravas (Fried Potatoes with Tomato Sauce or Aioli) and depending on the weather, Gazpacho (Spanish cold tomato soup). All have minimal ingredients, come together quickly and are still delicious at room temperature.

        What are Spanish Tapas?

        Spanish tapas, pronounced taa·puhz, "tapa" means snack, cover, top or lid in Spanish. Tapas, or tapa if we are talking about one, can be described as small plates or dishes, or basically a smaller portion or snack-size of any dish.

        Some describe tapas as similar to appetizers, hors d'oeuvres, starters, or mezze but those are served before the main course of a meal. Tapas can be eaten as a snack or many small plates can be grazed upon as an entire meal. Tapas can include small plates of appetizers, soups & salads, main course meals and desserts.

        Popular Tapas

        Tapas can be hot or cold dishes and can include practically anything. Here are popular tapas:

        • Albondigas (Spanish meatballs)
        • Calamari or Chopitos (fried squid)
        • Cheese and charcuterie
        • Croquetas (croquettes)
        • Escalivada (roasted vegetables)
        • Pinchos/Pintxos (slices of bread with different toppings)
        • Gazpacho
        • Paella
        • Tortilla Espanola (potatoes and eggs)

        What to Drink with Tapas

        I always like to pair beer or wine with tapas. Margaritas and tequila are a great choice too, but you don't have to order an alcoholic beverage to enjoy tapas.

        Tapas & Wine

        What's great about tapas and wine is that there's such an array of flavors that almost any wine will match with any of these recipes.

        To make better wine pairings, start out with lighter foods and lighter wines and then build up to heavier foods and meats with fuller-bodied wines.

        • Sangria - Refreshing and fruity, make a pitcher of red wine sangria and white wine sangria.
        • Cava - Spain's sparkling wine with aromas of tropical fruit and citrus.
        • Spanish Rosada - A darker, fruitier, and fuller rosé wine that has a foot in both red and white wine.
        • Albariño - A white wine with fruit flavors of lemon, grapefruit, and nectarine and makes a great pairing with seafood dishes.
        • Tempranillo - A red wine and the most famous red variety in Spain. Look for wines labeled Joven or Crianza for more fruit flavors and less oak.
        • Mencia - A red wine that is aromatic and much lighter in body.
        • Garnacha (Grenache)- A Spanish red wine with berry flavors of bright strawberries and raspberries and notes of white pepper.
        • Riojas - A less expensive wine that is full-bodied, with high tannins and rich flavors of dark berries, plums, and herbs. This one is so popular with tapas that there are even Rioja Wine & Tapas Festivals throughout the U.S.

        For American wines try a rosé, a well-chilled sherry or Fino, champagne, chardonnay or Syrah. Tempranillo is most like a Cabernet Sauvignon and Mencia wines are similar to a Pinot Noir.

        Tapas & Beer

        Spain is better known for its wine than its beer but tapas and beer are two tastes that match really well. Beer does a great job of cleansing and refreshing Many tapas are at the saltier end of the spectrum, and beer is absolutely perfect to go along with that.

        A fun way to enjoy tapas and beer is by matching Spanish beers with the same region they originated from.

        Similar to wine, start out with lighter foods and lighter, fruitier beer and then build up to heavier foods and meats with fuller-bodied beers.

        Tapas & Beer Pairings

        • Sours: Cheeses and charcuterie
        • Light lagers: Seafood, salads, spicy tapas
        • Wheat beers: Scallops, shrimp
        • India pale ales (IPAs): Sausages, spicy, salty, heat-charred, smoky, or aromatic plates, sweet desserts
        • Amber ales: Paella, aromatic, spicy and smoked meats
        • Dark lagers: Smoked or caramelized dishes
        • Brown ales: Pork, smoked sausage and hearty dishes
        • Porters: Smoked meats, especially bacon, coffee, and soft, creamy cheeses
        • Stouts: Nuttiness and braised, caramelized integrity of dishes, chocolate, coffee, oysters

        Spanish Beers to Pair with Tapas

        • Mahou Cinco Estrella (Madrid) - A  blonde beer with a light taste
        • La Virgin (Madrid) - A full-bodied fruity taste
        • Estrella Damm (Barcelona) - A rich, malty taste
        • Estrella Galicia Especial - A balance of pilsen and roasted malts
        • Moritz (Barcelona) - A pale pilsner made with mineral water
        • Ambar Especial Lager (Zaragoza) - A signature bright amber color with soft, balanced, refreshing taste
        • Cruz Campo (Seville) - Their pilsner lager is the most popular but there are several types

        What tapas recipes have you made? Share in the comment section (feel free to link to your favorites)!

        Easy Spanish Tapas Recipes

        We’ve collected 28 of our favorite Spanish tapas recipes! We cover everything from easy tapas recipes to authentic plates and classic tapas dishes with a modern twist.

        Gambas al Ajillo Tapas Dish

        Gambas al Ajillo (Shrimp in Garlic Sauce) Recipe

        My version is a fresh shrimp marinated with garlic and a combination of ground ancho and chipotle chile powders. All you have to do is give them a quick sear in a pan (or toss 'em on skewers if you're grilling) and you've got one Spanish tapas dish done!

        Patatas Bravas - Roasted Potatoes in a Spicy Sauce

        Patatas Bravas (Spanish Roasted Potatoes)

        Prep Time 10 minutes Active Time 40 minutes

        Just cut up your potatoes, toss them in olive oil, salt & pepper, then roast them for 40 minutes or so. Serve with a traditional Salsa Brava sauce or aioli (or both) and you're ready to enjoy a glass of wine!

        Best Gazpacho Recipe

        Easy Gazpacho Recipe

        Gazpacho is a classic cold Spanish soup, perfect for hot summer days. Just dice the garlic, chop the vegetables, stir all the ingredients and refrigerate for a few hours.

        Easy Calamares Fritos Recipe

        Easy Calamares Fritos Recipe (Spanish Fried Calamari)

        Photo Credit: spanishsabores.com

        This authentic Spanish recipe for Calamares Fritos is filled with so much Spanish goodness.

        Seafood Paella Recipe

        SPECTACULAR Seafood Paella with MINIMAL Effort | Quick & Easy Recipe

        Photo Credit: spainonafork.com

         Paella is one of the most loved tapas as is seafood in tapas. This authentic recipe combines the best of both worlds.

        Albondigas

        Albondigas (Tapas Spanish Meatballs)

        Photo Credit: www.curiouscuisiniere.com

        These meatballs in a flavorful tomato sauce are perfect for enjoying with a glass of Spanish red wine. 

        Easy Escalivada Recipe

        Easy Escalivada Recipe (Catalan Slow-Roasted Vegetables)

        Photo Credit: ourplantbasedworld.com

        Escalivada is a simple and delicious Catalan side or tapas dish of grilled or roasted vegetables.

        Spanish Croquettes Made With Jamon Serrano

        Spanish Croquettes Made With Jamon Serrano

        Photo Credit: thetortillachannel.com

        Spanish croquettes or croquetas de jamón are the perfect tapas recipe to serve at your next gathering.

        Classic Spanish Pinchos Recipes

        5 Classic Spanish Pinchos | Quick & Simple Tapas Recipes

        Photo Credit: spainonafork.com

        Spanish pinchos or pinxchos are so simple to make here are five quick and easy recipes for making this classic tapas dish.

        Tortilla de Patata Potato Omelet

        Tortilla de Patatas

        Photo Credit: tastesbetterfromscratch.com

        Breakfast for dinner is a welcome sight and this Spanish omelet is an easy Spanish recipe made with potatoes, onion, eggs, salt, and oil.

        Spanish Rice with Chorizo Recipe

        One pot Spanish rice with chorizo and tomatoes

        Photo Credit: www.thetastychilli.com

        Spanish rice is absolutely delicious and extremely versatile with tapas. This one pot Spanish rice recipe includes chorizo but it's simple enough to make without chorizo as well.

        Spanish Spice Almonds

        Spanish Spiced Almonds Tapa (Almendras Fritas)

        Photo Credit: www.flavourandsavour.com

        Spanish Spiced Almonds tapas, known as Almendras Fritas in Spain, makes for a great tapas starter and incredibly easy to make.

        Spanish Marinated Carrots

        Zanahorias Alinadas (Spanish Marinated Carrots)

        Photo Credit: tarasmulticulturaltable.com

        Zanahorias Aliñadas are Spanish marinated carrots are marinated in sherry vinegar with garlic and spices. This makes for a great vegetarian tapas option.

        White Wine Marinated Steak with Blue Cheese

        White wine marinated steak

        Photo Credit: www.carolinescooking.com

        This white wine marinated steak with blue cheese is easy to make, full of flavor and makes a great tapas dish.

        Smoke Sardine Crostini Recipe

        Smoked Sardine Crostini #SundaySupper

        Photo Credit: www.cindysrecipesandwritings.com

        This simple easy smoked sardine crostini recipe is also topped with smoked paprika and smoked sun-dried tomatoes.

        Pinchos Morunos Spanish Pork Skewers with Mojo Picon

        Pinchos Morunos (Spanish Pork Skewers) with Mojo Picon

        Photo Credit: www.curiouscuisiniere.com

        The Pinchos Morunos tapas recipe, flavor-infused pork skewers, is perfect with Spanish Mojo Picon sauce.

        Spanish Mussels Recipe

        Spanish Mussels

        Photo Credit: beyondmeresustenance.com

        I love mussels so I had to include this delicious Spanish mussels recipe.

        Lollipop Prawns

        Prawns & Olives Lollipops — Tapas Revolution - Spanish Tapas Bar & Restaurant

        Photo Credit: www.tapasrevolution.com

        Pinchos de Gambas Y Aceitunas, Prawns and olives lollipops are served with aioli in glass or cup. This easy recipe can be made even easier with store bought aioli.

        Traditional Spanish Sangria Recipe

        Traditional Spanish Sangria Recipe

        Photo Credit: www.spainfoodsherpas.com

        Sangria is a the perfect pairing with tapas especially during a hot summer. There are many modern twists on Sangria but this recipe sticks to Spanish traditions.

        Sangria with Cava Sparkling Wine

        Spanish Tapas Bar & Restaurant

        Photo Credit: www.tapasrevolution.com

        This drink recipe combines two very Spanish drinks, Sangria and Cava (sparkling wine) into one great cocktail that is perfect for tapas.

        sangria recipe

        Sparkling Grapefruit Sangria Recipe

        This Sparkling Grapefruit Sangria Recipe has a citrus twist and is perfect for warmer weather! So easy to throw together and is just beautiful to serve.

        Easy Sweet Tea Sangria Recipe

        Sweet Tea Sangria

        https://www.thewickednoodle.com/sweet-tea-sangria/

        Jalapeño Cucumber Margarita Recipe

        Cucumber Margarita

        The flavors in this margarita recipe will accentuate any tapas dish. It may sound strange but the cucumber adds a refreshing undertone and makes these margaritas perfectly drinkable.

        Arroz Con Leche

        Arroz con leche — Tapas Revolution - Spanish Tapas Bar & Restaurant

        Photo Credit: www.tapasrevolution.com

        Arroz con leche is a traditional Spanish rice pudding that can be made in under thirty minutes including cooking time.

        Torrijas Recipe

        Delicious & Easy Spanish Torrijas Recipe

        Photo Credit: www.spanishfoodguide.com

        Traditionally, torrijas are made of a slice of stale bread soaked in milk flavored with vanilla, and cinnamon. They can be served warm or cold are a great for a super simple tapas dessert.

        flan huevo casero receta abuela

        Classic Spanish Flan Recipe

        Photo Credit: www.quieropostre.com

        This easy flan recipe uses three simple ingredients: eggs, milk and sugar.

        Easy Patatas Bravas (Spanish Roasted Potatoes)

        August 14, 2022 by Kristy Bernardo 2 Comments

        Patatas Bravas Recipe

        Patatas Bravas potatoes are a popular Spanish tapas dish made with potatoes and a spicy tomato based sauce. This quick and easy patatas bravas recipe takes ten minutes to prep and forty minutes in the oven.

        How to Make Patatas Bravas

        Making this famous tapas dish couldn't be easier. Simply cut the potatoes into bite size pieces, toss them in olive oil and salt & pepper, and then roast them in a oven for 40 minutes (scroll to bottom for full recipe.)

        Why is it Called Patatas Bravas & How is it Pronounced?

        Patatas Bravas, also called patatas a la brava or papas bravas is pronounced puh·taa·tuhz braa·vuhz, and translates to "Spicy Potatoes." Patatas means "potatoes" and bravas roughly translates to "strong" or "brave" and is in reference to the bright red and slightly spicy Brava sauce.

        Patatas Bravas Recipe

        What Kind of Potatoes to Use?

        Starchy or all-purpose potatoes are best for patatas bravas as the outside will get crispy and the inside will become creamy when roasted. Yukon Gold, Russet, Asterix, or fingerling potatoes and all fall into these categories.

        What is Patatas Bravas Sauce Made of?

        Brava Sauce, sometimes called the "Mediterranean hot sauce," is perhaps the most well-known sauce in Spanish cuisine and can come in a thousand, slightly tweaked incarnations. It is essentially a spicy tomato sauce, and a traditional Salsa Brava is made from tomatoes, olive oil, and cayenne, and a few other ingredients. Compared to Latin American hot sauces this spice is typically mild.

        Brava sauce is not just the perfect accompaniment to patatas bravas, it's great as a sauce on chargrilled meat on a tasty barbecue. It also makes for a great dip with toasted bread or vegetables.

        A twist on Patatas Bravas is serving them with a garlic aïloi sauce which is also a traditional Spanish sauce combining garlic, mayonnaise and oil.

        Patatas Bravas Sauces to Buy

        • El Navarrico Spicy Salsa Brava (La Rioja region) - Tangy, mildly spicy sauce that is a blend of extra virgin olive oil, piquillo peppers, garlic and spicy smoked paprika.
        • Ferrer Brava Sauce - A traditional brava sauce available in medium or moderately spicy.
        • Iberia Spicy Spanish Brava Sauce - A combination of spicy Spanish hot sauce and creamy mayonnaise.
        • La Victoria Sauce Hot Salsa Brava - Very hot.
        • "The Tapas Sauce" Salsa Brava (from Spain) - Made with tomatoes, vegetable oil (olive and sunflower), onion, peppers and chili sauce.

        What to Serve with Patatas Bravas?

        Patatas Bravas are delicious served on their own or with other tapas plates. For American fare, chicken wings, BBQ chicken, steak, burgers, and fish e.g., cod, salmon, and sea bass are delicious options with Patatas Bravas.

        See our tasty list of tapas dishes for other small plates to serve with this dish.

        More Tasty Potato Recipes

        • Buffalo Chicken & Potato Skillet
        • Chipotle Cheese Potato Soup
        • Crispy Baked Potato Wedges
        • Crispy Smashed Potatoes
        • Steak & Potato Chimichurri
        • Stuffed Baked Potatoes
        • Twice Baked Potatoes Recipe
        Patatas Bravas - Roasted Potatoes in a Spicy Sauce

        Patatas Bravas (Spanish Roasted Potatoes)

        Yield: 8
        Prep Time: 10 minutes
        Cook Time: 40 minutes
        Total Time: 50 minutes

        Roasted in the oven, these patatas bravas are served with a traditional spicy tomato sauce or garlic aioli.

        Ingredients

        • 4 medium potatoes
        • Olive oil
        • Salt & pepper

        Instructions

          1. Preheat oven to 375°F
          2. Peel and cut potatoes into bite-size pieces
          3. Toss them in olive oil, salt & pepper
          4. Roast the potatoes for 40 minutes
          5. Serve with traditional Salsa Brava sauce or aioli (or both)
        Nutrition Information:
        Yield: 8 Serving Size: 1
        Amount Per Serving: Calories: 95Total Fat: 2gSaturated Fat: 0gTrans Fat: 0gUnsaturated Fat: 1gCholesterol: 0mgSodium: 46mgCarbohydrates: 18gFiber: 2gSugar: 1gProtein: 2g

        This data was provided and calculated by Nutritionix.

        © Kristy Bernardo
        Cuisine: Spanish / Category: Appetizers
        Easy Patatas Bravas (Spanish Roasted Potatoes)

        Gambas al Ajillo (Shrimp in Garlic Sauce) Recipe

        August 14, 2022 by Kristy Bernardo Leave a Comment

        Gambas al Ajillo (Shrimp in Garlic Sauce) Recipe

        Gambas al Ajillo also known as Spanish garlic shrimp is one of the more popular tapas in Spain and abroad and also one of the easiest to make. With its complex taste and rich garlic flavor this dish is perfect for entertaining along with other tapas dishes.

        Gambas al Ajillo (Shrimp in Garlic Sauce) Recipe

        What Does Gambas al Ajillo Mean & How is it Pronounced?

        Gambas al Ajillo, pronounced gahm- bahs-ahl-ah- hee-yoh, translates to "shrimp with garlic sauce" or "garlic shrimp."

        Gambas is actually Spanish for "prawn" and camarones means "shrimp". This tapas dish often uses medium to large shrimp because of availability and price of prawns. It has become acceptable to refer to the dish as Gambas al Ajillo when served with prawns or shrimp. Al Ajillo refers to the garlic sauce.

        Gambas al Ajillo Ingredients

        Just a few simple ingredients for this easy dish!

        • Large shrimp: Tapas should be easy to eat so I recommend removing the head, peeling and deveining the shrimp. Shrimp cook quickly, so watch for an opaque, pink color. You can also keep the shell, tail or head on, if you prefer. Keeping the head on may change the taste and intensity of the dish.
        • Extra-virgin olive oil (EEVO): This recipe uses few ingredients so use EEVO for the best flavor.
        • Chipotle & Ancho chili powder: The chili powders add just the right amount of spiciness.
        • Garlic cloves: Minced garlic releases an aromatic flavor into the olive oil.
        • Kosher Salt

        If you prefer, double the recipe, except the shrimp, for extra Al Ajillo sauce so you have even more for dipping.

        (Scroll down to the bottom for the printable recipe card with exact measurements and recipe instructions.)

        How to Make Gambas al Ajillo

        Making this famous tapas dish couldn't be easier. Simply sautée in olive oil, garlic, salt and chili powder to give the sauce a little kick (scroll to bottom for full recipe.)

        Easy Shrimp al Ajillo Recipe

        What Kind of Shrimp (or prawn) to Use?

        Large jumbo shrimp or prawns work best with Gambas al Ajillo but smaller shrimp will do as well. Frozen shrimp (or prawns) are more than fine since most shrimp is frozen and then thawed before being sold anyway. The shrimp can be quickly defrosted in cold tap water or even more quickly in running water with a slow, steady stream.

        What to Serve with Gambas al Ajillo?

        All you need is a loaf of good crusty bread to sop in the garlic sauce. Either slice or lightly toast the bread or break apart the loaf into big chunks. Crostini or any crunchy bread also works.

        See our tasty list of tapas dishes for other small plates to serve with this dish.

        How to Freeze Gambas al Ajillo

        Once the dish has cooled put the shrimp and Al Ajillo sauce into an airtight container to prevent freezer burn. Keep frozen for up to three months.

        Gambas al Ajillo Tapas Dish

        Gambas al Ajillo (Shrimp in Garlic Sauce)

        Yield: 4
        Prep Time: 10 minutes
        Cook Time: 10 minutes
        Additional Time: 30 minutes
        Total Time: 50 minutes

        Making this famous Gambas al Ajillo recipe couldn’t be easier With its complex taste and rich garlic flavor this dish is perfect for entertaining along with other tapas dishes.

        Ingredients

        • 2 tablespoons extra-virgin olive oil
        • 1 pound large shrimp
        • 1 teaspoon chipotle chili powder
        • 1 teaspoon ancho chili powder
        • 2-3 garlic cloves, minced
        • ½ teaspoon kosher salt

        Instructions

        1. Mix all ingredients together in a large bowl. Refrigerate for 30 minutes.
        2. Preheat a large skillet over medium heat.
        3. Add shrimp to pan and cook, turning once, until shrimp are just cooked through (about 4-5 minutes depending on size of shrimp).
        4. Alternatively, you can also put shrimp on skewers and toss them on the grill.

        Notes

        If you prefer, double the recipe, except the shrimp, for extra al ajillo sauce so you have even more for dipping.

        Get creative and mix in other seafood like calamari or squid.

        Nutrition Information:
        Yield: 4 Serving Size: 1
        Amount Per Serving: Calories: 207Total Fat: 9gSaturated Fat: 2gTrans Fat: 0gUnsaturated Fat: 7gCholesterol: 239mgSodium: 1341mgCarbohydrates: 4gFiber: 1gSugar: 1gProtein: 26g

        This data was provided and calculated by Nutritionix.

        © Kristy Bernardo
        Cuisine: Spanish / Category: Appetizers
        Gambas al Ajillo (Shrimp in Garlic Sauce) Recipe

        More Savory Shrimp Recipes:

        • 4-minute Spicy Garlic Shrimp
        • Blackened Shrimp & Crispy Chilled Cucumbers
        • Garlic Butter Shrimp Scampi
        • Grilled Shrimp with Garlic & Beer
        • Shrimp and Sausage Boil
        • Stuffed Poblanos with Potatoes and Shrimp

        Easy Gazpacho Recipe

        August 14, 2022 by Kristy Bernardo 60 Comments

        Best Gazpacho Recipe

        This gazpacho recipe is super-simple and incredibly easy to make whether tomatoes are in season or not - in just 30 minutes!

        I love gazpacho. It's one of those summertime recipes that I can't resist, year after year. There's something so satisfying about throwing all that nature straight into my food processor and then straight to the table. Clean eating at its finest.

        gazpacho

        What Is Gazpacho?

        Gazpacho Andaluz originates from the southern Spanish region of Andalusia and is a classic cold Spanish soup. Traditional recipes call for tomatoes, cucumbers, bell peppers, vinegar, olive oil, garlic, and bread.

        It's the perfect refreshing starter to any meal on a hot summer day and also makes for a healthy snack and weight loss meal.

        Gazpacho Recipe Tips

        • Refrigerate at least a few hours to allow flavors to meld.
        • Don't hold back on the seasoning. Cold soups require more seasoning than hot soups.
        • Try serving in a mug or glass.
        • Don't forget the toppings. It's worth the trouble for a great presentation and really enhances the flavor.

        Gazpacho Soup Topping Garnish

        Speaking of toppings, try adding these garnishments right before serving.

        • Sour cream or yogurt
        • Crème fraîche
        • Flavored oil
        • Roasted nuts e.g. almonds
        • Toasted seeds
        • Feta
        • Chopped boiled egg
        • Spanish Iberico jambon
        • Diced vegetables e.g. cucumbers, peppers, avocado
        • Herbs
        • Croutons
        • Seafood e.g. crab, scallops, shrimp, lobster

        What to Serve with Gazpacho?

        Since you're making a Spanish soup you can break free from the traditional appetizer and meal and instead serve up tapas, small plates of food. Here are some tapas ideas:

        • Crunchy bread e.g. crostini, croutons
        • Chicken skewers or kebabs
        • Mediterranean pasta salad
        • Calamari
        • Spanish rice
        • Steak & potato chimichurri with vegetables
        • Chorizo or Choriqueso
        • Hummus dip
        • Cheese and charcuterie platter
        • Shrimp in garlic (Gambas al Ajillo)
        • Grilled shrimp, crab or seared scallops
        • Roasted vegetables (escalivada)
        • Slices of bread with different toppings (pinchos/pintxos)
        • Potatoes with a spicy sauce (patatas bravas)
        • Spanish Meatballs (albondigas)

        Is Gazpacho Served Hot or Cold?

        Gazpacho served hot is tomato soup. Gazpacho is served cold as a reflection of the hot Spanish region it originated from.

        More Soup Recipes to Try!

        • Avocado Soup
        • Chicken Tortilla Soup with Hatch Chiles
        • Lobster Bisque with Old Bay Oyster Crackers
        • Lentil Soup Recipe with Parmesan and Smoked Sausage
        Gazpacho Recipe

        Easy Gazpacho Recipe

        Yield: 4
        Prep Time: 30 minutes
        Additional Time: 2 hours
        Total Time: 2 hours 30 minutes

        This is a very rustic easy gazpacho recipe. I have been known to put it through a fine mesh strainer when serving at a dinner party to make it smooth. Either way, it’s delicious!

        Ingredients

        • 3 garlic cloves
        • 1 large cucumber, seeded
        • 2 bell peppers (red, yellow or orange, but not green – be sure to stem and deseed)
        • ⅓ of a red onion
        • 2 large or 3-4 small tomatoes
        • ½ cup cilantro
        • 3 cups tomato juice
        • ¼ cup champagne vinegar (or white wine)
        • ⅓ cup high-quality extra-virgin olive oil
        • 2 teaspoons kosher salt
        • 1 teaspoon freshly ground black pepper

        Instructions

          1. Dice the garlic with a knife or place in a food processor, and pulse until it’s finely diced.
          2. Chop the vegetables (cucumber through tomatoes) into large pieces and add to food processor along with cilantro. Process until smooth.
          3. Add the rest of the ingredients and stir well.
          4. Refrigerate at least a few hours to allow flavors to meld, then serve chilled with avocado/diced veggie garnish.

        Notes

        Use only the best, freshest ingredients for this soup.

        You can drizzle with a small amount of olive oil, if desired.

        Nutrition Information:
        Yield: 4 Serving Size: 1
        Amount Per Serving: Calories: 242Total Fat: 19gSaturated Fat: 3gTrans Fat: 0gUnsaturated Fat: 15gCholesterol: 0mgSodium: 1100mgCarbohydrates: 18gFiber: 3gSugar: 10gProtein: 4g

        This data was provided and calculated by Nutritionix.

        © Kristy Bernardo
        Cuisine: Spanish / Category: Soups and Stews
        Easy Gazpacho Recipe

        26 Best Blueberry Desserts (Easy Recipes)

        August 14, 2022 by Kristy Bernardo Leave a Comment

        Baked Oatmeal Cups in muffin tin just out of the oven on a black plate.

        We looked through hundreds of blueberry desserts to bring you only the best of the best blueberry desserts with recipes. From cakes, cookies and pies to ice cream and milkshakes we have you covered with 26 easy blueberry desserts for this versatile fruit.

        Did you know blueberries are one of the healthiest fruits for you? Blueberries are rich in antioxidents, full of vitamins and minerals, help manage cholesterol, blood sugar and blood pressure. Also, one large handful (½ a cup) of blueberries contains just 44 calories.

        For your convenience, each of the blueberry desserts listed has the type of blueberries you'll need, as well as all prep and cook times. Most use either fresh or frozen, and some give you the choice between both. A few also have the option for a can of blueberry pie filling for those of you who might be looking for blueberry desserts with as minimal effort as possible.

        You might also enjoy these easy desserts or this list of Mexican desserts, too!

        Full list of Blueberry Desserts

        Table of Contents

        • Full list of Blueberry Desserts
        • 1. Blueberry Lemon Bread
        • 2. Blueberry Cream Cheese Babka
        • 3. The Best Blueberry Pie
        • 4. No-Bake Blueberry Cheesecake Dip
        • 5. Lemon Blueberry Cake
        • 6. Blueberry Bars with Crumble Topping
        • 7. Lemon Blueberry Cream Cheese Danish
        • 8. Blueberry Turnovers
        • 9. Blueberry Buckle
        • 10. Blueberry Donuts
        • 11. Blueberry Cheesecake
        • 12. No-Bake Blueberry Cheesecake
        • 13. Blueberry Oatmeal Cookies
        • 14. Soft Blueberry Cookies with Lemon Glaze
        • 15. The Best Blueberry Cobbler
        • 16. Blueberry Galette
        • 17. Lemon Blueberry Trifle
        • 18. Lemon Blueberry Sweet Rolls
        • 19. Blueberry Crumb Cake
        • 20. Blueberry Dump Cake
        • 21. Blueberry Ice Cream
        • 22. Blueberry Upside Down Cake
        • 23. Blueberry Lemon Pound Cake
        • 24. Blueberry Milkshake
        • 25. Blueberry Croissant Bread Pudding
        • 26. Blueberry Swirl Coconut Milk Pops
        • Bonus Recipe: Baked Oatmeal Cups

        1. Blueberry Lemon Bread

        • Type of blueberries used: Fresh or frozen
        • Prep time: 20 minutes
        • Cook time: 1 hour

        Lemon zest, freshly squeezed lemon juice, blueberries, and vanilla combine flavors for a truly wonderful blueberry dessert. This dessert bread is perfect for a summer barbecue, brunch, or as a breakfast treat.

        If you're feeling the winter blues, grab some frozen blueberries and get a taste of summer!

        2. Blueberry Cream Cheese Babka

        • Type of blueberries used: Fresh
        • Prep time: 55 minutes
        • Cook time: 40 minutes

        Babka is a sweet, yeast-leavened dough with a filling spread out over rolled-out dough before braiding. It sounds a bit complicated but it's actually quite simple and the effort is definitely worth it.

        This version uses from-scratch blueberry preserves (don't worry, it only takes a few ingredients and is very easy) for a fresh, bright blueberry flavor.

        3. The Best Blueberry Pie

        • Type of blueberries used: Fresh or frozen
        • Prep time: 45 minutes
        • Cook time: 1 hour 5 minutes

        Is there a better blueberry dessert than blueberry pie?? Making a pie from scratch - crust and all - can seem daunting, but there are plenty of tips in this article to make you feel like a pro.

        You'll be glad you took the time when you pull that cold piece of pie from the fridge for a midnight snack!

        4. No-Bake Blueberry Cheesecake Dip

        • Type of blueberries used: Frozen (can use fresh but read notes in the article)
        • Prep time: 5 minutes
        • Cook time: 30 minutes (time for chilling the dip; no cooking involved)

        This no bake recipe is arguably the easiest and quickest blueberry dessert on this list. Serve it with graham crackers, pretzels, or fruit for dipping, pick up an angel food cake and pour it over, or spread it on bagels.

        5. Lemon Blueberry Cake

        • Type of blueberries used: Fresh or frozen
        • Prep time: 30 minutes
        • Cook time: 21 minutes

        If you're looking for a blueberry dessert to impress, here's one that definitely fits the bill. This 3-layer cake is loaded with flavor from fresh lemon and blueberries, then it's topped with a cream cheese frosting plus fresh blueberries and and a twist of lemon.

        6. Blueberry Bars with Crumble Topping

        • Type of blueberries used: Fresh or frozen (see notes in the article for using frozen)
        • Prep time: 20 minutes
        • Cook time: 40 minutes

        A sweet and juicy blueberry filling that's layered between two layers of buttery goodness. Check out the article for step-by-step photos and instructions.

        7. Lemon Blueberry Cream Cheese Danish

        • Type of blueberries used: Fresh
        • Prep time: 20 minutes
        • Cook time: 18 minutes

        Why pay for store-bought pastries when they're so simple to make at home? Frozen puff pastry makes quick work of these delicious danishes. The article has step-by-step photos and instructions. Your next brunch will be the most delicious one yet!

        8. Blueberry Turnovers

        • Type of blueberries used: Frozen
        • Prep time: 15 minutes
        • Cook time: 15 minutes

        Here's another blueberry recipe that uses puff pastry to make an easy blueberry pastry. Since you're also starting with frozen blueberries, you can make these heavenly breakfast treats anytime the mood strikes.

        9. Blueberry Buckle

        • Type of blueberries used: Fresh
        • Prep time: 15-20 minutes (estimate)
        • Cook time: 50 minutes

        This Blueberry Buckle is similar to coffee cake with the addition of fresh, plump blueberries. It's baked in a cast iron pan and makes a delicious breakfast or dessert.

        10. Blueberry Donuts

        • Type of blueberries used: Fresh
        • Prep time: 5 minutes
        • Cook time: 10 minutes

        These donuts are really something special! They clock in at just 100 calories each and they take just 15 minutes from start to finish. You'll need a donut pan, but they're so delicious you'll be using it often!

        11. Blueberry Cheesecake

        • Type of blueberries used: Fresh or frozen
        • Prep time: 20 minutes
        • Cook time: 2 hours, 10 minutes

        Everyone needs a fabulous cheesecake recipe up their sleeve. This one is creamy and swirled with a sweet blueberry sauce. The article gives plenty of variations as well as tips to make your cheesecake come out perfect every time!

        12. No-Bake Blueberry Cheesecake

        • Type of blueberries used: Fresh, frozen, or blueberry pie filling
        • Prep time: 20 minutes
        • Chill time: At least one hour, preferably overnight

        Here's a great recipe to take to a summer barbecue! It's super versatile since you can use fresh or frozen blueberries, or even a can of blueberry pie filling. Just make an easy graham cracker crust, mix up the filling, and chill until you're ready to enjoy.

        13. Blueberry Oatmeal Cookies

        • Type of blueberries used: Frozen
        • Prep time: 15 minutes
        • Cook time: 15 minutes (plus 30 minutes to refrigerate the dough)

        Blueberries + oatmeal is a fantastic combination, so it makes perfect sense to add these plump little berries to oatmeal cookies. And if oatmeal is acceptable for breakfast, why not these delicious cookies?

        14. Soft Blueberry Cookies with Lemon Glaze

        • Type of blueberries used: Fresh (recommended) or frozen
        • Prep time: 15 minutes
        • Cook time: 12 minutes

        Another cookie recipe, but these are soft and pillowy with a tangy lemon glaze. The berries are folded into a butter cookie base, baked, cooled, then drizzled with the glaze. The whole family will love these little blueberry treats!

        15. The Best Blueberry Cobbler

        • Type of blueberries used: Fresh or frozen
        • Prep time: 20 minutes
        • Cook time: 45 minutes

        A simple buttermilk biscuit topping over an easy homemade blueberry filling. All blueberry desserts beg for ice cream, but this one is a perfect match for it! Cold ice cream with warm cobbler is a summertime treat that no one should miss.

        16. Blueberry Galette

        • Type of blueberries used: Fresh or blueberry pie filling
        • Prep time: 15 minutes
        • Cook time: 25 minutes

        This gorgeous galette has a buttery, flaky crust that's paired with fresh blueberries for a truly delicious, impressive dessert. Somewhere between a tart and a pie, but a galette is free-formed for a more rustic result. Use the dough recipe provided or take a shortcut with store-bought pie dough.

        17. Lemon Blueberry Trifle

        • Type of blueberries used: Fresh
        • Prep time: 20 minutes
        • Chill time: 2-4 hours

        Trifles tend to get better the longer they sit, so this recipe is perfect to make the day before. Layers of angel food cake, lemon pudding, and blueberries make this one of most delicious blueberry desserts around. It's also incredibly simple to make!

        18. Lemon Blueberry Sweet Rolls

        • Type of blueberries used: Fresh or frozen (see article notes if using frozen)
        • Prep time: 30 minutes
        • Cook time: 45 minutes (plus time for dough to rise)

        While this recipe is more time-intensive than most of the blueberry desserts on this list, the end result is worth every step. The assembled rolls can be stored in the fridge overnight before baking, making them perfect for a nice brunch or Christmas breakfast.

        19. Blueberry Crumb Cake

        • Type of blueberries used: None - uses a blueberry muffin mix
        • Prep time: 5 minutes
        • Cook time: 30 minutes

        This easy crumb cake uses a muffin mix for an easy and quick breakfast or dessert treat! With just 5 minutes of prep time, you'll want to keep this one handy for any day of the week.

        20. Blueberry Dump Cake

        • Type of blueberries used: Blueberry Pie Filling
        • Prep time: 5 minutes
        • Cook time: 50 minutes

        Yes, you literally just "dump" the ingredients in the baking dish and pop it in the oven! You'll be amazed at the delicious result you'll get with just 4 ingredients and extremely minimal effort. If only all blueberry desserts were this easy!

        21. Blueberry Ice Cream

        • Type of blueberries used: Fresh or frozen
        • Prep time: 15 minutes
        • Chill time: 4-6 hours or overnight

        If you have an ice cream maker at home, get ready for one delicious treat! It's not easy to find blueberry ice cream at the store - or even at an ice cream shop - which is why making it at home is absolutely worth it. Don't forget some cones for the kids!

        22. Blueberry Upside Down Cake

        • Type of blueberries used: Fresh
        • Prep time: 20 minutes
        • Cook time: 55 minutes

        This cake is an incredibly moist and flavorful dessert, but it could be great breakfast, too. The caramelized blueberries on top is a perfect dessert for fresh blueberry season.

        23. Blueberry Lemon Pound Cake

        • Type of blueberries used:
        • Prep time:
        • Cook time:

        This pound cakes uses greek yogurt for a lighter consistency, and has loads of bright lemon flavor. A lemon glaze is drizzled on top of this moist and flavorful cake.

        24. Blueberry Milkshake

        • Type of blueberries used: Frozen
        • Prep time: 5 minutes
        • Cook time: No cooking or chilling time for this one!

        Here's a quick and easy recipe for those hot summer days. You'll need just four ingredients: vanilla ice cream, frozen blueberries, milk, and honey!

        25. Blueberry Croissant Bread Pudding

        • Type of blueberries used: Fresh
        • Prep time: 10 minutes
        • Cook time: 50 minutes

        You know those big packs of croissants at Costco you never buy because you think you could never use them all? Go ahead and pick one up just so you can make this amazing bread pudding. (Tip: if you really don't use them all, pop them in the freezer!)

        26. Blueberry Swirl Coconut Milk Pops

        • Type of blueberries used: Fresh or frozen
        • Prep time: 5 minutes
        • Cook time: 5 minutes (plus 2 hours to chill)

        Of all the blueberry desserts on this list, this one screams summer the most. The recipe calls for just six ingredients - all that just happen to be vegan. They're almost too pretty to eat!

        Bonus Recipe: Baked Oatmeal Cups

        • Type of blueberries used: Fresh
        • Prep time: 10 minutes
        • Cook time: 20 minutes

        These baked oatmeal cups are the perfect portable breakfast. Use your favorite berries and/or nuts for a quick and easy on-the-go meal or snack!

        Baked Oatmeal Cups in muffin tin just out of the oven on a black plate from a list of blueberry desserts

        Grilled Trout with Fresh Herbs, Garlic and Lemon

        August 12, 2022 by Kristy Bernardo 5 Comments

        Grilled fish with lemon and spices

        It's easy to cook up whole grilled trout once you know how. This recipe for grilled trout uses fresh herbs, garlic and lemon. Delicious and simple!

        Grilled fish with lemon and spices

        Grilling a whole trout is intimidating for some...until they actually try it. This recipe, with its 10 minutes of prep and 10 minutes of cooking time, has a simple ingredients list and produces a flavorful dish you'll want to try again.

        The recipe here assumes you're using two whole trout that have already been cleaned and are ready for cooking. Cleaning fish is a bit outside the scope of this article, but if you need to clean your own trout make sure to remove the vein you'll find along the spine--skipping that step can add flavors to this dish you DON'T want.

        Before you start the recipe, there are a couple of choices to make. If you enjoy your fish with the skin on, you'll want to scrape off the scales before you prep the rest of the meal. And then there's washing your fish.

        Many sources recommend washing your trout in cold water before preparing. It cuts down on the fishy smell when cooking and you'll have an overall more pleasant experience cooking the meal.

        How to Cook Trout on the Grill in Foil

        Instead of using a cooking grate you can also grill trout in a foil boat. Here is how:

        1. Tear off 10" by 10" sheets of aluminum foil for each fillet (about 5 - 6 inches longer the fillet.)
        2. Prepare your foil in a little boat shape by turning up the edges of the foil to create a boat-like shape.
        3. Place one whole trout in the center of each sheet.
        4. Close up the foil packet tightly so steam will not escape

        Tip: Heavy duty aluminum foil works best when grilling.

        How to Store Grilled Trout

        Trout can be stored in an airtight container and refrigerated for up to 3 days.

        Whole Grilled Trout with Fresh Herbs, Garlic and Lemon

        Whole Grilled Trout with Fresh Herbs, Garlic and Lemon

        Yield: 2-4 servings
        Prep Time: 10 minutes
        Cook Time: 10 minutes
        Additional Time: 2 hours
        Total Time: 2 hours 20 minutes

        This recipe works best with a whole fish because you will want to place all the herbs inside of it. This recipe is for 2 trout, a pound each, so adjust the amounts accordingly.

        Ingredients

        • 2 whole trout
        • 2 tablespoons fresh parsley, minced
        • 2 tablespoons olive oil
        • 2 tablespoons fresh basil, minced
        • 1 tablespoons fresh rosemary, minced
        • 2 cloves garlic, minced
        • ½ teaspoon kosher salt
        • ½ teaspoon freshly ground black pepper
        • Lemon slices, about 2-3 slices per fish

        Instructions

        1. Mix together the herbs and garlic.
        2. Spread evenly inside the trout.
        3. Add lemon slices (two or three per fish, depending on size).
        4. Cover and refrigerate at least two hours.
        5. Oil cooking grate and preheat grill.
        6. Sprinkle fish with salt & pepper.
        7. Grill for 4-5 minutes on each side over medium heat or until fish is cooked through (larger fish can take a good fifteen minutes, so use your good judgement).
        8. Carefully remove fish from grill, sprinkle with more chopped parsley and lemon slices to garnish, and serve!

        Notes

        You can leave the head and tail on the trout or remove it before cooking, depending on your preference. Same with whether to debone the fish or serve-as-is.

        If you have any fish left over, the meat from the bones and store meat in a container in the fridge (discard bones).

        Nutrition Information:
        Yield: 2 Serving Size: 1
        Amount Per Serving: Calories: 585Total Fat: 26gSaturated Fat: 5gTrans Fat: 0gUnsaturated Fat: 19gCholesterol: 191mgSodium: 503mgCarbohydrates: 6gFiber: 2gSugar: 1gProtein: 84g

        This data was provided and calculated by Nutritionix.

        © Kristy Bernardo
        Cuisine: American / Category: Main Dish
        Grilled Trout with Fresh Herbs, Garlic and Lemon

        Try These Grilled Seafood Recipes Next!

        • Grilled Tilapia
        • Grilled Halibut

        Your Complete Guide to Cooking Bacon on the Grill (Without the Mess!)

        August 10, 2022 by Monique McArthur 2 Comments

        How to Cook Bacon on a Grill

        Cooking bacon on the grill is a simple way to add smoky flavor, reduce cleanup, and keep the smell of bacon grease outside where it belongs. From foil methods to a cast iron skillet, here's how to get perfectly crispy bacon every time.

        after cooking bacon on the grill, a pile of bacon sits on a piece of parchment paper on a black background
        [feast_advanced_jump_to]

        Why Cook Bacon on the Grill Instead of Frying It?

        • No greasy mess in the kitchen - No matter how I cook bacon in my kitchen (usually the oven but occasionally on the stovetop), it's a bit messy and the smell lingers for hours. Cooking it outside on the grill solves both problems!
        • Amazing flavor - Grilling adds smoky, charred edges that you just don't get from the oven or stovetop.
        • Versatile methods - Use foil, a skillet, or skewers depending on what you have on hand.
        • Perfect for brunches and barbecues - It's great for outdoor entertaining or cooking bacon alongside other grilled foods (grilled teriyaki wings are terrific). There's nothing like grilling with a brunch mimosa in hand!
        • Easy cleanup - With aluminum foil, you can cook the bacon, cool the grease, and toss the whole thing!
        • Convenience - If you're already firing up the grill and bacon is on the menu, why not do all your cooking in the same place? Some of our favorite grilling recipes are as simple as grilled avocado halves, charred asparagus spears, or fire-roasted artichokes. Or you could get a little fancier and grill some fruit for this sweet and savory salad.

        Best Methods for Cooking Bacon on the Grill

        There are multiple approaches you can take, some are beginner-friendly, others may be more challenging. It's best to experiment with a couple of individual slices of bacon first if you've never done it before just to make sure it's perfect when it really matters.

        Aluminum Foil "Pan" (Recommended)

        One of the easiest and cleanest ways for cooking bacon on the grill is on a homemade foil pan. It prevents sticking, contains grease, and makes cleanup a breeze. Scroll further down for detailed step-by-step instructions for this easy method!

        Heavy-duty aluminum foil works best but you can also use several sheets of regular foil stacked over one another in a pinch. Where I live in the US, this is the easiest heavy-duty foil to find and it works very well, but you can use any brand you prefer.

        How to do it:

        • Tear off a piece of heavy-duty aluminum foil and fold the edges to create a shallow "tray."
        • Place bacon in a single layer, then put the tray on the grill grates with space around the edges for airflow.
        • Cook with the lid closed, flipping halfway through.

        Why it's great:
        No flare-ups, minimal mess, and you can toss the foil after the grease cools.

        Tip: Use tongs or a spatula to flip the bacon-never a fork, which could puncture the foil.

        bacon cooking on a cast iron skillet that's sitting on a gas grill to demonstrate how to cook bacon on a grill

        Cast Iron Skillet, Grill Pan, or Griddle

        This is one of the most reliable and beginner-friendly methods. Cast iron provides even heat, catches the bacon grease safely, and prevents flare-ups. A cast iron grill pan or griddle is the best if you have it, but a skillet will work just fine.

        How to do it:

        • Preheat your grill and cast iron skillet to 400°F.
        • Place bacon strips in a single layer and close the lid.
        • Cook for about 7-10 minutes on the first side, then flip and cook another 3-5 minutes or until crispy.

        Why it's great:
        Even heat, safe grease containment, and very crispy bacon.

        Tip: Don't overcrowd the skillet, and keep the handle protected with a grill mitt when flipping.

        three pieces of skewered cooked bacon just off the grill on a black background

        On Skewers

        Skewered bacon has the potential to cook unevenly, so when placing the meat on skewers it pays to be mindful of how you "thread" the skewers. And if you're using skewers, you might as make twisted bacon, which is so fun to make and serve!

        Threading bacon onto skewers gives you a fun twist and a built-in portion control. It's great for party appetizers or a unique barbecue side dish, especially if you serve it alongside grilled shrimp skewers.

        How to do it:

        • Thread uncooked bacon onto metal or soaked wooden skewers in a loose "wave" shape.
        • Grill over medium heat, turning every few minutes to cook on all sides.

        Why it's great:
        No grill grates or foil needed, and it makes for an eye-catching presentation.

        Tip: Rotate the skewers like you would kebabs, ensuring all sides get crispy and fully cooked.

        Wrapped in Foil

        For even more grease control and nearly hands-off cooking, you can wrap the bacon completely in foil and grill it like a foil pack.

        How to do it:

        • Place bacon strips inside a folded piece of foil and seal the edges tightly.
        • Grill over medium indirect heat, flipping once halfway through.
        • Open the packet at the end to crisp up the bacon if needed.

        Why it's great:
        No mess, no flare-ups, and good for grilling multiple things at once.

        Tip: Add a cooling rack inside the foil to elevate the bacon slightly for better crisping.

        Directly on the Grill Grates (Not Recommended)

        While it's technically possible to grill bacon directly on the grates, it's a high-risk method that requires constant attention. Cooking bacon on the grill is common and generally very safe, but it's always best to remember there's fire and sometimes gas involved.

        Risks:

        • Bacon fat can cause dangerous flare-ups.
        • Thin bacon may stick or fall apart.
        • Uneven cooking and burnt spots are common.

        If you try it anyway:

        • Use thick-cut bacon.
        • Grill over indirect heat and watch it very closely.
        • Flip it often and move it to a cooler zone if flare-ups occur.

        Why it's not ideal:
        The risk of burning, sticking, and flare-ups makes this the least reliable method.

        Of all the techniques above, the aluminum foil method typically gets the best reviews but cast iron is a close second. The heat from using foil is much more even and the cooking is easier than laying bacon directly on the grill. You could end up with incinerated bacon in a matter of minutes when cooking directly on the grill or a flare-up from grease, and a lot of attention is required.

        crispy bacon on parchment paper just after cooking it on the grill

        How to Grill Bacon Using Aluminum Foil (Step-by-Step)

        1. Tear off a sheet of heavy-duty aluminum foil that's about double the size you need.
        2. Fold it in half for extra strength (skip if using thick foil).
        3. Fold the edges up ½ inch to form a shallow pan with a lip.
        4. Place bacon strips in a single layer on the foil "pan."
        5. Set the foil on the grill grates, leaving room for airflow around the sides.
        6. Cook with the lid closed for 5-7 minutes, flip with tongs, and cook another 3-5 minutes.
        7. Let grease cool before disposing of the foil.

        How to Prepare the Aluminum Foil for Grilling

        Caution: Do not completely cover the grates as it can obstruct the proper air movement of the grill which can potentially cause damage to internal components or a dangerous condition.

        Step 1: Take a piece of aluminum foil that is a little more than double the surface area you need for the bacon.

        Step 2: Fold it in half to create a strong aluminum foil surface. If you're using heavy duty aluminum foil you can skip this step, or use it for an even stronger foil surface.

        Step 3: Fold all four sides of the sheet about a ½ inch from the edge to create a lip that runs the perimeter of the foil sheet. This prevents the grease from dripping onto the BBQ and causing a flare-up.

        a piece of heavy duty aluminum foil with the edges folded up to form a "pan" to show one of the steps for cooking bacon on the grill

        Step 4: Fold in the corners so the grease from the bacon will not drip out of the aluminum foil.

        strips of uncooked bacon on a makeshift "pan" made out of aluminum foil to illustrate how to cook bacon on the grill

        Step 5: Place the bacon on the aluminum "pan" (make sure they aren't overlapping), and then place the "pan" onto the center of the grill grates. There should be adequate open grate space to allow for airflow around the foil.

        uncooked bacon strips on foil showing how to correctly space the bacon when cooking it on a grill

        Step 6: Once finished, allow the grease to cool and then throw away the aluminum foil.

        Caution: Do not completely cover the grates as it can obstruct the proper air movement of the grill which can potentially cause damage to internal components or a dangerous condition.

        Type of Aluminum Foil to Use

        Any aluminum foil can be used, but heavy duty aluminum foil for extra strength and durability while grilling works best. This helps prevent rips or tears that lead to grease leaking onto the grill and creating flare-ups.

        Tips for Cooking Bacon on the Grill - Safely and Effectively

        • Preheat your grill! Before cooking bacon on the grill, you'll want to preheat it to either 350F (longer cooking time, crispier bacon) or 400F (shorter cooking time, chewier bacon). If you're using a cast iron skillet you should preheat that as well.
        • Carefully flip and remove the bacon so the aluminum foil doesn't tear and leak grease onto the grill.
        • Use a spatula or tongs to flip and remove the bacon. A fork might puncture the aluminum foil and cause the grease to leak onto the grill.
        • Never walk away from the grill while grilling bacon. Like any fatty meat, bacon can cause a grease fire.
        • If a flare-up breaks out, remove the bacon from the grill, turn off the grill and allow the flare-up to go out. Never use water on a grease fire.
        • Don't throw away the foil and grease before it has cooled. This could start a fire in the trash.
        • Size the aluminum foil surface based on the amount of bacon you plan to cook.
        • Only line a portion of a grill in foil. Grills are built to ensure proper airflow and covering up all or a large portion of the grill in aluminum foil can be hazardous.
        • Do not use parchment paper as it can singe and even catch fire.
        • Cook over indirect heat to help prevent flare-ups.

        Frequently Asked Questions

        What Kind of Bacon Works Best on the Grill?

        It's often easier to grill with thick-cut bacon if you're cooking the bacon by itself. Thicker cuts are easier to turn and don't as easily stick to grill grates and pans.

        That said, regular cuts of bacon will work just fine! Especially if you're wrapping it around another type of food, it's actually easier and will cook much quicker the thinner it is.

        Which Side of the Aluminum Foil Should I Use?

        You can use whichever side you wish - it makes no difference!

        What Type of Grill Should I Use?

        Any grill will work including a gas, electric or charcoal grill.

        How Do I Store Leftover Bacon?

        Grilled bacon can be stored in a resealable plastic bag or airtight container in the refrigerator for up to 4 days. It can be stored in an airtight container or freezer bag in the freezer for up to 3 months.

        Crispy vs. Chewy Bacon - How You Can Control Texture

        • To make chewy bacon, increase the temperature and cook for a shorter time.
        • To make crispy bacon, decrease the temperature to 350F and cook for a longer time.

        If you have more questions about cooking bacon on the grill, please leave a comment below and we'll answer as quickly as possible!

        Bacon Grilling on Aluminum Foil Surface

        How to Cook Bacon on a Grill - Instructions

        Yield: 1 lb cooked bacon
        Prep Time: 5 minutes
        Cook Time: 30 minutes
        Total Time: 35 minutes

        Cooking bacon on your grill is easy and there's almost no cleanup! Use our method and keep your kitchen cool this summer.

        Ingredients

        • 1 lb slice bacon

        Instructions

          1. Preheat the grill to 400 °F degrees.
          2. Place the cooking surface of your choice on the grill grates.
          3. Add bacon to the cooking surface in a single layer (no overlapping).
          4. Close the lid of the grill and allow the bacon to cook for 15 minutes.
          5. Use tongs to flip the bacon slices to cook another 15 minutes, or until it's as crispy as you like it.

        Notes

        Any amount of bacon that will comfortably fit on your grill will work. Cook times will vary based on the thickness of the cut of bacon and your desired texture.

        Nutrition Information:
        Yield: 6 Serving Size: 1
        Amount Per Serving: Calories: 354Total Fat: 27gSaturated Fat: 9gTrans Fat: 0gUnsaturated Fat: 16gCholesterol: 75mgSodium: 1273mgCarbohydrates: 1gFiber: 0gSugar: 0gProtein: 26g

        This data was provided and calculated by Nutritionix.

        © Monique McArthur
        Cuisine: American / Category: How-To's
        Your Complete Guide to Cooking Bacon on the Grill (Without the Mess!)

        That Creamy Chipotle Sauce Recipe You’ll Want on Everything

        August 9, 2022 by Kristy Bernardo 69 Comments

        a dish of chipotle sauce topped with chopped green onions on a wooden table

        This smoky, spicy chipotle sauce recipe comes together in just five minutes and instantly elevates tacos, burrito bowls, grilled meats, sandwiches, salads, and even fries. It's rich and flavorful without being too heavy, thanks to a mix of yogurt and mayo that lightens things up without sacrificing flavor.

        ★★★★★

        "We use this on everything. Sometimes we sub a little yogurt for mayo, especially if we're using it for sandwiches. It's SO good!"

        - Sherri J.

        The real star, of course, is the chipotle pepper - it adds just the right amount of heat with that irresistible smoky depth. I keep a batch in a squeeze bottle in the fridge at all times, and it disappears faster than I'd like to admit. Once you try this easy chipotle sauce recipe, you'll be drizzling it on everything too!

        🕒 Prep Time: 5 minutes | 🍽️ Yield: ~1¼ cups | 🔥 Flavor: Smoky, creamy, mildly spicy | 🥄 Great For: Tacos, bowls, sandwiches, fries | 🧊 Storage: Keeps up to 2 weeks refrigerated

        a dish of chipotle sauce topped with chopped green onions on a wooden table

        I created this chipotle sauce recipe because 1) I'm obsessed with chipotle peppers and 2) I love to drizzle sauces on pretty much everything. It turned out to be the perfect topping for this chicken flatbread, and it's also terrific on fish tacos.

        [feast_advanced_jump_to]

        Ingredients

        • ½ cup plain yogurt (or substitute sour cream)
        • ½ cup mayonnaise
        • 1-2 chipotle peppers (from a can of chipotle peppers in adobo sauce)
        • ½ teaspoon ground cumin
        • ½ teaspoon kosher salt, or to taste
        • ½ teaspoon freshly ground black pepper

        Instructions

        • Add all ingredients to a blender or food processor.
        • Blend on high speed for about 30-60 seconds, or until the chipotle sauce is completely smooth and creamy. Taste and adjust seasoning if needed (add an extra chipotle pepper for more heat, or a squeeze of lime juice for a bit of acidity).

        Substitutions

        • Plain yogurt: Swap with sour cream for a tangier, richer base. Greek yogurt also works well for a thicker sauce and added protein.
        • Mayonnaise: You can use all yogurt or sour cream for a lighter version, or substitute with vegan mayo to make it dairy-free or plant-based.
        • Chipotle peppers: If you don't have canned chipotle peppers in adobo, use 1-2 teaspoons chipotle powder or 1-2 tablespoons chipotle hot sauce instead. You can also try smoked paprika plus a dash of cayenne for a similar smoky heat.
        • Cumin: Smoked paprika or taco seasoning can work in a pinch.
        • Kosher salt & black pepper: Any salt or pepper will do, just adjust it to your tastes.
        a white dish of chipotle sauce topped with chopped green onions next to a vintage spoon on a wooden table to show how to make this chipotle sauce recipe

        How to Use Chipotle Sauce

        This creamy, smoky chipotle sauce recipe is endlessly versatile, and once you try it, you'll want to drizzle it on everything! Here are some of our favorite ways to use it:

        • Tacos: Drizzle over grilled chicken, shrimp, or veggie tacos for added flavor and a little spice.
        • Burrito bowls & rice bowls: Add a spoonful right on top!
        • Burgers & sandwiches: Use this chipotle sauce recipe in place of mayo or mustard for a smoky, spicy spread.
        • Dips: Use it as a dipping sauce for fries, sweet potato wedges, onion rings, or even tortilla chips.
        • Salads: Thin it out with a little lime juice and use it as a creamy southwest-style salad dressing.
        • Grilled meats: It's delicious with steak, chicken, pork, or grilled tofu.
        • Eggs & breakfast wraps: Add a dollop to scrambled eggs, breakfast burritos, or avocado toast.
        • Pizza: Drizzle it over flatbread or taco-style pizzas.
        • Roasted veggies: Drizzle on or toss with roasted cauliflower, sweet potatoes, or Brussels sprouts.

        Once you start using this chipotle sauce, you'll wonder how your fridge ever lived without it!

        Equipment Needed

        • Blender or food processor - for blending the sauce until smooth
        • Measuring cups and spoons - to measure yogurt, mayo, and spices
        • Rubber spatula - to scrape down the sides of the blender and transfer the sauce
        • Airtight container or squeeze bottle - for storing the finished sauce in the fridge

        Storage

        • Refrigerator: Store chipotle sauce in an airtight container or squeeze bottle in the fridge for up to 2 weeks. Stir or shake before each use, as slight separation may occur.
        • Freezer: Freezing isn't recommended for this sauce due to the yogurt and mayo base, which can separate and change texture when thawed.
        • Tip: Use a squeeze bottle for easy drizzling over tacos, bowls, or veggies (plus it keeps your sauce fresher and mess-free).
        chipotle sauce topped with chopped green onions next to a vintage spoon on a wooden table

        Frequently Asked Questions

        How spicy is this chipotle sauce?

        It's mildly to moderately spicy, depending on how many chipotle peppers you use. Start with one pepper and add a second for more heat.

        Can I use chipotle powder instead of whole chipotle peppers?

        Use 1-2 teaspoons of chipotle powder as a substitute. The flavor won't be quite as rich or smoky, but it still works well.

        Can I make this chipotle sauce dairy-free or vegan?

        Swap the yogurt and mayo for your favorite plant-based alternatives. Make sure to use unsweetened versions.

        How long does chipotle sauce last in the fridge?

        Stored in an airtight container, it will last up to 2 weeks. Keep it refrigerated and give it a quick stir or shake before each use.

        What if I don't have a blender?

        You can finely mince the chipotle peppers and whisk all ingredients together by hand. The texture won't be as smooth, but the flavor will still be great.

        Can I use sour cream instead of yogurt?

        Sour cream is a great substitute and gives the sauce a slightly richer taste.

        Related

        Looking for more sauce recipes? Try these:

        • a bowl of tzatziki sauce with fresh lemon, fresh cucumbers, garlic cloves, and fresh dill and mint around the bowl on a table
          Authentic Greek Tzatziki Sauce with Yogurt & Cucumber
        • Jar of fresh homemade DIY mayo
          Homemade Mayo (takes just 2 minutes!)
        • Easy Basil Pesto Recipe
          Basil Pesto Recipe (and 25 unique ways to use it)
        • Sliced grilled steak Ribeye with herb butter on cutting board on wooden background
          9 Compound Butter Recipes for Steak, Chicken or Fish

        Pairings

        These are my favorite things to top with chipotle sauce:

        • This Dorito Taco Casserole is so simple to throw together that my kids make it all the time!
          Dorito Taco Casserole with Black Beans and Corn
        • Walking Taco Casserole In A Serving Dish
          Walking Taco Casserole (Easy, Cheesy Weeknight Dinner)
        • Mexican Gourmet Hot Dogs - cheesy, a little spicy and SO delicious!
          Cheesy Mexican Gourmet Hot Dogs
        • Golden crispy baked potato skins loaded with gooey cheese and crispy bacon, garnished with fresh green chives.
          The Secret to Extra Crispy Baked Potato Skins
        chipotle sauce topped with chopped green onions next to a vintage spoon on a wooden table

        Easy Chipotle Sauce

        Yield: 1 ¼ cups
        Prep Time: 5 minutes
        Total Time: 5 minutes

        This creamy chipotle sauce recipe comes together in just five minutes and can be used as a dip, as a topping for chicken or shrimp tacos, drizzled on salads and much more!

        Ingredients

        • ½ cup plain yogurt
        • ½ cup mayonnaise
        • 1-2 chipotle peppers (from a can of chipotle peppers in adobo sauce)
        • ½ teaspoon cumin
        • ½ teaspoon kosher salt, or to taste
        • ½ teaspoon freshly ground black pepper
        • squeeze of lime (optional)

        Instructions

        1. Place all the ingredients in a blender or food processor.
        2. Blend it on high speed until it's smooth and creamy.
        3. Store it in the refrigerator in an airtight container or squeeze bottle for up to two weeks.
        Nutrition Information:
        Yield: 10 Serving Size: 1
        Amount Per Serving: Calories: 87Total Fat: 8gSaturated Fat: 1gTrans Fat: 0gUnsaturated Fat: 7gCholesterol: 5mgSodium: 142mgCarbohydrates: 2gFiber: 0gSugar: 1gProtein: 1g

        This data was provided and calculated by Nutritionix.

        © Kristy Bernardo
        Cuisine: Mexican / Category: Sauces
        That Creamy Chipotle Sauce Recipe You’ll Want on Everything

        How to Make Italian Dressing

        August 7, 2022 by Kristy Bernardo Leave a Comment

        THIS is how to make Italian Dressing! Balsamic instead of white vinegar is what makes it!

        Now THIS is how to make an easy Italian Dressing! Balsamic instead of white vinegar is what makes it super special.

        THIS is how to make Italian Dressing! Balsamic instead of white vinegar is what makes it!

        I was making yet another pasta salad when it occurred to me I've never shared my simple Italian dressing recipe. It's one of those things that I could make with my eyes closed, that's how many times I've made it. This time I made sure to write down amounts! So if you've been wondering how to make Italian dressing, wonder no more, friends.

        The funny thing about Italian dressing - no matter if it's homemade or bottled - is that I really don't care for it much. With the exception of my own. The reason being is that I use balsamic vinegar in my Italian dressing instead of the typical white wine vinegar (recipe includes both options). Balsamic is just so much smoother and, for me, makes a superior salad dressing that I'll actually enjoy versus simply tolerate.

        And making Italian dressing from scratch really could not be simpler. If you got vinegar and olive oil, you've already got two essential ingredients. A little dried basil and oregano adds some great herb flavor (I'll even toss in a smidge of thyme now and then) and garlic brings it all together. I also add some dijon which gives it that extra "something"...plus I just really love dijon!

        So there you go! Now you no longer have to wonder how to make Italian dressing.

        Tips for a Better Homemade Italian Dressing

        • Replace Your Old Spices: Ground spices last about 6 months and deteriorate over time.
        • Extra Virgin Olive: Use for best flavor.
        • Parmesan Cheese: Add freshly grated Parmesan to step up the flavor factor. Canned works too but fresh is the best.

        Ideas for Italian Dressing

        This Italian dressing is great with my Skinny Chopped Veggie Salad (and very low calorie for those trying to shed a few pounds)! Italian dressing is also great on an Italian chopped salad or a pasta salad.

        If you're not in the mood for a salad or pasta try these clever uses for Italian dressing.

        • Marinate a steak with Italian dressing, salt, pepper and Worcestershire sauce.
        • Add it over roasted veggies like broccoli, cauliflower, tomatoes, or Brussels sprouts.
        • Drizzle over grilled potatoes, asparagus, eggplant, or zucchini.
        • Mix it in with couscous, farro or quinoa.
        • Marinade with lentils, chickpeas, mung beans, or white beans.
        • Use on a burger or deli sandwich instead of mayo or mustard.
        • Mix into ground beef before grilling burgers.
        • Toss with diced vegetables.
        • Use as a marinade for chicken, pork chops, white fish and shrimp.
        • Use leftover veggies and meats to make an Italian dressing sandwich.
        • Coating for steamed veggies or a dip for fresh veggies.
        • Add to cream, sour cream, cream cheese, hummus, or butter for spreads, sauces or dips.

        How long can you store Italian Dressing?

         Vinegar-based dressings usually last the longest. Homemade Italian Dressing can be stored in the refrigerator for up to 2-3 weeks, if it only contains oil vinegar and spices. If the dressing also contains fresh ingredients such as garlic and herbs, then the time is shortened according to that ingredient which is about three days. Be sure to give it a good stir or shake before using.  

        For store bought Italian dressing look at the "Best if Used By" date. The dates are typically 3 - 4 months after the production date, but this varies by manufacturer, so be sure to check the packaging.

        THIS is how to make Italian Dressing! Balsamic instead of white vinegar is what makes it!

        How to Make Italian Dressing

        Yield: 4 servings
        Prep Time: 5 minutes
        Total Time: 5 minutes

        This Italian salad dressing recipe uses balsamic vinegar and makes a fantastic addition to salads, grilled vegetables, or even as a dipping sauce.

        Ingredients

        • ½ cup balsamic vinegar, or white wine vinegar or champagne vinegar
        • ½ teaspoon dried basil
        • ½ teaspoon dried oregano
        • ½ teaspoon onion powder
        • 1 teaspoon dijon mustard
        • 1 large garlic clove, minced (or two small)
        • 1 large pinch salt
        • freshly ground black pepper
        • ¾ cup extra-virgin olive oil

        Instructions

        1. Put all ingredients in a shaker or blender. Shake or blend until blended.

        Notes

        Can be stored in the refrigerator for up to three days.

        Substitute fresh garlic with 1 teaspoon dried garlic and the dressing can be stored for up to three weeks. Dried garlic is more potent so less is needed.

        To save on prep time pre-make the dried herbs and spices in advance and keep them in a sealed container or bag.

        Nutrition Information:
        Yield: 4 Serving Size: 1
        Amount Per Serving: Calories: 393Total Fat: 41gSaturated Fat: 6gTrans Fat: 0gUnsaturated Fat: 34gCholesterol: 0mgSodium: 76mgCarbohydrates: 7gFiber: 0gSugar: 5gProtein: 0g

        This data was provided and calculated by Nutritionix.

        © Kristy Bernardo
        Cuisine: Italian / Category: Sauces
        How to Make Italian Dressing

        Easy Fried Rice – The Ultimate “Use What You Have” Dinner

        August 7, 2022 by Kristy Bernardo 83 Comments

        an overhead shot of an asian-style platter filled with fried rice on a wooden table, with carrots, peas, and onions clearly visible

        Easy Fried Rice is the ultimate "use what you have" dinner. It's quick, cheap, and easily adaptable. This isn't about chasing restaurant-style perfection or sticking to strict ingredients. It's about turning leftover rice, a few vegetables, and whatever protein you've got into a hot, flavorful meal in just 20 minutes.

        The beauty of fried rice is that it welcomes creativity. No peas? Use chopped green beans or edamame. Out of carrots? Try bell peppers or zucchini. Swap the meat for tofu, keep it vegetarian, or load it with shrimp, chicken, or pork. You can even make it without any protein at all for a light side dish.

        With just a little oil, a splash of soy sauce, and a few pantry staples, you can have a steaming bowl of fried rice that tastes like you planned it!

        a platter of easy fried rice on a wooden table with two chopsticks resting on the side of the dish

        I like to serve this easy fried rice with my Asian baked drumsticks for an easy weeknight meal. It's also delicious (and so pretty!) with a portion of garlic-honey broiled salmon served on top.

        [feast_advanced_jump_to]

        What Makes This Fried Rice "Easy"

        The beauty of this easy fried rice is that it's built for busy nights and minimal effort. You don't need a long list of specialty ingredients or a deep dive into traditional techniques, just a handful of pantry staples, some leftover rice, and whatever veggies or proteins you already have.

        • Uses leftover rice: Day-old rice has a firmer texture that fries up beautifully without turning mushy.
        • Pantry-friendly sauces: Soy sauce, oyster sauce, and even fish sauce give you plenty of flavor without a complicated marinade.
        • Flexible ingredients: Swap carrots for bell peppers, peas for corn, or chicken for shrimp, pork, steak, or tofu.
        • One-pan cooking: Everything comes together in a single wok or skillet, so cleanup is quick.
        • It's ready in 20 minutes: Perfect for weeknights, last-minute lunches, or when you need a side dish fast.

        This recipe is less about following strict rules and more about using the stir-fry method to turn odds and ends from your fridge into a hot, satisfying meal.

        Ingredients & Substitutions

        You only need a few basic ingredients to make this easy fried rice, and most can be swapped for what you already have on hand.

        Cooking oil: Canola oil works great for high-heat cooking, but vegetable oil, peanut oil, or avocado oil are all good alternatives. Add a drizzle of toasted sesame oil at the end for extra flavor.
        Garlic & Onion: Fresh garlic adds a ton of flavor, and of course goes hand in hand with onion. Use red, yellow, white onion, or even green onions at the end.
        Carrots: Diced carrots give a little sweetness and color. Try bell peppers, zucchini, or broccoli if that's what's in your fridge.
        Eggs: They add protein and texture. You can skip them or use scrambled tofu for a vegan option. Add an extra egg if you're not adding a meat protein.
        Protein: Any chopped leftover meat works: chicken, pork, beef, ham, or shrimp. Or keep it vegetarian with tofu or edamame.
        Peas: Frozen peas are easy and quick to use, but corn, edamame, or green beans make great swaps.
        Rice: Leftover medium or long-grain rice is perfect. Freshly cooked rice can work too, just cool it in the fridge for at least 2 hours so it doesn't clump.
        Sauces: Soy sauce, oyster sauce, and fish sauce are great for umami. Tamari or coconut aminos work for gluten-free versions. I've even added a spoonful of hoisin sauce!
        Seasoning: A pinch of coarse salt and freshly ground black pepper to balance the flavors.

        Tip: Keep a bag of frozen vegetables and some leftover rice in the freezer, and you'll be just minutes away from a hot, homemade fried rice any time. You can even keep a stir-fry sauce on hand to make it even easier!

        an overhead shot of an asian-style platter filled with fried rice on a wooden table

        How to Make Easy Fried Rice

        This easy fried rice comes together fast, so it's best to have all your ingredients prepped and ready before you start cooking. Here's how to make it:

        1. Prep the rice: If you're using leftover rice, break up any clumps with your hands or a fork so it's loose and easy to stir-fry. If using freshly cooked rice, spread it on a baking sheet and chill in the fridge first for at least 2 hours.
        2. Heat the oil: Place a wok or large skillet over medium-high heat. Add the oil and swirl to coat the pan so nothing sticks.
        3. Cook the vegetables: Add the carrots first since they take the longest to soften, cooking for about 2 minutes. Then add the garlic and onion, stirring for another 1-2 minutes until they're starting to soften.
        4. Scramble the eggs: Push the veggies to one side of the pan. Crack in the eggs and scramble until just set, then mix them back in with the vegetables.
        5. Add the protein: Stir in your leftover meat, tofu, or shrimp, cooking for 1-2 minutes to heat through.
        6. Add the rice and sauces: Stir in the rice, soy sauce, oyster sauce, and optional fish sauce. Toss it well so every grain is coated.
        7. Finish and serve: Cook for another 2-3 minutes, stirring constantly. Season it to taste with salt and pepper, then serve it hot.

        Tip: If the rice starts sticking, add a small splash of oil or water and keep the pan moving to prevent burning.

        an extreme closeup of easy fried rice, with peas, carrots, and onion clearly visible

        Tips

        Fried rice is simple to make, but a few small tricks can take it from good to great:

        • Use cold, day-old rice: Leftover rice has less moisture, so it fries up fluffy instead of turning soggy. If you have to cook fresh rice, spread it on a baking sheet and chill it uncovered for a couple of hours first.
        • Cook over medium-high heat: A hot pan helps the rice fry instead of steam, giving it that slightly toasted flavor.
        • Don't overcrowd the pan: Too much food at once lowers the heat and makes the rice clump. If needed, cook it in batches.
        • Add the vegetables in order of their cooking time: Start with harder veggies like carrots, then add quicker-cooking ones like peas toward the end.
        • Push ingredients aside for the eggs: Cooking the eggs separately in the same pan keeps them fluffy instead of mixing in raw with the rice.
        • Season in layers: Add a little soy sauce and oyster sauce early, then taste at the end and adjust the seasoning if needed.
        • Finish with fresh ingredients: A sprinkle of green onions, fresh herbs, or a drizzle of toasted sesame oil right before serving adds a lot of flavor!

        Flavor Variations

        One of the best things about this easy fried rice is how easy it is to adapt to your mood, the season, or whatever's in your fridge. Here are a few tasty ideas:

        • Vegetable Fried Rice: Skip the meat and load up on colorful veggies like broccoli, bell peppers, zucchini, corn, or snap peas.
        • Spicy Fried Rice: Add a spoonful of chili paste, sriracha, or diced fresh chili peppers when cooking the vegetables.
        • Kimchi Fried Rice: Stir in chopped kimchi and a splash of the brine. Top it with a fried egg, too!
        • Shrimp Fried Rice: Use chopped cooked shrimp or quickly sauté raw shrimp before adding the vegetables.
        • Pineapple Fried Rice: Toss in diced pineapple and cashews or almonds for a sweet-salty combo.
        • Teriyaki Fried Rice: Replace the soy sauce and oyster sauce with teriyaki sauce for a slightly sweeter glaze.

        Tip: You can even split your batch into halves or thirds before adding sauces and mix-ins so everyone gets their favorite flavor without making separate recipes.

        a closeup of a platter of easy fried rice on a wooden table with two chopsticks resting on the side of the dish

        Storage & Reheating

        Fried rice stores well and reheats beautifully, making it perfect for meal prep or using up a big batch.

        • Refrigerator Storage: Transfer any cooled fried rice to an airtight container and refrigerate it for up to 4 days.
        • Freezer Storage: Fried rice freezes well. Portion it into freezer-safe containers or bags, removing as much air as possible, then freeze it for up to 2 months.
        • Reheating in a skillet: The best way to bring fried rice back to life is in a skillet over medium heat. Add a splash of water or broth to loosen it up, then stir until hot.
        • Reheating in the microwave: Place the rice in a microwave-safe dish, cover it loosely, and heat in 30-40 second bursts, stirring between each. Adding a damp paper towel over the dish helps prevent drying out.
        • Reheating from frozen: Thaw it overnight in the fridge before reheating, or heat straight from frozen in a skillet with a splash of water, breaking apart any clumps as it warms.

        Food Safety Tip: Because fried rice contains cooked rice and often meat or eggs, store and reheat promptly.

        Frequently Asked Questions

        Can I use freshly cooked rice for fried rice?

        You can, but it works best if you cool it first. Spread the rice out on a baking sheet and refrigerate it uncovered for at least 2 hours to reduce moisture and prevent it from clumping.

        What's the best rice for fried rice?

        Medium or long-grain white rice (like jasmine or basmati) gives you light, separate grains. Short-grain rice tends to be stickier, so it doesn't work as well (unless you prefer a softer texture).

        How do I make fried rice without eggs?

        Just skip them, or replace them with scrambled tofu for a vegan-friendly version that still has protein.

        Can I make fried rice without meat?

        Of course! Just load it up with vegetables or use plant-based proteins like tofu, tempeh, or edamame.

        How can I make fried rice gluten-free?

        Swap the soy sauce for gluten-free tamari or coconut aminos, and check that your oyster sauce (if using) is gluten-free.

        Why is my fried rice mushy?

        Too much moisture is usually the cause. Use cold, day-old rice, cook over medium-high heat, and don't overcrowd the pan.

        Related

        Looking for more easy side dish recipes like this? Try these:

        • This easy mushroom risotto is sophisticated and has amazing flavor!
          Easy Mushroom Risotto with Gorgonzola
        • Green Beans Almondine on a white oval plate which sits on a wooden board with a rustic napkin next to it.
          Green Beans Almondine
        • Green Bean Casserole Recipe
          Easy Green Bean Casserole with Blue Cheese
        • a white bowl filled with homemade creamed corn and topped with chopped parsley on a tan napkin on a wood table
          Homemade Creamed Corn Recipe (With or Without Cream)

        Pairings

        These are my favorite dishes to serve with this easy fried rice:

        • Try this Easy Teriyaki Chicken Recipe - all in one pan and great for an easy weeknight meal!
          Easy Teriyaki Chicken Recipe
        • These shrimp are KILLER! They make a great main dish with a salad and bread or a wonderful appetizer. They always go FAST!! | the wicked noodle | #shrimp #appetizer
          4-minute Spicy Garlic Shrimp
        • Just 15 minutes to a healthy and delicious dinner! Sweet and Spicy Baked Salmon
          Sweet & Spicy Baked Salmon
        • Baked Salmon with Mayo just out of the oven on a sheet pan.
          Baked Salmon with Mayo
        Don't throw away that leftover rice! Easy Fried Rice is so much better for you than takeout and a lot tastier, too! | the wicked noodle | #dinner #asian #cheapeats

        Easy Fried Rice

        Yield: 4 servings
        Prep Time: 10 minutes
        Cook Time: 10 minutes
        Total Time: 20 minutes

        Keep just a few ingredients on hand to make this easy fried rice anytime!

        Ingredients

        • 1 tablespoon canola oil
        • 2 garlic cloves, minced
        • ½ medium onion, chopped (I use red but any will do)
        • 3 medium carrots, diced
        • 2 eggs
        • 1 cup leftover meat, chopped
        • 1 cup frozen peas, thawed
        • 3-4 cups leftover rice (preferably medium or long-grain)
        • 2 tablespoons oyster sauce
        • 2 tablespoons soy sauce
        • Dash of fish sauce (optional)
        • coarse salt & freshly ground black pepper

        Instructions

        1. Preheat a wok or large skillet over medium-high heat.
        2. Place the rice in a bowl and break up any large clumps.
        3. Add the oil to wok and swirl it to coat the sides.
        4. Add the carrots, stir and cook for two minutes.
        5. Add the garlic and onion, cooking for another two minutes.
        6. Move all the ingredients to one side of the wok, then break the eggs into the wok and stir until they’re almost cooked completely.
        7. Add in the chopped meat, peas and rice, stirring quickly between each addition.
        8. Stir in the oyster and soy sauces, and stir constantly until the rice is coated with the sauce and all the ingredients are heated thoroughly, about 3 minutes or so (add more oil if the rice begins to stick to the wok).
        9. Season to taste with salt and pepper. Serve immediately.
        Nutrition Information:
        Yield: 4 Serving Size: 1
        Amount Per Serving: Calories: 818Total Fat: 11gSaturated Fat: 3gTrans Fat: 0gUnsaturated Fat: 8gCholesterol: 124mgSodium: 887mgCarbohydrates: 145gFiber: 5gSugar: 4gProtein: 29g

        This data was provided and calculated by Nutritionix.

        © Kristy Bernardo
        Cuisine: Asian / Category: Dinner
        Easy Fried Rice – The Ultimate “Use What You Have” Dinner

        Easy Teriyaki Chicken Recipe

        August 7, 2022 by Kristy Bernardo 26 Comments

        Try this Easy Teriyaki Chicken Recipe - all in one pan and great for an easy weeknight meal!

        Try this Easy Teriyaki Chicken Recipe - all in one pan and great for an easy weeknight meal. Even your pickiest eaters will approve!

        Try this Easy Teriyaki Chicken Recipe - all in one pan and great for an easy weeknight meal!

        Teriyaki chicken is one of those dishes that even picky eaters are willing to try. The sweetness of the teriyaki sauce combined with the savory chicken is a great combination and making these with boneless, skinless chicken thighs makes the prep much easier.

        Ingredients

        • Boneless, skinless chicken thighs
        • Vegetable or canola oil
        • Kosher salt and freshly ground black pepper
        • Soy sauce
        • Apple cider vinegar
        • Brown sugar
        • White sugar
        • Ground ginger
        • Garlic cloves, minced
        • Cooked rice, for serving

        I like boneless, skinless chicken thighs the best because they are juicy and tender and cook quickly. Boneless, skinless chicken breasts are a perfectly fine substitute.

        Pro Tips For Chicken Teriyaki

        I learned some useful things about cooking chicken teriyaki; the recipe below uses vegetable or canola oil but some feel their teriyaki lacks something when prepared this way. Ideally, you would use sesame oil for a more specific teriyaki flavor, but sesame oil can get a bit smoky at higher temperatures.

        If you miss the flavor you can always toss your chicken in sesame oil once the cooking is finished. Cooked rice is recommended in my recipe, but what kind of cooked rice? Short-grain sushi rice is closer to "traditional" but long-grain jasmine rice can be amazing, too.

        If you want to substitute a gluten-free soy sauce, consider tamari, but be sure to sample it first as tamari brings its own flavor profile to the dish. Tamari is traditionally a byproduct of making miso paste, but check the label on your brand to make sure.

        Step number four in the cooking instructions is something you should note for other dishes. In step four, the recipe says, "immediately reduce heat to low and pour in soy sauce and vinegar" and you should stir to catch browned bits from the bottom of the pan. This is called deglazing, and it's a technique used in many different dishes to keep those flavorful extra bits in the dish.

        Garnishing

        When serving, consider adding some minced red onion to the top of the sushi rice as a garnish. Red pickled ginger can also be an attractive finishing touch. You can get pickled ginger in many Asian grocery stores and in the "international" aisle in local grocery stores.

        Try this Easy Teriyaki Chicken Recipe - all in one pan and great for an easy weeknight meal!

        My youngest daughter is always begging me to make this, too, so I know that everyone in the family will eat up this easy Teriyaki Chicken recipe, no questions asked!

        {Side note: This is the first time I've used my new Le Creuset Braiser that I got for Christmas (in the photo above). It's awesome and was perfect for this dish!}

        Try this Easy Teriyaki Chicken Recipe - all in one pan and great for an easy weeknight meal!

        Easy Teriyaki Chicken Recipe

        Yield: 6 servings
        Prep Time: 10 minutes
        Cook Time: 30 minutes
        Total Time: 40 minutes

        This Teriyaki Chicken recipe is easy to make with just one pan and perfect for a weeknight meal.

        Ingredients

        • 12 boneless, skinless chicken thighs
        • 1 tablespoon vegetable or canola oil
        • kosher salt and freshly ground black pepper, to season chicken
        • 1 cup soy sauce
        • ½ cup apple cider vinegar
        • ½ cup light brown sugar
        • ¼ cup white sugar
        • 1 teaspoon ground ginger
        • 3 garlic cloves, minced
        • cooked rice, for serving

        Instructions

        1. Pat chicken thighs dry and season with salt and pepper.
        2. Preheat a large, deep skillet or dutch oven over med-high heat. Add oil.
        3. Once oil is shimmering, add chicken thighs in batches (about 4-5 at a time) and brown on both sides. Remove chicken and set aside.
        4. Once the last batch of chicken is browned, immediately reduce heat to low and pour in soy sauce and vinegar, stirring to remove any browned bits from bottom of pan.
        5. Add remaining ingredients, stir well then bring to a boil. Nestle chicken into the sauce, turning to coat. Reduce heat to low again, cover pot and simmer for 10 minutes.
        6. Remove cover from pan, turn chicken and continue briskly simmering for another 20-30 minutes uncovered until chicken is cooked through and sauce is thickened. Serve immediately with hot rice on the side.

        Notes

        If you are using stainless steel cookware, be sure to fully preheat the pan to avoid your chicken sticking to it when cooking. Ceramic pans are great for chicken teriyaki and other lower-heat dishes.

        When serving, you won’t need seasonings that add more salt, thanks to the soy sauce. Taste this one before you season it just in case!

        Nutrition Information:
        Yield: 6 Serving Size: 1
        Amount Per Serving: Calories: 575Total Fat: 22gSaturated Fat: 6gTrans Fat: 0gUnsaturated Fat: 15gCholesterol: 287mgSodium: 2797mgCarbohydrates: 34gFiber: 1gSugar: 23gProtein: 62g

        This data was provided and calculated by Nutritionix.

        © Kristy Bernardo
        Cuisine: Japanese / Category: Dinner
        Easy Teriyaki Chicken Recipe

        5-minute Quick Faux Pho Recipe

        July 31, 2022 by Kristy Bernardo 92 Comments

        5-minute faux pho recipe | www.thewickednoodle.com | #pho #ramen

        Got 5 minutes? Then you've got time for this seriously delicious Faux Pho recipe.

        5-minute faux pho recipe | www.thewickednoodle.com | #pho #ramen

        There's a place not too far from me that serves up some pretty amazing pho dishes and I've tried just about all of them. It's gotten to the point where I crave it on cold days or if I'm not feeling up to par. Chicken noodle soup just doesn't do it for me anymore - I need the spiciness, heartiness and flavor of a really good Pho. 

        I'm frankly surprised that it's taken me this long to try my hand at making a pho recipe at home. This being a "faux" pho recipe, however, I suppose I can't really claim that I've made an authentic Pho recipe just yet. But it's my version and it tastes FANTASTIC. I took the liberty of adding an egg to the broth which thickens it and gives it a slightly creamy consistency which strays even further from authenticity. You can choose to skip the egg if that's not your thing.

        5-minute faux pho recipe | www.thewickednoodle.com | #pho #ramen

        This faux pho recipe could also be a great way to use up some leftover steak. You could easily make a bowl just for yourself for a quick lunch or dinner - just slice up whatever leftover steak you've got and toss it in. Flank, wagyu, brisket, braised, chuck roast and other steaks will all work.

        What is Pho?

        Pho is a Vietnamese soup typically served in a large bowl with a dish of extra ingredients on the side; bean sprouts, basil, cilantro, and jalapeno slices are just a few of the options.

        Pronounced, "fuh", this can be a tricky meal to make authentically because there are a couple of "secret" weapons you should use when preparing this amazing soup. Once you know what they are, the real trick is simply getting the measurements correct as we'll see below.

        Things To Know About 5-Minute Faux Pho

        Notice the recipe above does not indicate whether the steak should be raw or cooked. This is one of the discoveries some newcomers to Vietnamese cooking make--there is a traditional thinly sliced beef Pho where the beef is added raw to the very hot soup right at the end. The hot soup cooks the thinly sliced raw beef, and it's delicious.

        But if you aren't careful in the prep stage there may be a risk of food-borne illness. Cooked beef is the best for Pho beginners. Save the more traditional approach for after you're comfortable making the dish.

        5-minute faux pho recipe | www.thewickednoodle.com | #pho #ramen

        Upping Your Pho Game

        This 5-minute Pho recipe may be most effective for people who have not experienced a bowl of authentic Pho yet. If you try this recipe as an experienced Pho eater, you will notice a distinct lack of some very important flavors in the mix. They include:

        • Star anise
        • Whole cloves
        • Cinnamon sticks
        • Cardamom pods
        • Coriander seeds

        The good news is that you can still make this recipe fast AND get the full power of those seasonings simply by not using the ramen flavor packet, but swapping it out for a Pho bouillon cube instead.

        These cubes have all the spices needed for a closer-to-authentic Pho taste. You can get these cubes in most Asian grocery stores, on Amazon, and sometimes in the International aisle of your local supermarket. One brand to consider trying: Bao Long Pho Spice Cubes, which are available on Amazon and are a popular staple in some shops.

        There is one major thing to remember about Pho; it's a very flexible dish and there are few rules to follow unless you are dedicated to making a VERY authentic bowl of Pho.

        Fusion approaches (adding ingredients not considered traditional, like adding kimchi to a taco) work very well when you are experimenting with a different culture's recipes. There are all kinds of traditional Pho including seafood versions, chicken, vegetarian options, and more. Of all the varieties, the vegetarian version may be the trickiest because a standard feature of Pho is a rich beef stock

        Top it with your favorite Pho toppings and you'll be in faux heaven pho sho!

        More great soup recipes:

        • Lobster Bisque with Old Bay Oyster Crackers
        • Japanese Udon Noodle Bowls {20-minute meal}
        • Green Bay Booyah Recipe
        • Oyster Stew Recipe
        • Avgolemono Soup (Chicken Soup with Egg and Lemon)
        5-minute faux pho recipe | www.thewickednoodle.com | #pho #ramen

        5-Minute Quick Faux Pho Recipe

        Yield: 4 servings
        Prep Time: 5 minutes
        Cook Time: 5 minutes
        Total Time: 5 minutes

         This fast pho recipe is for those that don't have a whole day to make pho.

        Ingredients

        • 2 packages beef ramen
        • 1 tablespoon fish sauce
        • 1 teaspoon rice vinegar
        • 1 teaspoon sriracha hot sauce
        • 1 egg
        • ¼ pound flank steak (sliced very thinly)
        • Toppings of your choice, see notes for recommendations

        Instructions

          1. Prepare the ramen according to package directions. You will want to include the flavor packet, but fish sauce and ramen seasoning can both be high in sodium.
          2. Consider adding both seasonings gradually and taste as you go. If you add too much of either, you may be able to even the soup out by adding a bit more water but don’t add too much at once. You can add it gradually and taste it as you go in the same way as the seasonings themselves.
          3. Wait until the ramen is one minute away from being done before you add the beef, fish sauce, rice vinegar, and sriracha. You can add the egg and stir it to break up the yolk and help the egg cook in the broth. Remove from heat and serve immediately with your preferred toppings from the ingredient list.

        Notes

        Topping Recommendations: Sliced jalapeno, chopped scallions, bean sprouts, basil leaves, cilantro leaves, mint (spearmint is most common), lime wedges, jalapeno, chili sauce, Sriracha, onion.

        Nutrition Information:
        Yield: 2 Serving Size: 1
        Amount Per Serving: Calories: 828Total Fat: 35gSaturated Fat: 18gTrans Fat: 0gUnsaturated Fat: 22gCholesterol: 363mgSodium: 3609mgCarbohydrates: 110gFiber: 6gSugar: 6gProtein: 68g

        This data was provided and calculated by Nutritionix.

        © Kristy Bernardo
        Cuisine: Asian / Category: Soups and Stews
        5-minute Quick Faux Pho Recipe

        Easy 3-Ingredient Nutella Cookies

        July 29, 2022 by Kristy Bernardo 40 Comments

        3-Ingredient Nutella Cookies

        Loaded with Nutella flavor, these flourless 3 ingredient Nutella cookies will make a nice addition to your Nutella recipe box.

        3-Ingredient Nutella Cookies

        Why You'll Love these Cookies

        • Unbelievably easy to whip up.
        • Packed full of chocolate hazelnut flavor these cookies are incredibly delicious.
        • The absence of flour adds a crunchy texture to these cookies.

        What is Nutella?

        Nutella is a rich chocolate and hazelnut flavored spread made made by Italian company Ferrero. With creamy texture, it is a cross between a peanut butter and chocolate spread. The flavor is sweeter than peanut butter but not quite as sweet as chocolate.

        All this makes Nutella a delicious base for these 3 Ingredient Nutella Cookies.

        What is Nutella Made of?

        Nutella contains seven ingredients and is free from artificial colors and preservatives.

        Ingredients: Sugar, palm oil, hazelnuts, fat-reduced cocoa, skimmed milk powder, lecithin (SOYA) and synthetic vanillin.

        371 g. Ingredients: sugar, palm oil, hazelnuts,
        cocoa, skim milk, whey (milk), lecithin as emulsifier (soy), vanillin. Best before
        April 6 2017. Suggested "one serving" size: 37 g.

        . Ingredients: sugar, palm oil, hazelnuts (13 %), low fat cocoa, skim milk powder (7.5 %), lecithin as emulsifier (soy),
        vanillin. Best before May 4 2017. Suggested "one serving" size: 15 g.
        Considering a portion of 100 g it contains 31.8 g of fat, 102 mg of sodium, 56.9 g
        of carbohydrates, 6.6 g of proteins.

        American Vs European Nutella

        The ingredients above are for the American version of Nutella and while the ingredients are similar they do slightly vary. Many people believe the American version is lighter in color and more liquid while the European version is darker and thicker. The American version is reported to taste sweeter while the European version has more of a hazelnut and chocolate taste resulting in a richer flavor.

        Nutella Cookie Ingredients

        • Nutella: The chocolate and hazelnut combination makes these cookies sweet but not overly sweet. Other brands of hazelnut chocolate spread can be substituted although the flavor and sweetness may vary.
        • Sugar: Simple granulated sugar will do and gives these cookies a crispy lighter flavor.
        • Egg: The eggs add structure and moisten these cookies.

        (Scroll down to the bottom for the printable recipe card with exact measurements and recipe instructions.)

        How to Make Nutella Cookies

        As the 3-ingredient name might imply this a very easy recipe.

        1. Mix all three ingredients, mold into 1-inch balls
        2. Place on a greased cookie sheet
        3. Bake for under ten minutes.

        Be careful not to overcook these cookies so they stay soft and fudgy.

        Easy Nutella Cookies

        What to Add to Nutella Cookies?

        You can add sprinkles, frosting, chocolate chips, nuts, candy bar pieces or even dollop Nutella on top of the cookies. The combinations are endless! Wait for the cookies to cool before adding toppings.

        I decided that I needed to give mine a little Valentine's flair. I pulled them out of the oven about two minutes before they were done and gave them a little sprinkle. Cute, don't you think? And that is one amazing less-than-perfect photograph, if I do say so myself.

        How to Store Nutella Cookies

        The cookies can be stored at room temperature in an airtight container for up to three days. Heat them up for that same soft and gooey fresh out of the oven cookie.

        3-Ingredient Nutella Cookies

        3-Ingredient Nutella Cookies

        Yield: 14
        Prep Time: 10 minutes
        Cook Time: 10 minutes
        Total Time: 20 minutes

        These soft and chewy Nutella cookies have just 3 ingredients and are naturally flourless.

        Ingredients

        • 1 cup sugar
        • 1 cup Nutella
        • 1 egg

        Instructions

        1. Heat the oven to 350°F (180°C).
        2. Mix all ingredients together in a stand mixer.
        3. Place 1-inch balls of dough on a greased cookie sheet and bake at 350°F (180°C) for 8 - 10 minutes.
        4. The cookies will spread a lot and be very thin. Let cool for a minute or so then remove with a spatula. Cool on wire racks.

        Notes

        Substitute sugar for 1 cup flour for softer texture.

        No need to chill the cookie dough first before baking.

        Nutrition Information:
        Yield: 14 Serving Size: 1
        Amount Per Serving: Calories: 148Total Fat: 5gSaturated Fat: 5gTrans Fat: 0gUnsaturated Fat: 0gCholesterol: 13mgSodium: 12mgCarbohydrates: 24gFiber: 1gSugar: 23gProtein: 1g

        This data was provided and calculated by Nutritionix.

        © Kristy Bernardo
        Cuisine: American / Category: Desserts
        Easy 3-Ingredient Nutella Cookies

        More Tasty Cookie Recipes

        • 3 Ingredient Peanut Butter Cookies
        • Keto Chocolate Chip Cookies
        • Lemon Cake Mix Cookie
        • Lemon Shortbread Cookies
        • Secret Ingredient Chocolate Chip Cookies

        3 Easy Recipes Using Trader Joe's Pizza Dough

        July 26, 2022 by Kristy Bernardo 2 Comments

        Pizza Dough Cheese Sticks closeup
        Trader Joe's Pizza Dough Calzones
        Trader Joe's Pizza Recipe
        Trader Joe's Pizza Dough Cheese Sticks

        We've been making homemade pizza around here a lot the past couple of years, so it's safe to say we've made our share. I'm in charge of buying the pizza dough, and I've tried a lot of different brands, even some from our local pizza joints. The one that's risen to the top of the ranks is Trader Joe's pizza dough, which is easy to work with and can be turned into all sorts of easy Italian meals!

        The three recipes I'm sharing with you are what we make most often: calzones, sheet pan pizza, and cheese sticks. The cheese sticks are made the most, if only because the girls come home from school and make it themselves for a snack. It's that easy and quick!

        And in case you want to make a pizza with your own combination of pizza toppings, try this huge list of pizza topping ideas for inspiration.

        Trader Joe's Pizza Dough

        Does Trader Joe's have pizza dough besides plain dough?

        Trader Joe's pizza dough comes in Plain, Garlic & Herb, Wheat and Gluten Free. We prefer the plain dough then adding garlic and herbs to the top depending on the recipe, although the Garlic & Herb is good on its own. The main ingredients of the Gluten Free pizza dough is Tapioca and rice. We haven't tried the wheat so unfortunately can't offer an opinion on that. All of these recipes call for plain dough.

        How long do you cook Trader Joe pizza dough?

        How long you cook the dough really depends on the recipe and how thin or thick you like your pizza. We tend to lean toward the thin side, but good pizza is good pizza, am I right? A good rule of thumb is to check 8 minutes into the baking time, and it should rarely take longer than 15 minutes to cook through.

        Trader Joe's Pizza Dough Calzone

        Can you freeze Trader Joe's pizza dough?

        You sure can! I almost always have some in the freezer for a quick, easy meal. Make sure to wrap the dough tightly in saran wrap, then tin foil or a freezer bag (or both), before freezing it. You can keep it stored in the freezer for up to 3 months.

        How do you defrost Trader Joe's pizza dough?

        Defrost the dough by just setting it in its package on the counter at room temperature, or placing it in the refrigerator before you leave for work or the night before. We've tried the defrost setting on the microwave, but it's too easy to start actually cooking the dough. You can also put the package of dough in a bowl of cold water and let it defrost that way at room temperature.

        • Room temperature: 2 hours
        • Room temperature in a bowl with cold water: 1 hour
        • In the refrigerator: 8 hours

        Trader's Joe's Pizza Dough Ingredients

        Trader Joe's Plain Pizza Dough Ingredients: Enriched wheat flour, wheat flour, niacin, reduced iron, thiamine mononitrate, riboflavin, folic acid, malted barley flour, water, soybean oil, dextrose monohydrate, salt, mono & diglycerides, yeast, ascorbic acid.

        Trader Joe's Pizza Dough Recipe

        Trader Joe's Pizza Dough Cheese Sticks

        Pizza Dough Cheese Sticks are made the same way as pizza, but without the sauce and typically a little butter, garlic, and herbs. They're considered more of an appetizer (or, ironically, to be served alongside pizza), but you can serve them as a main course, too. We like them with a green salad and a glass of white wine. The kids eat them off the pan and disappear to their rooms. #teenagers

        Pizza Dough Cheese Sticks closeup

        Trader Joe's Pizza Dough Cheese Sticks

        Yield: 4 servings
        Prep Time: 10 minutes
        Cook Time: 12 minutes
        Total Time: 22 minutes

        Using Trader Joe's pizza dough to make hot, cheesy breadsticks takes just a few minutes of prep and they taste so good! The 4 servings listed is as an appetizer; for the main course, this will serve 2 people.

        Ingredients

        • 8 oz. (½ package) Trader Joe's pizza dough
        • 2 tablespoon unsalted butter
        • 1 teaspoon garlic powder
        • 1 teaspoon Italian seasoning
        • ¼ cup grated parmesan
        • 1 ½ cups shredded mozzarella (or more if you like it really cheesy!)
        • Pizza or marinara sauce, for dipping (optional)
        • Flour, for rolling out the dough

        Instructions

        1. Preheat your oven to 425F.
        2. Sprinkle a little flour on your work surface and shape the dough into a large rectangle, about 13x9 inches. (You can do this on parchment paper or a silicone baking mat to make transferring the dough to a sheet pan easier.) Transfer the dough to a large sheet pan.
        3. Melt the butter, garlic powder and Italian Seasoning in a small bowl. Brush the mixture over the dough.
        4. Sprinkle the parmesan over the dough, then do the same with the mozzarella.
        5. Bake for about 8-12 minutes or until the crust is golden brown and the cheese is bubbly brown and hot.

        Notes

        You can freeze any remaining pizza dough for another batch later! Wrap it very tightly in saran wrap, then tin foil. Freeze for up to 3 months.

        Nutrition Information:
        Yield: 4 Serving Size: 1
        Amount Per Serving: Calories: 778Total Fat: 35gSaturated Fat: 15gTrans Fat: 0gUnsaturated Fat: 16gCholesterol: 47mgSodium: 1076mgCarbohydrates: 94gNet Carbohydrates: 90gFiber: 4gSugar: 5gProtein: 22g

        This data was provided and calculated by Nutritionix.

        © Kristy Bernardo
        Cuisine: Italian / Category: Appetizers
        3 Easy Recipes Using Trader Joe's Pizza Dough

        Trader Joe's Pizza Dough Calzones

        What's the difference between Stromboli and a Calzone?

        A calzone is filled with ingredients (think of it as sort of being "stuffed" and it's ingredients are typically ricotta, mozzarella, Italian meats and sometimes onions, peppers, broccoli, spinach, etc.

        Stromboli is rolled up and has and has layers. Because it's rolled up, you can't be as free to load it up as you are with a calzone. Thin-cut meats like salami, pepperoni, ham, and prosciutto work well.

        For the most part, we stick to calzones because they're quicker to make and we like them just as well. You can change up the ingredients we've listed in the recipe to whatever you like! Be careful not to stuff it so full that you have trouble sealing it, otherwise the sky's the limit!

        Pizza Dough Calzones on a table next to a cup of marinara sauce

        Trader Joe's Pizza Dough Calzones

        Yield: 4 servings
        Prep Time: 15 minutes
        Cook Time: 15 minutes
        Total Time: 30 minutes

        Making calzones is simple, especially using Trader Joe's pre-made dough! This calzone recipe makes two calzones of two servings each.

        Ingredients

        • 1 ½ cups fresh ricotta cheese
        • ½ teaspoon coarse salt
        • ½ teaspoon freshly ground black pepper
        • ½ cup grated Pecorino Romano or Parmesan
        • ¼ cup chopped fresh basil
        • 1 16-oz package Trader Joe's pizza dough
        • ½-3/4 cup pizza sauce (depending on how saucy you like it)
        • 1 cup shredded mozzarella
        • 2 teaspoon extra-virgin olive oil
        • flour, as needed

        Instructions

        1. Preheat your oven to 500F.
        2. Mix together the ricotta cheese, salt, pepper, pecorino romano and fresh basil in a medium mixing bowl.
        3. Separate the pizza dough into 2 equal portions of 8 oz each.
        4. Sprinkle a little flour on your work surface and roll out one portion of the dough into a 12-inch circle.
        5. Spread half the pizza sauce half of the circle, leaving about a ½ inch border around the edge. Top with half of the ricotta mixture, then the mozzarella cheese.
        6. Fold the half-circle with no filling over the filling and crimp the sides of the dough to seal. Transfer the calzone to a baking sheet and repeat the process with the remaining dough.
        7. Brush each calzone with 1 teaspoon of extra-virgin olive oil (more if necessary). Bake in the oven for about 10-15 minutes or until the calzones are golden brown.
        Nutrition Information:
        Yield: 4 Serving Size: 1
        Amount Per Serving: Calories: 701Total Fat: 23gSaturated Fat: 10gTrans Fat: 0gUnsaturated Fat: 12gCholesterol: 54mgSodium: 1376mgCarbohydrates: 89gNet Carbohydrates: 84gFiber: 5gSugar: 6gProtein: 31g

        This data was provided and calculated by Nutritionix.

        © Kristy Bernardo
        Cuisine: Italian / Category: Dinner
        3 Easy Recipes Using Trader Joe's Pizza Dough

        Trader Joe's Pizza Dough Sheet Pan Pizza

        Making sheet pan pizza is the quickest way to get pizza on the table fast.

        How do you make pizza on a baking sheet?

        Sheet pan pizza is simple! We don't even bother rolling out the dough. You just punch, pull and press the dough until it's stretched to fit the entire pan.

        Can you put the pizza in the oven without a pan?

        Uhh...no.

        You can cook frozen pizza dough right on the rack because it's hard as a rock and won't fall through the grates. But please don't try putting raw dough directly on the oven rack.

        Can you cook the pizza on aluminum foil?

        Sure, it will work. It's not something I'd recommend doing if you have a sheet pan, pizza stone or just about anything else. But if you don't have those things, aluminum foil will work in a pinch. Be sure to use several layers and make it large enough to fit the entire pizza.

        Pizza Dough Sheet Pan Pizza on a table

        Trader Joe's Sheet Pan Pizza

        Yield: 4 servings
        Prep Time: 10 minutes
        Cook Time: 15 minutes
        Total Time: 25 minutes

        Making pizza on a sheet pan is much easier, especially using Trader Joe's pre-made pizza dough. Choose any toppings you like to have pizza your way, the easy way!

        Ingredients

        • 1 16-oz package Trader Joe's pizza dough
        • 1 cup pizza sauce
        • Assorted toppings of your choice
        • cooking spray

        Instructions

        1. Preheat your oven to 425F.
        2. Lightly spray a sheet pan with cooking spray. Stretch and press the dough to fit the size of your sheet pan.
        3. Spread the sauce over the dough, then add your favorite toppings.
        4. Bake for about 10-15 minutes or until the crust and cheese are golden brown. Slice and serve!

        Notes

        One package of dough will fit a large sheet pan, or you can split the dough if you want a smaller pizza. Any remaining dough can be frozen for up to three months. Wrap it tightly with saran wrap, then again in tin foil.

        Nutrition Information:
        Yield: 4 Serving Size: 1
        Amount Per Serving: Calories: 689Total Fat: 21gSaturated Fat: 6gTrans Fat: 0gUnsaturated Fat: 13gCholesterol: 0mgSodium: 860mgCarbohydrates: 110gNet Carbohydrates: 105gFiber: 5gSugar: 5gProtein: 13g

        This data was provided and calculated by Nutritionix.

        © Kristy Bernardo
        Cuisine: Italian / Category: Dinner
        3 Easy Recipes Using Trader Joe's Pizza Dough

        How To Cook Pizza In An Air Fryer

        1. Prepare the air fryer basket with nonstick cooking spray
        2. Prebake the dough in the air fryer for 2-3 minutes for a crispy bottom.
        3. Assemble the pizza in the air fryer.
        4. Cook at 375F for about 5-7 minutes or until the is brown and the cheese is melted.

        More easy weeknight recipes, all less than 10 ingredients!

        • Crispy Baked Lemon Pepper Chicken Wings
        • Blackened Salmon with Roasted Tomatoes
        • Instant Pot Pork Chops with Dijon-Butter Sauce
        • Instant Pot Zuppa Toscana Soup
        • Loads of Pizza Topping Ideas!
        • « Previous Page
        • 1
        • …
        • 8
        • 9
        • 10
        • 11
        • 12
        • …
        • 18
        • Next Page »

        Trending Recipes

        • a metal basket lined with parchment paper that's filled with air fryer flautas mexicanas and topped with pico de gallo, guacamole, and Cacique cheese. there are bowls of guacamole and fresh pico de gallo in the background.
          Air Fryer Flautas Mexicanas – Crispy in Minutes!
        • a closeup of a coconut smoothie bowl topped with fresh blueberries, granola, and goji berries
          Coconut Smoothie Bowl
        • top down view of two birria tacos on a wooden board next to a small bowl of consommé
          Authentic Birria Tacos Recipe (Step-by-Step with Consommé)
        • A stack of keto chocolate chip cookies next to a glass of milk
          Keto Chocolate Chip Cookies

        Popular Spring Recipes

        • a white dish with scalloped edges, filled with an easy pea salad that's topped with chopped parsley on a wooden table
          Make-Ahead Easy Pea Salad for Parties
        • Fried Deviled Eggs on a white plate
          Fried Deviled Eggs with Sausage
        • Beet-Pickled Deviled Eggs Recipe
          Beet-Pickled Deviled Eggs
        • A keto salad on a white plate, made up with grilled romaine, sliced cherry tomatoes, thinly sliced avocado and halved lemon slices for a garnish.
          Keto Salad | Lemony Romaine and Avocado Salad

        Footer

        ↑ back to top

        • Privacy Policy
        • About
        • Contact
        • Cookbooks

        Copyright © 2026 The Wicked Noodle