The Wicked Noodle

  • All Recipes
  • Freezer Meals
  • Dinner Ideas
menu icon
go to homepage
  • All Recipes
  • Freezer Meals
  • Dinner Ideas
search icon
Homepage link
  • All Recipes
  • Freezer Meals
  • Dinner Ideas
×

Jam Sandwich Cookies (Holiday Favorite)

October 3, 2025 by Aubrey Cornelius Leave a Comment

a stack of three jam sandwich cookies dusted with powdered sugar, next to cookies ready to be filled, along with a jar of raspberry jam and a spoon covered in jam

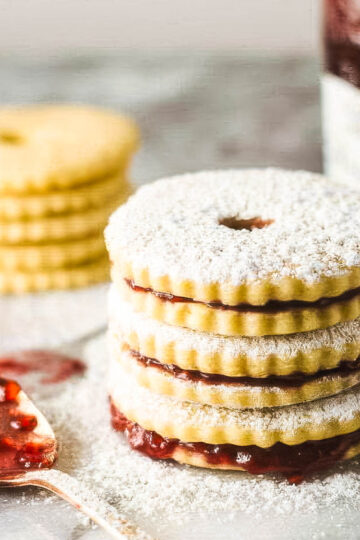
Jam sandwich cookies are one of those treats I never get tired of making. The buttery cookie layers are just slightly crisp, and the jam in the center brings the perfect amount of sweetness. I've made them with everything from raspberry jam to lemon curd, and every time it feels like a brand-new cookie!

A light dusting of powdered sugar makes them look like they came straight from a bakery, but they're simple enough to whip up at home anytime. They also hold up really well, which means I often bake them a day ahead.

a stack of three jam sandwich cookies dusted with powdered sugar, next to cookies ready to be filled, along with a jar of raspberry jam and a spoon covered in jam

These pretty jam sandwich cookies are also a perfect addition to your Christmas cookie tray. We like to pair them with easy, no-bake Christmas desserts like chocolate-dipped pretzel rods and M&M Pretzel Hugs to keep the holiday prep and stress to a minimum, while still having a gorgeous, colorful dessert tray. They're also wonderful for Valentine's Day!

[feast_advanced_jump_to]

Ingredients

  • All-purpose flour: You'll want to spoon the flour into your measuring cup so it doesn't get packed in, then gently level it with a knife.
  • Unsalted butter: This should be softened to room temperature so it mixes easily into the dough.
  • Granulated sugar: No need to spoon this into your measuring cups, just go ahead and scoop it from the container.
  • Eggs: Grab your eggs from the refrigerator at the same time you get the butter so it can all come to room temperature together.
  • White vinegar: This might seem like a strange ingredient in cookies, but there's a good reason to add vinegar to baked goods.
  • Baking soda: This will interact with the vinegar, which will help give the cookies a lift.
  • Honey: This adds a little extra sweetness that takes these jam sandwich cookies over the top.
  • Jam or preserves: We usually go with raspberry jam, but choose your favorite as they're all delicious! Strawberry or blueberry are great choices, or try some lemon curd. Or use a little of each for a cookie tray that has several flavors on it!
  • Powdered sugar: This is technically an optional ingredient, but we don't recommend skipping it, as it adds a gorgeous finish.
step 7: sandwich cookie dough rolled out on a marble surface with a cookie cutter and several circles already cut out

Step-by-Step Instructions

  1. Make the dough: In a large bowl, combine the flour and softened butter. Use your fingers to rub them together until the mixture looks sandy and crumbly.
  2. Whip eggs and sugar: In a separate small bowl, beat the eggs and granulated sugar with a hand mixer on high until pale yellow and smooth. This step is what gives the cookies a nice, light texture.
  3. Combine the wet and dry ingredients: Add the egg mixture to the flour mixture and stir just until it's blended.
  4. Add the vinegar, baking soda and honey: In a small container, mix the vinegar and baking soda until it's frothy. Pour this into the dough along with the honey, then gently mix it to bring everything together into a soft dough.
  5. Let it rest: Cover the dough with plastic wrap and let it rest at room temperature for 30 minutes. This helps the dough relax and makes it easier to roll.
  6. Preheat the oven: Set the oven to 350°F so it's ready when your cookies are.
  7. Roll and cut the dough: Divide the dough into four pieces. Working one piece at a time on parchment paper (the dough will be sticky), roll it out to about ⅛ inch thick. Use a round or fluted cookie cutter to cut out the shapes.
  8. Create the tops: For half the cookies, use a straw or small cutter to make a hole in the center (these will be the tops).
  9. Bake: Transfer the cut cookies to a parchment-lined baking sheet. Bake for 5-6 minutes, just until they're set. They should stay light in color, so keep a close eye on them!
  10. Cool: Let the cookies cool completely on the baking sheet before filling them.
  11. Assemble: Spread a thin layer of jam on the flat side of the bottom cookie, then gently press a "window" cookie on top.
  12. Dust with powdered sugar: Sprinkle your jam sandwich cookies generously with powdered sugar. Enjoy them right away, or let them sit overnight - the flavor and texture only get better!
step 10: sandwich cookies cooling on a wire rack next to a spoon covered in jam

Equipment Needed

  • Mixing bowls (a large one for the dough and smaller ones for the other ingredients)
  • Hand mixer or stand mixer
  • Spatula
  • Plastic wrap
  • Rolling pin
  • Parchment paper
  • Cookie cutters
  • Straw or small cutter
  • Baking sheets
  • Cooling rack
  • Fine-mesh sieve

Tips

  • Use parchment paper: The dough is sticky, so rolling it out on parchment makes it easier to handle and prevents it from tearing.
  • Chill the dough briefly if needed: If the dough feels too soft or warm after letting it rest, pop it into the fridge for 10-15 minutes. This will make the cookies easier to cut.
  • Keep the shapes uniform: Cut the cookies as close in size as possible so the tops and bottoms line up when you assemble them.
  • Use thick jam or preserves: A thicker filling won't run out the sides and helps the cookies hold their shape. If your jam is thin, cook it down for a few minutes on the stovetop and let it cool before using.
  • Don't overbake: These jam sandwich cookies should stay pale, not golden brown. Pull them out when they're just set.
  • Assemble them only after letting them cool completely: Make sure the cookies are completely cool before spreading the jam or other fillings, or it'll melt and soak in.
  • Dust just before serving: Powdered sugar looks prettiest when added at the last minute, especially if the cookies are stored overnight.
three jam sandwich cookies on a vintage tray with a spoon covered in jam next to it on a marble countertop

Storage and Make-Ahead

Jam sandwich cookies taste even better the next day, which is another reason they make a great cookie for the holidays.

  • Make-ahead dough: The dough can be prepared a day in advance. Keep it wrapped tightly in plastic wrap and refrigerate. Let it sit at room temperature for about 20 minutes before rolling so it's easier to work with.
  • Storing baked cookies (unfilled): You can bake the cookies and store them (without jam) in an airtight container at room temperature for up to 3 days. Fill and dust with powdered sugar just before serving.
  • Storing assembled cookies: Once filled, store the cookies in an airtight container in the refrigerator for up to 5 days. Place parchment paper between layers to keep them from sticking, and wait to dust them with the powdered sugar until just before serving.
  • Freezing: Both the unbaked dough and baked cookies (unfilled) freeze well. Wrap them tightly and freeze for up to 2 months. Thaw in the fridge overnight, then bring them to room temperature before rolling, baking, or filling.

Filling Ideas for Jam Sandwich Cookies

  • Fruit jams: Raspberry, strawberry, blueberry, blackberry, or apricot are all great choices.
  • Holiday flavors: Cranberry-orange relish, fig jam, or spiced apple butter.
  • Citrus curds: Try lemon, lime, or passion fruit.
  • Chocolate: Try using Nutella or a chocolate ganache.
  • Nut spreads: Almond butter, cashew butter, or pistachio cream.
  • Go a little exotic: Mango preserves, guava paste, or pineapple jam are great if you make these during the summer.
  • Savory-sweet: Try goat cheese or mascarpone with fig or cherry preserves, then add them to a cheese plate. It's easiest to spread the thicker filling on the inside of the top cookie, then add the preserves to the inside of the bottom, then sandwich them together.
  • Add a little booze: Add a splash of liqueur to your jam filling: Grand Marnier with orange marmalade, Chambord with raspberry jam, or amaretto with apricot preserves. It adds a little sophistication, plus it's delicious!
  • Serve them with a scoop of cranberry ice cream!
a stack of three jam sandwich cookies dusted with powdered sugar, next to cookies ready to be filled, along with a jar of raspberry jam and a spoon covered in jam

Frequently Asked Questions

Can I use store-bought cookie dough instead of making it from scratch?

You can use refrigerated sugar cookie dough as a shortcut. The texture will be slightly different, but it works if you're short on time.

What's the best jam to use?

Thicker jams, preserves, or curds work best because they won't ooze out the sides. Raspberry, apricot, and lemon curd are common favorites, but almost any flavor will do.

Why is my dough so sticky?

This dough naturally leans sticky. Rolling it out on parchment paper or chilling it briefly makes it much easier to handle.

Do I have to make the cut-out "window" on top?

You can keep them as solid sandwich cookies if you prefer, but the window makes them look more festive and shows off the filling. You can also make the "window" larger if you like.

Can I make them gluten-free?

Substitute a 1:1 gluten-free baking flour blend for the all-purpose flour. The texture will be a bit more delicate, but still delicious!

How far in advance can I make them?

The dough can be made a day ahead (unless you freeze it; see the storage section above), and baked cookies (unfilled) will keep for about 3 days. Once the cookies are filled, they're best eaten within 5 days.

Can I freeze assembled cookies?

It's best to freeze the cookies unfilled. Once the cookies are thawed, add your jam and powdered sugar before serving so they stay fresh and pretty.

Related

Looking for more delicious dessert recipes? Try these:

  • Homemade chocolate peppermint bark in decorative tin with candy cane
    Peppermint Bark Recipe
  • Homemade chocolate truffles in white paper candy cups for gift-giving
    Easy Chocolate Truffles Recipe
  • Coconut rum balls being rolled and coated in coconut
    Coconut Rum Balls
  • a plate of white chocolate biscotti, some coated with chopped pistachios and some with chopped cacao nibs, next to a glass of milk
    White Chocolate Biscotti Recipe (Gift-Worthy Cookies!)
a stack of three jam sandwich cookies dusted with powdered sugar, next to cookies ready to be filled, along with a jar of raspberry jam and a spoon covered in jam

Jam Sandwich Cookies

Yield: 24 cookies
Prep Time: 20 minutes
Cook Time: 6 minutes
Additional Time: 30 minutes
Total Time: 56 minutes

These delightful cookies are perfect for a Christmas cookie tray, or as a gift for Valentine's Day!

Ingredients

  • 3 ½ cups all-purpose flour
  • 1 cup unsalted butter (2 sticks), softened to room temp
  • 1 cup granulated sugar
  • 2 large eggs, room temp
  • 2 teaspoon white vinegar
  • 1 teaspoon baking soda
  • 2 tbs honey
  • 9 oz jar of your favorite jam or thick preserves (I used raspberry preserves and lemon curd)
  • ½ cup powdered sugar

Instructions

  1. In a large bowl, combine the flour and butter and use your fingers to crumble together until well combined.
  2. In a small bowl, add the sugar and eggs and use a hand mixer on high to mix together until pale yellow and smooth.
  3. Pour sugar and egg mixture into the flour mixture and mix together.
  4. In a small container, add the vinegar and baking soda and mix together until frothy.
  5. Add to the dough mixture to the vinegar mixture along with the honey and use a spatula to form one large mass.
  6. Let rest for 30 minutes at room temp, then divide into four sections.
  7. Preheat oven to 350°F.
  8. Roll out each section on a sheet of parchment paper until about ⅛ inch thick, then cut into rounds (I used a fluted round cutter).
  9. Gingerly place each cut-out onto a parchment-lined baking sheet and use a straw to make a hole in the center of half the cookies.
  10. Bake for 5 to 6 minutes, just until they're set.
  11. Once the cookies are completely cool, spread the jam on a bottom cookie, then add a top. Sprinkle with powdered sugar just before serving.
Nutrition Information:
Yield: 12 Serving Size: 1
Amount Per Serving: Calories: 437Total Fat: 17gSaturated Fat: 10gTrans Fat: 0gUnsaturated Fat: 6gCholesterol: 72mgSodium: 127mgCarbohydrates: 68gFiber: 1gSugar: 35gProtein: 5g

This data was provided and calculated by Nutritionix.

© Aubrey Cornelius
Cuisine: American / Category: Desserts
Jam Sandwich Cookies (Holiday Favorite)

Pumpkin Tres Leches Cake (A Make-Ahead Holiday Favorite)

September 29, 2025 by Kristy Bernardo Leave a Comment

a slice of pumpkin tres leches cake on a small white plate on a wood table with fall decorations in the background

This Pumpkin Tres Leches Cake takes the classic dessert and gives it a fall twist. A light and fluffy pumpkin-flavored cake is soaked in a blend of three milks, then it's topped with whipped cream for the perfect "frosting".

It's very simple to make and has a wonderful pumpkin flavor that's perfect for fall. And because it's best made the day before, it's the perfect choice for a Thanksgiving dessert, too!

a slice of pumpkin tres leches cake on a small white plate on a wood table with fall decorations in the background

Tres leches cake and pumpkin pie cake have always been two of my favorite desserts, so when fall arrived this year, I knew it was time to combine them. We like to serve it after a big bowl beanless chili with a side of sweet corn cake!

The key to a really good pumpkin tres leches cake is adding just the right amount of "three milks". The cake needs to be completely soaked but not so much that it's seeping out after it's sliced.

After several attempts, the ratio to cake and liquid is finally perfect. The cake is completely soaked in the three milks but is still sturdy when sliced. And the pumpkin flavor is *chef's kiss*!

Ingredients

Because this recipe starts with a boxed cake mix, it really couldn't be simpler to make! Here are all of the ingredients you'll need to make this delicious pumpkin tres leches cake:

Cake Ingredients:

  • Yellow cake mix
  • Granulated sugar
  • Vegetable oil
  • Eggs
  • Pumpkin puree
  • Pumpkin pie spice

Tres Leches (Three Milks) Mixture

  • Evaporated milk
  • Sweetened condensed milk
  • Heavy whipping cream

Whipped Cream "Frosting"

  • Heavy whipping cream
  • Powdered sugar
a slice of pumpkin tres leches cake on a small white plate on a wood table next to two vintage colored towels

Step-by-Step Instructions

There are a few stages to this recipe, but every one is very simple. It's best made at least the night before, so plan to make it the day before you'll be serving.

  1. The first step is to make the cake. Start by adding all of the cake ingredients to a large mixing bowl, then mix it using a hand or stand mixer for about two full minutes.
  2. Next you'll pour it into a greased 13x9 baking dish, and you'll bake it for approximately 40 minutes. Once it's done baking, set it aside until it's completely cooled to room temperature.
  3. Once it's cooled, you'll poke little holes all over the cake. This is done so that the tres leches mixture can seep down into cake all the way to the bottom.
  4. Mix together the three milks, then slowly pour it over the surface of the cake, allowing it to completely soak in before adding more. Once all of the milk mixture has been poured over the cake, cover it with foil or plastic wrap and put it in the refrigerator. It'll stay in the fridge for at least six hours and preferably overnight.
  5. All that's left to do is make the "frosting"! In a medium-sized mixing bowl, add the heavy whipping cream and powdered sugar, then whip it until stiff peaks form. Spread it over the top of the cake and dust it with a little pumpkin pie spice if you like.
  6. Cut it into individual slices and serve!
a slice of pumpkin tres leches cake on a small white plate on a wood table

Equipment Needed

  • 13x9-inch baking dish
  • Large mixing bowls (at least 2, unless you clean and reuse)
  • Hand mixer or stand mixer
  • Measuring cups and spoons
  • Spatula
  • Fork or skewer (for poking holes in the cake)
  • Offset spatula or spoon (for spreading the whipped cream topping)
  • Fine mesh sieve (optional, for dusting the pumpkin pie spice as a garnish)

Tips for Making Pumpkin Tres Leches Cake

  • Be sure to cool the cake completely before adding the milk mixture: If the cake is still warm, it can turn mushy instead of soft and spongy.
  • Poke plenty of holes: Every inch of the cake should have tiny holes, from the center to the sides to the corners. This is done so the liquid can soak in evenly.
  • Pour slowly and in stages: Add the milk mixture a little at a time, allowing it to absorb before adding more. This way the cake will be fully and evenly saturated.
  • Chill the soaked cake for at least 6 hours: Overnight is best, but a good six hours will work if you're short on time.
  • Use real whipped cream for the topping if you can: Cool Whip is a quick substitute and it'll work great in this recipe, but nothing beats real whipped cream!
  • You can spread the whipped cream topping smoothly over the top of the cake, or try piping it as seen in our images.

Serving idea: Add a drizzle of caramel sauce to individual slices just before serving - it's so good!

a slice of pumpkin tres leches cake on a small white plate on a wood table with fall decorations in the background

Storage Recommendations

  • Make-ahead: This cake is best when made in advance since it needs at least 6 hours to soak, but overnight is even better. You can easily prepare it a day or two before serving.
  • Refrigeration: Store the cake (covered in foil or plastic wrap) in the refrigerator for up to 5 days. The whipped cream topping will hold up well during that time.
  • Freezing: It's not recommended to freeze pumpkin tres leches cake once the milk mixture has been added, as the texture can become grainy. If you'd like to freeze it, bake the cake base, cool it completely, and freeze it before adding the milk mixture. Then thaw, soak, and finish it when you're ready to serve.

Frequently Asked Questions

Can I use homemade pumpkin puree instead of canned?

You can, but make sure it's very smooth and not watery. If it seems thin, strain it through cheesecloth or a fine mesh sieve before adding it to the batter.

Can I make Pumpkin Tres Leches Cake without a boxed mix?

You can swap the cake mix for your favorite homemade yellow or vanilla cake recipe. Just fold in the pumpkin and spices before baking.

How do I know when the cake is done baking?

The cake is done when a toothpick inserted in the center comes out clean. Start checking around the 35-minute mark.

What if my cake looks soggy after adding the milk mixture?

That's normal! tres leches cake is supposed to be very, very moist. The key is to let it chill long enough so the milks absorb evenly.

Can I use Cool Whip instead of whipped cream?

One 12-ounce tub works for a thinner layer, or two tubs if you want it thicker. It's a great shortcut for busy holidays.

How long does Pumpkin Tres Leches Cake last?

When stored in the fridge and covered properly, it will stay fresh for up to 5 days.

Ask AI for substitution recommendations here:

ChatGPT
Google AI
Perplexity
Grok

Related Recipes

Looking for more fall dessert recipes? Try these:

  • Mini Pumpkin Cheesecake Recipe
    Creamy Pumpkin Cheesecake (with Caramel Pecan Topping!)
  • The BEST carrot cake recipe I have ever found! A buttermilk glaze seeps into the warm cake layers making it extra moist. Then a delicious cream cheese frosting is added to bring all the flavors together. It's even BETTER the next day!
    The BEST Carrot Cake Recipe
  • Salted and Unsalted Homemade Caramel Sauce
    Homemade Easy Caramel Sauce (Salted & Unsalted)
  • cranberry oatmeal chocolate chip cookies that have just been drizzled with melted chocolate
    Cranberry Oatmeal Chocolate Chip Cookies
a slice of pumpkin tres leches cake on a small white plate on a wood table with fall decorations in the background

Pumpkin Tres Leches Cake

Yield: 12 servings
Prep Time: 15 minutes
Cook Time: 40 minutes
Additional Time: 6 hours
Total Time: 6 hours 55 minutes

This tres leches cake is just as simple to make as the original but has all the flavors of fall. It's a make-ahead dessert, making it a perfect choice for Thanksgiving!

Ingredients

Cake

  • 1 15.25-ounce box yellow cake mix
  • ¼ cup granulated sugar
  • ½ cup vegetable oil
  • 4 eggs
  • 1 15-ounce can pure pumpkin puree
  • 1 teaspoon pumpkin pie spice

Tres Leches (Three Milks) Mixture

  • 1 12-ounce can evaporated milk
  • 1 14-ounce can sweetened condensed milk
  • ⅓ cup heavy whipping cream

Whipped Cream "Frosting"

  • 2 cups heavy whipping cream
  • 2 tablespoons powdered sugar

Instructions

  1. Preheat the oven to 350°F.
  2. Add all of the cake ingredients to a large mixing bowl. Using a hand or stand mixer, beat the ingredients for two minutes.
  3. Pour the cake mixture into a greased 13x9 baking dish, smoothing it out so it goes evenly to the edges. Bake for approximately 40 minutes until the cake is baked through.
  4. Remove the cake from the oven and allow it to cool completely.
  5. In a large mixing bowl, whisk together the tres leches ingredients.
  6. Using a fork or skewer, poke tiny holes everywhere, all over the cake.
  7. Pour the tres leches mixture carefully over the cake, allowing it to soak in before adding more.
  8. Refrigerate the cake for a minimum of 6 hours and preferably overnight.
  9. In a large mixing bowl, whip together the whipping cream and powdered sugar until stiff peaks form. Spread it evenly over the top of the cake until it's smooth. Optional: garnish with a dusting of pumpkin pie spice.
  10. Cut into individual slices and serve.

Notes

  • Cool Whip can be used in place of the whipped cream "frosting". One 12-ounce container will do the trick; two will give you a thicker layer which many of our testers preferred.
  • You can pipe the whipping cream or Cool Whip over the cake in different designs if preferred.
  • Leftovers should be refrigerated and will keep for up to 5 days.

Nutrition Information:
Yield: 12 Serving Size: 1
Amount Per Serving: Calories: 624Total Fat: 35gSaturated Fat: 17gTrans Fat: 1gUnsaturated Fat: 16gCholesterol: 139mgSodium: 408mgCarbohydrates: 69gFiber: 2gSugar: 52gProtein: 11g

This data was provided and calculated by Nutritionix.

© Kristy Bernardo
Cuisine: American / Category: Desserts
Pumpkin Tres Leches Cake (A Make-Ahead Holiday Favorite)

Chunky Monkey Ice Cream Recipe (No-Churn!)

September 27, 2025 by Aubrey Cornelius

a metal loaf pan filled to the brim with chunky monkey ice cream, with an ice cream scoop sitting on the top and a waffle cone next to it

This chunky monkey ice cream recipe shows just how easy it can be to make at home. And that you don't need an ice cream maker to enjoy it! This no-churn version comes together with just a few simple steps and some time in the freezer.

a metal loaf pan filled to the brim with chunky monkey ice cream, with an ice cream scoop sitting on the top and a waffle cone next to it

We come back to this chunky monkey ice cream recipe again and again, especially in the summertime. The texture is incredibly smooth and creamy, with just the right amount of banana flavor in every bite. It's one of our go-to no-bake desserts (right up there with lemon cream cheese pound cake), making it the perfect treat to keep on hand for hot summer days.

Ingredients and Subtitutions

  • Heavy whipping cream: This is what gives this chunky monkey ice cream recipe its richness, so we don't recommend substituting it for milk or half & half. Coconut cream is the closest substitution, and will add a nice coconut flavor.
  • Sweetened condensed milk: There's really no good substitute for this, so if you don't have any on hand, we recommend a trip to the store. You can also try making it from scratch, as we've heard good things about this recipe.
  • Vanilla extract: Try using vanilla bean paste or scrape the seeds from one whole vanilla bean.
  • Bananas (2 for purée, 1 chopped into small chunks): The ripeness of your bananas will make a HUGE difference in the flavor, so keep that in mind! The more ripe they are, the more banana flavor you'll end up with. Ideally, you'll use one very ripe banana for the purée, and more firm bananas (but still ripe) for the chunks so they hold together.
  • Dark chocolate: Semi-sweet or even milk chocolate are good substitutes, but dark will give the best contrast to the sweet ice cream.
  • Coconut oil: This is used to help thin the chocolate and make it easier to pour and mix. You can substitute either butter or ghee, or even omit it entirely.
  • Salted caramel sauce: Either store-bought or homemade caramel sauce will work!

Optional add-ins:

  • Chopped nuts: Walnuts are terrific in this recipe, but pecans, almonds, or hazelnuts would be delicious, too!
  • Extra drizzle of caramel or chocolate (for serving)
a hand holding a waffle cone with a scoop of chunky monkey ice cream being placed in it

Tips for Making No-Churn Ice Cream

  • Whip the cream fully: Beat the heavy whipping cream until stiff peaks form before folding in the condensed milk. This gives your ice cream that light, airy texture.
  • Fold gently, don't stir: Stirring can "deflate" the ice cream, so be sure to gently fold the whipped cream and condensed milk together.
  • Use ripe bananas: The riper the bananas, the sweeter and more flavorful the base will be. The bananas should be very ripe, but not too brown or it can taste fermented.
  • Layer for flavor: Since stirring will change the texture (and not for the better), be sure to layer the chocolate, caramel, and banana chunks so there's no need to stir. This gives you a little of everything in each bite!
  • Line your container: Use parchment paper on top of the ice cream before freezing, which prevents ice crystals from forming.
  • Freeze long enough: Allow at least 4-6 hours (or overnight) so the ice cream is scoopable.
  • Warm your ice cream scoop: Dip your ice cream scoop in hot water to get smooth, round scoops.
  • Store it properly: Keep your ice cream in a freezer-safe, airtight container so it stays nice and creamy.
two ice cream cones from a chunky monkey ice cream recipe on their side in a vintage metal tin

Serving Ideas

  • Classic scoops: This chunky monkey ice cream recipe is so good that it easily stands alone. Serve it in bowls or cones with an extra drizzle of salted caramel and a sprinkle of chopped nuts.
  • Ice cream sundaes: Layer scoops with chocolate sauce, whipped cream, and sliced bananas for a chunky monkey sundae.
  • Waffle bowls: Add scoops to a waffle bowl, then add whatever additional ingredients you like. We love adding a maraschino cherry on top!
  • Ice cream sandwiches: Soften it slightly then sandwich it between two cookies and freeze until they're firm. We've made them with peanut butter, chocolate chip, and oatmeal cookies and all were delicious!
  • Milkshake: Blend a scoop or two with whole milk for a chunky monkey milkshake!
  • Add it to a dessert bar: Serve it alongside easy desserts like M&M pretzel hugs or chocolate covered pretzel rods, which also make great toppings.
a metal loaf pan filled with chunky monkey ice cream with an ice cream scoop taking out one scoop

Storage

  • Freezer container: Store the ice cream in an air-tight, freezer-safe container with a tight-fitting lid. A loaf pan also works, just wrap it really well in plastic wrap and foil.
  • Prevent ice crystals: Press a piece of parchment paper directly against the surface of the ice cream before sealing.
  • Storage time: Enjoy your chunky monkey ice cream within 2-3 weeks, though it can last up to a month if it's stored properly.
  • Soften it slightly before scooping: Let the container sit at room temperature for 5-10 minutes before serving to make it easier to scoop.
a two-scoop ice cream cone filled with chunky monkey ice cream

Frequently Asked Questions

Do I need an ice cream maker for this recipe?

This is a no-churn ice cream recipe, which means you only need a hand mixer or stand mixer to whip the cream. The freezer does the rest!

Can I use frozen bananas instead of fresh?

It's best to use fresh, ripe bananas, as frozen bananas can add extra water and change the texture, making the ice cream less creamy.

How long does homemade ice cream last in the freezer?

If it's stored properly in an airtight container with parchment pressed against the surface, it will keep up to 1 month. For the best flavor and texture, try to enjoy it within 2-3 weeks.

Can I add nuts to make it closer to the Ben & Jerry's version?

Add chopped walnuts for the Ben & Jerry's version, or you can try pecans, hazelnuts, or almonds.

Why do I need to whip the cream first?

Whipping the cream incorporates air into the base, which makes the ice cream light and scoopable without churning.

Can I make this dairy-free?

Swap the heavy cream for coconut cream and the sweetened condensed milk for sweetened condensed coconut milk to make a dairy-free version.

a metal loaf pan filled to the brim with chunky monkey ice cream, with an ice cream scoop sitting on the top and a waffle cone next to it

Chunky Monkey Ice Cream Recipe (No-Churn)

Yield: 10 servings
Prep Time: 20 minutes
Additional Time: 6 hours
Total Time: 6 hours 20 minutes

This Homemade Chunky Monkey Ice Cream recipe has a banana and vanilla-infused base, mixed in with fresh banana chunks, salted caramel, and creamy dark chocolate.

Ingredients

  • 2 cups heavy whipping cream
  • 1 14-ounce can sweetened condensed milk
  • 1 tablespoon vanilla extract or paste
  • 3 ripe bananas
  • 4 ounces dark chocolate pieces
  • 2 tablespoons coconut oil
  • ¼ cup salted caramel sauce

Instructions

  1. In a large bowl, whip the heavy cream until stiff peaks form.
  2. In another bowl, whisk together the sweetened condensed milk and vanilla.
  3. Slowly mix in the vanilla mixture into the heavy cream.
  4. In a food processor, puree 2 bananas until creamy.
  5. Fold the bananas into the cream mixture.
  6. Add the chocolate and coconut oil to a heat-proof bowl. Add ¼ cup of water to a small saucepan and place the bowl on top, forming a double-boiler. Melt the chocolate until almost all of the pieces have completely melted. Remove from the heat and whisk until completely smooth.
  7. Warm the salted caramel sauce.
  8. Chop the banana into small, bite-sized pieces.
  9. To a loaf pan, or an ice cream container, add a ½ inch layer of the cream mixture.
  10. Using a spoon, drizzle with the melted chocolate and salted caramel and sprinkle in about ¼ of the chopped banana.
  11. Add another layer of the cream and again top with the chocolate, banana and salted caramel.
  12. Repeat until the container is full, then press parchment paper into the top to completely cover.
  13. Freeze until it's solid for 4-6 hours or overnight.
Nutrition Information:
Yield: 10 Serving Size: 1
Amount Per Serving: Calories: 464Total Fat: 28gSaturated Fat: 18gTrans Fat: 1gUnsaturated Fat: 8gCholesterol: 73mgSodium: 98mgCarbohydrates: 48gFiber: 2gSugar: 43gProtein: 7g

This data was provided and calculated by Nutritionix.

© Aubrey Cornelius
Cuisine: American / Category: No-Bake Desserts
Chunky Monkey Ice Cream Recipe (No-Churn!)

Refreshing Cucumber Fruit Juice Recipe

September 24, 2025 by Aubrey Cornelius

a glass of cucumber fruit juice with a sprig of fresh mint as garnish, with another glass of juice in the background

Fresh, light, and naturally hydrating, this cucumber fruit juice recipe is made with cucumbers, grapefruit, cantaloupe, basil, and mint for a drink that's as delicious as it is refreshing!

We like to call it our "Get Up and Glow Juice" because it makes us feel amazing whenever we enjoy a glass! Best of all, you don't need a juicer, just a blender and a few minutes is all you need.

a cucumber fruit juice recipe freshly made and poured into a glass and garnished with a sprig of fresh mint

We like to make this cucumber fruit juice recipe for either breakfast or an afternoon pick-me-up. It's perfect with these easy baked oatmeal cups, or with some tuna lettuce wraps for lunch.

[feast_advanced_jump_to]

Ingredients

  • cucumbers
  • cantaloupe
  • grapefruit
  • fresh basil sprigs
  • fresh mint leaves
  • cold water
  • coconut sugar (or honey, optional, for added sweetness)

Instructions

  • Blend the ingredients: Add the cucumbers, cantaloupe, grapefruit juice, basil, mint, cold water, and coconut sugar to a blender or food processor. Blend it until it's completely smooth.
  • Strain the juice: Place a fine mesh strainer over a bowl and line it with cheesecloth. Slowly pour the juice through the cheesecloth, then gather the edges of the cloth and squeeze it to extract as much juice as possible.
  • Adjust the sweetness: Taste and stir in a little more coconut sugar (or honey) if desired. You can also omit the sugar entirely, and add some after blending if it's not sweet enough.
  • Serve it immediately: Pour into two tall glasses with ice, garnish with a sprig of mint or basil, and enjoy your fresh cucumber fruit juice!
a whole cucumber, half of a grapefruit, and fresh herbs on a marble countertop to show the ingredients needed to make a cucumber fruit juice recipe

Equipment Needed

  • Blender or food processor: You can also use a juicer!
  • Fine mesh strainer: If you're blending it, this is a must.
  • Cheesecloth: You can skip this only if you're using a juicer.
  • Large mixing bowl
  • Measuring cups and spoons: We usually just eyeball the amounts, but it's a good ideas to measure it the first time.
  • Knife and cutting board
  • Tall glasses

Tips for the Best Cucumber Fruit Juice

  • Use chilled ingredients: Starting with cold produce makes a nicely chilled juice that may not even need ice!
  • Peel the cucumbers: Peeling the cucumbers will give your juice a cleaner, fresher taste.
  • Balance the sweetness to your liking: Taste the juice before adding all the coconut sugar. Depending on how ripe your fruit is, you may need less (or none at all)!
  • Don't skip the herbs: Basil and mint add so much flavor and make the juice more refreshing. You can also bruise the leaves lightly before blending to release their oils.
  • Serve it immediately: This cucumber fruit juice recipe is best when it's fresh! It also helps keep its nutrients intact. If you're storing it, do so briefly in the fridge and stir it before drinking.
  • Choose a different citrus: If grapefruit tastes too tart, try orange or tangerine juice!
a glass of fresh cucumber fruit juce in a clear glass, with a fresh mint sprig being added

Storage and Make-Ahead

For the best flavor and to maximize the nutrients, cucumber fruit juice is best when it's served just after making it. Since that's not always possible, here are our suggestions for how to store it:

  • Refrigerator: Store the juice in a sealed glass jar or airtight container in the refrigerator for up to 24 hours. Stir or shake well before drinking, as it will naturally separate a bit.
  • Make-ahead option: You can prep the produce (peel the cucumbers, chop the cantaloupe, juice the grapefruits) up to one day ahead and keep everything refrigerated in separate containers. Then just blend and strain it just before serving.
  • Do not freeze: We don't recommend freezing it because it changes the texture.
a glass of cucumber fruit juice with a sprig of fresh mint as garnish, with another glass of juice in the background on a marble countertop

Frequently Asked Questions

Do I need a juicer to make this cucumber fruit juice recipe?

No juicer is required. A blender or food processor works well, just strain the mixture through a mesh strainer and cheesecloth.

Can I make this juice without grapefruit?

If you're not a fan of grapefruit, orange or tangerine juice are wonderful substitutes. It will be a bit sweeter so skip the coconut sugar and add some at the end if you like.

How can I make this juice sweeter?

To make this juice even sweeter, you can add more coconut sugar, honey, or agave nectar to taste. Keep in mind that ripe cantaloupe already adds quite a bit of natural sweetness, so adjust it gradually.

Can I use dried herbs instead of fresh?

Please do not use dried herbs in this recipe. If you don't have fresh herbs, we recommend omitting them entirely before resorting to dried.

Can I use frozen fruit?

Frozen cantaloupe can technically work in a pinch, but fresh cucumbers and citrus are definitely best for this recipe.

How long will this juice last?

It's best served fresh, but it will last up to 24 hours in the refrigerator. Make sure to store in an airtight container.

Related

Looking for more drink recipes? Try these:

  • a glass of pineapple water garnished with a sprig of fresh mint
    Fresh Pineapple Water with Mint - Summer's Best Drink
  • A Tropical Smoothie recipe with mango, banana and pineapple PLUS a surprising ingredient that adds protein and will make your smoothies SUPER creamy! (Includes two variations: with kale and SPICY with kale!)
    Pineapple Spinach Banana Smoothie (Creamy + High Protein!)
  • a closeup of a glass of raspberry lemonade with thin lemon slices, fresh raspberries, and a sprig of fresh mint
    Homemade Raspberry Lemonade (Sweet, Tart & Refreshing)
  • Dalgona Coffee Recipe on a gray table
    Dalgona Coffee Recipe (original + Keto version)

Pairings

These are the dishes we love to enjoy with this cucumber fruit juice recipe:

  • Cottage Cheese and Salsa is one of my favorite healthy snacks! Plus an easy way for more great cottage cheese mix-in ideas.
    Cottage Cheese and Salsa
  • Hash Brown Casserole with Eggs, Sausage and Mushrooms - super easy, delicious and feeds a crowd!
    Cheesy Sausage Hash Brown Breakfast Casserole
  • a top-down view of a cottage cheese egg bake on a rustic wooden table
    Cottage Cheese Egg Bake - Easy High-Protein Breakfast Casserole
  • Homemade Blueberry Banana Muffins
    Banana Blueberry Muffins
a glass of cucumber fruit juice with a sprig of fresh mint as garnish, with another glass of juice in the background

Cucumber Fruit Juice Recipe

Yield: 2 servings
Prep Time: 10 minutes
Total Time: 10 minutes

This juice is sweet and refreshing, perfect for breakfast or an afternoon pick-me-up.

Ingredients

  • 2 cucumbers, peeled
  • 5-6 sprigs fresh basil
  • 2 mint leaves
  • 2 grapefruits, juiced
  • 1 cup cold water
  • ¼ cantaloupe
  • 1 tablespoon coconut sugar (optional)

Instructions

  1. Place all of the ingredients into a blender or food processor and blend until it's completely smooth.
  2. Place a mesh strainer over a medium-sized bowl, then lay some cheesecloth over the top.
  3. Pour the juice mixture through the cheesecloth, then pick up the outside edges of the cloth, bring them together, and squeeze it tightly to release any remaining juice.
  4. Serve immediately or refrigerate for up to 24 hours.
Nutrition Information:
Yield: 2 Serving Size: 1
Amount Per Serving: Calories: 181Total Fat: 1gSaturated Fat: 0gTrans Fat: 0gUnsaturated Fat: 0gCholesterol: 0mgSodium: 20mgCarbohydrates: 45gFiber: 6gSugar: 32gProtein: 4g

This data was provided and calculated by Nutritionix.

© Aubrey Cornelius
Cuisine: American / Category: Drinks
Refreshing Cucumber Fruit Juice Recipe


Air Fryer Flautas Mexicanas – Crispy in Minutes!

September 22, 2025 by Aubrey Cornelius

a metal basket lined with parchment paper that's filled with air fryer flautas mexicanas and topped with pico de gallo, guacamole, and Cacique cheese. there are bowls of guacamole and fresh pico de gallo in the background.

These Air Fryer Flautas Mexicanas are crispy and so flavorful! Traditionally fried in oil, flautas are rolled tortillas stuffed with chicken, beans, and cheese, then cooked until they're perfectly crunchy.

This version uses the air fryer to get them crispy with less oil, making them just as delicious but even easier to prepare. Serve them hot with fresh pico de gallo, guacamole, shredded lettuce, and crumbled cheese for a fantastic weeknight meal!

a metal basket lined with parchment paper that's filled with air fryer flautas mexicanas and topped with pico de gallo, guacamole, and Cacique cheese. there are bowls of guacamole and fresh pico de gallo in the background.

Flautas mexicanas are a street food and dish that are made throughout Mexico. The name "flauta," meaning flute, comes from their long, thin shape (my love for them must come from my nine years of playing the flute as a child)! They're similar to taquitos, but typically larger and are made with flour or corn tortillas depending on the region.

We make air fryer flautas mexicanas a few times a month, usually for our Taco Tuesday night (it's tied with walking taco casserole). They're never served without sweet corn cake and some nachos loaded with veggies).

[feast_advanced_jump_to]

Ingredients

These are all of the ingredients you'll need to make each component for Air Fryer Flautas Mexicanas. Scroll a bit further down for a shopping list that's organized by type of ingredient.

Chicken Filling

  • 3 boneless, skinless chicken breasts
  • 2 (7 ounce) cans chipotle peppers in adobo
  • 2 jalapeños, deseeded
  • 2 tablespoons crushed pineapple
  • 2 garlic cloves, minced
  • 2 teaspoons salt
  • ¼ cup chicken broth

Glaze

  • ½ cup honey
  • ½ jalapeño, finely chopped

Pico de Gallo

  • 3 tomatoes, quartered
  • 3 garlic cloves, minced
  • Juice of 2 limes
  • ½ white onion, halved
  • ½ bunch fresh cilantro
  • 1 teaspoon salt

Guacamole

  • 2 avocados
  • A few tablespoons of pico de gallo

For Serving

  • 10-12 corn tortillas
  • 1 (16 ounce) can refried beans
  • 2 cups mozzarella cheese, shredded
  • Queso fresco cheese (for topping)
  • 2 limes, cut into wedges
  • 1 head iceberg lettuce, shredded (you may not need the entire head of lettuce)
a white bowl filled with fresh pico de gallo

Equipment Needed

It's important to prep all of your ingredients before starting any recipe, and having your equipment ready to go is really helpful, too. Here's everything you'll need:

  • Slow cooker
  • Parchment paper
  • Baking sheet
  • Two forks for shredding the chicken
  • Oven/broiler
  • Microwave
  • Paper towels
  • Air fryer
  • Food processor (you can also finely chop the ingredients)
  • Mixing bowls
  • Cutting board
  • Sharp knife
  • Pastry brush or spray bottle
  • Tongs

Shopping List

Here's the same list as above but we've organized it into different categories to make shopping for ingredients as easy as possible:

Produce

  • 2 jalapeños
  • 5 garlic cloves
  • 3 tomatoes
  • ½ white onion
  • ½ bunch fresh cilantro
  • 2 avocados
  • 1 head iceberg lettuce
  • 4 limes

Pantry

  • 2 (7 ounce) cans chipotle peppers in adobo
  • 2 tablespoons crushed pineapple
  • ¼ cup chicken broth
  • ½ cup honey
  • 1 (16 ounce) can refried beans
  • 10-12 corn tortillas

Meat

  • 3 boneless, skinless chicken breasts

Dairy

  • 2 cups mozzarella cheese, shredded
  • Queso fresco cheese (for topping)

Seasonings

  • 3 teaspoons salt (2 teaspoons for the chicken, 1 teaspoon for the pico de gallo)
a bowl of fresh guacamole on a black towel

Step-by-Step Instructions

  1. Cook the chicken: Place the chicken breasts, chipotle peppers, jalapeños, crushed pineapple, garlic, salt, and chicken broth in a slow cooker. Cover and cook on low for 3-4 hours, or until the chicken is tender and fully cooked. Remove the chicken from the broth and place it on a parchment-lined baking sheet. Shred the chicken with two forks. Toss the shredded chicken with the honey and chopped jalapeño. Broil on low for 5-6 minutes, just until the honey glaze thickens and the chicken turns golden.
  2. Assemble the flautas mexicanas: Warm the tortillas by wrapping them in a damp paper towel and microwaving for 30 seconds. Keep them covered as you assemble them so they stay soft. Working one at a time, spread a thin layer of refried beans down the center of each tortilla. Add about 2 tablespoons of chicken and 1 tablespoon of shredded mozzarella cheese. Roll them tightly into cylinders ("flutes"), placing them seam-side down.
  3. Air fry: Preheat your air fryer to 380°F. Lightly brush or spray the flautas with olive oil. Place them in a single layer in the air fryer basket, leaving space between each one. Air fry for 8-10 minutes, or until they're golden brown and crispy. (Cook in batches if needed.)
  4. Make the pico de gallo: Add the tomatoes, garlic, onion, lime juice, cilantro, and salt to a food processor. Pulse 6-8 times just until it's chunky (do not over-process).
  5. Make the guacamole: Mash the avocados in a bowl. Stir in a few spoonfuls of pico de gallo, plus a pinch of salt and a squeeze of lime.
  6. Serve: Top the crispy air fryer flautas with lettuce, queso fresco, and a squeeze of lime. Serve with pico de gallo and guacamole on the side.
a metal basket lined with parchment paper that's filled with air fryer flautas mexicanas and topped with fresh sliced jalapenos. there are bowls of halved avocados and fresh pico de gallo in the background.

Tips

  • Warm tortillas first: Corn tortillas are more likely to crack and split when they're cold. Always warm them in a damp paper towel in the microwave or place them briefly in a hot, dry skillet before rolling. Keep them wrapped in a clean towel as you work to prevent them from drying out.
  • Don't overfill: Use just a few tablespoons of filling per tortilla. Too much chicken or beans will cause the flautas to split open in the air fryer.
  • Roll them tightly: Roll the tortillas into snug cylinders and place them seam-side down so they hold their shape while cooking.
  • Don't skip the oil: A light coating of olive oil or spray is what makes the air fryer flautas taste just like they were fried.
  • Work in batches: Avoid crowding the air fryer basket (this is true for most air fryer recipes). Space them just far enough apart so air can circulate around each one.
  • Serve immediately: Flautas Mexicanas taste best fresh out of the air fryer while they're hot and crispy.

Storage & Make-Ahead

Flautas are perfect for making ahead of time then cooking only how many you'll need. They're perfect for parties since all the prep (even assembly) can be done up to a day in advance!

  • Refrigerator: Store leftover flautas in an airtight container in the refrigerator for up to 3 days. To get them crispy again, reheat them in the air fryer at 350°F for 4-5 minutes.
  • Freezing: Flautas Mexicanas freeze beautifully! You can freeze them either before or after air frying. Place them on a baking sheet in a single layer and freeze until they're solid, then transfer them to a freezer bag or airtight container (freezing them on a sheet pan first will prevent them from sticking together). They'll keep for up to 2 months.
  • Reheating from frozen: No need to thaw! Place the frozen flautas straight into the air fryer (brushed with oil) at 350°F for 8-10 minutes until they're heated through and crispy.
  • Make-ahead: You can assemble the flautas up to one day before air frying. Store them seam-side down on a parchment-lined baking sheet, cover them tightly with plastic wrap, and refrigerate. Air fry them just before serving.
a metal basket lined with parchment paper that's filled with air fryer flautas mexicanas and topped with fresh sliced jalapenos. there are bowls of halved avocados and fresh pico de gallo in the background.

Frequently Asked Questions

Are flautas and taquitos the same thing?

They're very similar! Flautas are typically made with larger tortillas (often flour or corn) and rolled into longer, flute-like shapes, while taquitos are usually smaller and are always made with corn tortillas.

Can I make these flautas with flour tortillas instead of corn?

Corn tortillas are more traditional, but flour tortillas work well and are easier to roll without splitting.

Do I need to use a toothpick to keep them from unrolling?

Not if you warm your tortillas first and roll them tightly seam-side down. You can use toothpicks, but don't forget to remove them before serving.

Can I bake these instead of air frying?

We often bake them if we already have something in the oven! Just place them on a parchment-lined baking sheet, spray or brush them lightly with oil, and bake at 400°F for 18-20 minutes, flipping them halfway through, until they're golden and crispy.

How do I keep my corn tortillas from cracking when rolling?

Warm them in the microwave between damp paper towels for 30 seconds, or heat them briefly in a dry, hot skillet. Begin assembling them immediately, keeping the tortillas you're not using covered with a clean towel.

What toppings go best with flautas Mexicanas?

Shredded lettuce, crumbled queso fresco or cotija, salsa, pico de gallo, guacamole, and Mexican crema or sour cream are all classic (and delicious!) choices.

Summarize this content and save it for later

ChatGPT
Google AI
Perplexity
Grok

Related

Looking for more Mexican recipes? Try these:

  • These Beer Battered Fish Tacos light and crispy with a killer sauce that brings all the flavors together!
    Crispy Beer Battered Fish Tacos
  • This Dorito Taco Casserole is so simple to throw together that my kids make it all the time!
    Dorito Taco Casserole with Black Beans and Corn
  • top down view of two birria tacos on a wooden board next to a small bowl of consommé
    Authentic Birria Tacos Recipe (Step-by-Step with Consommé)
  • Mexican Chopped Salad with a 4-ingredient Spicy Sweet Chipotle Balsamic Dressing - SO GOOD!!
    Mexican Chopped Salad with Spicy Sweet Chipotle Balsamic Dressing

Pairings

These are the dishes we like to serve with these air fryer flautas Mexicanas:

  • Close-up of colorful nachos showing melted cheese, diced tomatoes, red onions, avocado chunks, black beans, and fresh herbs.
    How to Bake Nachos in the Oven (Crispy Every Time!)
  • Stuffed Jalapeño Poppers Recipe
    Stuffed Jalapeño Poppers with Mexican Chorizo & Smoked Gouda
  • Smoked Queso Dip
    Smoked Queso Dip
  • a cast iron skillet filled with choriqueso made with chorizo and cheese then topped with diced tomato, white onion, and cilantro
    Choriqueso - Easy Mexican Chorizo and Cheese Dip
a metal basket lined with parchment paper that's filled with air fryer flautas mexicanas and topped with pico de gallo, guacamole, and Cacique cheese. there are bowls of guacamole and fresh pico de gallo in the background.

Air Fryer Flautas Mexicanas

Yield: 10-12 flautas
Prep Time: 15 minutes
Cook Time: 4 hours 30 minutes
Total Time: 4 hours 45 minutes

This air fryer chicken flautas recipe has a bit of heat from the jalapeño but the honey glaze balances the heat nicely. If you're short on time, rostisserie chicken makes a great substitute.

Ingredients

Chicken Filling

  • 3 boneless, skinless chicken breasts
  • 2 (7 ounce) cans chipotle peppers in adobo
  • 2 jalapeños, deseeded
  • 2 tablespoons crushed pineapple
  • 2 garlic cloves, minced
  • 2 teaspoons salt
  • ¼ cup chicken broth

Glaze

  • ½ cup honey
  • ½ jalapeño, finely chopped

Pico de Gallo

  • 3 tomatoes, quartered
  • 3 garlic cloves, minced
  • Juice of 2 limes
  • ½ white onion, halved
  • ½ bunch fresh cilantro
  • 1 teaspoon salt

Guacamole

  • 2 avocados
  • A few tablespoons of pico de gallo

For Serving

  • 10-12 corn tortillas
  • 1 (16 ounce) can refried beans
  • 2 cups mozzarella cheese, shredded
  • Queso fresco cheese (for topping)
  • 2 limes, cut into wedges
  • 1 head iceberg lettuce, shredded (you may not need the entire head of lettuce)

Instructions

  1. Place the chicken breasts, chipotle peppers, jalapeños, crushed pineapple, garlic, salt, and chicken broth in a slow cooker. Cover and cook on low for 3-4 hours, or until the chicken is tender and fully cooked.
  2. Remove the chicken from the broth and place it on a parchment-lined baking sheet. Shred the chicken with two forks. Toss the shredded chicken with the honey and chopped jalapeño. Broil on low for 5-6 minutes, just until the honey glaze thickens and the chicken turns golden.
  3. Warm the tortillas by wrapping them in a damp paper towel and microwaving for 30 seconds (keep them covered as you assemble them so they stay soft and pliable). Spread a thin layer of refried beans down the center of each tortilla. Add about 2 tablespoons of chicken and 1 tablespoon of shredded mozzarella cheese. Roll them tightly and place them seam-side down, then lightly brush or spray them with olive oil.
  4. Preheat your air fryer to 380°F. Place them in a single layer in the air fryer basket, leaving space between each one. Air fry for 8-10 minutes, or until they're golden brown and crispy. (Cook in batches if needed.)
  5. Meanwhile, add the tomatoes, garlic, onion, lime juice, cilantro, and salt to a food processor. Pulse 6-8 times just until it's chunky (do not over-process).
  6. Mash the avocados in a bowl. Stir in a few spoonfuls of pico de gallo, plus a pinch of salt and a squeeze of lime.
  7. Top the crispy air fryer flautas with lettuce, queso fresco, and a squeeze of lime. Serve with pico de gallo and guacamole on the side.
Nutrition Information:
Yield: 12 Serving Size: 1
Amount Per Serving: Calories: 343Total Fat: 15gSaturated Fat: 5gTrans Fat: 0gUnsaturated Fat: 8gCholesterol: 50mgSodium: 895mgCarbohydrates: 37gFiber: 6gSugar: 17gProtein: 20g

This data was provided and calculated by Nutritionix.

© Aubrey Cornelius
Cuisine: Mexican / Category: Air Fryer Recipes
Air Fryer Flautas Mexicanas – Crispy in Minutes!

Authentic Italian Pasta Carbonara Recipe

September 19, 2025 by Aubrey Cornelius

a closeup, overhead shot of an authentic Italian pasta carbonara recipe in a white bowl with a spoon, on a white tablecloth with crusty bread

There's something irresistible about the simplicity of an authentic Italian pasta carbonara recipe. This Roman classic relies on just a handful of quality ingredients to create a dish that's both comforting and sophisticated. Ready in under 30 minutes, carbonara is the perfect example to show that Italian cooking is all about doing more with less!

a closeup, overhead shot of an authentic Italian pasta carbonara recipe in a white ceramic pot with two serving spoons, on a white tablecloth with crusty bread

This authentic Italian pasta carbonara recipe is the one we pull out on a weeknight when we want something that feels fancy without a lot of effort. Sometimes we'll go with our easy avocado pasta for the same reason, and we serve both with a delicious stuffed garlic bread.

[feast_advanced_jump_to]

Ingredients

  • 16 oz spaghetti (or bucatini)
  • 4 oz guanciale, diced into small cubes (pancetta can be used if you can't find guanciale)
  • 4 large eggs (use just the yolks for a richer, silkier sauce, or 2 whole eggs + 2 yolks for a lighter dish)
  • 1 cup Pecorino Romano cheese, finely grated (use freshly grated, not pre-shredded)
  • 1 teaspoon freshly ground black pepper
  • Kosher salt
  • Prosciutto (optional and not part of an authentic pasta carbonara recipe)

Step-by-Step Instructions

  1. Prepare the pasta water: Bring a large pot of water to a boil and season it generously with kosher salt. It should taste like the sea!
  2. Cook the pasta: Add the spaghetti (or bucatini) and cook until it's al dente according to package directions. Before draining the pasta, reserve about 1 cup of the starchy pasta water.
  3. Cook the guanciale: While the pasta cooks, place the diced guanciale in a large skillet over medium heat. Cook it until the fat renders and it's crispy, about 5-7 minutes. Remove it from heat but leave the rendered fat in the pan.
  4. Make the egg and cheese mixture: In a medium bowl, whisk together the egg yolks (or whole egg + yolk combination), finely grated Pecorino Romano, and a generous amount of freshly cracked black pepper until it forms a thick paste.
  5. Combine pasta and guanciale: Add the drained pasta directly to the skillet with the guanciale and toss it to coat it in the rendered fat. Allow it to cool for about a minute so the eggs don't scramble when you add them.
  6. Create the sauce: Pour the egg and cheese mixture over the pasta while tossing quickly and continuously so the eggs don't scramble. Add small amounts of the reserved pasta water as needed until a silky sauce coats every strand of pasta.
  7. Add prosciutto: We like to add torn pieces of prosciutto just before serving, but this is entirely optional. This is not part of an authentic Italian pasta carbonara recipe, so if you want to keep its authenticity, feel free to skip this step.
  8. Serve it immediately: Plate the pasta and finish with extra Pecorino Romano and freshly cracked black pepper.
a white bowl filled with authentic Italian carbonara pasta on a white tablecloth

Equipment Needed

We like to gather all of our ingredients (mise en place) before beginning a recipe, but it's also a good idea to have all of the equipment you'll need ready to go, too. Here's a list of everything you'll need so you're ready to go before you begin the recipe:

  • Large pot
  • Large skillet or sauté pan
  • Mixing bowl
  • Whisk or fork
  • Wooden spoon or heatproof spatula
  • Tongs
  • Measuring cups & spoons
  • Box grater or microplane
  • Colander or pasta strainer
  • Ladle

Tips for the Best Carbonara

  • Use guanciale if you can find it: Pancetta or bacon are fine in a pinch (and they're delicious!), but guanciale is what gives this authentic Italian pasta carbonara recipe its incredible flavor.
  • Grate your own cheese: Freshly grated cheese has a much better flavor and texture, so take the extra minute and get out that grater.
  • Use reserved pasta water: The starchy water is the key to creating a silky sauce. Add it gradually when you're tossing the pasta (you might not need it all).
  • Temper the eggs: Remove the pan from from the heat and allow it to cool slightly before adding the egg mixture. The warmth of the pasta will cook the eggs gently without scrambling them, which is how you'll get a luscious, creamy sauce.
  • Work quickly: Toss the pasta with the eggs as quickly as possible, which will also help prevent the eggs from scrambling.
  • Cook the pasta just to al dente: The texture of al dente pasta helps the sauce cling to the noodles.
  • Season carefully: Guanciale and Pecorino Romano are naturally salty, so go easy on any added salt to make sure you don't overseason. Taste before adjusting, especially if you add prosciutto at the end (you likely won't need any added salt).
  • Use freshly cracked black pepper: This makes a huge difference! You want "cracked" pepper, not ground.
  • Serve it immediately: Carbonara doesn't wait! It's best enjoyed as soon as it's ready so the sauce stays nice and smooth.
an overhead shot of an authentic Italian pasta carbonara recipe in a white bowl with a spoon, on a white tablecloth with crusty bread

Substitutions

  • Guanciale: While guanciale is the traditional and authentic choice, it can be hard to find outside of specialty shops. Pancetta is the closest substitute since it also comes from pork belly and has a similar fat content. If neither is available, prosciutto can work in a pinch, though it's leaner and less fatty, so the sauce will be slightly different. Bacon may also be used, but use thick-cut, unsmoked bacon to keep the flavors closer to authentic.
  • Cheese: Pecorino Romano is the authentic choice. If you can't find it, a blend of Pecorino and Parmesan will work, too. You can also go with all Parmesan but the flavor will me more mild.
  • Pasta: Spaghetti is the most traditional, but you can also use bucatini, rigatoni, or even fettuccine.
  • Eggs: You can add extra yolks for a richer sauce. If you like a really creamy sauce, replace one whole egg with two yolks.

Storage and Reheating

  • Storage: Carbonara is always best served fresh, but leftovers can be stored in an airtight container in the refrigerator for up to 2 days.
  • Freezing: Don't freeze your carbonara. The eggs and cheese sauce will separate.
  • Reheating: Reheat it very gently to prevent scrambling the eggs. Place the pasta in a skillet over low heat, add a tablespoon or two of water, broth, or even a drizzle of olive oil, and toss it until it's just warmed through. Stir it constantly and keep the heat low.
  • Skip reheating altogether: Carbonara is delicious as a chilled pasta salad!
an overhead shot of an authentic Italian pasta carbonara recipe in a white ceramic pot with two serving spoons, on a white tablecloth with crusty bread

Frequently Asked Questions

Is carbonara supposed to have cream?

Traditional, authentic carbonara does not contain cream. The creamy texture comes from the emulsion of eggs, Pecorino Romano (or Parmesan), guanciale, and a splash of starchy pasta water. Some modern versions use cream, but an authentic Italian pasta carbonara recipe does not use any type of cream or dairy.

What's the difference between guanciale and pancetta?

Guanciale is made from pork cheek and has more fat. Pancetta is pork belly, with a milder flavor and slightly less fat. Guanciale is the traditional choice for carbonara, but pancetta is a good substitute.

Can I use bacon instead of guanciale?

Bacon is smoked, unlike guanciale or pancetta, so it adds a smokier flavor that will change the flavor of the overall dish. Pancetta is a closer substitute, but bacon will still make a tasty carbonara.

What pasta is best for carbonara?

Spaghetti is the classic choice (we like using a thick spaghetti), but bucatini, rigatoni, or fettuccine will also work. The key is choosing a pasta shape that can hold the sauce.

How do I keep the eggs from scrambling?

Make sure to remove the pan from the heat before adding the egg and cheese mixture, then stir it quickly and constantly while you slowly incorporate the hot pasta water. This will create a creamy sauce instead of scrambled eggs.

Can I make carbonara ahead of time?

We don't recommend it because the sauce will lose its silky texture if it's stored too long. If you need to prep it ahead, you can cube the guanciale or pancetta, grate the cheese, and whisk the egg mixture in advance, then cook everything just before serving.

Summarize this content and save it for later

ChatGPT
Google AI
Perplexity
Grok

Related

Looking for more pasta recipes like this one? Try these:

  • A Plate of Szechuan Gourmet Beef Pasta on a Black Table with Greens and Chopped Peanuts
    Szechuan Beef Pasta
  • Seafood Mac & Cheese in a Skillet
    Seafood Mac and Cheese
  • You already know that Alfredo sauce is creamy, cheesy and rich. Try it in this luscious Chicken Alfredo Pasta Bake for a delicious meal!
    Chicken Alfredo Pasta Bake
  • a closeup of instant pot lasagna on a white plate garnished with fresh basil, with more fresh basil in the background
    Instant Pot Lasagna (Easy, Cheesy, and Ready in 30 Minutes)

Pairings

These are the dishes we like to serve with this authentic Italian pasta carbonara recipe:

  • Green Beans Almondine on a white oval plate which sits on a wooden board with a rustic napkin next to it.
    Green Beans Almondine
  • cooked snap peas on a white plate set on a wood table
    Garlic Snap Peas Recipe
  • Homemade Affogato Recipe with Ice Cream and Coffee
    Affogato Recipe - Italian Dessert
  • Lemon Panna Cotta with Raspberry Sauce
    Lemon Panna Cotta with Raspberry Sauce
a closeup, overhead shot of an authentic Italian pasta carbonara recipe in a white bowl with a spoon, on a white tablecloth with crusty bread

Authentic Italian Pasta Carbonara Recipe

Yield: 4 servings
Prep Time: 10 minutes
Cook Time: 15 minutes
Total Time: 25 minutes

This easy recipe comes together in under 30 minutes from start to finish!

Ingredients

  • 16 ounces spaghetti (or bucatini)
  • 4 ounces Guanciale, diced into small cubes (or pancetta)
  • 4 large eggs (use the yolks only for a richer, silkier sauce, or 2 whole eggs + 2 yolks if you prefer a slightly lighter texture)
  • 1 cup Pecorino Romano cheese, finely grated (use freshly grated, not pre-shredded)
  • 1 teaspoon freshly ground black pepper (adjust to taste, freshly cracked is best)
  • Kosher salt, for the pasta water
  • 4 ounces torn prosciutto (optional; see notes)

Instructions

  1. Bring a large pot of water to a boil and season it generously with kosher salt.
  2. Add the spaghetti (or bucatini) and cook until it's al dente according to package directions. Before draining the pasta, reserve about 1 cup of the starchy pasta water.
  3. While the pasta cooks, place the diced guanciale in a large skillet over medium heat. Cook it until the fat renders and it's crispy, about 5-7 minutes. Remove it from heat and do not remove the fat in the pan.
  4. In a medium bowl, whisk together the egg yolks (or whole egg + yolk combination), finely grated Pecorino Romano, and a generous amount of freshly cracked black pepper until it forms a thick paste.
  5. Add the drained pasta directly to the skillet with the guanciale and toss it to coat it in the fat. Allow it to cool for about a minute so the eggs don't scramble when you add them.
  6. Pour the egg and cheese mixture over the pasta while tossing quickly and continuously so the eggs don't scramble. Add small amounts of the reserved pasta water as needed until a silky sauce coats every strand of pasta.
  7. Plate the pasta and finish with extra Pecorino Romano and freshly cracked black pepper.

Notes

We like to add torn pieces of prosciutto just before serving, but this is entirely optional. This is not part of an authentic Italian pasta carbonara recipe, so if you want to keep its authenticity, feel free to skip this step.

Nutrition Information:
Yield: 4 Serving Size: 1
Amount Per Serving: Calories: 590Total Fat: 31gSaturated Fat: 12gTrans Fat: 0gUnsaturated Fat: 17gCholesterol: 249mgSodium: 2248mgCarbohydrates: 46gFiber: 2gSugar: 2gProtein: 30g

This data was provided and calculated by Nutritionix.

© Aubrey Cornelius
Cuisine: Italian / Category: Dinner
Authentic Italian Pasta Carbonara Recipe

Chocolate Shortbread Cookies with Crunchy Pistachios

September 17, 2025 by Aubrey Cornelius

a round, vintage silver plate filled with chocolate shortbread cookies

These easy chocolate shortbread cookies have the buttery goodness of classic shortbread with a rich chocolate flavor and a wonderful crunch from pistachios. They're super simple to put together (hello, six ingredients!) and make a wonderful addition to your holiday cookie trays!

a closeup of a stack of chocolate shortbread cookies with pistachios, with a few chocolate chips sprinkled on top and a small wooden bowl of pistachios in the background

We like to gift these for the holidays with a batch or two of jam sandwich cookies. If we're short on time (and who isn't during that time of year?), we'll add some M&M Pretzel Hugs, too!

[feast_advanced_jump_to]

Ingredients

  • unsalted butter
  • powdered sugar
  • dark cocoa powder (we use Hershey's Special Dark)
  • all-purpose flour
  • vanilla extract
  • chopped pistachios

Step-by-Step Instructions

  1. Grab a large mixing bowl and add the room temperature butter and the powdered sugar. Using a hand or stand mixer, beat them together until the mixture is light yellow in color and fluffy.
  2. In another, small mixing bowl, whisk the cocoa and flour together. Turn your mixer back on, and add a small amount at a time while the mixer is running, until it's all combined, scraping down the sides as necessary.
  3. Add in the vanilla extract and pistachios on low speed, then turn off the mixer.
  4. Remove the dough from the mixer, and knead until it forms a ball (be careful not to over mix).
  5. Cover the ball of dough in plastic wrap and refrigerate for at least 20 minutes.
  6. Once it's chilled, roll the dough into a sheet ¼ inch thick, then use a cookie cutter or knife to cut out your preferred shape (we used a square cookie cutter, but any shape will do).
  7. Preheat the oven to 350°F.
  8. Place the cut cookies onto a parchment-lined baking sheet and place them in the freezer to chill for about 15 minutes (this helps the cookies maintain their shape).
  9. Once chilled for the second time, remove the cookies from the freezer and place them in the oven to bake for about 8-10 minutes.
  10. Remove the cookies from the oven and allow them to cool for about 10 minutes before transferring them to a wire rack to cool completely.
a wooden bowl filled with salty shelled pistachios

Air Fryer Instructions

If you prefer, you can bake these chocolate shortbread cookies in the air fryer! We often keep the dough chilled and bake just a few at a time so we can enjoy freshly-baked cookies anytime.

Follow the directions above through step 9, but instead of using the oven, place the cookies into a preheated air fryer at 340°F and bake them for 7-12 minutes (air fryers vary wildly in how hot they cook, so start checking after 7 minutes).

Equipment Needed

It's always a good idea to gather all of your ingredients and tools before starting any recipe ("mise en place"). To make this easier, here's a list of everything you might need to make chocolate shortbread cookies:

  • Mixing bowls (one large mixing bowl for the dough, and a smaller one to whisk the flour and cocoa together)
  • Hand mixer or stand mixer
  • Measuring cups and spoons
  • Spatula or wooden spoon
  • Plastic wrap
  • Rolling pin
  • Cookie cutter or sharp knife
  • Baking sheet
  • Parchment paper
  • Freezer space and a tray that will fit (it's a good idea to clear the space beforehand)
  • Oven (or an air fryer!)
  • Cooling rack
a closeup of a round, vintage silver plate filled with chocolate shortbread cookies

Tips

  • Use room temperature butter: Cold butter won't cream as smoothly as butter that's been softened to room temperature.
  • Don't skip chilling the dough: This step will help the cookies to hold their shape while they're baking, otherwise they may spread out too much.
  • Roll them out evenly: Try to get the dough to ¼ inch when you're rolling it out. It's important that you don't have thicker/thinner areas so it all bakes evenly.
  • Don't overmix the dough: Mixing the dough just until the ingredients are incorporated will give you cookies that aren't too hard.
  • Use high-quality ingredients: As with any recipe with just a handful of ingredients, it's important that they're a good quality. It will make a noticeable difference!
  • Try to get clean edges: Press straight down with your cookie cutter or knife instead of at an angle.
  • Keep an eye on them: You want chocolate shortbread cookies to be just set, not overly browned. They'll continue to firm up as they cool.
  • Cool them completely: Let the cookies rest on the baking sheet for about 10 minutes before transferring them to a cooling rack.
  • Add whatever size nuts you prefer: You can chop the pistachios finely or leave them in larger pieces depending on your preference.
a stack of chocolate shortbread cookies with pistachios, with a few chocolate chips sprinkled on top and a small wooden bowl of pistachios in the background

Storage

TIP: Add parchment paper between each cookie layer in the storage container to prevent them from sticking.

  • Room temperature: You can store the cookies in an airtight container at room temp for up to 5 days.
  • Refrigeration: Refrigeration isn't necessary but it will slightly extend their shelf life, as they'll keep for up to a week. The flavor will be best at room temp, so let them sit out for 30 minutes before serving.
  • Freezing cookies: Once the chocolate shortbread cookies are completely cool, you can place them on a baking sheet in a single layer and freeze them until they're solid. At that point, you can just pop them in a freezer-safe bag and keep them frozen for up to two months.
  • Freezing dough: If you'd like to freeze just the dough before baking, wrap the dough ball tightly with plastic wrap, then place it in a freezer-safe bag. It'll keep for up to two months. Thaw it completely in the fridge overnight.
a round, vintage silver plate filled with chocolate shortbread cookies with another plate of cookies in the background

Frequently Asked Questions

Can I use a different nut instead of pistachios?

These cookies are very versatile (you can even skip the nuts entirely). Walnuts, almonds, pecans, or hazelnuts would all be delicious nut alternatives.

Do I really need to chill the dough?

You really do need to chill the dough. Not only will it be far easier to cut into shapes, but it helps them hold their shape and not spread out too much in the oven.

Can I make chocolate shortbread cookies without a cookie cutter?

Using a cookie cutter is easiest if you want specific shapes, but a knife will work just fine. You can also roll the dough into a log then just slice the cookies into rounds.

What cocoa powder works best?

A dark cocoa powder will give the richest chocolate flavor, but regular unsweetened cocoa will also work.

Why are my cookies crumbly?

This usually happens because the dough was overmixed. As soon as the dough comes together, stop mixing so the dough doesn't get "tough".

Can I add a topping?

Melted chocolate drizzled over the top is not only delicious but looks really pretty, too! You can use any chocolate you prefer: dark, milk, or white all work well. You could also quickly add some sprinkles before the drizzled chocolate has a chance to set.

How long do chocolate shortbread cookies stay fresh?

If you keep them at room temperature, they'll stay fresh for up to 5 days in an airtight container. You can also freeze them for up to 2 months.

Related

Looking for more Christmas cookie recipes? Try these:

  • Another Almond Crescent Cookies Recipe - but this one comes from Dorie Greenspan! Light, crumbly, not too sweet and perfect for coffee or Christmas.
    Almond Crescent Cookies Recipe
  • a vintage metal baking pan lined with parchment paper and filled with lemon cake mix cookies sprinkled with powdered sugar
    Easy Lemon Cake Mix Cookies: 6 Ingredients + 15 Minutes
  • cranberry oatmeal chocolate chip cookies that have just been drizzled with melted chocolate
    Cranberry Oatmeal Chocolate Chip Cookies
  • Chocolate Bar with Caramel
    Chocolate Caramel Bars

Pairings

If you're serving these cookies for a delicious ending to Christmas dinner, here are our main dish suggestions:

  • Beef Wellington Recipe
    Beef Wellington Recipe
  • a white bowl of beef short ribs braised with garlic and red wine with a sprig of fresh thyme on a wooden table
    The BEST Braised Beef Short Ribs Recipe for the Holidays
  • a spiral sliced ham on a white plate with fresh orange wedges on a wood table
    How to Cook a Spiral Ham (plus a Ham Glaze recipe)
  • a slice of prime rib on a white plate with mashed potatoes and grilled asparagus, next to a small dish of horseradish sauce. the rest of the standing rib roast is in the background
    Perfect Standing Rib Roast + Garlic Mustard Wet Rub
a round, vintage silver plate filled with chocolate shortbread cookies

Chocolate Shortbread Cookies with Pistachios

Yield: 8-10 cookies
Prep Time: 30 minutes
Cook Time: 10 minutes
Total Time: 40 minutes

These easy shortbread cookies are firm on the outside, yet soft in the center, and have the buttery goodness of a classic shortbread cookie. The number of cookies this recipe yields depends on how large or small the shapes are.

Ingredients

  • ¾ cups unsalted butter (1 ½ sticks), room temperature
  • ¾ cup powdered sugar
  • ¼ cup dark cocoa powder
  • 1 ¼ cups all-purpose flour
  • 1 teaspoon vanilla extract
  • ¼-1/2 cup chopped pistachios (according to preference)

Instructions

  1. In a large mixing bowl, using a hand mixer, combine the room temp butter and powdered sugar until light yellow in color and fluffy.
  2. Combine the cocoa and flour in a small bowl then slowly combine with the butter mixture while continuously mixing.
  3. Add in the vanilla extract and the pistachios and mix them on low speed just until incorporated.
  4. Knead the dough just until it forms a ball (be careful not to over mix).
  5. Cover the dough in plastic wrap and refrigerate for about 20 minutes or longer.
  6. Once chilled, roll the dough into a sheet ¼ inch thick, then use a cookie cutter or knife to cut out your preferred shape (i used a square).
  7. Preheat oven to 350°F.
  8. Place the cut cookies onto a parchment-lined baking sheet and place in the freezer to chill for about 15 minutes (this helps the cookies maintain their shape).
  9. Once chilled for the second time, remove and place in the oven to bake for about 8-10 minutes.
  10. Remove the cookies from the oven and allow them to cool for about 10 minutes before transferring to a wire rack to cool completely.
Nutrition Information:
Yield: 10 Serving Size: 1
Amount Per Serving: Calories: 277Total Fat: 19gSaturated Fat: 9gTrans Fat: 1gUnsaturated Fat: 8gCholesterol: 37mgSodium: 153mgCarbohydrates: 24gFiber: 2gSugar: 9gProtein: 4g

This data was provided and calculated by Nutritionix.

© Aubrey Cornelius
Cuisine: American / Category: Desserts
Chocolate Shortbread Cookies with Crunchy Pistachios

White Bean & Barley Salad with Lemon-Garlic Vinaigrette

September 15, 2025 by Aubrey Cornelius

a closeup of a white bowl filled with barley salad on a black linen cloth next to a container of greek vinaigrette

This simple barley salad is both light and hearty, with a wonderfully fresh Mediterranean flavor! The chewy barley pairs really well with creamy white beans and crunchy cucumber. A quick lemon and garlic vinaigrette brings all the flavors together for an easy, flavorful lunch or light dinner.

a white bowl filled with barley salad on a black linen cloth next to a container of greek vinaigrette

When it comes to easy, flavorful salads, this barley salad is our go-to year-round. In the summer, we also make this easy pea salad, and when the leaves start to turn, we go for a creamy fall fruit salad.

[feast_advanced_jump_to]

Ingredients

Salad Ingredients

  • chicken broth
  • salt
  • uncooked quick barley
  • canned white beans
  • red onion
  • cucumber
  • parsley

Dressing Ingredients

  • fresh lemon juice
  • garlic cloves
  • salt
  • dried oregano
  • rice wine vinegar
  • olive oil

Instructions

  1. Cook the barley: In a large pot, bring the chicken broth and 1 teaspoon salt to a boil. Add the quick barley and cook for about 20 minutes, or until it's soft and tender.
  2. Cool the barley: Drain the cooked barley in a strainer, rinse with cold water, and transfer it to a large mixing bowl.
  3. Prepare the beans and veggies: Rinse and drain the white beans, then add them to the bowl with the barley. Stir in the sliced red onion, diced cucumber, and chopped parsley.
  4. Make the vinaigrette: In a food processor, combine the lemon juice, garlic, salt, oregano, and rice wine vinegar. With the motor running, slowly stream in the olive oil until the dressing emulsifies.
  5. Toss the salad: Pour the vinaigrette over the barley and bean mixture. Toss it well to coat all the ingredients evenly.
  6. Chill and serve: Refrigerate the salad for at least 15 minutes before serving to let the flavors meld. Serve the barley salad chilled or at room temperature.
a white bowl filled with barley salad with white beans on a black linen cloth with greek vinaigrette being poured over the salad

Equipment Needed

  • A large pot for cooking the barley.
  • A strainer or colander to drain and rinse both the barley and the beans.
  • A large mixing bowl for combining and tossing the salad ingredients.
  • A food processor or blender to make the Greek vinaigrette.
  • A cutting board and sharp knife for chopping the vegetables and parsley.
  • Measuring cups and spoons, although this is a recipe that's easy to measure with your heart!
  • A mixing spoon for tossing the salad with the vinaigrette.

Tips

  • Make sure to cook the barley in broth! This is what gives the barley extra flavor and it makes a big difference.
  • Rinse the barley and beans well, as this stops the barley from overcooking. It will also remove any liquid from the can still clinging to the beans. Make sure to drain both really well, too.
  • When you're chopping the veggies, make sure they're small enough so you get a little of everything in each bite.
  • Slowly streaming the olive oil into the food processor will emulsify the dressing so it clings to the salad.
  • Make sure to let it rest, even briefly! A short chill in the fridge (about 15-30 minutes) allows the flavors to meld, making the salad taste even better.
  • You can make it ahead of time by cooking the barley and prepare the vinaigrette up to a day in advance. Then just toss everything together about 30 minutes before you want to serve it.
an overhead view of a white serving bowl filled with barley salad with white beans next to two smaller bowls on a black linen cloth next to a container of greek vinaigrette

Substitutions & Variations

  • Grains: Try using farro, quinoa, or couscous.
  • Beans: You can use cannellini, great northern, or chickpeas.
  • Broth: Vegetable broth works just as well as chicken broth.
  • Herbs: Fresh parsley is definitely the way to go here, but you can also add a little fresh dill, mint, or basil.
  • Add a handful of baby spinach or arugula!
  • If we've got it on hand, we'll add some crumbled feta or shaved Parmesan - it's so good!
  • Add some toasted pine nuts, almonds, or sunflower seeds just before serving.
  • To make it a main dish, you can add grilled chicken, shrimp, or salmon.

Grab more ideas for variations to this barley salad! Ask AI here:

ChatGPT
Google AI
Perplexity
Grok

Storage

  • Refrigeration: Store the salad in an airtight container in the refrigerator for up to 3 days. Store the vinaigrette separately in a jar and toss it with the salad just before serving.
  • Make-ahead: Cook the barley and prepare the vinaigrette up to 1 day in advance, then assemble everything about 30 minutes before serving.
  • Freezing: We don't recommend freezing this barley salad.
an overhead view of a white serving bowl filled with barley salad with white beans next to two smaller bowls on a black linen cloth next to a container of greek vinaigrette

Frequently Asked Questions

Can I make this salad vegan?

To make this barley salad vegan, just swap out the chicken broth for vegetable broth, as the rest of the ingredients are vegan.

Can I use a different grain instead of barley?

Farro, quinoa, bulgur, or couscous all work well. Remember to adjust the cooking time according to whichever grain you're using.

What kind of beans work best?

Any canned white beans will work! We usually go with cannellini or great northern beans, but chickpeas or navy beans are great substitutes if that's what you have on hand.

How long does this salad last?

It will stay fresh for up to 3 days in the fridge. Make sure to store the dressing separately so it doesn't get soggy.

Can I make this salad ahead of time?

Cook the barley and make the vinaigrette up to a day ahead, then assemble everything about 30 minutes before serving.

Is this served warm or cold?

Barley Salad is best either chilled or served at room temperature.

Related

Looking for more recipes like this one? Try these:

  • a black serving bowl filled with cucumber and pineapple salad with hot honey, it's sitting on a green fabric napkin on a wooden table
    Cucumber and Pineapple Salad with Hot Honey
  • a very colorful chopped thai salad in a red bowl on a red table. the salad is covered in a coconut curry dressing with yellow and red bell peppers, kale, and chopped peanuts showing through the dressing
    Healthy Chopped Thai Salad with Mango and Kale
  • Asian Ramen Noodle Salad
    Asian Ramen Noodle Salad
  • Great texture and flavor plus takes just minutes to make! | www.thewickednoodle.com | #healthy #vegetables #salad
    Chopped Veggie Salad with Lemon-Garlic Dressing

Pairings

These are our favorite dishes to serve with this barley salad:

  • Foil Baked Tilapia Recipes
    Baked Tilapia in Foil Recipes (four ways)!
  • Blackened Salmon with Roasted Tomatoes just out of the oven on a cast iron pan
    Blackened Salmon with Roasted Tomatoes
  • a closeup of tuna salad lettuce wraps with a small dish of mayo and lemon wedges
    Tuna Lettuce Wraps
  • spanakopita or spanikopita on a plate with a bright green parsley garnish
    Easy Spanakopita
a closeup of a white bowl filled with barley salad on a black linen cloth next to a container of greek vinaigrette

White Bean and Barley Salad

Yield: 4 servings
Prep Time: 10 minutes
Cook Time: 20 minutes
Additional Time: 30 minutes
Total Time: 1 hour

White Bean & Barley Salad is a hearty Mediterranean-inspired salad that's perfect for lunch or a side salad with dinner.

Ingredients

For the salad

  • 24 ounces chicken broth
  • 1 teaspoon salt
  • 1 ½ cups uncooked quick barley
  • 1 14-ounce can white beans
  • ½ red onion, thinly sliced
  • 1 cucumber, deseeded and diced
  • 1 bunch parsley, roughly chopped

For the Dressing

  • Juice of 1 lemon
  • 2 garlic cloves
  • 1 teaspoon salt
  • 1 teaspoon dried oregano
  • ½ cup rice wine vinegar
  • ¼ cup olive oil

Instructions

  1. In a large pot, add the chicken broth & salt and bring it to a boil.
  2. Add the barley and cook for about 20 minutes or until it's soft and tender.
  3. Using a strainer, rinse the barley with cold water to stop the cooking process, drain it well. and add it to a large bowl.
  4. Rinse the beans in the strainer with cold water, drain them well, and add them to the barley.
  5. Add in the sliced red onion, diced cucumber, and roughly chopped parsley.

Dressing

  1. In a food processor, combine all of the dressing ingredients except the olive oil.
  2. With the motor running, slowly drizzle in the olive oil to form an emulsion.
  3. Pour the dressing over the bean and barley mixture and toss it to combine.
  4. Chill the salad in the fridge for about 30 minutes to let the flavors meld, then serve.
Nutrition Information:
Yield: 4 Serving Size: 1
Amount Per Serving: Calories: 340Total Fat: 15gSaturated Fat: 2gTrans Fat: 0gUnsaturated Fat: 12gCholesterol: 4mgSodium: 2093mgCarbohydrates: 43gFiber: 8gSugar: 3gProtein: 10g

This data was provided and calculated by Nutritionix.

© Aubrey Cornelius
Cuisine: Mediterranean / Category: Salads
White Bean & Barley Salad with Lemon-Garlic Vinaigrette

Italian Blood Orange Soda – Simple Party Drink Recipe

September 12, 2025 by Aubrey Cornelius

a closeup of two glasses of italian blood red soda garnished with fresh basil, on a tray next to a bottle of pellegrino and fresh blood orange slices

This Italian blood orange soda is as beautiful as it is delicious! It's perfect for parties, brunches, or anytime you'd like to serve a non-alcoholic option. It's both sweet and slightly tart with a creamy finish that everyone will love.

two glasses of italian blood red soda garnished with fresh basil, on a tray next to a bottle of pellegrino and fresh blood orange slices

The colors in this Italian blood orange soda are perfect for Mother's Day, Valentine's Day, or even the holidays! We like to serve it with raspberry lemonade or a PAMA cocktail to keep with the pink and red color theme.

[feast_advanced_jump_to]

Ingredients

Blood Orange Syrup

  • water
  • sugar
  • blood oranges
  • red gel food coloring (optional)

Soda

  • sparkling water, such as Pellegrino
  • unsweetened coconut milk
  • Basil or mint, for garnish (optional)

See the recipe card at the bottom of this page for specific ingredient amounts.

Step-by-Step Instructions

  1. Squeeze the blood oranges through a fine mesh strainer.
  2. In a medium-sized sauce pan, add the sugar and water and bring it to a boil, stirring constantly to make sure the sugar is completely dissolved.
  3. Remove the sugar syrup from the heat and add the blood orange juice, stirring well to combine. Place the syrup in the refrigerator to chill along with the sparkling water. Optional: If you want a darker pink or red coloring, add a drop or two of red food coloring to give it a deep red color.
step four in how to make italian blood orange soda: blood orange simple syrup being poured into a glass of pellegrino

Step 4: In a glass, add about ½ cup chilled sparkling water. Pour in approximately 2 tablespoons of the chilled blood orange simple syrup.

step five in how to make italian blood orange soda: coconut milk being poured into a glass of blood orange syrup and pellegrino

Step 5: Pour in approximately a quarter of a cup of the coconut milk. Stir gently to combine, then serve.

You can stop here and enjoy your Italian soda, or add a garnish first of fresh basil or mint. The green herbs give a nice color contrast to the gorgeous blood orange soda, but both ways are beautiful!

Equipment Needed

  • Citrus juicer
  • Fine mesh strainer (optional): This will collect any pulp and seeds for a smoother syrup.
  • Medium saucepan
  • Measuring cups and spoons
  • Mixing spoons (for both the simple syrup and the blood orange soda)
  • Glass bottles or jars with lids (optional, for storing the cooled syrup)
  • Serving glasses

Tips

  • Use fresh blood oranges: Don't be tempted to take a shortcut with the flavoring. It's important to use fresh fruit, especially since there are so few ingredients in this blood orange soda.
  • Cool the simple syrup completely: The simple syrup and sparkling water should both be thoroughly chilled before assembling.
  • Choose a high-quality sparkling water: Use a sparkling water that has no added flavors, and don't skimp on the quality. This is important in a recipe with so few ingredients.
  • Stir gently: You want to make sure the ingredients are completely combined, but stirring it too briskly can ruin the fizz that makes Italian soda so delicious.
  • Serve it immediately: As with any soda, the fizz is what "makes it", so don't let it sit out too long before serving.
  • Adjust the amounts: Start with the amounts of ingredients we've recommended, then adjust to your taste. I love mine more creamy, but you may prefer yours even more sweet. This blood orange soda is very versatile so make it exactly how you like it!
coconut milk being poured into a glass of italian blood red soda garnished with fresh basil, on a tray next to a bottle of pellegrino and fresh blood orange slices

Storage

  • Blood orange syrup: Store the cooled syrup in a clean glass jar or bottle with a tight-fitting lid. It will keep in the refrigerator for up to one week.
  • Coconut milk and sparkling water: Keep these chilled in the refrigerator until just before making the sodas. Don't mix them ahead of time so the bubbles don't go flat.
  • Make-ahead: This is a great make-ahead recipe! Prepare the recipe through step 3, then continue with step 4 whenever you're ready to serve.
  • Freezing: You can freeze the syrup into ice cubes, then transfer them to a freezer bag. The frozen cubes will last up to two months in the freezer. Just thaw them as needed!

Frequently Asked Questions

Can I use regular oranges if I don't have blood oranges?

You can use regular oranges but the flavor will be a bit sweeter, and the color won't be as red.

Can I leave out the coconut milk?

The coconut milk makes this a creamy blood orange soda, but you can leave it out if you're looking for something more like a traditional soda. You can also substitute it with whole milk or half & half.

Can I add booze?

If you want to turn this Italian soda into a cocktail, add a little vodka, gin, or Prosecco!

How far in advance can I make the syrup?

The blood orange simple syrup can be made up to a week ahead and stored in the refrigerator.

Can the recipe be doubled?

This recipe can easily be scaled up to serve as many people as you like.

Do I need the food coloring?

It's entirely optional, it just depends on whether you'd like a deeper color, but it's gorgeous without it, too.

What's the best garnish?

We usually go with sprigs of fresh basil or mint, but a slice of fresh blood orange is also gorgeous.

a closeup of two glasses of italian blood red soda garnished with fresh basil, on a tray next to a bottle of pellegrino and fresh blood orange slices

Related

Looking for more recipes like this one? Try these:

  • a glass of pineapple water garnished with a sprig of fresh mint
    Fresh Pineapple Water with Mint - Summer's Best Drink
  • sweet tea sangria with raspberries and fresh summer peaches
    Sweet Tea Sangria with Fresh Fruit
  • Mezcal & Grapefruit Cocktail
    Mezcal Grapefruit Cocktail
  • How To Make Pomegranate Margarita Cocktails
    Pomegranate Margaritas

Pairings

These are the appetizers we like to serve with Italian Blood Orange Soda:

  • cranberry cheese balls on a white plate with a gorgeous star in the background
    Cranberry Pecan Cheese Balls
  • Baked Camembert with Cranberries and Walnuts on a wooden board with bread
    Baked Camembert with Honey, Cranberries & Walnuts
  • Bite size Beef Wellingtons
    Beef Wellington Bites
  • a white bowl filled with fried ravioli and a small white dish of marinara sauce
    Crispy Fried Ravioli - Deep-Fried, Air Fryer, or Oven
a closeup of two glasses of italian blood red soda garnished with fresh basil, on a tray next to a bottle of pellegrino and fresh blood orange slices

Italian Blood Orange Soda

Yield: 4 servings
Prep Time: 5 minutes
Cook Time: 5 minutes
Additional Time: 1 hour
Total Time: 1 hour 10 minutes

This creamy, fizzy Italian soda is easy to make, has a wonderful flavor, and can easily be scaled up to serve a crowd.

Ingredients

Blood Orange Syrup

  • 1 cup water
  • 1 cup sugar
  • Juice of 3 blood oranges
  • 1 drop red gel food coloring (optional)

Soda

  • 1 large bottle sparkling water
  • 1 cup unsweetened coconut milk
  • Fresh basil, mint, or blood orange slices (for garnishing)

Instructions

  1. Squeeze the blood oranges through a fine mesh strainer.
  2. In a medium-sized sauce pan, add the sugar and water and bring it to a boil, stirring constantly to make sure the sugar is completely dissolved.
  3. Remove the sugar syrup from the heat and add the blood orange juice, stirring well to combine. Place the syrup in the refrigerator to chill along with the sparkling water for at least one hour. Optional: If you want a darker pink or red coloring, add a drop or two of red food coloring to give it a deep red color.
  4. In a glass, add about ½ cup chilled sparkling water. Pour in approximately 2 tablespoons of the chilled blood orange simple syrup.
  5. Pour in approximately a quarter of a cup of the coconut milk, and stir gently to combine.
Nutrition Information:
Yield: 4 Serving Size: 1
Amount Per Serving: Calories: 307Total Fat: 1gSaturated Fat: 1gTrans Fat: 0gUnsaturated Fat: 0gCholesterol: 0mgSodium: 44mgCarbohydrates: 76gFiber: 3gSugar: 69gProtein: 1g

This data was provided and calculated by Nutritionix.

© Aubrey Cornelius
Cuisine: Italian / Category: Drinks
Italian Blood Orange Soda – Simple Party Drink Recipe

Cucumber and Pineapple Salad with Hot Honey

July 23, 2025 by Kristy Bernardo

a black serving bowl filled with cucumber and pineapple salad with hot honey, it's sitting on a green fabric napkin on a wooden table

If you're looking for the perfect summer side dish, this Cucumber and Pineapple Salad is it. It's cool, crisp, and juicy with a sweet-spicy kick from hot honey and a pop of freshness from chopped cilantro. The combination of pineapple and cucumber might sound unexpected, but it works really well, especially with a pinch of salt to pull all the flavors together.

This salad takes just minutes to make and is endlessly versatile! Serve it with grilled chicken, scoop it onto tacos, or eat it straight from the bowl as a light, refreshing side dish or healthy snack. It has so much flavor and it's exactly what hot-weather meals need!

a black serving bowl filled with cucumber and pineapple salad with hot honey and cilantro, it's sitting on a green fabric napkin on a wooden table

Why You'll Love It

  • It's quick and easy. Just chop, toss, and serve. You don't even need to let it sit (although you can)!
  • Sweet + spicy + salty = magic. The hot honey adds just enough heat to balance the sweetness of the pineapple. And a pinch of salt helps bring those flavors together.
  • It's light and refreshing. Perfect for hot days, backyard barbecues, or when you just want a delicious, healthy snack or light lunch.
  • It's really versatile. Serve it as a side dish, taco topping, or a light, flavorful, and healthy snack.
  • Only 5 ingredients. And one is salt! It's so simple and fresh but it's full of flavor!

Ingredients You'll Need

  • English cucumber: English cucumbers hold up well in salads and add a nice crunchy texture. You can use other types of cucumbers, just remove the seeds so the salad doesn't get watery.
  • Fresh pineapple: Sweet and juicy! Fresh pineapple goes so well with the crunch cucumber. Please do use fresh - it makes a huge difference! If canned is all you have, it will still be good, but nowhere near the deliciousness of fresh.
  • Cilantro: Adds a bright flavor that ties everything together. If you're not a fan, try swapping in fresh mint, parsley, or basil. You can also skip it entirely if you don't have fresh herbs on hand.
  • Hot honey: A sweet-spicy drizzle that makes this salad pop. Adjust the amount depending on how much heat you like.
  • Salt: Just a pinch to enhance and balance the flavors.
an extreme closeup of cucumber and pineapple salad with hot honey

How to Make Cucumber and Pineapple Salad

This salad is as easy as it gets! Just a little chopping and mixing and you're done.

  1. Chop the cucumber and pineapple. Cut both into bite-sized pieces and place them in a medium mixing bowl (or put it straight into the serving bowl and mix it there).
  2. Add the cilantro. Toss in the chopped cilantro.
  3. Drizzle with hot honey. Start with a tablespoon, taste it, and add more if you like it spicier. I usually just eyeball this but if you're serving it for guests, you probably want to make sure it's not too spicy.
  4. Season it with a little salt. A pinch goes a long way to bring out the flavors. Taste it and adjust as needed.
  5. Toss and serve. Mix everything well and serve it immediately, or chill it for 15-20 minutes if you prefer it extra cold.

Tips & Variations

This cucumber and pineapple salad is super flexible, so feel free to get creative with whatever ingredients you have on hand!

  • Add a squeeze of lime: A little lime juice brightens the whole dish and adds a nice contrast to the sweet pineapple and spicy honey.
  • Use regular cucumber: No English cucumber? Just peel and deseed a regular cucumber to get a similar crunch.
  • Add some diced red onion: It adds both color and flavor.
  • Make it spicier or milder: Adjust the heat by using more or less hot honey, or swap it with plain honey and add red pepper flakes. Thinly-sliced jalapeño or serrano peppers would be delicious, too.
  • Switch up the herbs: Not a fan of cilantro? Try fresh mint, basil, or even a little chopped chives or green onion for a different flavor.
  • Add more fruit: Mix in chopped mango, watermelon, or even avocado.
  • Add crunch: Top with toasted cashews, peanuts, or pumpkin seeds for more texture.
  • Skip the hot honey: Try it with some Tajin seasoning, regular honey, or no seasoning at all!
  • Make it creamy: A drizzle of yogurt or a dollop of sour cream will turn this into a wonderfully creamy salad.
a black serving bowl filled with cucumber and pineapple salad with hot honey, it's sitting on a green fabric napkin on a wooden table

What to Serve It With

This cucumber and pineapple salad is incredibly versatile: it works as a side dish, a topping, or a light snack all on its own. Here are some of our favorite ways to serve it:

  • Grilled meats: It's perfect alongside grilled chicken, pork chops, shrimp, or salmon. The sweetness of the pineapple balances out smoky, savory flavors.
  • Tacos: Spoon it over fish or shrimp tacos in place of regular salsa.
  • Rice or grain bowls: Add it to a bowl with rice, quinoa, or cauliflower rice, plus some protein for a quick and delicious meal.
  • Pulled pork or BBQ ribs: Its brightness cuts through rich, smoky barbecue dishes.
  • Asian-inspired dishes: Because of the pineapple, it pairs well with spicy noodle bowls, sesame chicken, or teriyaki anything.
  • As a dip: Chop it really small and serve it with salty tortilla chips!

Storage Tips

This salad is best enjoyed fresh, but you can store it if necessary with a few small adjustments.

  • Short-term storage: Store leftovers in an airtight container in the refrigerator for up to 1 day. The cucumber and pineapple will release some liquid, so it may become a bit watery over time.
  • If making ahead: Chop the cucumber, pineapple, and cilantro ahead of time, but wait to add the hot honey and salt until just before serving. This helps keep the ingredients as crisp and fresh as possible.
  • Drain before serving: If your cucumber and pineapple salad has been sitting for a while, just give it a quick stir and drain off any excess liquid before serving again.

Because it's so quick to make, your best bet is to prep it fresh and enjoy it the same day whenever possible!

a black serving bowl filled with cucumber and pineapple salad with hot honey and cilantro, it's sitting on a green fabric napkin

Frequently Asked Questions

Can I use canned pineapple instead of fresh?

You can, but fresh will be so much better that it's worth the small effort to chop up a fresh pineapple. If you do use canned, make sure it's packed in juice, not syrup, and drain it really well.

What can I use instead of hot honey?

If you don't have hot honey, try mixing regular honey with a pinch of red pepper flakes or a dash of hot sauce. You can also drizzle plain honey and add thinly-sliced jalapeño or serrano peppers for a fresh heat. Tajin seasoning would be a much different flavor but it would be delicious, too!

Is this cucumber and pineapple salad spicy?

It has a gentle heat from the hot honey, but it's easy to adjust. Add more or less to suit your spice preference, or leave it out altogether!

Can I make this salad ahead of time?

You can, but for the best texture, wait to add the salt and hot honey until right before serving. The salt draws out moisture from the cucumber and pineapple, which can make the salad watery if it sits too long.

What type of cucumber is best?

English cucumbers work best because they're mild, mostly seedless, and have thin skin. If using regular cucumbers, peel them if necessary and scoop out the seeds.

If you love fresh, flavorful salads like this cucumber pineapple combo, there are a few more you should definitely try. My classic wedge salad with balsamic is really simple but always so good! For something seasonal and sweet, this autumn fruit salad is full of crunchy and juicy seasonal fall fruit. For a flavorful, healthy salad, try this white bean and barley salad with a lemon-garlic vinaigrette. And when you want something simple and nostalgic, this creamy pea salad recipe always hits the spot.

a black serving bowl filled with cucumber and pineapple salad with hot honey and cilantro, it's sitting on a green fabric napkin on a wooden table

Cucumber and Pineapple Salad with Hot Honey

Yield: 4 servings
Prep Time: 10 minutes
Total Time: 10 minutes

This is quite possibly the easiest salad you'll ever make, and it's SO delicious. Save this one for your next barbecue!

Ingredients

  • 1 english cucumber, chopped
  • 1 small pineapple, chopped
  • 2 tablespoon chopped cilantro
  • 1-2 tablespoon hot honey (more or less to taste)
  • a pinch of salt, or to taste

Instructions

  1. Mix all the ingredients together and serve!

Notes

Start with 1 tablespoon of hot honey, taste and add more if you like. You can also place some next to the salad if guests would like to add even more.

Nutrition Information:
Yield: 4 Serving Size: 1
Amount Per Serving: Calories: 40Total Fat: 0gSaturated Fat: 0gTrans Fat: 0gUnsaturated Fat: 0gCholesterol: 0mgSodium: 23mgCarbohydrates: 11gFiber: 1gSugar: 9gProtein: 0g

This data was provided and calculated by Nutritionix.

© Kristy Bernardo
Cuisine: American / Category: Salads
Cucumber and Pineapple Salad with Hot Honey

The Best Smoked Baked Beans with Bacon & Chipotle

July 9, 2025 by Kristy Bernardo Leave a Comment

a baking dish filled with baked beans just off the smoker

These Smoked Baked Beans are everything you want in a barbecue side dish: they're sweet, smoky, savory, and just a little spicy. They're loaded with flavor from smoky chipotle peppers, crispy bacon, and a rich sauce made with molasses, brown sugar, and barbecue sauce. If you want a dish that steals the show at your next barbecue or potluck, this one checks all the boxes.

The best part is these baked beans cook right in your smoker alongside your brisket, ribs, or pulled pork, soaking up all that smoky goodness over a few slow hours. It's a hands-off recipe that's perfect for feeding a crowd. If you've never smoked your baked beans before, get ready to never go back to the canned stuff again!

a baking dish filled with smoked baked beans just off the smoker

Why You'll Love This Recipe

  • It has real smoky flavor: These smoked baked beans get their rich, smoky flavor from three places: the smoker, chipotle peppers in adobo, and bacon. The result is a layered flavor that's miles beyond anything from a can.
  • It's the ultimate barbecue side dish: It's perfect alongside smoked brisket, pulled pork, ribs, or grilled burgers. These beans hold their own at any cookout, potluck, or tailgate!
  • Easy prep, big flavor: Just a few minutes of sautéing and stirring, then let your smoker do the rest.
  • It's sweet, spicy, and savory: A balanced blend of dark brown sugar, molasses, Dijon mustard, and apple cider vinegar creates a sauce that's complex but not cloying.
  • It feeds a crowd: This recipe makes a big batch (enough for 10-12 generous servings) making it ideal for gatherings or prepping ahead.

Ingredients You'll Need

These Smoked Baked Beans are packed with pantry-friendly staples and incredible flavor! Here's what you'll need:

  • 8 slices bacon, cut into 1-inch pieces: Any smoked baked beans recipe worth its salt has to have bacon! It adds extra smoky flavor and you use the fat it renders for sautéing the onions. Use thick-cut bacon for even more flavor.
  • 1 medium yellow onion, chopped: Gotta have some onions.
  • 2-3 chipotle peppers in adobo, chopped: These smoked jalapeños add spice and smokiness. Adjust the amount based on your spice preference. You can also substitute regular jalapeños if you prefer, just dice them and sauté them with the onions.
  • 2 (28-ounce) cans pork and beans: No need to make your own beans when canned work perfect well. And there's no need to even drain them!
  • ¾ cup barbecue sauce: I'm partial to my pomegranate chipotle barbecue sauce, but if I don't have time to make it, I'll pick up a bottle of store-bought. (There's an old country store near me that sells candied jalapeño barbecue sauce and it's incredible...as soon as I nail the recipe, I'll share it!)
  • ½ cup dark brown sugar: You can substitute light brown sugar, but dark has a molasses-rich sweetness that works especially well in this recipe.
  • ¼ cup apple cider vinegar: The acidity in apple cider vinegar helps to balance the sweetness of the sauce.
  • 2 tablespoons molasses: Don't skip the molasses! It adds a deep, rich flavor that really takes the beans to the next level.
  • 2 tablespoons Dijon mustard: Same for the mustard: it helps cut through the richness and adds a lot of flavor.

The Best Wood Chips to Use

The wood you choose plays a big role in the final flavor of your smoked baked beans. Since this dish is sweet, savory, and rich, it pairs well with woods that won't overpower its flavor.

  • Hickory: Best for classic barbecue flavor. Hickory is strong, smoky, and slightly sweet, which is perfect for complementing the bacon, brown sugar, and molasses in these beans. It's a bit strong, so use sparingly if you're also smoking meat.
  • Applewood: Mild and slightly sweet. Applewood adds a gentle smokiness and a subtle fruity flavor. It's ideal if you want your beans to stay on the sweeter side or if you're serving them with smoked chicken or pork.
  • Pecan: Nutty, sweet, and well-balanced, pecan is a great all-purpose wood. It gives a smooth, rich smoke that deepens the flavor of the beans without overwhelming them.
  • Cherry: Sweet and mellow, cherry wood will give a subtle sweetness to your beans. It's especially nice if you're smoking the beans alongside poultry or ham.
a closeup shot of smoked baked beans

How to Make Smoked Baked Beans

These smoked baked beans come together with minimal prep and have incredible flavor! Here's how to make them:

  1. Preheat the smoker: Set your smoker to 250°F. Use hickory, applewood, or pecan chips for the best balance of smoky sweetness. Let the smoker come to temperature while you prep the beans.
  2. Cook the bacon: In a large cast iron skillet, cook 8 slices of bacon, cut into 1-inch pieces, over medium heat. Sauté until the fat is rendered and the bacon is starting to crisp, about 5-7 minutes. Use a slotted spoon to transfer the bacon to a paper towel-lined plate. Leave the fat in the skillet.
  3. Sauté the onion: Add 1 chopped yellow onion to the bacon grease. Cook for a few minutes until it's softened.
  4. Add the remaining ingredients: Stir in the chopped chipotle peppers, pork and beans (undrained), barbecue sauce, dark brown sugar, apple cider vinegar, molasses, Dijon mustard, and the reserved cooked bacon. Stir everything well to combine. Note: You can add everything directly to the cast iron skillet if it's large enough, or transfer it to whatever dish you're using to smoke the beans in.
  5. Smoke the beans: Place the skillet or pan in the preheated smoker. Smoke at 250°F for about 3 hours, stirring once halfway through (no need to cover). The sauce will thicken beautifully!
  6. Rest and serve: Remove the beans from the smoker and let them sit for 10-15 minutes before serving. This allows the flavors to settle and the sauce to thicken slightly more.

If you're firing up the smoker for these baked beans, you might as well make it a full spread! Try pairing them with ultra-creamy smoked mac & cheese side dish or serve them alongside this flavor-packed, easy smoked pork butt recipe. For easy appetizers, you can't go wrong with barbecue smoked cream cheese or a gooey, crowd-pleasing queso in the smoker. And if you're looking to round out the meal with veggies and finger food, toss on some corn on the cob in the smoker or crispy smoked party wings. Want even more ideas? Don't miss our roundup of 62 smoker recipes you'll love; it's packed with smoky inspiration for every occasion.

Tips

Want perfect smoked baked beans every time? These tips will help you nail it!

  • Don't drain the beans: Leave the liquid in the cans of pork and beans. The sauce will reduce and thicken naturally in the smoker.
  • Use cast iron (if you can): A cast iron skillet or Dutch oven is ideal for smoking. It retains heat, handles smoke well, and allows for a gentle caramelization around the edges. If you're using a foil pan, make sure it's sturdy enough (you can always double up).
  • Smoke it uncovered: For maximum smoke flavor, keep the beans uncovered the entire time. This allows the smoke to penetrate and helps the sauce to thicken.
  • Don't overcook the bacon: Cook the bacon until it's just starting to crisp. It will finish rendering during the smoking process which will prevent it from becoming too chewy or tough.
  • Sauté for flavor: You could skip it, but sautéing the onions in bacon fat adds a lot of flavor, especially since you're cooking it in the bacon fat.
  • Don't stir too often: Give the beans one good stir halfway through smoking. This keeps the bottom from burning without breaking the surface crust that develops on top.
  • Adjust the heat to your taste: Chipotle peppers can pack a punch! Start with two and add more if you like it more spicy. You can also stir in hot sauce or cayenne to boost the heat.
  • Let it rest before serving: Resting the beans for 10-15 minutes after smoking allows the sauce to thicken and the flavors to come together.
a closeup of a glass baking dish filled with baked beans just off the smoker

Smoking Baked Beans at Different Temperatures

One of the best things about smoked baked beans is their flexibility - they can be smoked right alongside your brisket, ribs, pulled pork, or whatever's on your smoker, even if it's running at a different temperature. Here's how to adjust the cook time based on your smoker's temp:

  • Temperature: 225°F
  • Smoke Time: 3½ to 4 hours
  • Notes: This lower temp means extra smoke flavor and it takes longer to reduce the sauce. Stir once or twice during cooking to prevent sticking and help thicken the beans. (If you think the beans have picked up enough smoke flavor at some point, go ahead and cover them).
  • Temperature: 250°F (Standard)
  • Smoke Time: 3 hours
  • Notes: The ideal balance of smoke and time. You'll get rich flavor and perfectly thickened beans without needing to adjust anything.
  • Temperature: 275°F
  • Smoke Time: 2½ to 2¾ hours
  • Notes: A good option if you're smoking pork shoulder or ribs. Stir halfway through, and watch the edges to avoid over-reduction.
  • Temperature: 300°F
  • Smoke Time: 2 to 2¼ hours
  • Notes: Slightly faster cook time. Keep an eye on the sauce-if it's reducing too quickly, you can tent loosely with foil for the second half of the cook.
  • Temperature: 325°F
  • Smoke Time: 1½ to 1¾ hours
  • Notes: This higher temp is common when finishing off smoked meats or making quick sides. Use a deeper dish or stir more frequently to prevent scorching. Beans will still take on smoke flavor, but it will be subtler.
  • Temperature: 350°F
  • Smoke Time: 1 to 1¼ hours
  • Notes: At this temperature, you're more in baking territory than slow smoking. Great for a quicker version with a touch of smoke, just make sure to stir every 30 minutes and keep the beans toward the cooler side of your smoker if possible.

Storage & Reheating

Smoked baked beans are one of those dishes that taste even better the next day. The flavors deepen and the sauce thickens, making leftovers something to look forward to. Here's how to store and reheat them properly:

How to Store

  • Cool completely before storing to prevent condensation.
  • Transfer to an airtight container and refrigerate for up to 4-5 days.

How to Reheat

You can reheat smoked baked beans on the stovetop, in the oven, or in the microwave, depending on your preference:

  • Stovetop: Place the beans in a saucepan over medium-low heat. Add a splash of water or barbecue sauce if they've thickened too much. Heat, stirring occasionally, until they're warmed through.
  • Oven: Preheat to 300°F. Place beans in an oven-safe dish, cover loosely with foil, and bake for 15-20 minutes or until hot. Stir halfway through and add a touch of liquid if needed.
  • Microwave: Place a portion in a microwave-safe bowl. Cover with a damp paper towel and microwave in 45-60 second intervals, stirring between each, until heated through.

Freezing & Thawing Tips

  • Let the beans cool completely before freezing.
  • Label container(s) with the date and use within 3 months for best flavor.
  • Thaw overnight in the refrigerator before reheating.
a baking dish with baked beans just off the smoker with large pieces of bacon visible among the beans

Frequently Asked Questions

How long should you smoke baked beans?

Smoke baked beans at 250°F for about 3 hours. This allows the sauce to thicken and the smoky flavor to fully develop. Stir once halfway through, and let them rest for 10-15 minutes after smoking to finish thickening.

Do barbecue baked beans have gluten?

Baked beans are often gluten-free, but it depends on the ingredients. Check the labels on your ingredients to be certain.

Can I use dried beans instead of canned?

Yes, but you'll need to soak and fully cook the beans before adding them to the recipe. Canned pork and beans offer convenience and extra sauce, but you can substitute with dried beans, just be sure to increase the barbecue sauce.

Can I make smoked baked beans in the oven instead?

If you don't have a smoker, bake the beans uncovered at 300°F for 2-2½ hours. You can add a few drops of liquid smoke to mimic the smoky flavor.

Are smoked baked beans spicy?

They have a mild kick from the chipotle peppers, but you can adjust the heat to your liking. Use fewer peppers for a milder version or add more for extra spice.

Can you freeze smoked baked beans?

Smoked baked beans freeze very well. Let them cool completely, then transfer to a freezer-safe container or resealable bag. They'll keep for up to 3 months. To reheat, thaw in the refrigerator overnight and warm on the stovetop or in the oven with a splash of water or barbecue sauce to loosen the texture.

a baking dish with baked beans just off the smoker with large pieces of bacon visible among the beans

Smoked Baked Beans

Yield: 12 servings
Prep Time: 10 minutes
Cook Time: 3 hours 10 minutes
Additional Time: 15 minutes
Total Time: 3 hours 35 minutes

These smoked baked beans have incredible smoky flavor, both from the smoker as well as smoky chipotle peppers.

Ingredients

  • 8 bacon slices, cut into 1-inch pieces
  • 1 medium yellow onion, chopped
  • 2-3 chopped medium-sized chipotle peppers (from a can of chipotle peppers in adobo sauce)
  • 2 28-ounce cans pork and beans (do not drain)
  • ¾ cup barbecue sauce
  • ½ cup dark brown sugar
  • ¼ cup apple cider vinegar
  • 2 tablespoon molasses
  • 2 tablespoon Dijon mustard

Instructions

  1. Preheat your smoker to 250 degrees.
  2. Preheat a large cast iron skillet over medium heat (large enough to hold all the ingredients if you'll be smoking this in the same dish). Cook the bacon just until some of the fat has rendered and it starts to get crispy.
  3. Remove the bacon with a slotted spoon and place it on paper towels. Add the chopped onions to the skillet and cook for a few minutes, just until they start to soften.
  4. Add the rest of the ingredients to the skillet (or whatever you'll be smoking the beans in) including the cooked bacon. Stir it really well to combine.
  5. Smoke the beans for about 3 hours alongside whatever else you've got smoking. Remove from the smoker and let them sit for 10-15 minutes before serving.

Notes

Add more or less chipotle peppers depending on how spicy you like your beans. You can also just use the adobo sauce from the same can. If you can't find chipotle peppers, you can substitute fresh, minced jalapeños and sauté them with the onions.

Nutrition Information:
Yield: 12 Serving Size: 1
Amount Per Serving: Calories: 252Total Fat: 5gSaturated Fat: 2gTrans Fat: 0gUnsaturated Fat: 3gCholesterol: 17mgSodium: 930mgCarbohydrates: 45gFiber: 8gSugar: 16gProtein: 10g

This data was provided and calculated by Nutritionix.

© Kristy Bernardo
Cuisine: American / Category: Smoker Recipes
The Best Smoked Baked Beans with Bacon & Chipotle

Smoked Pork Butt Recipe (Tender, Juicy & Full of Flavor!)

June 18, 2025 by Kristy Bernardo Leave a Comment

a pork butt sits on the smoker

If you've never smoked a pork butt before, get ready to become obsessed with one of the most satisfying and flavorful cuts in barbecue! Despite the name, pork butt (also known as Boston butt) actually comes from the upper part of the shoulder. And thanks to its extensive marbling, it's ideal for low and slow smoking, which makes for tender, juicy pulled or sliced pork.

★★★★★

"We've had a favorite recipe for smoked pork butt but decided to try this one when I saw it on Pinterest. I'm so glad we did! This was SO tender and juicy, and the instructions made it easier than how we did it before. Will definitely be making this again!"

- Sherri J.

I use an easy brine paste in this recipe that's made with garlic, rosemary, mustard, olive oil, and spices to infuse the meat with flavor before it even hits the smoker. A 12-pound bone-in pork butt is smoked for eight hours at 225°F to slowly build the smoke flavor and allow it time to get very tender. This is followed by a blast of heat at 325°F to form a gorgeous crust. Then I let it rest for an hour after wrapping it in foil, at which point it's ready to shred or slice and serve!

This thorough guide will walk you through every step, from prep and smoking to resting and serving, so you can smoke pork butt like a pro!

a pork butt sits on the smoker

Table of Contents

  • What Is Pork Butt? (And Why It's Perfect for Smoking)
  • Choosing and Prepping Your Pork Butt
    • What to Look for at the Store
    • Flavorful Brine Paste
    • How to Brine and Prep
  • Smoking Process: Step-by-Step Guide
  • Resting and Shredding (or Slicing) the Pork Butt
    • Why Resting Matters
    • Shredding the Pork (Pulled Pork Style)
    • Slicing the Pork
    • Finishing Touches
  • Serving Suggestions for Smoked Pork Butt
    • Classic Pulled Pork Sandwiches
    • Tacos, Burritos, and Nachos
    • On Its Own with Barbecue Sides
    • Leftovers
  • Storage and Reheating Tips
    • How to Store Leftover Smoked Pork
      • In the refrigerator:
      • In the freezer:
    • How to Reheat Smoked Pork Without Drying It Out
      • Oven Method
      • Skillet Method
      • Steam Method
      • Microwave Method
  • Tips for Smoking Pork Butt Like a Pro
  • Frequently Asked Questions
    • Is pork butt the same as pork shoulder?
    • How long does it take to smoke a 12-pound pork butt?
    • What internal temperature should I cook smoked pork butt to?
    • Do I really need to rest it for an hour?
    • What wood is best for smoking pork butt?
    • Can I use a dry rub instead of the brine?
    • Can I slice the pork instead of shredding it?

What Is Pork Butt? (And Why It's Perfect for Smoking)

Despite its name, pork butt doesn't actually come from a pig's rear end, it comes from the upper shoulder (it's also known as Boston butt). This cut has just the right balance of fat, collagen, and connective tissue that renders slowly during the smoking process, which is why it always turns out tender and juicy.

Pork butt is a favorite among home smoking hobbyists (and pitmasters) for a few reasons:

  • The fat throughout the meat melts into the muscle, which creates a very tender, juicy roast.
  • The connective tissue breaks down during long cooking times, helping the pork stay juicy and flavorful.
  • A large bone-in pork butt (like the 12-pound cut in this recipe) is ideal for smoking low and slow to serve a crowd or to keep leftovers for sandwiches or tacos.

You might also hear this cut called shoulder roast or Boston shoulder, but make sure to choose a bone-in pork butt when you want maximum flavor.

smoked pork butt just off the smoker on a wood cutting board, ready to be sliced

Choosing and Prepping Your Pork Butt

What to Look for at the Store

For this recipe, go with a bone-in pork butt weighing around 12 pounds. Bone-in cuts have a much better flavor and give more structure during the smoking process. Look for:

  • Good marbling: Fat equals flavor!
  • Even shape: A uniform shape helps it cook evenly. Note: You can see in the images that the one we smoked wasn't uniform, but you can also see how juicy it was when we sliced it. So while this is something we always look for, it's not something to stress over if you can't find one.

If you see it labeled as Boston butt, you're in the right aisle. Just be sure it's not the picnic shoulder, which comes from a different area of the pig.

Flavorful Brine Paste

Instead of a dry rub, we brine our smoked pork butt with a brine paste that acts as both a marinade and adds a flavorful crust. There are only a few ingredients but it packs in a lot of flavor:

  • Garlic
  • Fresh rosemary (can substitute dried)
  • Salt + black pepper
  • Olive oil
  • Mustard: Use your favorite! We use anything from classic yellow to horseradish-flavored - they're all delicious.

How to Brine and Prep

  1. Mix the brine: In a small bowl, combine the chopped garlic, rosemary, salt, pepper, olive oil, and mustard.
  2. Coat the pork: Pat the pork butt dry (we just use paper towels), then massage the brine all over the surface and into any crevices.
  3. Wrap it and refrigerate: Cover it tightly with plastic wrap and refrigerate for at least 8 hours or overnight. This is an important step as it really helps to flavor the meat. Plus it's nice to do this the day before so you can just pop it on the smoker the next morning (or whenever you're ready).

Smoking Process: Step-by-Step Guide

By starting low and finishing hot, your smoked pork butt will turn out tender and juicy with a flavorful outside crust. Here's how to do it:

  1. Preheat Your Smoker: Set your smoker to 225°F. Wood Suggestions: Hickory or oak for a stronger, more classic barbecue flavor. Use applewood or cherry for a slightly sweeter, more subtle smoke flavor.
  2. Place the Pork Butt in the Smoker: Remove the pork from the fridge while your smoker comes up to temp. Set it directly on the grates, fat side up, so the fat bastes the meat as it cooks. There's no need to mop or spritz because of the olive oil and mustard in the brine paste.
  3. Smoke at 225°F for 8 Hours: Let the pork butt smoke undisturbed for 8 hours. During this time the smoke flavor will build gradually and the internal temperature will rise slowly, usually into the 160-170°F range. You may hit a stall-a point where the internal temperature plateaus. This is normal!
  4. Crank Up the Heat: After 8 hours, increase the temperature to 325°F and continue cooking for about 1 more hour, or until the internal temperature reaches 190°F. Use a meat thermometer!!
  5. Rest the Meat: Once it hits 190°F, remove the pork butt, wrap it tightly in foil, and let it rest for 1 hour. Resting allows juices to redistribute and the internal temp to carry over to about 195°F.
an overhead shot of smoked pork butt just off the smoker on a wood cutting board with three slices already cut

Resting and Shredding (or Slicing) the Pork Butt

Why Resting Matters

After a long smoke, your smoked pork butt needs a break, and that hour of rest is just as important as the cook itself. Wrapping the roast in foil and letting it rest allows:

  • Juices to redistribute instead of leaking out when sliced or shredded
  • Internal temperature to rise slightly (carryover cooking)
  • Collagen and fat to relax, making the meat exceptionally tender

Shredding the Pork (Pulled Pork Style)

Once rested, your pork butt should be tender enough to shred. Don't discard the juices that have accumulated!

  • Check the bone: For bone-in pork, the bone should easily slide out.
  • Shred the meat: Use meat claws, forks, or even just your hands to pull the meat into bite-sized pieces.
  • Remove any large fat deposits and gristle as you go (but not all - a little fat is delicious).
  • Toss with the juices: Drizzle the reserved juices from the foil wrap back over the pulled pork.

Slicing the Pork

I prefer my smoked pork butt to be shredded, but my mom loves it sliced, so I'm including it here in case that's your preference, too. (It will be very tender so it doesn't always slice cleanly).

  • Use a sharp carving knife or slicing knife
  • Slice across the grain

Finishing Touches

Whether you pull or slice, consider adding:

  • A splash of apple cider vinegar (be cautious with this - just a very small amount)
  • A drizzle of your favorite barbecue sauce

Serving Suggestions for Smoked Pork Butt

Smoked pork butt is incredibly versatile! You can serve it so many different ways, or even just on its own (especially this recipe - it really has a lot of flavor). Here are some ideas:

Classic Pulled Pork Sandwiches

The most classic way to enjoy smoked pork butt is piled high on a soft sandwich bun, paired with:

  • Creamy coleslaw
  • Dill pickles or pickled red onions
  • A generous drizzle of your favorite barbecue sauce. Experiment between vinegar-based, mustard-based, or Kansas City sweet and smoky.
  • Toast your buns first if you like!

Tacos, Burritos, and Nachos

Leftover pulled pork is excellent in Mexican dishes! Try one of these or get creative:

  • Pork tacos with corn tortillas, avocado, cotija cheese, and lime
  • Barbecue pulled pork nachos with melted cheddar, jalapeños, and black beans
  • Pulled pork enchiladas or burritos with a smokey salsa

On Its Own with Barbecue Sides

Pair your sliced or shredded pork with classic barbecue sides:

  • Creamy smoked mac and cheese
  • Cornbread with honey butter
  • Collard greens
  • Smoked baked beans
  • Potato salad
  • Coleslaw
  • Grilled vegetables

Don't forget to have extra barbecue sauce available!

Leftovers

Smoked pork butt stores well and can be turned into a whole new set of meals:

  • Toss it into soups or chili
  • Use it in fried rice (or just make regular rice and have a barbecue rice bowl)
  • Make a breakfast hash
  • Stir some into cheesy grits
  • Top a baked potato
  • Make a mac and cheese bowl
a closeup of a pork butt on the smoker

Storage and Reheating Tips

Smoked pork butt is delicious the day it's made but it's also one of the best meats to make ahead or freeze for later. Here's how to keep it juicy and flavorful long after the smoke clears!

How to Store Leftover Smoked Pork

In the refrigerator:

  • Let the pork cool to room temperature (no longer than 2 hours after cooking)
  • Store in an airtight container or wrap it tightly in foil
  • Keep in the fridge for up to 4 days

In the freezer:

  • Divide the pork into containers or freezer-safe bags (smaller portions are easier to thaw)
  • Pour a bit of broth over the meat to prevent it from drying out (or some of the juices you reserved earlier)
  • Label and freeze it for up to 3 months

How to Reheat Smoked Pork Without Drying It Out

Oven Method

  1. Preheat your oven to 300°F
  2. Place the pork into a baking dish with a splash of broth or water
  3. Cover it tightly with foil and heat until it's warmed through (about 20-30 minutes)

Skillet Method

  1. Heat a bit of oil or butter in a pan
  2. Add some pork and a little broth or barbecue sauce
  3. Cook it over medium heat until it's hot and slightly crispy on the edges

Steam Method

  1. Place the pork in a heatproof bowl or foil packet and place it inside a steamer basket
  2. Steam for 10-15 minutes or until it's heated through

Microwave Method

We don't recommend this method as it's easy to dry out the pork, but it will do in a pinch.

  • Place the pork in a covered microwave-safe dish
  • Add a tablespoon of broth or water and heat in 30-second intervals, stirring between rounds to avoid it drying out too much

Tips for Smoking Pork Butt Like a Pro

Whether you're smoking your first pork butt or you've done it a dozen times, these tips will help you get consistently great results!

  1. Let the Brine Work Its Magic: Don't rush the brining process. Letting your pork butt rest overnight in the garlic-rosemary-mustard mixture not only adds incredible flavor but it also helps tenderize the meat.
  2. Use a Meat Thermometer: Pork butt is done when the internal temperature reaches 190°F, not when the clock says so.
  3. Anticipate the Stall: Expect a plateau in temperature around 160-170°F, also known as "the stall." It's totally normal. Don't panic, and don't crank the heat until it's time.
  4. Don't Over-Smoke: Pork absorbs the most smoke flavor during the first few hours. Using too much wood or continuing to add chunks throughout the cook can lead to a bitter taste.
  5. Save the Juices: When you wrap and rest your pork, all those delicious juices collect inside the foil. Save it and pour it over your pulled pork to add even more moisture and flavor. (Reserve a small amount if you're planning on freezing or reheating leftovers).
  6. Resting Isn't Optional: Wrap your pork tightly and let it rest for at least 1 hour before shredding or slicing it. This helps redistribute its juices and allows it to gently finish cooking.
  7. Batch It and Freeze It: Smoking a large cut like a 12-pound pork butt is perfect for meal prep. Portion it out after shredding or slicing and freeze it for quick dinners.

Frequently Asked Questions

Is pork butt the same as pork shoulder?

Not exactly. Pork butt (also called Boston butt) comes from the upper part of the shoulder, while the pork shoulder (also labeled "picnic shoulder") comes from the lower part. Both are tough, fatty cuts that benefit from cooking them low and slow, but pork butt is generally more marbled and a better cut for smoking.

How long does it take to smoke a 12-pound pork butt?

With a two-stage method like this one, expect about 9 or so hours total:

  • 8 hours at 225°F
  • 1 hour (give or take) at 325°F (until internal temp reaches 190°F)

Always cook by temperature, not just time, as each pork butt is slightly different. Make sure you put the meat thermometer into the thickest part of the meat.

What internal temperature should I cook smoked pork butt to?

Pull the pork butt from the smoker when it reaches an internal temperature of 190°F. This is the ideal temperature for shreddable, juicy pork, and the temperature will continue to rise slightly while it's resting. Use a meat thermometer to be certain when it's at the correct temperature.

Do I really need to rest it for an hour?

Yes! Resting allows juices to redistribute and lets the internal temperature rise gently through carryover cooking. Skipping the rest can result in dry meat and lost flavor - that's not something you want, so give it a rest!

What wood is best for smoking pork butt?

Great wood options include:

  • Hickory: Classic barbecue flavor
  • Apple or cherry: Sweet and mild and it pairs well with pork
  • Oak: A great all-around option

You can also try mixing woods (for example, hickory + apple wood). Experiment to find your favorite combinations!

Can I use a dry rub instead of the brine?

Absolutely. While this recipe uses a flavorful garlic-rosemary brine paste, you can substitute a dry rub if you prefer. Mustard can still be used as a binder underneath the rub.

Can I slice the pork instead of shredding it?

Yes! Once your pork is cooked and well rested, you can slice it against the grain. It's great for barbecue platters or sandwiches.


If you're fired up about smoking meat, we have a few recipes you've got to try next. Start with our barbecue brisket smoker recipe - it's so good and ridiculously tender. For something a little more unexpected, cream cheese on the smoker! Love wings? Our Smoked Chicken Wings are perfectly crispy and loaded with flavor. And don't miss this simple smoked pork loin recipe -it's leaner than pork butt but just as juicy when done right. Then round it all out with this easy smoked corn recipe.

a closeup of a pork butt on the smoker

Smoked Pork Butt

Yield: 24 servings
Prep Time: 10 minutes
Cook Time: 9 hours
Additional Time: 1 hour
Total Time: 10 hours 10 minutes

This smoked pork butt takes just a few minutes of prep time, but has so much flavor! It's easy to make, it just needs time to hang out on your smoker to transform into a juicy, flavorful feast!

Ingredients

  • 12 lb bone-in pork butt

Brine

  • 3 garlic cloves, chopped
  • 3 tablespoon fresh rosemary (can use dried)
  • 3 teaspoon salt
  • 3 teaspoon ground black pepper
  • ¼ cup olive oil
  • ¼ cup mustard (yellow, horseradish, or your favorite)

Instructions

  1. Combine all the brine ingredients in a small bowl.
  2. Rub the brine all over the roast, then cover it with saran wrap and put in the refrigerator at least 8 hours or overnight.
  3. Remove the pork butt from the refrigerator and remove the plastic wrap.
  4. Preheat the smoker to 225F. Place the roast on the smoker and cook it for 8 hours. Increase the temperature to 325F and continue cooking for another hour or until the internal temperature reaches 190F.
  5. Remove the pork butt from the smoker. Wrap it in foil and let it rest for one hour. Save the juices that accumulate while it's resting.
  6. Place the pork butt on a cutting board and either shred the meat (use two forks, meat claws, or just your hands if the meat is cool enough) or slice it. Drizzle over some of the reserved juices and serve.

Notes

See the post for more ideas for serving, how to reheat, etc.

Nutrition Information:
Yield: 24 Serving Size: 1
Amount Per Serving: Calories: 633Total Fat: 45gSaturated Fat: 16gTrans Fat: 0gUnsaturated Fat: 25gCholesterol: 195mgSodium: 472mgCarbohydrates: 1gFiber: 0gSugar: 0gProtein: 53g

This data was provided and calculated by Nutritionix.

© Kristy Bernardo
Cuisine: American / Category: Smoker Recipes
Smoked Pork Butt Recipe (Tender, Juicy & Full of Flavor!)

Smoked Cream Cheese

May 14, 2024 by Kristy Bernardo

Smoked Cream Cheese

Smoked cream cheese is one of the easiest and most impressive appetizers you can make on a smoker. A simple block of full-fat cream cheese, lightly brushed with olive oil and coated in your favorite barbecue rub or seasoning, becomes a smoky, savory spread that's perfect for spreading on crackers or fresh veggies. It takes just 5 minutes to prep, and you can toss it onto the smoker with anything else you're smoking.

Smoked Cream Cheese

What Is Smoked Cream Cheese

Smoked cream cheese is exactly what it sounds like: a block of full-fat cream cheese that's smoked until it becomes soft and spreadable. What makes it special is how it turns a simple grocery staple into a fantastic appetizer that tastes like you spent hours on it!

Before going on the smoker, the cream cheese is lightly brushed with olive oil and coated with a flavorful barbecue rub or seasoning blend. As it smokes, the outside forms a caramelized crust, while the inside stays soft and creamy. Scoring the top in a crisscross pattern helps the smoke penetrate the cheese and gives it a beautiful presentation.

Why You'll Love This Recipe

  • It's ridiculously easy. Just 3 ingredients, 5 minutes of prep, and the smoker does the rest. It's a true set-it-and-forget-it appetizer.
  • It has so much flavor with zero effort. The smoke and seasoning work together to create incredible flavor that balances well with the creamy cheese.
  • It's versatile. Serve it at backyard barbecues, holiday parties, game day spreads, or as a low-carb snack. We make it every single time we start our smoker no matter the occasion!
  • It's completely customizable. Use your favorite barbecue rub or seasoning blend - any flavors will be delicious! You can even make it sweet with a cinnamon and brown sugar mixture.
  • It's perfect for most diets. It's naturally gluten-free, vegetarian, and easily works into keto and low-carb meal plans.
  • It pairs with anything. Serve it with crackers, chips, veggies, or smear it on bagels, burgers, or sandwiches. (I love making a spicy version for burgers!)

Ingredients

Just three ingredients and it takes just five minutes to get it ready for your smoker! 

  • Cream Cheese: Full fat is best. I've tried making this recipe several times with low-fat cream cheese and I don't recommend it. It doesn't have the same creaminess that its full-fat counterpart does, and the texture is just slightly off. This isn't the time to save a few calories anyway!
  • Olive Oil: The olive oil is there to help the spice rub adhere to the cream cheese. You don't need much-about a tablespoon or less. The surface needs to be slick but be careful not to use too much oil. I use a silicone brush to add the oil to the cheese.
  • Your favorite barbecue rub or spice mix: The seasoning choice is where things get fun! I'm partial to this blackening seasoning (I've been using this rub for years and it never disappoints) but you may prefer something with a little sweet brown sugar, like this easy dry rub for ribs. See more ideas further down!
How To Prepare Smoked Cream Cheese

Step-by-Step Instructions

Here are the steps to make smoked cream cheese:

  1. Prep Your Pan: Line a small sheet pan with foil, then lightly grease the foil. Use the smallest size you have that will fit however many blocks of cream cheese you're using. (Or go a bit larger if you're planning to use the pan as a serving tray. For example, make this in advance then, once the pan is cool enough, add crackers and sliced veggies to the pan around the smoked cream cheese.)
  2. Prep & Season The Cheese: Unwrap a block of cream cheese and place it on the sheet pan. Using a small silicone brush, coat it lightly with a small amount of olive oil. Sprinkle on your favorite seasoning, taking care to make sure all sides are thoroughly coated.
  3. Score: Using a sharp knife, score the top of the cheese in a criss-cross pattern. This will help the smoke permeate the cheese, giving it that incredible flavor.
  4. Smoke: Place the sheet pan on the smoker alongside whatever you're already smoking. The temp doesn't really matter, but between 200F-250F works best. You don't want the temperature too high or it'll be done before it gets enough smoke flavor, but too low and it could get too much. So try to stay within that temperature range. Plan to smoke the cheese for about two hours. It can be removed as soon as just one hour, depending on how much smoke flavor you're going for. I've found that 1 ½ to 2 hours is perfect!
  5. Serve: Serve the smoked cream cheese with crackers, chips, and/or freshly sliced vegetables. (See a list of serving ideas further down).
How To Score Smoked Cream Cheese

Seasoning Ideas

One of the best things about smoked cream cheese is how easy it is to customize. Here are some favorite ways to switch it up:

  • Use your favorite taco seasoning. Serve with tortilla chips, salsa, or guacamole. Add a little chipotle powder if you want a little more smokiness.
  • Try an Italian seasoning or Greek herb blend. You can top it with sun-dried tomatoes and kalamata olives (even chopped, fresh cucumber)!
  • Cajun, Creole, or blackening seasoning are fantastic spicy options.
  • Jerk seasoning
  • Adobo seasoning
  • Montreal Steak seasoning
  • Everything but the Bagel seasoning (especially good with veggie dippers or bagel chips)
  • Lemon pepper seasoning
  • Mix cinnamon and brown sugar for a dessert version! Serve it with graham crackers, vanilla wafers, or apple slices. Drizzle it with a little honey just before serving.
  • If you live near a Trader Joe's, you should definitely check out their spice section. I always find new combinations I can't find anywhere else!

Serving Suggestions

This smoked appetizer can be served in all kinds of ways! Here are our favorites:

Crackers and Chips

  • Crackers
  • Tortilla chips
  • Pita chips or bagel chips
  • Pretzel thins or rods

Fresh Veggies for Dipping

  • Carrot sticks
  • Celery
  • Cucumber rounds
  • Bell pepper strips
  • Snap peas or radishes

These are especially great for low-carb, keto-friendly, or gluten-free guests.

As a Spread

  • Spread it on bagels, toast, or crusty bread
  • Smear some onto grilled burgers or even hot dogs
  • Add a swipe inside a wrap or breakfast burrito

On a Snack Board

Include it on a charcuterie board or grazing table alongside:

  • Cured meats like salami or prosciutto
  • Pickled veggies
  • Olives, nuts, or roasted peppers
  • Crunchy crostini for spreading then topping with any of the above

Leftover Ideas

  • Mix it in some mashed potatoes
  • Use the filling a a stuffing for mushrooms
  • Add a spoonful to scrambled eggs
  • Spread on bagels or toast
  • As a spread for sandwiches, burgers, or wraps
  • A dip for chips, veggies, or even soft pretzels
Three Ingredient Smoked Cream Cheese

Storage & Make-Ahead Tips

Smoked cream cheese is best served warm and fresh off the smoker, but it stores well and can absolutely be prepped in advance. Here's how to get the most out of your leftovers if you have any!

How to Store It

  • Wrap the smoked cream cheese in foil or place it in an airtight container.
  • Store in the refrigerator for up to 3-4 days.
  • For the best texture, allow it to come to room temperature before serving again.
  • Avoid freezing. It will not have a good texture after it thaws.

Make-Ahead Tips

  • You can fully prepare and smoke the cream cheese up to a day in advance.
  • After smoking, let it cool slightly, then cover and refrigerate.
  • Reheat it gently in a warm oven (250°F for 10-15 minutes) or on a cool section of your smoker until just warmed through.

Frequently Asked Questions

Can I use low-fat or fat-free cream cheese?

Technically yes, but it's not recommended. Full-fat cream cheese holds its shape better and will have the creamy texture you want.

What's the best kind of wood to use?

Mild to medium woods like apple, pecan, or hickory are best. A stronger wood can overpower the flavor of the cheese.

Do I need a smoker, or can I make it another way?

A smoker will definitely give you the best results, but you can also use a grill with indirect heat and a smoker box. You could also use a tiny amount of liquid smoke in the seasoning and bake it low in the oven. It's not quite the same, but still tasty.

Can I make this ahead of time?

Yes! You can smoke the cream cheese up to 24 hours in advance, then cover it and refrigerate. Reheat it gently before serving for the best texture, or just bring it to room temperature.

How long can smoked cream cheese sit out?

For food safety, don't leave it at room temperature for more than 2 hours. If you're serving it at a party, just keep an eye on it. It's always been one of the first things to go at our parties though, so you likely won't have that problem!

Can I freeze smoked cream cheese?

I do not recommend freezing it. Freezing will affect its texture, and it will be crumbly and watery after it thaws. It's not a matter of taste, it really isn't something you'll want to try.


If you love how easy and flavorful smoked cream cheese is, you're going to want to keep that smoker fired up! Try pairing it with a tender, fall-apart smoked pork butt or a seasoned smoked turkey breast for a main course. For a side dish, you can't go wrong with baked beans on the smoker, creamy smoked mac and cheese or this smoky corn side dish. And if you need another appetizer, be sure to check out chicken wings in the smoker!

Smoked Cream Cheese

Smoked Cream Cheese

Yield: 6-8 Servings
Prep Time: 5 minutes
Cook Time: 2 hours
Total Time: 2 hours 5 minutes

You’ll love the few minutes prep time but loads of flavor you get with this easy recipe for smoked cream cheese. It’s quick, versatile, and absolutely delicious!

Ingredients

  • 8-oz block of full-fat cream cheese
  • ¼ cup BBQ rub
  • 1 tablespoon olive oil

Instructions

  1. Line a small sheet pan with foil, then lightly grease the foil. You can also use a small dish if you’re sure it won’t get stained by the smoker.
  2. Unwrap a block of cream cheese, leaving it on the wrapper. Using a small silicone brush, coat it lightly with a small amount of olive oil (or just drizzle some on and use your hands, it’s easier but messy).
  3. Sprinkle on your favorite bbq rub, taking care to make sure all sides are thoroughly coated. Place it on the sheet pan.
  4. Using a sharp knife, score the top of the cheese in a crisscross pattern. 
  5. Place the sheet pan on the smoker alongside whatever you’re already smoking. The temp doesn’t really matter, but I’ve found that between 200F-250F works best. See the blog post for more details. 
  6. Smoke the cheese for about two hours. It can be removed as soon as just one hour, depending on how much smoke flavor you’re going for. 
  7. Serve the smoked cream cheese with crackers, chips, and/or freshly sliced vegetables.
Nutrition Information:
Yield: 8 Serving Size: 1
Amount Per Serving: Calories: 127Total Fat: 12gSaturated Fat: 6gTrans Fat: 0gUnsaturated Fat: 5gCholesterol: 31mgSodium: 141mgCarbohydrates: 3gFiber: 0gSugar: 2gProtein: 3g

This data was provided and calculated by Nutritionix.

© Kristy Bernardo
Cuisine: American / Category: Appetizers
Smoked Cream Cheese

Grilled Cheese Burritos

April 11, 2024 by Monique McArthur

Grilled Cheese Burritos

Taco Bell first introduced the grilled cheese burrito but now I've created my version of this hearty, cheesy, and beefy delight at home and can't get enough.

Grilled Cheese Burritos

If you're unfamiliar, grilled cheese burritos are possibly the best version of a beef burrito ever made. They have seasoned beef, rice, and other must-haves, including lettuce, tomato, and nacho cheese, all wrapped in a warm flour tortilla. What makes them unique is that they're covered with a layer of grilled cheese that's crispy in some spots and a little gooey in others. Better yet, there are browned bits!

These have officially replaced taco night at my house. They are so filling that you don't need a side dish. Meat, rice, and vegetables are all rolled into an easy-to-eat wrap you want to sink your teeth into.

Why You'll Love Grilled Cheese Burritos

Packed with flavor - This recipe skips the packaged taco seasoning. Instead, it uses a delicious blend of chili powder, cumin, oregano, and a few other ingredients for perfectly seasoned beef. It's smoky, yet not overly so. There's a little heat, and the salt isn't overdone.

Lots of cheese - Otherwise, this wouldn't be a grilled cheese burrito recipe, right? In addition to the grilled cheese on the exterior, the burrito has a delicious, quick, and easy nacho cheese sauce that you will want to put on everything.

Customizable - I recommend trying the recipe as is; however, there's a lot of room for creativity.

Tasty leftovers - Grilled cheese burritos only get better in the fridge. They also reheat nicely.

Grilled Cheese Burritos

Grilled Cheese Burritos Ingredients Notes

  • Ground beef: I suggest lean ground beef for grilled cheese burritos. Most would suggest 80/20 ground beef, though 90/10 is better as I find the former to leave too much grease at the bottom of the skillet, so much so that I usually have to pour some out.
  • Leftover rice: Can you cook the rice fresh? Yes, but it comes down to texture. Since leftover rice has had time to firm up, it has a better texture once cooked with tomato sauce and seasonings.
  • Aromatics: These burritos wouldn't be half as flavorful without the onion and garlic. Consider them necessary.
  • Tomato sauce: The sauce is used in the seasoned beef and rice to add flavor, color, moisture, and acidity.
  • Tortillas: This is the time to whip out the large ten-inch flour tortillas. Flour tortillas are needed instead of corn because they hold their shape well and are more pliable.
  • Cheese: American cheese is used in the nacho cheese sauce since it melts beautifully, while shredded cheddar or a packaged Mexican cheese blend is needed for the grilled cheese layer.

Find the complete ingredients list with measurements in the recipe card below.

Grilled Cheese Burritos Ingredients

How To Make Grilled Cheese Burritos

  1. Cook the beef: I start by browning the meat, then add the aromatics and seasonings. Soon after, I pour in a little tomato sauce, water, or broth to keep the meat nice and juicy.
  2. Make the rice: The rice goes right into the skillet used to cook the meat, so the grains pick up any residual beef drippings. This method develops tons of flavor while dirtying fewer dishes.
  3. Time for the sauce: This is the easiest nacho cheese ever. It takes 2 minutes max in the microwave.
  4. Assemble: Divide the meat, rice, sauce, and other additions among the tortillas, and roll.
  5. Finish: Brown the burrito seam side down (this helps seal it, making it easier to eat), take it out, add cheese, and place it on top of the cheese. From there, you can flip it. You'll notice that the cheese drapes over the tortillas. Work with one or two burritos at a time, depending on the size of your skillet.
Making Grilled Cheese Burritos

Variations, Substitutions, and Cooking Tips

Go meat-free - Swap the beef for ground tofu or your favorite beans. Either will be delicious and equally filling.

Use a nonstick skillet - This is a must when "grilling" the cheese. Otherwise, you'll have a burnt, cheesy mess on your hands. I've been there and done that.

Try another sauce - Instead of the nacho cheese sauce, try a smoky chipotle sauce, a smooth red pepper sauce, or even guacamole. Warm guac isn't half bad.

A green tip - Lettuce works well in the burritos, even though it adds extra moisture. Still, it isn't ideal if you plan to store the burritos. If this is the case, consider butter lettuce. The variety has a lower moisture content. Alternatively, swap the lettuce for shredded green cabbage.

Storage and Freezer Tips

Individually wrap leftover burritos in foil and refrigerate for 3-4 days. Typically, burritos freeze well. However, since these are grilled cheese burritos, I wouldn't suggest freezer storage unless you wait to add the cheesy layer when you reheat.

How To Reheat

Reheat grilled cheese burritos in the oven or microwave. Preheat the oven to 350°F, place them onto a baking sheet, and heat for 30-35 minutes. For the microwave, stick with 30-second intervals until the internal temperature reaches 165°F, then transfer to a skillet to revive that cheesiness on the outside. If reheating from frozen using either method, defrost beforehand. I like to defrost overnight instead of trying to speed up the process the day of.

Grilled Cheese Burritos

Grilled Cheese Burritos Recipe

Yield: 4 Burritos
Prep Time: 25 minutes
Cook Time: 30 minutes
Total Time: 55 minutes

In 2020, a popular fast-food chain introduced the grilled cheese burrito. I’ve recreated the hearty, cheesy, and beefy delight at home and can’t get enough.

Ingredients

Seasoned Beef

  • 1 tablespoon vegetable oil
  • 1 pound lean ground beef
  • ½ medium onion, chopped
  • 2 garlic cloves, minced
  • 1 teaspoon chili powder
  • ½ teaspoon kosher salt
  • ½ teaspoon onion powder
  • ¼ teaspoon ground cumin
  • ¼ teaspoon dried oregano
  • ¼ teaspoon black pepper
  • ⅛ teaspoon cayenne pepper
  • 1 tablespoon tomato sauce
  • 1-2 tablespoons water or reduced-sodium beef broth

Rice

  • 1 tablespoon vegetable oil
  • 2 tablespoons chopped onion, yellow or white
  • 1 garlic clove, minced
  • ¼ teaspoon chili powder
  • ⅛ teaspoon onion powder
  • ⅛ teaspoon ground cumin
  • ⅛ teaspoon dried oregano
  • 2 tablespoons tomato sauce
  • 1 cup cooked white rice, preferably leftovers
  • Kosher salt and black pepper, to taste

Nacho Cheese

  • ½ cup heavy cream
  • 5 slices American cheese
  • Hot sauce, to taste
  • 1 tablespoon chopped pickled jalapeno

Burritos

  • 3-4 (10-inch) flour tortillas
  • 1 large tomato, seeds removed and diced
  • 1 ½ cups iceberg lettuce, chopped

Cheesy Finish

  • 1 cup cheddar cheese or Mexican cheese blend

Instructions

  1. Heat the oil in a deep skillet over medium-high heat.
  2. Crumble the ground beef into the skillet and sauté until it browns. Break it up with a spoon or spatula during this time.
  3. Add the onion and garlic. Continue to sauté until the onion and garlic soften.
  4. Sprinkle in the seasonings. They include salt, onion powder, cumin, oregano, black pepper, and cayenne.
  5. Cook while occasionally stirring for 2-3 more minutes.
  6. Stir in the tomato sauce and water (or beef broth).
  7. Reduce the heat to medium and cook for 3-5 minutes or until most of the liquid evaporates but the beef is still juicy.
  8. Transfer the seasoned beef to a bowl.

Rice

  1. Heat the oil in the same skillet used to cook the beef.
  2. Sauté the onion for a minute or until softened and fragrant, then toss in the garlic. Sauté for another 20 seconds or so.
  3. Sprinkle in the chili powder, onion powder, cumin, and oregano. Cook while stirring to wake up those flavors, and then pour in the tomato sauce.
  4. Cook while stirring until the tomato sauce reduces a bit.
  5. Add the rice and stir to coat with the tomato sauce and seasonings.
  6. Season to taste with salt and black pepper.
  7. Remove from the heat. Transfer the rice to a bowl and set it aside.

Nacho Cheese Sauce

  1. Add the heavy cream to a microwave-safe bowl with the cheese. Tear the cheese into pieces before adding it to the bowl.
  2. Heat in 30-second intervals, whisking in between, until smooth.
  3. Add hot sauce to taste, followed by pickled jalapenos.

Burritos

  1. Lay the tortillas out on a clean work surface.
  2. Add ¼ cup of rice just below the center of each tortilla, top with the beef, add the tomato and lettuce, then drizzle everything with nacho cheese.
  3. Fold the bottom of the tortilla over the fillings, fold in the sides, then roll tightly.
  4. Heat a nonstick skillet over medium heat.
  5. Add a burrito to the skillet seam side down and leave for 1 minute or until brown, then remove the burrito.
  6. Sprinkle ¼ cup of cheese into the skillet. Once it melts, return the burrito to the skillet seam side up.
  7. Once the cheese is completely melted, flip the burrito so the cheese side is up and transfer it to a plate or platter.
  8. Repeat with the remaining burritos.
Nutrition Information:
Yield: 4 Serving Size: 1
Amount Per Serving: Calories: 857Total Fat: 52gSaturated Fat: 24gTrans Fat: 1gUnsaturated Fat: 23gCholesterol: 191mgSodium: 1310mgCarbohydrates: 43gFiber: 3gSugar: 6gProtein: 52g

This data was provided and calculated by Nutritionix.

© Monique McArthur
Cuisine: Mexican / Category: Dinner
Grilled Cheese Burritos

Try These Cheesy Recipes Next!

  • Bacon Ranch Cheese Ball
  • Blue Cheese Burger Totchos
  • Air Fryer Grilled Cheese 2 Ways
  • Easy One Pot Chili Mac & Cheese

Stewed Turkey Necks

April 11, 2024 by Monique McArthur

Stewed Turkey Necks

These stewed turkey necks are cooked to fall-apart tender perfection in a rich, hearty gravy. For a complete meal, serve with rice, quinoa, or potatoes.

Stewed Turkey Necks

This is by far one of my favorite ways to cook turkey necks. The necks are treasure troves of flavor and have more meat on them than you might think. In addition to being dark meat, which is chock full of rich flavor, turkey necks contain a lot of collagen. Collagen adds depth and excels at thickening anything from broths to stew gravies.

Another reason I love creating dishes with turkey necks is that despite offering so much flavor and texture, they're very inexpensive, thus allowing me to create rich, complex meals with a lot of depth economically. If that isn't a win, I don't know what is.

Why You'll Love Stewed Turkey Necks

Layers of flavor - There are the turkey necks, aromatic vegetables, herbs, spices in the seasoning blend, and flavor from the broth. Let's not forget the complexity imparted by everything from the fond collected at the bottom of the pot from browning and sautéing to the hours of cooking that allow flavors to meld and develop.

Easy - Although stewed turkey necks require low and slow cooking, the process is easy for anyone and doesn't involve advanced cooking techniques.

Comforting - Stewed turkey necks are one of my favorite comfort food dishes. Everything from the fall-apart tender turkey to the warm, hearty stew gravy delicious enough to enthusiastically spoon into your mouth can put one at ease.

Stewed Turkey Necks Ingredients Notes

  • Turkey necks: Try your local grocery store, butcher shop, or farmer's market. Since they are long and often slightly curved, consider cutting them in half or thirds. Doing so makes moving them around in the pot easier, easier to plate, and easier to eat.
  • Lemons: I like to toss turkey necks in fresh lemon juice and let them sit to improve the flavor. Poultry is excellent, but sometimes it has an unappetizing turkey scent, and the flavor comes across as a little too robust. Lemon rounds out this aroma and taste while tenderizing the meat and decreasing cooking time.
  • Aromatics: Onion, bell pepper, celery, and garlic create a fragrant base for the stew gravy. Many aromatic combinations will work for this recipe, but I always return to this one because it works well with the Cajun seasoning.
  • Cajun seasoning: I suggest a brand with moderate sodium unless you are on a low-sodium diet. Salt-free runs the risk of under-seasoning, meaning you'll have to taste and add salt as needed, whereas high-sodium Cajun seasoning blends run the risk of over-seasoning.
  • Flour: Flour creates a roux that helps thicken the stew.
  • Chicken broth: The broth adds more flavor to the stewed turkey necks than water. Choose your favorite and consider low-sodium.
  • Soy sauce: A little bit of the umami-packed condiment substantially impacts the finished dish. Regular or low-sodium is fine.
  • Starch: A corn or tapioca starch slurry goes into the stewed turkey necks at the end to ensure a thick, rich result.
Stewed Turkey Necks Ingredients

How To Make Stewed Turkey Necks

  1. Toss in lemon: Toss the turkey necks in lemon juice. Use a nonreactive bowl for this step.
  2. Season, then brown: After patting any excess moisture from the turkey necks, sprinkle the Cajun seasoning over the turkey and rub the seasonings in. I highly recommend using food-safe gloves for this step. Once done, heat the oil in a pot and brown the necks on all sides.
  3. Sauté the aromatics: Begin by sautéing the onion, bell pepper, celery, and carrot. Add the garlic after the other vegetables have softened to prevent burning. Remove the turkey necks before starting this step.
  4. Start building the stew: Add the seasonings first so the heat wakes up those flavors. Follow with flour to create a roux, then slowly pour in the broth and bring it to a boil.
  5. Bring everything together: Return the turkey necks to the pot, cover them, and cook them for a couple of hours.
  6. Add the slurry: If the gravy is thick enough, skip this step. If not, create a slurry with cornstarch or tapioca starch and the cooking liquid from the pot, then slowly add the slurry while stirring until the gravy thickens. You may not need all of it.
  7. Serve it up: It looks particularly nice in a shallow bowl with a carb such as steamed rice on the side.
How To Cook Turkey Necks
Turkey Neck Stew

Variations, Substitutions, and Cooking Tips

Switch up the seasonings - Instead of Cajun seasoning, try Creole seasoning, a blend of your favorite herbs and spices, or keep it simple with salt and pepper.

Use different aromatics - Ginger, green onions, chili peppers, fennel; there are many combinations to try.

Go gluten-free - Replace all-purpose flour with gluten-free all-purpose flour and use tamari instead of soy sauce. Also, check all your ingredients to ensure they are not processed in a facility where they may have come in contact with gluten.

Make it dairy-free - To do this, replace the butter with your favorite dairy-free butter alternative.

Add potatoes - For a one-pot meal, add quartered potatoes during the last 30-40 minutes of cooking. They get really tender, and their natural starch thickens the stew. Peeled or unpeeled is up to you.

Stewed Turkey Necks

Stewed Turkey Necks Recipe

Yield: 4 Servings
Prep Time: 45 minutes
Cook Time: 2 hours 40 minutes
Total Time: 3 hours 25 minutes

These turkey necks are cooked to fall-apart tender perfection in a rich, hearty stew gravy. For a complete meal, serve with rice, quinoa, or potatoes.

Ingredients

  • Juice of 2 lemons
  • 3 pounds turkey necks
  • 4 tablespoons Cajun seasoning, divided
  • 1 tablespoon vegetable oil
  • ½ cup unsalted butter
  • 1 medium onion, chopped
  • 1 green bell pepper, chopped
  • 2 ribs of celery, chopped
  • ½ cup chopped carrot
  • 5 garlic cloves, minced
  • ½ teaspoon dried oregano
  • ¼ cup all-purpose flour
  • 3 cups reduced-sodium chicken broth
  • 2 tablespoons soy sauce
  • 2 teaspoons cornstarch or tapioca starch

Instructions

    1. Squeeze lemon juice in a nonreactive bowl, add turkey necks, toss to coat them in the juice, cover, and refrigerate for thirty minutes to an hour.
    2. Remove the turkey necks and pat them dry with paper towels.
    3. Preheat the oven to 300°F.
    4. Sprinkle the Cajun seasoning on top and rub the seasonings into the necks.
    5. Heat the oil and 2 tablespoons of butter in a Dutch oven over medium-high heat.
    6. Add the turkey necks and brown on all sides. Browning will take 6-7 minutes.
    7. Transfer them to a platter, reduce the heat to medium, and add the remaining butter.
    8. Sauté the onion, bell pepper, celery, and carrot for 4-5 minutes.
    9. Toss in the garlic and sauté for another 1-2 minutes.
    10. Sprinkle in the remaining Cajun seasoning and the oregano. Heat for a few seconds to awaken the flavors.
    11. Sprinkle in the flour and cook while stirring for 1-2 minutes or until the scent of raw flour is gone.
    12. Add a splash of the broth to the pot and use a wooden spoon to scrape the bottom to release any fond, then whisk in the remaining broth. Also, pour in the soy sauce.
    13. Bring to a boil. Next, return the turkey necks to the Dutch oven. Arrange them in a single layer. If the Dutch oven has a tight-fitting lid, cover it with the lid. If not, foil will do.
    14. Carefully transfer the turkey necks to the oven to cook for 2 hours or until fork-tender. Remove the pot from the oven and stir halfway through.
    15. Return the pot to the stovetop over medium heat.
    16. Bring to a gentle boil, reduce to a simmer, and simmer for 10-12 minutes to thicken the gravy.
    17. At this point, the stew may be thick enough. If not, combine the cornstarch (or tapioca starch) and a few spoonfuls of the liquid in a small bowl to make a slurry.
    18. Slowly add the slurry as you stir until the stew gravy has thickened to your liking.
    19. Taste. Add salt and black pepper to taste, if needed. The need for salt depends on the Cajun seasoning used. Some have a higher sodium content than others.
Nutrition Information:
Yield: 4 Serving Size: 1
Amount Per Serving: Calories: 1105Total Fat: 58gSaturated Fat: 24gTrans Fat: 0gUnsaturated Fat: 29gCholesterol: 450mgSodium: 4534mgCarbohydrates: 37gFiber: 4gSugar: 12gProtein: 107g

This data was provided and calculated by Nutritionix.

© Monique McArthur
Cuisine: American / Category: Dinner
Stewed Turkey Necks

Try These Recipes Next!

  • Giblet Gravy Recipe
  • Homemade Turkey Gravy
  • Spatchcock Turkey Recipe
  • Old Fashioned Turkey & Noodles

Fried Corn on the Cob Recipe

March 30, 2024 by Monique McArthur

Fried Corn

Golden and crispy on the outside, sweet and tender on the inside, fried corn on the cob is nothing short of a delight. It's the perfect accompaniment to any main dish.

When fresh corn enters my home, fried corn on the cob is a must. A particular fast-food chain has made it famous, but I prefer to make it myself because I can fry as much as I want for the price of a 10-piece with extra butter on the side for dipping.

This side dish is an experience. Although the most essential thing is crisp, juicy corn, the butter takes it over the top. It's garlicky and super savory, with spices, herbs, and a bright citrusy acidity. Once you bite into a piece, the corn's juices and butter dribble down your chin, the flavors take over your taste buds, that happiness kicks in, and you get to enjoy it again with the next piece. At least that's been my experience, so I had to share the recipe!

Fried Corn

Why You'll Love Fried Corn on the Cob

If those two words aren't enough to sell you, below are a few reasons you'll fall hard for this recipe:

Super flavorful - Fried corn delivers a little bit of everything. There is no shortage of seasoning here.

Easy - Corn on the cob fries quickly, and the butter is easy to prepare. The most challenging part is shucking the corn; sometimes, those little stringy bits are annoying. However, you can skip this step altogether and buy shucked cobs!

Excellent texture - The kernels are snappy and golden yet not overly so, retaining that juicy quality. The contrast plays a significant role in why fried corn is so incredible.

Great for preventing food waste - Fresh corn is the best corn. That said, once you bring it home, you only have a day or two before it goes bad unless you freeze it. If you're like me and tend to buy more than you need when it's on sale, you must do something with it. Fried corn on the cob is an excellent go-to.

Fried Corn Ingredients Notes

To make fried corn, you will need the following ingredients:

  • Corn: Look for ears of corn that are closed tightly with bright green husks and little to no signs of wilting. I also like to give the ears a firm yet gentle squeeze to ensure they feel full and juicy instead of soft and mushy, indicating that they have rotted. Lastly, the ear should feel heavy for its size when you pick it up. As mentioned earlier, shucked corn is an option. If you go this route, look for plump, firm kernels that are bright in color. Remember that the extra handling means they are further away from their harvest time and considerably less fresh.
  • Butter: I recommend unsalted since it allows complete control over the salt level. If you only have salted, that will do. However, it's important to taste as you go to ensure the butter isn't overly salted.
  • Garlic: Smash the cloves before you mince to release the cloves' powerful oils.
  • Spices: Chili powder, black pepper, and paprika add complex flavors, smokiness, and a pleasant heat.
  • Herbs: Dried oregano brings an earthy flavor with minty notes. I think it works particularly well with lemon juice. As for the parsley, the green flecks it adds are incredible, and the herb acts as a balancing agent that rounds out the other flavors.
  • Lemon juice: The acid adds a bit of brightness and balances all the delicious fat from the butter.

Find the complete ingredients list with measurements in the recipe card below.

Fried Corn Ingredients

How To Make Fried Corn on the Cob

  1. Prep: To shuck corn, start by removing the outer leaves. Next, expose the tip of each ear of corn until you can see the first few rows of kernels. Then, grasp the top of the leaves and tassels, pull them down with one firm tug, pull them to the bottom, and break off the leaves and silks. Once done, cut each cob into 1-1 ½-inch pieces.
  2. Make the butter: Melt the butter, add the garlic, leave it to infuse the butter with its delicious flavor, then stir in the remaining spices and herbs.
  3. Fry: Transfer the corn to hot oil to fry until golden and crisp. If you're the type to try to get everything done at once and overload the skillet, avoid the urge. Oily corn isn't very appetizing.
  4. Toss: Toss the fried sections of the corn in some flavorful butter, much like when saucing hot wings.
  5. Serve: Plate and serve alongside any extra butter for dipping.
Fresh Fried Corn

Variations, Substitutions, and Cooking Tips

Go dairy-free - Use Earth Balance in place of butter. This swap also adapts this fried corn recipe for vegan diets.

Air fry instead - When I don't feel like frying, I toss the sections with oil and air fry until golden brown.

Change up the herbs - Cilantro can be used instead of parsley, as can basil. Alternatively, dried parsley is a good substitute for fresh. The only thing I strongly advise against is dried cilantro. The stuff is pretty terrible tasting.

Serve with sauce - Some like cool ranch on the side for dipping instead of extra butter. You can also go with a spicy sauce or even an avocado-based one.

Fried Corn

Fried Corn Recipe

Yield: 4
Prep Time: 12 minutes
Cook Time: 12 minutes
Total Time: 24 minutes

Golden and crispy on the outside, sweet and tender on the inside, fried corn is nothing short of a delight. It’s the perfect accompaniment to any main dish.

Ingredients

  • 4 ears of corn, shucked
  • 1 cup unsalted butter
  • 1 tablespoon minced garlic
  • 1 tablespoon chopped fresh parsley
  • 1 ½ teaspoons chili powder
  • ½ teaspoon fine sea salt
  • ½ teaspoon black pepper
  • ½ teaspoon onion powder
  • ½ teaspoon garlic powder
  • ½ teaspoon smoked paprika
  • ¼ teaspoon dried oregano
  • 2 tablespoons fresh lemon juice
  • Vegetable oil, for frying

Instructions

  1. Carefully cut each corn cob into four sections about 1-1 ½-inch thick.
  2. Melt the butter in a saucepan over medium heat.
  3. Add the garlic, reduce the heat to medium-low, and leave on the heat for 3-5 minutes or until the garlic is softened and fragrant and the butter turns golden yellow.
  4. Transfer the butter to a bowl to prevent it from browning or burning.
  5. Stir in the parsley, chili powder, salt, pepper, onion powder, garlic powder, paprika, oregano, and lemon juice. Set aside.
  6. Add enough oil to a deep, heavy frying pan to completely submerge the corn. The amount of oil will vary depending on the pan selected. Heat to 350°F.
  7. Pat the corn dry with paper towels, then use tongs to transfer them to the hot oil. Fry for 5 minutes, flipping halfway through for even cooking/browning. Fry in two batches if your pan isn’t large enough.
  8. Transfer to a paper towel-lined plate to drain excess oil.
  9. Add about half of the butter mixture to a large heat-safe bowl along with the corn. Toss to coat the corn evenly.
  10. Plate and serve with extra butter on the side.
Nutrition Information:
Yield: 4 Serving Size: 1
Amount Per Serving: Calories: 525Total Fat: 51gSaturated Fat: 29gTrans Fat: 0gUnsaturated Fat: 19gCholesterol: 122mgSodium: 302mgCarbohydrates: 19gFiber: 3gSugar: 4gProtein: 4g

This data was provided and calculated by Nutritionix.

© Monique McArthur
Cuisine: American / Category: Sides
Fried Corn on the Cob Recipe

Try These Recipes Next!

  • Fried Deviled Eggs
  • Smoked Fried Chicken
  • Baked Or Fried Portobello Fries
  • Buttermilk Fried Green Tomatoes

Homemade Yuzu Sauce Recipe

March 25, 2024 by Monique McArthur

Yuzu Sauce Recipe

Forget store-bought yuzu sauce and make this homemade sauce instead! The umami-packed condiment is surprisingly easy to prepare and can be made in bulk.

I can't get enough of this yuzu sauce. The sauce, commonly called yuzu ponzu, is a delicious combination of the juice of yuzu fruit, soy sauce, mirin, and notable additions, including kombu and bonito flakes, to add depth of flavor. It makes a fantastic dipping sauce and salad dressing.

I also use it as a marinade and enjoy it drizzled over Japanese rice. Plain steamed rice with yuzu sauce is such a nice side or snack. In the winter, I'll take a few trips to the nearest Asian grocery store to find this delicious fruit and try my luck at farmers' markets. I know it's extra, but yuzu fruits are worth the effort, so let's get into how to make yuzu sauce at home!

Yuzu Sauce Recipe

Why You'll Love Yuzu Sauce

Super flavorful - Bright, citrusy, salty, smoky, and sweet; yuzu sauce offers a bit of everything, and it's all good!

Versatile - I mentioned a few ways I like to use it, but the sauce's uses extend far beyond those. Add it to anything from meat or fish to your favorite bowl of soup. A drizzle on top can make all the difference!

Easy - Anything that takes 7 minutes to prepare is a winner in my book.

Suited for long-term storage - A jar of yuzu sauce can last 6-12 months in the fridge. Imagine having this sauce conveniently waiting in the refrigerator for you to enjoy.

Yuzu Sauce Ingredients Notes

  • Yuzu juice: If you can find fresh fruits, use them. The fragrant Japanese citrus fruit can be found in Asian grocery stores and some specialty grocery stores during the fall and winter, with the peak season from November to December. If not, go with bottled yuzu juice. I usually get mine from Whole Foods or Amazon.
  • Kombu: Kombu is an edible kelp often used in Japanese cuisine to make dashi. It imparts a lot of umami and helps to create a flavorful foundation or base for this yuzu sauce.
  • Bonito flakes: Bonito flakes, also known as katsuobushi, add a smokiness to the sauce. It is a fish product (skipjack tuna, to be exact), so the flakes can be replaced with dried shiitake mushrooms if you want vegan yuzu ponzu.
  • Soy sauce: The popular condiment adds saltiness and complexity.
  • Mirin: The rice wine offers a delicate sweetness accompanied by a pleasant aroma. It pairs nicely with the fruit juice. (If you don't have mirin, you can try these mirin substitutes).
  • Rice Wine Vinegar: You won't use a lot of rice vinegar, but it is essential for preserving the sauce and and adding the perfect amount of acidity to balance out the other flavors in the sauce.

Refer to the recipe card below for a complete list of yuzu sauce ingredients with precise measurements.

Yuzu Sauce Ingredients

How To Make Yuzu Sauce

  1. Prepare the jars: Add the kombu and bonito flakes to the jars. Add 1 piece of kombu and half a cup of bonito flakes (or dried mushrooms) per jar.
  2. Pour in the other ingredients: Divide the juice and other ingredients equally between the jars, then secure the lids.
  3. Shake it up: I noticed that the kombu and bonito flakes are rarely submerged, so I shake each jar to correct this. They need to be submerged to extract as much flavor as possible.
  4. Wait time: Yes, prep is easy, but you want to wait at least 24 hours before tasting the sauce since the flavors need time to meld. Just ensure you don't exceed 24 hours because the kelp tends to get slimy after this amount of time.
  5. Strain and enjoy, or not: Strain the solids, return the liquid to the jars, and then the sauce is ready! Enjoy it after 24 hours, or wait to give the flavors more time to meld. This is precisely why this recipe yields 2 jars instead of one. This way, I can start on a jar immediately and keep the second one in the fridge for a few months. Yuzu sauce gets better with time.

Variations, Substitutions, and Cooking Tips

Evaporate the alcohol in mirin - If the alcohol content is a concern, you can cook off the alcohol or use an alcohol-free variant. I suggest nikiri mirin, which is simply mirin that has been boiled. This way, you don't miss out on all the complex flavors.

Use another citrus fruit - If you prefer fresh fruit juice but can't find yuzu, use lemon, lime, orange, or a combination. Although it won't be yuzu sauce, it will taste delicious.

Sterilize the jars - This isn't a canning recipe. However, sterilizing jars is so easy that there's no reason not to. You only need a large pot with a rack and some boiling water. Additionally, try to avoid contamination as you use the sauce over time by wiping the rim clean before screwing on the lid, not dipping food directly into the jar, etc. These extra steps will ensure the sauce lasts a long time.

Add sugar - For a sweeter sauce, add a little sugar. The acidity of yuzu juice becomes subtler with time, so you may want to add sugar to the jar you plan to use immediately.

Yuzu Sauce Recipe

Homemade Yuzu Sauce Recipe

Yield: 2 Cups
Prep Time: 7 minutes
Additional Time: 1 day
Total Time: 1 day 7 minutes

Forget store-bought yuzu sauce and make this homemade sauce instead! The umami-packed condiment is surprisingly easy to prepare and can be made in bulk.

Ingredients

  • 2 (2-inch) pieces of kombu
  • 1 cup dried bonito flakes or dried shiitake mushrooms, divided
  • 1 cup soy sauce, divided
  • ¼ cup mirin, divided
  • 2 teaspoons rice wine vinegar, divided
  • 1 cup yuzu juice (preferably freshly squeezed), divided

You Will Also Need:

  • 2 (16-ounce) mason jars, sterilized

Instructions

    1. Add a piece of kombu and half the bonito flakes (or shiitake mushrooms) to each of the jars.
    2. Follow with half the soy sauce, mirin, rice wine vinegar, and yuzu juice.
    3. Ensure that the kombu and bonito flakes are fully submerged, then screw on the lids. If they are not submerged, shake the closed jars.
    4. Refrigerate for 24 hours. Do not exceed this time.
    5. Strain the solids from each jar and return the yuzu sauce to the jars.
    6. Enjoy immediately or wait 3-4 months for the flavors to meld.

Notes

While you can enjoy this Yuzu Sauce immediately, allowing it to rest for a day really allows the flavors to meld.

Nutrition Information:
Yield: 64 Serving Size: 1
Amount Per Serving: Calories: 8Total Fat: 0gSaturated Fat: 0gTrans Fat: 0gUnsaturated Fat: 0gCholesterol: 0mgSodium: 233mgCarbohydrates: 1gFiber: 0gSugar: 1gProtein: 0g

This data was provided and calculated by Nutritionix.

© Monique McArthur
Cuisine: Asian / Category: Sauces
Homemade Yuzu Sauce Recipe

Try These Delicious Recipes Next!

  • Spam Musubi
  • Ahi Tuna Sashimi
  • Korean Cold Noodle Soup
  • Air Fryer Frozen Potstickers & Dumplings

The Ultimate List of Taco Toppings

March 20, 2024 by Kristy Bernardo

Best Beer Batter Fish Tacos

Tired of the same old tacos? Shake things up with this ultimate list of taco toppings! If you're planning a casual Taco Tuesday at home or hosting a full-blown taco bar for a crowd, the right toppings can turn even the simplest taco into something unforgettable.

From classic combos to creative twists, this guide has loads of taco toppings to choose from: crunchy veggies, flavorful sauces, spicy seasonings, fresh herbs, melty cheeses, and so much more. Keep it simple or go all out. With so many tasty options, no two tacos ever need to be the same.

a jar of salsa with other taco toppings next to it on a rustic wood table: lime wedges, cherry tomatoes, garlic, spicy peppers, red onion, and fresh cilantro

Table of Contents

  • Build Your Ultimate Taco Bar
    • Start with the basics
    • Then go wild with toppings
  • Taco Shell Options
  • The Best Cheeses for Tacos
  • Fresh and Pickled Vegetables
    • Fresh Vegetables
    • Pickled Vegetables
  • Salsas, Sauces, and Creamy Toppings
    • Classic Salsas
    • Smooth Sauces
    • Creamy Toppings
  • Herbs, Seasonings, and Citrus
    • Fresh Herbs
    • Dry Spices & Seasoning Blends
    • Citrus & Acids
  • Crunchy & Unique Toppings
    • Crunchy Add-Ons
    • Unexpected Twists
  • Taco Toppings by Dietary Preference
    • Vegetarian & Vegan-Friendly
    • Gluten-Free
    • Low-Carb & Keto
    • Dairy-Free
  • Creative Taco Combos You've Gotta Try
  • Taco Toppings - Frequently Asked Questions

Build Your Ultimate Taco Bar

Creating a taco bar is one of the easiest and fun ways to serve tacos! It's perfect for everything from a family dinner to a party with friends. Set out a variety of proteins, toppings, and sauces so everyone can build their perfect taco just the way they like it.

Start with the basics

  • Tortillas: Offer both flour and corn tortillas, or go all out with street taco size, blue corn, and crunchy taco shells. Warm them before serving to make them soft and pliable.
  • Proteins: Choose from ground beef, shredded chicken, carne asada, carnitas, or even vegetarian options like grilled mushrooms or beans.
  • Cheese: Put out bowls of shredded cheddar, crumbled cotija, queso fresco, Monterey Jack, or creamy nacho cheese.

Then go wild with toppings

Fresh ingredients: Shredded lettuce, diced tomatoes, avocado slices, onions, radishes, pickled jalapeños, and cilantro. You may want to have a larger bowl of shredded lettuce so all the taco toppings can be turned into salads.
Flavor-boosters: Lime wedges, crema, guacamole, sour cream, and hot sauces like Tapatío, Cholula, or homemade salsa verde.
Crunchy extras: Fried shallots, chicharrones, tortilla strips, or a crunchy coleslaw all add flavor and texture to tacos.

A taco bar is customizable, it's perfect for picky eaters, and cleanup is a breeze. Don't forget to include a few toppings people might not expect, like mango salsa, roasted pepitas, or even kimchi. The more choices, the better!

Taco Shell Options

The foundation of any great taco starts with the shell, and there are more options than you might think! Set out a few different types of tortillas so your guests can mix and match. It doesn't matter if you're going classic or looking for something unexpected, here are some of the best taco shell choices to serve:

  • Corn Tortillas: Traditional and naturally gluten-free, corn tortillas have a wonderful flavor. They're perfect for street tacos and proteins like carne asada or al pastor.
  • Flour Tortillas: Flour tortillas are soft, flexible, and slightly chewy. They're great for larger tacos with heavier fillings like ground beef, chicken tinga, or breakfast tacos.
  • Crunchy Taco Shells: Store-bought crunchy shells are perfect for immediately adding texture to your tacos. They're ideal for ground beef tacos topped with shredded lettuce and cheese.
  • Blue Corn Tortillas: These are arguably the prettiest tortillas you can serve, and will add a gourmet feel to any taco bar.
  • Mini Street Taco Tortillas: These are tiny tortillas that are perfect for tasting a variety of toppings without committing to a full-size taco, making them perfect for a party!
  • Lettuce Wraps: A low-carb option using romaine or butter lettuce. They're crisp, refreshing, and great for lighter fillings like shrimp or grilled veggies.
  • Cheese Taco Shells: Made by baking or pan-frying shredded cheese until crispy, then shaped into shells. They're delicious, gluten-free and low-carb!
  • Jicama Slices: Thinly sliced jicama offers a crunchy, fresh shell alternative that's low in calories and carbs. I've seen these at a few restaurants in my area and they're such a fun way to serve tacos!
Three Beer Battered Fish Tacos with roasted jalapeños and lime wedges in a metal dish lined with parchment paper

The Best Cheeses for Tacos

Cheese can make or break a taco. It adds richness, creaminess, and a salty finish that ties everything together. You can melt it inside the shell under a piping hot protein or sprinkle it on top, or both! Here are some of the best cheeses to consider:

Cotija: This is a crumbly, salty Mexican cheese that's often compared to feta. It's great for sprinkling over tacos once the other ingredients are loaded into the tortilla.
Queso Fresco: This one is soft and mild with a slight tang. It crumbles easily and perfect for cooling down spicy fillings.
Oaxaca: Oaxaca is a semi-soft cheese that melts beautifully! Think of it as the mozzarella of Mexican cuisine, making it perfect for tacos or quesadillas.
Monterey Jack: It's mild, creamy, and great for melting. It works well in beef or chicken tacos, especially when mixed with spicier cheeses.
Cheddar: Choose either sharp or mild, either are wonderful choices. Cheddar is a go-to in Tex-Mex style tacos because it melts well and a wonderful flavor.
Pepper Jack: This is a spicier twist on Monterey Jack with bits of jalapeño or chili. Use this if you want to add heat without using a hot sauce.
Asadero: A creamy, stretchy cheese used in authentic Mexican cooking. It melts smoothly, making it a great choice for making a cheesy beef filling.
Chihuahua: This one is similar to a mild cheddar. Chihuahua cheese melts beautifully and has a buttery flavor. It's perfect for melty, cheesy taco fillings.
Smoked Queso: This is perfect for adding a unique flavor to tacos, especially if you're already smoking your proteins. It's very rich and flavorful! It can double as a dip and a topping.
Panela: A firm cheese that holds its shape even when heated. Try it diced or grilled and added to veggie or shrimp tacos.

Fresh and Pickled Vegetables

Fresh and pickled veggies add crunch and acidity. Mix and match fresh and pickled toppings for layered flavor and texture. Think pickled red onions with shredded cabbage, or fresh avocado with tangy jalapeños.

Fresh Vegetables

Shredded Lettuce: A taco classic that cools down spicier ingredients and adds a nice crunchy texture.
Diced Tomatoes: Juicy and sweet, tomato is perfect for softening spicy or smoky flavors.
Avocado Slices: A must for great tacos! Avocado is creamy and rich and pairs well with spicy ingredients.
Red Onion: Slice it thinly or dice it.
Green Onion (Scallions): These are great for a milder onion flavor. They also add a nice pop of color.
Jalapeño: Sliced these thinly or dice them. Make sure to put a spoon in the dish so no one has to immediately wash their hands.
Radishes: These will add a peppery bite and a crunchy texture.
Cucumber: Cucumber is especially good on fish or shrimp tacos. Dice these instead of slicing.
Bell Peppers: These are sweet and crunchy when they're served raw. You can also char them before chopping which will make them slightly softer.
Corn Kernels: You can serve corn fresh off the cob (no cooking!), grilled, or charred. Corn adds sweetness and texture and is SO good as a taco topping.
Shredded Cabbage: Adds a wonderful crunch! Serve it as-is or make a quick slaw.

Pickled Vegetables

Pickled Red Onions: These are sweet and tangy, a must-have taco topping.
Pickled Jalapeños: Even if you're already serving fresh jalapeños, don't overlook these tangy, spicy little bites.
Pickled Radishes: Another great taco topping that's worth considering even if you're serving the fresh version.
Escabeche (Pickled Carrots & Cauliflower): This is a traditional Mexican mix that works both as a taco topping or to enjoy on the side.
Kimchi: This is especially great for Korean-inspired tacos.
Pickled Cucumber: Especially good with fried fish or tofu.

a measuring cup on a wooden board filled with Adobo Seasoning For Tacos

Salsas, Sauces, and Creamy Toppings

No taco is complete without a drizzle (or dollop) of something saucy. From spicy and smoky to tangy and rich, these toppings bring everything together. Combine a few for maximum flavor!

Classic Salsas

  • Pico de Gallo: Fresh tomatoes, onion, cilantro, lime, and jalapeño.
  • Salsa Verde: Made from tomatillos and green chiles. It's tangy and slightly spicy.
  • Roasted Tomato Salsa: Smoky and deep in flavor. Perfect for carne asada.
  • Corn Salsa: Sweet and crunchy, especially great on fish and veggie tacos.
  • Pineapple or Mango Salsa: Adds a fruity sweetness and pairs well with spicy proteins.
  • Black Bean and Corn Salsa: This is a great all-in-one taco topping.
  • Habanero or Chile de Árbol Salsa: For the heat lovers!

Smooth Sauces

  • Tomatillo Avocado Salsa: Creamy, bright, and herby.
  • Chipotle Sauce: Smoky and spicy, it's great with chicken or pork. Just mix a few tablespoons of adobo sauce (from a can of chipotle peppers in adobo sauce) with some sour cream.
  • Adobo Crema: This is a tangy, smoky "sauce" that's perfect with grilled meats.
  • Enchilada Sauce (Red or Green): This is a great alternative to salsa.
  • Chimichurri: This is filled with fresh herbs and has a garlicky punch that works really well with steak tacos.
  • Mole Sauce: This is a deep, rich sauce that's delicious with shredded chicken or pork.

Creamy Toppings

  • Mexican Crema: Smooth, tangy, and thinner than sour cream.
  • Sour Cream: A classic creamy topping that cools spicier taco toppings.
  • Cilantro Lime Crema: Mince some cilantro and squeeze fresh lime juice, then stir it into either Mexican crema or sour cream.
  • Avocado Crema: Same as above, with the addition of avocado. Blend the crema or sour cream, cilantro, and fresh lime juice with Mexican cream or sour cream.
  • Queso Dip: Who doesn't love queso dip, either with crunchy chips or as a taco topping?
  • Ranch Dressing: This one definitely isn't traditional but it's a great topping for chicken tacos!
  • Guacamole: This one's obvious because it's used so often, and for good reason!
  • Aioli (Chipotle, Roasted Garlic, etc.): We love serving different aiolis on our taco bars!

Herbs, Seasonings, and Citrus

A sprinkle of herbs or a squeeze of lime can transform your tacos with a fresh burst of flavor that really pack a punch! Add these in small dishes or in their spice jars so everyone can add whichever extra flavors they love best. Choose a few from our list to take your tacos from average to fantastic:

Fresh Herbs

  • Cilantro: As far as taco toppings go, this is THE go-to herb.
  • Parsley: This is a fresh alternative to cilantro.
  • Mint: Mint pairs surprisingly well with spicy chicken or grilled veggie tacos.
  • Chives: This has a delicate onion flavor and adds a nice pop of green.
  • Basil: Try it with fusion tacos or anything with tomato or mozzarella.

Dry Spices & Seasoning Blends

  • Taco Seasoning: The obvious classic blend for beef or chicken.
  • Adobo Seasoning: A fantastic mix that's great on pork or paired with beans.
  • Tajin: Tajin is a chili-lime salt that's amazing on everything from corn to pineapple salsa.
  • Cumin: This adds a ton of flavor to meats, beans, and sauces.
  • Smoked Paprika: This has a rich, smoky kick without the heat.
  • Chili Powder: This has a mild spice with a lot of flavor.
  • Crushed Red Pepper: Add just a pinch for heat, especially with cheese or crema.

Citrus & Acids

  • Lime Wedges: Lime brightens up every bite and helps to balance spicy fillings.
  • Lemon Wedges: Especially good with fish tacos!
  • Pickled Red Onions: Adds color, crunch, and tang all in one taco topping.
  • Vinegar-Based Hot Sauces: Try Tabasco or Valentina.

Crunchy & Unique Toppings

Adding texture to tacos makes them much more interesting, and a little crunch goes a long way. These taco toppings will add texture and a little something unexpected to taco night!

Crunchy Add-Ons

  • Frito chips: Crushed and sprinkled on top for a salty crunch.
  • Chicharrones: Crispy, crushed pork rinds will add a savory, delicous crunch.
  • Tortilla strips: Fried or baked, these are great over slaw or crema.
  • Fried shallots or onions: Take your onion topping up a notch!
  • Roasted pepitas: Toasted pumpkin seeds have a nutty flavor and add crunch.
  • Crispy bacon or candied bacon: Sweet, salty, and irresistible!
  • Cabbage slaw: Light, crunchy, and fresh. It's especially great on fish tacos.

Unexpected Twists

  • Fried egg: Try it on breakfast tacos or chorizo and potato!
  • Kimchi: Spicy, tangy, and perfect for Korean-Mexican fusion tacos.
  • Plantain chips or strips: Adds a sweet crunch that pairs well with black beans and pulled pork.
  • Pomegranate arils: A juicy pop of sweet-tart flavor.
  • Toasted coconut flakes: A surprising favorite with shrimp or mango salsa.
  • Crumbled queso chips: For a cheesy, crispy topping!
Roasted Chickpeas with tabasco in a beautiful green dish on a colorful cloth napkin

Taco Toppings by Dietary Preference

No matter who's at the table, there's a taco topping combo that works. Whether you're feeding vegetarians, keto eaters, or just trying to offer healthier options, this list makes it easy to build tacos everyone can enjoy.

Vegetarian & Vegan-Friendly

  • Grilled vegetables: Think bell peppers, zucchini, mushrooms, or corn.
  • Avocado or guacamole: Adds creaminess and flavor.
  • Black beans, pinto beans, or refried beans: Great protein and fiber.
  • Cabbage slaw: Make it mayo-free for vegan.
  • Salsas: Pico de gallo, mango salsa, and salsa verde are all naturally vegan.
  • Pickled red onions: Great for both vegetarians and vegans.
  • Tofu or tempeh: Seasoned and pan-fried for a plant-based protein.
  • Roasted chickpeas: These are super crunchy and can add a lot of flavor!

Gluten-Free

  • Corn tortillas: Naturally gluten-free and perfect for street-style tacos.
  • Crispy jicama slices or lettuce leaves: Use as a taco "shell" alternative.
  • Most salsas, guacamole, and crema: Double-check the labels if store-bought.
  • Rice (cilantro lime or Spanish): This makes a great taco filling that's naturally gluten-free.

Low-Carb & Keto

  • Cheese shells: Melt and cool cheese into a crispy taco shell.
  • Thinly sliced jicama or lettuce wraps: Butter lettuce or romaine work great.
  • Shredded lettuce: Easier than assembling lettuce wraps and turns tacos into salads with all the same taco toppings.
  • Sour cream, shredded cheese, and guacamole: All of these are keto-approved!
  • Fried or roasted cauliflower: A great sub for beans or potatoes.
  • Crumbled bacon or chicharrones: Adds crunch and salty deliciousness.

Dairy-Free

  • Avocado slices or guacamole: Creamy without the cheese.
  • Salsas and hot sauces: Tons of flavor without the dairy.
  • Pickled veggies: Onions, jalapeños, and radishes will all work.
  • Fresh herbs like cilantro and mint: Great for every diet!

Creative Taco Combos You've Gotta Try

If you want to move beyond basic tacos, these inspired combinations are where the magic happens. Mix and match toppings to create delicious tacos that are far from ordinary.

Sweet Heat Shrimp Tacos

  • Grilled or blackened shrimp
  • Mango salsa
  • Pickled red onions
  • Avocado crema
  • Fresh cilantro

Loaded Breakfast Tacos

  • Scrambled eggs or fried egg
  • Crispy bacon or chorizo
  • Diced potatoes or hash browns
  • Shredded cheddar
  • Salsa verde or hot sauce

BBQ Brisket Street Tacos

  • Shredded smoked brisket
  • Creamy slaw
  • Crispy fried onions
  • Chipotle mayo
  • Fresh lime juice

Veggie Lovers

  • Roasted mushrooms and bell peppers
  • Fajita onions
  • Queso fresco
  • Smashed avocado
  • Cilantro-lime dressing

Korean-Inspired Fusion

  • Bulgogi beef or gochujang-marinated tofu
  • Kimchi
  • Sliced scallions
  • Sriracha mayo
  • Toasted sesame seeds

Baja Fish Tacos

  • Beer-battered or grilled white fish
  • Cabbage slaw
  • Creamy chipotle sauce
  • Fresh lime
  • Pickled jalapeños

Carnitas & Pineapple

  • Crispy carnitas
  • Grilled pineapple chunks
  • Pickled red onion
  • Cotija cheese
  • Fresh cilantro

Buffalo Chicken Tacos

  • Shredded buffalo chicken
  • Shredded lettuce
  • Crumbled blue cheese or ranch drizzle
  • Diced celery
  • Crispy tortilla strips

Spicy Thai Peanut Tacos

  • Ground turkey or tofu
  • Shredded cabbage
  • Matchstick carrots
  • Thai peanut sauce
  • Chopped peanuts and a squeeze of lime

Elote-Inspired Street Tacos

  • Grilled corn off the cob
  • Mayo or crema
  • Crumbled cotija
  • Tajín seasoning
  • Lime wedges

Chili Cheese Frito Tacos

  • Spicy ground beef or beanless chili
  • Nacho cheese or shredded cheddar
  • Crushed Fritos
  • Sour cream
  • Green onions or jalapeños

Taco Toppings - Frequently Asked Questions

What are the most popular toppings for tacos?
Some of the most popular taco toppings include shredded lettuce, diced tomatoes, chopped onions, avocado or guacamole, shredded cheese (like cheddar or cotija), sour cream, and a variety of salsas. Cilantro and lime are also classic garnishes.

What toppings go well with fish tacos?
Great toppings for fish tacos include shredded cabbage or slaw, mango or pineapple salsa, crema (especially with lime or chipotle), avocado slices, and fresh cilantro. These pair well with grilled or fried white fish.

What kind of cheese is best for tacos?
Traditional Mexican cheeses like cotija, queso fresco, and Oaxaca are excellent choices. For melty options, Monterey Jack, pepper jack, or cheddar also work well, especially in Tex-Mex-style tacos.

How can I keep taco toppings organized for a party?
Use small bowls or ramekins to separate each topping, grouping similar ingredients together (salsas, veggies, cheeses). Labeling them can help guests make quick decisions, and offering both mild and spicy options will make sure everyone's happy.

Can I prepare taco toppings ahead of time?
Absolutely. Many toppings like shredded cheese, chopped veggies, salsas, and guacamole can be prepared a few hours in advance. Store them in airtight containers in the refrigerator until you're ready to serve them.

What are some low-carb taco topping options?
Great low-carb toppings include grilled meats, shredded cheese, avocado, sour cream, salsa, jalapeños, and leafy greens like lettuce or cabbage. You can also serve your taco fillings in lettuce cups or low-carb tortillas.

Are there vegan taco toppings?
Yes! Vegan-friendly taco toppings include black beans, pinto beans, grilled vegetables, guacamole, salsa, pickled onions, fresh herbs, slaw, and plant-based cheese or crema alternatives.

What are some fun toppings for kids?
For a kid-friendly taco bar, offer toppings like shredded cheese, mild salsa, sour cream, corn, and crushed tortilla chips. You can also include seasoned ground beef or shredded chicken that isn't too spicy.


We'd love to hear what your favorite taco toppings are - let us know in the comments below!

Bruschetta Caprese Recipe

March 6, 2024 by Kristy Bernardo

Bruschetta Caprese Recipe

Bruschetta Caprese is one of the easiest and most flavorful appetizers and works for any occasion. It uses just a few ingredients and comes together quickly!

I've been making appetizers for years - for parties, birthdays, the cooking classes I've taught, and even creating unique flavor combinations for brands. One of my absolute favorites has always been making bruschetta! It's such an easy way to elevate party food and can be tailored to the occasion.

You start with crostini, which is essentially a fancy word for a small slice of toasted bread, usually from a baguette. Once you add toppings, it becomes bruschetta, regardless of what toppings you've chosen. Bruschetta Caprese is so simple yet so flavorful, it's no wonder that it's so popular!

Bruschetta Caprese Recipe

What Is Bruschetta Caprese

If you've ever had a caprese appetizer salad then you're already familiar with the flavors of bruschetta caprese. Fresh tomatoes, mozzarella, and basil are layered with a drizzle of olive oil and a sprinkling of coarse salt. A drizzle of balsamic glaze is also sometimes added - I rarely make caprese without it.

Use those same ingredients as a topping for crostini and you've got bruschetta caprese. It's that simple! You can use smaller tomatoes sliced and left whole, or you can dice the tomatoes and toss them with small pieces of the mozzarella. I always leave the fresh basil until the end so it stays ultra fresh.

Crostini is a common addition to a charcuterie board, too, and I'll often use bruschetta as the "anchor" to my boards. This recipe is perfect for that, or you can get more charcuterie board ideas on my new site that was just launched last month!

Why You'll Love Bruschetta Caprese

There are a few reasons why you'll love this recipe:

  • It's incredibly simple to make! Anyone can toast some bread and slice tomatoes, so it's a great choice no matter your level of cooking skill.
  • It's easy on the wallet. None of the ingredients are expensive but, when combined, they taste like a million bucks.
  • It uses just a handful of ingredients. When you're making food for a party or even just a quick, easy meal or snack, having a recipe with a short ingredient list can be extremely helpful! 
  • Everyone loves it! Bruschetta caprese is always one of the first appetizers I make to disappear. It's easy to pick up and enjoy in just a few bites and the flavor is incredible.

Bruschetta Caprese Main Ingredients

Baguette - This is what you'll use to make the crostini, which serves as the base for the other ingredients.

Olive oil - For drizzling onto the bread before toasting and on the other ingredients before serving.

Tomatoes - Roma tomatoes are the ideal size if you prefer to use slices. Cherry tomatoes are really flavorful and are great for slicing or dicing.

Fresh mozzarella - The cheese you use - in this case, mozzarella - needs to be fresh or the flavor and texture won't be quite right.

Fresh basil - You must, must, MUST use fresh basil - NOT dried. The fresh basil is key to the overall success of the final dish.

Balsamic glaze - This ingredient is optional but highly recommended. It will still be delicious without it, but a little drizzle of balsamic glaze adds so much flavor that you should definitely use it if you can.

Find the complete Bruschetta Caprese ingredients list with measurements in the recipe card below.

How To Make Bruschetta Caprese

How To Make Bruschetta Caprese

  1. Make the crostini: Slice a baguette into ½ inch thick slices, then drizzle with a little olive oil. I like to sprinkle them with a little coarse salt, too. Place them on a sheet pan and broil until the edges are golden brown, about 3-5 minutes. Set them aside to cool.
  2. Make the toppings: Slice or dice the tomatoes and fresh mozzarella. If they're sliced, simply place a slice of each onto a crostini and add a fresh basil leaf, then drizzle with a little olive oil and balsamic glaze (if using). You can add two of each if there's room. Don't forget to season with a little coarse salt!
  3. Prep Alternatives: If you've diced the tomato and mozzarella, toss them together in a small bowl with just enough olive oil to coat. Spoon it onto the crostini, then top with some torn or chiffonade basil. Sprinkle with a little coarse salt and add a drizzle of balsamic glaze.

Variations

  • Add diced avocado - this is a great addition and adds a nice texture and flavor. Just be sure to add it just before serving to ensure it keeps its beautiful green color.
  • Add chili flakes for a little spice.
  • Add freshly minced garlic for even more flavor.
  • If you have a surplus of fresh zucchini in the summer, give it a quick sauté until it's just crisp-tender, then add a slice to the bruschetta.
  • Make caprese bites instead!
  • Use the ingredients - minus the bread - as a stuffing for baked chicken breast.
  • Use burrata cheese instead of fresh mozzarella. 
  • Make it into a salad, and consider serving it family style.
  • Toss all the ingredients with pasta for a quick and easy meal.
  • Use slow-roasted tomatoes in place of fresh.
  • Using cherry tomatoes and mozzarella balls (bocconcini), plus the fresh basil leaves and a small square of toasted bread, make little caprese bites using sturdy toothpicks or small skewers.

Make Ahead Of Time

Bruschetta Caprese can easily be made ahead of time. The crostini can be made up to two days ahead and kept at room temperature in an airtight container. The tomatoes and mozzarella can both be sliced ahead of time, then kept in separate airtight containers in the refrigerator.

Simply assemble the bruschetta just before serving, which will take just a few minutes since you've prepped everything ahead of time!

Bruschetta Caprese Recipe

Bruschetta Caprese Recipe

Yield: 8 Servings
Prep Time: 10 minutes
Cook Time: 5 minutes
Total Time: 15 minutes

Bruschetta Caprese is one of the easiest and most flavorful appetizers and works for any occasion. It uses just a few ingredients and comes together in just minutes!

Ingredients

  • ½ - ¾ french baguette, sliced into 16 ½ inch thick slices
  • 3-4 Roma tomatoes, sliced, or 1 pint of cherry tomatoes, quartered
  • 8 oz fresh mozzarella, sliced
  • 16 fresh basil leaves, whole, torn, or chiffonade
  • 3 tbs extra-virgin olive oil, divided
  • 2 tbs balsamic glaze, or to taste
  • Coarse salt, to taste

Instructions

    1. Preheat oven to Broil.
    2. Make the crostini: Slice the baguette into 16 ½ inch thick slices, drizzle with a little olive oil, and sprinkle lightly with a little coarse salt, too.
    3. Place them on a sheet pan and broil until the edges are golden brown, about 3-5 minutes. Set them aside to cool.
    4. Wash and slice the tomatoes. Layer them on the crostini with the fresh basil and mozzarella. Drizzle with the remaining olive oil and balsamic glaze, if using. Season with a sprinkling of coarse salt. Serve immediately.
Nutrition Information:
Yield: 8 Serving Size: 1
Amount Per Serving: Calories: 160Total Fat: 11gSaturated Fat: 4gTrans Fat: 0gUnsaturated Fat: 6gCholesterol: 18mgSodium: 273mgCarbohydrates: 10gFiber: 1gSugar: 5gProtein: 7g

This data was provided and calculated by Nutritionix.

© Kristy Bernardo
Cuisine: Italian / Category: Appetizers
Bruschetta Caprese Recipe

Try The Appetizer Recipes Next!

  • Bacon Ranch Cheese Ball
  • Buttermilk Fried Green Tomatoes
  • Lemon Oregano Turkey Meatballs
  • Salami & Cheese Puff Pastry Appetizer

How To Make Stale Bread (fresh to stale)

March 4, 2024 by Monique McArthur

How To Make Stale Bread

Do you need stale bread but only have fresh? No problem! This guide covers how to make stale bread fast! Dry, chewy bread is closer than you think.

Sometimes, a fluffy, tender loaf won't do. The thing is, if that's all you have, what can you do? Well, turning bread stale isn't difficult. Usually, this happens naturally after a few days in the breadbox. But what if you need stale bread sooner? Whether you're looking to make breadcrumbs, croutons, Panzanella salad, or bread pudding, stale bread is a must. The reason? All of them benefit from that dry texture. Let's explore some easy methods to speed up the process.

How To Make Stale Bread

Why Some Recipes Call For Stale Bread

The reasons some recipes call for stale bread are relatively simple. The main one is structural integrity. Recipes that require stale bread are those where fresh bread will fail by either disintegrating or becoming soggy when exposed to liquid. One example of this is French toast. Slices of fresh bread dipped in custard may fall apart before they hit the pan, whereas stale bread won't. Secondly, fresh bread can fall short on crunch or texture. Third is flavor; stale bread has a superior ability to hold onto flavors. So whether you add bread to a Panzanella salad where it's expected to soak up the dressing or toss cubes in oil and seasonings, all those flavors cling tight.

Quick Methods To Stale Bread

The Pale Toast

When you need to transform fresh bread into stale bread fast, and I mean fast, look no further than your toaster. Think back to when you tried to make toast in the morning, and it came out pale because you chose the wrong setting. It had no toast on it; instead, it was just kind of stale, right? For this method, complete the following steps:

  1. Slice the bread. Thickness doesn't matter.
  2. Place it into a toaster or toaster oven and set it to the lightest setting.
  3. Remove the bread from the toaster and transfer it to a wire rack. The wire rack is essential because it prevents steam from collecting at the bottom of each slice and helps the bread dry out further.
  4. Repeat as needed until you have enough bread for the recipe you intend to make.

Why It Works: The heat exposure will help dry the bread without developing much color on the exterior, making it perfect for anything from homemade breadcrumbs to croutons.

How To Make Stale Bread With Wire Rack

In The Oven It Goes

A low-temperature oven is another way to make stale bread fast; by fast, I mean in 30 minutes or less. Here's how to make stale bread in the oven:

  1. Preheat the oven to 250°F.
  2. Slice the bread.
  3. Arrange slices directly on the center oven rack or place an oven-safe wire rack over a baking sheet and arrange the slices on that.
  4. Place into the oven for 20-25 minutes or until the bread is dry.
  5. Remove from the oven, set the bread aside to cool, then use as desired. It will dry out further as it cools.

Why It Works: Leaving bread in a low-temperature oven is similar to "the pale toast" mentioned above minus the toaster. The low heat dries the bread without browning it, broadening its uses.

Slower Methods

These are still faster than leaving bread in the kitchen for a few days; however, you can expect to wait a little longer than the methods above.

The Slice and Abandon

If you have plans for the stale bread the next day and can tell immediately that your loaf will need longer than that to dry out, try this option.

  1. Slice the loaf of bread. Cut as thick or thin as you'd like. Slice thickness doesn't matter.
  2. Arrange the slices onto a wire cooling rack.
  3. Leave the bread on the counter (uncovered) overnight.

Why It Works: Exposing as much of the bread's surface to air increases moisture loss. The gluten structure also changes during this time.

The Big Chill

To take bread from fresh to stale faster, do the opposite of what is suggested for bread storage. To start, use refrigeration since refrigerated bread gets stale much quicker than bread left on the counter, so if you want to take bread from fresh to stale, refrigeration is a great way to do it. As for how to make stale bread in the refrigerator, follow these steps:

  1. Grab your loaf of bread and slice to speed up the process.
  2. Place into a container or zipper bag, but do not secure the lid on the container or seal the bag. Instead, you want to expose the bread to the cold air.
  3. Leave overnight (8 hours) or up to 24 hours.

Why It Works: The cold temperature of the fridge causes the starches in the bread to recrystallize, which, in turn, will cause a stale taste and texture.

Additional Notes: Although effective, this method works better for homemade bread made without preservatives. Furthermore, use your newly stale bread quickly, as taking bread from a cold, relatively moist environment to a drier, room-temperature one isn't ideal.

How To Make Stale Bread With The Freezer

The Set It and Forget It

Another way to turn fresh bread stale is by baking a loaf and then leaving it in the oven until it fully cools. This method was discovered accidentally but is quite effective. The process is pretty much the same if working with a store-bought loaf. Heat the oven to 350°F, then turn the oven off and leave the bread in the oven until the oven cools. Of course, the bread should be removed from any packaging and placed on a baking sheet, on a wire rack over the baking sheet, or directly on the oven rack.

Why It Works: The residual heat from the oven continues to draw moisture from the bread.

Additional Notes: This works best on lighter, fluffier bread and is not recommended for bread that is very crusty or prone to getting very hard.

Authentic Birria Tacos Recipe (Step-by-Step with Consommé)

February 28, 2024 by Monique McArthur

top down view of two birria tacos on a wooden board next to a small bowl of consommé

These birria tacos are flavorful, juicy, and packed with tender, slow-cooked beef that melts in your mouth! Inspired by the traditional Jalisco-style stew, this birria simmers low and slow in a rich chile and spice-infused broth until the meat is fall-apart tender and infused with flavor.

These birria tacos will beat anything from a restaurant. We ladle the consommé into a dipping bowl and sear the tacos in a bit of that same broth until they're golden and crispy on the outside. They're perfect for taco night, a weekend cooking project, or a freezer stash of next-level leftovers.

top down view of two birria tacos on a wooden board next to a small bowl of consommé

We make tacos often, and we go back and forth between this birria tacos recipe and our beer-battered fish tacos. And we always serve our tacos with a side of Mexican sweet corn cake!

[feast_advanced_jump_to]

Ingredients

For the Birria (Meat + Broth)

  • 2 tablespoons neutral-flavored oil (e.g., avocado or vegetable oil)
  • 6 pounds beef chuck roast, cut into 4-5 large pieces
  • 1 yellow onion, peeled and quartered
  • 4 (1-inch) pieces of carrot
  • 2 (1-inch) pieces of celery
  • 6 garlic cloves, stem ends removed
  • 6 dried guajillo chiles, stems and seeds removed
  • 1 dried chipotle Morita, stem and seeds removed
  • 1 dried chipotle Meco, stem and seeds removed (learn the difference between Morita and Meco chipotle chiles)
  • 5 tablespoons beef bouillon (granulated or paste)
  • 2 teaspoons chili powder
  • ½ teaspoon ground cumin
  • 9 cups water
  • 1 cup tomato purée
  • 3 bay leaves
  • 1 teaspoon kosher salt
  • ¼ teaspoon ground black pepper
  • ¾ teaspoon dried oregano

For Serving

  • Corn tortillas (5-6 inch size recommended)
  • Lime wedges
  • Chopped white or yellow onion
  • Chopped fresh cilantro
  • Oaxacan cheese (optional, but highly recommended)
Birria Taco Meat
Making Birria

Instructions

  1. Sear the meat: Heat the oil in a large Dutch oven or heavy-bottomed pot over medium-high heat. Season the beef generously with the kosher salt. Working in batches, sear the meat on all sides until it's well-browned. Transfer it to a bowl and set aside.
  2. Sauté the aromatics & chiles: In the same pot, add the onions, carrots, celery, garlic, and dried chiles. Sauté for about 5 minutes, stirring often, until everything is lightly toasted and fragrant.
  3. Make the broth: Add the beef bouillon, chili powder, and cumin. Stir to coat the vegetables and toast the spices for about a minute. Return the seared meat and its juices to the pot. Add the water, tomato purée, bay leaves, additional salt, and black pepper. Stir to combine.
  4. Short simmer: Bring the pot to a boil, then reduce it to a simmer. Cover and simmer for 30 minutes, stirring occasionally.
  5. Blend the chiles: Remove the softened chiles from the pot and place them in a blender. Add a small amount of the broth and blend it until it's smooth. Pour the chile puree back into the pot and stir it well to combine.
  6. Long simmer: Cover the pot and simmer for 3 to 3½ hours, stirring every 30 minutes. Remove the lid during the last 30 minutes and stir in the oregano. The meat should be fork-tender and shred easily.
  7. Shred the beef: Remove the meat from the pot. Discard any bones or connective tissue, if using bone-in beef. Shred the beef and return it to the pot to soak in the broth. Remove bay leaves and discard.
  8. Assemble the Tacos: Fill each tortilla with shredded birria and top with chopped onion, cilantro, and optional Oaxacan cheese. Fold it gently and dip each tortilla lightly into the surface of the birria consommé. Sear the tacos in a hot skillet until crispy on both sides.
  9. Serve with a side of the warm consommé for dipping and lime wedges on the side.
side view of birria tacos on a wooden board next to a small bowl of consommé

Slow Cooker Instructions

  1. In a skillet over medium-high heat, sear the seasoned beef in batches until browned on all sides. Transfer to the slow cooker. In the same skillet, toast the onion, carrots, celery, garlic, and dried chiles for 4-5 minutes to enhance their flavor. Add to the slow cooker.
  2. Add all remaining broth ingredients to the slow cooker (bouillon, chili powder, cumin, water, tomato purée, bay leaves, salt, pepper). Cover and cook on LOW for 8-10 hours or HIGH for 5-6 hours, until the beef is fork-tender.
  3. Remove the softened chiles and blend with a few ladles of broth until smooth. Pour the purée back into the slow cooker and stir to combine.
  4. Remove the beef, shred it, and discard any bones or connective tissue. Return the meat to the broth and stir. Remove the bay leaves.
  5. Fill each tortilla with shredded birria and top with chopped onion, cilantro, and optional Oaxacan cheese. Fold it gently and dip each tortilla lightly into the surface of the birria consommé. Sear the tacos in a hot skillet until crispy on both sides.

Instant Pot Instructions (Make sure your Instant Pot is large enough to hold all of the ingredients! You can cut the recipe in half if necessary).

  1. Turn Instant Pot to Sauté and heat the oil. Brown the beef in batches, then set aside.
  2. Add the onions, carrots, celery, garlic, and chiles. Sauté for 3-4 minutes, then add chili powder, cumin, and bouillon. Stir for about a minute longer.
  3. Return the beef to the pot and add the water, tomato purée, bay leaves, salt, and pepper. Lock the lid and pressure cook on High Pressure for 45 minutes.
  4. Allow the pressure to release naturally for 15 minutes, then quick release any remaining pressure.
  5. Remove the chiles, blend with the broth, and return the purée to the pot. Stir to combine.
  6. Remove meat, shred, discard any bones, and return to broth. Remove bay leaves.
  7. Fill each tortilla with shredded birria and top with chopped onion, cilantro, and optional Oaxacan cheese. Fold it gently and dip each tortilla lightly into the surface of the birria consommé. Sear the tacos in a hot skillet until crispy on both sides.

Substitutions

  • Beef chuck roast: Swap with short ribs, beef shank, oxtail, or even a mix for deeper flavor. Traditional birria is often made with goat or lamb, so feel free to use those if preferred.
  • Dried chiles (guajillo, Morita, meco): Guajillo is essential, but if Morita or meco are unavailable, substitute with ancho chiles (mild and smoky) or chiles de arbol (for more heat). If you're in a pinch, chipotle peppers in adobo sauce can provide smokiness, but use them sparingly.
  • Beef bouillon: Substitute with beef stock or broth (use 9 cups total liquid). You can also add 1 tablespoon soy sauce or Worcestershire to boost the umami if using broth instead of bouillon.
  • Tomato purée: Use canned crushed tomatoes, fire-roasted tomatoes, or 2-3 fresh tomatoes, roasted and blended.
  • Oaxacan cheese: Substitute with shredded mozzarella or Monterey Jack.
  • Corn tortillas: Use flour tortillas if preferred, as they hold up well to the dipping and frying, though they'll be less traditional.
  • Oil: Any neutral oil like canola or avocado can be used for searing and cooking.
top down view of three birria tacos on a wooden board next to a small bowl of consommé

Equipment Needed

  • Large Dutch oven or heavy-bottomed pot, for searing the beef and simmering the birria
  • Tongs, for turning meat and handling tortillas
  • Blender or food processor, to puree the softened chiles into a smooth sauce
  • Cutting board and sharp knife, for prepping the meat and vegetables
  • Ladle, for transferring the consommé and serving
  • Skillet or griddle, for crisping the tortillas (cast iron works best)
  • Measuring cups and spoons, for spices, bouillon, and liquids
  • Mixing bowl, for holding seared meat before it returns to the pot
  • Serving platter or plates, for assembling and serving tacos
  • Napkins, because these are deliciously messy!

Storage & Reheating

Refrigerator:
Store leftover birria (meat and consommé together) in an airtight container in the fridge for up to 7 days. Keep the tortillas and toppings separate for the best texture when reheating.

Freezer:
Birria freezes really well. Cool it completely, then store it in freezer-safe containers (with the consommé) for up to 3 months. Thaw it overnight in the refrigerator before reheating.

Reheating:

  • Stovetop: Reheat birria and broth in a pot over medium heat until hot. Add a splash of water or broth if it has thickened too much.
  • Microwave: Place in a microwave-safe bowl and heat in 30-60 second increments, stirring in between until warmed through.
  • For tacos: Reheat filled tacos in a skillet over medium heat until crispy again, or air fry at 375°F for 4-6 minutes.

Save extra consommé to use as a flavorful base for ramen, soup, or even to moisten shredded birria for future tacos or burritos.

Frequently Asked Questions

What is birria?

Birria is a traditional Mexican stew made with beef, goat, or lamb, simmered in a rich broth flavored with dried chiles, spices, garlic, onion, and tomatoes.

Are birria tacos spicy?

This birria tacos recipe is mild to moderately spicy, depending on the chiles used. To make it spicier, add extra chipotle or chiles de arbol. For milder heat, use fewer spicy chiles like Morita or Meco.

What are the best tortillas for birria tacos?

Corn tortillas are traditional and soak up the broth much better than flour. You can use flour, but corn are definitely best.

Can I make birria in advance?

Birria actually tastes better the next day as the flavors deepen. It's perfect for meal prep, just store in the fridge or freezer and reheat it when you're ready to serve.

What's the dipping sauce for birria tacos?

That's the consommé, or cooking broth, from the stew. It's rich, flavorful, and perfect for dipping the crispy tacos.

How many tacos does this recipe make?

It depends on how full you stuff them, but typically this recipe yields 20+ tacos with 6 pounds of beef.

Related

Looking for more recipes like this? Try these:

  • Walking Taco Casserole In A Serving Dish
    Walking Taco Casserole (Easy, Cheesy Weeknight Dinner)
  • This Dorito Taco Casserole is so simple to throw together that my kids make it all the time!
    Dorito Taco Casserole with Black Beans and Corn
  • An easy recipe for killer Chicken Enchiladas. Makes a great use out of leftover Thanksgiving turkey, too!
    Chicken Enchiladas with Roasted Jalapenos
  • Porcupine Meatballs with Chipotle Sauce - comes together quickly and the easy sauce is to die for!
    Porcupine Meatballs in Chipotle Sauce

Pairings

These are my favorite things to serve with birria tacos:

  • Spicy Avocado Sauce
    Avocado Sauce
  • a cast iron skillet filled with choriqueso made with chorizo and cheese then topped with diced tomato, white onion, and cilantro
    Choriqueso - Easy Mexican Chorizo and Cheese Dip
  • a white bowl filled with homemade creamed corn and topped with chopped parsley on a tan napkin on a wood table
    Homemade Creamed Corn Recipe (With or Without Cream)
  • a dish of chipotle sauce topped with chopped green onions on a wooden table
    That Creamy Chipotle Sauce Recipe You'll Want on Everything
side view of birria tacos on a wooden board next to a small bowl of consommé to show how to make this birria tacos recipe

Birria Tacos Recipe (Stovetop, Slow Cooker, and Instant Pot Instructions)

Yield: 20+ Tacos
Prep Time: 30 minutes
Cook Time: 3 hours 30 minutes
Total Time: 4 hours

Tender, melt-in-your-mouth beef with a rich flavorful broth is the foundation for these drool-inducing birria tacos that are better than any restaurant in town!

Ingredients

For the Birria

  • 2 tablespoons neutral oil of choice
  • 6 pounds beef chuck roast, cut into 4-5 large pieces
  • 1 yellow onion, peeled and quartered
  • 4 (1-inch) pieces of carrot
  • 2 (1-inch) pieces of celery
  • 6 garlic cloves, stem ends removed
  • 6 guajillo chiles, stems and seeds removed
  • 1 chipotle Morita, stems and seeds removed
  • 1 chipotle meco, stems and seeds removed
  • 5 tablespoons granulated beef bouillon
  • 2 teaspoons chili powder
  • ½ teaspoon ground cumin
  • 9 cups water
  • 1 cup tomato puree
  • 3 bay leaves
  • 1 teaspoon kosher salt
  • ¼ teaspoon black pepper
  • ¾ teaspoon dried oregano

For the tacos

  • Corn tortillas
  • Lime wedges
  • Chopped white or yellow onion
  • Chopped fresh cilantro
  • Oaxacan Cheese

Instructions

  1. Heat the oil in a large Dutch oven or heavy-bottomed pot over medium-high heat. Season the beef generously with the kosher salt. Working in batches, sear the meat on all sides until it's well-browned. Transfer it to a bowl and set aside.
  2. In the same pot, add the onions, carrots, celery, garlic, and dried chiles. Sauté for about 5 minutes, stirring often, until everything is lightly toasted and fragrant.
  3. Add the beef bouillon, chili powder, and cumin. Stir to coat the vegetables and toast the spices for about a minute. Return the seared meat and its juices to the pot. Add the water, tomato purée, bay leaves, additional salt, and black pepper. Stir to combine.
  4. Bring the pot to a boil, then reduce it to a simmer. Cover and simmer for 30 minutes, stirring occasionally.
  5. Remove the softened chiles from the pot and place them in a blender. Add a small amount of the broth and blend it until it's smooth. Pour the chile puree back into the pot and stir it well to combine.
  6. Cover the pot and simmer for 3 to 3½ hours, stirring every 30 minutes. Remove the lid during the last 30 minutes and stir in the oregano. The meat should be fork-tender and shred easily.
  7. Remove the meat from the pot. Discard any bones or connective tissue, if using bone-in beef. Shred the beef and return it to the pot to soak in the broth. Remove bay leaves and discard.
  8. Fill each tortilla with shredded birria and top with chopped onion, cilantro, and optional Oaxacan cheese. Fold it gently and dip each tortilla lightly into the surface of the birria consommé. Sear the tacos in a hot skillet until crispy on both sides.
  9. Serve with a side of the warm consommé for dipping and lime wedges on the side.

Slow Cooker Instructions
1. Sear the beef in a large skillet as directed, then transfer it to the slow cooker.
2. Sauté the aromatics and chiles in the same skillet, then transfer to the slow cooker along with the spices.
3. Add the tomato puree, bouillon, water, and bay leaves to the slow cooker.
4. Cook on LOW for 8–10 hours or HIGH for 5–6 hours, until the beef is fall-apart tender.
4. In the last hour of cooking, remove the chiles, blend with broth, and stir the puree back into the slow cooker. Add oregano in the final 30 minutes.
5. Continue with Step 8 of the instructions.
Instant Pot Instructions
1. Use the Sauté function to brown the beef and aromatics directly in the Instant Pot.
2. Add the spices, tomato puree, bouillon, and water to the pot.
3. Pressure cook on High for 45 minutes. Allow natural pressure release for 15 minutes, then release the remaining pressure with a quick release.
4. Remove the chiles, blend with some broth, and stir the puree back into the pot.
5. Continue with Step 8 of the instructions.

Nutrition Information:
Yield: 20 Serving Size: 1
Amount Per Serving: Calories: 365Total Fat: 23gSaturated Fat: 9gTrans Fat: 1gUnsaturated Fat: 12gCholesterol: 114mgSodium: 587mgCarbohydrates: 6gFiber: 1gSugar: 2gProtein: 35g

This data was provided and calculated by Nutritionix.

© Monique McArthur
Cuisine: Mexican / Category: Dinner
Authentic Birria Tacos Recipe (Step-by-Step with Consommé)

Blue Cheese Steak Sauce

February 26, 2024 by Monique McArthur

Blue Cheese Steak Sauce Recipe

Blue cheese steak sauce instantly enhances any cut of beef. The robust beefiness combined with the rich tang of blue cheese is a match made in culinary heaven.

Blue cheese steak sauce is creamy, tangy, and oh-so cheesy. It elevates any steak, whether inexpensive or not, and as a bonus, the sauce is a cinch to make. Moreover, the flavors of this version of the sauce are spot-on.

Although easy to prepare, blue cheese steak sauce comes with the difficulty of getting the flavors just right. It should be tangy yet not overly so, creamy but not too creamy, and of course, there has to be a nice balance of smooth and crumbly because who wants a blue cheese steak sauce without crumbles of delicious cheese throughout?

Blue Cheese Steak Sauce Recipe

I just love a good sauce on perfectly cooked steak! You can also try our mushroom steak sauce or make this one with mushrooms au gratin on the side.

Why You'll Love Blue Cheese Steak Sauce

  • Balanced flavors - The sauce is savory, tangy, and a little salty, with a touch of sweetness - it has it all.
  • Several uses - In addition to steak, blue cheese steak sauce tastes amazing on burgers, makes an incredible dip for crudités, and also serves as a delicious salad dressing. Greens and vegetables with chopped chicken finished with some of the sauce are incredibly delicious and filling!
  • Quick to prepare - The sauce takes 5-7 minutes from start to finish. It doesn't get much faster than that.
  • Excellent depth of flavor - Obviously, blue cheese brings a lot of flavor, but the other additions, including garlic and soy sauce, bring complexity to the finished product.
  • Short ingredients list - Minimal ingredients combine to make this incredible sauce.

Ingredients

  • Blue cheese: There are so many fabulous blue cheeses to choose from; therefore, the best blue cheese to use in this sauce is one that you enjoy. If you prefer creaminess over pungency, try Gorgonzola, or go pungent with Roquefort. If you prefer a flavor somewhere in the middle, you can't go wrong with Stilton.
  • Heavy cream: Cream labeled "heavy cream" or "heavy whipping cream" is fine. They are the same.
  • Soy sauce: Although you'll often see Worcestershire sauce in blue cheese steak sauce, soy sauce adds something special.
  • Garlic: Garlic sautéed in a bit of oil kickstarts the sauce. Blue cheese and garlic is such a yummy pairing.

Find the complete ingredients list with measurements in the steak sauce recipe card below.

Blue Cheese Steak Sauce Ingredients

How To Make Blue Cheese Steak Sauce

  1. Sauté the garlic: Once you heat oil in a small saucepan, toss in minced garlic and sauté until fragrant.
  2. Simmer the cream: Pour in the heavy cream and simmer it gently until it thickens. Ensure the heat remains low during this time and continuously stir to prevent curdling.
  3. Add cheese: Stir in half of the blue cheese after you give it a thorough mash. Breaking it up helps it melt. Afterward, stir in the soy sauce and seasonings.
  4. Add more cheese: The remaining crumbled blue cheese goes in at the end. This addition leaves crumbles in the sauce for a pleasant texture.
Steak With Blue Cheese Sauce

Variations, Substitutions, and Cooking Tips

  • Use a saucepan with a heavier bottom - This helps to prevent overheated, curdled cream.
  • Monitor heat closely - Depending on your stovetop, you may have to adjust as the cream simmers to prevent boiling.
  • Use half and half - Replace some heavy cream (or all) with half and half if you prefer a thinner sauce.
  • Replace the soy sauce - You can use tamari or Worcestershire sauce. The choice is yours. The point is to add umami flavor to the sauce. Umami and beefiness complement each other.

What To Serve With Blue Cheese Steak Sauce

Blue cheese steak sauce's uses extend beyond steak. As mentioned, it tastes great on burgers, makes a mean dip, and will instantly enhance any salad, but there are other foods to serve it with. These include pasta, poultry, and even creamy slaws.

Make Ahead

Blue cheese steak sauce can be kept in the fridge for up to 5 days, so you can certainly make it in advance.

Storage and Freezer Tips

Store leftover blue cheese steak sauce in a shallow airtight container, preferably glass, and refrigerate. Do this once the sauce has cooled to room temperature. A shallow container is essential because too much air at the top will cause the sauce to spoil.

As for the importance of glass, it is more effective at keeping food fresh since it is nonporous. And the garlic and blue cheese scent won't remain in glass containers, which is always a plus.

As for freezing, I don't recommend it. Frozen blue cheese isn't the best idea since freezing introduces too much moisture.

How To Reheat

Reheat blue cheese steak sauce in a saucepan over low heat until warmed to your liking. Do not boil. If you find the sauce too thick, add a splash or two of milk.

Blue Cheese Steak Sauce Recipe

Blue Cheese Steak Sauce

Yield: ½ Cup
Prep Time: 5 minutes
Cook Time: 5 minutes
Total Time: 5 minutes

Blue cheese steak sauce instantly enhances any cut of beef. The robust beefiness combined with the rich tang of blue cheese is a match made in culinary heaven.

Ingredients

  • 1 teaspoon olive oil
  • 1 garlic clove, minced
  • ¼ cup heavy cream
  • 2 ½ ounces crumbled blue cheese, divided
  • ½ teaspoon soy sauce
  • ⅛ teaspoon black pepper

Instructions

    1. Heat the oil in a small saucepan over medium-low heat.
    2. Add the garlic and sauté for 20-30 seconds or until fragrant.
    3. Pour in the cream. Bring the cream to a gentle simmer.
    4. Cook while stirring for 2-3 minutes or until the cream thickens. It is important to stir constantly to prevent the cream from curdling or burning.
    5. Briefly mash half of the blue cheese and add it to the cream. Stir until the cheese melts. A few lumps are okay.
    6. Stir in the soy sauce and black pepper. Stir constantly for another minute or so to give the flavors time to meld.
    7. Turn off the heat, then stir in the remaining blue cheese. You want to turn off the heat to ensure a few crumbles of blue cheese remain. Use the sauce as desired.
Nutrition Information:
Yield: 4 Serving Size: 1
Amount Per Serving: Calories: 125Total Fat: 12gSaturated Fat: 7gTrans Fat: 0gUnsaturated Fat: 4gCholesterol: 30mgSodium: 244mgCarbohydrates: 1gFiber: 0gSugar: 1gProtein: 4g

This data was provided and calculated by Nutritionix.

© Monique McArthur
Cuisine: American / Category: Sauces
Blue Cheese Steak Sauce

White Chocolate Popcorn Balls Recipe

February 26, 2024 by Monique McArthur

Popcorn Balls Recipe

These popcorn balls are simply irresistible. In addition to the basics, I've added white chocolate, strawberries, and lemon zest to the mix.

Popcorn balls are fantastic. The sweet, crunchy treats are as tasty as they are cute, and something about them is reminiscent of carnival (or state fair) fun. Traditional versions offer a nice sweet-salty combo, but this version takes it further with white chocolate, crushed freeze-dried strawberries, and a touch of lemon for a fragrant, fruity burst.

Popcorn Balls Recipe

Why You'll Love These Popcorn Balls

An elevated version of a classic - Traditional popcorn balls are great; however, when it comes down to it, they're just popcorn, a sticky-sweet substance (marshmallows, syrup, or caramel), some fat, and salt.

Easy to make - Pop the kernels, melt the marshmallows, shape, and finish - it doesn't get much simpler.

Satisfying texture - Popcorn balls are a cross between kettle corn and puffed rice (Rice Krispy) treats.

One batch goes a long way - Aside from being quite large, popcorn balls are a lot of indulgences rolled into one treat, so you probably don't want more than one or two, making them perfect for sharing.

Childhood nostalgia - A popcorn ball or two will make you feel like a kid again. Memories of your first carnival or that trip to the state fair will soon be flooding back.

Popcorn Balls Ingredients Notes

To make popcorn balls, you will need the following:

  • Popcorn: Pop the corn kernels using a popcorn popper, stovetop, or microwave.
  • Marshmallows: Melted marshmallows are the glue that holds popcorn balls together. You can use any marshmallows you like (larger ones will work); however, no other size melts quite like minis. Go small for a super smooth result.
  • Butter: A bit of fat helps the marshmallows melt smoothly.
  • Strawberries: Your favorite freeze-dried strawberries will do. Check to ensure they aren't soggy before use. This tends to happen in packages of freeze-dried fruit that were previously opened. The berries should be light, airy, and crisp. If they're not, the strawberries are almost impossible to crush.
  • White chocolate: White chocolate drizzles on top of the popcorn balls are not so much decorative but add a layer of milky, buttery sweetness and keep the crushed freeze-dried strawberries and lemon zest in place. Ensure you use a high-quality baking bar.

The complete ingredients list with measurements is in the popcorn balls recipe card below.

Popcorn Balls Ingredients

How To Make Popcorn Balls

  1. Pop the kernels and sort: Pop the corn kernels using your preferred method; the stovetop works best. Then, sort through the popcorn and discard any unpopped kernels, any popcorn that has burned, and those partially popped kernels bound to break a tooth. We don't want that.
  2. Melt the marshmallows: Melt the butter in a large pot to accommodate the popcorn. Add the marshmallows and continuously stir until the marshmallows melt. Do this over low heat to prevent scorching.
  3. Shape into balls: Add the popcorn to the melted marshmallows and mix well. Once the popcorn is coated, shape the mixture into balls and place them on a parchment-lined baking sheet.
  4. Melt the chocolate: Add the finely chopped white chocolate to a microwave-safe bowl. Heat in brief intervals until melted. If you do not have a microwave, this can be done in a double boiler, or you can create a makeshift double boiler with a heat-safe bowl over a saucepan with an inch of water in it.
  5. Add the finishing touches: Start by drizzling white chocolate over each popcorn ball, then immediately go in with the crushed strawberries and lemon zest before the chocolate sets.
Popcorn Balls With White Chocolate And Strawberries

Variations, Substitutions, and Cooking Tips

Make them dairy-free - Replace the butter with coconut oil, ensure the marshmallows you select do not contain dairy, and skip the white chocolate or swap it for melted cacao. Look for the 100% cacao bars at the store. They melt beautifully.

Try orange zest - Or use any citrus zest. Orange, lime, and even grapefruit would work well in this recipe.

Use dark chocolate - A drizzle of dark chocolate with strawberries and lemon will create a richer, more complex flavor profile. Milk chocolate is another option, although it may take the sweetness a bit overboard.

Add nuts - Sliced almonds or chopped pecans would work well in the popcorn balls, as would peanuts, especially if strawberry and lemon aren't your thing.

The wok is the way - If you have a wok, consider using it to pop the corn kernels. A wok makes a perfect popcorn popper due to its shape and size.

A tip for melting marshmallows - If you're concerned about scorching them, melt them using a double boiler instead of throwing them into a pot with the butter.

Storage and Freezer Tips

Store popcorn balls in an airtight container at room temperature. They can be kept for up to a week. Refrigeration should be avoided. Popcorn balls do not fare well in the fridge. As for freezing, avoid it as well.

Popcorn Balls Recipe

White Chocolate Popcorn Balls Recipe

Yield: 20 Popcorn Balls
Prep Time: 10 minutes
Cook Time: 10 minutes
Additional Time: 10 minutes
Total Time: 30 minutes

These popcorn balls are simply irresistible. In addition to the basics, I’ve added white chocolate, strawberries, and lemon zest to the mix.

Ingredients

  • ½ cup corn kernels (will yield 16 cups of popcorn)
  • 2 ½ ounces unsalted butter (5 tablespoons)
  • 10 ounces marshmallows, preferably mini marshmallows (1 ¼ cup)
  • 1 teaspoon pure vanilla extract
  • ½ teaspoon lemon zest
  • ⅛ teaspoon fine sea salt
  • ¼ cup freeze-dried strawberries, processed or crushed into a powder
  • 1 ½ ounces premium white chocolate, finely chopped

Instructions

    1. Pop the kernels.
    2. Sort through the kernels and discard any that have not popped or have partially popped.
    3. Line a large baking sheet with parchment paper and set it aside.
    4. Add the butter to a pot large enough to accommodate all the popcorn. Do this over low to medium-low heat.
    5. Add the marshmallows and continuously stir until the marshmallows are fully melted.
    6. Remove the melted marshmallows from the heat. Stir in the vanilla extract, lemon zest, and salt.
    7. Add the popcorn and stir until well-coated. Set aside to cool for a few minutes.
    8. Meanwhile, lightly oil your hands or spray with nonstick cooking spray.
    9. Scoop portions of the popcorn mixture and roll into balls using a ½ cup measuring cup or standard 4-ounce ice cream scoop. Place onto the parchment-lined baking sheet and repeat with the remaining popcorn mixture.
    10. Add the white chocolate to a microwave-safe bowl and heat in 30-second intervals until melted.
    11. Drizzle the melted white chocolate over each popcorn ball and sprinkle some crushed strawberries over the top before it sets.
    12. Refrigerate for 10 minutes to give the popcorn balls and chocolate time to set.
Nutrition Information:
Yield: 20 Serving Size: 1
Amount Per Serving: Calories: 88Total Fat: 4gSaturated Fat: 2gTrans Fat: 0gUnsaturated Fat: 1gCholesterol: 8mgSodium: 27mgCarbohydrates: 14gFiber: 0gSugar: 10gProtein: 1g

This data was provided and calculated by Nutritionix.

© Monique McArthur
Cuisine: American / Category: Desserts
White Chocolate Popcorn Balls Recipe

Try These Dessert Recipes Next!

  • Candy Apple Snickers Salad
  • Peanut Butter & Maple Gourmet Popcorn
  • Homemade Marzipan Chocolates
  • Homemade Vanilla Marshmallows

Grilled Mahi Mahi With Salsa Verde

February 22, 2024 by Kristy Bernardo

Grilled Mahi Mahi With Salsa Verde

Grilled Mahi Mahi with Salsa Verde has just five ingredients - all which you can keep on hand for a healthy and super tasty meal anytime!

Mahi Mahi, also known as Dorado, is a delicious meaty fish that is flaky and mild. It is perfect for grilling, pan-searing, baking, and even air-frying. It can be enjoyed on it's own in filet form or added to tacos (yes, you can fry it!). And it is firm enough that you can even stir it into your favorite seafood soups and stews like chowder and cioppino. Even better, mahi is a healthy alternative that is high in protein, low in calories, and full of iron, selenium, potassium, and other essential nutrients.

Grilled Mahi Mahi With Salsa Verde

Why You'll Love Grilled Mahi Mahi With Salsa Verde

Healthy - As we mentioned, mahi mahi is packed with vitamins and minerals and it is low in calories, and salsa verde is light and fresh, so you can enjoy a super flavorful meal without packing on the calories.

Quick and Easy - Mahi Mahi only takes about 8 minutes to cook on the grill or the stove top, and 15 minutes in the oven. Pairing that with a store bought salsa verde means you've got a meal on the table in less than 20 minutes. All you need to do is prep your sides!

Versatile - This Mahi Mahi with salsa verde can be eaten alone with the sides of your choice, added atop a bed of lettuce for a delicious salad, or served with tortillas to make fish tacos.

Grilled Mahi Mahi With Salsa Verde Ingredients Notes

  • Mahi Mahi: I prefer fresh, wild-caught mahi, but you can find plenty of fantastic frozen mahi in your grocers freezer. Just be sure to thaw it completely first.
  • Salsa Verde: When using store-bought salsa verde, I go for the Herdez brand. They have it both in jars or cans, and there's no added sugar.
  • Lime Juice: A drizzle of fresh lime juice before cooking adds the perfect kick of acid to bring out the natural flavors in the mahi and pairs perfectly with the salsa verde.
  • Cilantro: This adds a hint of citrus and pepper to the overall flavor profile.

Refer to the recipe card below for a complete list of ingredients with precise measurements.

Fresh Wild Mahi Mahi

How To Make Grilled Mahi Mahi With Salsa Verde

  1. Prep: Rinse your fish and pat it dry. Drizzle with lime juice and sprinkle with chopped cilantro.
  2. Grill: Cook mahi about 4 minutes per side on grill or non-stick grill pan with cooking spray.
  3. Finish: Remove from heat, plate, top with salsa verde and a dollop of sour cream and enjoy!
How To Make Mahi Mahi With Salsa Verde

Variations, Substitutions, & Cooking Tips

Make fresh salsa verde - If you have extra time on your hands, you can make your own batch of salsa verde with just a few ingredients. Add tomatillos, garlic, onion, jalapeno and cilantro into a food processor or belnder with water and a dash of salt and voila! - fresh salsa!

Use a different sauce - If salsa verde isn't your thing, try fresh pico de gallo or whatever your favorite salsa is.

Preheating is essential - Preheat your grill for 5 to 10 minutes before adding the fish, or your grill pan for 3 to 4 minutes. This helps cook the fish evenly on both sides and creates those lovely grill marks!

Use non-stick cooking spray - Whether you're using a grill or grill pan, use a quality non-stick cooking spray to keep the fish from sticking to the grates or pan. If grilling, spray the grates before turning on the flame to eliminate a flare-up.

What To Serve With Grilled Mahi Mahi with Salsa Verde

We love this grilled mahi with cooked plantains or fresh green beans, but there are so many things to serve this delicious fish with. Try warm flour or corn tortillas, cilantro lime rice, a fresh chopped veggie salad, baked potato, grilled asparagus, or grilled avocado.

How To Make Mahi Mahi With Salsa Verde

Grilled Mahi Mahi with Salsa Verde

Yield: 2 Servings
Prep Time: 5 minutes
Cook Time: 8 minutes
Total Time: 13 minutes

Grilled Mahi Mahi with Salsa Verde has just five ingredients - all which you can keep on hand for a healthy and super tasty meal anytime!

Ingredients

  • 12 ounces Mahi Mahi filets
  • 1 tablespoon fresh lime juice
  • 1 tablespoon freshly chopped cilantro
  • ½ cup salsa verde, the store-bought Herdez brand is very good
  • 2 tablespoons fat-free sour cream (optional)

Instructions

  1. Rinse fish; pat dry with paper towels. Cut into two 6-ounce pieces, if necessary.
  2. Heat grill or a large non-stick coated grill pan with cooking spray over medium-high heat.
  3. Drizzle fish with lime juice; sprinkle with minced cilantro.
  4. Cook fish 4 minutes on each side or until fish flakes easily when tested with a fork.
  5. Transfer to serving plates and top with salsa and sour cream. Serve with cooked plantains or warmed corn tortillas, if desired.
Nutrition Information:
Yield: 2 Serving Size: 1
Amount Per Serving: Calories: 219Total Fat: 2gSaturated Fat: 0gTrans Fat: 0gUnsaturated Fat: 1gCholesterol: 161mgSodium: 569mgCarbohydrates: 6gFiber: 1gSugar: 2gProtein: 41g

This data was provided and calculated by Nutritionix.

© Kristy Bernardo
Cuisine: Seafood / Category: Dinner
Grilled Mahi Mahi With Salsa Verde

Try These Recipes Next!

  • Royal Red Shrimp
  • Easy Citrus Marinated Chicken
  • Panko Crusted Cajun Mahi Mahi
  • Grilled Halibut With Mango Salsa

Giblet Gravy Recipe

February 20, 2024 by Monique McArthur

Giblet Gravy Recipe

Giblet gravy tastes great and helps reduce food waste. Instead of tossing giblets out, use them to make a full-flavored sauce to accompany roasted poultry.

Giblet Gravy Recipe

Offal meat may not be the go-to choice for everyone, but it has its uses. Among them is giblet gravy. Butchers include the neck and edible organs in the cavity for a reason when preparing poultry. Aside from their ability to create incredibly flavored broth, giblets are the key to a rich and flavorful gravy. A roasted bird isn't complete without a drizzle of the sauce over the top.

Why You'll Love This Giblet Gravy

Thick and rich - One sign of good gravy is its smoothness. Moreover, it clings to the back of a spoon. With this recipe, you get the perfect consistency every time.

Good enough to drink - You know how some gravies are tasty, but you don't necessarily want a lot of it? This isn't one of them. The flavor is rich, robust, and satisfyingly savory, yet not overly so.

Quick and easy gravy - Most giblet gravy recipes start by making a stock with the giblets, extending the process by 2 hours. This version takes a shortcut without sacrificing flavor.

No giblet bits - Some recipes end with giving the cooked giblets a rough chop and mixing the bits into the gravy, but when serving with roasted chicken or turkey, a silky-smooth gravy to drizzle (or drown) the meat is much preferred. Don't you think?

Giblet Gravy Ingredients Notes

  • Giblets: This includes the liver, heart, gizzard, and neck.
  • Fat: This recipe calls for oil and butter. They are used to sauté giblets and aromatics. The oil prevents the butter from burning as the giblets brown, while the butter offers good flavor and is a must to get the roux off to a good start.
  • Vegetables: A classic mirepoix is used for this giblet gravy. This comprises onion, carrot, and celery. The trio adds tons of flavor and lovely aromas to the finished sauce.
  • Fresh herbs: Sage and rosemary are great go-to's. Sage brings a warm earthiness to the gravy, while the latter is herbal, peppery, and piney.
  • Flour: All-purpose flour is used for the roux that thickens the gravy. You can't make a thick, rich gravy without it. Well, technically, you can with cornstarch. However, we're not going that route in this recipe.
  • Seasonings: The recipe keeps it simple with salt, black pepper, and paprika for color and depth of flavor.

Refer to the recipe card below for a complete list of ingredients with precise measurements.

Giblet Gravy Ingredients

How To Make Giblet Gravy

  1. Prep the giblets: Usually, they don't require much; however, you may have to remove any excess connective tissue from the top and squeeze out any remaining blood. Yeah, it doesn't sound like a fun activity, but it's easy to do.
  2. Sauté: After you heat the cooking fat, toss in the giblets and brown. They need time to develop a deeper brown color, so don't rush the process, but watch closely and turn as required for an even color.
  3. Add the aromatics: This includes the mirepoix, garlic, herbs, and seasonings. Then, cook until softened and fragrant. As the aromatics cook, the giblets will also cook further.
  4. Time for roux: Sprinkle the flour over the giblets and vegetables and stir to combine everything. Once you no longer smell raw flour, pour some stock in to get the gravy started. Adding some of the stock instead of adding it all at once helps prevent lumps.
  5. Boil: Bring the gravy to a boil after you pour in the remaining stock and simmer until thick and rich.
  6. Strain: Pour the finished gravy through a strainer, transfer it to your favorite gravy boat, and serve.
Giblet Gravy Recipe
Giblet Gravy Recipe

Variations, Substitutions, and Cooking Tips

Make giblet stock - If you have extra time, make giblet stock to use in the gravy. To go this route, brown the giblets, sauté the aromatics, then cover with water and simmer for 2 hours or so.

Change up the herbs - Oregano or thyme would work equally well here. If dried herbs are all you have, those will work as well. Just use considerably less.

Skip the butter - This does compromise the flavor a tad, but if you don't consume dairy for whatever reason, replace the butter with oil or use your favorite alternative, like Earth Balance.

Add giblet bits if you like - Finely chop the meat and add it to the gravy if desired. For the best results, simmer it a bit longer after adding to ensure the meat is tender.

Storage and Freezer Tips

Store leftover giblet gravy in an airtight container and refrigerate for 3-4 days. Once chilled for a while, the gravy will seize up. Don't worry. This is normal and will return to its original state once reheated. Giblet gravy can also be transferred to a freezer-safe bag and frozen for up to 3 months.

How To Reheat

Reheat giblet gravy in a small saucepan over medium heat until it bubbles. Then, reduce the heat and simmer for 5 minutes or until warmed to your liking. If the gravy is too thick, add a splash of water, stock, or broth to loosen it up.

Giblet Gravy Recipe

Giblet Gravy

Yield: 8-10 Servings
Prep Time: 10 minutes
Cook Time: 40 minutes
Total Time: 50 minutes

Giblet gravy tastes great and helps reduce food waste. Instead of tossing giblets out, use them to make a full-flavored sauce to accompany roasted poultry.

Ingredients

  • 2 tablespoons olive oil
  • 1 tablespoon unsalted butter
  • Turkey neck and giblets from one turkey/chicken
  • 2 ribs of celery, roughly chopped
  • 2 medium carrots, roughly chopped
  • 1 medium onion, roughly chopped
  • 4 garlic cloves, minced
  • 2 sage leaves
  • 2 sprigs of rosemary
  • ½ teaspoon kosher salt
  • ½ teaspoon black pepper
  • ¼ teaspoon smoked paprika
  • 3 tablespoons all-purpose flour
  • 2 ½ cups reduced-sodium chicken stock

Instructions

    1. Pat the giblets dry and prep if necessary. This may include removing excess connective tissue, removing any blood, etc.
    2. Heat the oil in a deep pan over medium heat. Follow with the butter.
    3. Once the butter melts, add the giblets and sauté until nicely browned.
    4. Add the celery, carrots, onion, and garlic. Follow with the herbs, salt, black pepper, and paprika. Continue to sauté until the aromatics are softened and fragrant.
    5. Sprinkle in the flour and stir until well combined.
    6. Pour in about ¼ of the chicken stock once you no longer smell raw flour.
    7. Mix well to break up any lumps of flour, and then pour in the remaining stock.
    8. Bring to a boil, reduce to a simmer, and simmer for 15 minutes. The gravy will be thick and rich at this point.
    9. Pour the gravy through a strainer to remove solids.
    10. Taste the gravy. Add more salt and black pepper if needed.
    11. Serve.

Nutrition Information:
Yield: 10 Serving Size: 1
Amount Per Serving: Calories: 145Total Fat: 9gSaturated Fat: 3gTrans Fat: 0gUnsaturated Fat: 5gCholesterol: 83mgSodium: 249mgCarbohydrates: 5gFiber: 1gSugar: 1gProtein: 11g

This data was provided and calculated by Nutritionix.

© Monique McArthur
Cuisine: American / Category: Sauces
Giblet Gravy Recipe

Try These Recipes Next!

  • Smoked Turkey Breast
  • Easy Homemade Stuffing
  • Spatchcock Turkey Recipe
  • Easy Turkey Pot Pie Recipe

Amazing Cheetos Chicken Wings (4 Seasonings)

February 20, 2024 by Monique McArthur

Amazing Cheetos Chicken Wings (4 Seasonings)

These Cheetos Chicken Wings are made with four amazing flavors, Bold & Cheesy, FLAMIN' HOT, Cheesy Jalapeño, and Cheesy Ranch using the seasoning packets from Cheetos Mac 'n Cheese.

Amazing Cheetos Chicken Wings Recipe (4 Seasonings)

We didn't know what to expect but once we made these incredible chicken wings with four cheesy flavors, we couldn't stop eating them. Making Cheetos chicken wings couldn't be easier and the only difficult part is deciding which flavor you like best.

How To Get Cheetos Powder

It's simple, just purchase a box of your favorite Cheetos Mac n Cheese flavor and remove the cheese packet from the box. Each Cheetos packet contains a 3 tablespoons Cheetos powder and here are the flavors to choose from:

  • Mac 'n Cheese Bold & Cheesy
  • Mac 'n Cheese FLAMIN' HOT
  • Mac 'n Cheese Cheesy Jalapeño
  • Mac 'n Cheese Cheesy Ranch

We served these at a Super Bowl party, with jalapeño and ranch emerging as crowd favorites, and a few adventurous souls opting for the FLAMIN' HOT variety. Bold & Cheesy received less applause, but would work well as a base seasoning, where additional spices could be added into to the cheese mix to customize the flavor to your liking.

Cheetos Chicken Wings Ingredients

  • Chicken wings - I used pre-cut party wings already separated into wingettes and drumettes. However, if you prefer whole wings, use them whole or simply remove the wing tip and cut vertically through the joint, discarding the wing tip.
  • Oil - I use olive oil but any type of vegetable oil will work.
  • Mac 'n Cheese Seasoning - Choose your favorite or choose all four.

Refer to the recipe card below for a complete list of ingredients with measurements.

How To Make Cheetos Chicken Wings 4 Ways

How To Make Cheetos Wings

This Cheetos wings recipe can also be used as a seasoning on chicken thighs, drumsticks or breasts. It's not just limited to chicken as well, use it as a mix, rub, or coating on a variety of meats and seafood such as steak, pork, hamburger, shrimp, or fish.

  1. Dry the Wings: The dryer the chicken skin, the better it will crisp when cooked. Blot the wings with a paper towel and press down on the wings to absorb even more moisture.
  2. Toss with Oil: Toss with a little oil so the skin crisps up beautifully and dry rub sticks to the wings.
  3. Season: Lightly season the wings with the Cheetos seasoning flavor of your choice.
  4. Arrange: Place the wings on a wire rack in a single layer with the skin side up.
  5. Bake at a High Heat: Bake until well-browned, and extra crispy.
Homemade Cheetos Chicken Wings

More Ways To Use Cheetos Powder

Cheetos powder isn't just limited to being used as a dry rub. Here are more amazing ways to use Cheetos powder with your foods:

  • Elevate snack mixes with a generous dusting on tortilla or potato chips, popcorn, pretzels, crackers, seeds, nuts, biscuits, or cereal.
  • Infuse your favorite dips, dressings, marinades, and soups with a unique twist.
  • Create a cheesy white sauce for pasta dishes by blending the seasonings with milk.
  • Elevate cheesy potato dishes like scalloped or au gratin recipes with the distinctive Cheetos flavors.
  • Sprinkle the seasoning on sandwiches or wraps for an extra burst of cheese and other flavors.
  • Enhance your roasted vegetables by sprinkling it on corn, baked potatoes, or cauliflower.
  • Bring a cheesy twist by dusting on fruits such as mango, pineapple, dragon fruit, avocado, watermelon, fruit cups, apple chips, or your preferred fruit.
  • Flavor up your favorite Mexican dishes by incorporating with tacos, oven nachos, taquitos, burritos, and tostadas.
  • Rim your cocktail glasses with the seasoning for a unique twist on drinks such as Bloody Marys, margaritas, or frozen cocktails.
  • Experiment with Cheetos powder in various dishes, from eggs, yogurt, grilled cheese, mac n cheese, rice, and beans to pasta, pizza, easy mashed potatoes, French fries, ice cream, cheesecake, and even candy.

The possibilities are limitless, allowing your imagination to run wild!

Amazing Cheetos Chicken Wings (4 Seasonings)

Amazing Cheetos Chicken Wings (4 Seasonings)

Yield: 2 Servings (about 8-10 wings)
Prep Time: 5 minutes
Cook Time: 40 minutes
Total Time: 45 minutes

These Cheetos wings are made with four amazing flavors, Bold & Cheesy, FLAMIN' HOT, Cheesy Jalapeño, and Cheesy using the seasoning from Cheetos Mac 'n Cheese.

Ingredients

  • 1 lb chicken wings
  • 1 tbs olive oil or any vegetable oil
  • Cheetos seasoning (1 mac n cheese packet)

Instructions

  1. Preheat oven to 400°F.
  2. Dry the wings by blotting with a paper towel and press down on the wings to absorb even more moisture.
  3. In a bowl or sealed Ziploc bag, toss chicken wings with oil.
  4. In a separate bowl add the Cheetos seasoning flavor of your choice, then add the wings to the bowl, and toss to evenly coat.
  5. Place wings skin side up on a wire rack set on a baking sheet, taking care not to crowd wings. Bake for 40-50 minutes or until golden brown and crispy.
  6. Remove wings from oven, let rest for 5 minutes, then serve.

Notes

Once you apply the Cheetos seasoning, you can bake, grill or cook these any way you like.

Nutrition Information:
Yield: 2 Serving Size: 1
Amount Per Serving: Calories: 961Total Fat: 75gSaturated Fat: 22gTrans Fat: 1gUnsaturated Fat: 47gCholesterol: 187mgSodium: 1246mgCarbohydrates: 32gFiber: 1gSugar: 1gProtein: 39g

This data was provided and calculated by Nutritionix.

© Monique McArthur
Cuisine: American / Category: Dinner
Amazing Cheetos Chicken Wings (4 Seasonings)

Easy Oat Bread Recipe

February 14, 2024 by Monique McArthur

Easy Oat Bread Recipe

This easy oat bread recipe yields a soft, fluffy loaf perfect for morning toast, sandwiches, and more. Baking high-quality bread has never been so simple!

Easy Oat Bread Recipe

Have you ever craved a hearty, sweet, light, and fluffy homemade bread but didn't want to bother with yeast, rise time, shaping, and more? Well, oat bread is an excellent alternative. This easy oat bread is an effortless, quick bread that can be enjoyed in numerous ways. It has a toasty, nutty, and slightly sweet flavor, is easy to slice, and provides a way to make bread without all the fuss.

Why You'll Love This Easy Oat Bread

It's easy - This oat bread recipe is genuinely fuss-free. Mix the batter, pour it into a prepared pan, bake, and the loaf is done! The hardest part is waiting for the bread to cool, but it's worth it if you value clean slices.

Simple ingredients - This easy oat bread recipe needs nothing besides fridge and pantry staples.

A touch of honey - Have you noticed that bread with a touch of honey seems to be 10 times more delicious than bread that doesn't contain honey? The reason is its flavor goes beyond sweetness. Honey is floral, woody, earthy, and more, depending on the type.

Moist - The yogurt, oil, egg, and milk do an excellent job ensuring the bread isn't dry.

Easy Oat Bread Ingredients Notes

  • Oats: Quick-cooking oats work best in oat bread recipes since they are cut into smaller pieces and rolled thinner. Because of their smaller size, they mix well with the other ingredients without compromising the structure, as larger old-fashioned or steel-cut oats would.
  • Flour: All-purpose flour is called all-purpose for a reason! It's the perfect blend of hard and soft wheat flour, making it ideal for almost any baked good, including oat bread.
  • Sugar: A little granulated sugar contributes to the loaf's subtle sweetness.
  • Baking powder: Baking powder lifts the loaf, resulting in a fluffy, tender texture.
  • Eggs: Eggs keep the bread soft and fluffy, adding a pleasant richness to the loaf. Additionally, they improve the gluten structure, thus enhancing the structure of the oat bread.
  • Honey: Honey adds sweetness and a unique flavor profile. Due to its consistency, honey also contributes moisture to the bread.
  • Milk: Specifically, whole milk is used in the bread. Because of its higher fat content, the milk is better for making bread with a softer crumb.

Find the complete ingredients list with measurements in the oat bread recipe card below.

Oat Bread Batter

How to Make Easy Oat Bread

  1. Mix the wet: Well, you will mix most of the wet ingredients at this stage. These include the yogurt, oil, egg, sugar, and honey. Whisk until smooth.
  2. Mix the dry: A quick whisk will do it. You can also sift them together. Sifting comes with the added benefit of breaking up any lumps.
  3. Bring the batter together: Add some of the dry ingredients to the wet ingredients, then follow with some milk. Continue until you've used all of both.
  4. Add the oats: Fold them in with a rubber spatula. They will thicken the batter. Afterward, pour the batter into a prepared loaf pan. Butter, followed by a generous dusting of flour, ensures that the oat bread comes out easily.
  5. Bake: Pop the pan into the oven and bake. The easy oat bread takes a little over 30 minutes. Once baked, transfer the loaf to a cooling rack and leave it to cool for an hour or so.
How To Cool Easy Oat Bread

Variations, Substitutions, and Cooking Tips

Go gluten-free - Use gluten-free all-purpose flour in place of all-purpose flour and ensure the oats used are gluten-free and not processed in a facility where they may have come into contact with gluten.

Top with oats - For a more aesthetically pleasing loaf, brush the top of the loaf with a little extra honey towards the end of baking and sprinkle some oats on top.

Avoid the electric mixer - You'll get better results mixing this easy oat bread by hand. An electric mixer can overmix the batter.

Easier cleanup - For easier cleanup and removal of the loaf, butter, then line the loaf pan with parchment paper. The butter will help the parchment stick.

A note about pans - Light pans reflect heat, while dark-colored pans retain heat. Therefore, if you use a light loaf pan, the exterior of the loaf will get less brown than dark. Also, if you use a darker loaf pan, keep a close eye on it because baked goods tend to cook faster.

Pan sizes - If you want a loaf that you can slice and use for sandwiches or toast, use a 9x5-inch loaf pan. We used a wider pan to get more of a flat loaf as we served ours with soup and these slices are more dippable.

Storage and Freezer Tips

Store leftover oat bread in an airtight container and refrigerate for 1-3 days. Alternatively, you can freeze the bread and keep it for up to 3 months.

How To Reheat

This easy oat bread can be reheated in the oven, microwave, or a toaster oven. You can even pop it under the broiler for a little exterior texture. I would avoid using a toaster because the bread may crumble and make a mess of your toaster.

Easy Oat Bread Recipe

Easy Oat Bread

Yield: 12 Slices
Prep Time: 10 minutes
Cook Time: 40 minutes
Additional Time: 1 hour
Total Time: 1 hour 50 minutes

This easy oat bread recipe yields a soft, fluffy loaf perfect for morning toast, sandwiches, and more. Baking high-quality bread has never been so simple!

Ingredients

  • 1 cup full-fat Greek yogurt
  • ⅓ cup vegetable oil
  • 1 large egg
  • 1 teaspoon granulated sugar
  • 3 tablespoons honey
  • 2 cups unbleached all-purpose flour
  • 2 teaspoons baking powder
  • ¾ teaspoon fine sea salt
  • ¼ teaspoon baking soda
  • ½ cup whole milk
  • 1 cup quick oats

Instructions

    1.Preheat the oven to 350°F. Also, butter and flour a 9x5-inch loaf pan.
    2.Whisk the yogurt, oil, egg, sugar, and honey together in a bowl until smooth.
    3.Whisk the flour, baking powder, salt, and baking soda in a separate bowl.
    4.Alternate adding the dry ingredients and milk to the yogurt mixture as you stir until you have a smooth batter.
    5.Fold in the oats.
    6.Transfer the batter to the loaf pan and bake for 40 minutes or until a tester comes out clean when inserted in the center.
    7.Remove from the oven and run a paring knife around the sides to make removing the loaf easier, then invert it onto a cooling rack.
    8.Carefully flip the loaf so it is right side up, and let it cool for an hour.
    9.Slice with a serrated knife and serve.

Notes

The 60 minutes of additional time is just cooling the bread on the rack.

© Monique McArthur
Cuisine: American / Category: Bread
Easy Oat Bread Recipe

Try These Other Easy Bread Recipes Next!

  • Banana Bread Muffins
  • Chocolate Banana Brownies
  • Chocolate Chip Zucchini Bread
  • Lemon Blueberry Yogurt Bread

Easy Citrus Marinated Chicken Recipe

February 10, 2024 by Kristy Bernardo

Citrus Marinated Chicken

Citrus Marinated Chicken is a versatile and flavorful protein that can be paired with everything from cauliflower rice to mac and cheese.

Easy Citrus Marinated Chicken Recipe

Grilled chicken with a citrus marinade is a lean, healthy protein, and even better, we've got two ways to make it for you - on the grill (of course) or in the Instant Pot. Either way, you have a delicious main course that you can match with any of your favorite sides or serve on top of a salad.

Why You'll Love Citrus Marinated Chicken

Juicy & Flavorful - Whether you grill it over gas or coal, or let the Instant Pot do the work, this chicken comes out tender and juicy, with the light, refreshing flavors of lemon and garlic.

Versatile - You can do pretty much anything with this protein. It pairs just as well with healthy sides like grilled veggies and cauliflower rice and leafy green salads, as it does with comfort food dishes like scalloped potatoes and macaroni and cheese.

Quick & Easy - Just 10 minutes on the grill or 7 minutes in the Instant pot and this chicken is ready to eat. And prep requires minimal effort. Just toss all the ingredients in a Ziploc bag and let it marinate! Clean-up is a breeze.

Healthy - Chicken is a lean protein that will help keep you fuller longer. You can serve it on it's own or with vegetables like asparagus or zucchini and keep your calories low, and nutrient density high.

Citrus Marinated Chicken Ingredients Notes

Grilled citrus chicken is such a simple recipe that there are really no notes to include, but here's what you'll need to make it:

  • Two lbs chicken breasts (2 large breasts): Boneless, skinless, I use Open Nature® Air Chilled Chicken

Citrus Chicken Marinade

  • 2 lemons: zest from one; juice from both
  • Crushed garlic cloves
  • Dried oregano
  • Extra-virgin olive oil

Refer to the citrus chicken marinade recipe card below for a complete ingredients list with measurements.

How To Make Citrus Marinated Chicken

  1. Marinate: Add all ingredients except chicken to a Ziploc Bag; mix well, add chicken, and refrigerate for up to an hour.
  2. Grill: Remove chicken from the bag and grill and toss the marinade away.
  3. Or Add To The Instant Pot: If using this method, add water to pot, place chicken inside on a trivet, pour marinade into pot over chicken, and cook on high for 7 minutes.
  4. Serve: Remove the chicken from grill or instant pot and serve with your choice of side.
Grilled Chicken with Citrus Marinade

Variations, Substitutions & Cooking Tips

Change Up Your Chicken - You can use chicken thighs for this recipe if you prefer. They'll be extra juicy!

Grilling Tips - Grill over hot coals for about 5 minutes on each side or until cooked through. If grilling with gas, use a medium high flame. Try not to flip it more than once and avoid over-grilling.

Instant Pot Tips - Be sure to use a trivet to keep the chicken raised from the bottom. You can use chicken broth instead of water if you prefer.

Switch Up Your Seasonings - You can add a variety of extra flavors to this recipe. A few you might want to consider are lemon pepper; cayenne pepper or red pepper flakes for a bit of heat; rosemary; tarragon; saffron; ginger; or dill.

Storage & Reheating

Store any leftover chicken in the refrigerator in an air tight container. To reheat, you can zap it in the microwave in 45 second increments until heated through, or place in the air fryer for 3-4 minutes until warmed.

Easy Citrus Marinated Chicken Recipe

Easy Citrus Marinated Chicken Recipe

Yield: 2 Servings
Prep Time: 5 minutes
Cook Time: 40 minutes
Total Time: 45 minutes

Citrus Marinated Chicken is not only incredibly easy to prepare but also a healthy meal option, a perfect pairing with dishes like cauliflower rice or mac and cheese.

Ingredients

  • 1 pkg Open Nature® Air Chilled Chicken, (2 breasts)
  • 2 lemons, (zest from one; juice from both)
  • 2-3 garlic cloves, crushed
  • 1 teaspoon dried oregano
  • 2 tablespoon extra-virgin olive oil

Instructions

  1. Place all ingredients except chicken into a large, resealable plastic bag; mix ingredients. Add chicken, seal bag and toss gently to coat. Place in refrigerator for 30-60 minutes.

For the grill:

  1. Remove chicken from marinade and discard bag and marinade. Grill over hot coals until thoroughly cooked, turning once after about 5 minutes.

For Instant Pot:

  1. Set trivet inside Instant Pot, then add ½ cup water to pot. Remove the chicken from the bag and set it on the trivet. Pour marinade over chicken and into pot. 
  2. Close and lock the lid of the Instant Pot. Press "Manual" and immediately adjust the timer to 7 minutes. Check that the cooking pressure is on "high" and that the release valve is set to "Sealing".
  3. When the time is up, release the pressure using quick release. Carefully remove the chicken and serve.

Notes

I like to serve this Citrus Grilled Chicken over cauliflower rice with lots of pepper and a little more lemon juice.

© Kristy Bernardo
Cuisine: American / Category: Dinner
Easy Citrus Marinated Chicken Recipe

Adobo Seasoning Recipe

February 6, 2024 by Kristy Bernardo

Adobo Seasoning Recipe

Our adobo seasoning recipe is an incredibly versatile spice mix that can be used in and on just about everything! It's as ubiquitous as salt and pepper in some countries, so give it a try and spice up your own cooking!

Adobo Seasoning Recipe

What Is Adobo Seasoning?

If you've been to Latin America or eaten in a restaurant that serves Latin American or Filipino cuisine, odds are you've enjoyed the flavors of an adobo spice mixture. The spices used vary in different regions, but typically it will have garlic powder, onion powder, oregano, black pepper, and sometimes other spices such as cumin, paprika, and chili powder. 

It's savory with a slight tang; the spice level depends on which ingredients were used, but it's typically not very spicy. Of course, spice lovers can just kick theirs up a notch by adding whatever they like!

Different versions are available at almost any grocery store, but it's so simple to make a DIY adobo mix that not only tastes better and will be just the way you like it, but it costs much less! It also uses herbs and spices that you likely already have on hand in your pantry.

Adobo Seasoning Ingredients

Our adobo seasoning recipe uses these herbs and spices for a flavorful spice mix:

  • Garlic powder
  • Onion powder
  • Oregano
  • White or black pepper
  • Salt

You can also add hot or smoked paprika for even more flavor, or try adding a little cumin or chili powder until you find the flavors you like best.

How To Make This Adobo Seasoning Recipe

It's so simple to make adobo seasoning that there's no reason to ever buy it at the store. With so few ingredients, it takes less than five minutes to mix together.

Place the garlic powder, onion powder, oregano, pepper, salt, and paprika (if you're using it) into a small bowl and mix it well. You can add a little turmeric for color, too. That's it, you're done!

You can also put the spices into the jar that you'll be using to store it, then simply shake it until it's completely mixed. 

How To Make Adobo Seasoning

Uses For Adobo Seasoning

You can use a homemade Adobo spice mix in just about anything! It's incredibly versatile and can be added to almost any meal to maximize flavor. Here are some ways we love to use it:

  • As a marinade - Mix adobo seasoning with olive oil and lime juice for a flavorful marinade for meats like chicken, pork, or beef. Marinate for a few hours or overnight before cooking.
  • As a seasoning for grilled meats - Sprinkle adobo seasoning onto meats before grilling. It works particularly well on chicken, steak, pork chops, or even fish.
  • As a rub before roasting meats - Rub adobo seasoning on chicken, pork, or beef before roasting in the oven. It adds a lot of flavor for minimal effort.
  • Add it to soups and stews - When your soup or stew needs that little extra "something", try adding a tablespoon of adobo seasoning!
  • It's great on vegetables - Toss vegetables in a little olive oil and adobo seasoning before roasting or sauteing. Try it on potatoes, carrots, bell peppers, zucchini, or mushrooms. It adds a flavorful kick and pairs well with the natural sweetness of vegetables.
  • Seasoning for rice - Mix adobo seasoning into cooked rice, quinoa, or other grains for a flavorful side dish.
  • Make an easy bean side dish - Stir adobo seasoning into cooked beans, lentils, or chickpeas for added flavor. It makes a delicious side dish or filling for tacos and burritos.
  • Add it to sauces and dips - Mix adobo seasoning into sauces, dips, or dressings. It works well in creamy dips like sour cream or yogurt-based sauces.
  • It's delicious on seafood - Sprinkle adobo seasoning on fish or shrimp before grilling, baking, or pan-searing.
  • Use it to flavor your snacks - Sprinkle adobo seasoning on popcorn, roasted nuts, or homemade potato chips.
  • It works for breakfast, too! - Mix homemade adobo seasoning into scrambled eggs, omelets, or frittatas. Or add a little to the butter or oil in a hot pan before frying your eggs.
  • As an all-purpose seasoning - Use it on just about anything, like a dish of cottage cheese, on pizza (really!), or even mixed with a little olive oil and brushed onto pita or naan bread.
  • Mix a little with mayo for a delicious sandwich spread - Especially with chicken. It also makes a great dressing for chicken salad.

How To Store Homemade Adobo Seasoning

Store your DIY adobo mix in a small container or spice jar. Keep it in a cool, dry location to help extend its shelf life. It will keep indefinitely, but try to use it within a few months before it begins to lose flavor.

Adobo Seasoning Recipe

Adobo Seasoning Recipe

Yield: ⅓ Cup
Prep Time: 5 minutes
Total Time: 5 minutes

Our adobo seasoning recipe is an incredibly versatile spice mix that can be used in and on just about everything! Give it a try and spice up your cooking!

Ingredients

  • 2 tablespoon garlic powder
  • 2 tablespoon onion powder
  • 1 teaspoon dried oregano
  • 1 teaspoon coarse salt
  • ½ teaspoon white or black pepper

Optional spices

  • 1 teaspoon paprika
  • 1 teaspoon ground cumin
  • 1 teaspoon turmeric
  • ½ teaspoon cayenne pepper

Instructions

  1. Place all of the ingredients into a small bowl and mix well. Store in a small container or spice jar in a cool, dry place (such as your pantry).

Notes

If you’re a garlic lover, adjust the amounts to three tablespoon garlic powder and just one tablespoon onion powder. Adjust the other seasonings to your preference, too!

Nutrition Information:
Yield: 4 Serving Size: 1
Amount Per Serving: Calories: 36Total Fat: 0gSaturated Fat: 0gTrans Fat: 0gUnsaturated Fat: 0gCholesterol: 0mgSodium: 589mgCarbohydrates: 8gFiber: 2gSugar: 0gProtein: 1g

This data was provided and calculated by Nutritionix.

© Kristy Bernardo
Cuisine: Filipino / Category: Seasonings
Adobo Seasoning Recipe

Try These Seasonings Next!

  • Takis Powder Seasoning
  • Lemon Pepper Seasoning
  • Flamin Hot Cheetos Seasoning
  • The Best Blackening Seasoning

Easy Slow Cooker Turkey Chili Recipe

February 6, 2024 by Monique McArthur

Easy Slow Cooker Turkey Chili Recipe

Packed with hearty beans, lean ground turkey, and a rich blend of spices, this set it and forget it Turkey Chili simmers to perfection in the slow cooker.

Easy Slow Cooker Turkey Chili Recipe

This is a family favorite recipe in our household and my go to on a cold night. Whether it's game day or a weeknight dinner, this slow cooker turkey chili is a crowd-pleaser that delivers on both flavor and simplicity to prepare.

Ground Turkey Chili Ingredients

  • Ground turkey - I usually make mine with 85% lean ground turkey but have gone leaner with success. It all depends on how health conscious I'm feeling at the time.
  • Italian turkey sausage (spicy or mild) - Choose your heat level and I don't recommend sweet Italian sausage but I've also used it in a pinch.
  • Onion - Yellow or white onion works best for the flavors in this recipe.
  • Canned whole tomatoes - Use fire roasted tomatoes or fresh diced tomatoes if you prefer.
  • Tomato sauce - An essential ingredient in chili.
  • Sugar - Just a teaspoon full of sweetness.
  • Seasonings - Cumin, chili powder, and dried oregano leaves offer the perfect mix of seasonings.
  • Canned spicy chili beans - Use your favorite brand.
  • Canned cannellini beans - Also known as white kidney beans, the nutty, earthy flavor of cannellini beans pairs well with the Italian sausage. I've also made this chili with garbanzo beans (chickpeas) and kidney beans.
  • Optional Toppings
    • Sour cream
    • Sliced green onions
    • Shredded cheese

Refer to the Turkey Chili recipe card below for a complete list of ingredients with measurements.

How To Make Slow Cooker Turkey Chili

How To Make Slow Cooker Turkey Chili

  1. Cook Turkey, Sausage & Onions - In a skillet cook the ground turkey, sausage and onions.
  2. Add Ingredients to Crockpot - Combine the turkey mixture and remaining ingredients to a slow cooker.
  3. Slow Cook - Slowly cook the chili for 6 to 8 hours on low or for 3 to 4 hours on high.
  4. Serve - Add the chili to bowls and serve with your choice of toppings.
Slow Cooker Chili With Ground Turkey

Tips & Variations

Mix up the protein - I've made this recipe with ground beef, chicken, and turkey and have also used Italian pork and chicken sausage. Chicken and turkey are very comparable and combined with all the flavors from the other ingredients, it's hard to taste the difference. Ground beef and pork sausage have bolder and juicier flavors which I think enhances the flavor slightly but not without giving up the lean benefits of turkey.

Create a chili toppings station - Instead of going with just a few chili toppings, give your friends and family a variety of options. Additional toppings ideas include corn chips, saltine crackers, tortilla chips, sour cream, greek yogurt, parsley, chopped red onion, chives, green chilis, jalapeños, red pepper flakes, hot sauce, bacon crumbles, chopped tomatoes, or avocado slices.

Use this chili as a topping - Top hot dogs with chili and cheddar cheese or make stuffed baked potatoes with turkey chili. It's even delicious on nachos or french fries.

Thicker Chili - To thicken the chili to your preferred consistency simply remove the cover when there is 30 minutes to an hour left of cooking time.

Try these Secret Ingredients for Chili to enhance this chili and make it your own.

Storing & Reheating

After cooling, store in an airtight container in the refrigerator for up to 3 to 4 days or in the freezer for up to 3 months. Avoid freezing it in a slow cooker to prevent damage.

For optimal results, thaw the frozen chili overnight in the refrigerator before reheating.

To reheat, warm the chili in a covered pot on the stovetop over medium-low heat, stirring occasionally until warmed through. Alternatively, reheat individual servings in the microwave until warmed through using 30 second to one minute bursts and stirring in between each interval.

I don't recommend reheating in a slow cooker as it will take hours to reheat and bacteria could form. After reheating, feel free to transfer to a pre-heated slow cooker to keep warm.

Easy Slow Cooker Turkey Chili Recipe

Easy Slow Cooker Turkey Chili Recipe

Yield: 6 servings (1 ½ cups each)
Prep Time: 15 minutes
Cook Time: 6 hours
Total Time: 6 hours 15 minutes

Packed with hearty beans, lean ground turkey, and a rich blend of spices, this set it and forget it turkey chili simmers to perfection in the slow cooker.

Ingredients

  • 1 lb ground turkey
  • ½ lb Italian turkey sausage, spicy or mild
  • ½ cup onion, chopped
  • 1 28 oz can whole tomatoes, undrained, cut up
  • 1 15 oz can tomato sauce
  • 1 teaspoon granulated sugar
  • 1 teaspoon cumin
  • 2 tspns chili powder
  • 1 teaspoon dried oregano leaves
  • 1 15 oz can spicy chili beans, undrained
  • 1 15 oz can cannellini beans, drained, rinsed
  • Sour cream, optional topping
  • Green onions, sliced, optional topping
  • Shredded cheese, optional topping

Instructions

  1. In a large skillet, cook ground turkey, sausage and onion over a medium-high heat until turkey is thoroughly cooked and brown (4-5 minutes), stirring frequently. Drain.
  2. In a 3 ½ to 4-quart slow cooker, combine turkey mixture with all remaining ingredients except the optional toppings, mix well.
  3. Cover and cook on low setting for 6 to 8 hours or high setting for 3 to 4 hours.
  4. Top individual servings with sour cream, green onions and shredded cheese.

Notes

I've used Garbanzo beans (chickpeas) and kidney beans in place of cannellini beans. All three work well.

Nutrition Information:
Yield: 6 Serving Size: 1
Amount Per Serving: Calories: 500Total Fat: 21gSaturated Fat: 6gTrans Fat: 0gUnsaturated Fat: 12gCholesterol: 121mgSodium: 1499mgCarbohydrates: 40gFiber: 10gSugar: 12gProtein: 40g

This data was provided and calculated by Nutritionix.

© Monique McArthur
Cuisine: American / Category: Soups and Stews
Easy Slow Cooker Turkey Chili Recipe

Try These Chili Recipes Next!

  • Texas Chili - Award Winning Chili
  • Beefy Beanless Chili
  • One-Pot Chili Mac and Cheese
  • Instant Pot Turkey Chipotle Chili
  • Boilermaker Chili

Flamin Hot Cheetos Seasoning Recipe

February 3, 2024 by Monique McArthur

Flamin Hot Cheetos Seasoning Recipe

This homemade Flamin Hot Cheetos Seasoning is an essential addition to any spice rack for those who appreciate a touch of cheesy spiciness in their creations.

Flamin Hot Cheetos Seasoning Recipe

Inspired by my son's love for my Homemade Takis Seasoning, he threw down the gauntlet and challenged me to create a Flamin' Hot Cheetos seasoning. Challenge accepted! After carefully examining the Flamin' Hot ingredients label and testing many versions, I believe I found the perfect homemade blend. Now you can create your own seasoning to elevate your mac and cheese, popcorn or any other dish you desire. Enjoy the fiery goodness!

What Are Flamin Hot Cheetos Made Of?

While the exact ingredient measurements of Flamin Hot Cheetos is a brand secret, the CHEETOS® Crunchy FLAMIN' HOT ingredients are not. Here are the ingredients you'll find on the package label:

Cheetos: Enriched Corn Meal (Corn Meal, Ferrous Sulfate, Niacin, Thiamin Mononitrate, Riboflavin, Folic Acid), Vegetable Oil (Corn, Canola, and/or Sunflower Oil).

Flamin' Hot Seasoning: (Maltodextrin [Made from Corn], Salt, Sugar, Monosodium Glutamate, Yeast Extract, Citric Acid, Artificial Color [Red 40 Lake, Yellow 6 Lake, Yellow 6, Yellow 5], Sunflower Oil, Cheddar Cheese [Milk, Cheese Cultures, Salt, Enzymes], Onion Powder, Whey, Whey Protein Concentrate, Garlic Powder, Natural Flavor, Buttermilk, Sodium Diacetate, Disodium Inosinate, Disodium Guanylate), and Salt.

Note: Contains milk ingredients

Wired magazine does a nice job of breaking down and describing these ingredients in case you'd like to learn more.

Homemade Flamin Hot Seasoning Ingredients

  • Cheddar cheese powder: The base for any Cheetos product. I used Hoosier Hill Farm cheese powder.
  • Cayenne pepper: The foundation for the spiciness.
  • Ghost pepper: Ghost pepper adds an extra spicy kick that you won't get from cayenne pepper and similar to what you'll taste with Flamin' Hot Cheetos.
  • Kosher salt & white pepper: The salt enhances the flavor while white pepper adds a milder pepper flavor than black pepper. Black pepper can be used in a pinch.
  • Garlic & onion powder: Two classic ingredients that balance and enhance each other.
  • Buttermilk powder: I used Hoosier Hill Farm and you can also find it in most baking sections at the grocery store or near the powdered milk.
  • MSG (monosodium glutamate): The not so secret taste enhancer in so many snack products.
  • Citric acid: As the name suggests it will add a bit of an acidic, sour taste plus it also acts as a natural preservative.
  • Maltodextrin: Helps dilute and balance the other flavors.
  • Red dye #40 (optional): To achieve a similar vibrant red color, you can use the same red color #40 in the original recipe or a comparable red color powder.

Scroll down to the bottom for the printable Flamin Hot Cheetos recipe card with exact measurements and recipe instructions.

How To Make Flamin Hot Cheetos Seasoning

How To Make Flamin Hot Powder Seasoning

This DIY seasoning is incredibly easy to make!

  1. Combine Ingredients: In a bowl, combine all the ingredients.
  2. Grind: Balance out the flavors and reduce to a powdery consistency with a mortar and pestle or an electric or manual grinder.

Quick Hack For Flamin Hot Cheetos Seasoning

  • Buy a box of CHEETOS Mac 'n Cheese FLAMIN' HOT and use the Flamin' Hot cheese packet. Save the pasta for another use.
  • Use equal parts cheddar cheese powder and cayenne pepper. While not the same thing, it's similar.
  • Follow the recipe and omit the more difficult to find ingredients such as maltodextrin, citric acid and red dye #40.

Where To Buy Flamin Hot Cheetos Powder

Although Frito-Lay, a subsidiary of PepsiCo, and the producer of Flamin Hot Cheetos snacks, does not sell Flamin Hot Cheetos Powder, there are several online companies that strive to create their own copycat Flamin Hot Cheetos powder including La Heladita Paleteria Y Neveria. This is not an endorsement of either one and plus, this homemade version is close to the real thing!

How To Use Flamin Hot Cheetos Seasoning

Uses For Flamin Hot Cheetos Seasoning

The applications for homemade Flamin' Hot Cheetos seasoning are diverse, offering a spicy, tangy, and savory kick to a variety of dishes. Consider these creative ways to incorporate this flavorful blend into your culinary ventures:

  1. Seasoning for Chips:
    • Turn ordinary tortilla or potato chips into a fiery and flavorful snack by dusting them with Flamin' Hot seasoning.
  2. Snack Mix Addition:
    • Dust popcorn, pretzels, crackers, seeds, nuts, biscuits, or cereal with Flamin' Hot Cheetos seasoning.
  3. Seasoning for Meat and Seafood:
    • Use the seasoning as a mix, rub or coating for chicken, steak, chicken wings or nuggets, hamburger, shrimp, or fish.
  4. Dips, Dressings, Marinades, Soups:
    • Infuse your favorite dips, dressings, soups, sauces, and marinades with a unique twist.
  5. Creamy Sauce
    • Blend with milk for a white creamy sauce for pasta dishes.
  6. Scalloped or Au Gratin Recipes
    • Use with any cheesy potato dish.
  7. Sandwich or Wrap Enhancer:
    • Sprinkle Flamin' Hot seasoning on sandwiches or wraps.
  8. Roasted Vegetable Seasoning:
    • Add a touch of magic by dusting Flamin' Hot Cheetos seasoning on roasted vegetables like corn, baked potatoes, or cauliflower.
  9. Fruit Enhancer:
    • Create a sweet and spicy contrast by sprinkling the powder on fruits such as mango, pineapple, dragon fruit, avocado, watermelon, fruit cups, apple chips, or your favorite fruit.
  10. Mexican Dishes:
    • Spice up your favorite Mexican dishes by sprinkling Flamin' Hot powder on tacos, nachos, taquitos, burritos, tostadas, and more.
  11. Drink Liner:
    • Rim your glasses with the seasoning for a unique twist on cocktails like Bloody Marys, margaritas, or frozen cocktails.
  12. More Seasoning Ideas:
    • Explore more possibilities by experimenting with Flamin' Hot Cheetos seasoning with eggs, yogurt, grilled cheese, mac n cheese, rice, beans, pasta, pizza, mashed potatoes, French fries, ice cream, wings, cheesecake, and even candy. Let your creativity run wild!
How To Use Flamin Hot Cheetos Seasoning

Flamin Hot Cheetos Seasoning Recipe

Yield: 5 ounces
Prep Time: 10 minutes
Total Time: 10 minutes

This homemade Flamin Hot Cheetos Seasoning seasoning is an essential addition to any spice rack for those who appreciate a touch of cheesy spiciness in their creations.

Ingredients

  • 2 ½ tbs cheddar cheese powder
  • 2 ½ tbs cayenne pepper
  • ¼ teaspoon ghost pepper
  • 1 teaspoon kosher salt
  • ½ teaspoon white pepper
  • ½ teaspoon garlic powder
  • ½ teaspoon onion powder
  • ½ teaspoon buttermilk powder
  • ¾ teaspoon MSG (monosodium glutamate)
  • ½ teaspoon maltodextrin
  • ½ teaspoon citric acid
  • Red dye #40 (optional)

Instructions

  1. In a bowl, combine all the ingredients.
  2. Balance out the flavors and reduce to a powdery consistency with a mortar and pestle or an electric or manual grinder.

Notes

Red dye #40 is to match the color, it is not needed for flavor.

Add more ghost pepper, if you prefer and can handle the heat!

Nutrition Information:
Yield: 4 Serving Size: 1
Amount Per Serving: Calories: 37Total Fat: 2gSaturated Fat: 1gTrans Fat: 0gUnsaturated Fat: 1gCholesterol: 5mgSodium: 349mgCarbohydrates: 3gFiber: 1gSugar: 1gProtein: 2g

This data was provided and calculated by Nutritionix.

© Monique McArthur
Cuisine: American / Category: Seasonings
Flamin Hot Cheetos Seasoning Recipe

Old Fashioned Turkey And Noodles Recipe

February 2, 2024 by Heidi Deal Leave a Comment

Old Fashioned Turkey And Noodles Recipe

A spin on chicken and noodles, this old fashioned turkey and noodles recipe is a hearty and comforting classic just like grandma used to make.

Old Fashioned Turkey And Noodles Recipe
★★★★★

"Just made this soup with homemade mashed potatoes. Absolutely delicious! I don't think I would even change a thing."

- Christina

Growing up in the Midwest with grandparents who were farmers, homecooked comfort food dishes were a common appearance on the dinner table. One of my favorites was chicken and noodles. Sometimes my grandmother would even make the noodles from scratch. Every now and then, I get a craving for that dish and it takes me right back to my happy place.

Why You'll Love Old Fashioned Turkey & Noodles

Twist on the classic - Turkey and noodles is just as delicious as the more common chicken and noodles, with the easy substitution of leftover turkey. This often makes an appearance after Thanksgiving or Christmas when we are using up our leftovers.

One pot recipe - Some recipes call for the noodles to be cooked separately, but I do it all in one pot where the noodles can absorb the flavor from the veggies and the chicken broth.

Basic ingredients - You'll have to hit the frozen section for the frozen egg noodles, but other than that, this recipe uses your standard mirepoix of carrots, celery, and onion, and a few pantry staples.

Lots of turkey - You won't be combing through your noodles to find the protein here! This one is loaded with tender turkey.

Easy to prep and great for leftovers - My house is full of big appetites so recipes that serve four are a no-go. This recipe is done in 45 minutes or less and can feed a family of four with plenty left for seconds.

Old Fashioned Turkey & Noodles Ingredients

To make old fashioned turkey and noodles, you'll need the following:

  • Turkey: Leftover turkey is ideal for this recipe. If it's off season, you can buy a turkey breast and roast that ahead of time, or swap it for shredded rotisserie chicken instead.
  • Frozen egg noodles: We use Reames, but the available brands may vary by location. These are a bit different from boxed pasta, with a thicker, doughy texture that carries the rich, creamy sauce of this dish quite well.
  • Vegetables: The veggie base for this is the classic mirepoix of carrots, celery, and onion, adding fresh flavor to the sauce. Sauté these in the butter. Both salted and unsalted are fine.
  • Herbs & Seasonings: Garlic is added to the veggies while they cook, but thyme and parsley boost the flavor profile. The thyme is added just before the chicken broth, while the fresh chopped parsley is stirred in just a few minutes before serving. This adds the fresh, earthy flavor that parsley imparts, while retaining the vibrant green color. Salt and pepper of course enhance the overall flavor.
  • Chicken broth: You can use your favorite box or can, or homemade if you have it. We generally use an organic, low sodium variety, but any will work. You can also swap it for vegetable broth if you prefer.
  • Cream of chicken soup: One can works well in this recipe, acting both as a flavor enhancer and thickener. We love the creaminess that comes from the addition of this soup.

Refer to the recipe card below for a complete list of ingredients with measurements.

Turkey And Noodles Ingredients

How To Make Old Fashioned Turkey And Noodles

  1. Prep your protein: If your leftover turkey hasn't already been prepped, shred or chop it into bite sized pieces, place it in a bowl, and set it aside.
  2. Make your mirepoix: Melt the butter in your dutch oven and sauté the carrots, celery, and onion, along with the garlic. Cook, stirring occasionally, until onion is tender and translucent.
  3. Build the broth: Add the thyme, stir to wake up the flavor, add in the chicken broth and bring to a boil.
  4. Cook the noodles: Add the egg noodles to boiling broth, stirring gently to separate any that are stuck together, and cover for about 8 minutes. During this time, it should return to a boil and the noodles should be almost done when you remove the lid.
  5. Add soup and turkey: Uncover, reduce to medium low, and stir the cream of chicken in until incorporated. Add the turkey and simmer.
  6. Finishing touches: Stir in the the fresh parsley, salt, and pepper to finish off the dish, then serve and enjoy.
How To Cook Turkey And Noodles

Variations, Substitutions, & Cooking Tips

Swap the turkey - As we mentioned above, this is a twist on classic chicken and noodles, so feel free to use leftover chicken or shredded rotisserie chicken in place of the turkey.

Add extra veggies - If you want to bulk up the portion size and nutritional value, add in some more vegetables. Stir in broccoli, asparagus, peas, bell peppers, or zucchini.

Add or change the herbs - Oregano, sage, basil, and rosemary would all work well as variations in this dish.

Serve it over mashed potatoes - If this isn't enough carbs for you, some say the traditional way to serve chicken and noodles is atop a bed of mashed potatoes, so you can always give it a try with this version.

Make it soupy - Add extra broth and thicken it to your desired consistency to make it more of a noodle soup and serve it with crusty bread, biscuits, or dinner rolls.

Give it a crunchy topping - If you like a crunchy breadcrumb topping, add panko breadcrumbs for the last five to ten minutes of baking. You can also make the breadcrumbs extra crunchy by placing it in the broiler for the last few minutes.

Old Fashioned Turkey And Noodles Recipe

Old Fashioned Turkey And Noodles Recipe

Yield: 6 Servings
Prep Time: 15 minutes
Cook Time: 25 minutes
Total Time: 15 minutes

A spin on chicken and noodles, this old fashioned turkey and noodles recipe is a hearty and comforting classic just like grandma used to make.

Ingredients

  • 4 cups chopped or shredded cooked turkey
  • ½ stick of butter
  • 2 small carrots, diced
  • 2 small ribs of celery, diced
  • ¼ cup diced onion
  • 1 teaspoon minced garlic
  • ½ teaspoon thyme
  • 7 cups chicken broth
  • 2 12-ounce packages of Reames frozen homestyle egg noodles
  • 1 10.25-ounce can cream of chicken soup
  • Salt & Pepper to taste
  • 2 Tablespoons chopped fresh parsley

Instructions

  1. Chop or shred 4 cups of cooked turkey and set aside.
  2. Heat ½ stick of butter over medium high heat in a dutch oven or similar high sided pot.
  3. Add diced carrot, celery, onion, and garlic and sauté until onions are tender and translucent.
  4. Add thyme and chicken broth and bring to a boil.
  5. Stir in both packages of egg noodles, stirring gently to separate any that are stuck together. Return to boil and let cook for about 8-10 minutes total.
  6. Reduce heat to medium low and stir in cream of mushroom soup. Stir gently until soup is well incorporated.
  7. Add turkey to the pot and gently stir to incorporate.
  8. Add salt and pepper to taste and stir in fresh parsley.
  9. Simmer for about 5 minutes or until noodles are done and sauce has slightly thickened.
  10. Spoon into bowls and enjoy.
Nutrition Information:
Yield: 6 Serving Size: 1
Amount Per Serving: Calories: 501Total Fat: 23gSaturated Fat: 9gTrans Fat: 0gUnsaturated Fat: 11gCholesterol: 170mgSodium: 1682mgCarbohydrates: 36gFiber: 2gSugar: 3gProtein: 36g

This data was provided and calculated by Nutritionix.

© Heidi Deal
Cuisine: American / Category: Main Dish
Old Fashioned Turkey And Noodles Recipe

Try These Recipes Next!

  • Chicken Cobbler
  • Scalloped Potatoes With Ham
  • Rice And Mushroom Casserole
  • Lemon Oregano Turkey Meatballs

Cowboy Butter Recipe

February 2, 2024 by Monique McArthur

Cowboy Butter

Prepare your taste buds for a wild ride with cowboy butter! The rich blend of butter, garlic, herbs, and spices enhances everything from toast to grilled meat.

Cowboy Butter
Salmon with Cowboy Butter

Although commonly used on grilled meats and vegetables, cowboy butter is a compound butter you'll want to slather on everything. The reason? There are so many mouthwatering flavors rolled into one log of butter. The salt level is just right. The mustard and lemon add a bright tanginess to the butter, the chives add a nice oniony note, cowboy butter has a pleasant heat, and so much more.

Why You'll Love Cowboy Butter

Delightful flavor fusion - Cowboy butter combines simple yet boldly flavored ingredients to create something that commands your taste buds' attention. There's something super satisfying about the blend of garlic, herbs, and a touch of heat.

Versatility - Whether you're grilling steak, chicken, shrimp, or vegetables, want a tasty sandwich spread, or wish to elevate a grilled cheese sandwich, cowboy butter is the answer. It's more than a condiment; the compound butter is a flavor enhancer.

Ease - Add everything to a bowl, mix, then shape into a log with the help of plastic or parchment paper - that's it! You can even use an electric mixer if you don't feel like mixing the butter by hand. What a fuss-free way to elevate your favorite dishes without complicating the recipe.

Cowboy Butter Ingredients Notes

  • Butter: Unsalted butter is best. Leave the butter on the counter to soften if it was refrigerated prior. Otherwise, combining it with the other ingredients will be quite a task. To soften chilled butter fast, grate the butter using the largest holes on a box grater.
  • Garlic: Grated garlic tends to add a more intense garlic flavor. If you prefer a subtler taste, finely chop, mince, or scale back the number of cloves used.
  • Herbs: Parsley adds peppery freshness, and chives give the butter an oniony taste. Both add lovely flecks of green throughout.
  • Lemon zest: Zest is used instead of juice to add that bright, lemony quality without the acidity. The mustard is tangy enough.
  • Mustard: Speaking of mustard, I suggest coarse mustard because it gives cowboy butter additional texture and that signature sharp, tasty, earthy flavor.
  • Cayenne pepper: Contributes to cowboy butter's orange hue and brings a pleasant background heat. How much you add is entirely up to you. You may want to keep the heat in the background or move it to the forefront.

Refer to the recipe card below for a complete ingredients list with measurements.

Cowboy Butter Recipe Ingredients
Cowboy Butter Ingredients

How To Make Cowboy Butter

  1. Mix: Add the butter to a large mixing bowl along with the other ingredients - mix until well combined. You can use a large spoon, but I prefer a rubber spatula. The result is smoother, and the add-ins are distributed more evenly.
  2. Shape: Rolling the butter into a log is the most convenient way, as cutting slices off as needed is easy. Alternatively, you can roll tablespoons of butter into balls or transfer the cowboy butter to a dish.
  3. Refrigerate: Refrigeration is critical because it gives all the flavors time to meld. The longer cowboy butter sits, the better it gets.
Cowboy Butter Ingredients
Cowboy Butter Compound Butter Slices

Variations and Substitutions

Spice it up - Those who crave extra heat can add red pepper flakes or take it up a few more notches with a diced red chili or two. Keep the seeds and ribs intact if you want to feel the burn.

A sweet twist - Add honey or maple syrup for a sweeter cowboy butter.

Use salted butter - Salted butter is a simple swap and will work for this recipe; just don't add any additional salt.

Herb selection - Experiment with different herb combinations. Give thyme, rosemary, or dill a try.

Turn it into a spread - Add a few tablespoons of oil to the mix to make spreadable cowboy butter.

Turn into a dip - All you have to do is melt it, and boom, you have an amazing cowboy butter dipping sauce.

What To Serve With Cowboy Butter

There are endless foods to serve with cowboy butter. A few of my favorites include:

  • French fries - Dipping hot fries in melted cowboy butter is sublime-one of my favorite indulgent snacks.
  • Any protein - Chicken, fish, shellfish, steak - you can't go wrong. It's delicious on top of salmon, and shrimp and lobster would be a whole new level of perfect dipped in this!
  • Morning toast - A smear of cowboy butter on freshly toasted bread is so delicious. It melts into the bread as soon as it hits the surface.
  • Baked potato - Cowboy butter, cheese, and bacon bits are all you need to make a very impressive baked potato.
  • Asparagus - Roast the spears, then toss them in the butter. The result is *chef's kiss.

Storage and Freezer Tips

Store cowboy butter in an airtight container and refrigerate. The compound butter will keep for 2 weeks. Avoid leaving it solely in parchment or plastic that you used to form into a log for too long since this will expose it to too much air and moisture. Keeping the butter in the plastic or parchment is fine, but provide an extra layer of protection by placing it into an airtight container to ensure the butter remains fresh.

Cowboy Butter

Cowboy Butter Recipe

Yield: 8 servings
Prep Time: 5 minutes
Cook Time: 2 hours
Additional Time: 2 hours
Total Time: 4 hours 5 minutes

Prepare your taste buds for a wild ride with cowboy butter! The rich blend of butter, garlic, herbs, and spices enhances everything from toast to grilled meat.

Ingredients

  • ½ cup (1 stick) unsalted butter, softened
  • 3 garlic cloves, grated
  • 1 tablespoon chopped fresh parsley
  • 1 tablespoon snipped fresh chives
  • ¾ teaspoon smoked paprika
  • ½ teaspoon lemon zest
  • 1 teaspoon coarse mustard
  • ¼ teaspoon garlic powder
  • 1⁄8 teaspoon cayenne pepper
  • ½ teaspoon fine sea salt
  • ¼ teaspoon black pepper

Instructions

  1. Add all the ingredients to a bowl.
  2. Mix with a large spoon or rubber spatula. Alternatively, you can use an electric mixer.
  3. Transfer the butter mixture to a large sheet of parchment paper or plastic wrap.
  4. Roll into a log, pressing and shaping as you go.
  5. Twist the ends of the paper or plastic to secure and hold the shape.
  6. Refrigerate for 2 hours.
  7. Unwrap, cut into slices, and use as desired.
Nutrition Information:
Yield: 8 Serving Size: 1
Amount Per Serving: Calories: 10Total Fat: 1gSaturated Fat: 0gTrans Fat: 0gUnsaturated Fat: 0gCholesterol: 2mgSodium: 146mgCarbohydrates: 1gFiber: 0gSugar: 0gProtein: 0g

This data was provided and calculated by Nutritionix.

© Monique McArthur
Cuisine: American / Category: Sauces
Cowboy Butter Recipe

Try Cowboy Butter on these Steak Recipes!

  • Tomahawk Steak
  • Denver Steak Cut
  • Steak Accordion
  • Coulotte Steak (Sirloin Cap Steak)

How To Melt Marshmallows

February 1, 2024 by Monique McArthur

How To Melt Marshmallows

Do you know how to melt marshmallows? Considering the different sizes, shapes, and types, you might not, but this guide will teach you how.

How To Melt Marshmallows

Ask anyone how to melt marshmallows; the popular answer is generally 'heat them.' Well, of course, but there is a process to get the desired result. How you approach the task depends on what you intend to do with the melted marshmallows. For example, if the goal is to make marshmallow fluff, the process differs from melting marshmallows for s'mores bars. Moreover, there are different methods to go about it, including using the microwave, stovetop, etc.

What Are Marshmallows?

Marshmallows are fluffy confections often used to adorn mugs of hot chocolate or serve as the sticky, sweet glue that holds s'mores together. Although made using marshmallow root once upon a time, today's marshmallows consist of sugar, water, and gelatin, giving them their stretchy, gooey quality. The mixture undergoes a whipping process to create their signature spongy texture.

Melted Marshmallow Uses

Marshmallow's versatility extends beyond their classic form, and melting unlocks that. Uses for melted marshmallows include:

  • S'mores: It isn't a proper s'more without melted marshmallows. Additionally, melted marshmallows offer a sticky textural element and hold the sweet treat together, making it easier to bite.
  • Dessert toppings and decorations: Melted marshmallows can serve as an irresistible dessert topping/decoration on anything from cakes to ice cream. It has enough structure to stay in place and can be spread, piped, torched, and toasted to add depth to the final result. Additionally, melted marshmallows can be used to make fondant.
  • Hot chocolate upgrade: Just throwing a few marshmallows on top of a cup of hot chocolate is boring and expected. However, when thoroughly melted and turned into fluff, you have a topping that will take a cup of hot chocolate to the next level. The creaminess enhances the richness of the beverage, creating a comforting, indulgent treat.
  • Puffed rice treats: You can't make them without melted marshmallows. In addition to being the primary structural component, they give the treats their sweet taste.
  • Fondue fun: Melted marshmallows and sweetened condensed milk combine to create a fun, playful, and interactive dessert option. Dip in your favorite fruits, cookies, graham crackers, and more.
Ways To Use Melted Marshmallows

Ways To Melt Marshmallows

Now, let's explore how you can achieve melted marshmallows with the perfect, gooey consistency. Below each method are steps on exactly how to melt marshmallows using that method for the desired result every time.

Stovetop

  1. Select a pot larger than needed to accommodate the marshmallows you plan to melt, as they will expand once exposed to heat.
  2. Rub a thin layer of neutral cooking oil on the inside of the pot or lightly coat it with cooking spray. It also helps to do the same to the spoon or rubber spatula you plan to use.
  3. Add the marshmallows to the pot, preferably mini marshmallows, and turn the heat to low.
  4. Add water. You will need 3 tablespoons for every 16 ounces of marshmallows.
  5. Stir continuously until the marshmallows melt and reach a smooth consistency. It is important to keep stirring to prevent the marshmallows from burning. This will take about 5 minutes.
  6. Use as desired.

Alternatively, you can follow the same steps using a double boiler, which supplies gentler heat. A double boiler is great because it reduces the chance of burning the marshmallows. Since marshmallows are so sticky, they have a higher chance of scorching. You can use a standard double boiler or make your own by placing a heat-safe bowl over a pot with an inch or two of water.

Microwave Method

  1. Lightly grease a microwave-safe bowl larger than needed since the confections will expand when heated. Do the same with the spoon or rubber spatula you plan to stir with.
  2. Add the marshmallows to the bowl. Drizzle a tablespoon or two of water over the marshmallows.
  3. Microwave in 10-15-second increments, stirring in between, until smooth.

If you're not looking to melt marshmallows until they reach a smooth, homogeneous consistency, consider one of the following methods.

Grill Method

  1. Preheat the grill to medium heat.
  2. Add marshmallows to a greased-rimmed baking pan.
  3. Transfer the pan to the grill grates, cover the grill, and heat for a few minutes or until melted to your liking. The bottom of the marshmallows may brown a bit. Move away from direct heat if you'd prefer less browning.

Broiler Method

This method yields marshmallows that are toasty on the exterior and melted on the interior.

  1. Set your oven to broil.
  2. Grab a baking sheet and arrange marshmallows in a single layer.
  3. Pop them under the broiler and leave until toasted on the exterior. Time will vary depending on the size of your marshmallow, but keep a close eye on them to prevent burning.
  4. Flip the marshmallows and repeat on the second side.
  5. Use as desired. If used to make puffed rice treats, mix with the other ingredients while the marshmallows are still hot.
How To Melt Marshmallows On The Stove

Tips For Successful Marshmallow Melting

Don't use old marshmallows - Over time, they lose their moisture, and once moisture is lost, they melt less easily.

Use minis when you can - Their small size means they melt more quickly. Moreover, they melt more evenly.

Monitor heat closely - Whether using a stovetop, microwave, or other methods, monitor the heat and don't walk away. You always want to keep an eye on the marshmallows you're melting.

Avoid thin cookware - Cookware with thin bottoms comes with an increased risk of scorching. The heat permeates the thin material far too quickly to achieve desirable results.

Mise en place - Before you put the marshmallows over the heat, have everything you need on the counter and ready to go so you don't have to walk away at any time.

Clean equipment promptly - Clean utensils and equipment soon after melting marshmallows to prevent hardening and sticking. Or at least soak them in water. Trust me, this will save you a lot of time and effort.

Read These For More Helpful Cooking Tips!

  • 75+ Cupcake & Cake Toppings
  • How To Roast Marshmallows Without A Fire (Or Indoors)

26 Ground Chicken Recipes + Creative Ideas for Every Meal

January 28, 2024 by Monique McArthur

Side view of a cast iron pan with healthy nachos topped with fresh vegetables and avocado slices, surrounded by ingredients like cherry tomatoes, cilantro, and an avocado half.

Ground chicken is a versatile, lean protein perfect for quick weeknight dinners and easy meals. These ground chicken recipes are not only delicious, but most can be prepared in 30 minutes or less!

[feast_advanced_jump_to]
Close-up of a colorful skillet filled with healthy nachos topped with sliced avocado, cherry tomatoes, jalapeños, corn, black beans, and ground beef, served with tortilla chips, as part of a recipe roundup for ground chicken recipes.

If you've got a pack of ground chicken in the fridge and aren't sure what to make, you've come to the right place. Ground chicken is one of the most versatile proteins you can cook with: it's lean, budget-friendly, and takes on flavors beautifully.

From easy weeknight dinners like tacos and skillet pasta to comforting classics like chili and shepherd's pie, there are endless ways to use it. This collection of ground chicken recipes has something for everyone, so you'll never be stuck wondering what to make for dinner again.

26 Quick and Easy Ground Chicken Recipes

These ground chicken dinner ideas promise lean meat and flavor, and most can be prepared in 30 minutes or less!

The Best Spicy Chicken Burgers

The Best Spicy Chicken Burgers

A healthy alternative to hamburgers. These juicy and flavorful ground chicken burgers are made up of just the right ingredients.

Healthy nachos in a cast iron skillet.

Healthy Nachos

Healthy nachos are made with your choice of ground chicken, turkey, or beef and loads of veggies, and mixed with your favorite salsa.

Ground Chicken Tacos

Ground Chicken Tacos

Photo Credit: www.slenderkitchen.com

This quick and easy recipe is perfect because it's completely customizable to your taste preference and what's available in your kitchen.

Air Fryer Ground Chicken Meatballs

10 Minute Air Fryer Ground Chicken Meatballs

Photo Credit: pinchmegood.com

Ground Chicken Meatballs make for an easy weeknight meal. Serve them over noodles, rice, vegetables, or eat them a la carte.

Ground Chicken Chili

Ground Chicken Chili

Photo Credit: www.staysnatched.com

A perfect weeknight meal on a cold night that is healthier and has fewer calories than chili with beef. Use this recipe or swap out your favorite chili recipe that calls for ground beef.

Ground Chicken Meatloaf

Ground Chicken Meatloaf

Photo Credit: littlesunnykitchen.com

This is not your mom's meatloaf with this healthy twist on a classic comfort food.

Asian Ground Chicken Lettuce Wraps

Asian Ground Chicken Lettuce Wraps

Photo Credit: www.eatingonadime.com

Wow the family with this easy, healthy dish that is also packed with a ton of flavor.

Homemade Ground Chicken Nuggets

Homemade Chicken Nuggets

Photo Credit: temeculablogs.com

The kids will love this one and so will mom because these baked nuggets are not only tasty but a healthier way to eat nuggets.

Ground Chicken Stuffed Bell Peppers

Ground Chicken Stuffed Bell Peppers

Photo Credit: sailorbailey.com

This nutritious alternative is low carb, gluten-free and features bell peppers stuffed with meat, veggies and a little heat.

One-Skillet Ground Chicken Pasta

One-Skillet Ground Chicken Pasta

Photo Credit: www.eatingwell.com

This versatile dish includes your choice of pasta and is made with meat, veggies, Italian seasoning, marinara sauce and two types of cheese.

Creamy Ground Chicken Soup

Creamy Ground Chicken Soup

Photo Credit: chefjar.com

This soup is ready in 30 minutes and is made with simple ingredients such as potatoes, mushrooms, celery, onion, spinach and seasonings.

Ground Chicken Casserole

Ground Chicken Casserole

Photo Credit: www.thelittlepine.com

This keto friendly casserole is made with red onions, cauliflower rice, tomatoes, cream cheese and cheddar with only 20 minutes prep and cook time each.

Ground Chicken Stir Fry with Green Beans

Ground Chicken Stir Fry with Green Beans

Photo Credit: confessionsofafitfoodie.com

Just a few pantry ingredients and 30 minutes is all you need to make this naturally gluten and dairy free dish.

Ground Chicken Enchiladas

Ground Chicken Enchiladas

Photo Credit: ccstable.com

Not only is this recipe easy to make, it's ideal for making ahead on a busy weeknight when you won't have time to prepare.

Easy Chicken Spaghetti

Easy Chicken Spaghetti

Photo Credit: www.inspiredtaste.net

Enjoy this quick and budget-friendly chicken spaghetti in under 30 minutes with a pre-made marinara sauce that is infused with garlic, rosemary, and red wine for added flavor.

Ground Chicken Teriyaki

Ground Chicken Teriyaki

Photo Credit: www.tablefortwoblog.com

Just 4 ingredients and 15 minutes is all you need to have this meal ready for the dinner table.

Ground Chicken Sloppy Joes

Ground Chicken Sloppy Joes

Photo Credit: simplytodaylife.com

This kid-friendly meal is incredibly simple to make and perfect for almost any budget.

Chicken Taco Salad

Chicken Taco Salad

Photo Credit: www.chelseasmessyapron.com

If you're looking for something lighter but still packed with lean protein then this salad is for you.

Instant Pot White Chicken Chili

Instant Pot White Chicken Chili

Photo Credit: www.howewelive.com

This soup is made with simple ingredients such as corn, white beans, sour cream, peppers, green chilis and sour cream, and is ready in 40 minutes.

Air Fryer Chicken Kebabs

Air Fryer Chicken Kebabs (kababs)

Photo Credit: spicecravings.com

These are really easy to make and you can make a meal out of these with naan and saffron rice, or even a sandwich.

Healthy Ground Chicken & Broccoli Stir Fry

Healthy Ground Chicken and Broccoli Stir Fry

Photo Credit: thewholecook.com

Packed with broccoli and protein this dish is ready in 25 minutes. Perfect for a busy weeknight dinner.

Buffalo Chicken Sliders

Buffalo Chicken Sliders with ground chicken

Photo Credit: foodyschmoodyblog.com

The easy recipe is ready in 15 minutes using store bought buffalo sauce, ranch and slider buns.

Easy Chicken Lasagna

Easy Chicken Lasagna Recipe

Photo Credit: www.eatingonadime.com

This clever recipe uses frozen cheese ravioli, pre-made marinara sauce, Italian seasoning and two cheeses. The prep time is minimal and all you have to do is wait for it to bake.

Chicken Gyros

Chicken Gyros

Photo Credit: nourishednutritioncounseling.com

Enjoy a Mediterranean style dinner with this easy meal loaded with vegetables and lean meat.

Firecracker Ground Chicken

Firecracker Ground Chicken

Photo Credit: masonfit.com

This high protein, no carb recipe is made with chicken simmered in chili oil and coated in a sweet and spicy firecracker sauce.

Cajun Chicken Meatballs in Cajun Cream Sauce

Cajun Chicken Meatballs in Cajun Cream Sauce

Photo Credit: whoneedsacape.com

This one-pan meal with with a Cajun cream sauce is perfect over rice or pasta for a hearty family dinner.

Why You'll Love These Ground Chicken Recipes

Easy to Use - Can be used in a wide range of recipes and is an easy substitute for recipes calling for ground beef or turkey.

Healthy - A lean source of protein while providing a valuable source of vitamins and minerals such as B vitamins, selenium, and phosphorus.

Versatile & Tasty - Whether you're making burgers, chili, meatballs, tacos, or stir-fries, ground chicken easily takes on the flavors of many dishes.

Affordable - Chicken is generally more affordable than other types of meat and ground chicken can be even more cost effective because it's easier to produce and can use a variety of less expensive chicken cuts.


More Ground Chicken Ideas

We've put together a list of even more ground chicken recipe ideas so you'll always have one ready when you need it!

Comfort Food with a Twist

  • Ground Chicken Meatloaf - a lighter take on the classic, moist and flavorful.
  • Chicken Shepherd's Pie - creamy mashed potatoes over a hearty chicken and veggie filling.
  • Chicken Chili - white chicken chili or a tomato-based version.
  • Ground Chicken Sloppy Joes - saucy, sweet-savory, and kid-friendly.

Weeknight-Friendly Dinners

  • Ground Chicken Tacos - quick, easy, and perfect for taco night.
  • Chicken Enchiladas - rolled in tortillas with green or red sauce.
  • Stuffed Peppers with Ground Chicken - healthy and customizable.
  • Ground Chicken Pasta Skillet - one-pan meal with garlic, veggies, and parmesan.
  • Chicken Lasagna or Baked Ziti - comfort food lightened up.

Asian-Inspired Ground Chicken Recipes

  • Chicken Lettuce Wraps - fresh, crisp, and restaurant-style.
  • Thai Basil Chicken (Pad Krapow Gai) - spicy, savory, and fast.
  • Chicken Fried Rice - better than takeout, made at home.
  • Egg Roll in a Bowl - low-carb, high flavor.
  • Ground Chicken Dumplings or Potstickers - freezer-friendly and fun to make.

Mediterranean & Middle Eastern Flavors

  • Chicken Kofta Kebabs - spiced skewers grilled or broiled.
  • Ground Chicken Gyros - wrapped in pita with tzatziki.
  • Chicken Shawarma Bowls - served with rice, salad, and creamy sauce.
  • Chicken Kefta Meatballs - paired with couscous or flatbread.

Ground Chicken Burgers, Sandwiches & Wraps

  • Classic Chicken Burgers - juicy and well-seasoned.
  • Buffalo Chicken Burgers - spicy with blue cheese or ranch.
  • Chicken Parmesan Sandwiches or Sliders - cheesy and crowd-pleasing.
  • Chicken Pita Wraps with Hummus - fresh and Mediterranean-inspired.
  • Chicken Banh Mi Sandwich - a Vietnamese classic made with ground chicken.

Soups & Stews

  • Italian Wedding Soup with Chicken Meatballs - cozy and flavorful.
  • Chicken Tortilla Soup - topped with avocado and crispy tortilla strips.
  • Chicken Pho - aromatic broth with seasoned ground chicken.
  • Chicken Meatball Miso Soup - light but satisfying.

Appetizers & Small Bites

  • Ground Chicken Meatballs - endless variations: Buffalo, BBQ, teriyaki, or Mediterranean.
  • Chicken Quesadillas - fast and cheesy.
  • Chicken Nachos - the ultimate party snack.
  • Stuffed Mushrooms with Ground Chicken - elegant appetizer.
  • Chicken Sausage Rolls - wrapped in puff pastry for gatherings.

Meal Prep & Healthy Options

  • Ground Chicken Lettuce Cups - low-carb and high-protein.
  • Chicken Quinoa Bowls - with roasted veggies and tahini dressing.
  • Chicken Stir-Fry Bowls - fast, versatile, and great for leftovers.
  • Chicken Chili Meal Prep - freezer-friendly and hearty.
  • Chicken Meatball Lunch Boxes - protein-packed for grab-and-go meals.

Creative & Unexpected Uses

  • Ground Chicken Pizza Topping - spicy or Italian-seasoned chicken crumbles.
  • Chicken Breakfast Sausage Patties - homemade and lean.
  • Chicken-Stuffed Zucchini Boats - fresh and filling.
  • Ground Chicken Chili Mac - the ultimate comfort combo of pasta and chili.
  • Stuffed Spaghetti Squash with Ground Chicken - low in carbs!

Ask AI to give you even more ground chicken recipe ideas

ChatGPT
Google AI
Perplexity
Grok

Frequently Asked Questions

Is ground chicken healthier than ground beef?

Ground chicken is often leaner than ground beef, making it lower in calories and fat while still providing plenty of protein. It's a good choice if you're looking for a lighter option, though it can dry out more quickly, so recipes often include ingredients like onions, sauces, or cheese to keep it moist.

Can I substitute ground chicken for ground beef or turkey?

Ground chicken can usually be swapped in for ground beef or turkey in most recipes. Keep in mind that chicken has a milder flavor, so it benefits from more seasoning, marinades, or sauces. It's works especially well in tacos, pasta dishes, soups, and casseroles.

What's the best way to season ground chicken?

Ground chicken has a pretty neutral flavor, so it's very versatile. You can use Italian herbs and garlic for pasta, chili powder, chipotle, and cumin for Mexican recipes, or soy sauce, hoisin sauce, and ginger (either fresh or ground) for Asian dishes.

How do I keep ground chicken from drying out?

Ground chicken is lean, so it dries out much faster than ground beef. Cooking it in sauces, soups, or stir-fries helps to keep it juicy, and you want to avoid overcooking it whenever possible.

Can you freeze ground chicken recipes?

Many ground chicken dishes (chili, meatballs, soups, and stuffed peppers) freeze really well. Store them in airtight containers or freezer bags, label them with the date, and they'll keep for up to 3 months. Thaw them in the fridge overnight before reheating.

Is ground chicken good for meal prep?

Recipes like chicken meatball bowls, stir-fries, or chili can be made in bulk, portioned out, and stored in the fridge for several days of easy lunches or dinners.

Candied Jalapeno Cocktails (4 Ways!)

January 26, 2024 by Heidi Deal

Candied Jalapeno Cocktails

If you like a hint of heat in you cocktails, you'll love these candied jalapeno cocktails! A little sweet and a little spicy takes your favorite drink to the next level.

Candied Jalapeno Cocktails aka Cowboy Candy Cocktails

If you've ever had a margarita at your local Mexican restaurant, you may have seen some drinks with jalapeno added to the mix. If you like a little spice, these are pretty delicious. When done right, the spice isn't overpowering, but your palette will pick up that hint of spice that jalapenos impart.

You can use fresh or pickled jalapenos to make cocktails, but I'm here to tell you that candied jalapenos are the way to go. Make a batch of candied jalapenos and keep them in a jar in the refrigerator to add to everything from hot dogs and tacos to margaritas and mojitos.

When using the candied jalapenos to make cocktails, you have options:

  1. Use in place of simple syrup: Add 2 to 3 teaspoons of the candied jalapeno syrup to the drink to add just a touch of the jalapeno heat.
  2. Muddle the jalapenos: Add them to the bottom of the glass or shaker with mint, lime, and other ingredients then mix into your cocktail and serve over ice. If you don't want the chunks of jalapeno, use a strainer when pouring into your glass.
  3. Use the syrup and the rings: This will create a more obvious heat to the cocktails, but you can choose how much of each to add to control the level of heat. You can use the rings as a garnish too if you wish.

Notes About Our Candied Jalapeno Cocktails

Refer to the Cowboy Candy Cocktail recipe card below for a complete list of ingredients with measurements.

Candied Jalapeno Moscow Mule aka Cowboy Candy Mule

Moscow Mules are traditionally made with vodka, ginger beer, and lime juice and garnished with mint and lime. You'll often see these served in copper cups that help consumers enjoy the chill of a cold and refreshing cocktail. The jalapeno syrup adds just the right amount of spice to this invigorating drink that is perfect for an after-work happy hour cocktail. Want to make it a Kentucky Cowboy Candy Mule? Use bourbon instead of vodka!

Candied Jalapeno Moscow Mule Recipe (Cowboy Candy Mule)
Candied Jalapeno Moscow Mules

Candied Jalapeno Mojito

The traditional mojito is made with rum, mint, lime juice, club soda or soda water, and simple syrup. In our mojito, we replace the simple syrup with candied jalapeno syrup giving this refreshing Cuban cocktail a slightly spicy zing. We also like to use 7-Up instead of soda water or club soda as it imparts an extra touch of sweetness that is usually imparted by the simple syrup. This might just be your favorite cool-down cocktail on a warm day!

Candied Jalapeno Mojito Recipe
Candied Jalapeno Mojito

Candied Jalapeno Margarita

Margaritas with jalapenos in them are becoming more popular on menus in bars and restaurants. This recipe is based on a traditional margarita, and you choose you favorite tequila. The candied jalapeno syrup replaces the triple sec, but you can add that too if you like the orange flavor that it imparts.

Candied Jalapeno Margarita Variations

  • Make it a blended margarita by adding the tequila, ice, lime juice and candied jalapeno syrup and rings to the blender. Blend well then pour in garnished rocks glass.
  • Add your favorite fruit puree, or frozen fruit, then blend. Strawberry and pineapple are great with the hint of jalapeno.
  • Add cucumber or mint to add a cooling element to your margarita.
  • Make it a Cadillac and top it with Grand Marnier or Cointreau.

Candied Jalapeno Martini

Classic martinis are made with the very minimal gin and vermouth, shaken over ice, then strained into a martini glass garnished with an olive or a twist (lemon peel). You can do the same with vodka instead. For our recipe, we eliminate the vermouth and replace it with a splash of lime juice and a dash of candied jalapeno syrup. Change the recipe up however you choose to find your perfect level of spice on this one!

More Candied Jalapeno Cocktails Ideas

Once you've made your candied jalapenos, you'll have plenty on hand to experiment. Get creative and make some great candied jalapeno cocktails. Here are some other ideas to consider.

  • Flavors that pair well with candied jalapeno cocktails: cucumber, kiwi, mango, pineapple, pomegranate, watermelon, grapefruit, peach, orange, lemon
  • Use mezcal instead of tequila for your margaritas
  • Add the candied jalapeno rings and syrup to a bloody mary
  • Instead of a margarita, make a candied jalapeno paloma with tequila, grapefruit soda, lime, and candied jalapeno
  • Add a splash of candied jalapeno syrup to whiskey or bourbon for a little kick
  • You can make alcohol-free candied jalapeno cocktails as well! Or add it to smoothies or agua fresca
Candied Jalapeno Cocktails

Candied Jalapeno Cocktails Recipes (4 Ways!)

Yield: 1 cocktail per recipe
Prep Time: 5 minutes
Total Time: 5 minutes

If you like a hint of heat in you cocktails, you'll love these candied jalapeno cocktails! A little sweet and a little spicy takes your favorite drink to the next level.

Ingredients

Candied Jalapeno Moscow Mule

  • 2 ounces vodka
  • ¾ ounce of lime juice (fresh or from the little bottles)
  • ½ cup ginger beer (we use Bundaberg)
  • 2-3 teaspoons candied jalapeno syrup
  • Candied jalapeno rings and mint, optional

Candied Jalapeno Mojito

  • 2 ounces rum (use a white/light rum like Bacardi Superior)
  • 1 ounce lime juice
  • 8-12 fresh mint leaves
  • 1-2 ounces 7-Up, club soda, or sparkling water
  • 2 to 3 teaspoons candied jalapeno syrup
  • Mint sprigs and lime wedges as optional garnishes

Candied Jalapeno Margarita

  • 2 ounces tequila of your choice (we like a good blanco tequila but you can use your favorite!)
  • 1.5 ounces fresh lime juice
  • .5 to 1 ounce candied jalapeno syrup
  • Margarita salt or tajin for rim (optional)

Candied Jalapeno Martini

  • 4 to 5 ounces Vodka or Gin
  • .5 to 1 ounce lime juice
  • 2 to 3 teaspoons candied jalapeno syrup (and rings if desired)

Instructions

Candied Jalapeno Moscow Mule

  1. Add lime juice, vodka, and candied jalapeno syrup (and rings if using) to a shaker and mix well. If you don't have a shaker, you can just add them to the cup and mix together.
  2. Add ginger beer.
  3. Add ice and garnish with a lime wedge and/or a sprig of mint and serve in a copper mule mug if you have one.

Candied Jalapeno Mojito

  1. Add lime juice, mint leaves, and candied jalapeno syrup (and rings if using) to shaker or bottom of glass and muddle well.
  2. Add rum to shaker or glass and mix well.
  3. Top with 7-up or club soda and add ice.
  4. Garnish, serve, and enjoy.

Candied Jalapeno Margarita

  1. Moisten the rim of a rocks glass then dip in tajin or salt (if desired).
  2. Add tequila, lime juice, and candied jalapeno syrup (and rings) to shaker.
  3. Add ice to shaker and mix well.
  4. Pour into glass and add extra ice if needed.
  5. Garnish with lime wedge (optional).

Candied Jalapeno Martini

  1. In a shaker, add vodka or gin of your choice, lime juice, and candied jalapeno syrup (and rings if using), then fill with ice.
  2. Shake well.
  3. Use a strainer and pour into martini glasses.
  4. Garnish with lime wedge and a jalapeno ring.

Notes

Use this recipe for candied jalapenos slices and syrup.

If you prefer your cocktails with a little less alcohol drop it down to an ounce and a half or even an ounce of alcohol.

© Heidi Deal
Cuisine: American / Category: Drinks
Candied Jalapeno Cocktails (4 Ways!)

Candied Jalapeno Cocktails Recipes

For our candied jalapeno cocktails, we use basic classic cocktail recipes then build on them by adding our candied jalapeno syrup and rings. Here are our favorites:

Try These Recipes Next!

  • 30+ Champagne Cocktail Recipes
  • 20 Incredible Moscow Mule Recipes
  • The Jason Mimosa (Hawaiian Mimosa with Vodka)

Birria Ramen Recipe

January 25, 2024 by Monique McArthur

Birria Ramen Recipe

Move over birria tacos because birria ramen is out of this world! Nuanced consommé, tender beef, and ramen noodles are a match made in heaven.

When I first heard about birria ramen, I thought it was an intriguing fusion, so I had to try it. Blending the robust flavors of birria with the familiar comfort of ramen is genius! This twist on ramen is nuanced, standing out distinctly from classic versions. The broth takes center stage with its thicker, richer consistency, and an unmistakable smoky sweetness adds a uniquely satisfying dimension. Grab your chopsticks and a ramen soup spoon!

Easy Birria Ramen Recipe

Why You'll Love Birria Ramen

Fall-apart tender beef - Minimal work is required to shred it. The meat will start falling apart when you try to lift it from the pot.

Drinkable broth - Once the beef and ramen are gone, you will pick up the bowl and down any broth that's left. It is that delicious.

Freshness throughout - Although there are a lot of big, bold flavors going on, the aromatics and tomato puree keep everything tasting fresh.

Hearty and cozy - There's no shortage of beef in each bowl, and the hot broth paired with the heat of the chiles will warm you from the inside out. Note that this recipe is not super spicy. It is relatively mild, but you can up the heat with hot sauce, spices, and toppings if you like extra heat.

Versatile - I'll go into more detail in a bit, but there are so many directions you can go with birria ramen.

Birria Ramen Ingredients Notes

  • Beef chuck roast: I recommend a bone-in roast if you can find it since the bones help create an even more flavorful broth. Alternatively, you can replace 2-3 pounds of roast with beef short ribs.
  • Aromatics: Onion, garlic, carrot, and celery take this birria ramen over the top. Without them, the flavor profile isn't as outstanding.
  • Chiles: Most of the chiles used are guajillos. They have a lot of depth. They are sweet and tangy with an underlying smokiness. Morita chile peppers and chipotle mecos also make an appearance. Moritas have a nice fruitiness, whereas Chipotle mecos are very smoky (like BBQ smoky) and peppery.
  • Beef bouillon: Specifically granulated, enhances the beefiness of the broth.
  • Cumin: This is a must for any birria recipe, whether you're making ramen or tacos. The warm, earthy spice adds a lot of depth.
  • Tomato puree: Puree is preferred over sauce since it includes no additional seasonings like herbs and spices. Tomato puree is also thicker.
  • Ramen noodles: You can use the noodles from any packages of ramen you have or go all out with traditional Japanese ramen noodles.

Find the complete birria ramen ingredients list with measurements in the recipe card below.

Birria Ramen Ingredients

How To Make Birria Ramen

  1. Sear: The first thing you want to do is sear the beef on all sides. Although it may seem counterintuitive since the meat is cooked in liquid, this extra step leaves fond at the bottom of the pot, adding a layer of beefy goodness to the consommé. Once done, remove the beef and set it aside.
  2. Saute: Add the aromatics and chiles to the pot with the residual oil and fond to wake up the flavors and get a nice toast on the chiles.
  3. Build the broth: I like to add the seasonings first to wake up the flavors. Then, I follow with the water and broth, return the meat to the broth, and leave that to simmer for half an hour to rehydrate the chiles and draw out impurities from the meat that will float to the top.
  4. Blend: Fish out the chiles, blend with some broth, and pour the puree into the pot. After that's done, leave to simmer for a few hours. In the meantime, relax or get a few tasks done.
  5. Shred: Remove the beef, shred it, and discard the bones and aromatics. You can remove them with tongs or use a strainer. Some of the aromatics may dissolve due to the long cooking time - my carrots and onions were nowhere to be found. But the bay leaves are the ones you really want to try to find and remove.
  6. Build the bowls: Cook the ramen noodles, divide them between the bowls, top with beef, then ladle the broth over the top. Afterward, you can add your desired toppings.
Birria simmering in broth
Sliced birria meat

Variations, Substitutions, and Cooking Tips

Make it vegan - Swap the beef for tofu (stick with 2-3 ounces per serving) and use vegetable bouillon instead of beef. The cooking process will differ as well. Since you're not slow-cooking beef, you can simmer the broth until you like the flavor of it and add the tofu towards the end.

Experiment with chiles - Anchos and pasillas are pretty standard as are arbols. You may even want to incorporate a fresh jalapeno or two.

Have the toppings ready to go - This makes assembly easy, plus the smell of birria ramen is so mouthwatering that you'll want a bowl as soon as possible. The consommé takes hours, so there's no reason to extend the wait. Toppings to consider include:

  • Lime wedges
  • Soft or hard-boiled eggs
  • Shredded cabbage
  • Chopped fresh cilantro
  • Sliced radish (fresh or pickled)
  • Chopped fresh or pickled onion (pickled red onions add a great tangy element to the dish!)
  • Sliced jalapeno (fresh, pickled, or candied)
  • Sliced fresh green onions
  • Cotija cheese or queso fresco
  • Hot Sauce, like Sriracha or Tapatio
Birria Ramen Toppings

Make Ahead

Birria ramen is a great make-ahead. Prepare as instructed and cook noodles as needed. You probably won't serve eight bowls of ramen at once, so only cook the amount of noodles you need and store the rest of the consommé and beef in the fridge (in an airtight container) for a later time. If stored properly, the beef and consommé will keep in the refrigerator for up to 5 days, and can be stored in the freezer for up to 3 months.

How To Use Leftover Birria

  • Make more ramen noodles and top it with birria
  • Make tacos! Serve it with corn tortillas, chopped fresh onion and cilantro and a squeeze of lime juice for street taco style
  • Serve it burrito style
  • Eat on its own as a stew
  • Make enchiladas
  • Birria quesadillas are amazing! Especially with shredded Oaxaca.
  • Put it on a homemade pizza
  • Make taquitos
  • Tostadas, or do it Mexican Pizza Style
  • Birria Fries
  • Birria Nachos
  • Add it to pasta instead of ramen
  • Use it as a topping for plain or tomato rice
Birria Ramen Recipe

Birria Ramen Recipe

Yield: 8 Servings
Prep Time: 15 minutes
Cook Time: 4 hours 10 minutes
Total Time: 4 hours 25 minutes

Move over birria tacos because birria ramen is out of this world! Nuanced consommé, tender beef, and ramen noodles are a match made in heaven.

Ingredients

  • 2 tablespoons neutral oil of choice
  • 6 pounds beef chuck roast (preferably on the bone), cut into 4-5 large pieces
  • Kosher salt
  • 1 yellow onion, peeled and halved
  • 4 (1-inch) pieces of carrot
  • 2 (1-inch) pieces of celery
  • 6 garlic cloves, stem ends removed
  • 6 guajillo chiles, stems and seeds removed
  • 1 chipotle Morita, stems and seeds removed
  • 1 chipotle meco, stems and seeds removed
  • 5 tablespoons granulated beef bouillon
  • 2 teaspoons chili powder
  • ½ teaspoon ground cumin
  • 9 cups water
  • 1 cup tomato puree
  • 3 bay leaves
  • 1 teaspoon kosher salt
  • ¼ teaspoon black pepper
  • ¾ teaspoon dried oregano
  • 12 ounces ramen noodles

Optional Toppings

  • Lime wedges
  • Soft or hard-boiled eggs
  • Pickled onion
  • Shredded cabbage
  • Chopped fresh cilantro
  • Sliced jalapeno
  • Sliced radish

Instructions

Beef and Consommé

  1. Heat the oil in a large pot over medium-high heat—season the meat with salt.
  2. Brown the meat on all sides, work in batches if necessary, then transfer to a platter.
  3. Add the onion, carrots, celery, garlic, and chiles to the pot.
  4. Cook for 5 minutes; add the beef bouillon, chili powder, and cumin. Stir to wake up those flavors.
  5. Return the meat to the pot and pour in the water. Add tomato puree, bay leaves, salt, and pepper as well.
  6. Bring to a boil, reduce to a simmer, cover, and simmer for 30 minutes.
  7. Skim any impurities that collect at the top of the pot.
  8. Remove the chiles and transfer them to a blender. Blend until smooth, adding broth as needed.
  9. Place a strainer over the pot and pour the puree through it to remove any bits of skin. Stir to combine.
  10. Cover the pot and simmer for 3-3 ½ hours or until the beef is fall-apart tender and easy to shred. Uncover the pot to stir every 30 minutes or so. Add the oregano during the last 30 minutes.
  11. Skim any fat off the top.
  12. Remove and discard the aromatics. This includes the onion, carrot, celery, garlic, and bay leaves.
  13. Remove the meat and shred. Also, discard any bones.

Ramen

  1. Bring a large pot of water to a boil.
  2. Add the noodles and cook for 2-3 minutes.
  3. Drain the noodles and divide them between the serving bowls. Top with shredded beef.
  4. Ladle the birria consommé over the noodles and beef.
  5. Complete each bowl with any desired toppings and enjoy.
Nutrition Information:
Yield: 8 Serving Size: 1
Amount Per Serving: Calories: 914Total Fat: 57gSaturated Fat: 23gTrans Fat: 3gUnsaturated Fat: 31gCholesterol: 283mgSodium: 1604mgCarbohydrates: 14gFiber: 2gSugar: 5gProtein: 87g

This data was provided and calculated by Nutritionix.

© Monique McArthur
Cuisine: Fusion / Category: Soups and Stews
Birria Ramen Recipe

Try These Recipes Next!

  • Korean Cold Noodle Soup
  • Udon Noodle Soup Recipe
  • 30 Inspiring Ramen Noodle Recipes

Spatchcock Turkey Recipe

January 25, 2024 by Monique McArthur Leave a Comment

Spatchcock Turkey Recipe

Consider spatchcock turkey your new favorite holiday main. The simple butchering method allows you to roast a turkey in a fraction of the time.

There's nothing like roasted turkey, but they take so long to cook. I don't know about you, but when the holidays come around, I want to spend time enjoying the company of my loved ones, not monitoring a turkey for hours. Regardless of the cooking method, turkeys require more prep than, let's say, a chicken, and that is where I prefer to spend the bulk of my time. That way, cooking it is smooth sailing. This spatchcock turkey recipe allows that. By removing the backbone and flattening the bird, you shave hours off the cooking time while getting tender, juicy, flavorful results!

Spatchcock Turkey Recipe

Why You'll Love This Spatchcock Turkey Recipe

Straightforward prep - Spatchcocking a turkey is a bit more extensive, but the steps aren't complex. Poultry shears make quick work of the process, and dry brining is a breeze (as long as you have space in your refrigerator).

Fast Turkey Recipe - When you want to roast a whole bird in a short amount of time, spatchcocking is the way. How else can you roast a 12-14-pound turkey in under two hours?

Well seasoned - If you haven't been dry brining your poultry, or any meat for that matter, now is the time to start. It ensures deeply seasoned, juicy food without diluting the flavor or waterlogging the turkey, which inhibits browning. Furthermore, garlic and butter are applied under the skin for even more flavor!

Super crispy skin - As the turkey sits uncovered in the fridge, the skin dries out due to the loss of surface moisture, and the skin crisps up like a dream. Better yet, it stays crisp!

Easy to carve - Where you should cut is mapped out right before you. Remove the legs, cut the drumsticks from the thighs if you wish, then switch your attention to the breast. Super easy.

How To Carve A Spatchcock Turkey

Spatchcock Turkey Ingredients Notes

For this spatchcock turkey recipe, you'll need:

  • Turkey: Purchase whatever you usually do. Fresh or frozen is fine. A few tips for a good selection include a well-rounded bird, preferably free-range or pasture-raised. Oh, and skip self-basting turkeys. There's no need for the added fat/moisture.
  • Kosher salt: Kosher salt is ideal for dry brining. It sticks well and is easy to distribute evenly since the grains are less prone to clumping due to their size.
  • Brown sugar: Add sugar to your meat and poultry, turkey included. The sweetness enhances the overall flavor without making it sweet. Sugar also tenderizes and puts you on the fast track to browning.
  • Paprika: It adds a faint smoky flavor and a pleasant aroma. The color it contributes is also quite nice.
  • Olive oil: After dry brining, brushing the turkey with a bit of fat is important to assist in crisping the exterior.
  • Aromatics: Since the turkey is spatchcocked, there is no cavity to house the aromatics, but if you place them below the rack the turkey is cooked on, the turkey still benefits.

Refer to the recipe card below for a complete list of ingredients with precise measurements.

Spatchcock Turkey Aromatics & Butter Rub

How To Make Spatchcock Turkey

  1. Spatchcock: Pat the turkey dry, carefully remove the backbone with poultry shears or a knife, flip the turkey over, and press on the breast bone until it cracks so the turkey lays flat. If you skip this step, the turkey won't lie flat.
  2. Brine: Combine salt, black pepper, and brown sugar in a bowl and apply it all over the turkey. All over means on the skin, under the skin, the cavity area, everywhere.
  3. Chill: Place the turkey on a wire rack over a baking sheet and leave to brine, uncovered, for 12 hours. It is essential to leave the turkey uncovered to dry out the skin.
  4. Butter it up: Combine the butter, garlic, and paprika in a bowl, then apply this under the skin. To do this, separate the skin from the meat by gently sliding your hand underneath so as not to tear the skin, then gently work the butter into this space.
  5. Roast: Lightly brush the skin with oil, then roast the turkey at 425°F.
How To Spatchcock Turkey

Variations, Substitutions, and Cooking Tips

Experiment with aromatics - Carrots, lemon, fennel, leeks; use what you like.

Use sea salt instead - Coarse sea salt will do if you don't have kosher salt. Just don't use fine or flaked sea salt.

Set a timer for 1 hour - After this time, you want to start closely monitoring the internal temperature to avoid overcooking. Overcooked turkey is subpar turkey.

Always tuck the tips - The wing tips, that is. Just tuck underneath the breast to prevent them from burning. Skip this step, and you may notice a charred, bitter aroma wafting from the oven before the turkey is cooked.

Verify proper temperature - To prevent overcooking, the turkey comes out of the oven a few minutes shy of the goal temperature of 165°F because carry-over cooking will take place. That said, always check the internal temperature after resting to ensure that this temperature is reached before serving. Food safety is the number one priority, after all.

Fast Turkey Recipe
Flip the turkey to expose the backbone
Turkey with Backbone Removed
Turkey with backbone removed
Backbone for Turkey bone broth
Keep the backbone if you'd like to make bone broth

Try making these stewed turkey necks instead of tossing them.

Spatchcock Turkey Recipe

Spatchcock Turkey Recipe

Yield: 36 Servings
Prep Time: 45 minutes
Cook Time: 1 hour 30 minutes
Additional Time: 12 hours
Total Time: 14 hours 15 minutes

Consider spatchcock turkey your new favorite holiday main. The simple butchering method allows you to roast a turkey in a fraction of the time.

Ingredients

  • 1 12-14 pound turkey, neck and giblets removed
  • ¼ cup kosher salt
  • 1 tablespoon black pepper
  • 1 tablespoon light brown sugar
  • ½ cup unsalted butter, softened
  • 3 garlic cloves, minced
  • ¼ teaspoon sweet or smoked paprika
  • 2 tablespoons olive oil
  • 1 yellow onion, quartered and peeled
  • 2 ribs of celery, cut into 2-inch pieces
  • 3 garlic cloves, peeled and smashed
  • ½ cup water or chicken broth

Instructions

    1. Pat the turkey dry with paper towels and transfer the turkey to a cutting board breast side down.
    2. Cut along both sides of the backbone using poultry shears or a sharp knife to detach it.
    3. Use a sharp knife to cut down the oblong bone in the center of the breast. This cut makes it easier to break the breastbone when it is time to do so.
    4. Flip the turkey so it is breast-side up, and turn the legs out.
    5. Firmly press down on the breastbone until you hear a crack.
    6. Transfer the turkey to a wire rack placed over a rimmed baking sheet.
    7. Combine the kosher salt, black pepper, and brown sugar in a small bowl. This is the dry brine.
    8. Apply the dry brine all over the turkey.
    9. Place into the refrigerator to brine, uncovered, for at least 12 hours. After this time, the skin should appear taut and dry.
    10. Preheat the oven to 425°F. Also, combine the butter, garlic, and paprika in a bowl.
    11. Line a deeper roasting pan with foil, add the aromatics, pour in the water or broth, then place the rack on top.
    12. Use your hands to separate the skin from the meat, then apply the butter underneath the skin.
    13. Tuck the wing tips behind the breast to prevent them from burning.
    14. Rub the skin with oil, then roast the turkey for 1 hour and 30 minutes or until the internal temperature reaches 155°F. Start to check the internal temperature after an hour.
    15. Remove the turkey from the oven and rest for 15 minutes. During this time, the internal temperature will increase to 165°F due to carry-over cooking.
    16. Carve and serve.
Nutrition Information:
Yield: 36 Serving Size: 1
Amount Per Serving: Calories: 378Total Fat: 17gSaturated Fat: 6gTrans Fat: 0gUnsaturated Fat: 10gCholesterol: 215mgSodium: 634mgCarbohydrates: 1gFiber: 0gSugar: 0gProtein: 52g

This data was provided and calculated by Nutritionix.

© Monique McArthur
Cuisine: American / Category: Dinner
Spatchcock Turkey Recipe

Try These Recipes Next!

  • Smoked Turkey Breast
  • What To Do With Turkey Giblets
  • Homemade Turkey Gravy Recipe
  • Creative Thanksgiving Leftover Recipes

How To Roast A Whole Lamb On A Spit

January 25, 2024 by Monique McArthur Leave a Comment

How To Cook A Whole Lamb On A Spit

Roasting a whole lamb on a spit is easier than you think and this guide will help you plan a successful lamb roast and cook it with confidence.

Having Greek friends has its benefits and one of those is celebrating Greek Orthodox Easter with them and enjoying the tradition of Ovelias, where a Greek Easter lamb is roasted on a spit. Over the years I gradually went from just enjoying the roasted lamb to learning how to cook a whole lamb on a spit. Here is what I learned from my Greek friends.

How To Roast A Whole Lamb On A Spit

Where To Buy A Whole Lamb

Surprisingly, it's easier than you think to find a whole lamb for purchase. There are several options with some varying by your location and the availability being even more likely in the Spring, hence the name Spring lamb.

  • Local Butcher Shops or Meat Markets: Many local butchers carry whole lambs, simply call in advance to confirm.
  • Online Meat Stores: There are many online meat stores that ship whole lambs throughout the U.S. Just make sure you read the reviews and purchase from reputable sources.
  • Farms & Ranches: Many farms and ranches that raise lambs also sell them locally while a fair amount are also willing to ship throughout the U.S.
  • Costco or Costco Business Centers: Some Costco's throughout the U.S. carry whole lambs as well as Costco Business Centers.
  • Restaurant Depot: If you're a restaurant or caterer with access to Restaurant Depot then most likely you'll find a whole lamb in their amazing meat section.
  • Halal Butchers: Lamb is considered halal so if you know of a halal butcher in your area, there is a good chance they carry whole lambs.
  • Farmers' Markets: You may not find whole lamb available at the market but one of the farmers or vendors may be able to tell you where to find one.

The price of a whole lamb will vary based on quality, freshness, how they're raised (e.g. pasture raised), type of lamb, and location. Typically, whole lambs are $3.50 to $12.00 a pound with the more expensive lambs coming from pasture raised, grass-fed farms and never frozen.

Where To Buy A Whole Lamb

Storing A Whole Lamb

Whole lambs should be refrigerated at 40°F or below for up to 3 to 5 days and kept frozen at 0°F or below for up to 3 to 4 months.

Most people won't have a refrigerator or freezer large enough to store so be prepared to store it in an ice chest or bath tub that is large enough to hold a whole lamb and ice. The USDA has a useful Farm to Table guide for storing and handling lamb.

Equipment You'll Need

Spit Roaster - You'll need a large cross-shaped spit, open fire pit or kettle grill. We used this stainless steel rotisserie grill from Ash & Ember. They were known as Titan Outdoor Grills when this was purchased which is why'll you'll see the Titan logo in the pictures.

Charcoal - If you prefer a smokey flavor add wood whips such as mesquite, hickory or cherry on top. If you're using hardwood, you'll need about 50 to 70 pounds of oak or birch. Depending on the spit roaster you're using hardwood lump coal might work as well.

Twine - Use butcher's twine, also known as cooking twine, to stitch the lamb after stuffing with seasonings.

Knives - A quality sharp knife is recommended and always cut against the grain when carving. An 8 to 12 inch paring or carving knife works best to cut the meat while a boning knife will work best to remove skin and bone. A Brazilian knife and cleaver will also work.

Large cutting board - I recommend a large cutting board to carve the lamb. This will make it much easier to carve and prevents ruining any other surfaces with stray cuts.

Roast Lamb Ingredients

  • 25 - 35 pound whole lamb - You'll get about fifty percent meat from a whole lamb.
  • Kosher salt
  • Freshly ground black pepper
  • Cloves of garlic
  • Lemons
  • Fresh rosemary sprigs

Basting Mixture

  • Fresh Lemon Juice
  • Olive oil
  • Kosher salt
  • Freshly ground black pepper
  • Sprigs of fresh rosemary

Refer to the roast lamb recipe card below for the complete ingredients list with measurements and instructions.

Seasoning a lamb
Rosemary, lemon and garlic seasoning for a lamb roast

Lamb Doneness Temperature Chart

We cook the lamb medium-rare to medium as any higher and you risk drying it out.

Preferred DonenessPull TemperatureFinal Internal Temperature*
Medium Rare135˚F145˚F
Medium150˚F160˚F
Well160˚F170˚F

*The USDA recommends cooking lamb to 145°F. By resting the lamb for 15 to 20 minutes prior to carving, the internal temperature will continue to rise about 10 degrees to your desired final internal temperature.

The best way to check doneness is with a digital instant-read thermometer.

Cooked lamb
Meat slices from a whole lamb roast

Tips & Variations

Greek Style Tradition - For the Greeks this is a social event so invite your friends over to help prepare and roast the lamb. When the lamb is almost done, carve of off a few pieces while on the spit. The combination of skin and juicy meat will melt in your mouth!

Oven Baked Lamb - Alternatively, you can cut the lamb into large pieces and roast the individual pieces in the oven. Once ready to roast, preheat the oven to 300°F, place the lamb pieces in a roasting pan, and roast for 3 to 4 hours until the internal temperature reaches 145°F.

Pre-Cut Whole Lamb - If you don't have a spit roaster or simply prefer a pre-cut whole lamb some butchers and specialty meat purveyors like Stemple Creek Ranch and Grand Teton Meat will do this for you.

Roasting Time Factors - Type of heat, weather, wind, size of lamb and an open or half-closed spit can affect cooking time.

Head of the Lamb or Not - This is a presentation preference where many guests may prefer not to see a lamb roasting with its head on.

Butchering A Whole Lamb Cooked On A Spit

How To Roast A Whole Lamb On A Spit

Yield: 12 - 18 pounds of meat
Prep Time: 1 hour
Cook Time: 5 hours
Total Time: 6 hours

Roasting a whole lamb on a spit is easier than you think and this guide will help you plan a successful lamb roast and cook it with confidence.

Ingredients

  • 1 25 - 35 pound whole lamb
  • 1 cup kosher salt
  • ¼ cup freshly ground black pepper
  • 12 cloves of garlic, whole
  • 6 lemons, halved
  • 10 sprigs fresh rosemary

Basting Mixture

  • 3 cups fresh lemon Juice
  • 3 cups olive oil
  • 1 tbs kosher salt
  • 1 tbs freshly ground black pepper
  • 2-3 sprigs of fresh rosemary

Instructions

  1. Rinse the lamb with water to remove any stray hairs or dirt and dry with paper towels.
  2. Place the lamb on its side on a large cutting board, or use trash bags, and use two lemon halves to rub the lamb inside and out, reserve lemon halves for placing inside the lamb.
  3. Liberally season the lamb inside and out with salt and pepper and fill the cavity with the lemon halves, garlic cloves, and rosemary sprigs (save a couple for basting).
  4. Stitch the stomach cavity with twine to seal the seasoning. Use an eye needle, end of a pointy knife or screwdriver to make the holes for threading.
  5. Skewer the lamb through the front and back cavities and secure with "U" clamps to prevent the lamb from spinning. Bind the front legs with twine while interlocking and binding the hind legs. This may slightly vary by rotisserie spit.
  6. Preheat the coals until they're red hot, about 30 minutes and ensure that the lamb has come to room temperature, about 30 to 60 minutes.
  7. Once ready, place the lamb at the lowest rung level of the spit and roast for 1 hour.
  8. Combine the basting mixture ingredients of lemon juice, olive oil, salt, and black pepper. Use the rosemary sprigs as the basting brush and baste every 20 to 30 minutes.
  9. After 1 hour place the lamb at the highest rung level of the spit for 3 hours.
  10. Lower the lamb to the middle or lowest rung for the remaining time and until it reaches at least a medium rare pull temperature of 135 degrees Fahrenheit (see temp chart for doneness levels). Temperature should be measured in the thickest part of the lamb, the leg or shoulder area.
  11. Allow the lamb to rest for 15 to 20 minutes, then carve.

Notes

For best results and easy day of roasting, season, stitch and skewer the lamb the day before (steps 1-5).

Monitor the charcoal level to maintain heat, and add more charcoal as needed.

Cook time is an estimate and many factors will affect time. Use an instant read thermometer and pull by desired temperature.

Nutrition Information:
Yield: 60 Serving Size: 1
Amount Per Serving: Calories: 881Total Fat: 66gSaturated Fat: 25gTrans Fat: 0gUnsaturated Fat: 36gCholesterol: 257mgSodium: 1263mgCarbohydrates: 2gFiber: 1gSugar: 1gProtein: 65g

This data was provided and calculated by Nutritionix.

© Monique McArthur
Cuisine: Greek / Category: All Our Recipes
How To Roast A Whole Lamb On A Spit

Try These Mediterranean Recipes Next

  • Rack of Lamb with Herb Crust
  • Tzatziki Sauce
  • Hummus Dip

Easy Potato Corn Chowder without Cream

January 21, 2024 by Kristy Bernardo 82 Comments

creamy summer corn & potato chowder - super creamy with no cream!

This tasty Potato Corn Chowder recipe is very healthy but tastes creamy and luscious - all due to a secret ingredient! It is one of my most requested recipes.

It's so creamy with a wonderful texture from the sweet summer corn. And it's incredibly healthy to boot - the secret is no cream added. How is that possible, you ask?

I add reduced-fat milk (or almond milk) and...silken tofu.

It sounds strange, I hear you. I am not someone who ever eats tofu and the only reason I buy it is to put it in my soups. Because there's no real flavor, tofu simply adds a creamy texture and turns soups into something luscious without all the fat and calories (not to mention the protein if offers)! You could certainly replace the tofu with heavy cream or half-n-half if you're just too wary to go for it - it will be delicious either way!

Easy Potato Corn Chowder without Cream

Potato Corn Chowder Ingredients

  • Olive oil
  • Onion
  • Corn kernels - I use fresh summer corn but canned or frozen corn will work too. It will always be a bit better with fresh summer corn taken right off the cob but when that's not an option, you just have to go with what you've got. And this corn chowder is so delicious that you'll want to make it year-round! No need to boil the corn before cutting off the cob.
  • Russet potato, cut into small bite-sized cubes
  • Chicken stock or broth - Use vegetable broth if you prefer.
  • Reduced-fat milk or almond milk - I've used almond milk with success so if you need or want a dairy free chowder this is an easy substitute.
  • Silken tofu - Silken, as the name implies, is creamier and softer than regular tofu and the secret ingredient to this recipe.
  • Kosher salt - Add a teaspoon or better yet to taste.
  • Freshly ground black pepper
  • Chopped Parsley - For garnish and a little bit extra flavor. Garnish with diced jalapeños if you prefer it spicy.

Refer to the potato corn soup recipe card below for the complete ingredients list with measurements.

How to Make Potato Corn Chowder

  1. Sauté: Sauté the onion then add half the kernels, potato and stock, bring to a boil then simmer.
  2. Blend: Blend the milk, tofu and cooked potato mixture.
  3. Add more corn & season: Add the remaining corn and black pepper and salt, to taste.
  4. Garnish & serve: Add chopped parsley and heat the bowls, if you prefer.
Healthy Potato Corn Chowder Recipe

Tips & Variations

Vegetarian Potato Corn Chowder (or dairy free) - To make this vegan, vegetarian or dairy-free simply substitute the chicken broth with vegetable broth and/or the milk with almond milk.

Make it Meaty - The tofu already has plenty of protein but if you prefer a meatier flavor in your chowder add some diced ham, shredded chicken, bacon, salt pork, crab or shrimp.

Thicken - If you'd like to thicken your chowder add equal parts cornstarch and water or stock and whisk into the soup. Start with a combined tablespoon. You can also add mashed potato flakes to thicken.

Heated bowls - Soups cool off quickly so I like to use heated bowls. I usually pop mine in the microwave, or you can put them in the oven for 30 seconds at 200 degrees Fahrenheit. Adding boiling water to the bowls is another easy trick to warm them up.

Additional garnish - Chopped bacon, croutons, cheddar cheese or a dollop of sour cream would work well as garnishes with this soup.

Easy Potato Corn Chowder without Cream

Easy Potato Corn Chowder without Cream

Yield: 4
Prep Time: 15 minutes
Cook Time: 20 minutes
Total Time: 35 minutes

This healthy chowder is made with corn, potatoes, and seasonings but no cream! To make it creamy all you need is reduced-fat milk or almond milk and a secret ingredient...silken tofu.

Ingredients

  • 1 tbs olive oil
  • ¾ cup chopped onion
  • 2 cups corn kernels (about 4 ears), divided
  • 1 large russet potato, cut into small bite-sized cubes
  • 2 cups chicken stock or broth
  • ½ cup reduced-fat milk or almond milk
  • ⅓ cup silken tofu
  • 1 teaspoon kosher salt, or to taste
  • ½ teaspoon freshly ground black pepper
  • chopped parsley, for garnish

Instructions

  1. Preheat large sauté pan over medium heat. Add onion, sauté about four minutes or until soft. Add half of corn kernels, potato and stock, bring to a boil then simmer until potatoes are soft (about 15 minutes).
  2. Add milk, tofu and cooked potato mixture to Vitamix or blender (or stockpot, saucepan, etc. then just use a hand blender once hot). Start on low speed and then quickly to high. Blend for 2-3 minutes until soup is very hot.
  3. Add remaining corn to soup and stir. Carefully taste soup and add black pepper and kosher salt to taste.
  4. Garnish with chopped parsley and optionally, serve in heated bowls (I just heat mine in the microwave).
Nutrition Information:
Yield: 4 Serving Size: 1
Amount Per Serving: Calories: 300Total Fat: 9gSaturated Fat: 2gTrans Fat: 0gUnsaturated Fat: 6gCholesterol: 8mgSodium: 603mgCarbohydrates: 46gFiber: 4gSugar: 13gProtein: 12g

This data was provided and calculated by Nutritionix.

© Kristy Bernardo
Cuisine: American / Category: Soups and Stews
Easy Potato Corn Chowder without Cream

More delicious soup recipes:

  • Loaded Potato Soup Recipe - Creamy Cheese & Bacon
  • Easy Instant Pot Potato Soup
  • 15 Minute New England Clam Chowder
  • Seafood Chowder
  • Dairy Free Potato Soup
  • Cheesy Potato Soup with Mexican Chorizo & Roasted Jalapenos

Chocolate Bread Pudding Recipe with Almonds

January 20, 2024 by Kristy Bernardo 2 Comments

Chocolate Bread Pudding Recipe with Almonds

This is THE BEST chocolate bread pudding recipe I have EVER made or EATEN!! So simple, so GOOD and the best way to use stale bread!!

Chocolate Bread Pudding Recipe with Almonds

Chocolate Bread Pudding Ingredients

  • Stale bread - At least a day old stale Artisan french bread is my preference but any stale bread such as white, brioche, challah will work. Fresh bread can quickly be converted to stale too (see below for instructions).
  • Dark chocolate spread - This recipe is versatile so use any chocolate spread you prefer. Nutella is certainly a worthy replacement as well. If you use a almond flavored chocolate spread such as Trader Joe's Cocoa Almond Spread, than use vanilla extract instead of almond extract.
  • Eggs, half & half and granulated sugar - The sweet and creamy ingredients for the custard mixture.
  • Almond extract - Vanilla extract will work in a pinch, you'll just lose a bit of that almond flavor. If you use a chocolate almond spread than do use vanilla extract.
  • Kosher salt - The flavor enhancer.
  • Sliced almonds - Raw almonds work best.

Refer to the bread pudding recipe card below for the complete ingredients list with measurements.

How to Make Chocolate Bread Pudding

  1. Prepare the bread: Spread the dark chocolate almond spread onto half the bread slice and then cut bite-sized pieces.
  2. Make the custard mixture: Beat eggs and sugar in a mixing bowl and the add cream, vanilla extract and salt.
  3. Combine bread and mixture: Pour egg mixture over bread and refrigerate for an hour.
  4. Bake: Bake for 30 minutes, sprinkle on sliced almonds, then bake for another 15 minutes until liquid is absorbed and the top of pudding is lightly browned and almonds are lightly toasted.

How to Quickly Stale Fresh Bread in the Oven

For this recipe it's best that the bread is stale so it will soak up the mixture and keep its shape. Fresh bread tends to get mushy and fall apart.

  1. Preheat oven to 300°F
  2. Cut the bread into slices or cubes, if not already pre-cut.
  3. Place the bread on a baking sheet or pan in a single layer.
  4. Bake for about 15 to 30 minutes until the bread is dry and slightly toasted. Flip or toss the bread once or twice to evenly "stale" the bread.
Chocolate Brioche Bread Pudding Recipe

Bread Pudding Add-Ins

Bread pudding is a versatile dessert and perfect for whatever you have on hand. Try these add-ins and make it your own.

  • Add apples, berries, bananas, raisins or dried cherries.
  • Soak the raisins in bourbon or rum.
  • Use pecans, peanuts and vanilla extract instead of almonds and almond extract.
  • Add shredded coconut.
  • Make it crunchy with crushed pretzels or Oreos.
  • Sweeten it up a bit more with chocolate chips or crushed candy bars.
  • Serve it with ice cream or whipped cream.
Chocolate Almond Bread Pudding Recipe

Chocolate Bread Pudding Recipe with Almonds

Yield: 10
Prep Time: 15 minutes
Cook Time: 45 minutes
Additional Time: 1 hour
Total Time: 2 hours

This is THE BEST chocolate bread pudding recipe I have EVER made or EATEN!! So simple, so GOOD and the best way to use stale bread!!

Ingredients

  • 8 slices artisan french bread, white, brioche, or challah
  • ½-3/4 cup dark chocolate spread, chocolate spread or Nutella
  • 2 eggs
  • ½ cup sugar
  • 1 ¼ cup half & half
  • 1 teaspoon almond or vanilla extract
  • ¼ teaspoon Kosher salt
  • ½ cup sliced almonds

Instructions

  1. Preheat oven to 350°F.
  2. Spread the dark chocolate almond spread onto four slices of bread, dividing it equally. Place remaining bread slices on top, then cut up "sandwiches" into 1 inch bite-sized pieces. Set aside.
  3. Beat eggs and sugar in a mixing bowl. Add cream, vanilla extract and salt, mix thoroughly.
  4. Grease a small baking dish (an 8x8 works well) and add bread cubes. Pour egg mixture over bread, pressing down to ensure it's all submerged. Cover and refrigerate for at least an hour.
  5. Place bread pudding in oven and bake for 30 minutes. Remove from oven and sprinkle on sliced almonds. Place back in oven and bake another 15 minutes or until liquid is absorbed and the top of pudding is lightly browned and almonds are lightly toasted.
Nutrition Information:
Yield: 10 Serving Size: 1
Amount Per Serving: Calories: 554Total Fat: 21gSaturated Fat: 14gTrans Fat: 0gUnsaturated Fat: 6gCholesterol: 60mgSodium: 562mgCarbohydrates: 78gFiber: 4gSugar: 35gProtein: 14g

This data was provided and calculated by Nutritionix.

© Kristy Bernardo
Cuisine: American / Category: Desserts
Chocolate Bread Pudding Recipe with Almonds

More scrumptious dessert recipes:

  • Chocolate Berry Bread Pudding
  • Microwave Chocolate Pudding
  • Chocolate Pots de Crème Recipe
  • Chocolate Truffles
  • Chocolate Mousse with Drunken Cherries

Easy Microwave Chocolate Pudding

January 20, 2024 by Kristy Bernardo 58 Comments

Easy Microwave Chocolate Pudding in a white, scalloped dish on a pink napkin

This Easy Microwave Chocolate Pudding recipe is ready in just 15 minutes with just 6 pantry ingredients, including cocoa powder and no eggs needed.

I was the Chocolate Pudding Queen when I was a kid. I could open that box, stir in the milk and get it thick and creamy on the stove in five seconds flat. Or ten minutes...but you get the idea. I haven't bought the boxed stuff in years but I do still love good chocolate pudding. But then there are days when I just want a good, creamy, hot, chocolate pudding in about ten minutes flat. That's when I turn to this Easy Microwave Pudding recipe.

Easy Microwave Chocolate Pudding in a white, scalloped dish on a pink napkin

Why You'll Love This Chocolate Pudding Recipe

Quick and Easy to Make - Pudding is typically made on the stovetop but microwave pudding is just as good and ready in 15 minutes. You probably have all the ingredients in your pantry already.

So Many Ways to Use - Homemade chocolate pudding can be used for an easy chocolate pie, layered with whipped cream and chocolate shavings for a chocolate parfait, or just enjoyed hot with a spoon!

Microwave Chocolate Pudding Ingredients

The main ingredients in chocolate pudding are cocoa powder, whole milk or cream, and sugar. Cornstarch can be used to thicken it and vanilla extract for flavor. A pinch of salt helps bring out the flavors as well. Egg yolks are also sometimes added but not with this recipe.

  • Granulated sugar - The key ingredient to its sweetness.
  • Unsweetened cocoa powder - Natural or Dutch cocoa powder will work but I recommend Dutch if you have it for its milder taste that works just a bit better with pudding. Guittard, Ghirardelli and Valrhona are a couple of brands that make Dutch cocoa. Hershey's Cocoa is the most common natural cocoa powder you'll find and will work just fine.
  • Cornstarch - The thickening agent that results in a smooth and creamy pudding.
  • Salt - Draws out the flavors of the other ingredients.
  • Whole milk - You can use any milk you like without changing the pudding too much but the fat content in whole milk is the best.
  • Vanilla extract - Adds a subtle vanilla flavor to this dessert.

Refer to the microwave pudding recipe card below for the complete ingredients list with measurements.

How to Make Microwave Chocolate Pudding

  1. Combine Ingredients - Combine all the dry ingredients and whisk in the milk until it's smooth.
  2. Microwave & Whish at Intervals - Microwave for 3 minutes, then whisk it until it's smooth. Microwave for 2 minutes and whisk again. Continue for 1-minute increments until it's smooth and thick and stir in the vanilla extract, once ready.

It's important to whisk your pudding at each microwave interval. Whisk it thoroughly to remove any lumps, then cook it a bit more, then whisk it again. You'll only need to go through this process 3-4 times and it goes very quickly!

Why did my pudding get lumpy?

Pudding most commonly gets lumpy from eggs that weren't tempered first, resulting in "cooked" eggs. This can also happen if the mixture isn't whisked enough during cooking.

How do you keep skin from forming on pudding?

The easiest way to do this is to place a piece of plastic wrap over the surface of the pudding as it cools.

What's the difference between chocolate pudding and chocolate mousse?

Although they're very similar, chocolate mousse is much lighter in texture. This is achieved by folding whipped egg whites or whipped cream into the chocolate. Chocolate pudding has a creamier texture, too.

Easy Microwave Chocolate Pudding in a white, scalloped dish on a pink napkin

Easy Microwave Chocolate Pudding

Yield: 4 servings
Prep Time: 5 minutes
Cook Time: 5 minutes
Total Time: 10 minutes

If you think you can't get a rich, smooth chocolate pudding in the microwave, give this recipe a try!

Ingredients

  • ⅓ cup granulated sugar
  • ¼ cup unsweetened cocoa powder (Dutch if you have it)
  • 3 tablespoon cornstarch
  • ⅛ teaspoon salt
  • 2 cups whole milk
  • 1 teaspoon vanilla extract

Instructions

  1. Combine the sugar, cocoa, cornstarch, and salt in a medium-sized microwave-safe bowl. Whisk in the milk until it's smooth.
  2. Place the bowl in the microwave and cook uncovered on high for 3 minutes, then whisk it until it's smooth.
  3. Place it back in the microwave for 2 minutes and whisk it again. Continue cooking in 1-minute increments until it's smooth and thick. Stir in the vanilla extract.
  4. Spoon into individual serving dishes and serve.
Nutrition Information:
Yield: 4 Serving Size: 1
Amount Per Serving: Calories: 185Total Fat: 4gSaturated Fat: 2gTrans Fat: 0gUnsaturated Fat: 1gCholesterol: 12mgSodium: 117mgCarbohydrates: 31gNet Carbohydrates: 30gFiber: 1gSugar: 23gProtein: 5g

This data was provided and calculated by Nutritionix.

© Kristy Bernardo
Cuisine: American / Category: Desserts
Easy Microwave Chocolate Pudding

More delicious chocolate dessert recipes:

  • Chocolate Berry Bread Pudding
  • Chocolate Almond Bread Pudding
  • Chocolate Pots de Crème
  • Chocolate Truffles
  • Chocolate Mousse with Drunken Cherries
  • « Previous Page
  • 1
  • 2
  • 3
  • 4
  • …
  • 18
  • Next Page »

Trending Recipes

  • a metal basket lined with parchment paper that's filled with air fryer flautas mexicanas and topped with pico de gallo, guacamole, and Cacique cheese. there are bowls of guacamole and fresh pico de gallo in the background.
    Air Fryer Flautas Mexicanas – Crispy in Minutes!
  • a closeup of a coconut smoothie bowl topped with fresh blueberries, granola, and goji berries
    Coconut Smoothie Bowl
  • top down view of two birria tacos on a wooden board next to a small bowl of consommé
    Authentic Birria Tacos Recipe (Step-by-Step with Consommé)
  • A stack of keto chocolate chip cookies next to a glass of milk
    Keto Chocolate Chip Cookies

Popular Spring Recipes

  • a white dish with scalloped edges, filled with an easy pea salad that's topped with chopped parsley on a wooden table
    Make-Ahead Easy Pea Salad for Parties
  • Fried Deviled Eggs on a white plate
    Fried Deviled Eggs with Sausage
  • Beet-Pickled Deviled Eggs Recipe
    Beet-Pickled Deviled Eggs
  • A keto salad on a white plate, made up with grilled romaine, sliced cherry tomatoes, thinly sliced avocado and halved lemon slices for a garnish.
    Keto Salad | Lemony Romaine and Avocado Salad

Footer

↑ back to top

  • Privacy Policy
  • About
  • Contact
  • Cookbooks

Copyright © 2026 The Wicked Noodle